2/3
J250 Abbreviated instruction
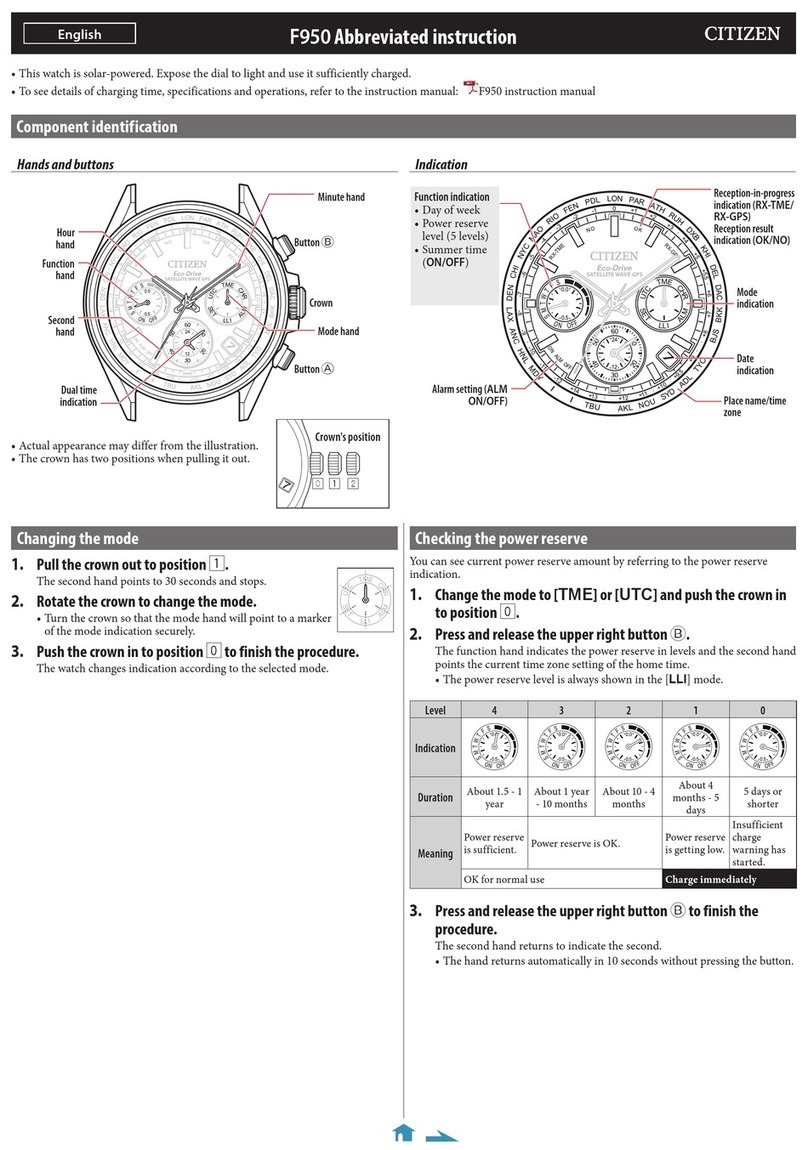
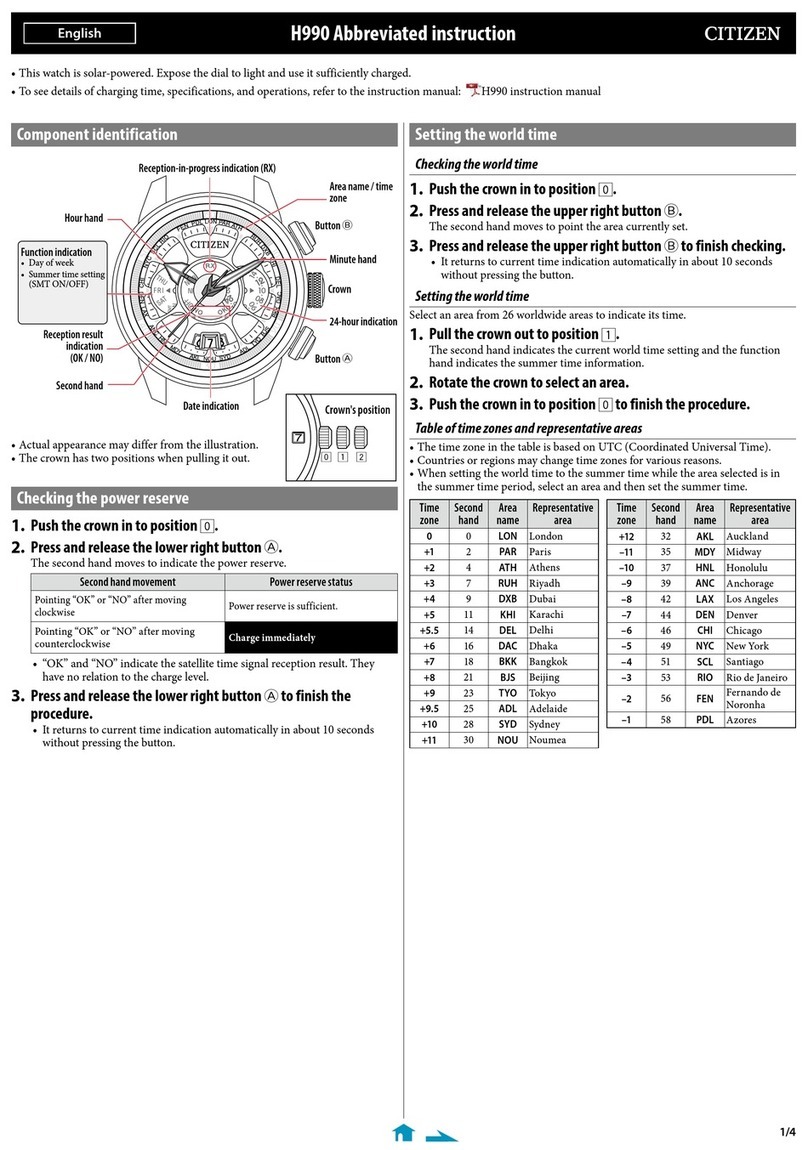
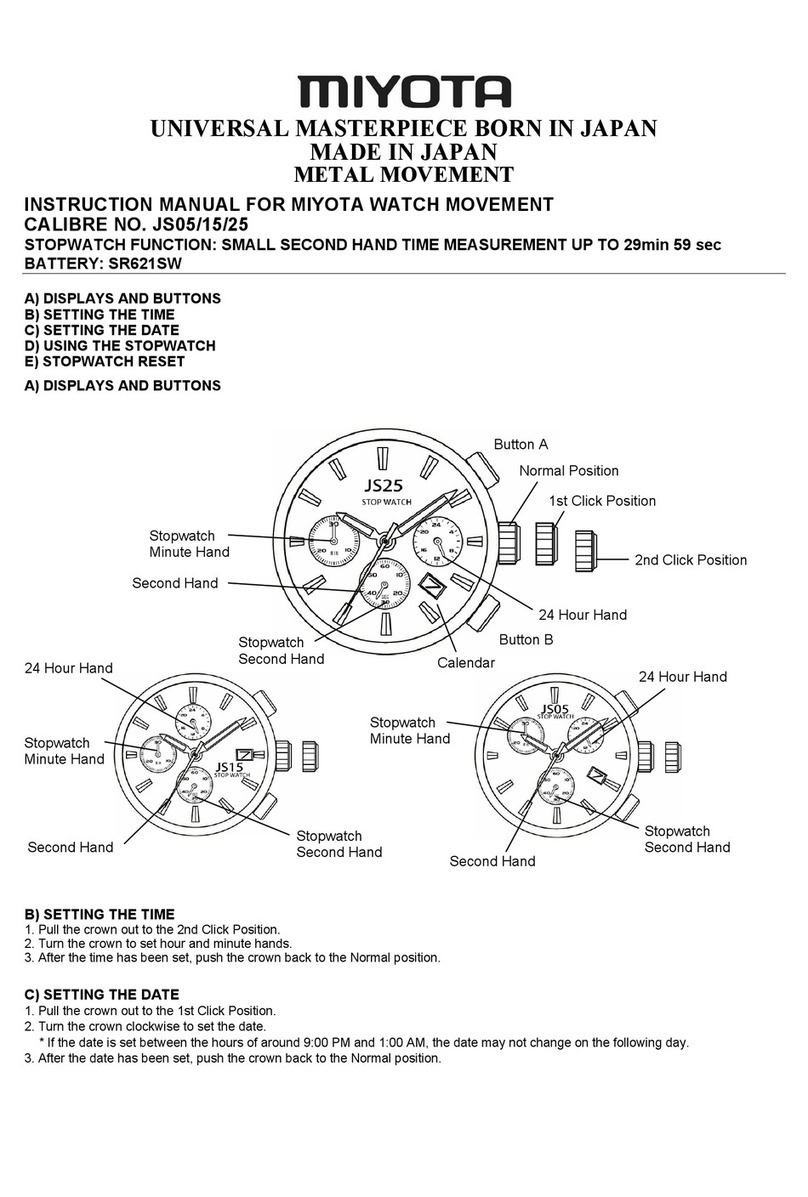
Water depth measurement
When the water sensor is in contact with water for about 2 seconds, the power
reserve indication hand points to “READY” and the water pressure sensor starts
water depth measurement.
How to read water depth indication
Power reserve
Indication hand:
returns to power
reserve indication as
measurement starts and
the water depth hand
moves.
Maximum water depth
hand:
indicates the maximum
diving depth during a
measurement.
Water depth hand:
indicates current water
depth.
0 m
M
E
T
E
R
S
D
E
P
0
4
7
2
OVER
READY
E
Indication range of water depth
0 ‒ 70 m
Unit: 1 m (0 ‒ 40 m), 2 m (40 ‒ 70 m)
Finishing measurement
To finish water depth measurement, press and hold the upper left button
A
for 5
seconds or more after taking the watch out of water and wiping water away from
the water sensor and other parts of the watch.
When the depth goes beyond the indication range
The water depth hand and maximum water depth hand point to “OVER”.
The water depth hand stops indicating “OVER” and moves to indicate current
depth as the detected depth comes back within the indication range.
About the “OVER” indication
“OVER” may be indicated when the water sensor remains wet or very sudden
change of water depth is detected. For details, refer to the instruction manual and
follow its instructions.
About the rapid ascent warning alarm
The rapid ascent warning alarm sounds as the watch detects ascent equivalent to
9 m per minute.
Checking the rapid ascent warning alarm
1.
Press and release the lower left button Bwhile the crown is in
position 0.
The maximum water depth hand indicates the maximum diving depth for 10
seconds.
2.
Press and release the upper left button Awhile the maximum
depth is indicated.
The alarm sounds for 10 seconds. Press button
B
to stop the alarm.
Reviewing the maximum water depth record
The maximum water depth hand indicates the maximum diving depth of each
measurement. The stored maximum depth record can be indicated after finishing
measurement.
1.
Press and release the lower left button Bwhile the crown is in
position 0.
The maximum water depth hand indicates the maximum diving depth.
2.
Press and release the lower left button Bto finish the
procedure.
• The maximum water depth indication automatically ends in about 10
seconds without pressing the button.
Checking the reference position
1.
Check the power reserve.
• Charge if the power reserve level is lower than “2”.
2.
Pull the crown out to position 2.
The watch stops and the water depth hand and maximum water depth hand
move to their current reference position.
• The power reserve indication hand points to “READY” after quivering.
3.
Check the reference position.
Correct reference positions:
Water depth hand: 0 m (3 o'clock position)
Maximum water depth hand: 0 m (3 o'clock
position)
The hour, minute and second hands, power
reserve indication hand and date indication do
not have a reference position.
When the current reference position is different from the correct one, adjust
the position following the steps of “Correcting the reference position”.
4.
Push the crown in to position 0to finish the procedure.
Correcting the reference position
1.
Check the power reserve.
• Charge if the power reserve level is lower than “2”.
2.
Pull the crown out to position 2.
The watch stops and the water depth hand and maximum water depth hand
move to their current reference position.
• The power reserve indication hand points to “READY” after quivering.
3.
Press and hold the lower left button Bfor 2 seconds or more.
The water depth hand moves to the 10-second position and the maximum
water depth hand becomes ready to have its reference position adjusted.
4.
Press and release the upper left button A.
• Each time you press the button, the hand moves by 1 step. The hand moves
continuously while you are pressing and holding the button.
5.
Press and release the lower left button Bto change the hand
to be corrected.
The maximum water depth hand moves near of the 10-second position and
the water depth hand becomes ready to have its reference position adjusted.
• Each time you press button
B
, the target hand is switched.
6.
Press and release the upper left button A.
• Each time you press the button, the hand moves by 1 step. The hand moves
continuously while you are pressing and holding the button.
7.
Push the crown in to position 0to finish the procedure.
M
E
T
E
R
S
D
E
P
T
H
0
4
0
7
2
OVER
7
E
READY
E
Video
Video
Video


