Citizen E67 User manual

3
Request to Customers
All repairs performed on this watch, excluding repairs involving the
band, are to be performed at the CITIZEN. When desiring to have your
watch repaired or inspected, place contact the Citizen Service Center
either directly or through the store where you purchased your watch.

5
WWThis watch is a radio wave watch that receives the
standard time radio wave transmitted in Germany WW
This radio wave watch is equipped with a regular automatic reception function that sets
the time and date by automatically receiving radio waves at 3:00 AM or 4:00 AM, and a
free reception function that allows the time to be set arbitrarily at any time by receiving
radio waves.
· This watch is unable to receive radio waves of countries other than Germany.
WWPlease use this watch after charging sufficiently by
placing in light WW
If the second hand of the watch is moving at two-second intervals while the watch is in
use, this indicates that the watch is insufficiently charged. Use the watch after first
recharging by referring to the section entitled, "15. General Reference for Charging
Times of Solar-Powered Watches".
Since it may be difficult for light to shine on the watch as a result of being covered by
clothing during the winter months in particular, it is recommended to charge the watch
by exposing to direct sunlight once a month. To ensure that your watch is used
comfortably, it is recommended to try to keep the watch fully charged at all times.
4
60
120
100
90
140
180
70
75
80
250
T
A
C
H
Y
M
E
T
E
R
RX
L
M
H
OFF
ON
NO
R
A
D
I
O
C
O
N
T
R
O
L
L
E
D
NO: Reception result
24 hour hand
Hour hand
Button (B)
Date
Crown
Minute hand
Button (A)
H, M, L:
Reception level/reception
result
* The illustrations shown in this manual may differ from the actual watch you have purchased.
Second hand
RX: Reception standby Function hand (day,
chronograph minutes,
chronograph 1/20 seconds)
Mode hand (time, chronograph,
local time, reference position,
alarm, date)
ON/OFF
(alarm/daylight
savings time)

76
60
120
100
90
140
180
70
75
80
250
T
A
C
H
Y
M
E
T
E
R
RX
L
M
H
OFF
ON
NO
R
A
D
I
O
C
O
N
T
R
O
L
L
E
D
WWPlease confirm the following before
using the watch WW
* Set the mode hand to the TME mode.
H, M, L: Reception
level/reception
result
Please confirm the following before
using the watch
Button
(B)
[TME mode]
Mode
hand
NO: Reception result RX: Reception standby
Check the
movement of the
second hand.
Recharge the watch
by placing under
direct sunlight
Second hand
moving at two-
second intervals
Second hand
moving at
one-second
intervals
Second hand moving
at one-second
intervals
Check the
reception result by
pressing button (B)
at the 4:00
position.
When the second
hand has pointed to
reception result
(H, M or L)
When the second
hand has pointed to
reception result (NO)
The standard time
radio wave has been
received properly.
The watch can now
be used.
Perform radio wave
reception by referring
to the section entitled,
"Free Reception" on
the next page.
(The mode can be switched by pulling the crown out to Position 1. Set the mode
hand to one of the three locations of the TME mode. Return the crown to its
original position after switching the mode.)

8 9
WWImportant Points Regarding Radio Wave
Reception WW
· Radio waves are received in the Time Mode (TME/3 locations) or Local Time Mode
(L-TM). Radio waves cannot be received in other modes.
[Regular Automatic Reception]
The watch sets the time (including daylight savings time) and date by automatically
receiving radio waves at 3:00 AM or 4:00 AM each day. (Radio waves are not received
at 4:00 AM if they have been successfully received at 3:00 AM.)
[Free Reception]
The free reception function lets you receive radio waves at any time. Use this function
when the reception environment has changed or in other cases when radio waves are
unable to be received by Regular Automatic Reception. Do not move the watch during
free reception to ensure that radio waves are reliably received. (It may take up to about
15 minutes to receive radio waves.)
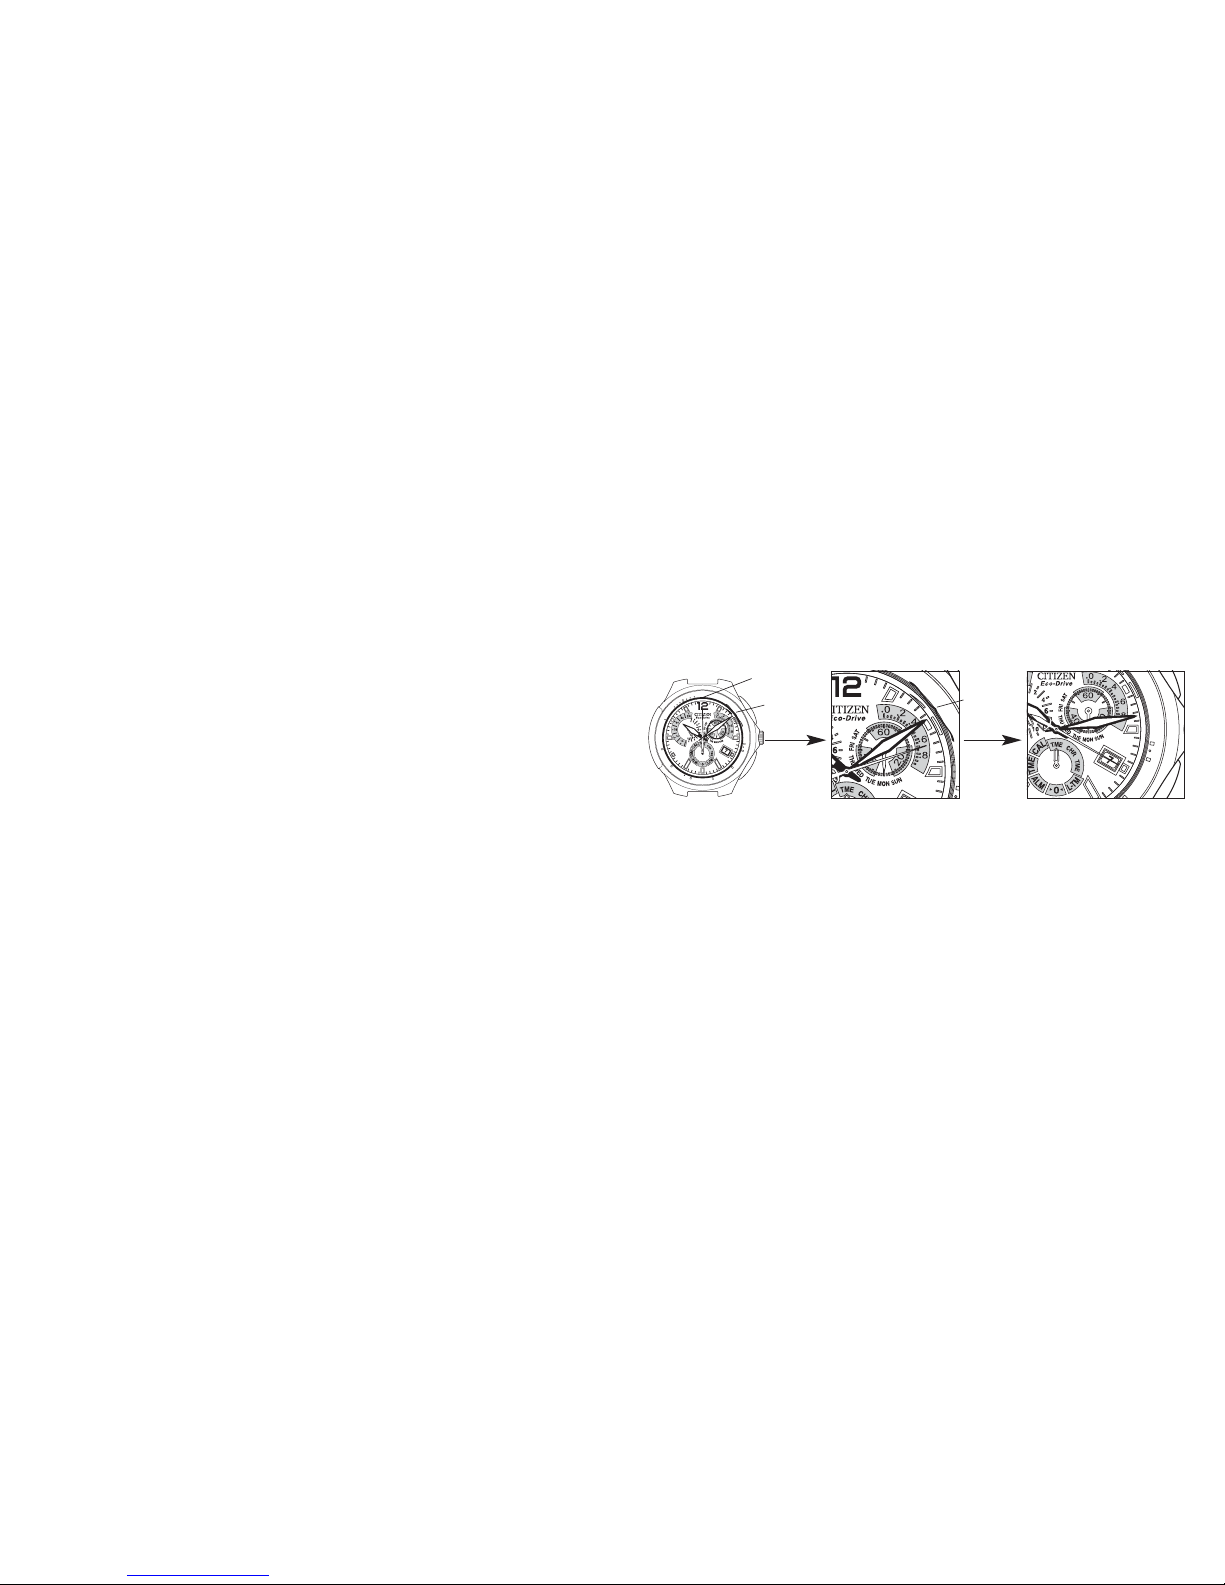
<Reception Procedure>
Remove the watch from your wrist and place it in a
stable location where radio waves are able to be
received easily such as near a window with the 6:00
position of the watch facing a radio wave transmitter
station.
· In the case of free reception, press button (B) at the 4:00 position for about 2 seconds or
more and after hearing a confirmatory tone, release your finger when the second hand
begins to move to the RX: Reception Standby position (12:00).
· It is not necessary to press button (B) in the case of regular automatic reception.
· It may be difficult to receive radio waves around the times of dawn and dusk. It is
recommended to receive radio waves while avoiding these times. Refer to the section
entitled, "4. Receiving Radio Waves" for further information on the procedure for
receiving radio waves.
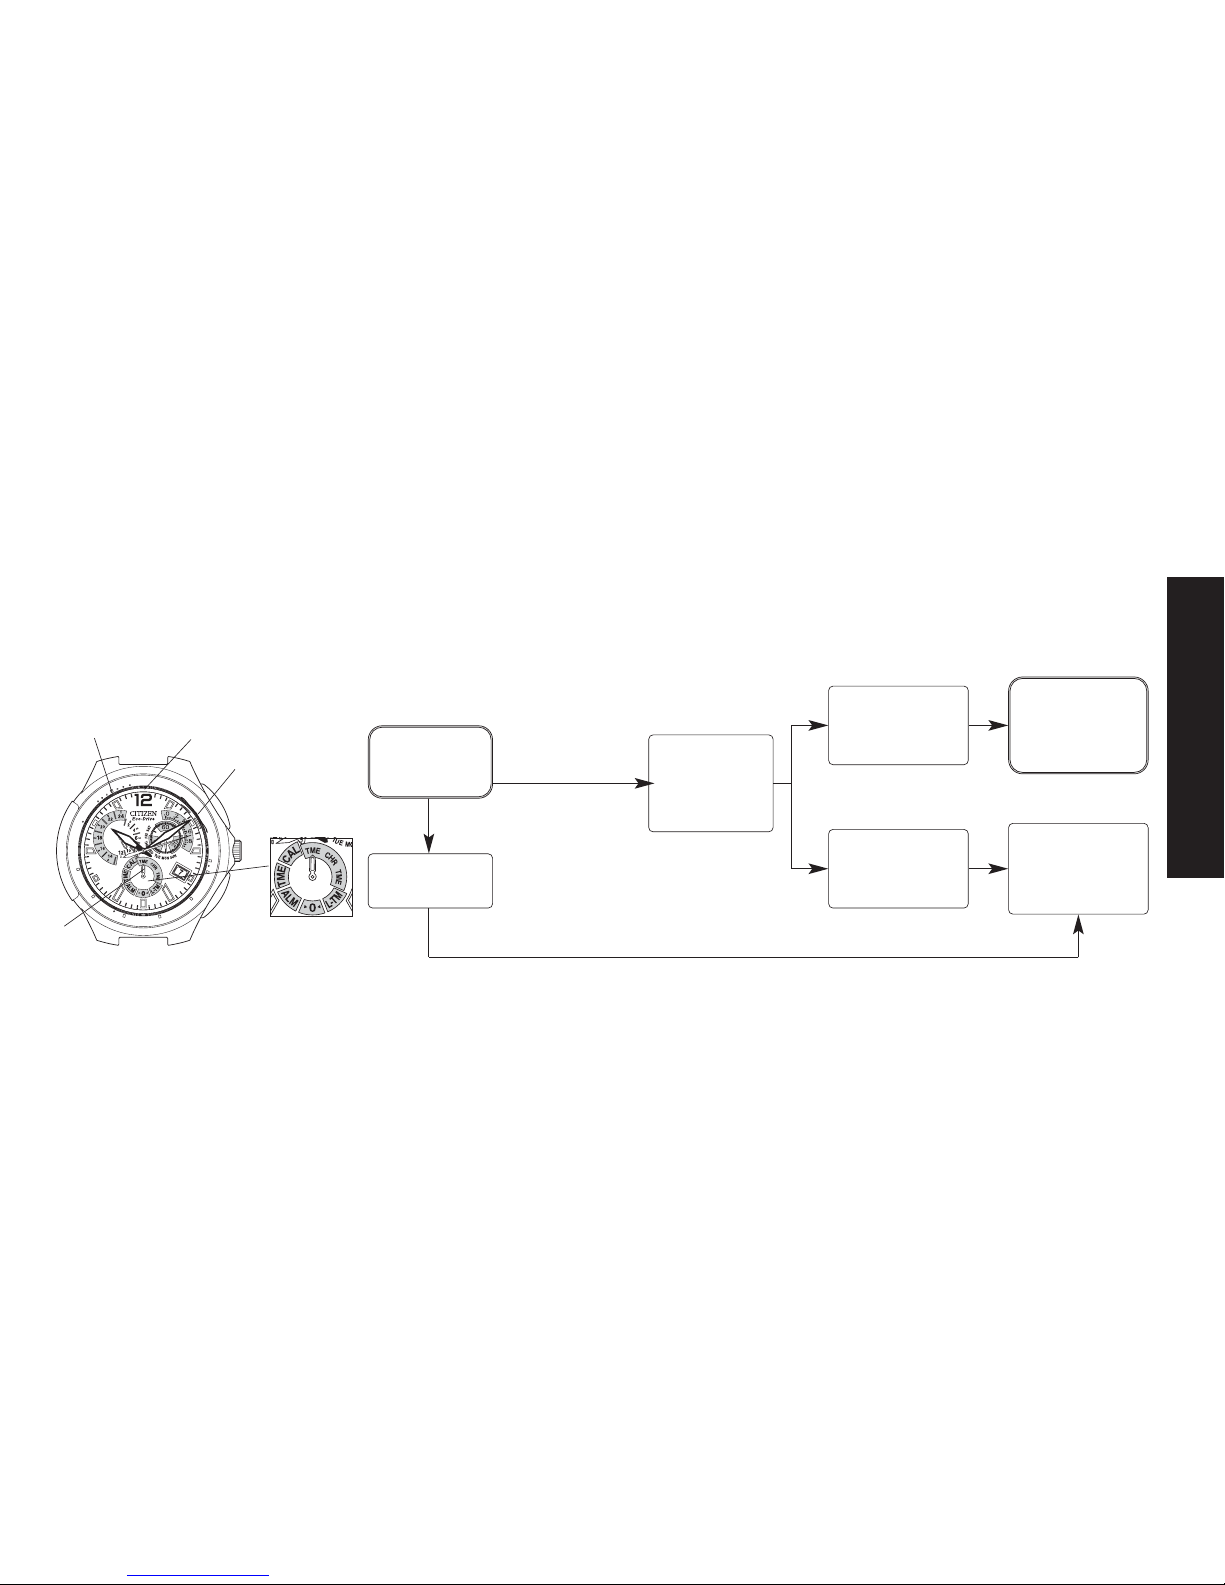
<Confirmation of Reception Result>
Check the reception result to determine whether or not radio waves have been received
properly by pressing button (B) located at the 4:00 position following reception. If the
second hand points to H, M or L, this indicates that radio waves have been received
properly. The watch can now be used.
If the second hand points to NO, this means that radio waves were unable to be received.
If this happens, try receiving radio waves again at a different location.
Important Points Regarding Radio
Wave Reception
60
120
100
90
140
180
70
75
80
250
T
A
C
H
Y
M
E
T
E
R
RX
L
M
H
OFF
ON
NO
R
A
D
I
O
C
O
N
T
R
O
L
L
E
D

10 11
WWPower Save Function WW
This power saving function causes the second hand to stop at the 12:00 position when
light does not shine on the watch for 30 minutes or more such as when it is blocked by
clothing or during storage.
· Other hands continue to operate normally.
· The watch continues to receive radio waves by regular automatic reception and keep
the correct time even when the power save function has been activated. It may not be
able to receive radio waves depending on the storage environment. In this case, the
timekeeping accuracy of the watch is ±15 seconds per month.
· When the watch is exposed to light, the power save function is canceled and the
second hand begins to move normally again.
* Refer to the section entitled, "14. A. Power Save Function" for further information on
the power save function.
CONTENTS
1. Features.................................................................................................................... 14
2. Operating the Crown.............................................................................................. 15
3. Before Using ............................................................................................................ 16
A. Radio Wave Receiving Function
<For Good Reception>
<Time Required for Receiving Radio Waves>
<Locations where Reception may be Difficult>
4. Receiving Radio Waves .......................................................................................... 19
A. Position of the Second Hand During Reception
B. Confirmation of Reception Result
C. Reception Level and Reception Result
D. General Reference for Receiving Areas
5. List of Functions Assigned to Mode Hand............................................................ 26
6. Switching the Mode................................................................................................. 30
7. Using the Chronograph .......................................................................................... 32

12 13
8. Setting Local Time and Daylight Savings Time................................................... 36
9. Using the Alarm ...................................................................................................... 40
10. Manually Setting the Time and Daylight Savings Time...................................... 42
A. Setting the Time
B. Setting Daylight Savings Time
11. Manually Setting the Date...................................................................................... 46
12. Checking and Correcting the Reference Position ................................................ 52
A. Checking the Reference Position
B. Correcting the Reference Position
13. Photoelectric Power Generation Function............................................................ 57
<For Optimum Use of this Watch>
<Try to Keep the Watch Charged at all Times>
14. Unique Functions of Solar-Powered Watches...................................................... 58
A. Power Save Function
<Power Save>
<Canceling Power Save>
B. Insufficient Charge Warning Function
C. Overcharging Prevention Function
15. General Reference for Charging Times of Solar-Powered Watches.................. 63
16. Solar-Powered Watch Handling Precautions....................................................... 65
Charging Precautions
Handling the Secondary Battery
Replacing the Energy Storage Cell
17. Using the Tachymeter (When Provided) .............................................................. 67
18. Troubleshooting ...................................................................................................... 68
19. Precautions .............................................................................................................. 70
20. Specifications ........................................................................................................... 76

14 15
1. Features
This watch is a radio wave watch that automatically corrects the time (including daylight
savings time) and date by receiving standard time radio waves (time data) transmitted in
Germany. In addition, this watch is also an Eco-Drive radio wave watch provided with a
photoelectric power generation function that converts light energy into electrical energy
to drive the watch. It is also equipped with the features listed below.
(1) Chronograph Function
· This function is able to measure time up to 59 minutes 59.95 seconds in 1/20 second
units.
(2) Local Time Function
· This function allows the watch to be set to the time in another country or city.
· Local time can be corrected in one hour units.
· Daylight savings time can be switched on and off.
(3) Alarm Function
· The alarm time can be set based on a 24-hour clock.
· The alarm sounds for 15 seconds when the watch reaches the set time.
(4) Perpetual Calendar Function
· The date (elapsed years, month, date and day) does not have to be corrected through
February 28, 2100 even if radio waves are not received.
2. Operating the Crown
(Continuously Moving the Hands)
Rapidly turning the crown continuously to the left or right (by two clicks) causes the
hands (hour hand, minute hand or second hand) to move continuously. Click the crown
once to the right or left to interrupt hand movement.
H
M
L
R
A
D
I
O
C
O
N
T
R
O
L
L
E
D
Click Click
Rapidly turn the crown continuously (by
two clicks) with the side of your Finger.

3. Before Using
A. Radio Wave Receiving Function
<For Good Reception>
This watch incorporates an antenna for receiving radio waves inside the watch case (at
the 6:00 position). For good reception, it is recommended to have the 6:00 position of
the watch facing in the direction of the radio wave transmitter station when receiving
radio waves. The reception level varies depending on the environment in which the
watch is used. Try receiving radio waves while changing the orientation or location of
the watch while referring to the reception level of H, M or L. Find the location and
direction where radio waves are received
easily as indicated by H or M for the
reception level.
[Note]
Radio waves can be received in the time
(TME) mode found at three locations on the
watch or the local time (L-TM) mode.
Radio waves cannot be received in other
modes.
17
· In order to receive radio waves properly, remove the watch from your wrist and place
it in a stable location that facilitates reception of radio waves such as in front of a
window. Do not move the watch during reception.
· Radio waves may be hard to receive due to blockage by metallic objects or the
environment. When inside a building and so on, reception should be performed as
close to a window as possible.
<Time Required for Receiving Radio Waves>
It takes from about 2 to 15 minutes to receive radio waves. If reception has failed due to
a poor reception environment and so forth, it may take about 60 seconds for the watch to
return to the normal display.
16
Time mode (TME)
Local time mode
(L-TM)

18 19
<Locations where Reception may be Difficult>
It may not be possible to properly receive radio waves at locations susceptible to
generation of radio wave noise or under environmental conditions that cause difficulty in
receiving radio waves.
jLocations subject to extremely high or low temperatures
jInside a reinforced concrete building, between tall buildings or in valleys between
mountains or underground
jIn a car, train or airplane
jNear a cellular telephone in use
jNear high-tension wires (power lines), railroad overhead wires or airports
(communication facilities)
jNear household electric appliances or OA equipment such as TV sets, refrigerators,
personal computers, fax machines, etc.
4. Receiving Radio Waves
· There are three ways to receive radio waves consisting of regular automatic reception,
free reception and recovery automatic reception. The time (including daylight savings
time) and date are corrected automatically when radio waves have been properly received.
[Note] Do not move the watch until reception is completed.
1. Regular Automatic Reception
· The watch automatically begins to receive radio waves at 3:00 AM or 4:00 AM each day.
(Radio waves are not received at 4:00 AM if they have been successfully received at 3:00
AM.)
(1) When receiving radio waves, remove the watch from your wrist and place it in a stable
location where radio waves can be received easily such as by a window with the 6:00
position of the watch facing in the direction of the radio wave transmitter station.
(2) After the second hand has moved to the reception standby (RX) position, it moves to H,
M or L to indicate that reception of radio waves is in progress after which the watch
begins to receive radio waves.
(3) reception is completed, the second hand automatically moves from H, M or L to the
correct time.

2120
2. Free Reception
· Free reception can be used to receive radio waves at any time.
(1) When receiving radio waves, remove the watch from your wrist and place it in a stable
location where radio waves can be received easily such as by a window with the 6:00
position of the watch facing in the direction of the radio wave transmitter station.
(2) Press button (B) at the 4:00 position for about 2 seconds or more. After the hearing the
confirmatory tone, release your finger after checking that the second hand has moved to
the standby position (RX) (12:00). The remainder of the procedure is the same as steps
(2) and (3) of the procedure for regular automatic reception (on the previous page).
<Tone Indicating Completion of Free Reception>
· If reception is successful, a beeping tone sounds twice and the watch is corrected to the
correct time.
· If reception has failed, a beeping tone sounds once and the watch returns to the time
display prior to radio wave reception.
3. Recovery Automatic Reception
· When the watch has stopped as a result of being insufficiently charged, radio waves are
then received once automatically. However, charge the watch for about 30 minutes under
direct sunlight to initiate recovery automatic reception. Try to keep the watch charged at
all times so that it does not become insufficiently charged.
A. Position of the Second Hand During Reception
(movement of second hand from start of reception to completion)
60
120
100
90
140
180
70
75
80
250
T
A
C
H
Y
M
E
T
E
R
RX
L
M
H
OFF
ON
NO
R
A
D
I
O
C
O
N
T
R
O
L
L
E
D
250
A
C
H
Y
M
E
T
E
R
RX
L
M
H
180
250
T
E
R
M
H
[Reception Standby] [Reception in Progress] [Completion of Reception]
The second hand
moves to the RX
position and stops.
The second hand
moves to either the H,
M or L reception level.
Although the second
hand may turn to
correct the time during
reception, this does not
mean that reception is
completed.
When radio waves have been
received properly, the second
hand returns to one-second
interval movement and each
hand is automatically corrected to
the correct time. If radio waves
were unable to be received, the
watch returns to the time prior to
radio wave reception. Never
move the watch until the second
hand returns to one-second
interval movement.
Reception
standby
Reception
level
Button (B)
Reception
level

2322
B. Confirmation of Reception Result
· When button (B) is pressed once, the second hand moves to H, M, L or NO to enable
confirmation of the reception result.
[Note] Since the second hand moves to the 12:00 (RX) position and free reception
begins if button (B) is depressed continuously for 2 seconds or more, do not
press button (B) for 2 seconds or more. In the case of having mistakenly
begun free reception, press button (B) for 2 seconds and to cancel radio wave
reception.
· The reception is indicated for 10 seconds after which the watch automatically returns
to the current time. In addition, the watch can also be returned to the current time by
pressing button (B) while the reception result is indicated.
C. Reception Level and Reception Result
· During the time radio waves are being received, the second hand waits at the
reception position corresponding to the reception state to indicate the reception level.
Following reception, the reception result can be confirmed by pressing button (B).
Reception
level
Position of
second hand Reception level during reception Reception result after reception
H12 seconds
position
· When the radio wave reception
environment is extremely good
· When radio waves were
received in an extremely good
reception environment
M9 seconds
position
· When the radio wave reception
environment is good
· When radio waves were received in
a good reception environment
L6 seconds
position
· When the radio wave reception
environment is somewhat good
· When radio waves were
received in a somewhat good
reception environment
NO 55 seconds
position -------------------- When reception has failed

2524
HambHamburg
OsloOslo
Warsaw
Budapest
Naples
RomeRome
Barcelona
MarseillesMarseilles
Paris
Berlin
Belgrade
Hamburg
Oslo
Warsaw
Belgrade
Budapest
Naples
Rome
Barcelona
Marseilles
Paris
Berlin
D. General Reference for Receiving Areas
The following provides a general reference for those areas where the watch is able to
receive standard time radio waves. These areas may vary as a result of changes in radio
rave reception conditions depending on the time period, seasonal variations and weather.
Since this map only provides a general reference of the areas where radio waves can be
received, there may be locations where radio waves cannot be received even if they are
within the range shown on the map.
Standard time radio wave
transmitter station
DCF77
Location of transmitter
station
Mainflingen, Germany (25
km southeast of Frankfurt)
General reference for areas where radio
waves can be received
Radius of about 900 km from radio wave
transmitter station (radio waves may not
be able to be received in the vicinity of
Lake Leman, Switzerland)
Although the standard time radio waves used by radio wave watches are transmitted
nearly continuously 24 hours a day, transmission may be interrupted for reasons such as
maintenance and inspections. This watch will continue to keep the correct time at an
accuracy of within ±15 seconds per month even if it is unable to receive standard time
radio waves.

2726
Normal position
Position 1
Position 2
Normal position
Position 1
Position 2
Normal position
Position 1
Position 2
Normal position
Position 1
Position 2
Normal position Displays seconds
Mode switching (stops at
30 seconds position)
Displays daylight savings
time ON or OFF
Stops at 0 position
Mode switching (stops at
30 seconds position)
Stops at 0 position
Position 1
Position 2
Name Crown position TME (*1) CHR
Function hand Displays day Stops at chronograph
0 minutes position
Date Displays date Displays date
Hour hand/
minute hand Displays hours/minutes Displays hours/minutes
24 hour hand Displays time
(24 hour clock)
Displays time
(24 hour clock)
Second hand
L-TM
Displays day of local
time
Displays date of local
time
Displays hours/minutes
of local time
Displays local time
(24 hour clock)
Displays seconds
Mode switching (stops at
30 seconds position)
Displays daylight savings
time ON or OFF
a0b
Stops at chronograph
30 minutes position
Displays 31/1
Stops at 12:00 position
Stops at 24:00 position
Stops at 12:00 position
Mode switching (stops at
30 seconds position)
Stops at 12:00 position
ALM
Stops at chronograph
0 minutes position
Displays date
Displays alarm
hours/minutes
Displays alarm time
(24 hour clock)
Displays alarm ON or OFF
Mode switching (stops at
30 seconds position)
Displays alarm
ON or OFF
CAL
Displays day
Displays date
Displays hours/minutes
Displays time (24 hour
clock)
Displays elapsed
years/month
Mode switching (stops at
30 seconds position)
Displays elapsed
years/month
5. List of Functions Assigned to Mode Hand Please read this section while referring to the watch illustration found at the beginning of
this manual. *1: The same time is displayed at three locations of the TME mode.

2928
Normal position
No change
Zeroes second hand to
12:00 position (by pressing
for 2 seconds)
No change
Mode switching
Time correction (after
pressing button (B) for
2 seconds)
No change
No change
Mode switching
No change
Name Crown position TME (*1) CHR
Button (A)
Confirms whether daylight
savings time ON or OFF
Start/stop/reset
Position 1
Position 2
Normal position
Position 1
Position 2
Normal position
Position 1
Position 2
Button (B)
Crown
Switches daylight savings
time ON and OFF
No change
Reception result/Reception
standby
Displays 1/20 seconds
when chronograph stopped
*1: The same time is displayed at three locations of the TME mode.
No change
No change
Mode switching
Local time correction
L-TM
Confirms whether
daylight savings time
ON or OFF
Switches daylight
savings time ON and
OFF
Reception result/
Reception standby
No change
No change
Mode switching
Reference position
correction
a0b
No change
Selects location for
reference position
correction
No change
No change
Mode switching
Alarm time correction
ALM
Switches alarm
ON and OFF
Alarm tone monitor
No change
No change
Mode switching
Date correction
CAL
No change
Selects location for date
correction

3130
6. Switching the Mode
· This watch is equipped with six modes consisting of a time (displayed at three locations),
chronograph, local time, reference position, alarm and calendar mode.
· The same time is displayed at all three locations in the time (TME) mode.
<Procedure for Switching the Mode>
When the crown is pulled out to Position 1 (mode switching position), the second hand
advances (clockwise rotation) and stops at the 30 second position.
If the second hand does not stop at the 30 seconds position, refer to the section entitled,
"Checking and Correcting the Reference Position" and correct the reference position.
(1) Turn the crown and align the mode hand at
each mode.
· The mode hand can be aligned by turning the
crown to the right or left. Each mode can be
selected by moving the mode hand.
(2) Pull the crown out further to Position 2 (mode
correction position) to enter the correction state
of each mode.
· Read the correction procedures for each mode
for details on correcting each mode.
Mode switching
position
Mode correction
position
Second hand
Mode hand
60
120
100
90
140
180
70
75
80
250
T
A
C
H
Y
M
E
T
E
R
RX
L
M
H
OFF
ON
NO
R
A
D
I
O
C
O
N
T
R
O
L
L
E
D
TME
Time Mode
CHR
Chronograph
Mode
TME
Time Mode
L-TM
Local Time
Mode
CAL
Calendar Mode
TME
Time Mode
ALM
Alarm Mode
a0b
Reference
Position Mode
[Mode Names]
[Switching the Mode]
Time mode
Calendar mode
Time mode
Alarm mode
Reference position mode
Chronograph mode
Time mode
Local time mode

32 33
7. Using the Chronograph
· The chronograph is able to measure time up to 59 minutes 59.95 seconds in 1/20
second units. It is reset to 0 after timing.
<Meanings of Hands When
Timing with the Chronograph>
Pull the crown out to Position 1 and
then turn the crown to align the
mode hand at [CHR] (chronograph).
Then return the crown to the normal
position.
· The second hand and function
hand are rapidly advanced to the
0 position and the watch enters
the chronograph mode.
· The second hand changes to the chronograph second hand and is rapidly advanced by
one revolution only when starting timing at 0 seconds. It then moves at one-second
intervals to measure chronograph seconds.
· The function hand changes to chronograph minutes and advances at one minute
intervals or it changes to chronograph 1/20 seconds.
· When button (B) is pressed to stop the chronograph, the function hand displays time
in chronograph 1/20 seconds for as long as it is pressed.
· The hour and minute hands may display the mode prior to switching the mode when
the watch has been switched from another mode to the chronograph mode.
60
120
100
90
140
180
70
75
80
250
T
A
C
H
Y
M
E
T
E
R
RX
L
M
H
OFF
ON
NO
R
A
D
I
O
C
O
N
T
R
O
L
L
E
D
Function hand (chronograph
minutes/chronograph 1/20
seconds)
Mode switching
position
Button (B)
Second hand
(chronograph
seconds)

34
<Chronograph Timing>
Pull the crown out to Position 1 and turn to align the mode hand at [CHR]
(chronograph), and then push it in to the normal position.
(1) The chronograph is repeatedly started and stopped and a confirmatory tone sounds
each time button (A) is pressed.
(2) If button (B) is pressed while the chronograph is stopped, the function hand displays
the time in chronograph 1/20 seconds for as long as it is pressed. Releasing button
(B) returns the function hand to
displaying chronograph minutes.
(3) If button (A) is depressed continuously
while the chronograph is stopped, the
chronograph second hand and
chronograph minute hand are reset to the
0 position.
35
Reset Timing Stop
Recall of 1/20
seconds
display
Button (A) Button (A)
Button (A) depressed
continuously
Button (A) While button (B)
is pressed
C
H
Y
M
E
T
E
R
RX
L
M
H
Function hand (chronograph
minutes/chronograph 1/20 seconds)
Chronograph
1/20 second
display
Chronograph second hand

3736
<Procedure for Setting Local Time>
Pull the crown out to Position 1 and turn
to align the mode hand to [L-TM] (local
time).
(1) Pull the crown out to Position 2
(local time correction position).
· The second hand turns continuously
and stops at the daylight savings time
ON or OFF position.
(2) Turn the crown to set the hour and
minute hands to the local time.
ATurning the crown to the right (by 1 click) causes the hour and minute hands and
the 24 hour hand to advance by 1 hour.
BTurning the crown to the left (by 1 click) causes the hour and minute hands and 24
hour hand to go back by 1 hour.
· Turning the crown continuously (rapidly by 2 clicks or more) causes the hour and
minute hands and the 24 hour hand to move continuously.
· Turn the crown to the left or right to interrupt continuous movement of the hands.
· The date and day also change corresponding to the calendar and local time.
60
120
100
90
140
180
70
75
80
250
T
A
C
H
Y
M
E
T
E
R
RX
L
M
H
OFF
ON
NO
R
A
D
I
O
C
O
N
T
R
O
L
L
E
D
Mode switching
position
Local time correction
position
Mode hand
Button (A)
Daylight savings time
ON/OFF position
8. Setting Local Time and Daylight Savings
Time
· The local time function lets you set the watch to a time in a different area from the
time set in the time mode [TME].
· The time difference can be made in 1 hour units.
· The local time can be set over a range of ±26 hours based on the time mode [TME].
· Daylight savings time can also be set. The time in this case can be set over a range of
-25 to +27 hours.
[Note] The times cannot be set beyond the above ranges. In addition, daylight
savings time must be switched on and off manually. It cannot be switched
automatically by receiving radio waves.

3938
<Checking Daylight Savings Time ON/OFF Setting>
The daylight savings time setting is displayed for about 10 seconds as either ON or OFF
when the crown is returned to the normal position or when button (A) is pressed while
the crown is at Position 1 in the local time mode (L-TM).
· The second hand indicates ON when daylight savings time has been set.
· The second hand indicates OFF when daylight savings time has not been set.
[Note] Set the local time correctly by checking AM and PM with the 24 hour hand.
(3) Return the crown to the normal position. This completes the procedure for
correcting the local time.
<Procedure for Setting Daylight Savings Time>
Perform the following steps while the local time is already displayed.
(1) Pull the crown out to Position 2 (local time correction position).
· The second turns continuously, and then stops at the daylight savings time ON or
OFF position.
(2) Press button (A) to change the daylight
savings time setting.
· Each time button (A) is pressed, a
confirmatory tone sounds and ON or OFF
can be selected for daylight savings time.
The time advances by 1 hour if daylight
savings time has been set to ON.
(3) Return the crown to the normal position.
This completes the procedure for setting
daylight savings time.
120
100
90
1
8
OFF
ON
R
A
D
I
O
C
O
N
T
R
O
L
L
E
D
Second
hand
[Daylight Savings Time
ON/OFF Setting]
OFFON

40 41
(1) When the crown is pulled out to Position 2 (alarm time correction position), the
second hand stops at the ON or OFF position.
· Press button (A) to move the second hand to the alarm ON position.
· Each time button (A) is pressed, a confirmatory tone sounds and the alarm setting
switches between ON and OFF.
The setting can be changed while the crown is in the normal position or when pulled
out to Position 1.
(2) Turn the crown to set the correct alarm time while checking AM and PM with the 24
hour hand.
ATurning the crown to the right (by 1 click) causes the minute hand and hour hand
to advance by 1 minute.
BTurning the crown to the left (by 1 click) causes the minute hand and hour hand to
go back by 1 minute.
· Turning the crown continuously (rapidly by 2 clicks or more) causes the hour and
minute hands to move continuously.
· Turn the crown to the left or right to interrupt continuous movement of the hands.
(3) Push in the crown to Position 1 to return the watch to previously used mode.
(4) Return the crown to the normal position. This completes the procedure for setting
the alarm time.
9. Using the Alarm
· The alarm function uses a 24 hour clock. Once the alarm has been set, the alarm
sounds for 15 seconds when the set time is reached once a day.
· The alarm can be used in the time mode as well as the local time and calendar modes.
The alarm does not sound when the watch is in another mode.
Furthermore, press button (A) or (B) to stop the alarm tone from sounding before 15
seconds have elapsed.
<Setting the Alarm Time>
Pull the crown out to Position 1 and
turn to align the mode hand at [ALM]
(alarm).
· The hour hand and minute hand
display the previously set alarm
time.
60
120
100
90
140
180
70
75
80
250
T
A
C
H
Y
M
E
T
E
R
RX
L
M
H
OFF
ON
NO
R
A
D
I
O
C
O
N
T
R
O
L
L
E
D
Mode switching
position
Alarm time
correction
position
Mode hand
Button (A)
Alarm ON/OFF position
Button (B)
Table of contents
Other Citizen Watch manuals

Citizen
Citizen 0S80 User manual

Citizen
Citizen FS20 User manual

Citizen
Citizen 41 series User manual

Citizen
Citizen 6S50 User manual

Citizen
Citizen JY8035-04E User manual

Citizen
Citizen 6P00 User manual

Citizen
Citizen 6070 Operating manual

Citizen
Citizen C440 Manual

Citizen
Citizen J810 User manual

Citizen
Citizen C650 User manual

Citizen
Citizen H149 User manual

Citizen
Citizen CTZ-B6813 User manual

Citizen
Citizen 6S21 User manual

Citizen
Citizen Quartz 6760 Manual

Citizen
Citizen H128 User manual

Citizen
Citizen G910 User manual

Citizen
Citizen Eco-Drive CA0 Series User manual

Citizen
Citizen H380 User manual

Citizen
Citizen H11A User manual

Citizen
Citizen OS20 User manual