Clas Ohlson K-1300 User manual

EnglishSvenskaNorskSuomiDeutsch
Automatic Hand
Sanitiser Dispenser
Handspritpump, automatisk
Automatisk håndspritdispenser
Käsidesipumppu, automaattinen
Automatischer Dosierspender für
Desinfektionsmittel
Art.no Model
31-1932 K-1300 Ver. 20201127
2
English
1
7
8
2
3
4
5
6
Automatic Hand Sanitiser Dispenser
Art.no 31-1932 Model K-1300
Please read the entire instruction manual before using the product and then save it for
future reference. We reserve the right for any errors in text or images and any neces-
sary changes made to technical data. If you have any questions concerning technical
problems please contact our Customer Services.
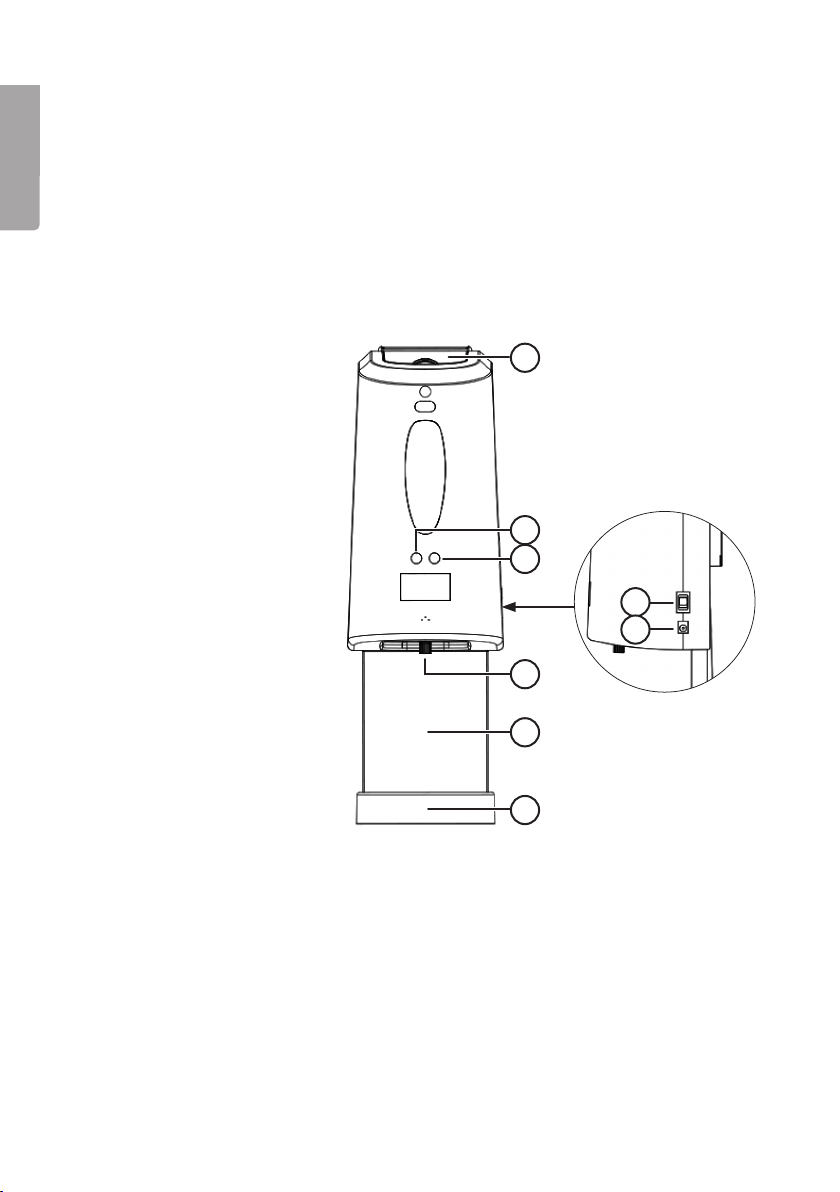
Buttons and
functions
1. Lid for reservoir, to fill with
sanitiser
2. Red indicator light – error
alert
3. Green indicator light –
operating normally
4. Spray nozzle
5. Upright holder
6. Drip catcher
7. On/Off button
8. Mains adapter socket
3
English
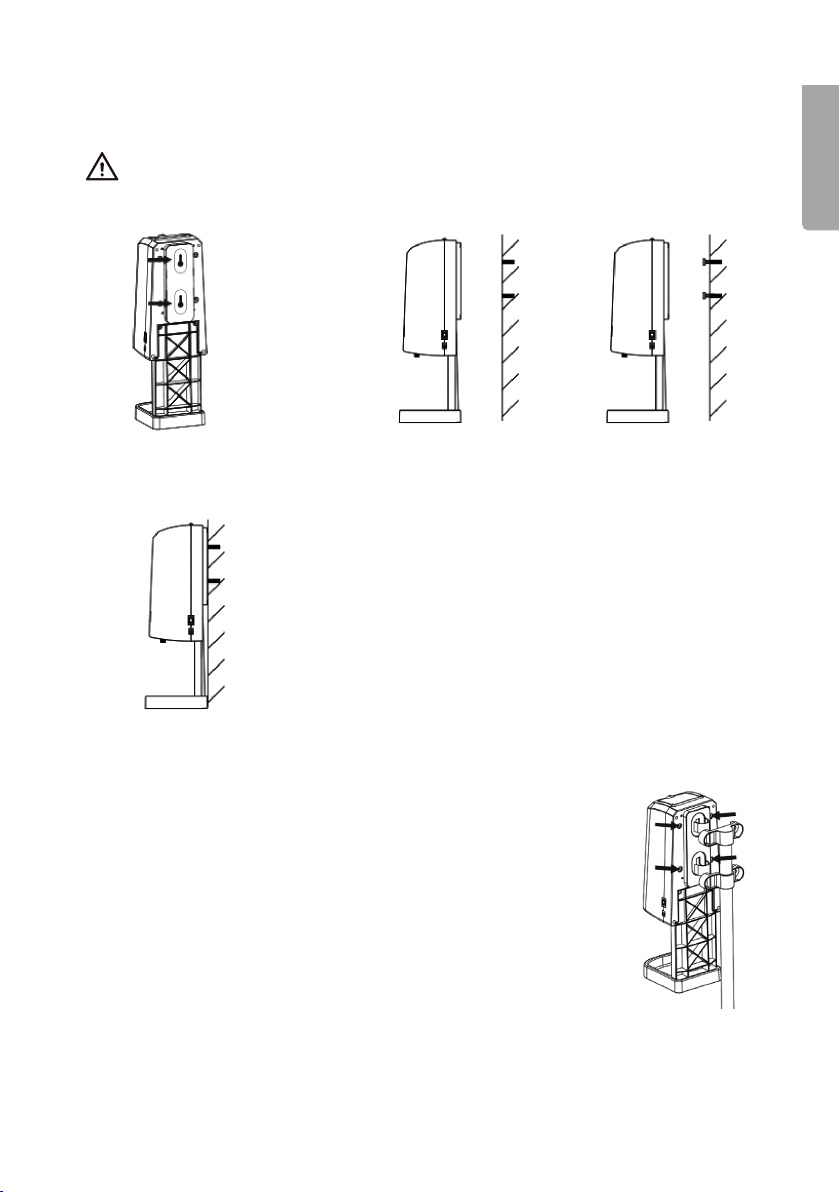
Installation
Mounting onto a wall
Use fasteners (screws/wall plugs) suitable for the wall material and ensure that
there are no electrical wires or water pipes in the wall where you intend to drill/screw.
1. Measure the distance
between the mounting
holes.
2. If necessary, drill holes and insert a wall plug
into each hole, otherwise screw directly into
the wall. Do not screw the screws all the way
in, leave the heads sticking out enough to
hang the dispenser on them.
3. Mount the dispenser onto the screws.
Mounting onto a stand
Fasten the dispenser to the included stand using the screws.

4
English
21
Fitting and replacing the batteries
1. Remove the dispenser from the upright, stand or wall. Remove the battery cover
from the back of the dispenser.
2. Insert 4 x AA/LR06 1.5 V batteries (sold separately). Refer to the markings in the
battery compartment to ensure correct polarity. Never mix old and new batteries.
Never mix rechargeable and non-rechargeable batteries. With new batteries the
dispenser will be able to spray approximately 5,000 shots of sanitiser.
The dispenser can also be powered by the included mains adapter.
Instructions for use
Filling with sanitiser
Open the lid on the top of the dispenser, remove the airtight plug, fill the reservoir with
your choice of hand sanitiser and then refit the airtight plug and close the lid. Switch
the dispenser on and place your hands in the detection zone under the reservoir. Sani-
tiser will be dispensed automatically.

5
English
Dispenses gel, liquid or foam
The dispenser can be used for different types of hand sanitiser and dispenses different
amounts depending on which type of sanitiser is used:
• Gel, 1.2−1.5 ml per shot
• Liquid spray, 0.5 ml per shot
• Foam, 0.8 ml per shot
Care and maintenance
Clean the product by wiping it with a moist cloth. Use only mild cleaning agents, never
solvents or corrosive chemicals.
Troubleshooting guide
The red light is flashing. • The sanitiser needs topping up.
• Low battery level.
Responsible disposal
This symbol indicates that the product should not be disposed of with
general household waste. This applies throughout the entire EU. In order
to prevent any harm to the environment or health hazards caused by
incorrect waste disposal, the product must be handed in for recycling
so that the material can be disposed of in a responsible manner. When
recycling your product, take it to your local collection facility or contact
the place of purchase. They will ensure that the product is disposed of in
an environmentally sound manner.
Specifications
Batteries 4×AA/LR6
Size (W x H xL) 131×399×138mm
Capacity 1.3 L
Operating temperature 10−40 ºC
Mains adapter
IP rating IP20
Input 220–240 V AC, 50/60 Hz
Output 5 V DC, 1 A
6
Svenska
1
7
8
2
3
4
5
6
Handspritpump, automatisk
Art.nr 31-1932 Modell K-1300
Läs igenom hela bruksanvisningen före användning och spara den sedan för framtida
bruk. Vi reserverar oss för ev. text- och bildfel samt ändringar av tekniska data. Vid
tekniska problem eller andra frågor, kontakta vår kundtjänst.
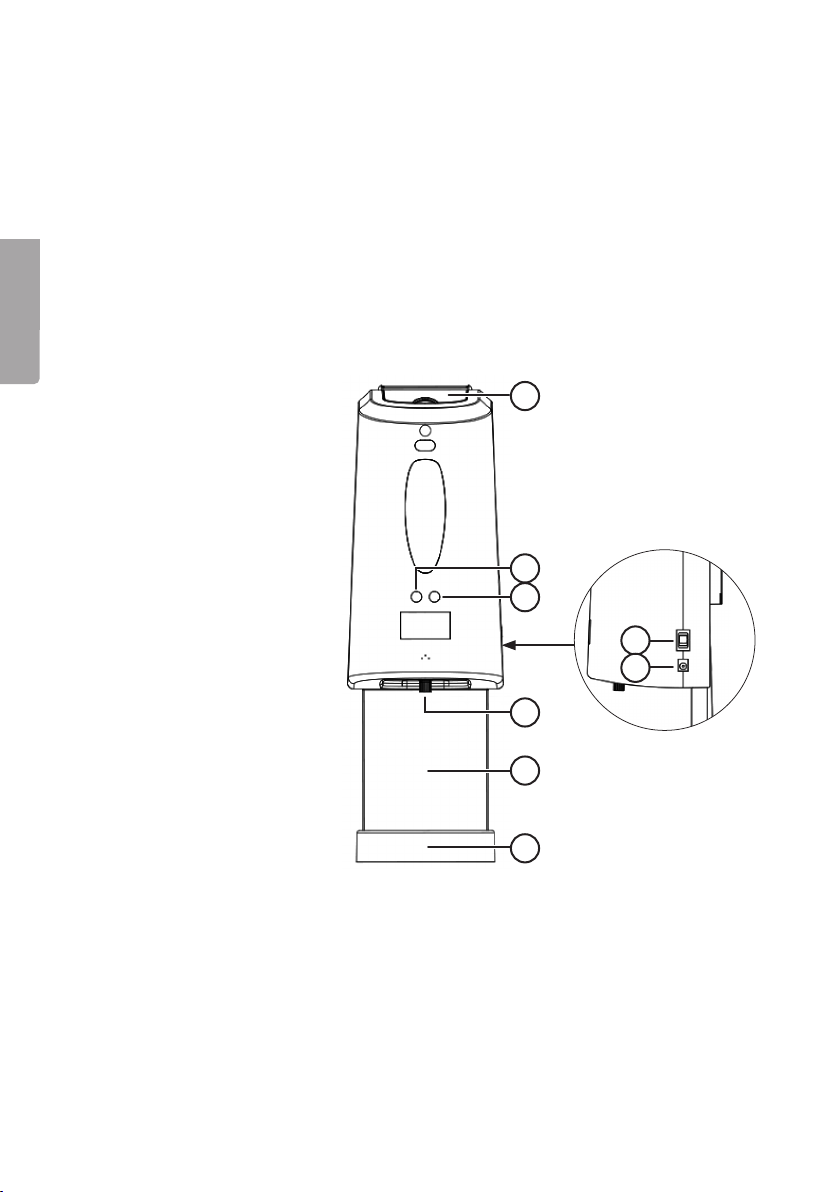
Knappar och
funktioner
1. Påfyllning
2. Röd indikatorlampa
för onormal funktion
3. Grön indikatorlampa
för korrekt funktion
4. Spraymunstycke
5. Hållare
6. Bottenplatta
7. Av/på-knapp
8. Anslutning för
nätadapter
7
Svenska
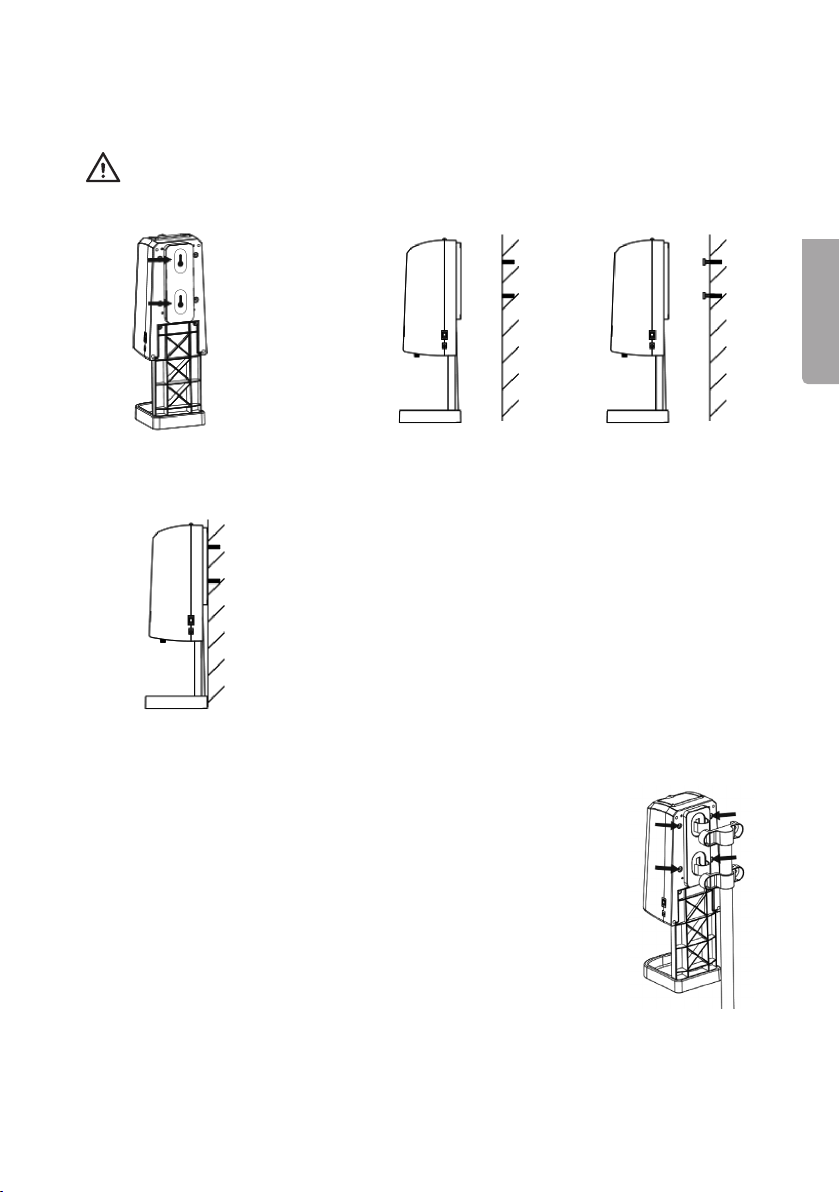
Montering
Monterad på vägg
Använd för väggen lämplig fästmetod (skruv/plugg etc.) och försäkra dig om att
inga el- eller vattenledningar finns i väggen där du ev. avser att skruva/borra.
1. Mät avståndet mellan
monteringshålen.
2. Borra vid behov hål och sätt i plugg och skruv.
Skruva inte in skruven helt utan låt den sticka
ut tillräckligt långt så att du kan hänga upp
produkten.
3. Häng upp produkten på skruvarna.
Monterad på ställning
Skruva fast produkten med skruvarna på det medföljande fästet.

8
Svenska
21
Batteri, installation och byte
1. Ta bort produkten från hållaren/väggen. Ta bort batteriluckan på produktens baksida.
2. Sätt i 4 × AA/LR06, 1,5 V-batterier (säljs separat). Se märkningen i botten på
batterihållaren så att polariteten blir rätt. Blanda inte gamla och nya batterier. Blanda
inte heller laddbara med ej laddbara batterier. Med ett nytt batteri kan produkten
spruta vätska ca 5000 ggr.
Produkten kan också drivas med medföljande nätadpter.
Användning
Fyll på desinfektion
Öppna locket högst upp på produkten och ta ut luftskyddet, fyll på desinfektionsmedel
och sätt tillbaka luftskydd och lock. Slå på produkten, placera händerna i detektors-
området, produkten sprutar automatiskt ut desinfektionsmedel.
Metoder för att använda produkten
Vätskeutmatningen från de 3 dispensrarna är:
• gel, 1,2−1,5 ml/gång
• spray, 0,5 ml/gång
• skum, 0,8 ml/gång
9
Svenska
Skötsel och underhåll
Rengör produkten med en lätt fuktad trasa. Använd ett milt rengöringsmedel, aldrig
lösningsmedel eller frätande kemikalier.
Felsökningsschema
Röd indikaror lamapa blinkar. • Desinfektionsmedlet behöver fyllas på.
• Låg batterinivå.
Avfallshantering
Denna symbol innebär att produkten inte får kastas tillsammans med
annat hushållsavfall. Detta gäller inom hela EU. För att förebygga
eventuell skada på miljö och hälsa, orsakad av felaktig avfallshantering,
ska produkten lämnas till återvinning så att materialet kan tas omhand på
ett ansvarsfullt sätt. När du lämnar produkten till återvinning, använd dig
av de returhanteringssystem som finns där du befinner dig eller kontakta
inköpsstället. De kan se till att produkten tas om hand på ett för miljön
tillfredställande sätt.
Specifikationer
Batterier 4×AA/LR6
Mått (B×H×L) 131×399×138 mm
Volym 1,3 l
Temperatur 10−40 ºC
Nätadapter
Kapslingsklass IP20
In 220−240 V AC, 50/60 Hz
Ut 5 V DC, 1 A

10
Norsk
1
7
8
2
3
4
5
6
Automatisk håndspritdispenser
Art. nr. 31-1932 Modell K-1300
Les gjennom hele bruksanvisningen før produktet tas i bruk, og ta vare på den for
fremtidig bruk. Vi tar forbehold om eventuelle feil i tekst og bilder, samt endringer av
tekniske data. Ved tekniske problemer eller spørsmål, ta kontakt med vårt kundesenter.
Knapper og funksjoner
1. Påfylling
2. Rød indikator som varsler
feil
3. Grønn indikator som varsler
at alt er riktig
4. Spraymunnstykke
5. Holder
6. Bunnplate
7. Av/på-knapp
8. Tilkobling for strømadapter
This manual suits for next models
1
Table of contents
Languages:
Other Clas Ohlson Dispenser manuals


Popular Dispenser manuals by other brands

Silver King
Silver King Majestic SK12MAJ Technical manual and replacement parts list

Franke
Franke F3Dn Twin Service manual

STIEBEL ELTRON
STIEBEL ELTRON UltraHot Plus Operation and installation instructions

DAN DRYER
DAN DRYER 282 installation guide

Essity
Essity Tork 473208 manual

CBS
CBS SD300BU-88 COMPONENT MAINTENANCE MANUAL WITH ILLUSTRATED PARTS LIST


