Clearfield FieldShield FLATdrop User manual

FieldShield FLATdrop
Installation Manual ______________________________________________________
Manual 018957 Rev C - July 2022

Direct: 763.476.6866 • National: 800.422.2537 • www.SeeCleareld.com • [email protected]
2
FieldShield FLATdrop
Installation Manual _________________________________________________________
Manual 018957 REV C - July 2022
Table of Contents
Application 3
Description 3
Technical Specications 3
Opening Standard Flat Drop 4
Opening 900um Peelable FLATdrop 6
Pre-Connectorized SFF FLATdrop 7
Field Installable FlexConnector - SFF 8
Field Installable FlexConnector - Standrd FLATdrop 10
Placing FLATdrop MPO and Single-Fiber Assemblies 12
Connector Cleaning Procedure 16
Standard Warranty 21
Proprietary Notice 22
Technical Support 22

3
FieldShield FLATdrop
__________________________________________________________ Installation Manual
Direct: 763.476.6866 • National: 800.422.2537 • www.SeeCleareld.com • [email protected]
Manual 018957 Rev C - July 2022
Application
Technical Specications
Description
FLATdrop options designed to save contractors and installers time
and space in almost any deployment environment. The peelable outer
sheath of FieldShield FLATdrops allow for easy access to the inner
ber elements (either 3mm or 900um) and each offer a large selection
of connector types in a pre-connectorized solution while allowing for up
to 100 feet of compact ber slack storage. Cleareld’s suite of at drop
solutions effectively meet the unique needs of your network deployment.
The FieldShield FLATdrop suite offers the rst pre-connectorized at
drop style cable to provide hardened environmental performance on a
peelable at drop style cable without the added cost or dependency on
the market’s existing bulky connector. Connectivity to access terminals
is achieved through the innovative FlexConnector, which snaps into the
FlexPort, providing an air-tight and water-tight connection.
The FieldShield FLATdrop suite offers the rst pre-connectorized at drop style cable to provide hardened environmental
performance on a peelable at drop style cable without the added cost or dependency on the market’s existing bulky con-
nector. Connectivity to access terminals is achieved through the innovative FlexConnector, which snaps into the FlexPort,
providing an air-tight and water-tight connection.
Standard Flat Drop
FieldShield Peelable FLAT-
drop (With and Without
Rip Cords)
FieldShield Peelable Small
Form Factor FLATdrop
Coil Diameter 12” 12” 8”
Slack Footprint of Sub-Unit N/A 100ft 100+ ft
Sheath Jacket Dims 8.3mm x 4.7mm 8.3mm x 4.7mm 5.4mm x 3mm
Sub-Unit 250μm 3mm 900μm
Connector Types SC/APC, SC/UPC, HFOC SC/APC, SC/UPC, HOFC,
Pushable
SC/APC, SC/UPC, HOFC,
Pushable
Deployment Environment Aerial, Buried, Conduit Aerial, Buried, Conduit Aerial, Buried, Conduit

Direct: 763.476.6866 • National: 800.422.2537 • www.SeeCleareld.com • [email protected]
4
FieldShield FLATdrop
Installation Manual _________________________________________________________
Manual 018957 REV C - July 2022
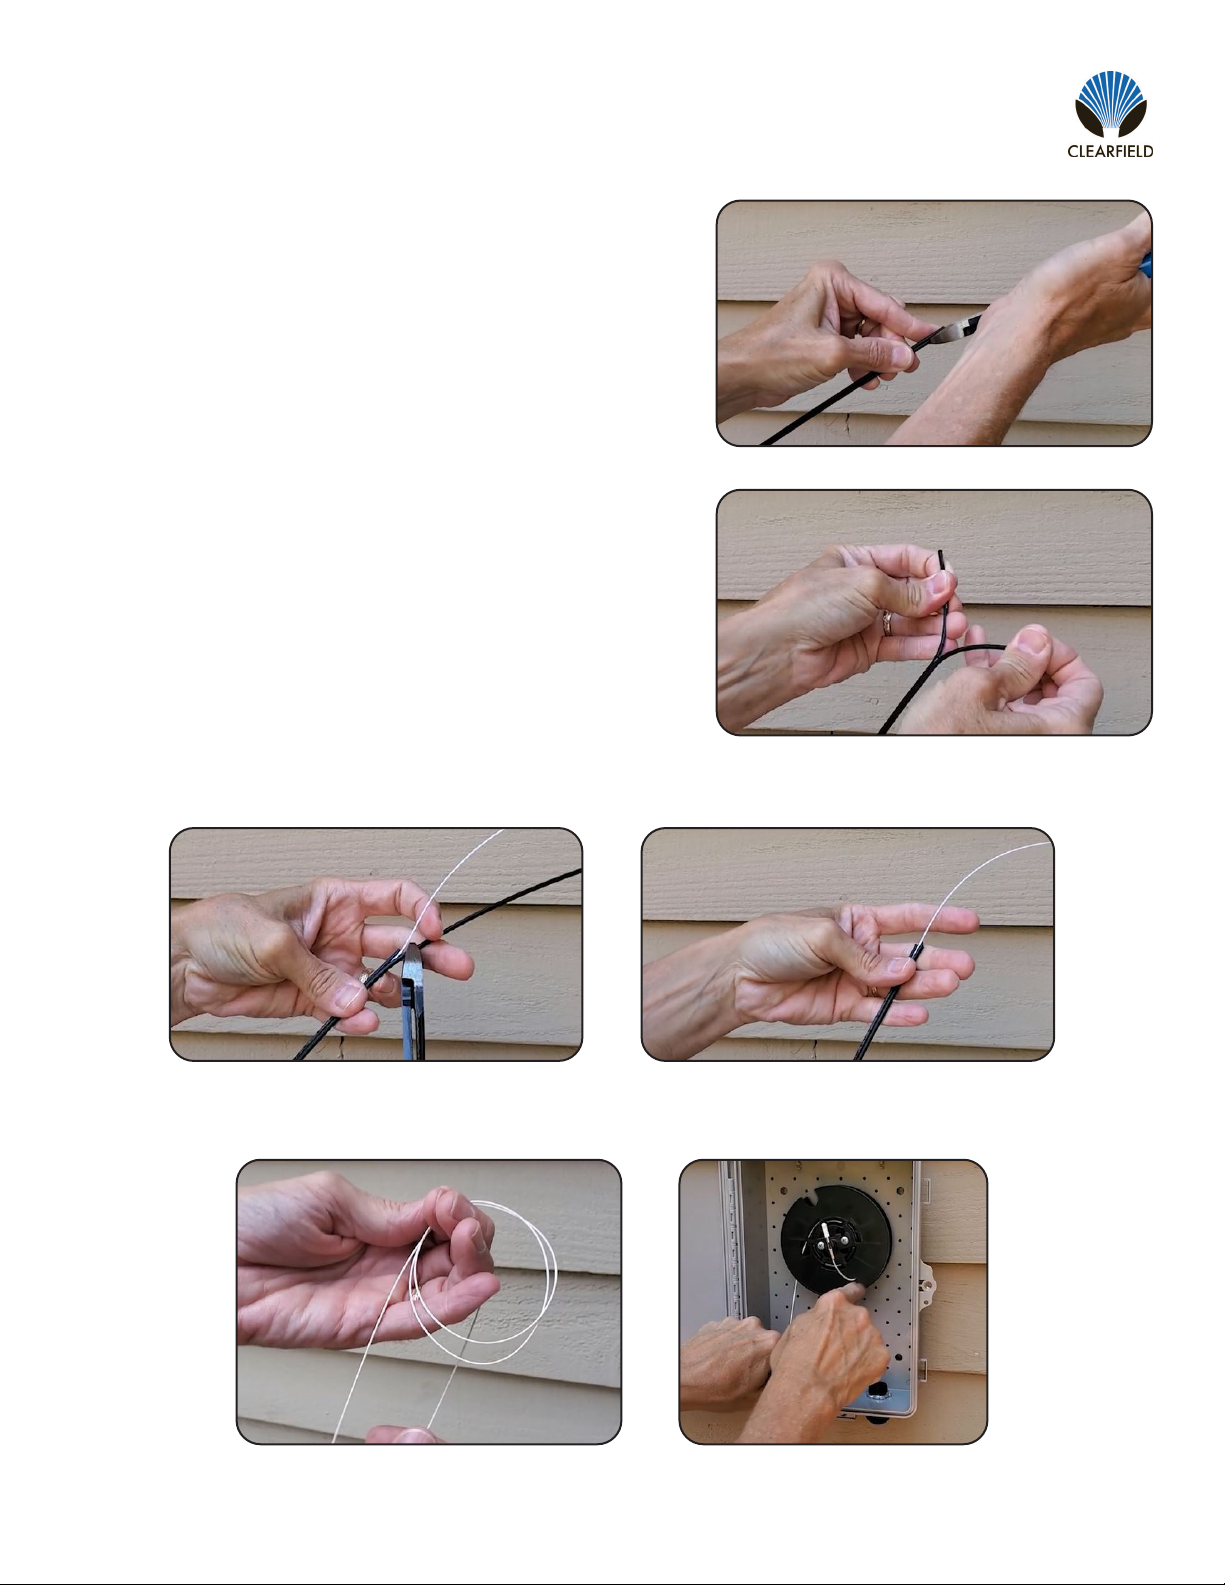
Isolate the internal subunit from the jacket and strength
members. Cut away the excess jacket and strength mem-
bers.
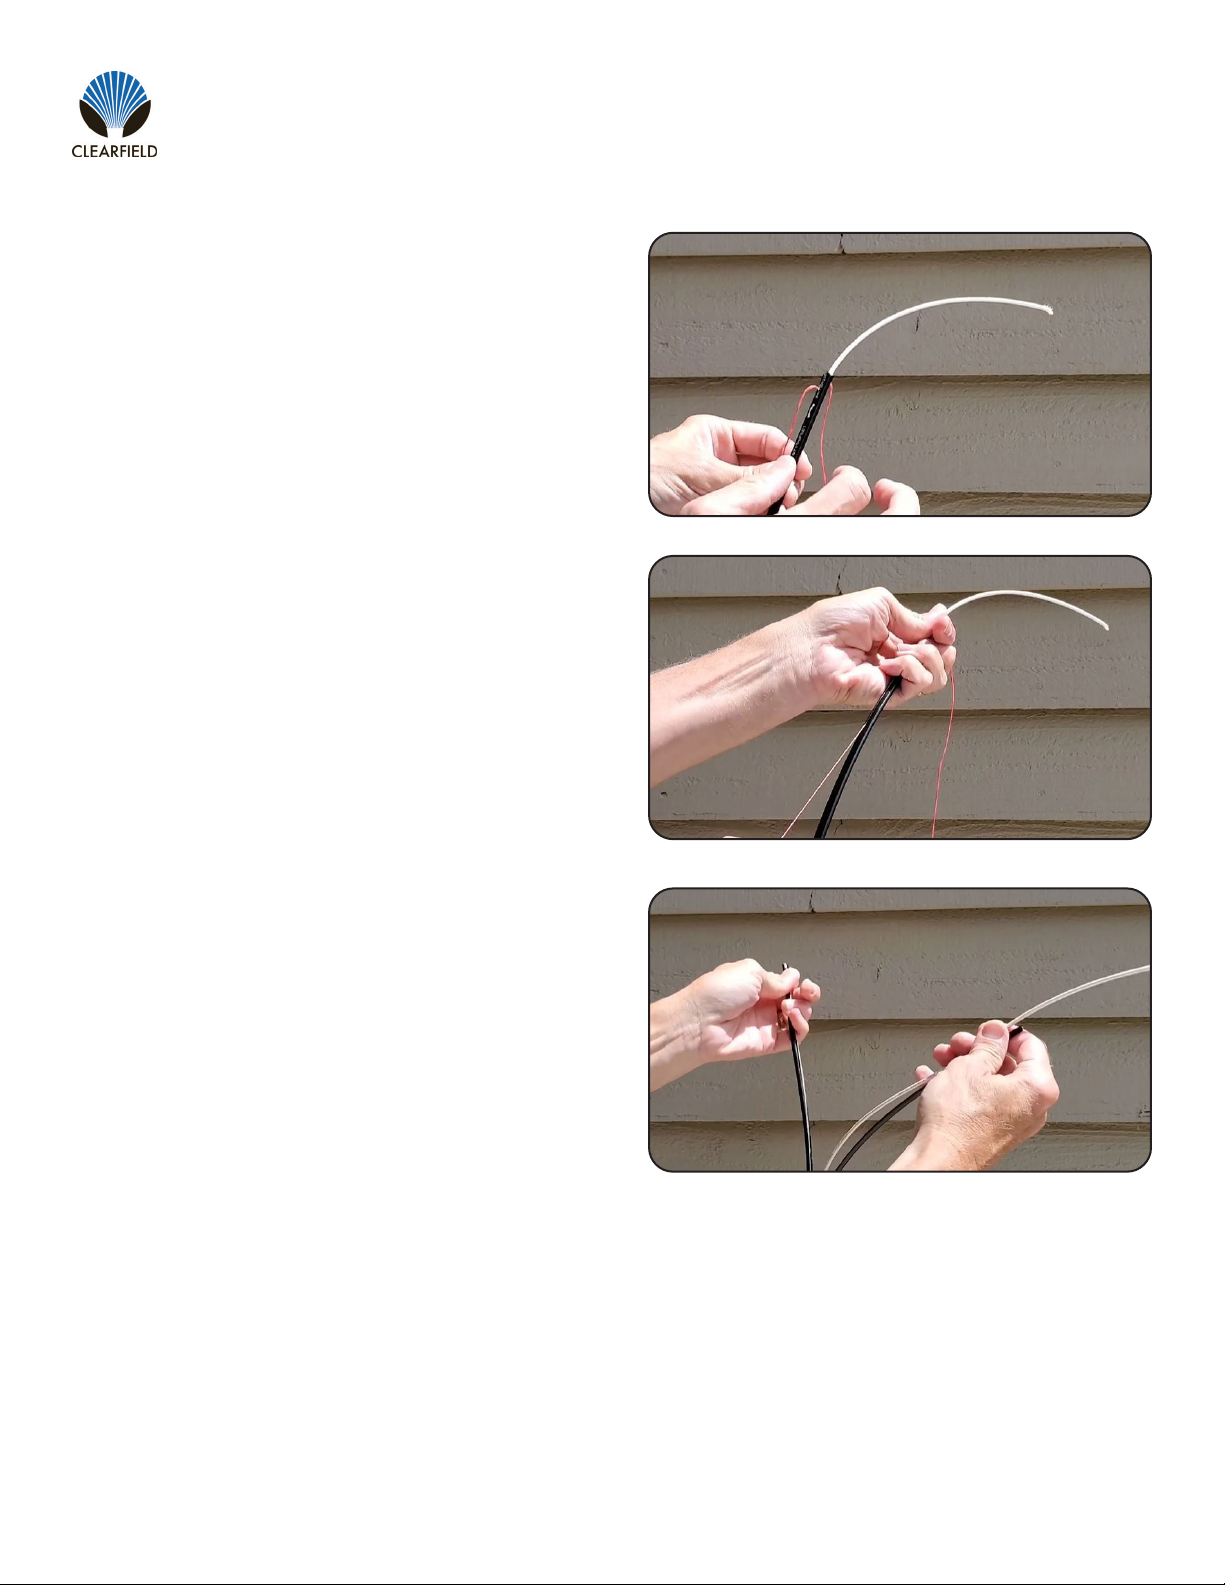
Opening Standard Flat Drop
1. Determine the amount of cable to be opened and enclose
your side cutting tool around the cable.
2. Pull the cutting tool along the length of the cable until you
reach the end of the jacket.
3.
Without Rip Cords
5
FieldShield FLATdrop
__________________________________________________________ Installation Manual
Direct: 763.476.6866 • National: 800.422.2537 • www.SeeCleareld.com • [email protected]
Manual 018957 Rev C - July 2022
With Rip Cords
From the end of the cable, determine the length of cable
to be opened. Using a side cutting tool or blade, remove
approximately 6 inches of jacket to expose the rip cords.
1.
2.
3.
Tightly grip the rip cord and pull straight back along the
length of the cable.
Repeat on the other side to fully open the desired length
of cable. Cut away excess jacket, rip cords and strength
members.
Direct: 763.476.6866 • National: 800.422.2537 • www.SeeCleareld.com • [email protected]
6
FieldShield FLATdrop
Installation Manual _________________________________________________________
Manual 018957 REV C - July 2022
Opening 900um Peelable FLATdrop
1.
2.
3.
4.
Using a clipping tool, clip the ends of the cable at the peel-
able seams on each side, taking care not to cut the internal
subunit.
Pull the two jacket halves apart, opening the cable to the
desired length.
Cut away excess material.
The 900 micron sub-unit slack can then be wound onto slack reel for storage.

7
FieldShield FLATdrop
__________________________________________________________ Installation Manual
Direct: 763.476.6866 • National: 800.422.2537 • www.SeeCleareld.com • [email protected]
Manual 018957 Rev C - July 2022
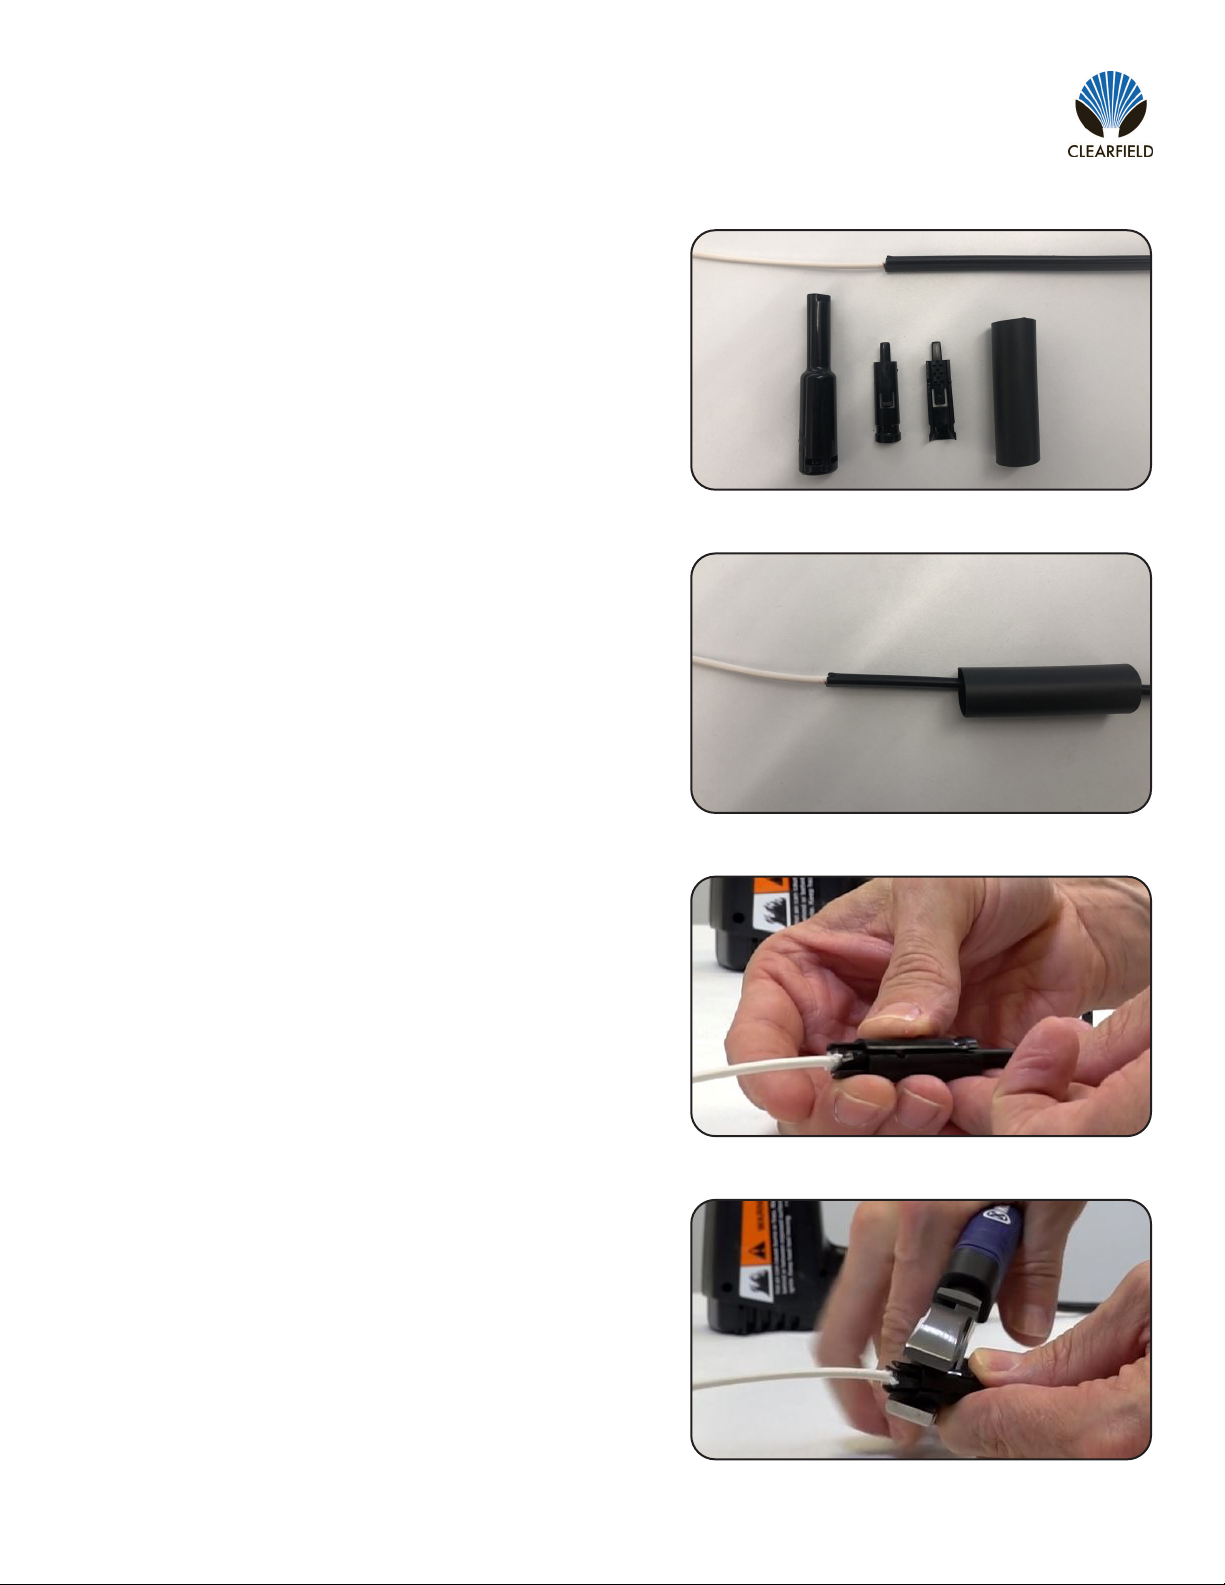
Pre-Connectorized SFF FLATdrop
Pre-connectorized Small Form Factor (SFF) FLATdrop
comes with protective shrink wrap around the pushable
connectorized end.
Carefully cut away the shrink wrap.
Remove the shrink wrap to expose pushable connector.
Slide back the protective tubing and ber designation
label back to the end of the cable jacket.
1.
2.
3.
4.
Note: When opening SFF cable to store slack, removing
the ramining two pieces of heat shrink must be done with
care. Score the two pieces of heat shrink on the outside,
opposite the 900 micron cable, to peel away.

Direct: 763.476.6866 • National: 800.422.2537 • www.SeeCleareld.com • [email protected]
8
FieldShield FLATdrop
Installation Manual _________________________________________________________
Manual 018957 REV C - July 2022
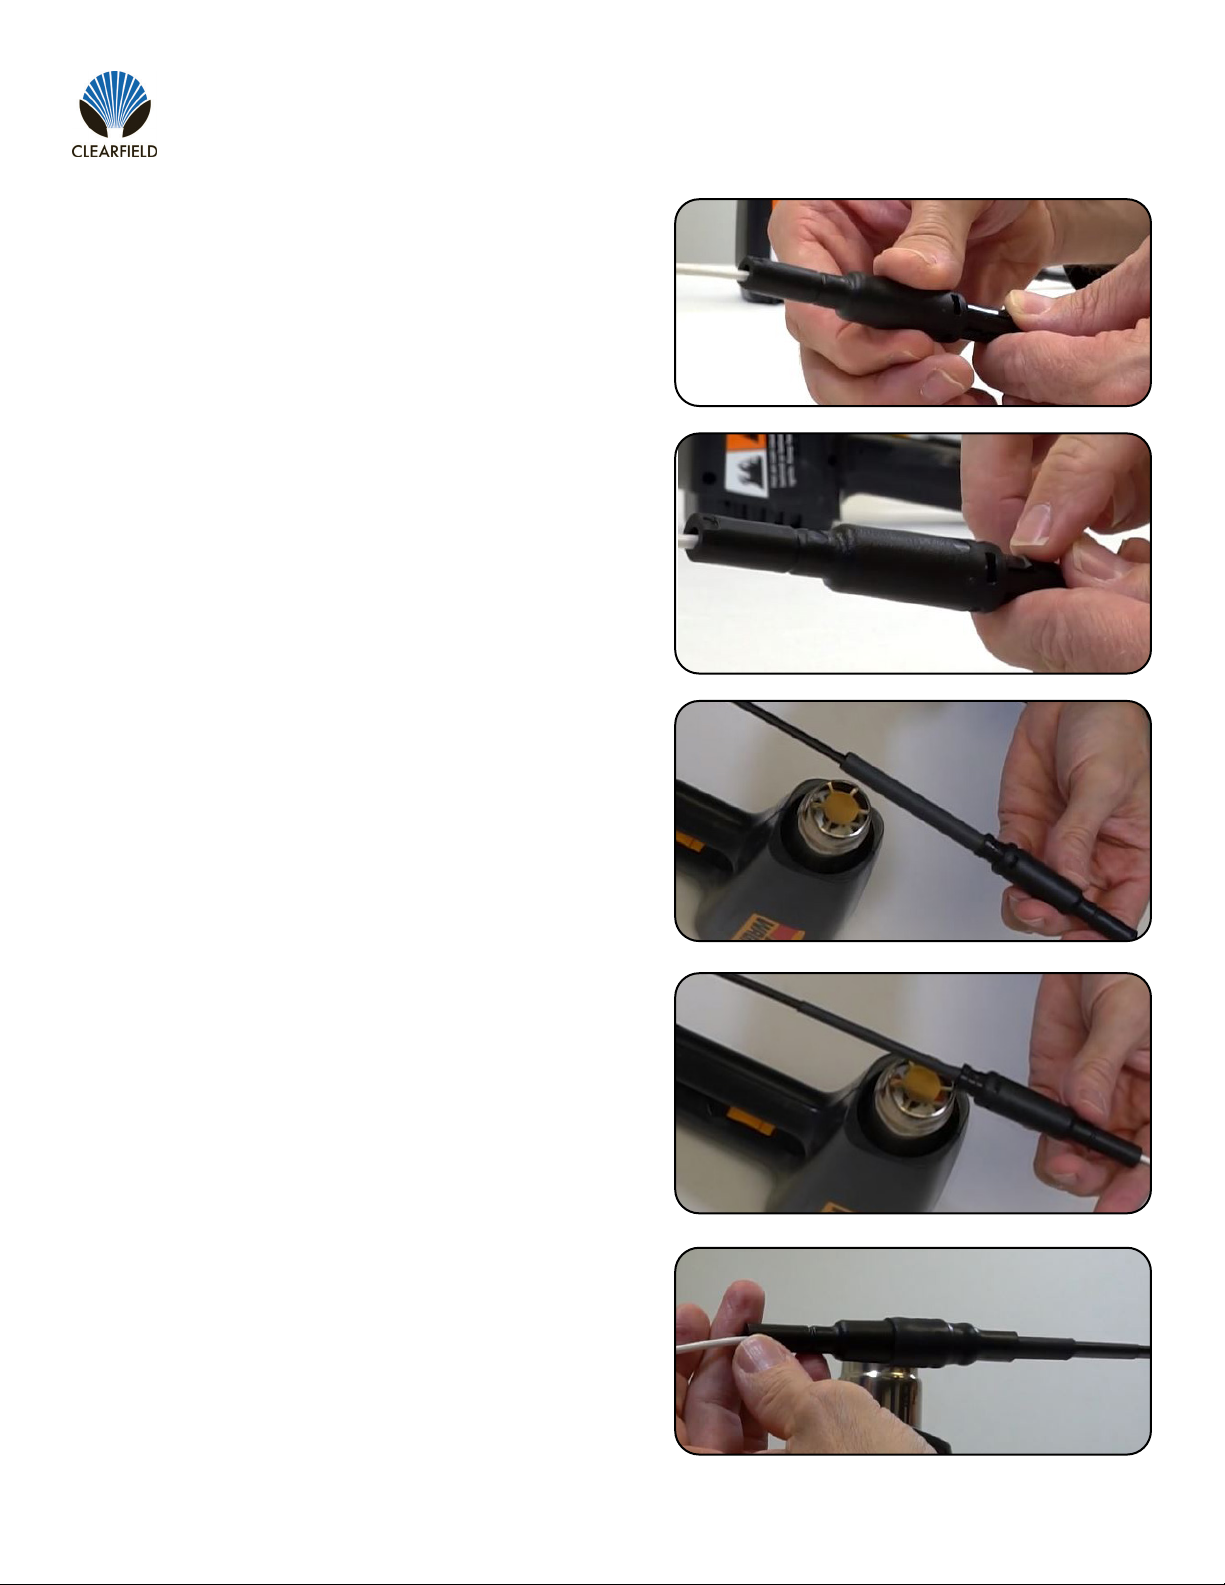
1. Open your cable to the desired breakout length.
Place both pieces of heatshrink over the end of the cable,
and push them down out of the way of the end of the jack-
et. These will be utilized later to seal the FlexConnector.
2.
Place the two halves of the internal retaining clips around
the end of the cable jacket, with the end of the clips even
with the end of the cable jacket.
3.
Using a pliers, squeeze the two retaining clips together to
ensure the teeth bite into the jacket.
4.
Field Installable FlexConnector - SFF
9
FieldShield FLATdrop
__________________________________________________________ Installation Manual
Direct: 763.476.6866 • National: 800.422.2537 • www.SeeCleareld.com • [email protected]
Manual 018957 Rev C - July 2022
Align the holes in the FlexConnector with the retainer
clips and snap it into place.
Slide the FlexConnector over the end of the cable and
down to the two retaining clips.
5.
6.
Position the smaller, 5/16”, heatshrink just inside the
back portion of the retainer clips and shrink using a heat
gun.
7.
Position the 3/4” heatshrink about halfway over the
FlexConnector and shrink with the heat gun.
8.
Direct: 763.476.6866 • National: 800.422.2537 • www.SeeCleareld.com • [email protected]
10
FieldShield FLATdrop
Installation Manual _________________________________________________________
Manual 018957 REV C - July 2022
1. Open your cable to the desired breakout length.
Place the pieces of heatshrink over the end of the cable,
and push them down out of the way of the end of the jack-
et. These will be utilized later to seal the FlexConnector.
2.
Place the two halves of the internal retaining clips around
the end of the cable jacket, with the end of the clips even
with the end of the cable jacket.
3.
Using a pliers, squeeze the two retaining clips together to
ensure the teeth bite into the jacket.
4.
Field Installable FlexConnector - Standrd FLATdrop

11
FieldShield FLATdrop
__________________________________________________________ Installation Manual
Direct: 763.476.6866 • National: 800.422.2537 • www.SeeCleareld.com • [email protected]
Manual 018957 Rev C - July 2022
Align the holes in the FlexConnector with the retainer
clips and snap it into place.
Slide the FlexConnector over the end of the cable and
down to the two retaining clips.
5.
6.
Position the 3/4” heatshrink about halfway over the
FlexConnector and shrink with the heat gun.
7.
Direct: 763.476.6866 • National: 800.422.2537 • www.SeeCleareld.com • [email protected]
12
FieldShield FLATdrop
Installation Manual _________________________________________________________
Manual 018957 REV C - July 2022
Placing FLATdrop MPO and Single-Fiber Assemblies
-Before starting:
• Do a visual inspection of the cable
• Remove the corregated tubing
• Place assembly into pull tool
-DO NOT ASSEMBLE THE CONNECTOR
-Use pulling tool for pulling through conduit
-Aerial placing utilizing the stationary reel method.
• Place temporary cable blocks
• Utilize the Cleareld pulling tool
• Lash toward reel
• Slack storage per local practice
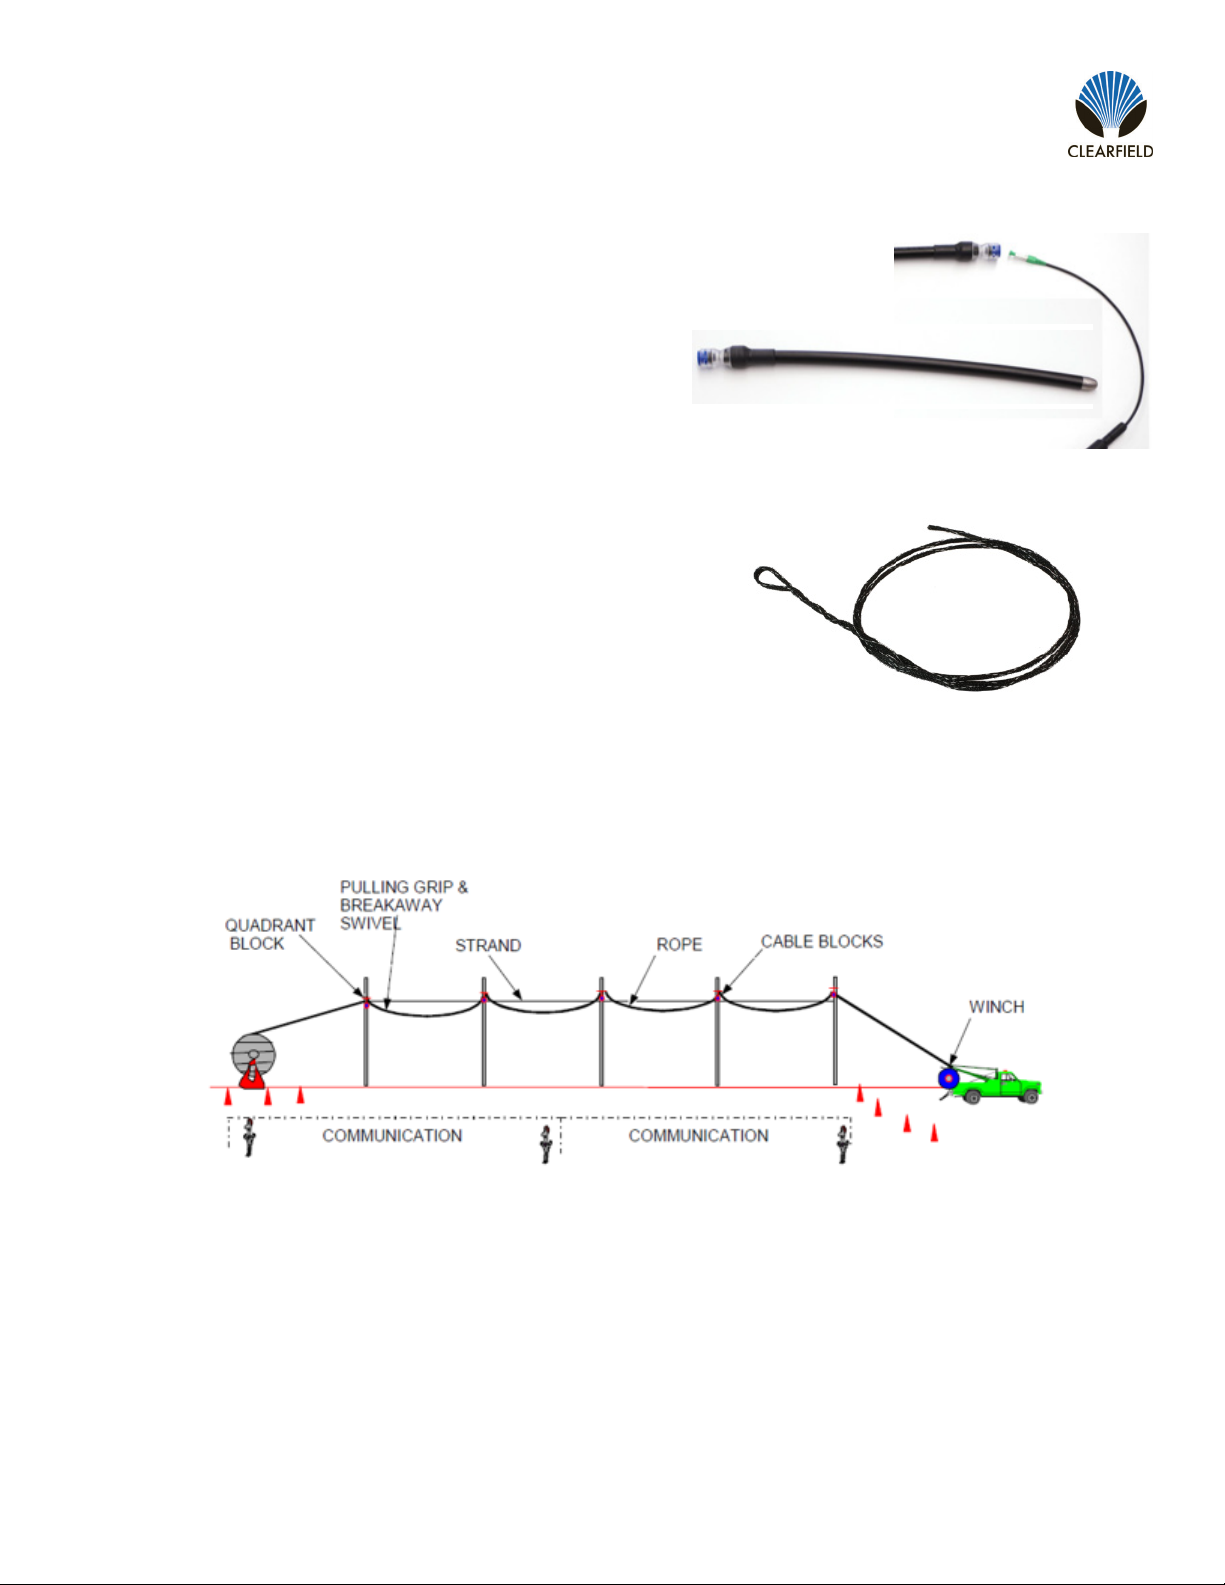
FLATdrop Pulling Tool
P/N: FS-PUL-YOURX
SFF Pulling Sock
P/N: FS-PUL-5-9MM
13
FieldShield FLATdrop
__________________________________________________________ Installation Manual
Direct: 763.476.6866 • National: 800.422.2537 • www.SeeCleareld.com • [email protected]
Manual 018957 Rev C - July 2022
Note: DO NOT assemble the connector prior to pulling/placing ber.
When placing a FLATdrop with an assembly (MPO or Single-Fiber) cables be sure to utilize the pulling tool. Failure to do so
could damage the assembly and render the cable useless.
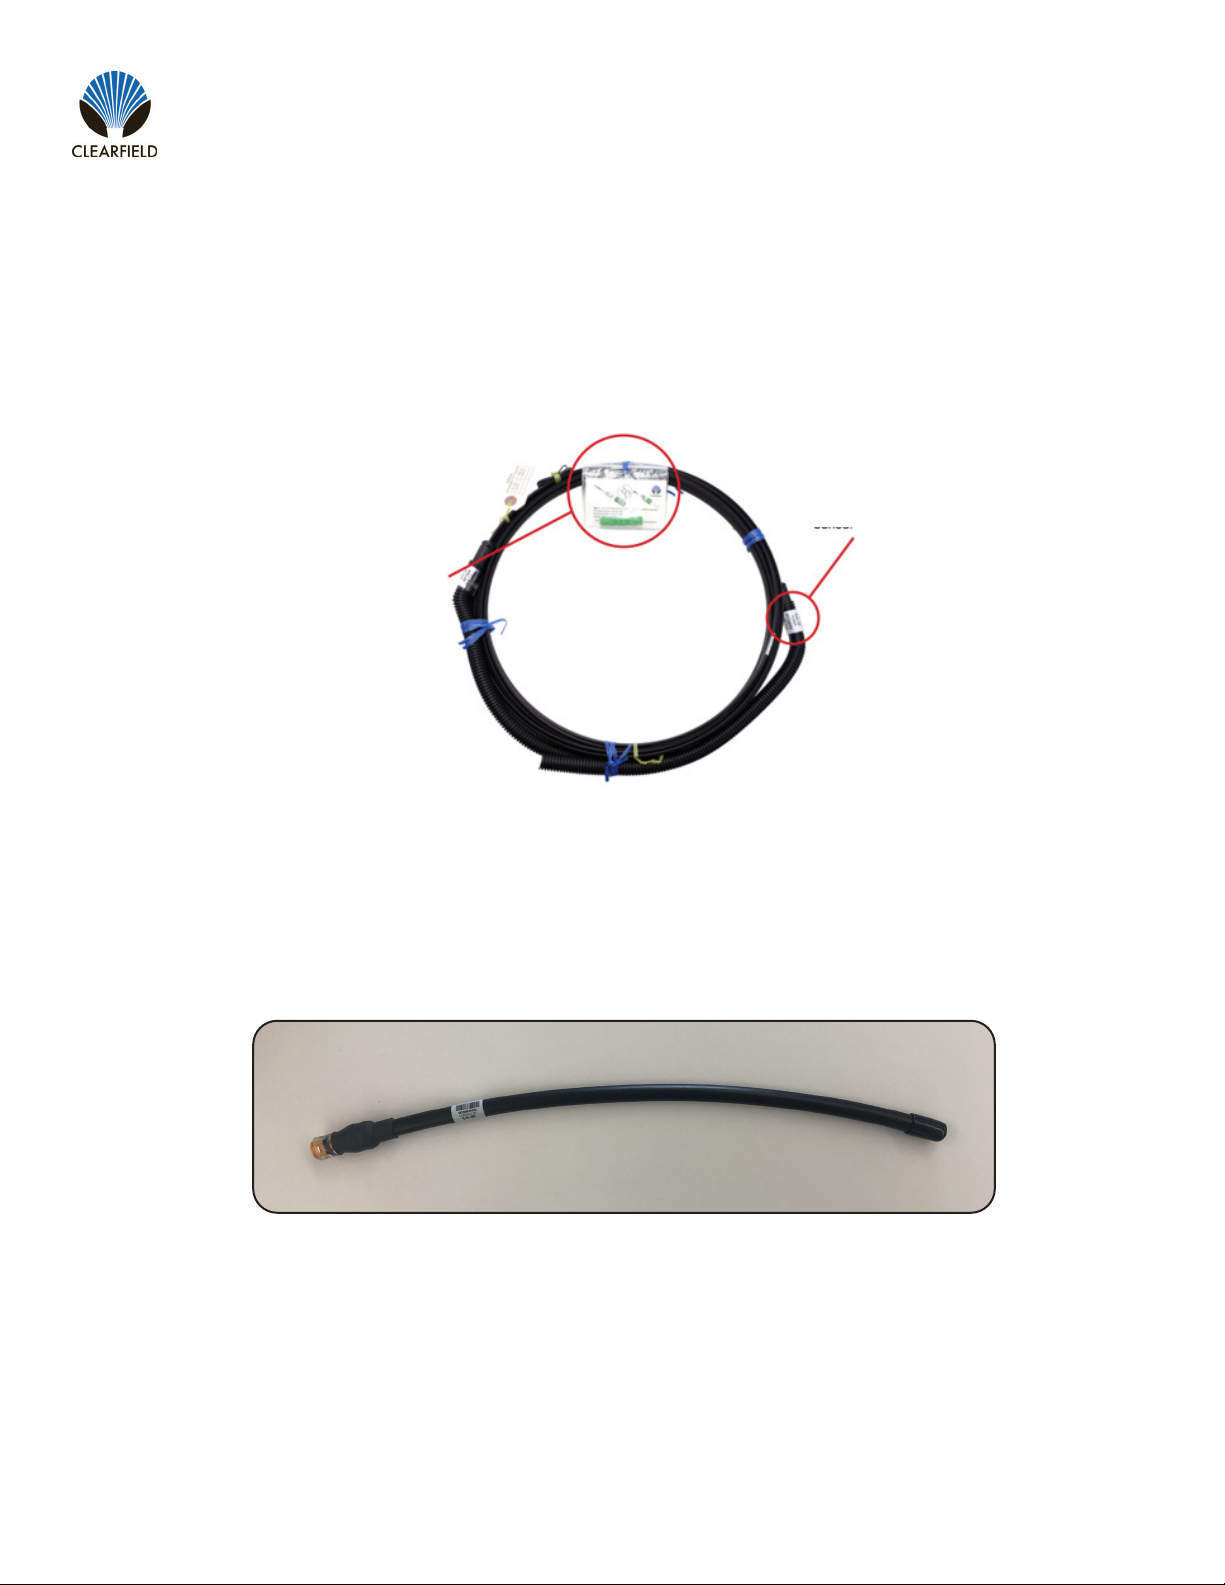
First, remove cable ties from corrugated tube. Then, starting at the FLEXconnector end of tubing, unwrap the tubing to
expose the FLEXConnector and then gently pull the assembly free from the tubing. Do not yank it from the tubing.
Ship along connector
pieces will be tied to the
individual drops
MPO and Single-Fiber
Begin removing corrugated
tubing at end closest to the at
drop (over the FLEXconnector)
The FS-PROTECT-TOOL can be used to protect the YOURx breakout during deployment, when a pulling line is
not required.
FS-PROTECT-YOURX
Direct: 763.476.6866 • National: 800.422.2537 • www.SeeCleareld.com • [email protected]
14
FieldShield FLATdrop
Installation Manual _________________________________________________________
Manual 018957 REV C - July 2022
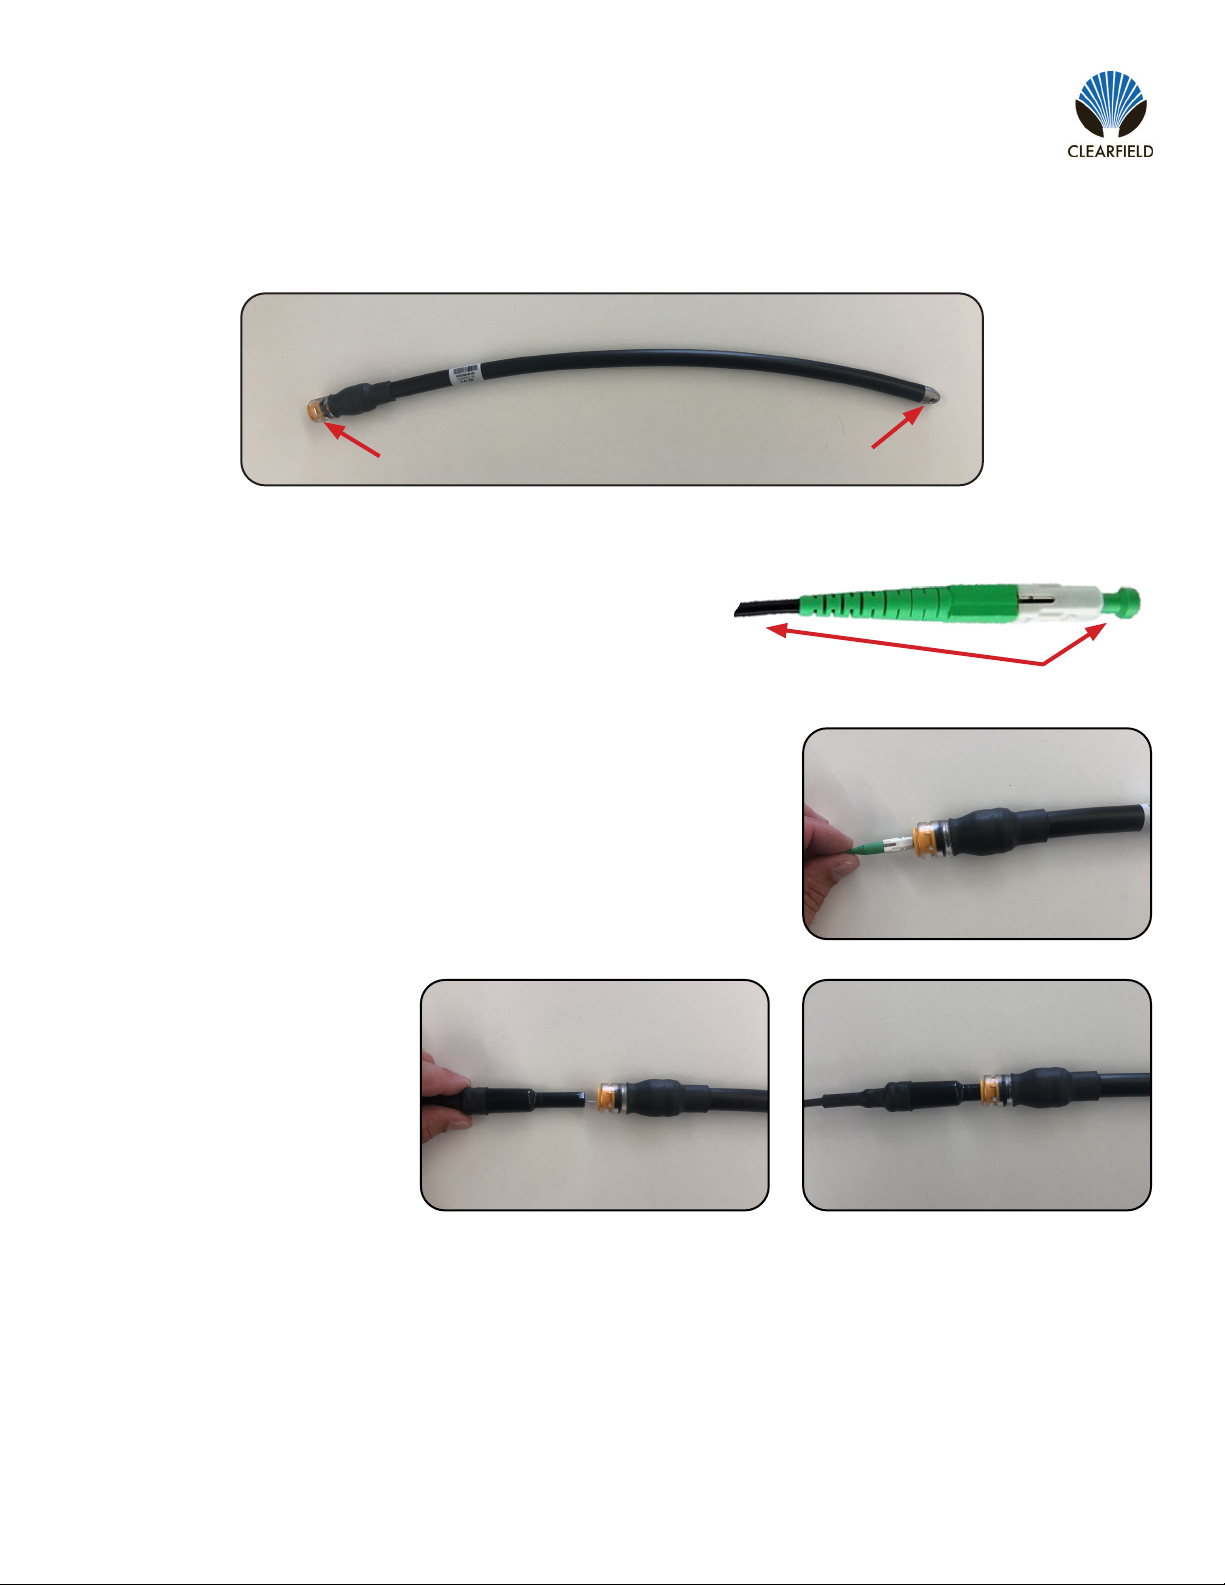
Pulling FLATdrop MPO and Single-ber assemblies using the FS-PUL-YOURX
FS-PUL-YOURX
Coupler Pulling Carrot
If using a single-ber connector, prior to inserting into the pulling
tool, snip off the dust cap “tail” close to the back edge of the dust
cap and at the cap itself to remove it from the cable. Do not remove
the dust cap. Snip here to remove tail
Insert the bullet for MPO assembly or the single-ber connector gently, holding
onto the boot/crimp tube. Do not push the bullet into the pulling tool using the
cable sheath or ber damage could occur.
Gently slide the single-ber/
MPO assembly connector into the
coupler on the pulling tool until the
coupler has engaged the FLEXcon-
nector at a hard stop.
You are now ready to pull the FLATdrop to its desired location. Tie the pulling device to the carrot on the end of the pulling
tool. Cleareld recommends a max pulling force of 50 lbs
When you have reached to desired location, compress the ring holding the FlexConnector to release it. Gently pull the
FLEXconnector from the coupler along with the assembly.
Note: Do not yank it out of the pulling tool or ber damage may occur.
15
FieldShield FLATdrop
__________________________________________________________ Installation Manual
Direct: 763.476.6866 • National: 800.422.2537 • www.SeeCleareld.com • [email protected]
Manual 018957 Rev C - July 2022
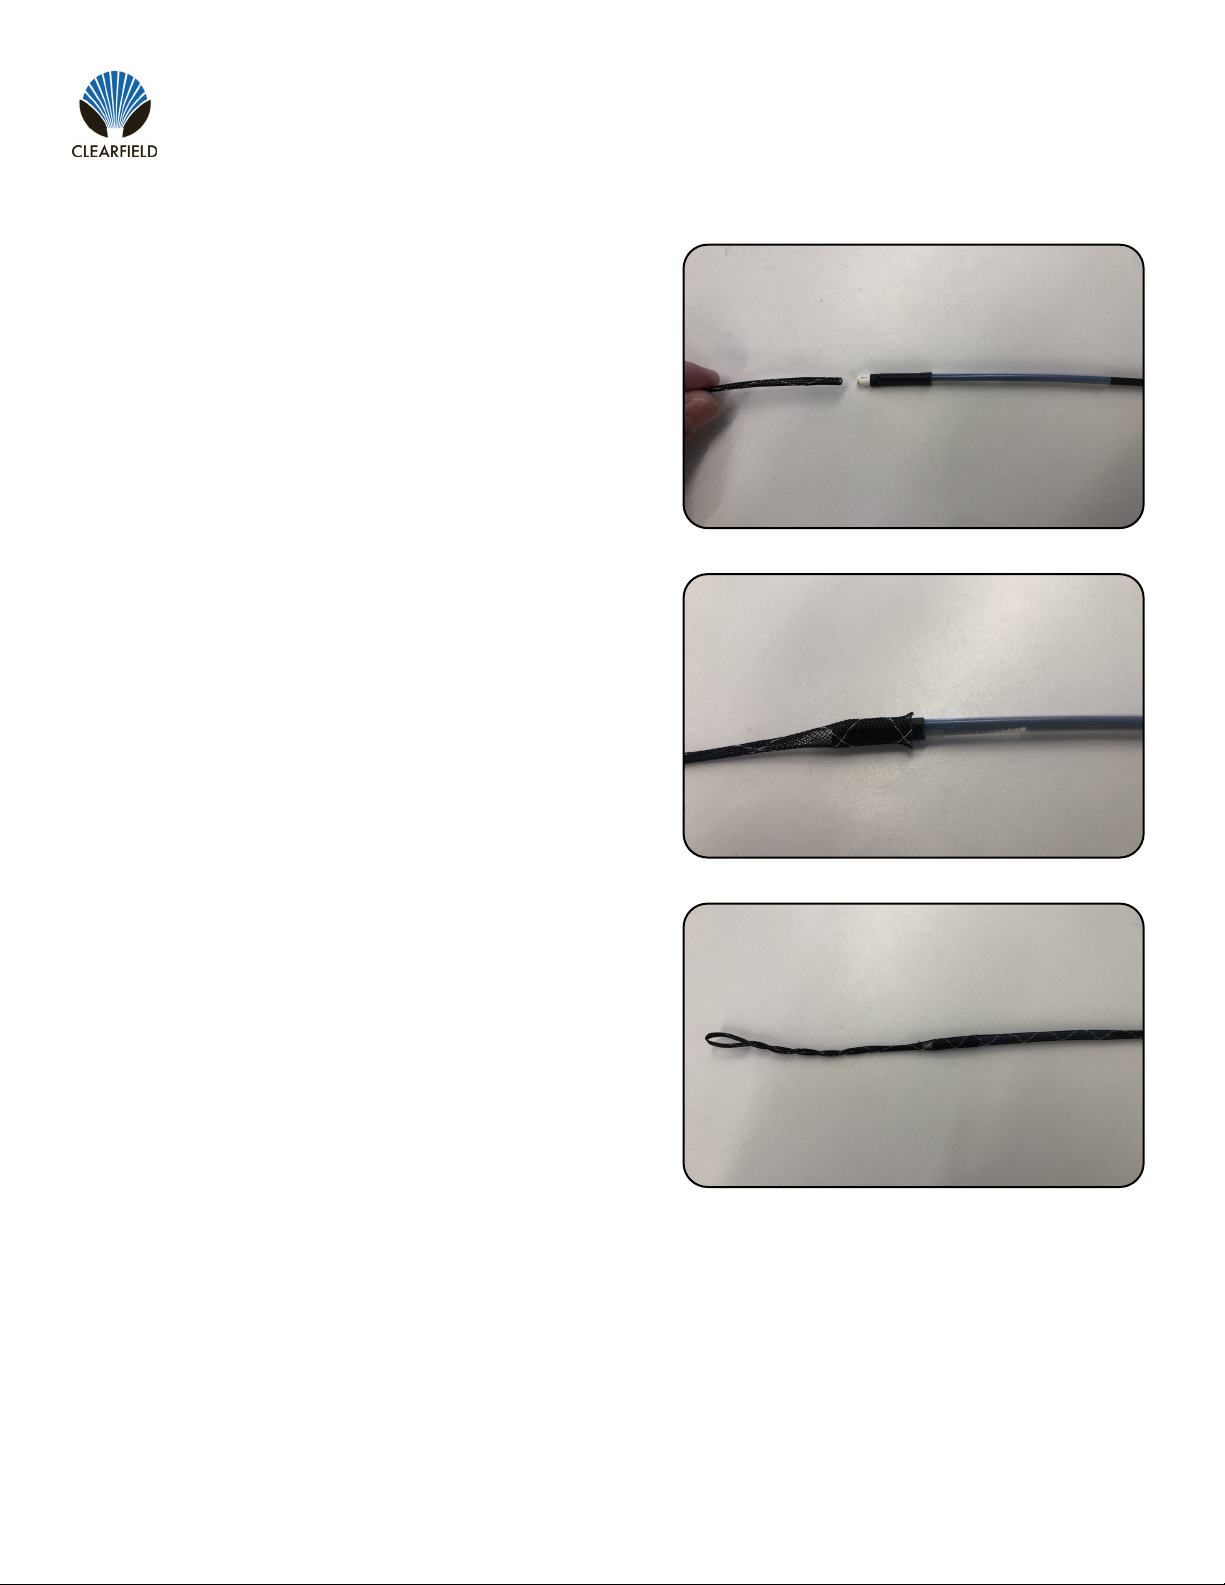
Pulling SFF Single-ber assemblies using the Pulling Sock
1. The SFF assembly will feed into the pulling sock. If nec-
essary, clean up the end of the pulling sock with a pair of
snips or a side-cutter.
You are now ready to pull the SFF to its desired location. Tie the pulling device to the loop on the end of the sock.
When you have reached to desired location, remove the pulling sock by pushing up on the back end of the sock to release
the compression.
Note: Do not attempt yank it out of the pulling sock or ber damage may occur.
2. Insert the end of the SFF into the pulling sock, pushing the
sock onto the pre-terminated end.
3. Continue feeding the sock onto the cable until it reached
the end of the pulling sock. When removing the sock, re-
member to push up from the back end of the sock instead
of attempting to pull it off.

Direct: 763.476.6866 • National: 800.422.2537 • www.SeeCleareld.com • [email protected]
16
FieldShield FLATdrop
Installation Manual _________________________________________________________
Manual 018957 REV C - July 2022
Inspect Then Connect
These are Cleareld recommended products/applications. Use the product
you feel will complete your cleaning procedures. Create a “best practice” for
your company and follow those procedures.
The use of Chemtronics end face and bulkhead cleaning products and
techniques ensures a clean end face, no matter the type of contamination.
Before cleaning any connector, be sure you know what type of contaminate
you are cleaning (dry, uidic, or combination). All the available products are
good, it’s the process that you need to be aware of. Using a dry cleaning
method to clean “dirt” can lead to scratching of the end face. Learn the
process of cleaning properly.
Note: It is NOT recommended to use isopropyl alcohol to clean the end face.
Cleaning an SC/LC Connector
Cleaning the End Face
• Place one wiping paper on QbE-2 FiberSafe™ Cleaning Platen.
(Figure 1)
• Apply small amount of precision cleaner (about 1” in diameter) with
Electro-Wash MX pen on to one end of the wipe. (Figure 2)
• Hold end face at a 90 degree angle. For APC connection, adjust by
slightly tilting the container or end face. Angle is correct when no drag is
felt on the end face. (Figure 3)
• Draw end face from wet to dry part of the wipe 3 times. Use just enough
pressure to ensure complete contact between end face and the wipe.
Note: DO NOT retrace previous step.
Figure 1
Figure 2
Figure 3
Connector Cleaning Procedure
Whether factory terminated or eld spliced, clean connectors are essential for proper system operation. Even the smallest
dust particle can cause transmission problems, so for optimal network performance inspect, and if necessary, clean
connectors and adapters prior to mating.

17
FieldShield FLATdrop
__________________________________________________________ Installation Manual
Direct: 763.476.6866 • National: 800.422.2537 • www.SeeCleareld.com • [email protected]
Manual 018957 Rev C - July 2022
Cleaning the Ferrule
• Lightly moisten the ber optic swab (2.5mm/38542F or 1.25mm/38040)
by spotting a small amount (about 1”) of Electro-Wash PX or
Electro-Wash MX pen onto the QbE. Hold the swab, 1 side down to the
wetted area and hold for a count of 1-2-3-4-5. (Figure 4)
Figure 4
Figure 5
Figure 6
Cleaning the Mate Through an Adapter AND the Adapter Itself
• Lightly moisten the ber optic swab (2.5mm/38542F or 1.25mm/38040)
by spotting a small amount (about 1”) of Electro-Wash PX or
Electro-Wash MX pen onto the QbE. Hold the tip of the swab onto the
wetted area and hold for a count of 1-2-3-4-5.
• Insert the swab into the adapter to the connector, press lightly against
the connector, twist 2-3 times, remove and discard.
• Dry with a second dry swab.
• Inspect, repeat cleaning if necessary, and test for signal strength.
• Use additional swabs to clean inside the actual adapter. Moisten
swab, like above, and insert through hole and remove while twisting.
(Figure 6)
• Insert swab into side of ferrule, wet side to the ceramic ferrule and
circle around 2-3 times and remove. Turn swab to dry side and repeat.
(Figure 5)
Direct: 763.476.6866 • National: 800.422.2537 • www.SeeCleareld.com • [email protected]
18
FieldShield FLATdrop
Installation Manual _________________________________________________________
Manual 018957 REV C - July 2022
Male Connector
• Use of Chemtronics MTP Connector Cleaning Swabs (CC505F) is rec-
ommended. Even after cleaning with a probe cleaner, you should always
clean the pins with this (or an equivalent) type swab. Cleans ALL MTP/
MPO connector end faces. This swab also cleans the “pins” of the male
connector
• Lightly “spot” a QbE-2 wipe on the platen with Electro-Wash PX Fiber
Optic Cleaner, the FiberWash or MX Pen.
• Lightly touch short side of the MTP/MPO Connector Swab to the wetted
area (3-5 secs) to absorb some cleaning solution (DO NOT over saturate
the swab).
• Wipe connector areas to be cleaned, sliding pad from bottom of pad
across and forward to tip of swab, from 1 side to the other, turn over and
use long side to dry in same movement.
Cleaning an MPO/MTP Connector
19
FieldShield FLATdrop
__________________________________________________________ Installation Manual
Direct: 763.476.6866 • National: 800.422.2537 • www.SeeCleareld.com • [email protected]
Manual 018957 Rev C - July 2022
• Use the hole on end of pad to
clean one alignment pin, then
press the end of the swab
into the other pin to clean.
• Check your work with a ber
scope. This can take several
attempts to get the endface
clean.
Female Connector (without pins)
• Cleaned like a single ber connector, using a cleaning platform. The
receptacles will be cleaned as long as you are using a combination clean-
ing process as recommended.
• Again, using a platen, moisten the platen with cleaning solvent on one
end to accommodate 3 swipes of the MPO female endface.
• Holding the connector (If APC, slightly at an angle to accommodate for 8°
angle) swiping with medium pressure, from the wet area into the dry area
3 times, without wiping over previous area.
• Inspect, and if clean, make the connection. If NOT, repeat above steps
until clean or if determined that the end face is damaged (based on stan-
dards of 5 cleanings per connection), replace.

Direct: 763.476.6866 • National: 800.422.2537 • www.SeeCleareld.com • [email protected]
20
FieldShield FLATdrop
Installation Manual _________________________________________________________
Manual 018957 REV C - July 2022
Cleaning Using a Probe-Style Cleaning Tool
• The probe style cleaning tools are capable of cleaning a connector end face separately or through the adapter.
• Slightly engage probe by pulling back but do not allow to click. Lightly “spot” a QbE-2 wipe on the platen with Elec-
tro-Wash PX Fiber Optic Cleaner, this will help alleviate “over saturation” of the material.
• Lightly touch the tip of probe and release.
Wipe
Material
Wet
End
Face
Dry
• Insert connector or insert probe though adapter and click 2-3 times to move past the wet area and allow material to dry
wipe.
• Inspect connector, repeat if necessary (following standards)
• If cleaning a male connector, clean the pins (see above)
Table of contents
Other Clearfield Cables And Connectors manuals


Popular Cables And Connectors manuals by other brands


Alvey
Alvey Adventurer 40GDZ quick start guide

Foxun
Foxun SX-SP28-Audio operating instructions

Kenwood
Kenwood CA-U1EX instruction manual

TE Connectivity
TE Connectivity AMPACT 83452 Series instruction sheet

Cadenceberge
Cadenceberge CADHV-HCA25 user manual

National Instruments
National Instruments NI SHC68 user guide