ClearSounds Quattro 4.0 User manual

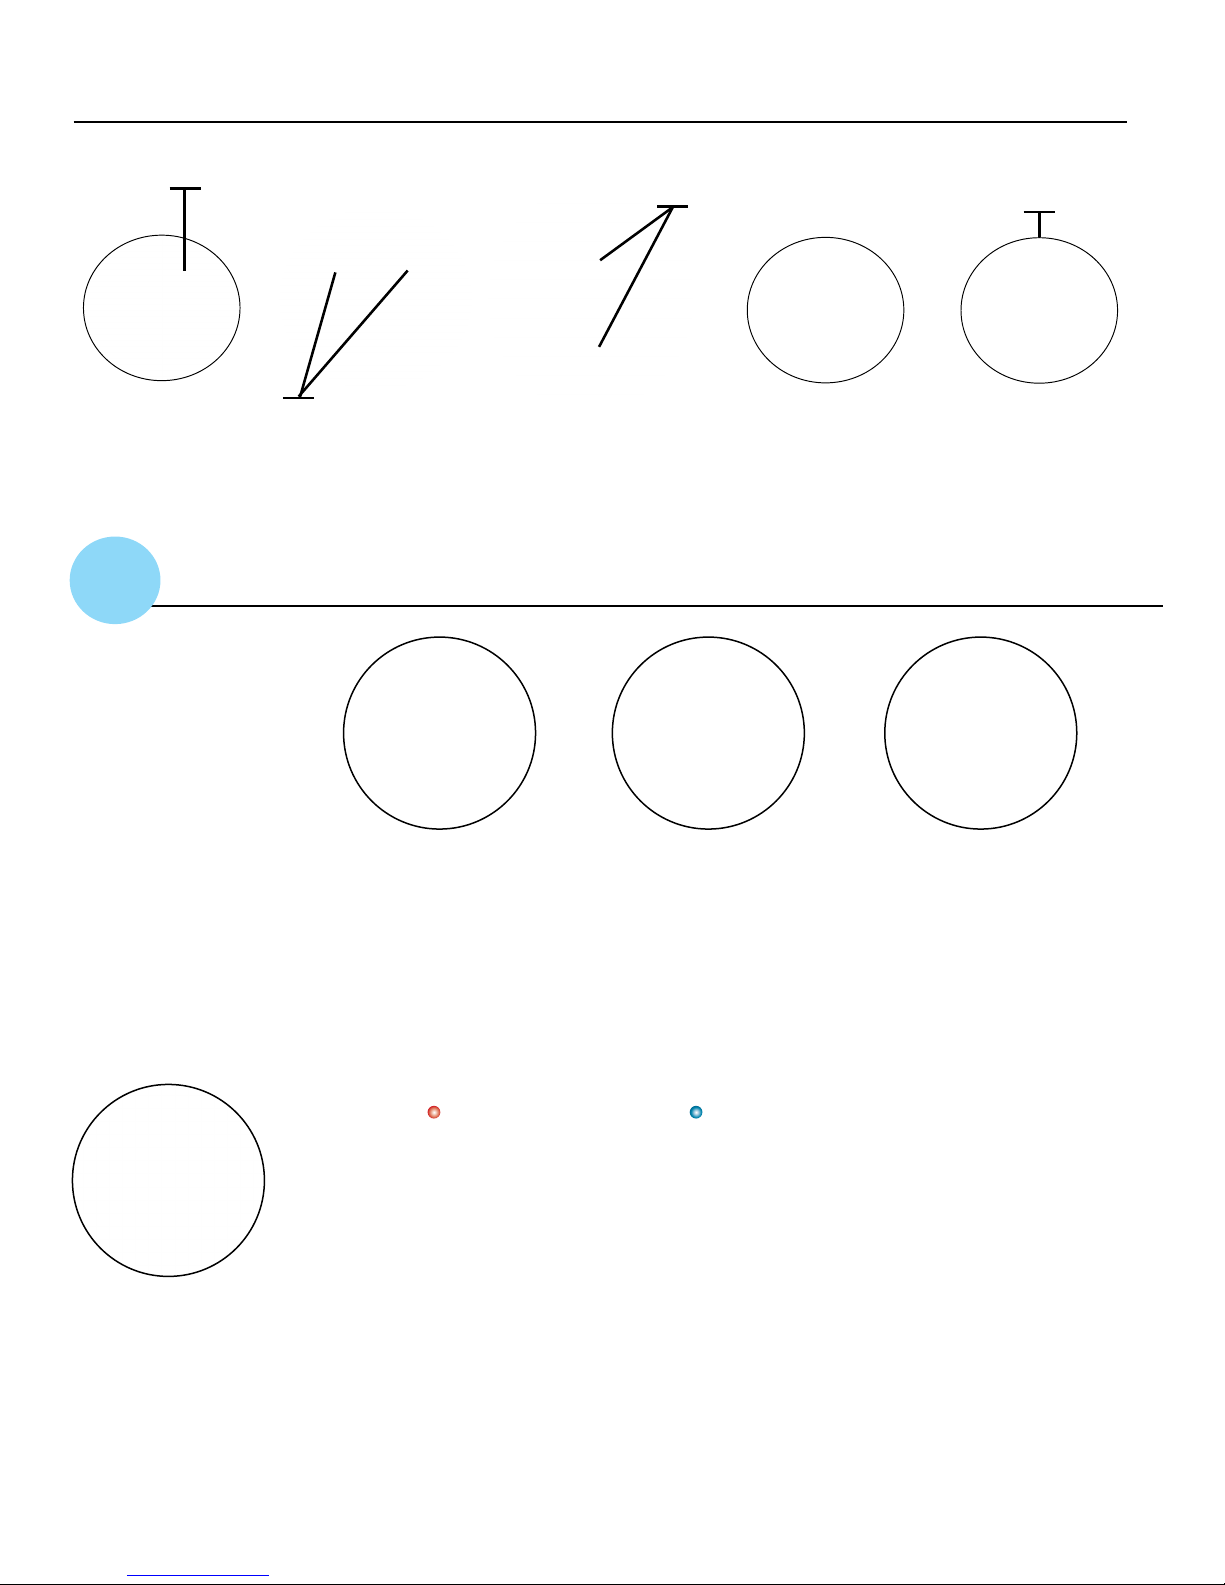
Home Screen: The screen
displays the following
information:
a) Devices connected to
the Quattro 4.0
b) Headphones plugged
into the Quattro 4.0
c) Battery charge level
The Home Screen
display remains active
for approximately 8
seconds, then goes dark.
To re-activate the screen,
simply tap the Touch
Function Key (TFK) or Multi
Function Button (MFB).
TFK Touch Function
Key: The touch sensor
is used to answer & end
phone calls. It activates
the LCD screen and
pauses & plays music.
Tap twice to activate
the voice control for the
second device.
Volume & Scroll Touch
Keys: These keys are
used to turn the volume
up or down, scroll
through the menu or skip
forward & back when
listening to music.
QUATTRO 4.0 QUICKSTART GUIDE
Earbud Jack: This jack accepts any 3.5mm audio
only headsets. We package the Quattro 4.0 with our
patented SmartSound Earbuds.
8-wire Neckloop: This cord hangs the Quattro 4.0
around your neck like a necklace. This is an 8-wire
loop that connects to hearing aids or cochlear im-
plants with t-coils, delivering sound directly through
the hearing aids or cochlear implants when they are
in t-coil mode.
MFB Base Multi-Function Button: This
button is used to initiate & answer calls, turn
the Quattro 4.0 on & off, activate the LCD
screen, pair the Quattro 4.0 to Bluetooth de-
vices (e.g. mobile phone), switch between calls
and initiate Siri or S-Voice for voice activation.
MMFB Microphone Multi-Function
Button: This button is used to pair and
connect the QT4 Mic to the Quattro 4.0 unit
and adjust the sensitivity level of the QT4
Mic.
Battery Engage Switches: There is a battery engage switch on both the QT4 Mic and the Quattro
4.0 unit. This switch MUST be in the +position on both the Mic & Quattro 4.0 for the units to
function. By switching to the – position, the battery is disengaged from the circuit. This switch
does NOT need to be put in the –position; its purpose was to protect the integrity of the battery
during storage.
STEP 2: Plug
charger into
Quattro 4.0.
STEP 3: Plug
charger into outlet
to fully charge the
Quattro 4.0.
STEP 4: “Charging”
appears on the
screen and the red
light is on.
STEP 5: Quattro
4.0 is charged when
screen indicates
100% and battery
icon shows full.
STEP 1: Use the tip
of a pen to move the
battery engagement
+/- switch into the
+ position on the
Quattro 4.0.
Do NOT turn it off!
Æ
TIP: Charge the Quattro 4.0 every night for maximum performance. The battery icon will
identify when battery power is running low on the main base. On the QT4 Mic, the indicator
light will turn red. The QT4 Mic can be charged any time with the mic clip charger.
1.
USING THE QUATTRO 4.0
CHARGING THE QUATTRO 4.0
www.clearsounds.com

NOTE: You can place a call directly from your phone with sound
delivered through your Quattro 4.0 if “Headset” or “Quattro 4.0”
is selected on the phone.
STEP 1: Ensure Quattro
4.0 is turned off, then
press and hold MFB for
approximately six seconds.
STEP 2: After around
six seconds, the
Quattro 4.0 announces
“Pairing”, and
“Pairing...” appears on
the Quattro 4.0 screen.
STEP 3: Turn on the
Bluetooth device and put
it in Bluetooth pairing
mode. Often this requires
device menu selections
such as Settings >
Bluetooth > ON.
Choose Quattro 4.0.
STEP 4: When
the device name
appears on the
Quattro 4.0 screen,
it is paired and
connected.
PAIRING THE QUATTRO 4.0 WITH A BLUETOOTH DEVICE
STEP 1: To answer
the call: Firmly press
MFB twice.
STEP 2: To reject
the call: Press and
hold MFB.
STEP 3: To check Caller
ID (Caller ID service
required): Firmly press
MFB once. The number
appears on Quattro 4.0
screen. To answer call,
press MFB again.
STEP 4: Adjust the
volume: Tap <
(volume -) or >
(volume +). Volume
levels (1-15) appear
on the screen when
engaged in a call or
using the QT4 Mic.
TAKE A CALL
Æ
• Make sure other connected Bluetooth devices are turned off when syncing a new Bluetooth device.
Æ
Æ
Æ
Æ
Æ
x2 HOLD
STEP 5: To end
call, press and
hold MFB. The
Quattro 4.0
announces “call
terminated.”
Æ
HOLD
STEP 1: To call using
the Caller ID list
on the Quattro 4.0
(Caller ID service
required): Press and
hold MFB until you
hear a tone.
STEP 2: Caller
ID list appears
on screen. List
includes calls
received or missed
while the phone
was connected to
the Quattro 4.0.
STEP 3: Highlight the
number that you want
to call by tapping <.
STEP 4: Press
MFB. “Dialing”
appears on the
screen.
PLACE A CALL USING CALLER ID
Æ
STEP 5: Adjust the
volume: Tap <
(volume -) or >
(volume +).
Æ
Æ
Æ
Æ
HOLD
2.
3.
4.

USING THE QT4 MICROPHONE & CLIP
Metal plate with lanyard hole
(magnetically holds clip to clothing)
Charging contacts (dimples)
Magnetic contacts on clip
Lanyard with adjustable
strap and fastener
USB charging jack
STEP 2: Make sure your
QT4 Mic is securely
seated in the clip with
the metal pegs on the
Mic lining up with the
dimples on the clip.
STEP 4: Plug the other
end of the USB cable
into the power adapter.
CHARGING YOUR QT4 MIC USING THE CLIP
STEP 5: Plug the
power adapter into
the wall outlet.
STEP 3: Plug the USB
cable into the charging
jack on the clip.
STEP 6: You will see
a red light on the QT4
Mic, which indicates it
is charging.
STEP 7: When charging
is 100% complete, the
light will turn blue.
1.
Æ
Æ
Æ
STEP 1: Use the tip
of a pen to move the
battery engagement
+/- switch into the
+ position on the
QT4 Mic.
Do NOT turn it off!

STEP 2: Quickly pair
and connect the QT4
Mic: On the Mic, press
and hold MMFB until
light flashes red and
blue.
PAIRING AND CONNECTING THE QT4 MIC
STEP 3: The Quattro 4.0
announces “Paired,”
and then “Device
(number) connected.”
“CS QT4 Mic” appears
on screen.
Æ
Æ
PAIR
The QT4 Mic comes already paired from the factory; however, if for some reason it was removed from
the paired list, it’s easy to re-pair it.
STEP 1: Place QT4 Mic in a
position that best captures
the voice(s) that you want to
hear. On the QT4 Mic, BRIEF-
LY press MMFB on the Mic
and the device will begin
connecting to the
Quattro 4.0.
CONNECT & USE
STEP 2: The Quattro 4.0
displays “Incoming” and
automatically connects.
Æ
x2
Æ
Æ
TIP: The QT4 Mic must
be within 33 feet of the
Quattro 4.0 to operate
correctly. STEP 4: To terminate
connection, press and
hold MFB. The Quattro
4.0 announces, “Call
Terminated.”
STEP 3: Scroll through the
four levels of audio sensitiv-
ity by pressing and releasing
the MMFB until you reach
your desired level.
Æ
HOLD
3.
WEARING THE QT4 MIC CLIP
2.
OPTION 1: On Clothing-
Attach it to the speaker’s
clothing using the metal plate.
For optimum performance,
place the clip as close to the
speaker’s mouth as possible.
OPTION 3: In the Car-
When riding in a car,
you can attach the clip
to the speaker’s seat-
belt the same way you
would to clothing.
OPTION 2: Using the Lanyard -
Attach the lanyard to the hole in the
metal plate. The metal plate attach-
es magnetically to the back of the
clip. Hang the lanyard around the
speaker’s neck and slide the plastic
adjuster to customize the length.
The QT4 Mic Clip can be worn in multiple ways.
STEP 1: Ensure
Quattro 4.0 is turned off,
then press and hold MFB
for approximately six
seconds until “Pairing...”
appears on screen.
Other manuals for Quattro 4.0
2
Other ClearSounds Headset manuals