Cleaver The Bullock User manual

MODELS:
CDABU127 - The Bullock
CDAOX388 - The Ox
USER MANUAL

2
Please read this manual carefully. We sincerely hope that you enjoy using your
CLEAVER.
Troubleshooting...
or email dave@cleaversalumicabinets.com.au
Contents
Important Safety Notes ............................................................................
Warnings..........................................................................................
................................................
When Your Cabinet is Not is Use .....................................................
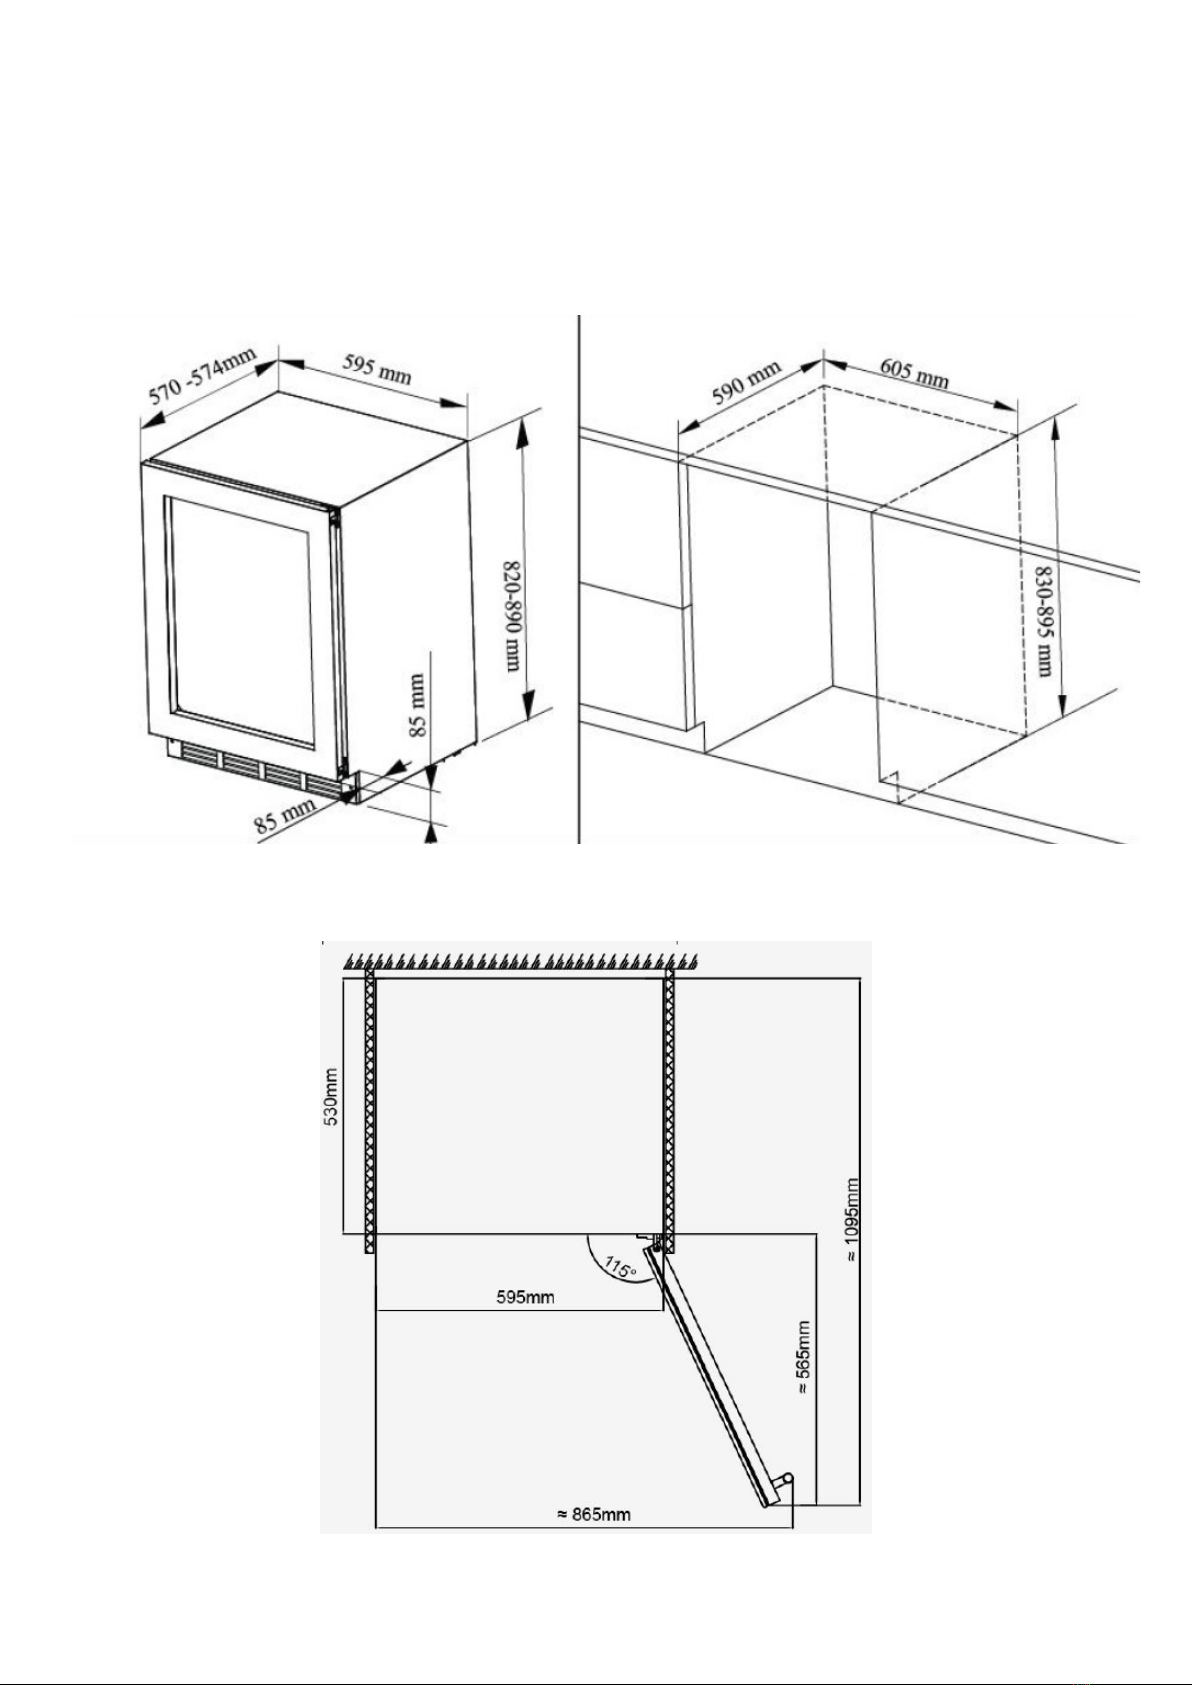
Cabinet Dimensions.................................................................................. 5
The Bullock ...................................................................................... 5
The Ox .............................................................................................
................................................................................... 7
Before Turning Your Cabinet On ............................................................... 7
Turning Your Cabinet On...........................................................................
Control Panel............................................................................................
Controlling Temperature ..........................................................................
Controlling Humidity ................................................................................
Care and Maintenance .............................................................................
Cleaning Your Cabinet......................................................................
When Not in Use .............................................................................
Moving Your CLEAVER Dry Ageing Cabinet......................................
.......................................................................................
Dry Ageing Tips.........................................................................................
What is dry ageing? .........................................................................
What cuts can you dry age?.............................................................
What is the ideal environment? ......................................................
How long should you dry age for?...................................................
.........................................
Technical Parameters................................................................................
CLEAVER Dry Ageing Cabinets is the registered trademark of

1. Important Safety Notes:
Warnings
designed.
We cannot be held responsible or liable for any spoilage or damage to meat or
of the CLEAVER Dry Ageing Cabinet.
Warranty applies to the CLEAVER Dry Ageing Cabinet only and not to the
contents of the CLEAVER Dry Ageing Cabinet.
To reduce the risk of re, electrical shock, failure or injury when using your
appliance, follow these basic precauons:
• Never allow children to operate, play with, or crawl inside the cabinet.
• If your cabinet stops working, please call our service department or
replace cord.
• Make sure that the plug is removed from outlet while cleaning, moving or
repairing.
• To avoid damage to door seal, please ensure the door is fully open when
pulling out the removable shelves.
• Place the cabinet close to power outlet.
• Never move the cabinet with food inside.
from being easily touched.
• Please dispose of old cabinets responsibly.

1. Important Safety Notes:
refrigerant circuit is not damaged.
• Avoid using sharp objects near compressor or condenser coils.
• Leaking refrigerant can ignite and may cause injury.
and using any device which creates a spark. Disconnect the appliance from
power outlet.
minutes.
out servicing or repairs to this appliance.
• Remove all of goods from CLEAVER Dry Ageing Cabinet;
• Keep Dry Ageing Cabinet clean and dry.
clear any residual odours.

5
2. Cabinet Dimensions

2. Cabinet Dimensions

7
to be fully integrated behind a joinery door.
page 5 and 6
built-in CLEAVER Dry Ageing Cabinet ensuring no less than the minimum
when looking from front of cabinet.
• This air vent or grid must not open on the same side as other appliances
such as ovens, or an area that is sealed and without access to fresh cool air.
3. Built-In Installation
• Remove the exterior and interior packing.
- Away from heat sources and direct sunlight
- Not too damp
your cabinet.
• Clean the interior surface with lukewarm water and gentle detergent and
• Remove any factory smells in the cabinet by spraying the internal services
4. Before Turning Your Cabinet On

a few seconds.
Important: If the unit is unplugged, power is lost, or turned o, wait 3 to 5
minutes before restarng the unit. The CLEAVER Dry Ageing Cabinet may not
start if you aempt to restart before this me delay.
The CLEAVER Dry Ageing Cabinets operate using a compressor and fans to
following types of noises.
coils.
of the refrigerant gas used in the chilling process.
5. Turning Your Cabinet On

6. Control Panel
Display actual temperature when at rest.
Display actual humidty when at rest.
Press once to change the temperature LED display to/from degrees Celsius to

7. Controlling Temperature
Important: By default, the LED displays the actual internal air temperature.
and any/all meat held within a stocked CLEAVER Dry Ageing Cabinet.
Best results are achieved with minimal or infrequent adjustments to the
While the thermostat will maintain the temperature inside the CLEAVER Dry
Ageing Cabinet within a +/- 2.5
and any meat inside is such that the actual temperature of any meat held in the
C.
Refer to image on page 9.

Important: By default, the LED displays the actual internal relave humidity.
Figures 1 and 2).
Figure 3).
Figure 4 and 5).
The cabinet will indicate low water reserve with a short beep accompanied by
8. Controlling Humidity
Refer to image on page 9.

9. Care and Maintenance
• Your cabinet should be cleaned regularly and maintained to prevent
possible corrosion and any build up of mould or bacteria.
shelves and rack.
water.
• Wring excess water out of the sponge or cloth when cleaning the
controls, or any electrical parts.
• Wash the outside cabinet with warm water and mild liquid detergent.
- Remove power lead from power point.
- Pull cabinet forward to access rear of the cabinet.
- Empty discharge tray using a cloth and bucket.
• If the appliance will not be used for several months,
thoroughly so as to reduce odours and mould. Prop the door slightly ajara all
of the cabinet before turning back on.
• Remove all items.
• Tighten adjustable leg up to the base to avoid damage.
• Lock door shut.
• Protect outside of appliance with a blanket, or similar item.

10. Troubleshooting
Cabinet does not operate. • Not plugged in.
• The appliance is turned o.
• The circuit breaker has been tripped or a
blown fuse.
• Electrical fault in cabinet circuit board.
Please call service department immediately.
Cabinet is not cold enough. • Check the temperature control seng.
• External environment may require a
higher seng.
• The door is opened too oen.
• The door is not closed completely.
• The door gasket does not seal properly.
• Turn unit o at the powerpoint for
20 minutes to reset. Turn on and set
temperature.
• Sensor or condensor failure. Please call
service immediately.
Turn on and o frequently. • The room temperature is hoer than
normal.
• A large amount of contents has been
added to the cabinet.
• The door is opened too oen.
• The door is not closed completely.
• The temperature control is not set
correctly.
• The door gasket does not seal properly.
Vibraons. • Check to assure that the cabinet is level.
The door will not close properly. • The cabinet is not level.
• The door was reversed and not properly
installed.
• The door seal is dirty.
• The shelves are out of posion.
Water leaking from humidier tank • Humidier tank is over lled. Empty
excess water via drainpipe
Excessive mould growth or scky surface on
meat.
• Humidity level is set too high.
• Excess humidity in cabinet. Empty water
from humidier tank.

11. Dry Ageing Tips
promote tenderness.
Eventually, the steak will begin to take on a pungent, cheese-like aroma as well.
The CLEAVER Dry Ageing Cabinets are designed to provide the ideal
The best meat for dry ageing beef and vension are large muscle or sub-primal
cuts on the bone like a strip loin, ribeye or sirloin. Bones and fat layers are the
best way to protect the meat from drying out too much.
The meat should be as freshly slaughtered as possible. Tell your butcher that
The three main areas of control required for dry ageing meat are temperature,
these for you.

11. Dry Ageing Tips
There is no exact age you should aim for. When it comes to dry ageing meat, the
changes to tenderness and taste.
tenderness.
You have aged your meat to your desired level, now what?
shell that forms during ageing, the cap of fat and the bone.
cooking process and will reduce your dining pleasure. Removing the bone is also
to a food safe level. Carefully remove any areas on the surface or internal air
pockets which have grown any mould.
When you sear a steak, the surface area comes into contact with high heat
sterile, and has never been exposed to bacteria.

12. Technical Parameters
Volume(L) 127L 388L
Height 820mm 1720mm
Width 595mm 595mm
Depth 574mm 714mm
Shelves (installed) 1 3
Hanging Bar (Hooks) 1 (3) 1 (3)
Temperature Range 1oC to 25oC 1oC to 25oC
Humidity Range 60% to 85% 60% to 85%
Rated Voltage
Rated Frequency
Net Weight 60kg 70kg
Gross Weight (Kg) 65kg 75kg
CLEAVER Salumi Cabinets is a Trademark of Canned Industries Pty Ltd
DRY AGEING CABINETS
CLEAVER
CLEAVER
CLEAVER
This manual suits for next models
3
Table of contents