CLF POSEIDON Wash XL User manual
POSEIDON Wash XL manual

Table of contents
Dimensions...........................................................................................................................................3
Safety Instruction .................................................................................................................................4
Fixture overview...................................................................................................................................6
Introduction .........................................................................................................................................7
AC POWER............................................................................................................................................7
Power voltage....................................................................................................................................7
Power cables .....................................................................................................................................8
Daisy-chain power to other devices...................................................................................................8
Data link ...............................................................................................................................................8
Tips for reliable data transmission.....................................................................................................8
Physical installation ..............................................................................................................................9
Fastening the fixture to a flat surface................................................................................................9
Outdoor IP-rated fixtures ................................................................................................................ 10
Condensation/moisture inside housing ...........................................................................................10
Fixtures temperature specification..................................................................................................10
Temporary usage............................................................................................................................. 10
Setup..................................................................................................................................................11
Control panel and menu navigation ................................................................................................11
DMX address setting........................................................................................................................11
Onboard control menus .....................................................................................................................12
DMX protocol 28ch.............................................................................................................................15
photometrics...................................................................................................................................... 32
circuit connection diagram.................................................................................................................33
Specif
i
cations .....................................................................................................................................34
Positioning..........................................................................................................................................36
Layout.................................................................................................................................................37
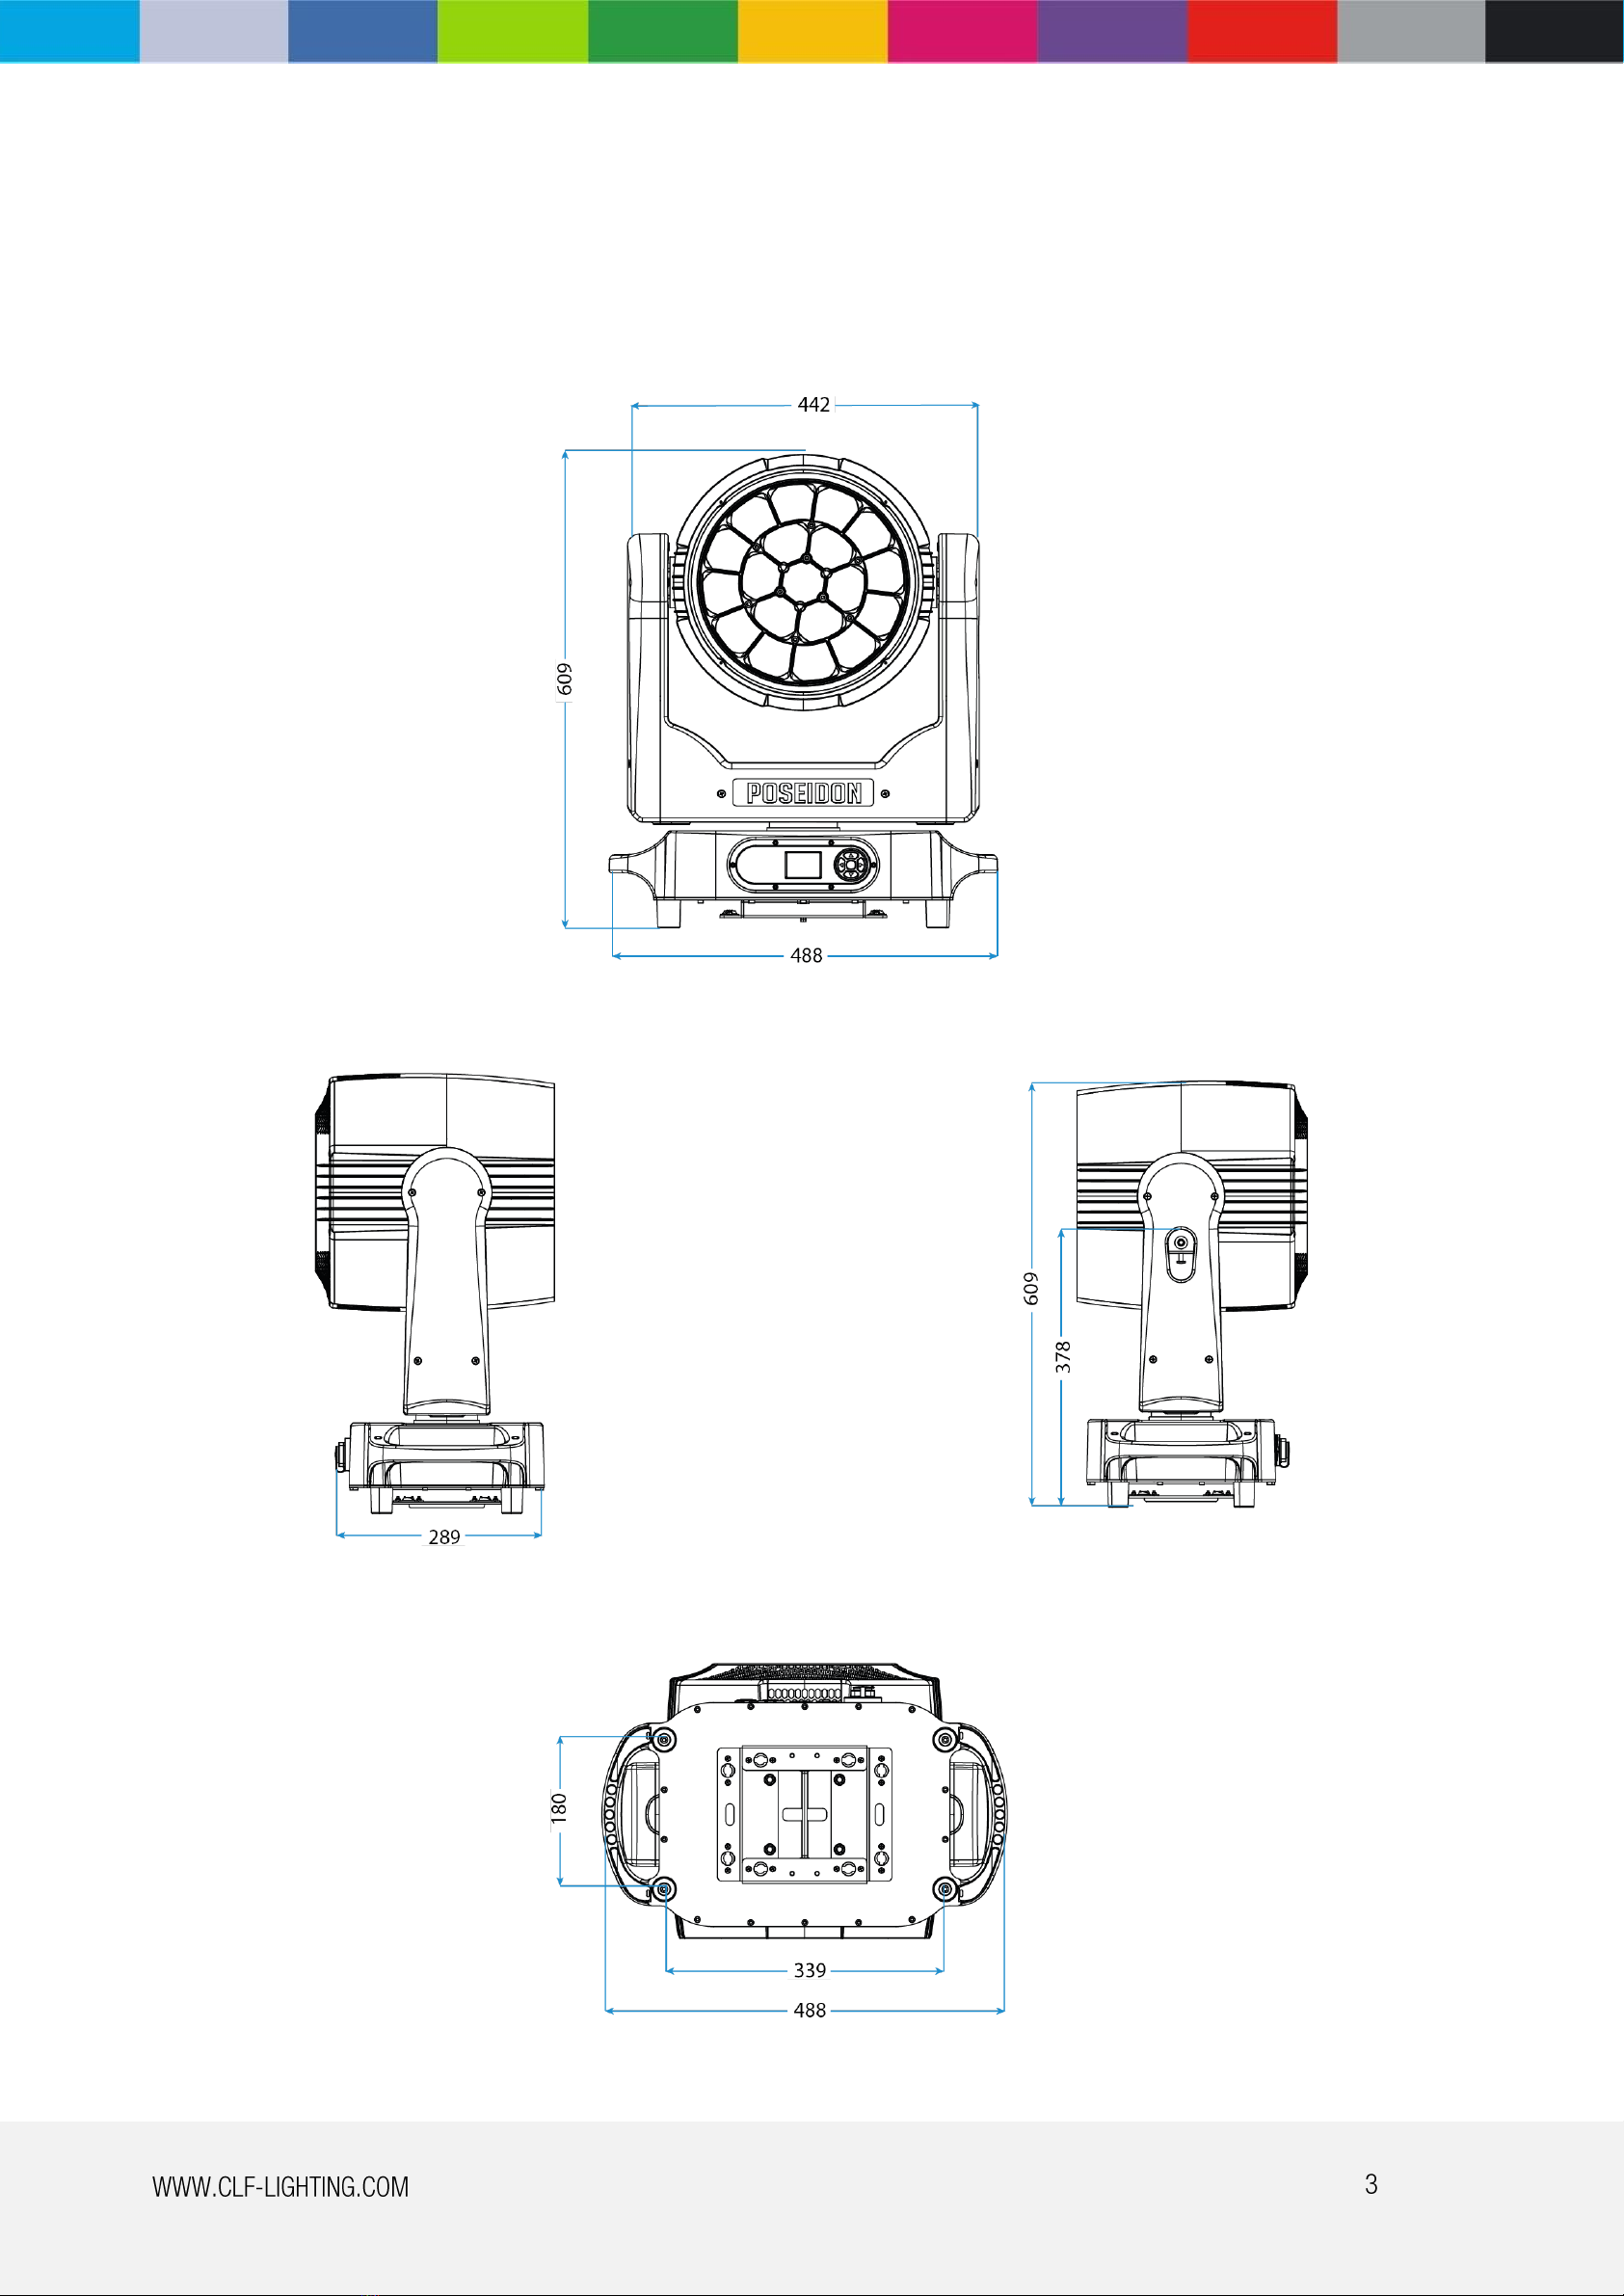
Dimensions
in millimeters
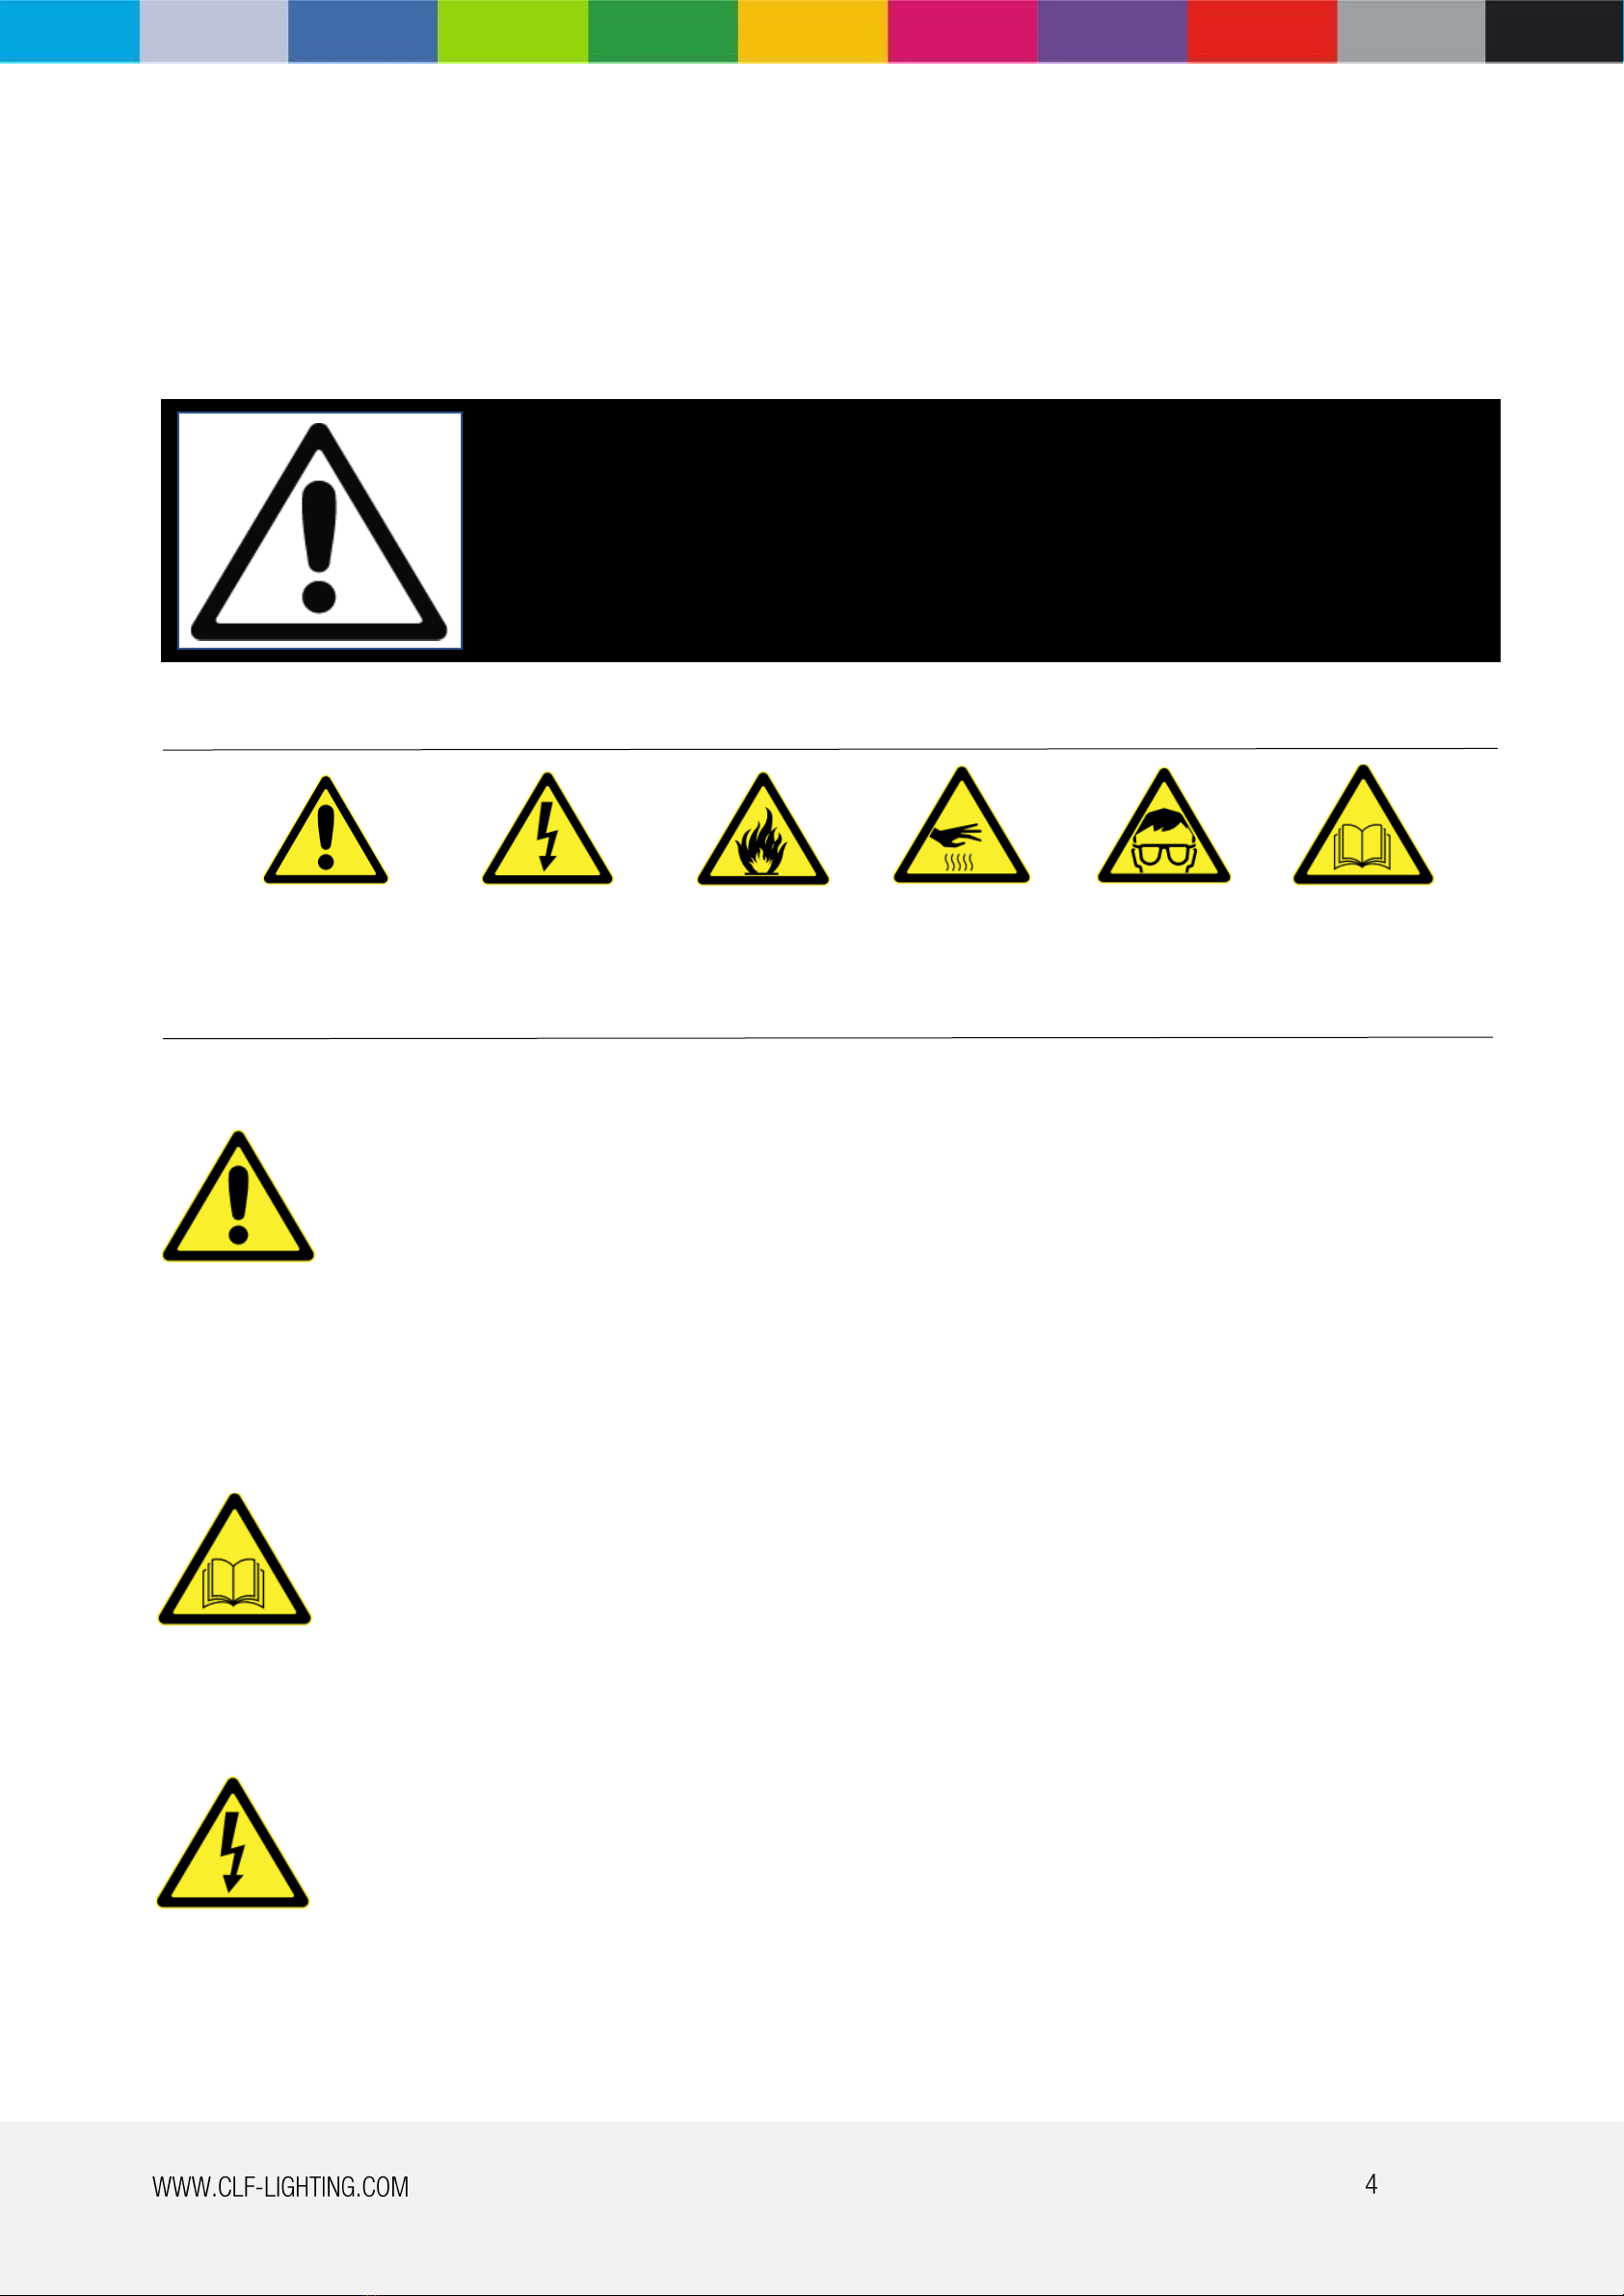
Safety Instruction
WARNING!
Read the safety precautions in this section
before installing, powering, operating or
servicing this product.
The following symbols are used to identify important safety information on the product and in this manual:
DANGER!
Safety hazard.
Risk of severe
injury or death.
DANGER!
Hazardous voltage. Risk
of lethal or severe
electric shock.
WARNING!
Fire hazard.
WARNING!
Burn hazard. Hot
surface. Do not
touch.
WARNING!
Wear
protective
eyewear.
WARNING!
Refer to user
manual.
This product is for professional use only. It is not for household use.
This product presents risks of severe injury or death due to fire and burn hazards, electric shock and falls.
Read this manual before installing, powering or servicing the fixture, follow the safety precautions listed below and
observe all warnings in this manual and printed on the fixture. If you have questions about how to operate the fixture
safely, please contact your supplier.
PROTECTION FROM ELECTRIC SHOCK
•Disconnect the fixture from AC power before removing or installing any cover or part.
•Always ground (earth) the fixture electrically.
•Use only a source of AC power that complies with local building and electrical codes and has both overload and
ground-fault (earth-fault) protection.
•Before using the fixture, check that all power distribution equipment and cables are in perfect condition and
rated for the current requirements of all connected devices.
•Power input and throughput cables must be rated 20A minimum, have three conductors 1.5 mm² (16 AWG)
minimum conductor size and an outer cable diameter of 5 - 15 mm. Cables must be hard usage type (SJT or
equivalent) and heat-resistant to 90°C minimum.
•Use only PowerCON TRUE 1 ®cable connectors to connect to power input sockets. Use only PowerCON TRUE1
®cable connectors to connect to power throughput sockets.
•Isolate the fixture from power immediately if the power plug or any seal, cover, cable, or other component is
damaged, defective, deformed, wet or showing signs of overheating. Do not reapply power until repairs have
been completed.
•Refer any service operation not described in this manual to a qualified technician.
•Socket outlets used to supply fixture fixtures with power or external power switches must be located near the
fixtures and easily accessible so that the fixtures can easily be disconnected from power.

•The exterior of the fixture becomes hot during use. Avoid contact by persons and materials.
Allow the fixture to cool for at least 5 minutes before handling.
•Keep all combustible materials (e.g. fabric, wood, paper) at least 1 metres away from the fixture.
•Keep flammable materials well away from the fixture.
•Ensure that there is free and unobstructed airflow around the fixture.
•Do not illuminate surfaces within 1 metres of the fixture.
•Do not attempt to bypass thermostatic switches or fuses.
•If you relay power from one fixture to another using power throughout sockets, do not connect
more than five fixtures in total to eachother in an interconnected chain.
•Connect only other fixtures to fixture power throughout sockets.
•Do not stick filters, masks or other materials onto any optical component.
•Do not modify the fixture in any way not described in this manual.
PROTECTION FROM BURNS AND FIRE
•Fasten the fixture securely to a fixed surface or structure when in use. The fixture is not portable
when installed.
•Ensure that any supporting structure and/or hardware used can hold at least 10 times the weight
of all the devices they support.
•Allow enough clearance around the head to ensure that it cannot collide with an object or another
fixture when it moves.
•Check that all external covers and rigging hardware are securely fastened.
•Block access below the work area and work from a stable platform whenever installing, servicing or
moving the fixture.
•Do not operate the fixture with missing or damaged covers, shields or any optical component.
PROTECTION FROM INJURY
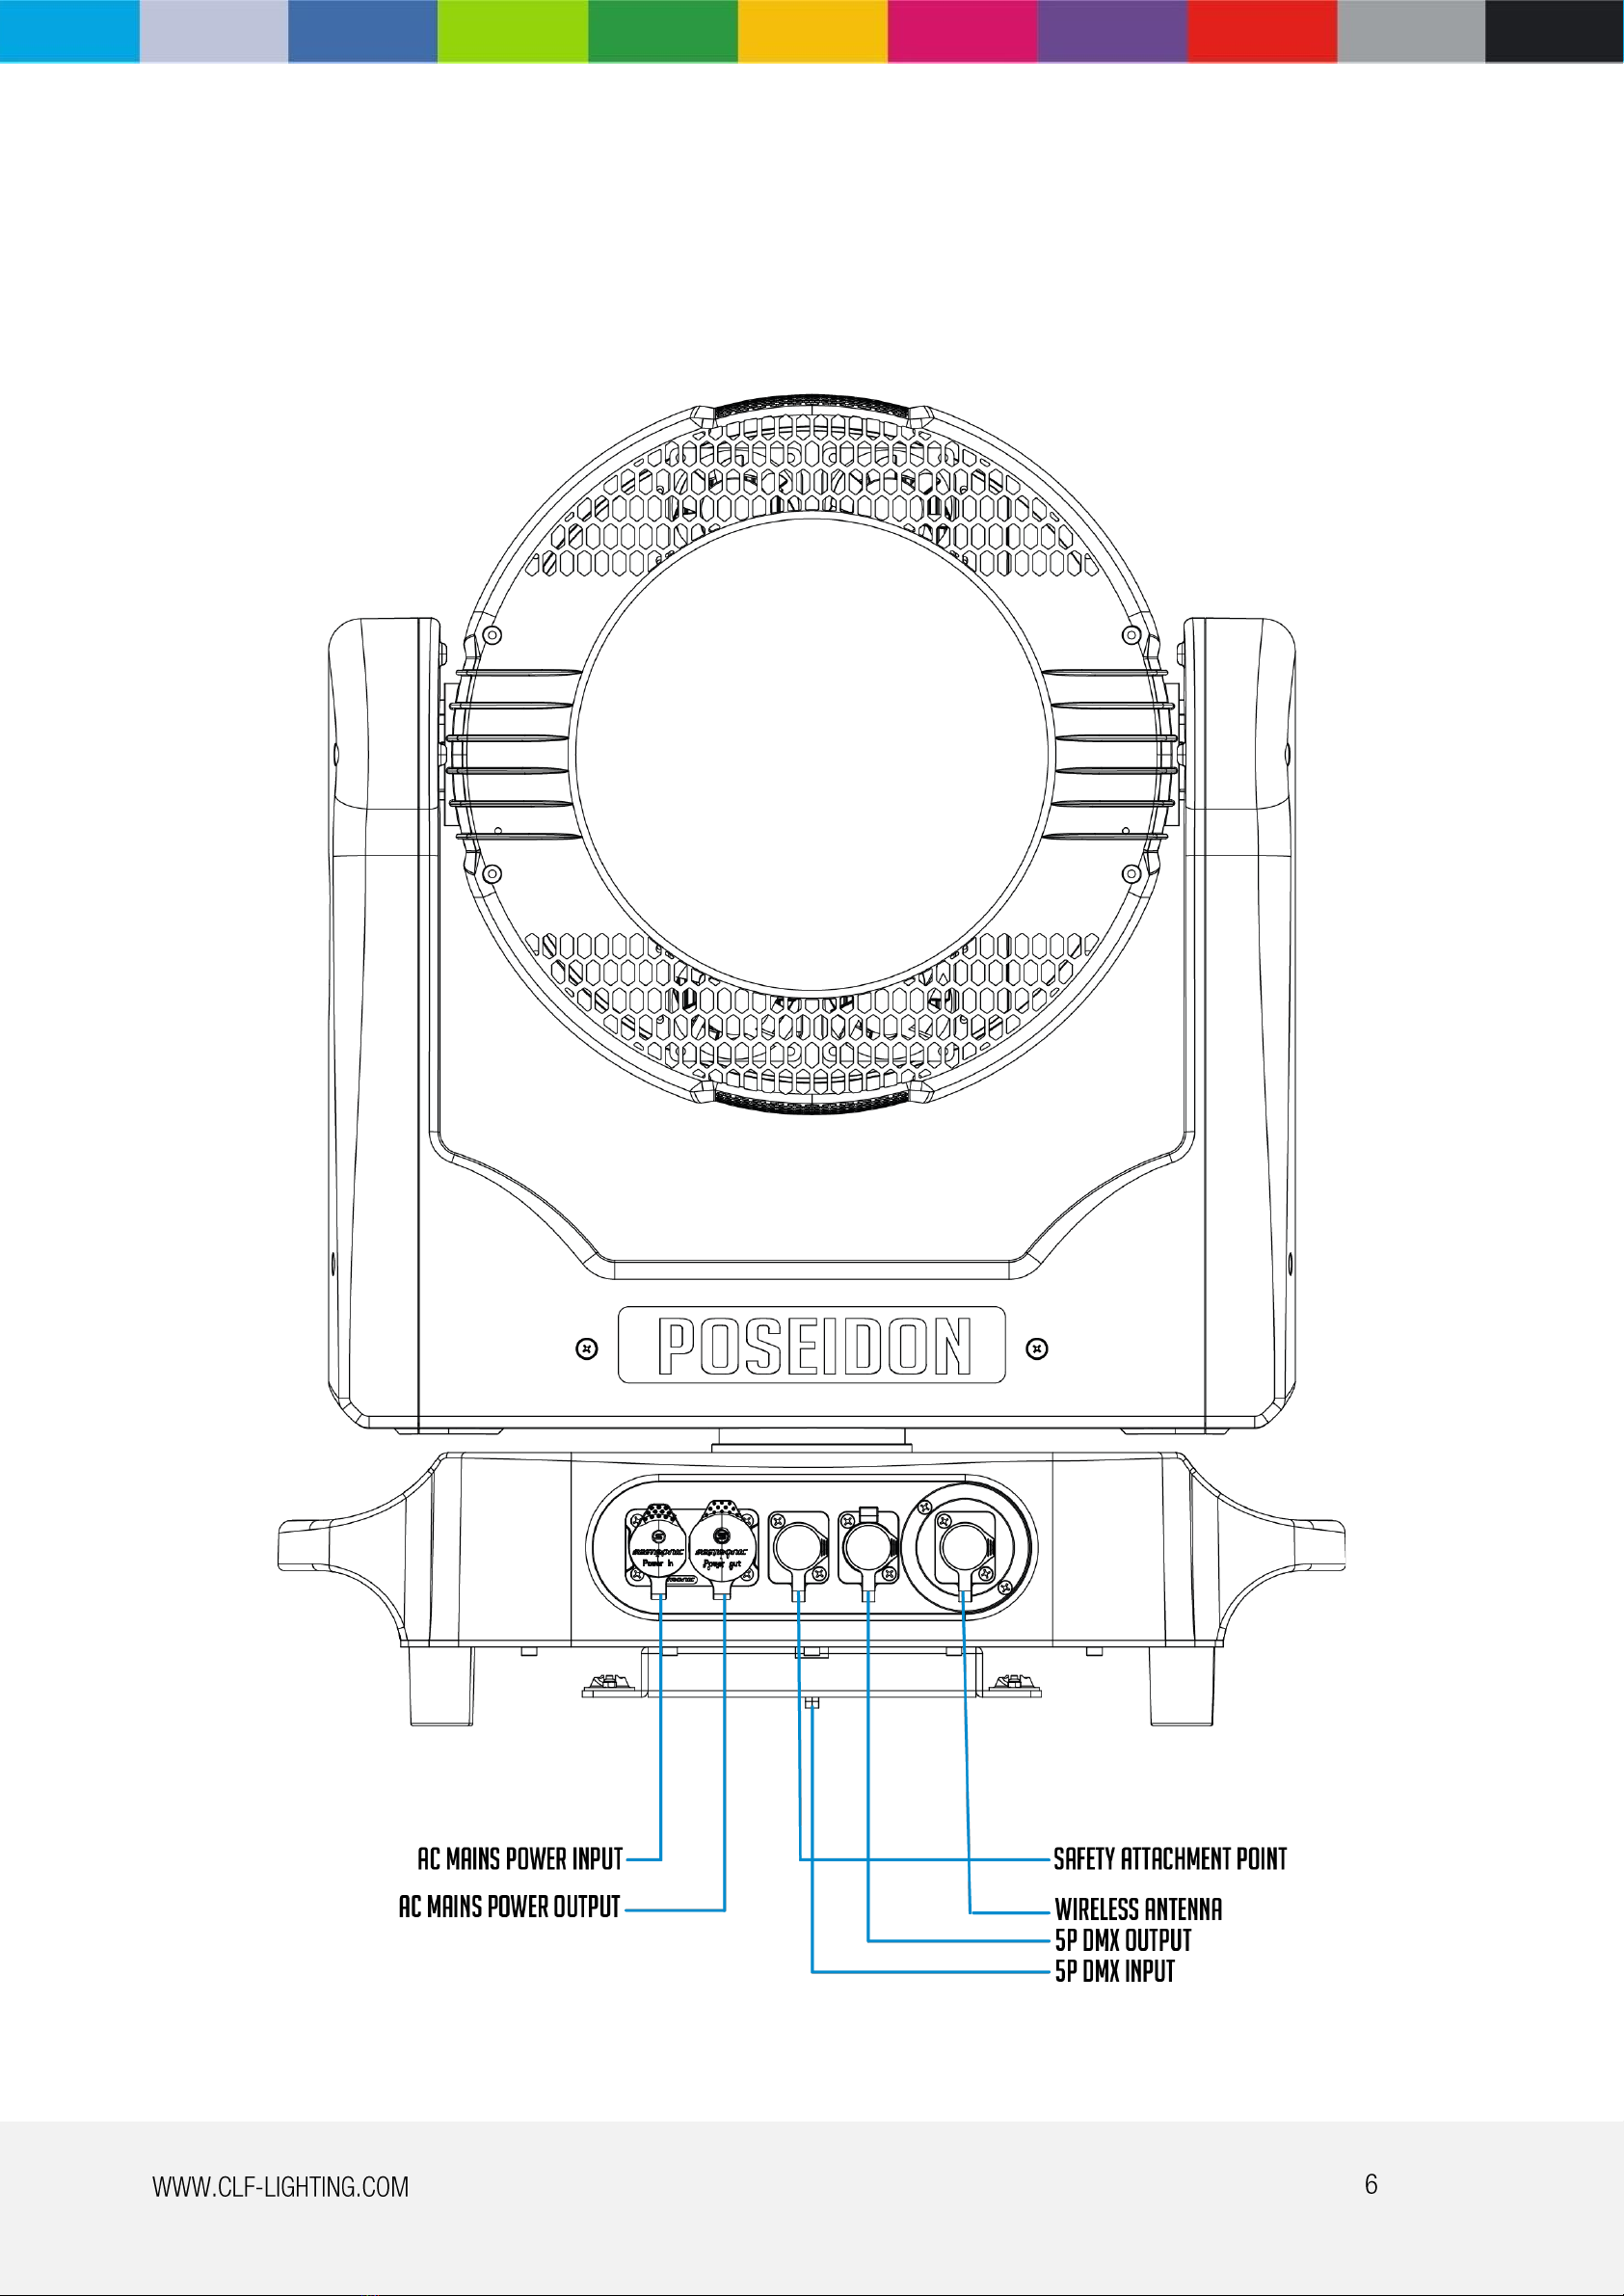
Fixture overview

Introduction
powerful outdoor Wash
Using for the first time
Warning! Read “Safety Information” before installing, powering, operating or servicing the fixture. Before applying
power to the fixture:
Check that the local AC mains power source is within the power voltage and frequency ranges of the fixture
See “Power cables and power plug”. Install a PowerCON TRUE1 ® power input connector power cable.
AC POWER
▪
▪
▪
▪
▪
Warning! Read “Safety Information” starting on before connecting the fixtures to AC mains power.
Warning! For protection from electric shock, the fixture must be grounded (earthed). The power distribution circuit must
be equipped with a fuse or circuit breaker and ground-fault (earth-fault) protection.
Warning! Socket outlets or external power switches used to supply the fixture with power must be located near the
fixture and easily accessible so that the fixtures can easily be disconnected from power.
Important! Do not insert or remove live PowerCON TRUE 1 ® connectors to apply or cut power, as this may cause arcing at
the terminals that will damage the connectors.
Important! Do not use an external dimming system to supply power to the fixture, as this may cause damage to the
fixture that is not covered by the product warranty.
The fixture can be hard wired to an electrical installation if you want to install it permanently, or a power plug that is suitable
for the local power outlets can be installed on the power cable.
Power voltage
Warning! Check that the voltage range specified on the fixture serial number label matches the local AC mains power voltage
before applying power to the fixture.
The fixtures accepts AC mains power at 100-240V nominal, 50/60 Hz. Do not apply AC mains power to the fixture at any
other voltage than specified.
Power cables
Power input and throughput cables must be rated 16A minimum, have three conductors 1.5 mm² (16 AWG) minimum
conductor size and an outer cable diameter of 5 - 15 mm. Cables must be hard usage type (SJT or equivalent) and heat-
resistant to 90°C minimum. In the EU the cable must be HAR approved or equivalent.
If you install a power plug on the power cable, install a grounding-type (earthed) plug that is rated 16A minimum. Follow
the plug manufacturer’s instructions. Table 1 shows standard wire color-coding schemes and some possible pin
identification schemes; if pins are not clearly identified.
Wire Color (EU models)
Wire Color (US models)
Conductor
Symbol
Brown
Black
Live
L
Blue
White
Neutral
N
Yellow/Green
Green
Ground (earth)
or
Daisy-chain power to other devices
Warning! Do not connect more than three fixtures in total in one interconnected chain. Power can be relayed to another
device via the PowerCON TRUE 1 ® throughput socket.
If you daisy-chain the fixtures in a chain so that they all draw AC mains power via the first fixture, certain points must be
respected:
A heavy duty, three-conductor, 16 AWG or 1.5 mm2 cable with SJT or equivalent cable jacket must be used to connect the first
fixture to AC mains power. PowerCON TRUE1 ® connectors must be used to draw
AC mains power from the fixtures power throughput socket and yellow PowerCON TRUE 1 ® connectors must be used to supply
power at the fixture’s power input sockets.
Data link
A DMX 512 data link is required in order to control a fixture via DMX. The fixture has 5-pin XLR connectors for DMX data
input and output. The pin-out on all connectors is pin 1 = shield, pin 2 = cold (-), and pin 3 = hot (+) Pins 4 and 5 in the 5-
pin XLR connectors are not in use.
Tips for reliable data transmission
To connect the fixture to data:
1. Connect the DMX data output from the controller to the 5-pin XLR connector of the nearest fixture.
2. Connect the DMX output of the first fixture to the DMX input of the next fixture and continue connecting fixtures.

Physical installation
Warning! The fixture must be either fastened to a flat surface such as a stage or wall, or clamped to a truss or
similar structure in any orientation using a rigging clamp.
Warning! Always attach an approved safety cable to one of the safety cable attachment points on the base.
Do not illuminate surfaces within 1 meters of the fixture. Ensure that flammable materials (wood, fabric, paper, etc.) are
minimum 1 meters from the fixture and allow a free airflow around the fixture.
Fastening the fixture to a flat surface
The fixture can be fastened to a fixed flat surface that is oriented at any angle. Check that the surface can
support at least 10 times the weight of all fixtures and equipment to be installed.
Warning! The supporting surface must be hard and flat or cooling may be blocked, which will cause overheating.
Fasten the fixture securely. Do not place it on unstable surfaces. Always attach a securely anchored safety cable to the
safety cable attachment point.
Block access under the construction area. Work from a stable platform, hang the fixture on a truss with the
arrow on the base towards the area to be illuminated. Tighten the rigging clamp.

Outdoor IP-rated fixtures
CLF products are applied to official classified IP norm levels. For this product the IP rate is IP65 when using the covers for
the chassis parts. IP65 means according classified norm: shielded against dust and pressurized water from any side.
Typical use for outdoor rated stage events with normal weather acceptance. So no heavy rain, because then the water
pressure over exceeds the IP norm.
Condensation/moisture inside housing
Because of high humidity levels during production condensation can occur inside the housing. This is mostly visible on
the coldest parts of the fixture, like the front glass or display. To prevent this problem we work with special conditioned
areas for outdoor fixtures. Because of the breathing air valves it is still possible to get humidity inside the fixture. This
will evaporate slowly. Do not put wet fixtures in a flightcase, this will help humidity enter the fixture.
Fixtures temperature specification
Make sure the fixture is used within its working temperature range. Outside this range we cannot guarantee correct
operation.
Temporary usage
Stage event equipment is designed for temporary outdoor use. Materials are not designed for long-term exposure to
heavy weather conditions. Rubber covers will be negatively affected by long-term UV exposure and should be checked
by qualified service technicians over time. Tightening screws too hard will negatively affect the IP-rating.

Setup
Warning! Read “Safety Information” before installing, powering, operating the fixture.
Control panel and menu navigation
The onboard control panel and backlit graphic display are used to adjust the DMX address, fixture settings (personality),
service utilities. See “Onboard control menus” for a complete list of menus and commands.
Using the control buttons:
•To enter the menu select [ENTER].
•Press [UP], [DOWN], [LEFT] AND [RIGHT] to scroll within a menu or adjust values.
•To enter a menu, select a function or apply a selection, press [ENTER].
•To escape a function or move back one level in the menu structure, press [LEFT].
DMX address setting
The DMX address is the first channel used to receive instructions from the controller. For independent control, each
fixture must be assigned to a separate channel. The DMX address can be configured by using the DMX ADDRESS menu in
the control panel.
•NO DMX: Display flashes and shows at ‘DMX: X‘.
•DMX: Display backlight turns off and shows ‘DMX: V‘.
•The fixture is fully RDM ready. For RDM functions please refer to the ANSI/ESTA E1.20-2006 standard.

Main Menu
Menu level 1
Menu level 2
Menu level 3
Menu level 4
DMX Settings
Address
DMX signal mode
Ethernet
Wire priority
Wireless/Ethernet
Control Protocol
IP address
Mask address
ArtNet Sub net Address
ArtNet Universe Address
sACN Universe
Return (ESC)
ArtNet
sACN
This menu is visible when optional
ArtNet module is inserted
Information
Total Time
Lamp hours
Service Information
Temperature
Logged Temperature
Fan Information
RDM UID/RDM
DMX Live
Power On:****(H)
LED On:****(H)
Total Hours:****(H)
Lamp open:****(H)
Power:**.*V
Heatsink-Fan1: ****%
Heatsink-Fan2: ****%
Heatsink-Fan3: ****%
Heatsink-Fan4: ****%
Heatsink-Fan1: ****R
Heatsink-Fan2: ****R
Heatsink-Fan3: ****R
Heatsink-Fan4: ****R
LED TEMP: **.*°C
LED Power: ***.*%
LED TEMP/:00.0
LED Temperature
Return (ESC)
LED Fan
***
1. Pan
2. Pan Fine
3. Tilt
4. Tilt Fine
5. Function
6. Zoom
7. Zoom ROTA
8. Dimmer
9. Dimmer Fine
10. Shutter
11. Macro
12. CCT
13. Sta Effect
14. MoveEffect
Cur TEMP: **.*
Max TEMP: **.*
Min TEMP: **.*
Power: **.*V
Heatsink-Fan1: ****%
Heatsink-Fan2: ****%
Heatsink-Fan3: ****%
Heatsink-Fan4: ****%
Heatsink-Fan1: ****R
Heatsink-Fan2: ****R
Heatsink-Fan3: ****R
Heatsink-Fan4: ****R
***
***
***
***
***
***
***
***
***
***
***
***
***
***
Onboard control menus

Information
DMX Live
System Version
15. EffectSP
16. LED Fade
17. Back Color
18. Back Dimmer
19. Red
20. Green
21. Blue
22. White
23. LED Ring Dimmer
24. LED ring RED
25. LED ring GREEN
26. LED ring BLUE
27. LED ring Effect Macro
28. LED ring Effect Speed
XY Board / : V*.**
LED Board / : V*.**
Zoom Board / : V*.**
DIS Board / : V*.**
***
***
***
***
***
***
***
***
***
***
***
***
***
***
Personal
Display Lock
Channel Mode
Wireless Options
Frequency
Fan Mode
Dimmer Speed
Dimmer Curve
OFF
ON
Mode-1/ (28CH)
Mode-2/ (47CH)
Mode-3/ (100CH)
Mode-4/ (41CH)
Wireless ON/OFF
Wireless Settings
Wireless Status
1800HZ
3600HZ
7200HZ
25000HZ
LED Normal Fan
LED Maximal Fan
LED Minimal Fan
LED Silent Fan
Normal Dimmer Speed
Smooth 1 Dimmer Speed
Smooth 2 Dimmer Speed
Smooth 3 Dimmer Speed
Linear
Square
I-Square
S Curve
Off
On
Idle
Unlink Transmitter
Wireless Off
Not found sender
No DMX receiving
Connected to sender
No DMX receiving
Connected to sender
DMX receiving
This menu is invisible and will only be
displayed when the wireless module
is inserted
P/T Invert
Pan Invert
Tilt Invert
Off
On
Off
On

Display
Pan/Tilt EMS
Backlight
Rotate
Backlight Blink
Off
On
Always On
Auto Off
Normal
Rotate 180°
On
Off
Manual Control
Service
Channel Control
Reset
Error Information
Factory
1. Pan
2. Pan Fine
3. Tilt
4. Tilt Fine
5. Function
6. Zoom
7. Zoom ROTA
8. Dimmer
9. Dimmer Fine
10. Shutter
11. Macro
12. CCT
13. Sta Effect
14. MoveEffect
15. EffectSP
16. LED Fade
17. Back Color
18. Back Dimmer
19. Red
20. Green
21. Blue
22. White
23. LED Ring Dimmer
24. LED ring RED
25. LED ring GREEN
26. LED ring BLUE
27. LED ring Effect Macro
28. LED ring Effect Speed
Reset All
Pan/Tilt Reset
Zoom Reset
Error List
Empty List
Load Default
Reset Timers
Clear Logged Temperature
Developer
Calibration
***
***
***
***
***
***
***
***
***
***
***
***
***
***
***
***
***
***
***
***
***
***
***
***
***
***
***
***
No
Yes
Test
Test P/T
Test Effect
Test All
STEP ***
STEP ***
STEP ***
Language
English
Rotate
Normal
Display
Rotate 180°

Channel
Function
Value
Function
Remark
1
Pan
0-225
Pan
2
Pan Fine
0-225
Pan Fine
3
Tilt
0-225
Tilt
4
Tilt Fine
0-10
Tilt Fine
5
Function
0-10
11-15
16-20
21-25
26-30
31-40
41-50
51-55
56-60
61-65
66-70
71-75
76-80
81-85
86-90
91-95
96-102
103-105
106-110
111-115
116-120
121-125
126-130
131-135
136-140
141-255
No Function
DMX Input
Wireless / ArtNet Input
W-DMX / ArtNet Reset
Zoom Reset
P / T Reset
Fixture Reset
LED NORMAL FAN
LED MAXIMAL FAN
LED MINIMAL FAN
LED SILENT FAN
RGBW Color Mixing Mode
CMY Colour Mixing Mode
DISPLAY ON
DISPLAY OFF
CALIBRATION FACTORY
CALIBRATION MANUAL
Enable Pixel Map
Disable Pixel Map
1800HZ
3600HZ
7200HZ
25000HZ
Beam mode on
Beam mode off
No Function
6
0-225
Zoom
7
0-100
101-127
128-190
191-192
193-255
Zoom Rotation
LENS ANGLE 0-60°
Shaking Lens from slow to fast
CW Rotation Speed fast to slow
Stop Rotation
CCW Rotation Speed slow to fast
Only in aisle 6 ZOOM <44 channel
is effect
8
0-225
Dimmer
9
0-225
Dimmer Fine
10
0-9
10-49
50-89
90-119
120-179
180-249
250-255
Shutter
Shutter Closed
Slow Closing, Fast Opening
Fast Closing, Slow Opening
Slow Closing, Slow Opening
Random Strobe
Synchronous Strobe
Shutter Open
slow-fast
slow-fast
slow-fast
slow-fast
slow-fast
11
0-4
5
6
7
8
9
10
11
12
13
14
15
16
17
18
19
20
21
22
23
24
25
26
Macro
No Function
LEE 002 Rose Pink
LEE 004 Medium Bastard Amber
LEE 007 Pale Yellow
LEE 008 Dark Salmon
LEE 009 Pale Amber Gold
LEE 010 Medium Yellow
LEE 013 Straw Tint
LEE 015 Deep Straw
LEE 017 Surprise Peach
LEE 020 Medium Amber
LEE 022 Dark Amber
LEE 025 Sunset Red
LEE 026 Bright Red
LEE 036 Medium Pink
LEE 048 Rose Purple
LEE 058 Lavender
LEE 063 Pale Blue
LEE 068 Sky Blue
LEE 071 Tokyo Blue
LEE 075 Evening Blue
LEE 088 Lime Green
LEE 089 Moss Green
DMX protocol 28ch

Channel
Function
Value
Function
Remark
11
27
28
29
30
31
32
33
34
35
36
37
38
39
40
41
42
43
44
45
46
47
48
49
50
51
52
53
54
55
56
57
58
59
60
61
62
63
64
65
66
67
68
69
70
71
72
73
LEE 090 Dark Yellow Green
LEE 101 Yellow
LEE 103 Straw
LEE 104 Deep Amber
LEE 105 Orange
LEE 106 Primary Red
LEE 107 Light Rose
LEE 108 English Rose
LEE 109 Light Salmon
LEE 110 Middle Rose
LEE 111 Dark Pink
LEE 113 Magenta
LEE 115 Peacock Blue
LEE 117 Steel Blue
LEE 118 Light Blue
LEE 119 Dark Blue
LEE 121 LEE Green
LEE 122 Fern Green
LEE 124 Dark Green
LEE 126 Mauve
LEE 127 Smokey Pink
LEE 128 Bright Pink
LEE 131 Marine Blue
LEE 132 Medium Blue
LEE 134 Golden Amber
LEE 135 Deep Golden Amber
LEE 137 Special Lavender
LEE 138 Pale Green
LEE 139 Primary Green
LEE 140 Summer Blue
LEE 141 Bright Blue
LEE 142 Pale Violet
LEE 143 Pale Navy Blue
LEE 144 No Colour Blue
LEE 147 Apricot
LEE 148 Bright Rose
LEE 151 Gold Tint
LEE 152 Pale Gold
LEE 153 Pale Salmon
LEE 154 Pale Rose
LEE 156 Chocolate
LEE 157 Pink
LEE 158 Deep Orange
LEE 161 Slate Blue
LEE 162 Bastard Amber
LEE 164 Flame Red
LEE 165 Daylight Blue
74
75
76
77
78
79
80
81
82
83
84
85
86
87
88
89
90
91
92
93
94
95
96
97
98
99
LEE 170 Deep Lavender
LEE 172 Lagoon Blue
LEE 174 Dark Steel Blue
LEE 176 Loving Amber
LEE 179 Chrome Orange
LEE 180 Dark Lavender
LEE 181 Congo Blue
LEE 183 Moonlight Blue
LEE 192 Flesh Pink
LEE 194 Surprise Pink
LEE 195 Zenith Blue
LEE 196 True Blue
LEE 197 Alice Blue
LEE 198 Palace Blue
LEE 199 Regal Blue
LEE 200 Double CTB
LEE 201 Full CTB
LEE 202 Half CTB
LEE 203 Quarter CTB
LEE 204 Full CTO
LEE 205 Half CTO
LEE 206 Quarter CTO
LEE 207 Full CTO + .3 ND
LEE 208 Full CTO + .6 ND
LEE 212 LCT Yellow (Y1)
LEE 213 White Flame Green

Channel
Function
Value
Function
Remark
11
100
101
102
103
104
105
106
107
108
109
110
111
112
113
114
115
116
117
118
119
120
121
122
123
124
125
126
127
128
129
130
131
132
133
134
135
136
137
138
139
140
141
142
143
144
145
146
147
148
149
150
151
152
153
154
155
156
157
158
159
160
161
162
163
164
165
166
167
168
169
170
171
172
LEE 219 LEE Fluorescent Green
LEE 230 Super Correction LCT Yellow
LEE 232 Super Correction W.F. Green
LEE 236 HMI (to Tungsten)
LEE 237 CID (to Tungsten)
LEE 238 CSI (to Tungsten)
LEE 241 LEE Fluorescent 5700 Kelvin
LEE 242 LEE Fluorescent 4300 Kelvin
LEE 243 LEE Fluorescent 3600 Kelvin
LEE 244 LEE Plus Green
LEE 245 Half Plus Green
LEE 247 LEE Minus Green
LEE 248 Half Minus Green
LEE 249 Quarter Minus Green
LEE 281 Three Quarter CTB
LEE 283 One and a Half CTB
LEE 285 Three Quarter CTO
LEE 286 One and a Half CTO
LEE 287 Double CTO
LEE 322 Soft Green
LEE 323 Jade
LEE 327 Forest Green
LEE 328 Follies Pink
LEE 332 Special Rose Pink
LEE 343 Special Medium Lavender
LEE 345 Fuchsia Pink
LEE 352 Glacier Blue
LEE 353 Lighter Blue
LEE 354 Special Steel Blue
LEE 363 Special Medium Blue
LEE 366 Cornflower
LEE 441 Full CT Straw
LEE 442 Half CT Straw
LEE 444 Eighth CT Straw
LEE 500 Double New Colour Blue
LEE 501 New Colour Blue (Robertson Blue)
LEE 502 Half New Colour Blue
LEE 504 Waterfront Green
LEE 505 Sally Green
LEE 506 Marlene
LEE 507 Madge
LEE 508 Midnight Maya
LEE 525 Argent Blue
LEE 550 ALD Gold
LEE 604 Full CT Eight Five
LEE 650 Industry Sodium
LEE 651 HI Sodium
LEE 652 Urban Sodium
LEE 700 Perfect Lavender
LEE 701 Provence
LEE 702 Special Pale Lavender
LEE 703 Cold Lavender
LEE 704 Lily
LEE 706 King Fals Lavender
LEE 708 Cool Lavender
LEE 709 Electric Lilac
LEE 710 Spir Special Blue
LEE 711 Cold Blue
LEE 712 Bedford Blue
LEE 714 Elysian Blue
LEE 715 Cabana Blue
LEE 716 Mikkel Blue
LEE 719 Colour Wash Blue
LEE 721 Berry Blue
LEE 722 Bray Blue
LEE 723 Virgin Blue
LEE 724 Ocean Blue
LEE 725 Old Steel Blue
LEE 727 QFD Blue
LEE 728 Steel Green
LEE 729 Scuba Blue
LEE 736 Twickenham Green
LEE 738 JAS Green

Channel
Function
Value
Function
Remark
11
173
174
175
176
177
178
179
180
181
182
183
184
185
186
187
188
189
190
191
192
193-255
LEE 742 Bram Brown
LEE 744 Dirty White
LEE 747 Easy White
LEE 748 Seedy Pink
LEE 763 Wheat
LEE 764 Sun Colour Straw
LEE 765 LEE Yellow
LEE 767 Oklahoma Yellow
LEE 768 Egg Yolk Yellow
LEE 770 Burnt Yellow
LEE 777 Rust
LEE 778 Millennium Gold
LEE 779 Bastard Pink
LEE 780 AS Golden Amber
LEE 781 Terry Red
LEE 790 Moroccan Pink
LEE 793 Vanity Fair
LEE 794 Pretty ‘n Pink
LEE 795 Magical Magenta
LEE 799 Special KH Lavender
Color Effect
12
0-225
CCT
13
0-142
Static LED Effect
14
0-225
Move LED Effect
15
0-225
Move LED Effect Speed
16
0-225
LED Effect Delay
17
0-225
Background Color
18
0-225
Background Dimmer
19
0-225
Red
20
0-225
Green
21
0-225
Blue
22
0-225
White
23
0-225
LED ring Dimmer
24
0-225
LED ring RED
25
0-225
LED ring GREEN
26
0-225
LED ring BLUE
27
0-9
10-19
20-39
40-255
LED ring Effect Macro
Shutter closed
Shutter open
Strobe, slow to fast
Effect Macro
28
0-255
LED ring Effect Speed

Channel
Function
Value
Function
Remark
1
Pan
0-225
Pan
2
Pan Fine
0-225
Pan Fine
3
Tilt
0-225
Tilt
4
Tilt Fine
0-10
Tilt Fine
5
Function
0-10
11-15
16-20
21-25
26-30
31-40
41-50
51-55
56-60
61-65
66-70
71-75
76-80
81-85
86-90
91-95
96-102
103-105
106-110
111-115
116-120
121-125
126-130
131-135
136-140
141-255
No Function
DMX Input
Wireless / ArtNet Input
W-DMX / ArtNet Reset
Zoom Reset
P/T Reset
Fixture Reset
LED NORMAL FAN
LED MAXIMAL FAN
LED MINIMAL FAN
LED SILENT FAN
RGBW Color Mixing Mode
CMY Colour Mixing Mode
DISPLAY ON
DISPLAY OFF
CALIBRATION FACTORY
CALIBRATION MANUAL
Enable Pixel Map
Disable Pixel Map
1800HZ
3600HZ
7200HZ
25000HZ
Beam mode on
Beam mode off
No Function
6
0-225
Zoom
7
0-100
101-127
128-190
191-192
193-255
Zoom Rotation
LENS ANGLE 0-60°
Shaking Lens from slow to fast
CW Rotation Speed fast to slow
Stop Rotation
CCW Rotation Speed slow to fast
Only in aisle 6 ZOOM <44 channel
is effect
8
0-225
Dimmer
9
0-225
Dimmer Fine
10
0-9
10-49
50-89
90-119
120-179
180-249
250-255
Shutter
Shutter Closed
Slow Closing, Fast Opening
Fast Closing, Slow Opening
Slow Closing, Slow Opening
Random Strobe
Synchronous Strobe
Shutter OPEN
slow-fast
slow-fast
slow-fast
slow-fast
slow-fast
11
0-4
5
6
7
8
9
10
11
12
13
14
15
16
17
18
19
20
21
22
23
24
25
Macro
No Function
LEE 002 Rose Pink
LEE 004 Medium Bastard Amber
LEE 007 Pale Yellow
LEE 008 Dark Salmon
LEE 009 Pale Amber Gold
LEE 010 Medium Yellow
LEE 013 Straw Tint
LEE 015 Deep Straw
LEE 017 Surprise Peach
LEE 020 Medium Amber
LEE 022 Dark Amber
LEE 025 Sunset Red
LEE 026 Bright Red
LEE 036 Medium Pink
LEE 048 Rose Purple
LEE 058 Lavender
LEE 063 Pale Blue
LEE 068 Sky Blue
LEE 071 Tokyo Blue
LEE 075 Evening Blue
LEE 088 Lime Green
DMX protocol 47ch

Channel
Function
Value
Function
Remark
11
26
27
28
29
30
31
32
33
34
35
36
37
38
39
40
41
42
43
44
45
46
47
48
49
50
51
52
53
54
55
56
57
58
59
60
61
62
63
64
65
66
67
68
69
70
71
72
73
LEE 089 Moss Green
LEE 090 Dark Yellow Green
LEE 101 Yellow
LEE 103 Straw
LEE 104 Deep Amber
LEE 105 Orange
LEE 106 Primary Red
LEE 107 Light Rose
LEE 108 English Rose
LEE 109 Light Salmon
LEE 110 Middle Rose
LEE 111 Dark Pink
LEE 113 Magenta
LEE 115 Peacock Blue
LEE 117 Steel Blue
LEE 118 Light Blue
LEE 119 Dark Blue
LEE 121 LEE Green
LEE 122 Fern Green
LEE 124 Dark Green
LEE 126 Mauve
LEE 127 Smokey Pink
LEE 128 Bright Pink
LEE 131 Marine Blue
LEE 132 Medium Blue
LEE 134 Golden Amber
LEE 135 Deep Golden Amber
LEE 137 Special Lavender
LEE 138 Pale Green
LEE 139 Primary Green
LEE 140 Summer Blue
LEE 141 Bright Blue
LEE 142 Pale Violet
LEE 143 Pale Navy Blue
LEE 144 No Colour Blue
LEE 147 Apricot
LEE 148 Bright Rose
LEE 151 Gold Tint
LEE 152 Pale Gold
LEE 153 Pale Salmon
LEE 154 Pale Rose
LEE 156 Chocolate
LEE 157 Pink
LEE 158 Deep Orange
LEE 161 Slate Blue
LEE 162 Bastard Amber
LEE 164 Flame Red
LEE 165 Daylight Blue
74
75
76
77
78
79
80
81
82
83
84
85
86
87
88
89
90
91
92
93
94
95
96
97
98
LEE 170 Deep Lavender
LEE 172 Lagoon Blue
LEE 174 Dark Steel Blue
LEE 176 Loving Amber
LEE 179 Chrome Orange
LEE 180 Dark Lavender
LEE 181 Congo Blue
LEE 183 Moonlight Blue
LEE 192 Flesh Pink
LEE 194 Surprise Pink
LEE 195 Zenith Blue
LEE 196 True Blue
LEE 197 Alice Blue
LEE 198 Palace Blue
LEE 199 Regal Blue
LEE 200 Double CTB
LEE 201 Full CTB
LEE 202 Half CTB
LEE 203 Quarter CTB
LEE 204 Full CTO
LEE 205 Half CTO
LEE 206 Quarter CTO
LEE 207 Full CTO + .3 ND
LEE 208 Full CTO + .6 ND
LEE 212 LCT Yellow (Y1)
Table of contents
Other CLF Dj Equipment manuals


Popular Dj Equipment manuals by other brands

S-Lighting
S-Lighting S-PROFILE user manual

Martin
Martin THRILL Multi-FX LED Safety and installation guide

Traxon
Traxon Washer Allegro AC XB DW installation guide

Winlite
Winlite COB200W 2in1 WW+CW led Par Light user manual

Flash
Flash F7000579c user manual

Pioneer
Pioneer SEP C1 - Software Entertainment Controller operating instructions

Chauvet Professional
Chauvet Professional COLORdash Par-Quad 18 Quick reference guide

Chauvet Professional
Chauvet Professional COLORdash Par-H7XIP user manual

Pioneer
Pioneer EFX-500 operating instructions

Oppray
Oppray ML-W0194A user manual

Blizzard Lighting
Blizzard Lighting ToughSTICK RGBAW user manual

Acclaim Lighting
Acclaim Lighting Dyna Graze HO Exterior DMX user guide


