Page 4
127(
BEFOREEXERCISINGONTHEVERSACLIMBER, READ THIS
OPERATION MANUAL THOROUGHLY. INSTRUCT OTHERS
HOW TO USE THE MACHINE IN ACCORDANCE
WITH THE PROCEDURES OUTLINED IN THIS MANUAL.
ADDITIONAL MANUALS ARE AVAILABLE UPON
REQUEST FROM HEART RATE, INC.
BEFORE BEGINNING THIS OR ANY OTHER EXERCISE
PROGRAM, CONSULT YOUR PHYSICIAN. THIS IS
ESPECIALLY IMPORTANT FOR THOSE INDIVIDUALS
OVER THE AGE OF 30 AND THOSE WHO HAVE
KNOWN HEALTH PROBLEMS. HRI ASSUMES NO
RESPONSIBILITY FOR PERSONAL INJURY OR PROPERTY
DAMAGE SUSTAINED BY OR THROUGH THEUSE OFTHE
VERSACLIMBER.
*(1(5$/,1752'8&7,21
7KH9HUVD&OLPEHU LQWURGXFHG LQ ZDV WKH
ILUVW FOLPELQJ H[HUFLVH PDFKLQH RQ WKH PDUNHW
DQGWRWKLVGD\UHPDLQVWKHOHDGHUDVDWUXHWRWDO
ERG\ FRQGLWLRQLQJ XQLW 7KLV IXOO ERG\ FOLPELQJ
H[HUFLVH PDFKLQH SURYLGHV DQ DOWHUQDWLQJ DUP
DQGOHJDFWLRQDJDLQVWJUDYLW\ZLWKYDULDEOHIRUFH
VWURNHOHQJWKDQGVSHHG$OOWKHPDMRUPXVFOHV
RIWKHDUPVFKHVWVKRXOGHUVEDFNKLSVEXWW
DQG
OHJV DUH XVHG ZKLOH FOLPELQJ7KH9HUVD&OLPEHU
KDV EHHQ SURYHQ ZRUOGZLGH DQG LV D ZLGHO\
DFFHSWHG WRWDO ERG\ H[HUFLVHU WKDW LV XVHG E\
KHDOWK FOXEV VSRUWV PHGLFLQH IDFLOLWLHV PLOLWDU\
ILUH GHSDUWPHQWV FRUSRUDWH J\PV DQG ZKHUHYHU
JURXSVRISHRSOHJDWKHUWRH[HUFLVH
7R FOLPEWKH SHUVRQVWDQGV LQD YHUWLFDOO\ HUHFW
SRVLWLRQ ZLWK ERWK IHHW OHYHO RQ SHGDOV ZKLOH
JUDVSLQJ WZR KDQGJULSV VHW DW DERXW VKRXOGHU
KHLJKW7RLQLWLDWHFOLPELQJPRWLRQVWHSGRZQRQ
RQHIRRWSHGDOZKLOHSXVKLQJXSRQWKHKDQGJULS
:KHQWKHIRRWDQGKDQGPRYHYHUWLFDOO\GRZQZDUG
WKH RWKHU IRRW DQG KDQG PRYH YHUWLFDOO\ XSZDUG
DQGWKHQDOWHUQDWHV\QFKURQRXVO\$F\FOLFDFWLRQ
RIWKHDUPVDQGOHJVLVSHUIRUPHGWKDWVLPXODWHV
PRWLRQ RI FOLPELQJ DQ HQGOHVV ODGGHU IRU DQ\
VHOHFWHG VWHS KHLJKW WLPH UDWH DQG GLVWDQFH $
PL F U R FRPSXWHU P RQ L W R UV DQ G G L VS OD\VFOLPELQJ
SHUIRUPDQFH KHDUWUDWHFDORULHVGLVWDQFHWLPH
DQGJLYHVDXGLEOHLQVWUXFWLRQVDQGPRWLYDWLRQDO
PHVVDJHV GXULQJWKHH[HUFLVH7KHPDFKLQHLV
RULHQWHGDWDGHJUHHFOLPEDQJOH
127(
'RQ¶W&OLPE7RR)DVW%HJLQQHUV
6KRXOG7DNHDLQFK6WHS$WD*HQWOH3DFH
)LUVWWLPHXVHUVRIWKH9HUVD&OLPEHUKDYHDWHQGHQF\
WRFOLPEWRRIDVWDQGWRWDNHWRRORQJDVWHS8QWLO
XVHUV EHFRPH WKRURXJKO\ IDPLOLDU ZLWK WKH
9HUVD&OLPEHULW LV LPSRUWDQWWR WDNHVKRUW VORZ
VWHSV 7R PDLQWDLQ D VKRFN DQG WUDXPD IUHH
PRWLRQ LW LV PDQGDWRU\ QRW WR ³ERWWRP RXW´ RU
LPSDFWWKHSHGDOVDWWKHHQGRIHDFKVWURNH
6(/(&7,1*(;(5&,6(7,0(
,I\RXDUHQRWDOUHDG\ZDUPHGXSDZDUPXSSHULRG
RIDWOHDVWWRPLQXWHVVKRXOGEHLQFOXGHGLQ
HDFK9HUVD&OLPEHUZRUNRXW7DNLQJDVKRUWVWHS
DW D VORZ FOLPELQJ VSHHG GXULQJ WKH ZDUP XS
SHULRGLVWKHNH\WRDJUHDWZRUNRXW7KHILUVWWLPH
XVHU FDQ HDVLO\ FOLPE IRU WR PLQXWHV E\
LQFOXGLQJDVORZPLQXWHZDUPXSDQGDWR
PLQXWHFRROGRZQSHULRG:LWKUHSHWLWLYHXVHLWLV
SRVVLEOH WR EXLOG XS WR ORQJHU FOLPEV DW KLJKHU
VSHHGV
0DQ\ LQGLYLGXDOV HQMR\ PLQXWHV RU PRUH RI
XQLQWHUUXSWHGFOLPELQJ$IWHUHDFKZRUNRXWQRWH
H[HUFLVHWLPHFOLPELQJVSHHGDQGKHLJKWFOLPEHG
IRU HVWDEOLVKLQJ D JRDO IRU IXWXUH VHVVLRQV 8VH
KHDUWUDWHDQGSHUFHLYHGH[HUWLRQWRGHWHUPLQHLI
\RX DUH DW D FRPIRUWDEOH H[HUFLVH OHYHO
5HPHPEHU WKDW ZRUN LQWHQVLW\ DQG FDORULH EXUQ
UDWHLVEDVHGRQFOLPELQJVSHHG,IWKHH[HUFLVHLV
WRRKDUGVORZGRZQ
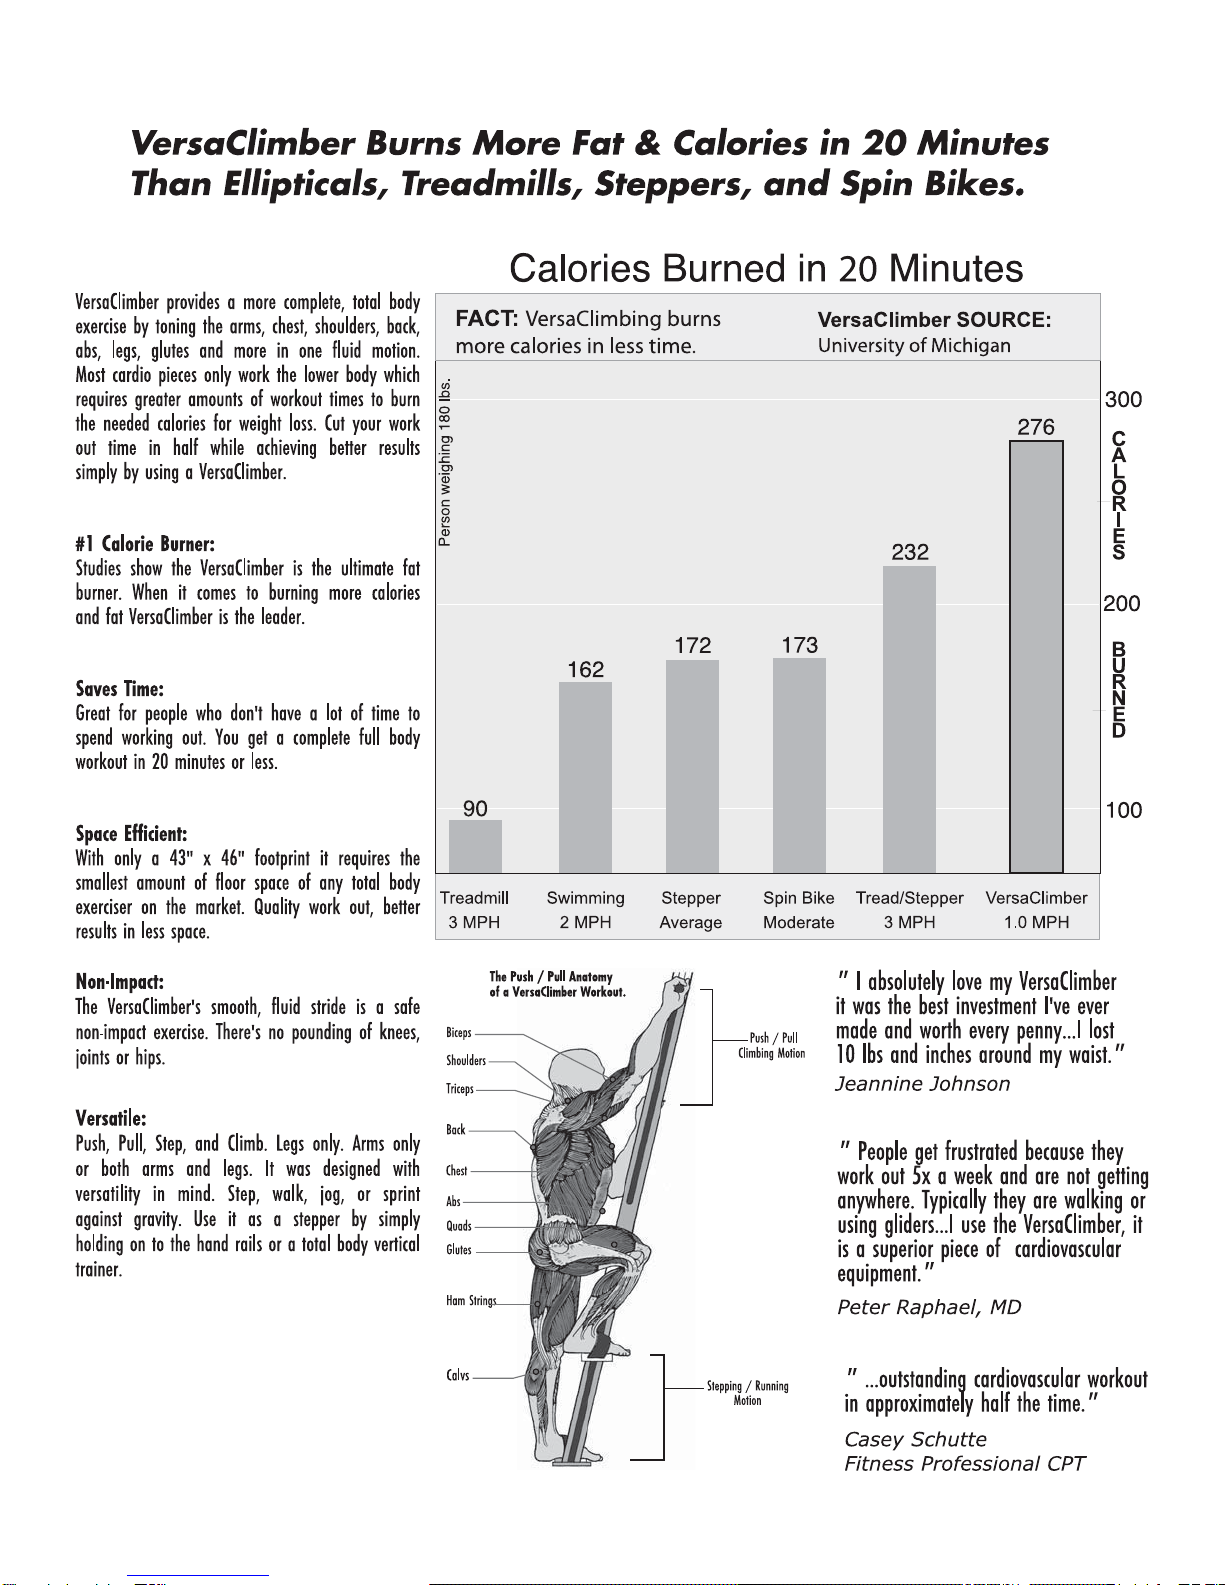
&$/25,(%8515$7(
)XOO ERG\ FOLPELQJ UDQNV KLJKHVW LQ FDORULHV
EXUQHG HYHQ WKRXJK FOLPELQJ VSHHG LV VORZHU
WKDQRWKHUDFWLYLWLHV)LUVWWLPHXVHUVRIWHQWU\WR
PDLQWDLQ WKH VSHHG WKH\ XVH LQ RWKHU DFWLYLWLHV
DQGWHQGWRRYHUH[HUWWKHPVHOYHV,WLVLPSRUWDQW
WR UHPHPEHU WKDW EHFDXVH 9HUVD&OLPELQJ LV D
WRWDO ERG\ FOLPE DJDLQVW JUDYLW\ LW LV QRW
QHFHVVDU\ WRFOLPE DW D KLJK UDWH RI VSHHG
GHPRQVWUDWHGDVIROORZV