CO/Tech M1B-YH10-82X3-UK User manual

Important!
Read the entire instruction manual carefully
and make sure that you fully understand
it before you use the equipment. Keep the
manual for future reference.
Viktig information:
Läs hela bruksanvisningen noggrant och
försäkra dig om att du har förstått den
innan du använder utrustningen. Spara
bruksanvisningen för framtida bruk.
Viktig informasjon:
Les disse anvisningene nøye og forsikre deg om
at du forstår dem, før du tar produktet i bruk.
Ta vare på anvisningene for seinere bruk.
Tärkeää tietoa:
Lue nämä ohjeet huolellisesti ja varmista
että olet ymmärtänyt ne, ennen kuin alat
käyttää laitetta. Säilytä ohjeet myöhempää
tarvetta varten.
Wichtiger Hinweis:
Vor Inbetriebnahme die komplette
Bedienungsanleitung durchlesen und
aufbewahren.
ENGLISHSVENSKANORSKSUOMIDEUTSCH
Ver. 20141006
Original instructions
Bruksanvisning i original
Original bruksanvisning
Alkuperäinen käyttöohje
Original Bedienungsanleitung
Art.no Model
18-3086 M1B-YH10-82X3-UK
30-9984 M1B-YH10-82X3
Elhyvel
Elektrisk høvel
Sähköhöylä
Elektrohobel
Power Planer


3
ENGLISH
Power Planer
Art.no 18-3086 Model M1B-YH10-82X3-UK
30-9984 M1B-YH10-82X3
Please read theentire instruction manual before use and save it for future reference.
Wereserve theright for any errors in text or images and for making any necessary
technical changes to this document. Ifyou should have any questions concerning
technical problems please contact our Customer Services.
Table of Contents
Description 4
Safety 5
Operating Instructions 8
Changing Blades 11
Changing the Drive Belt 12
Troubleshooting Guide 13
Specifications 13

4
ENGLISH
2 3 4 5 6 7
1
8
9
10
11
12
13 14
15
16
17
Description
1. Sawdust bag
2. Parallel guide bracket wingscrew
3. Parallelguide
4. Parallel guide bracket
5. Parallel guide adjustment wingscrew
6. Drive beltcover
7. Holder for blade changing tools
8. Power switch
9. Safety lock button
10. Handle
11. Airvent
12. Dustport
13. Rebating depth adjustmentscrew
14. Rebating depthguide
15. Front soleplate
16. Cutting depthscale
17. Cutting depth adjuster

5
ENGLISH
Safety
Warning: Whenusing this tool all basic safety precautions must be followed to
avoid therisk of fire, electrocution and personal injury. Theentire instruction
manual should be read before thetool isused.
General Safety Instructions for Hand-Held Electric Tools
Warning! Readall theinstructions. Failure to adhere to thefollowing instructions may
lead to electric shocks, fires and/or serious injury. Theterm “electrical hand tools” in
thewarning text below refers to your mains operated or battery operated handtool.
SAVETHEINSTRUCTIONS.
1) The work space
a) Keep thework space clean and well illuminated. Cluttered and poorly lit areas
invite accidents.
b) Do not use electrical hand tools in explosive environments,i.e. nearby
flammable liquids, gas ordust. Electrical hand tools generate sparks that could
easily ignite dust orfumes.
c) Keep away from children and other spectators while using theelectrical
handtool. Distractions can make you lose your concentration and control.
2) Electrical safety
a) Theelectrical hand tool’s plug must fit correctly in thewall socket.
Nevermodify theplug in anyway. Neveruse anadaptor together with
earthed electrical handtools. Unmodified plugs and suitable wall sockets
decrease therisk of electricshock.
b) Avoid body contact with earthed objects, such as pipes, radiators, ovens or
refrigerators. Thereis anincreased risk of electrical shock if your body is earthed.
c) Do not expose theelectrical hand tool to rain or other wet conditions.
Ifwater gets inside anelectrical hand tool it increases therisk of electricalshock.
d) Do not misuse thelead. Neveruse thelead to carry, drag or pull theplug
out of thewall socket. Keepthelead away from heat, oil, sharp edges and
movableparts. Damaged or tangled leads increase therisk of electricalshock.
e) When you use anelectrical hand tool outdoors; use anextension cord
suitable for this purpose. Useof anextension cord for outdoor use decreases
therisk of electricalshock.
3) Personal safety
a) Pay attention to what you do and use common sense when using electrical
handtools. Neveruse anelectrical hand tool if you are tired or under
theinfluence of drugs, alcohol or medication. Onemoment of not paying
attention while using anelectrical hand tool may result in serious injury.

6
ENGLISH
b) Use protective equipment. Always use safety glasses. Usingprotective
equipment such as aface mask, slip resistant protective shoes, ahelmet and
ear defenders when needed decreases therisk of injury.
c) Avoid unexpected starts. Makesure that theswitch is set to OFF before
you connect thedevice to thewall socket. Nevercarry anelectrical hand tool
with one finger on thetrigger or never connect thehand tool to awall socket
when theswitch is set to ON, since it may result in injury.
d) Remove all service tools/keys before switching on thehandtool. Aforgotten
service tool on arotating part of theelectrical hand tool may result in injury.
e) Do not overreach. Makesure you stand steady and well balanced at
alltimes. Thisgives better control in unexpected situations.
f) Wear suitable clothing. Donot wear loose fitting clothes or jewellery.
Keephair, clothes and gloves away from movingparts. Loosefitting clothes,
jewellery or long hair could get caught in movingparts.
g) If theequipment for suctioning or collecting dust is available make sure it
is connected and used properly. Usingtechnical aids may reduce dust related
hazards.
4) Use and maintenance of the electrical hand tool
a) Do not overload thehandtool. Useahand tool suitable for thework you
are to perform. Atthecorrect rate of feed, thecorrect tool will carry out thework
better and more safely.
b) Never use theelectrical hand tool if theswitch does not work properly to
turn on and shut off thetool. Allelectrical hand tools that cannot be operated
by theswitch are dangerous and must be repaired.
c) Unplug thelead from thewall socket before making any adjustments,
changing accessories or storing theelectrical hand toolaway.
Theseprecautions reduce therisk of theelectrical hand tool starting
unexpectedly.
d) Store electrical hand tools that are not being used out of children’sreach.
Do not let people unfamiliar with theelectrical hand tool or its instructions
useit. Electrical hand tools can be dangerous if they get into thehands of
inexperiencedusers.
e) Inspect electrical hand tools regularly. Checkthat all settings are correct,
that no moving parts are getting jammed, that no parts are broken and
for other reasons that might cause theelectrical hand tool to malfunction.
Ifsomething is damaged it must be repaired beforeuse. Manyaccidents are
caused by poorly maintained electrical handtools.
f) Keep thetools sharp andclean. Properly maintained cutting tools with sharp
blades are less likely to jam and are easier to control.
g) Use theelectrical hand tool, accessories and such according to
theinstructions and in away suitable for thetype of electrical hand
toolused. Usingtheelectrical hand tool for work other than that for which it is
intended could result in adangerous situation.

7
ENGLISH
5) Service
a) Repairs and service should only be performed by qualified persons, and
only with original spareparts. Thisguarantees thesafety of theelectrical
handtool.
Specific Safety Requirements for Planers
• Wait until thecutter blade has completely stopped before putting thetooldown.
Anunguarded cutter could catch on theworking surface and cause you to lose
control of thetool, possibly leading to personal injury.
• Use adust extractor.
Guide to Safety Symbols
Read theentire instruction manual.
Always use ear protection.
Always use safety glasses or avisor and wear adustmask.
8
ENGLISH
16
17
Operating Instructions
Warning:
Unplug theplaner before adjusting thecutting depth or cuttingwidth.
Preparations
• Always make sure that themains supply voltage is compatible with themachine’s
rated voltage.
• Thework bench should be placed on afirm and level surface.
Plug theplug into thewall socket. Holdin thesafety button (9) and press
thepower switch (8).
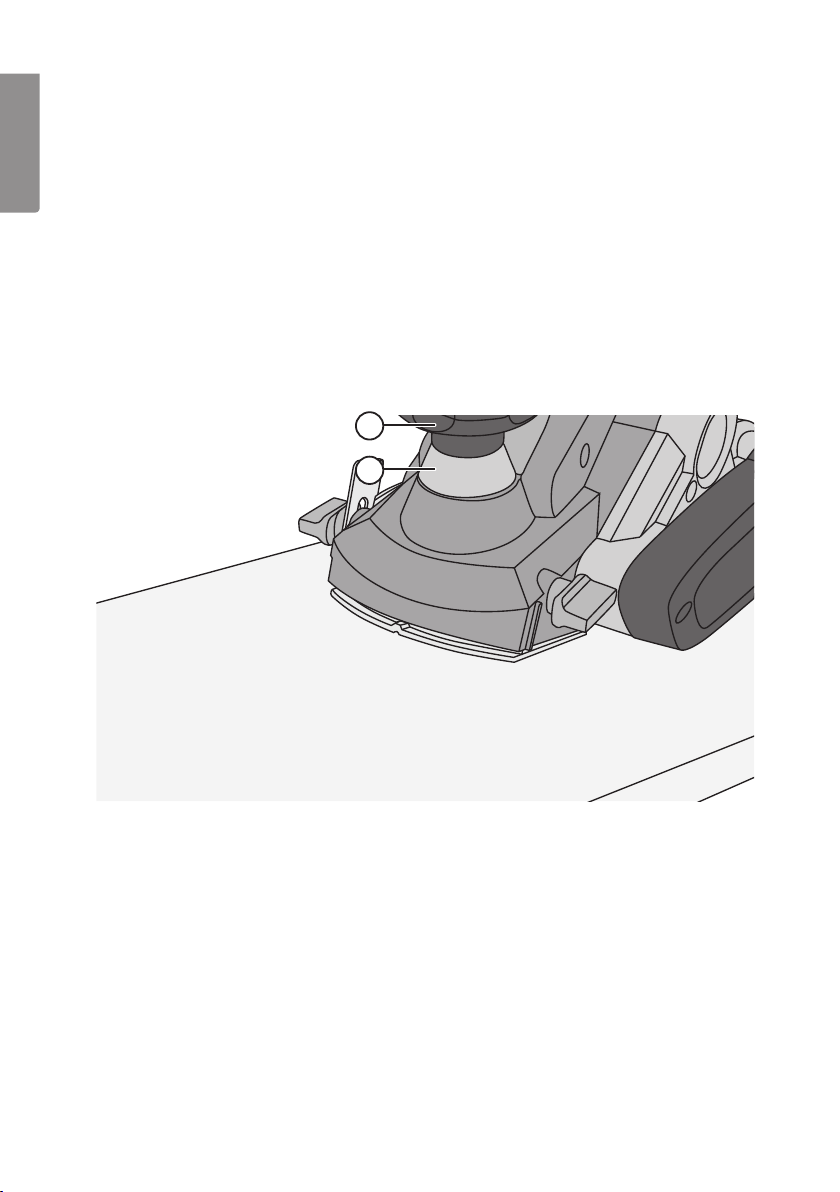
Planing a flat surface
16. Cutting depthscale
17. Cutting depth adjuster
Turn thecutting depth adjuster until thedesired setting has been reached
(use thescale).
Warning! Neveradjust thecutting depth whilst planing as this will result in
anuneven surface. Inorder to avoid planing too deeply, always set thecutting depth
to 0when you have finished planing.

9
ENGLISH
16
17
13
14
3 5
Rebating
3. Parallelguide
5. Parallel guide adjustment wingscrew
13. Rebating depth adjustmentscrew
14. Rebating depthguide
16. Cutting depthscale
17. Cutting depth adjuster
Adjusting the Rebating Depth
Place theplaner on afirm level surface so that theblade, rebating depth guide and
base plate all lineup. Settherebating depth guide (14) to thedesired depth according
to thescale and lock it using theadjustment screw (13).
Adjusting the Cutting Depth
Turn thecutting depth adjuster (17) until thedesired setting has been reached
(use thescale) (16). Warning! Neveradjust thecutting depth whilst planing as this
will result in anuneven surface. Inorder to avoid planing too deeply, always set
thecutting depth to 0when you have finished planing.
Adjusting the Rebating Width
Theplaning width can be adjusted using theparallelguide. Undothewing screw (5),
set theguide to thedesired width and lock it in place by tightening thescrewagain.
10
ENGLISH
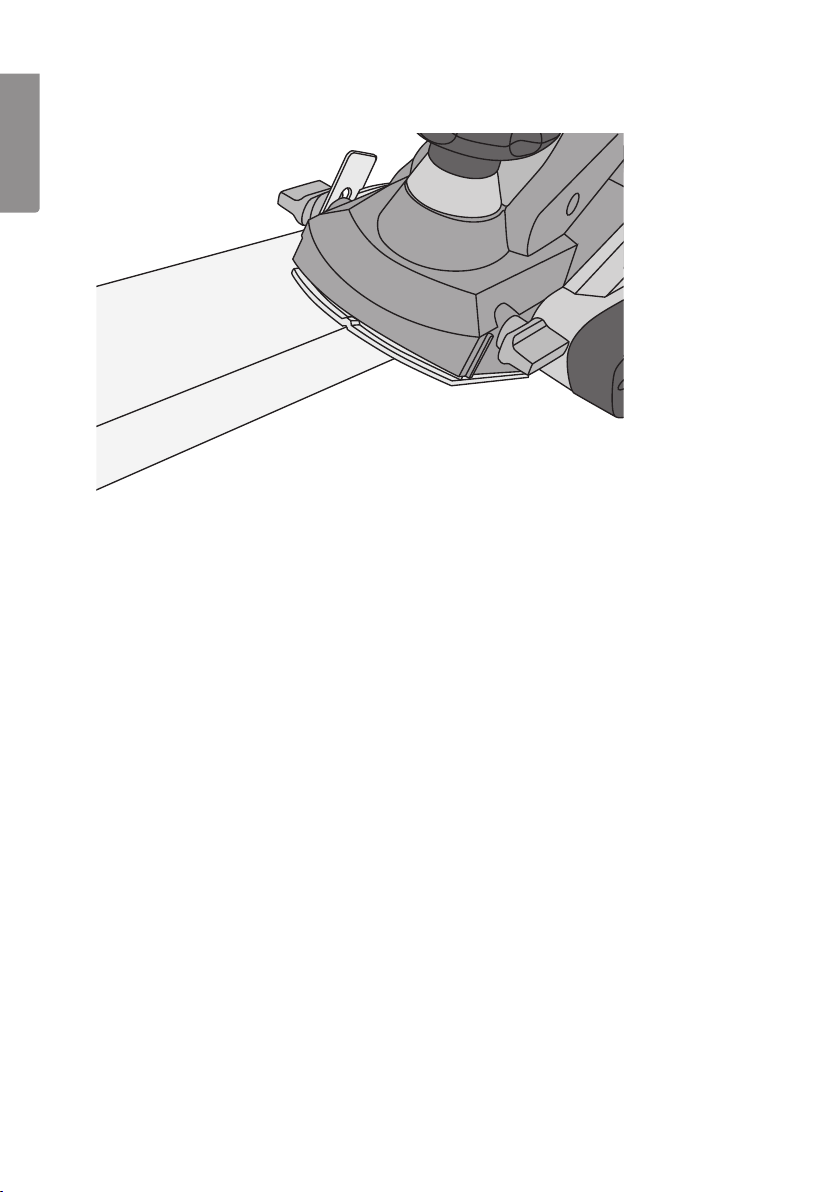
Chamfering
TheV-groove on thebottom of thefront sole plate makes it possible to chamfer
theedges of theworkpiece.
Method
In order to achieve asmooth, even surface on theworkpiece it is best to begin with
acoarse/deeper cut and then reduce thecutting depth and finish with afinercut.
Keep theplaner steady and level whilst planing; otherwise theworkpiece could end
up with anuneven surface. Turntheplaner off and unplug it when you have finished
working.
Small Workpieces
Use some kind of holding device, such as avice to secure small workpieces.

11
ENGLISH
20
22
21
19 18
18
18
18
19
20
21
22
23
Changing Blades
Warning! Always unplug theplaner before carrying out any repairs or maintenance.
• After the planer blades have been used for a while they will become blunt.
Continued use of blunt or worn blades will reduce the efficiency of the planer and
could overload the motor. The blades should therefore be checked regularly and
turned over or replaced if necessary.
• The tungsten carbide tipped blades are double-edged and can be turned over
and the other edge used once one of the edges is worn.
• The tools for changing or adjusting the blades are kept in the holder (7).
Pulltheholder straight out.
• The cutting depth of the blades does not need to be adjusted very often. Avoid
unscrewing the set screws (19) unnecessarily until you are sure that the cutting
depth needs adjusting.
Installing and changing the planer blades
Blade holder assembly
18. Retaining screw
19. Set screw
20. Set plate
21. Planer blade (double-edged)
22. Drum plate
Blade removal
Undo the three retaining
screws (18) and slide
theplaner blade (21)
sideways out of the set
plate(20).
• Note: Do not adjust
theset screws (19).
• Note: Remember how
the blade is fitted before
removing it.

12
ENGLISH
Turning the blades over/Fitting the blades
The blades can be fitted with the set plates loose or still in the cutterhead.
1. Turn the blade upside down and fit it back into the set plate (20) like it was
before.
2. Make sure that the slots in the blade line up with the guides on the drum plate
(22). There are also two protrusions on the drum plate that must line up with two
holes in the set plate.
3. Return the assembled set plate (20), blade (21) and drum plate (22) into the
cutterhead in their original positions.
4. Tighten the retaining screws. Make sure that the cutterhead can rotate freely
before switching the planer on.
• If you adjust the cutting depth, the edge of the blade must not protrude more
than 1.1 mm from the drum and both blades must have the same setting.
• After changing or adjusting the blades, make sure that all the screws are tight.
Changing the Drive Belt
1. Always unplug theplaner before carrying out and repairs or maintenance.
2. Undo thethree screws (one is under therating plate) securing thedrive belt cover
and then remove thecover. Remove theworn drivebelt. Cleanthepulley wheel
before fitting anew drivebelt.
3. Fit thenew belt over thesmall pulley and then pull it by hand over thelarge wheel
whilst rotating thewheel. Makesure that thebelt sits properly in thegrooves on
thepulley wheels.

13
ENGLISH
Troubleshooting Guide
For your safety and thesafety of others, never make any adjustments to thesettings
or remove any part of theplaner whilst it is in operation. Repairs should only be
carried out by aqualified tradesman.
Use only original spareparts.
Problem Possible cause Possible solution
Motor doesn’t run or
runs slowly.
1. Break in power circuit.
2. Damaged or faulty
powerlead.
3. Faulty power switch.
4. Blunt blades.
1. Check to see if there is
power at thepowerpoint.
2. Have theplaner repaired.
3. Have theplaner repaired.
4. Change blades.
Themotor overheats. 1. Blunt blades.
2. Air vents blocked.
3. Too muchload.
1. Change blades.
2. Unblock airvents.
3. Reduce theload.
Themotor runs but
theblades don’tspin.
1. Worn drivebelt. 1. Change drivebelt.
Sparks coming frommotor. 1. Short-circuitedrotor.
2. Worn brushes.
1. Have theplaner repaired.
2. Have theplaner repaired.
Disposal
Follow local ordinances when disposing of this product. Ifyou are
unsure about thedisposal of this product contact your municipality.
Specifications
Power supply 230 V AC, 50 Hz
Power 900 W
No-load speed 16 000rpm
Max. cutting width 82mm
Max. cutting depth 3mm
Rebating depth 20mm
Sound pressure level (LpA) 91.2 dB(A), K: 3dB(A)
Sound power level (LwA) 102.2 dB(A), K: 3dB(A)
Vibration 4.130 m/s², K: 1.5 m/s²

14
SVENSKA
Elhyvel
Art.nr 18-3086 Modell M1B-YH10-82X3-UK
30-9984 M1B-YH10-82X3
Läs igenom hela bruksanvisningen före användning och spara den sedan för fram-
tidabruk. Vireserverar oss förev. text- och bildfel samt ändringar av tekniskadata.
Vid tekniska problem eller andra frågor, kontakta vår kundtjänst (se adressuppgifter
på baksidan).
Innehåll
Beskrivning 15
Säkerhet 16
Användning 19
Byte av hyvelstål 22
Byte av drivrem 23
Felsökningsschema 24
Specifikationer 24

15
SVENSKA
2 3 4 5 6 7
1
8
9
10
11
12
13 14
15
16
17
Beskrivning
1. Spånpåse
2. Vingskruv för sidoanhåll
3. Sidoanhåll
4. Sidoanhållsenhet
5. Vingskruv för inställning av sidoanhåll
6. Drivremskåpa
7. Hållare för verktyg till byte av hyvelstål
8. Strömbrytare
9. Spärrknapp
10. Handtag
11. Ventilerathölje
12. Spånutkast
13. Låsskruv för falsdjup
14. Falsdjupsanhåll
15. Hyvelsula
16. Spåndjupsskala
17. Reglage för spåndjupsinställning

16
SVENSKA
Säkerhet
Varning! Närdu använder detta verktyg ska grundläggande försiktighetsåtgärder
iakttas för att minska risken för brand, elektrisk stöt och personskada. Innandu
använder verktyget ska du läsa och förstå hela bruksanvisningen.
Generella säkerhetsföreskrifter – elektriska handverktyg
Varning! Läsalla instruktioner. Omnedanstående instruktioner inte följs kan detta
leda till elektrisk stöt, brand och/eller allvarligskada. Termen ”elektriskt handverktyg”
ivarningstexten nedan refererar till ditt nätanslutna eller batteridrivna handverktyg.
SPARADESSA INSTRUKTIONER.
1) Arbetsutrymmet
a) Håll arbetsutrymmet rent och väl upplyst. Belamrade och mörka utrymmen
inbjuder till olyckor.
b) Använd inte elektriska handverktyg iexplosiva miljöer, som inärheten av
lättantändliga vätskor, gaser ellerdamm. Elektriska handverktyg genererar
gnistor som kan antända damm ellerångor.
c) Håll undan barn och åskådare medan du använder det elektriska hand-
verktyget. Störningsmoment kan göra att du tappar kontrollen över verktyget.
2) Elektrisk säkerhet
a) Det elektriska handverktygets stickpropp måste passa ivägguttaget.
Modifiera aldrig stickproppen på någotvis. Använd aldrig adapter
tillsammans med jordade elektriska handverktyg. Omodifierade stickproppar
och passande vägguttag minskar risken för elektriskstöt.
b) Undvik kroppskontakt med jordade föremål, som rör, element, köksspis
eller kylskåp. Detinnebär ökad risk för elektrisk stöt om din kropp är jordad.
c) Utsätt inte det elektriska handverktyget för regn eller våta förhållanden.
Omvatten tränger in iettelektriskt handverktyg ökar det risken för elektriskstöt.
d) Misshandla inte nätsladden. Använd aldrig nätsladden för att bära, dra eller
rycka stickproppen ur vägguttaget. Hållundan nätsladden från värme, olja,
vassa kanter och rörligadelar. Skadade eller trassliga nätsladdar ökar risken för
elektriskstöt.
e) När du använder ettelektriskt handverktyg utomhus, använd enskarvsladd
anpassad för detta ändamål. Användning av enskarvsladd för utomhusbruk
minskar risken för elektriskstöt.
3) Personlig säkerhet
a) Var uppmärksam på vad du gör och använd sunt förnuft när du använder
ettelektriskt handverktyg. Använd inte ettelektriskt handverktyg om du
är trött eller påverkad av droger, alkohol eller medicinering. Ettögonblicks
ouppmärksamhet när du använder ettelektriskt handverktyg kan resultera
iallvarlig personskada.

17
SVENSKA
b) Använd skyddsutrustning. Bäralltid skyddsglasögon. Användning av
skyddsutrustning som andningsskydd, halksäkra skyddsskor, hjälm och
hörselskydd vid behov minskar risken för personskada.
c) Undvik oavsiktligstart. Setill att strömbrytaren är iläge OFF innan du
ansluter stickproppen till vägguttaget. Attbära ettelektriskt handverktyg med
ettfinger på strömbrytaren/avtryckaren eller att ansluta ettelektriskt handverktyg
till elnätet när strömbrytaren är iläge ON inbjuder till olyckor.
d) Tag bort alla serviceverktyg/nycklar innan du slår på det elektriska
handverktyget. Ettkvarglömt serviceverktyg på enroterande del av det
elektriska handverktyget kan resultera ipersonskada.
e) Sträck dig inte förlångt. Setill att du står stadigt med god balans
helatiden. Dettamöjliggör bättre kontroll ioväntade situationer.
f) Bär lämplig klädsel. Bärinte löst sittande kläder eller smycken. Hållundan
hår, kläder och handskar från rörligadelar. Lösakläder, smycken eller långt
hår kan fastna irörligadelar.
g) Om utrustning för utsugning och uppsamling av damm finns tillgänglig,
se till att denna är ansluten och används ordentligt. Användning av dessa
hjälpmedel kan minska dammrelateradefaror.
4) Användning och underhåll av det elektriska handverktyget
a) Pressa inte det elektriska handverktyget. Använd ettelektriskt handverktyg
som är avsett för det arbetsmoment duutför. Korrekt elektriskt handverktyg
gör jobbet bättre och säkrare med avsedd matningshastighet.
b) Använd inte det elektriska handverktyget om strömbrytaren inte slår på och
stänger av verktyget. Allaelektriska handverktyg som inte kan kontrolleras med
strömbrytaren är farliga och måste repareras.
c) Dra ut stickproppen ur vägguttaget innan du utför några justeringar, byter
tillbehör eller lägger undan det elektriska handverktyget för förvaring.
Dessaåtgärder iförebyggande syfte minskar risken för att starta det elektriska
handverktyget oavsiktligt.
d) Förvara elektriska handverktyg som inte används utom räckhåll för
barn och låt inte personer som inte är förtrogna med det elektriska
handverktyget eller dessa instruktioner användadet. Elektriska handverktyg
är farliga om de kommer ihänderna på ovana användare.
e) Underhåll elektriska handverktyg. Kontrollera om något är felinställt,
om rörliga delar kärvar, om delar har gått sönder eller något annat som
kan påverka funktionen av det elektriska handverktyget. Omnågot är
skadat måste det repareras före användning. Mångaolyckor beror på dåligt
underhållna elektriska handverktyg.
f) Håll verktygen vassa ochrena. Ordentligt underhållna skärverktyg med vassa
eggar är mindre benägna att kärva och lättare att kontrollera.
g) Använd det elektriska handverktyget, tillbehör och liknande enligt
instruktionerna och på det sätt som är ämnat för just den typen av elektriskt
handverktyg, och ta även hänsyn till arbetsförhållandena och den typ av
arbete som ska utföras. Användning av det elektriska handverktyget för andra
arbeten än vad det är ämnat för kan resultera ienfarlig situation.

18
SVENSKA
5) Service
a) Låt behörig personal utföra service och reparationer, och endast med
originalreservdelar. Dettagaranterar att säkerheten på det elektriska
handverktyget behålls.
Särskilda säkerhetsföreskrifter för elhyvel
• Vänta tills kuttern har stannat helt innan du lägger ifrån dig verktyget.
Enoskyddad kutter kan greppa tag iunderlaget och orsaka att du förlorar
kontrollen över verktyget vilket kan leda till personskada.
• Använd spånutsug.
Produktmärkning med säkerhetssymboler
Läs hela bruksanvisningen.
Använd alltid hörselskydd.
Använd alltid skyddsglasögon eller visir och andningskydd.

19
SVENSKA
16
17
Användning
Varning!
Dra ut stickproppen ur vägguttaget innan du gör några justeringar av spåndjup
och hyvlingsbredd på hyveln.
Före start
• Se till att spänningen ivägguttaget stämmer överens med spänningen på
verktygets märkskylt.
• Arbetsbänken ska placeras på jämn och stadigyta.
Sätt stickkontakten ivägguttaget. Hållin spärrknappen (9) och tryck sedan in
strömbrytaren (8).
Hyvling av plan yta
16. Spåndjupsskala
17. Reglage för spåndjupsinställning
Vrid på reglaget för spåndjupsinställning tills önskat spåndjup är nått
(se spåndjupsskalan).
Varning! Justera aldrig spåndjupet under drift eftersom detta resulterar iojämn
hyvlingsyta. Föratt undvika hyvling på oavsiktligt spåndjup, se alltid till att återställa
spåndjupet till 0när du har hyvlatklart.

20
SVENSKA
16
17
13
14
3 5
Falsning
3. Sidoanhåll
5. Vingskruv för inställning av sidoanhåll
13. Låsskruv för falsdjup
14. Falsdjupsanhåll
16. Spåndjupsskala
17. Reglage för spåndjupsinställning
Justering av falsdjup
Placera hyveln på jämn och stadig yta så att hyvelstålet, falsdjupsanhållet och bas-
plattan är ilinje. Ställin falsdjupsanhållet (14) så att önskat djup syns på skalan och
fixera med låsskruven (13).
Justering av spåndjup
Vrid på reglaget för spåndjupsinställning (17) tills önskat spåndjup är nått (se spån-
djupsskalan) (16). Varning! Justera aldrig spåndjupet under drift eftersom detta
resulterar iojämn hyvlingsyta. Föratt undvika hyvling på oavsiktligt spåndjup,
se alltid till att återställa spåndjupet till 0när du har hyvlatklart.
Justering av falsbredd
Du kan justera bredden med sidoanhållet. Lossavingskruven (5), ställ sedan in
önskad bredd och fixera sedan vingskruvenigen.
This manual suits for next models
1
Table of contents
Languages:
Other CO/Tech Planer manuals


