CO/Tech 2502W User manual
Important!
Read the entire instruction manual carefully
and make sure that you fully understand
it before you use the equipment. Keep the
manual for future reference.
Viktig information:
Läs hela bruksanvisningen noggrant och
försäkra dig om att du har förstått den innan
du använder utrustningen och spara den för
framtida bruk.
Viktig informasjon:
Les disse anvisningene nøye og forsikre deg
om at du forstår dem før du bruker enheten
og oppbevar dem for senere bruk.
Tärkeätä tietoa:
Lue nämä ohjeet huolellisesti ja varmista
että olet ymmärtänyt ne, ennen kuin alat
käyttää laitetta. Säilytä ohjeet myöhempää
tarvetta varten.
Art.no Model
40-7993 92502W
ENGLISH
SVENSKA
NORSKSUOMI
Combination Saw
Kombinationssåg
Kombinasjonssag
Yhdistelmäsaha
Ver. 201107
Original instructions
Bruksanvisning i original
Original bruksanvisning
Alkuperäinen käyttöohje

2
ENGLISH
Combination Saw
Art.no: 40-7993 Model: 92502W
Please read the entire instruction manual before using the product and save it for future reference.
We apologise for any text or photographic errors and any changes of technical data. If you have any
questions concerning technical problems please contact our Customer Service Department (see address
on reverse.)
!
Important safety instructions:
Read the entire instruction manual before using this product.
1. Safety
Warning: When using this machine all basic safety precautions must be followed to avoid the risk of re,
electrocution and personal injury. Read these instructions carefully before using the product and keep them
for future reference.
1. Keep the working area tidy. Cluttered areas and benches invite accidents.
2. Take stock of your working environment. Do not expose the machine to rain. Do not use the machine in moist
or wet areas. Keep the working area well lit. Never operate the machine near ammable liquid or gas.
3. Avoid electric shocks. Avoid body contact with earthed objects, such as pipes, radiators, ovens or refrigerators.
4. Keep other people at a safe distance. Do not allow anyone not involved in the work process to touch the
machine or its electric cable, especially children. Keep all bystanders at a distance.
5. Store the machine in a safe place. When your machines are not in use, keep them in a locked, dry area, away
from children.
6. Do not overload the machine. The correct feed rate makes the work better and safer.
7. Use the correct machine. Do not try to use small machines to perform jobs requiring more powerful machines.
Do not use a machine for a purpose for which it was not designed, e.g. using a circular saw for lopping
branches off trees or cutting timber.
8. Wear suitable clothing. Do not wear loose-tting clothing or jewellery, they could get caught in moving parts.
Non-slip shoes are recommended for outdoor work. Wear a hairnet or similar if you have long hair.
9. Always use safety glasses. Wear safety glasses. Use a face mask or dust lter when working in dusty
environments.
10. Use dust extractors. If the machine is equipped with or connected to a dust extractor/collector, make sure that
it is turned on and used correctly.
11. Do not abuse the lead. Do not jerk the lead, grip the plug itself when disconnecting the power. Make sure that
the mains lead does not come into contact with heat, oil, or sharp edges.
12. Secure the workpiece rmly. If possible use vices or clamps to hold the workpiece in place. This is much safer
than holding the workpiece in one hand.
13. Do not overreach. Make sure that you stand steady and balanced all times.
14. Look after the machine. Keeping the machine clean and the blades sharp will ensure the best results. Follow
the manuals advice regarding lubrication and the replacement of accessories. Regularly inspect the power
lead. If it damaged it should be replaced by a qualied service technician. Regularly inspect all extension leads
for any damage. Keep the handles of the machine and all controls and switches dry and free from oil and
grease.

3
ENGLISH
15. Turn the power off. Pull out the plug and push in the emergency stop button before servicing or changing
any blades, drill bits, cutters or sanding discs.
16. Remove all spanners and repair tools. Make a habit of checking to make sure that the machine is free of
all spanners and tools before turning the power on.
17. Avoid accidental starting. Do not walk around with the machine with your nger on the power button if it
is plugged in. Make sure that the on/off switch is set to OFF before plugging in any power tool.
18. Use the correct extension leads. If you use extension leads outdoors, only use those designed for
outdoor use. Only use extension leads with thick enough diameter core wires and roll out the whole lead.
19. Use common sense and be careful. Think before carrying out any task, so that it is carried out safely.
Never operate machines when you are tired, under the inuence of medicine etc.
20. Check the following before turning the machine on:
• That all guards and other parts are whole and in working order.
• That moving parts are free and correctly aligned.
• That no moving parts can get caught.
• That no defects are apparent.
• Other factors that can inuence work execution.
• A safety guard or any other part that is damaged should be repaired by a tradesman or replaced.
Damaged power leads and switches must always be replaced by a tradesman or qualied service
centre. Never operate the machine if you cannot stop or start the tool safely.
21. Use only recommended accessories. The use of non-recommended accessories can cause accidents
and personal injury.
22. Should only be repaired by a qualied technician. This machine conforms to current safety requirements.
Repairs to the machine should only be carried out by a tradesman using original spares; otherwise the
machine could cause accidents and personal injury.
1.2. Safety Instructions Specific to Combination Saws
Warning: Always unplug the machine before carrying out any maintenance or changing the blade.
Helpful Suggestions:
• Working with wood can be dangerous if the correct procedures are not observed.
• Using the saw with common sense and caution will greatly reduce the risk of personal injury.
• Safety devices such as guards, push-sticks, clamps, safety goggles, dust masks and ear defenders
can never make up for bad judgement, carelessness or inattentiveness.
• Remember: you are responsible for your own safety. The saw has been designed to perform certain
tasks. We strongly recommend that the saw is not altered in any way and that it is not used for
performing any task for which it was not designed.
• DO NOT USE THE SAW if you are unsure if the saw can perform the task you intend to perform.
Make sure that all the parts are working properly and that the safety devices are in place before starting
the saw.
1. Warning: Use only cross-cut saw blades. Make sure that TCT blades have negative rake. Do not use
blades with deep spacing between the teeth because the teeth might bend and come into contact with
the blade guard. A damaged blade should be replaced immediately.
2. Do not use the saw unless it has been completely assembled using the instructions in this manual.
Check that the motor and the blade are rotating the right way (see direction arrow on blade guard). Make
sure that the blade does not come into contact with the table in any of the settings. Unplug the machine
and manually tilt the blade to 45° and 90°. Adjust the saw head if necessary.
3. If you do not understand how the saw should be used, ask a knowledgeable person for advice.

4
ENGLISH
4. Do not saw freehand. Make sure that the workpiece is rmly secured against the fence before you start
sawing. If the workpiece that you are sawing requires you to have one hand as close as 10 cm from the
blade, x the workpiece to the table using a clamp, etc. before sawing.
5. Warning: Keep hands away from the saw blade. Never saw small objects. Use a push-stick.
6. Check that the blade is well-centred, sharp and that it rotates freely and without vibration.
7. Let the motor come up to speed before starting to cut.
8. Always keep the motor’s ventilation openings free of dust and debris.
9. Make sure that all clamps are tight before starting to saw, even if the table is locked at a xed angle.
10. Make sure that the blade and anges are clean and that the spindle nut is tight. Use only the blade
anges belonging to your saw.
12. Use only saw blades having a diameter and speed rating complying with those in the technical
specications.
13. When sawing long objects, make sure that the ends are adequately supported.
14. Always check the blade for cracks and fractures before using it. Replace a damaged blade immediately.
15. Do not use the saw if any of the parts is missing, damaged or not working properly. Unplug the saw if
it starts to make strange noises or vibrate. Get a professional to replace the missing or damaged part
before you use the saw again.
16. Never use the saw if the blade guard is not in place and working properly.
17. Never stretch round or over the blade when it is rotating. Maintain a steady stance and remain balanced
at all times.
18. Make sure that the blade can rotate freely (especially after transportation/blade changes) before plugging
in and starting the saw.
19. Never lock the switch in the ON position.
21. Important: When the workpiece has been completely sawn through: Turn the machine off and wait until
the blade has stopped rotating before lifting the saw head.
22. Turn the machine off and wait until the blade has stopped before moving the workpiece or adjusting any
setting.
23. Do not remove any offcuts or jammed material from around the blade area until the blade has stopped.
24. Never saw into ferrous metals, brick or mortar.
25. Never use the saw near ammable uids or gas.
26. Never clean the plastic parts of the saw using solvents. Solvents can dissolve or otherwise damage
plastic; use a soft, moist cloth only.
27. Unplug and clean the saw before leaving it. Always tidy the work area when you have nished working.
28. Keep this instruction manual safe. Read through it regularly and use it to help instruct other users.
Make sure that everyone using the saw has read these instructions.
29. Do not expose the saw to rain and do not use it in humid environments.
30. Ensure that the work area is well-lit.
31. Wear suitable clothing, loose clothing or jewellery can get caught in moving parts.
32. The saw must only be operated by persons over the age of 18; persons over the age of 16 may operate
the tool under supervision. Keep children away from the saw when it is connected to the power supply.
33. Keep the work area tidy, do not leave offcuts or waste material around the saw unnecessarily. Make sure
that all offcuts can be removed from the saw blade; otherwise they might be ejected by the blade.
34. Do not distract the operator of the saw.
35. Do not try to stop the blade by pushing something against the side of the blade when the power has
been turned off.

5
ENGLISH
36. Never use saw blades that do not comply with the specications in this manual.
37. Always make sure that the blade guard is in place and working properly.
38. Never lock the blade guard in the open position or alter any of the machines safety devices in any way.
Never use a faulty safety device, replace it immediately.
39. Always position your hands in such a way that they will not slip into the saw blade should you lose your
balance. Never saw workpieces that are too small to hold safely.
40. Use a table, roller stand, etc for support when working on long workpieces, to prevent the table from
tipping over.
41. Secure round workpieces to the table using suitable clamps to stop them from rotating.
42. Never cut a workpiece with nails or screws in it. Inspect the workpiece before sawing.
43. Always stand to the side of the blade when using the saw so that you are not in its path in case it breaks.
44. Always ensure that the workpiece is securely pressed against the rip fence and surface of the table so
that it cannot twist whilst being sawed.
45. Never saw more than one workpiece at a time.
46. Never attempt to remove sawdust or offcuts trapped around the blade whilst the saw blade is rotating.
Always switch off the machine and unplug it before adjusting the machine or removing waste material.
47. Always switch off the machine and unplug it before cleaning the machine or measuring the workpiece.
48. Always switch off the machine and unplug it before leaving the work area.
49. Electrical installations, repairs or maintenance must be carried out by a qualied person.
50. All safety devices must be reattached to the machine immediately after any repairs or maintenance.
51. It is very important to observe the directions for the safety, operation and maintenance of the machine as
well adhering to the characteristics specied in Technical Data.
52. It is essential to follow all Health and Safety Executive regulations as well as general safety regulations.
53. Use only a machine with a dust extractor in a closed room if the room has an air inlet, to prevent the
build-up of a vacuum.
54. The saw must only be used with a 230 V plug protected by at least a 10 A slow-blow fuse.
55. Faulty safety devices and damaged parts must be repaired or replaced by a qualied tradesman at an
authorised service centre.
56. This machine conforms to all relevant safety standards. The machine must only be repaired by a
qualied tradesman at an authorised service facility using original spare parts. Failure to adhere to this
rule can lead to an accident and endanger the user.
57. Do not use saw blades that are thicker or thinner than the riving knife (applies to circular saws).
58. Always use a riving knife when rip cutting.
59. Make sure that the riving knife is adjusted so that: The distance between the saw blade and the riving
knife should be 5-6 mm.
60. The riving knife should have a radius compatible with the diameter of the saw blade.
61. Do not use high speed steel blades (HSS) if the machine is delivered with tungsten carbide (TCT) blades.

6
ENGLISH
Failure to respond to the safety warnings could result in injury
or damage the tool.
Keep the saw head lowered until the saw blade has completely
stopped after a cut has been made to avoid being injured by
ying splinters and wood chips.
Unplug the machine before turning the table and using another
method of working.
Note: The blade nut has a left-hand thread.
Clear any saw dust, waste material, etc from the table before
using the combination saw.
Think about where you place your hands when carrying
the saw.
2. Product safety symbols and their meaning
Always use ear protection.
Always wear protective glasses or a visor and breathing protection.

7
ENGLISH
3. Description
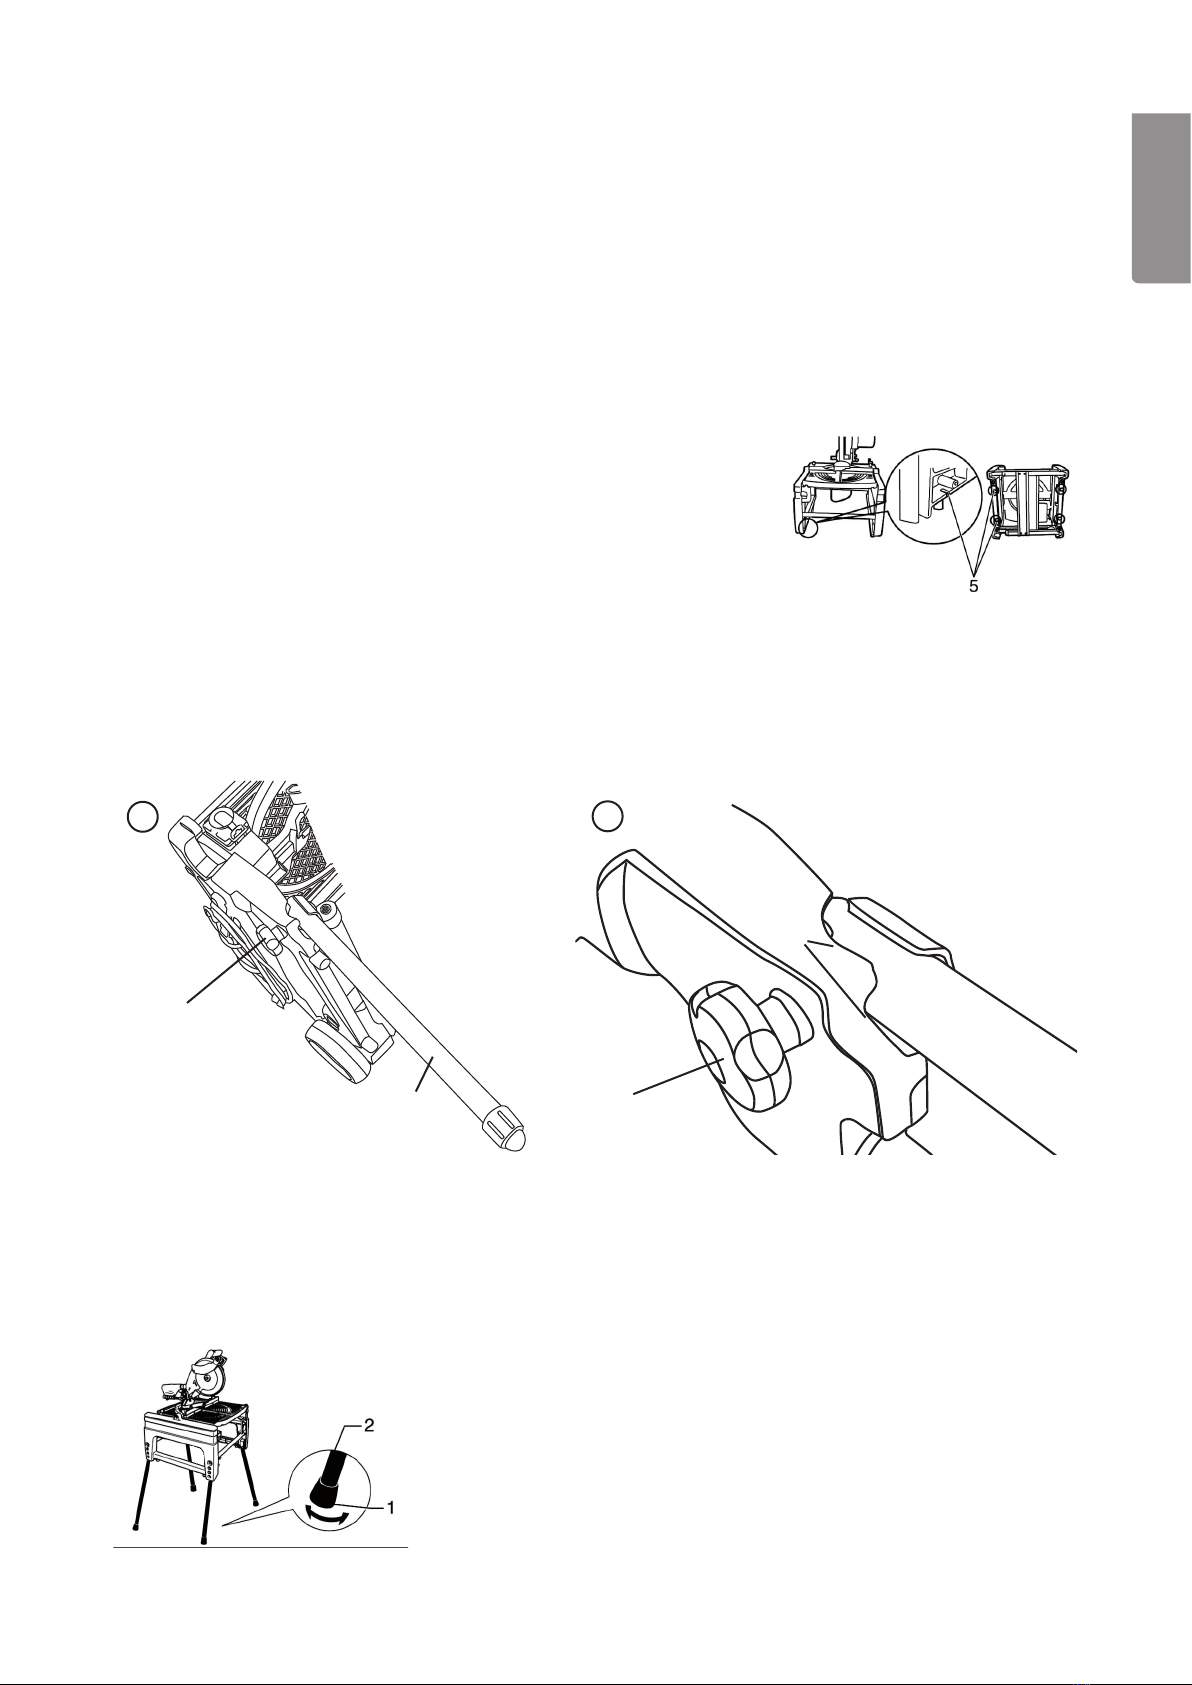
1. Adjustable foot
2. Leg 5. U-shaped slot
6. Adjustable blade guard
7. Fixed blade guard
8. Lower blade guard
(only for mitre saws)
9. Upper blade guard lock
10. Riving knife
11. Upper blade guard
(only for circular saw)
12. Surface of the table
13. Edge of the blade
14. Fence
4. Bolt
15. Depth stop
16. Lock nut
14. Fence
17. Locking knob
18. Handle
19. Turntable
20. Locking knob 18. Handle
20. Locking knob
21. Cutting depth adjusting screw
1 2 3
4 5 6
7 8 9
10 11 12

8
ENGLISH
21. Cutting depth adjusting screw 28. Saw head lock
29. 13 mm Allen key for saw blade
30. Allen key holder
4. Bolt
29. 3 mm Allen key for saw blade
34. Spindle Lock Button 35. Lifting grip
7. Fixed blade guard
36. Saw blade
36. Saw blade
37. Saw blade cover
38. Rotation arrow
4. Bolt
36. Saw blade
39.Outer blade ange
40. Inner blade ange
41. Spindle
42. Washer
4. Bolt
10. Riving knife
43. Riving knife locking knob
31. Leg locking knob
32. Leg
31. Leg locking knob
33. Leg seat
18. Handle
3. Lock
22. Power switch (for compound mitre saw mode)
23. Power switch /Emergency stop (for circular
saw mode)
24. Safety Catch
25. Power switch in handle (for compound mitre
saw mode)
26. ON switch (green) (for circular saw mode)
27. OFF switch (red) (emergency stop with lid)
13 14 15
16
19 20 21
22 23 24
31
32
17
33
31
18
9
ENGLISH
10. Riving knife
36. Saw blade
4. Bolt
10. Riving knife
44. Kerf
45. Rip fence guide clamp
46. Rip fence slot
47. Rip fence locking knob
48. Rip fence guide locking knob
49. Rip fence
36. Saw blade
45. Rip fence guide clamp
49. Rip fence
50. Index line
51. Circular saw
52. Workpiece
36. Saw blade
45. Rip fence guide clamp
49. Rip fence
45. Rip fence guide clamp
47. Rip fence locking knob
48. Rip fence guide locking knob
49. Rip fence
53. Nut
54. Try square (not included)
45. Rip fence guide clamp
49. Rip fence
55. Adjusting screw
36. Saw blade
49. Rip fence
56. Upper blade guard
57. Mitre guide track
58. Mitre guide
60. Dust bag/extractor coupling sleeve
61. Dust bag
62. Zip
61. Dust bag
62. Zip
25 26 27
28 29 30
31 32 33
34 35 36
10
ENGLISH
60. Dust bag/extractor coupling sleeve
63. Angled coupling sleeve for dust bag/
extractor
14. Fence
17. Locking knob
64. Clamp arm
65. Clamp rod
66. Clamp knob
14. Fence
17. Locking knob 20. Locking knob
4. Bolt
15. Depth stop
17. Locking knob
28. Saw head lock 67. Saw blade guard
68. Table lock for changing from
compound mitre saw to circular saw
69. Catches
10. Riving knife
43. Riving knife locking knob
43 A 43 B 43 C
43 D43 E43 F
37 38 39
40 41 42
43 44
45 46 47
68
69
11
ENGLISH
9. Upper blade guard lock
10. Riving knife
11. Upper blade guard (only for circular saw) 28. Saw head lock
10. Riving knife
43. Riving knife locking knob 14. Fence
71. Lower right fence
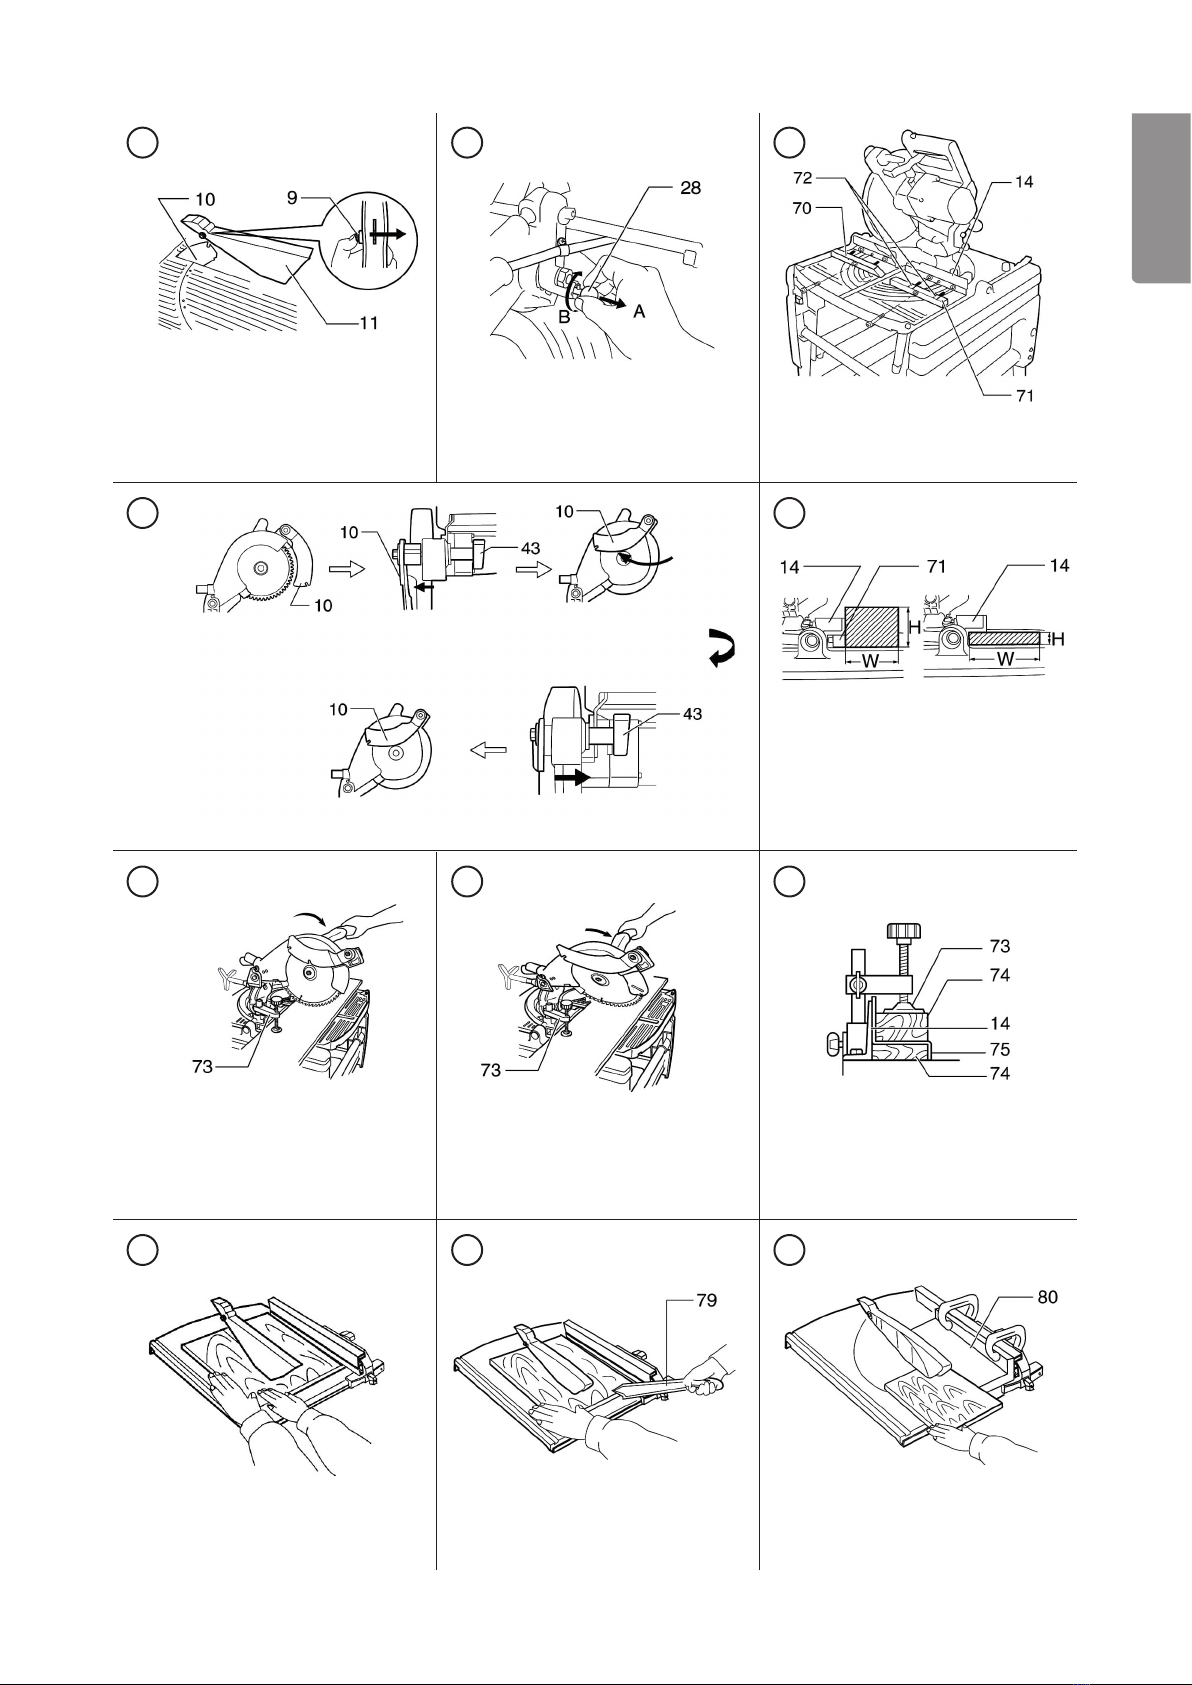
73. Clamp 73. Clamp
14. Fence
73. Clamp
74. Scrap wood
75. Aluminium section (workpiece)
79. Push stick 80. Sawing block (not included)
14. Fence
70. Lower left fence
71. Lower right fence
72. Guide pins
50 A 50 B 50 C
50 D50 E
48 49 51
50 52
53 54 55
56 57 58

12
ENGLISH
28. Saw head lock
87. Suitable holding point for
transportation.
14. Fence
36. Saw blade
88. Try square (not included)
89. Adjustment screw (0°)
90. Adjustment screw (45°)
12. Surface of the table
36. Saw blade
88. Try square (not included)
19. Turntable
91. Locking knob
92. Tilt angle scale
93. Index mark
82. Right angle cut
83. Mitre cut
84. Bevel cut
85. Compound cut (both bevel and mitre)
58. Mitre guide
59. Mitre guide track
86. Locking knob
20. Locking knob
59 60
61 62 63
64 66
67 68
65
13
ENGLISH
Circular Saw/Table saw: (motor under table)
Compound Mitre Saw (motor over table)
4. Preparing the saw for use
Note:
• Always make sure that the oor surrounding the saw is clear of waste material, sawdust or anything that
one might trip over.
• The combination saw can be used standing on the oor with its legs extended or mounted on a bench
with its legs folded.
• If the saw is to be mounted on a bench, table, etc it must be securely anchored by passing bolts through
the bench/table and the U-shaped slots (5) on the base of the saw.
4.1 Unfolding the legs
1. Lay the combination saw on its side.
2. Undo the big locking knobs (31) which hold the legs in place.
3. Unfold the legs and tighten the knobs again to lock the legs in the extended position.
4. Do the same with the other side.
Adjusting the legs
The legs must be steady on the oor, adjust them if necessary using the adjustable feet (1) on the ends of
the legs if the oor is uneven. Turn the foot anticlockwise to screw it in and clockwise to screw it out.
31
32
17
31
33
18

14
ENGLISH
5. Description
5.1. Starting/stopping
The combination saw is started and stopped in different ways depending on how the saw is being used.
In circular saw (table saw) mode: (motor under table)
The machine is started and stopped using the power switch (23) (underneath the yellow lid)
• Push the green button (26) to start the motor.
• Push the red button (27) to turn the machine off.
In compound mitre saw mode: (motor over table)
The machine is started and stopped using the power switch (22)
• Hold in the safety catch (24) and the power switch (25) to start the motor.
• Release the power switch (25) to stop the motor.
Warning: Always unplug the machine before carrying out any adjustments or maintenance.
The combination saw is equipped with two types of blade guard which are to be attached depending
on whether the saw is being used as a circular saw or compound mitre saw.
Warning:
• Before using the saw, check that all safety devices are intact and that the handle (18) cannot be lowered
without the safety catch (3) having rst been slid to the left.
• Make sure that the adjustable blade guard (6) does not open without the safety catch (3) rst having
been slid to the left.
• Make sure that the lower blade guard (8) is mounted before using the saw in compound mitre saw mode.
• Make sure that the lower blade guard (11) is mounted before using the saw in compound mitre saw
mode.
• The table must be locked in one of the working modes for the catches to spring out and lock the table.
• The compound mitre saw can be very dangerous if it is used without proper safety guards, the operator
could be seriously injured.
24 25
3
18
6
69
68
69

15
ENGLISH
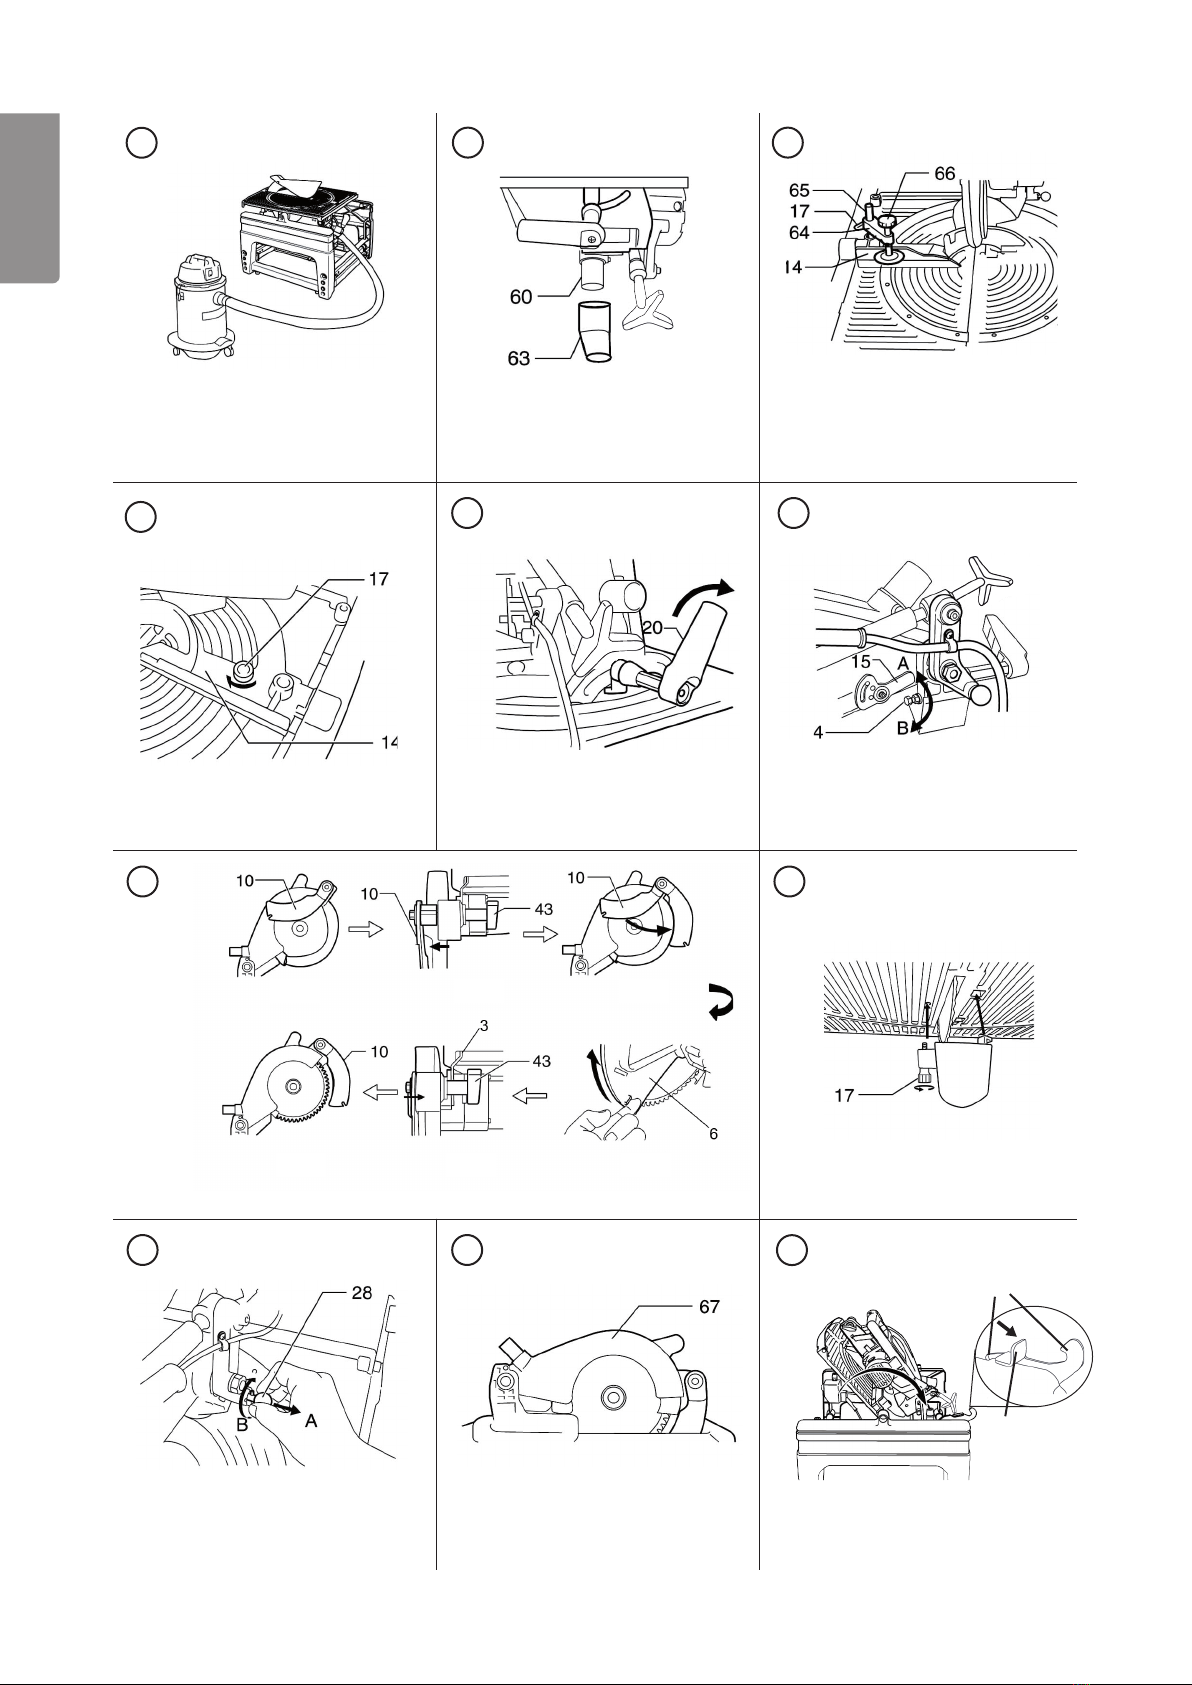
5.2. Attaching/removing blade guards
The lower blade guard (8) and upper blade guard (11) are never to be used at the same time. One of the
guards should be attached and the other removed depending upon the mode the saw is set in:
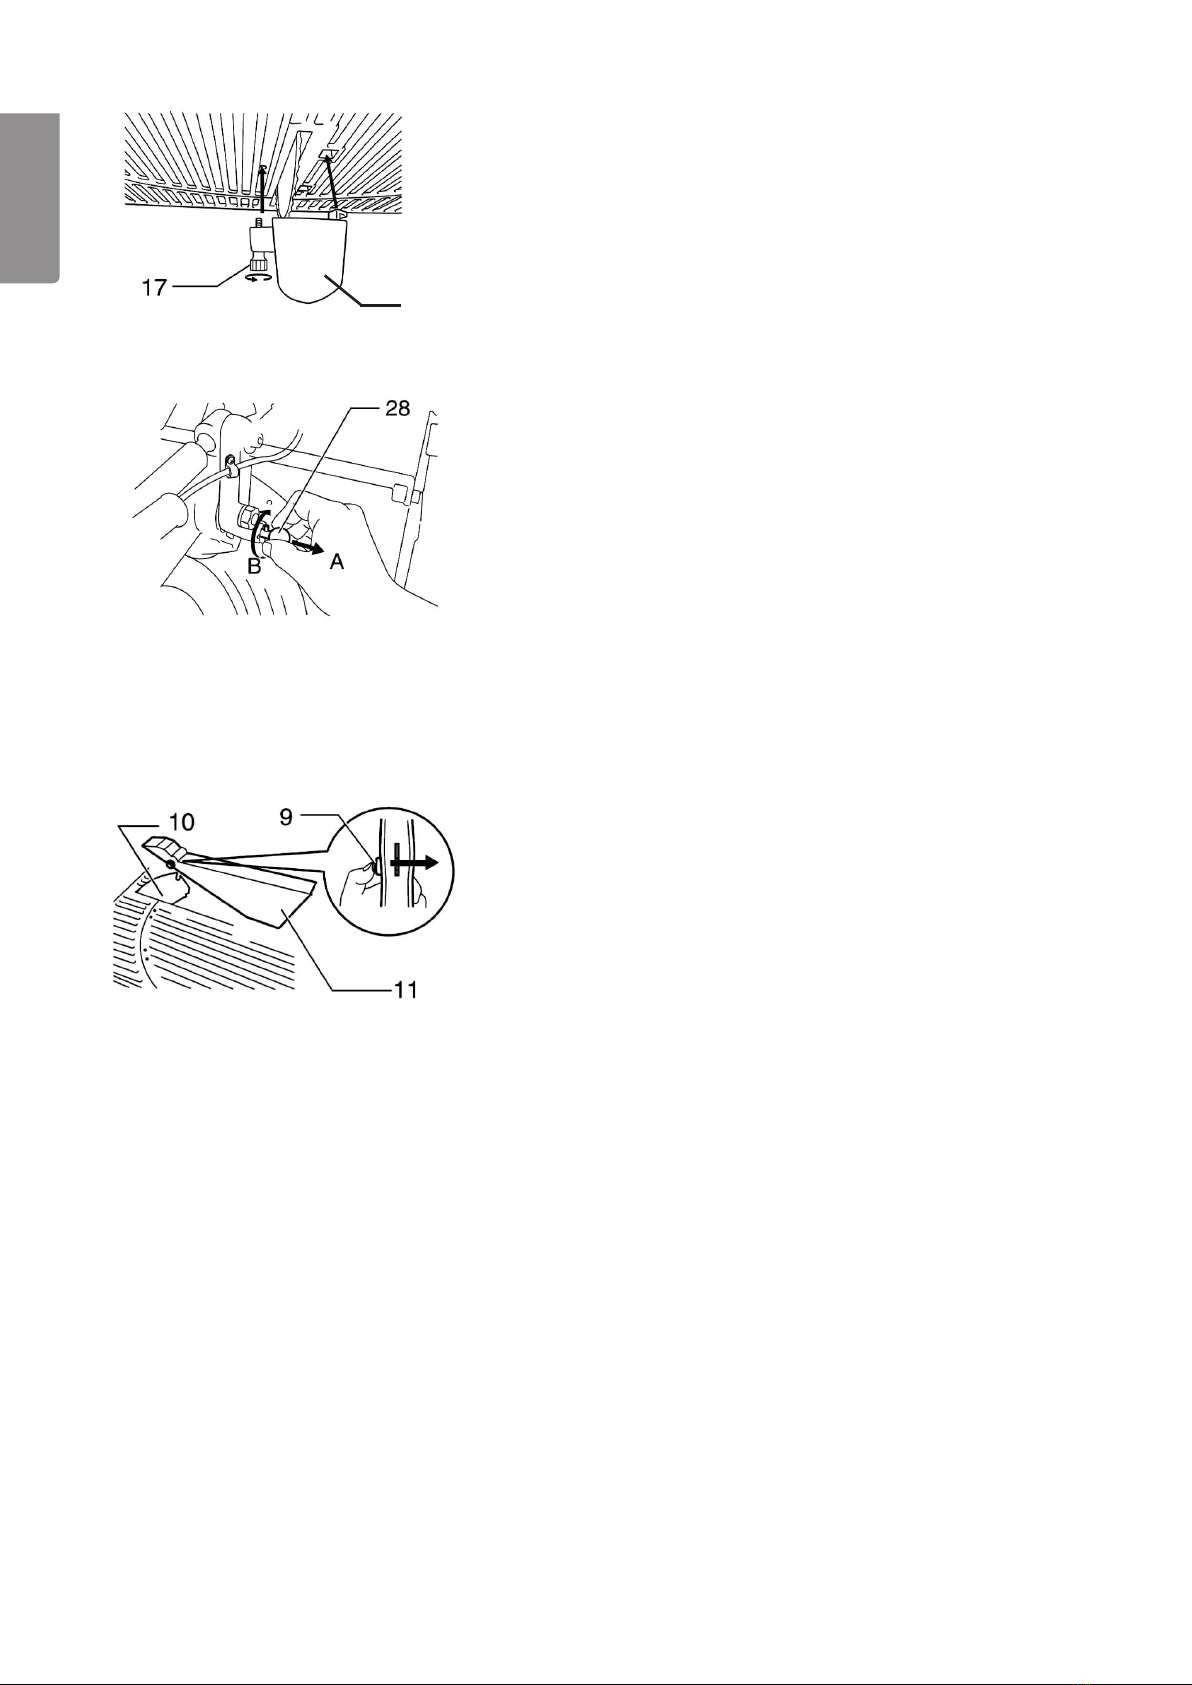
• The lower blade guard (8) (used in compound mitre saw mode) is mounted underneath the table, hook
onto the catches under the table and tighten the screws (17) on the other side. First, remove the guard
(11) if it is tted.
Undo the riving knife (10) and attach it to the side:
1. Undo the knob (43) and pull the riving knife to the side (Fig. 50-B).
2. Move the riving knife in the direction indicated by the arrow to move it out of the way (Fig. 50-C).
3. Push in the riving knife and lock the knob (43) (Fig.50-D).
4. Test by hand that the blade moves freely and does not catch on anything.
• The upper blade guard (11) (used
only in circular saw mode) attaches
to the riving knife (10).
5. Turn the table over so that the
motor is on top. First, remove
the guard (8) if it is tted.
6. The riving knife (10) is moved to
the side when the saw is used in
compound mitre saw mode (Fig
43-A).
7. Undo the knob (43) and pull the
riving knife to the side (Fig. 43-B).
8. Move the riving knife in the
direction indicated by the arrow
until it just clears the teeth of the
saw blade (Fig. 43-C).
9. Push in the safety catch (3) and
raise the blade guard (6) as far
as it will go and lock the knob
(43) (Fig.43-E).
10. Test by hand that the blade
moves freely and does not catch
on anything.
11. Push the control/selector lever
(68) down and turn the table over.
12. Take the upper blade guard (11),
press in the lock (9) and keep
it pressed in, place the guard
over the notch in the riving knife
and release the lock. Check that
the guard is secure and able to
move up and down freely.
850 A 50 B 50 C
50 D50 E
43 A 43 B 43 C
43 F 43 E 43 D
16
ENGLISH
5.3 Cleaning the blade guards
Warning!
Always unplug the machine before cleaning or carrying out any adjustments or maintenance.
The transparent blade guard will need cleaning occasionally if sawdust sticks to it and obscures vision.
• Wipe the guard using a lightly moistened cloth.
• Clean the adjustable blade guard (6) as follows: Raise the handle fully, remove the saw blade (see
chapter Changing Saw Blade). Slide the safety catch (3) to the side and move the guard to a position
in which it can be cleaned. Replace the saw blade.
• Always check that all the safety devices work properly after cleaning or servicing.
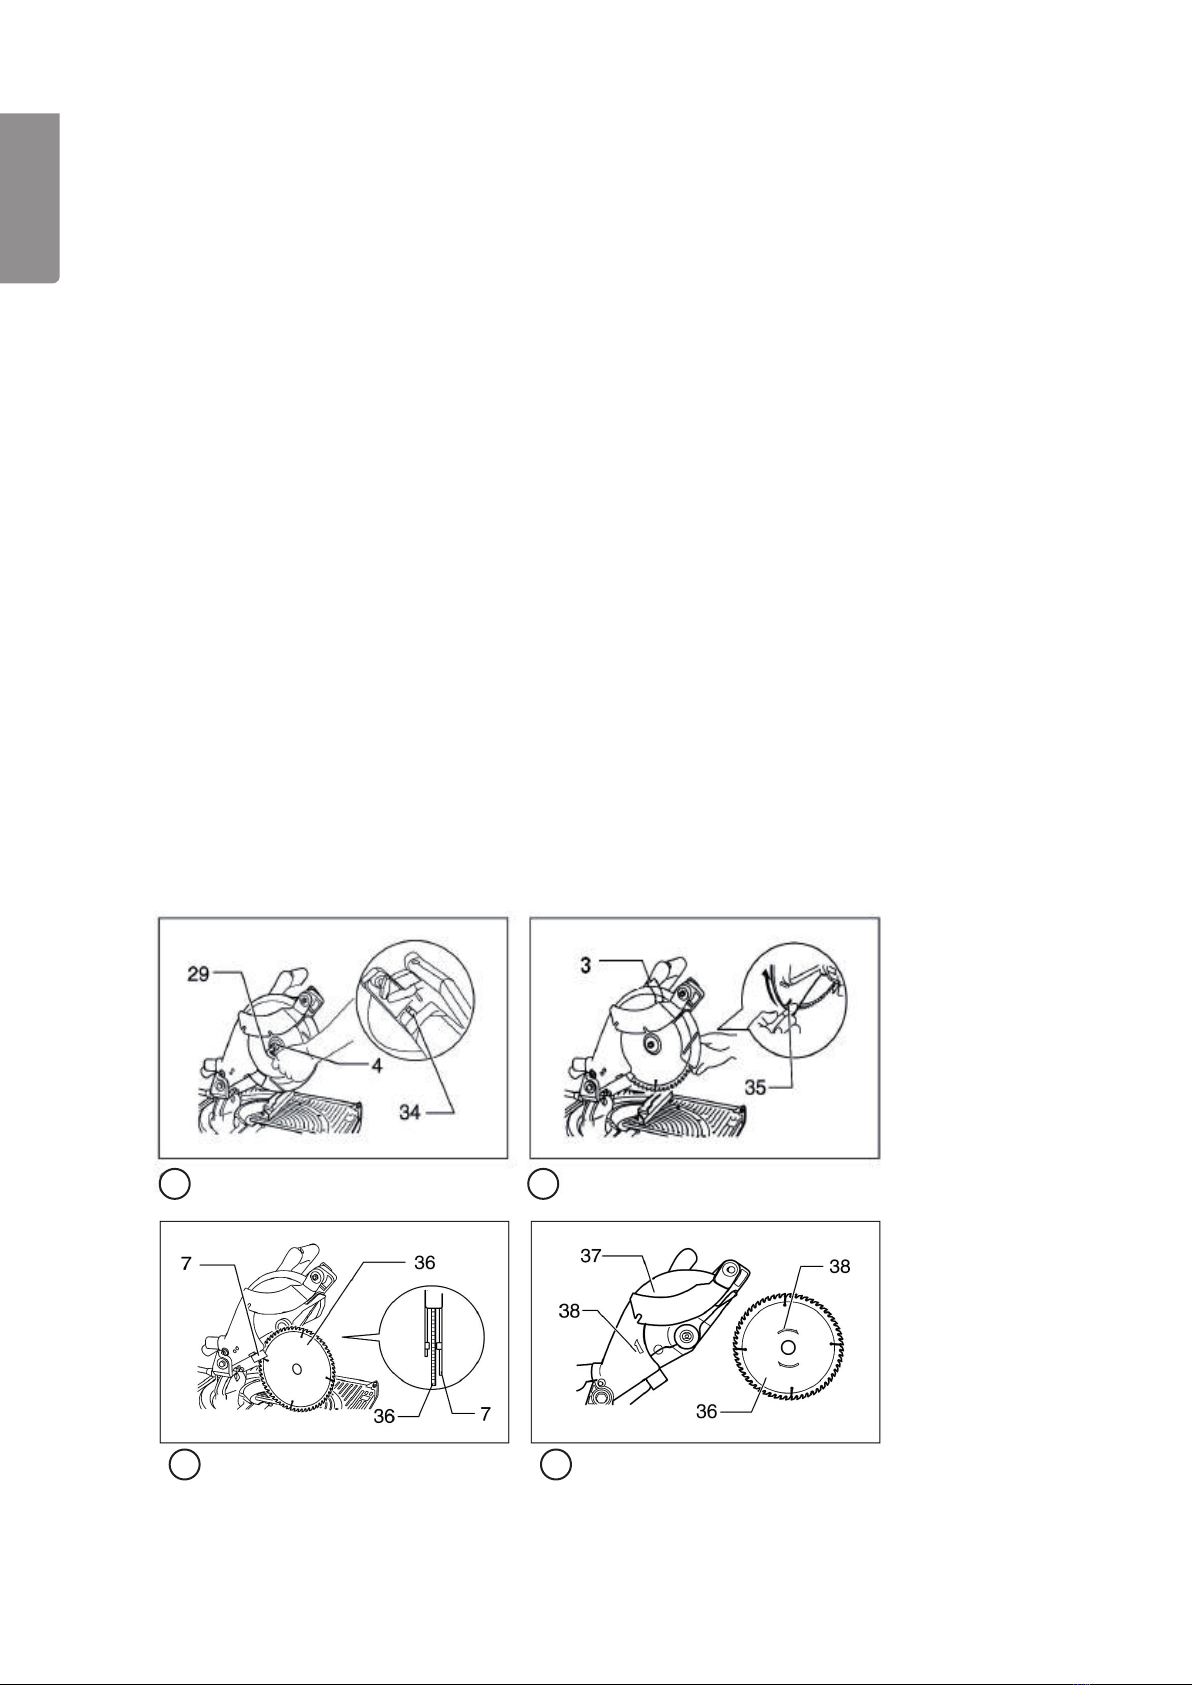
5.4 Changing the blade
1. Turn the table to compound mitre saw mode (motor above table)
2. Lift the handle and saw head to maximum elevation.
3. Push in the spindle lock (34), use the spanner (29) to undo the bolt (4) by turning it clockwise.
4. Release the lock (3) and lift and hold the adjustable blade guard using the lifting handle (35).
5. Unscrew the bolt (4), remove the blade ange (39) and remove the blade (36).
6. Carefully t the new blade making sure that it is the right way round, look at the arrow indicating
the direction of rotation (38) on the saw blade (36) and the blade guard (37).
7. Replace the outer ange (39) and screw the bolt (4) back on.
8. Make sure that the blade rotates freely and it correctly mounted.
19 20
21 22

17
ENGLISH
6. Emergency Stop
When the saw is used as a circular saw the motor is connected to an
emergency stop button. When the saw is used as a compound mitre saw
the emergency stop button is not connected to the motor, instead the motor is
started/stopped using the power switch on the handle (22).
The cover over the switch (23) acts as an “emergency stop button”.
Note: Always use the “emergency stop” and pull out the plug when the saw
is not in use or when left unattended, to prevent children or unauthorised per-
sons from using the saw.
Triggering the emergency stop
Push in the cover over the power switch (23) to stop the motor and the cover stays pushed in.
Resetting the emergency stop
Reset the emergency stop as follows: Press the red button upwards (towards the table) to release the catch
and the cover over the switch can be opened. Start the motor in the normal way.
Note: Always reset the cover over the switch when the motor has started in case you need to stop the motor
in an emergency. (be careful not to trigger the emergency stop whilst resetting the cover)
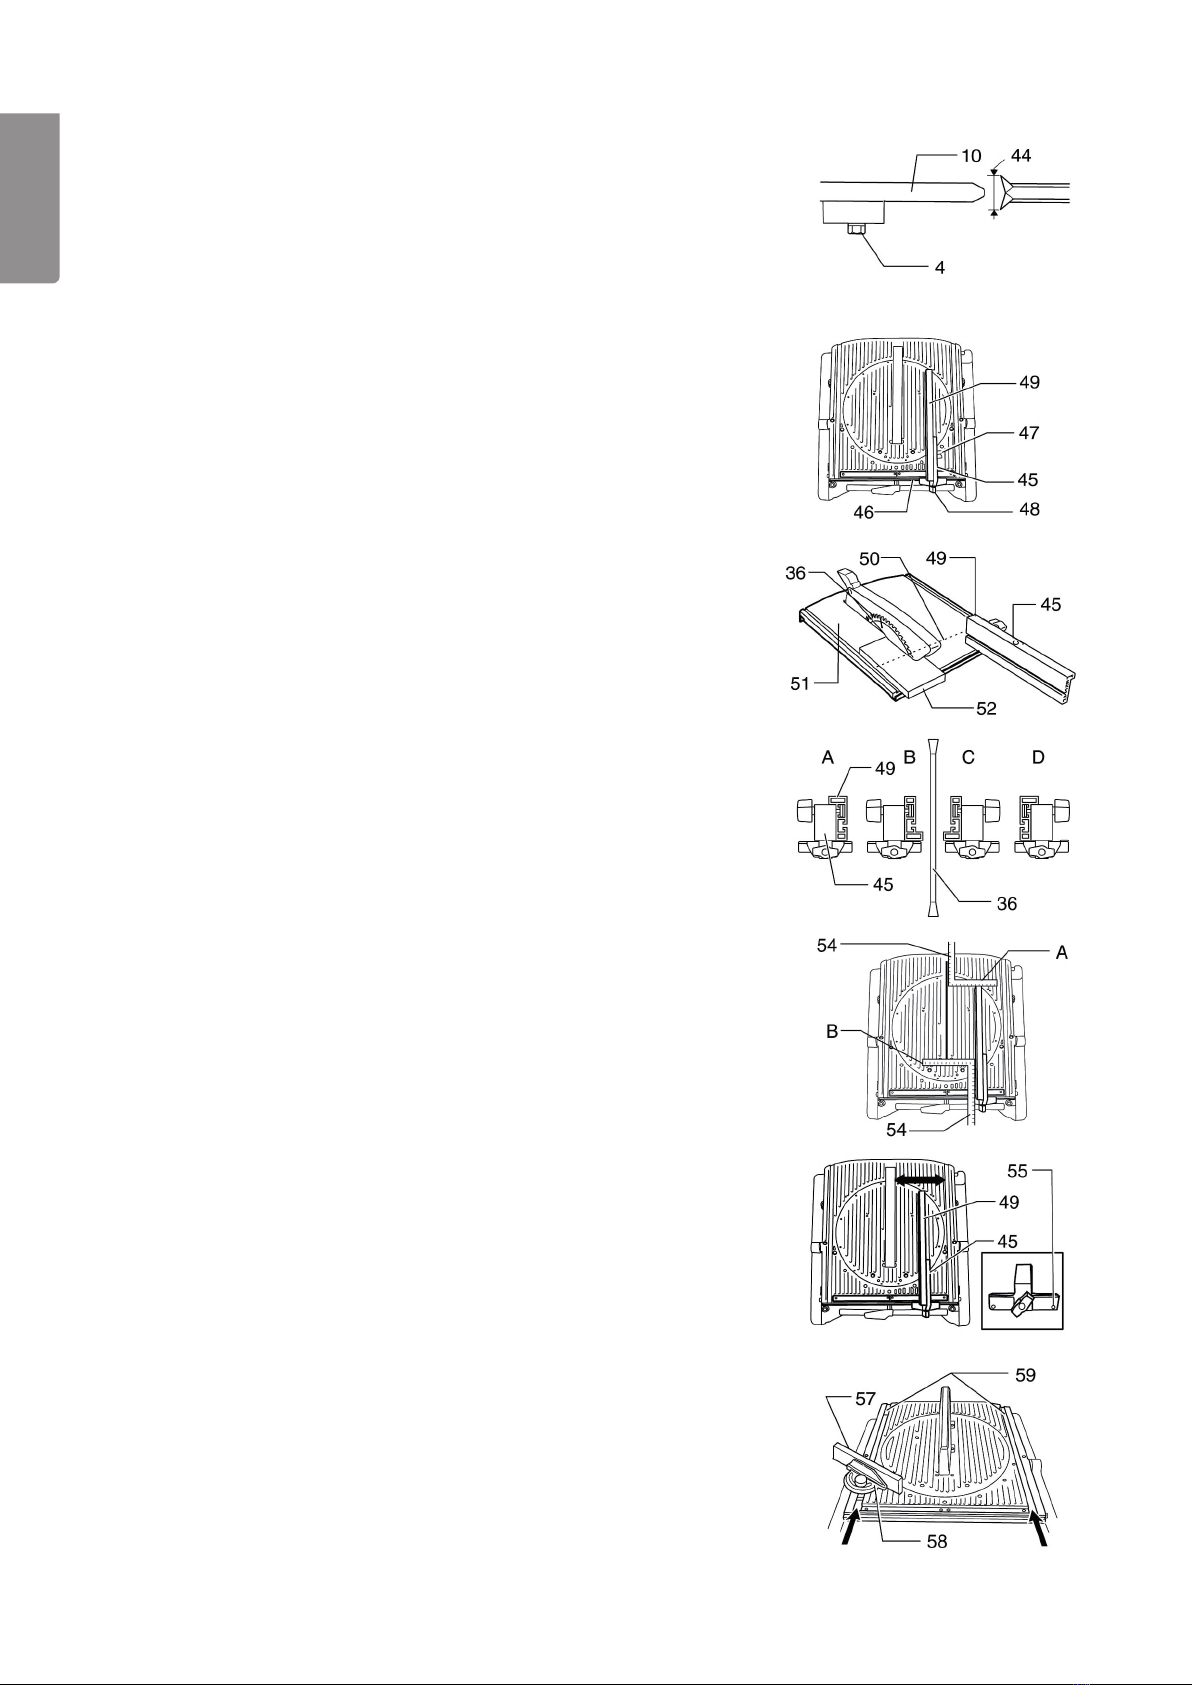
6.1 Riving knife
The riving knife (10) is an important safety feature which prevents the blade from binding and getting stuck in
the workpiece, thereby reducing the risk of the workpiece being ejected violently towards the operator of the
saw. When the saw is used as a table saw the riving knife must always be mounted behind the blade.
Adjust the riving knife if necessary
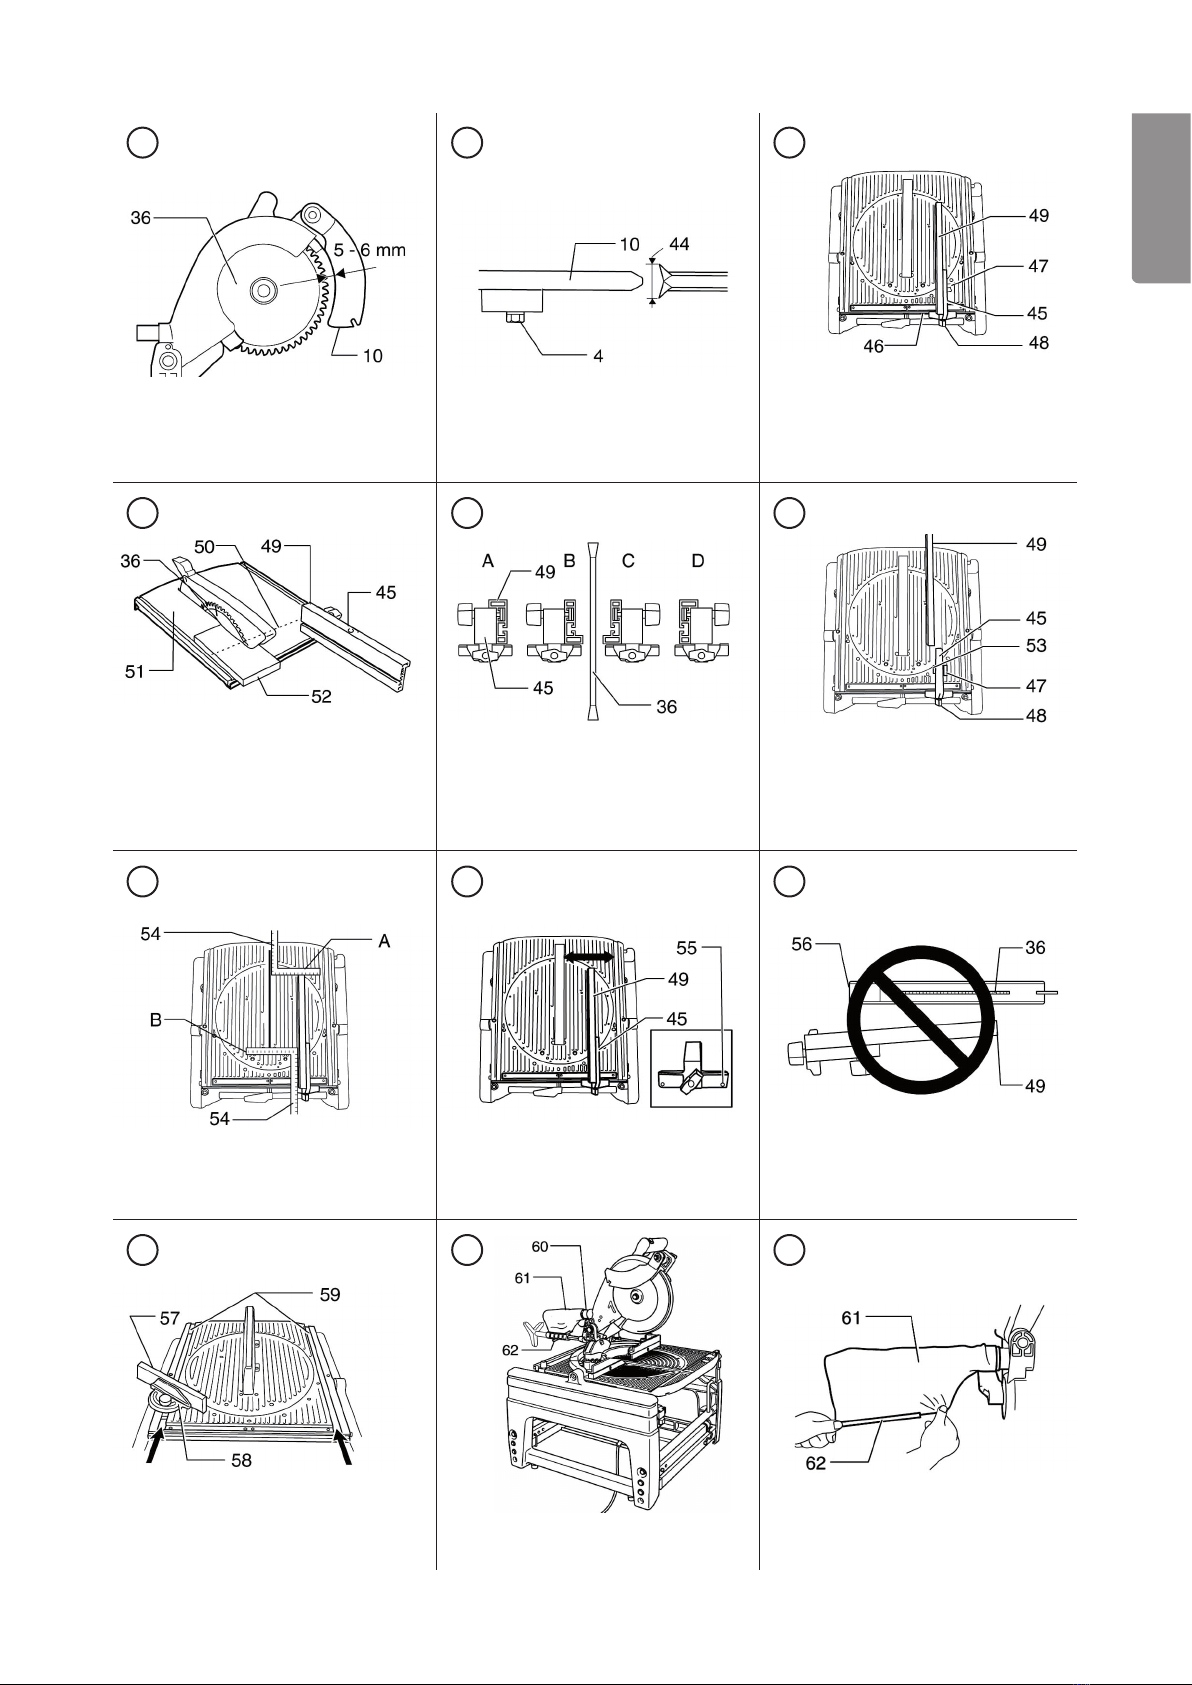
There must be a distance of 5-6 mm between the saw blade (36) and the riving knife (10). Adjust the
riving knife by undoing the bolt (4) and adjusting the gap between the knife (10) and the saw blade (36)
to 5 - 6 mm. Retighten the bolt (4).
The riving knife must be in line with the saw blade.
Warning!
If the saw blade and riving knife are not in line with each other the workpiece could bind and be ejected
towards the operator. The saw blade and riving knife must line up.
26
23
27
18
ENGLISH
6.2 Attaching and adjusting the rip fence
1. Attach the rip fence guide holder (45) in the slot (46) in the table.
2. Set it to the desired width according to the scale and lock the
knob (48).
3. Undo the locking knob (47).
4. Slide the fence (49) into the holder (45) so that it stops just where
the saw blade (36) emerges from the table (see the index line
50). Note: This is important to prevent the workpiece from being
ejected back towards the operator if it gets squashed between the
rip fence and saw blade. Note: The setting should be changed
depending on the thickness and angle setting.
5. Lock the knob (47) so that the fence is fastened in place.
Note:
The rip fence guide can be mounted in the holder (45) in four different
ways.
The rip fence must be parallel to the saw blade, check it as follows:
1. Set the saw blade to its maximum height above the table.
2. Mark one of the teeth.
3. Rotate the blade by hand until the marked tooth is level with the
table, measure the distance from the tooth to the rip fence. Use
a try square, set square, etc.
4. Rotate the blade backwards by hand until the marked tooth is
level with the table, measure the distance from the tooth to the rip
fence at that place. If the two distances (A) and (B) are the same,
the rip fence is parallel to the saw blade.
5. Adjust the rip fence guide if necessary: the holder (45) has an
adjustment screw on the outside, undo the locking knob (48)
slightly, turn the adjustment screw until the rip fence is parallel
to the saw blade. Tighten the locking knob (48).
6. Make sure that the saw blade can rotate freely and that all safety
guards work properly.
Note: Do not lift the rip fence, the holder can break.
6.3 Mitre guide
1. Attach the fence (57) to the mitre guide (58).
2. Fit the mitre guide (58) to the table by sliding the long aluminium
section of the mitre guide into the track (59) at the front of the
table.
19
ENGLISH
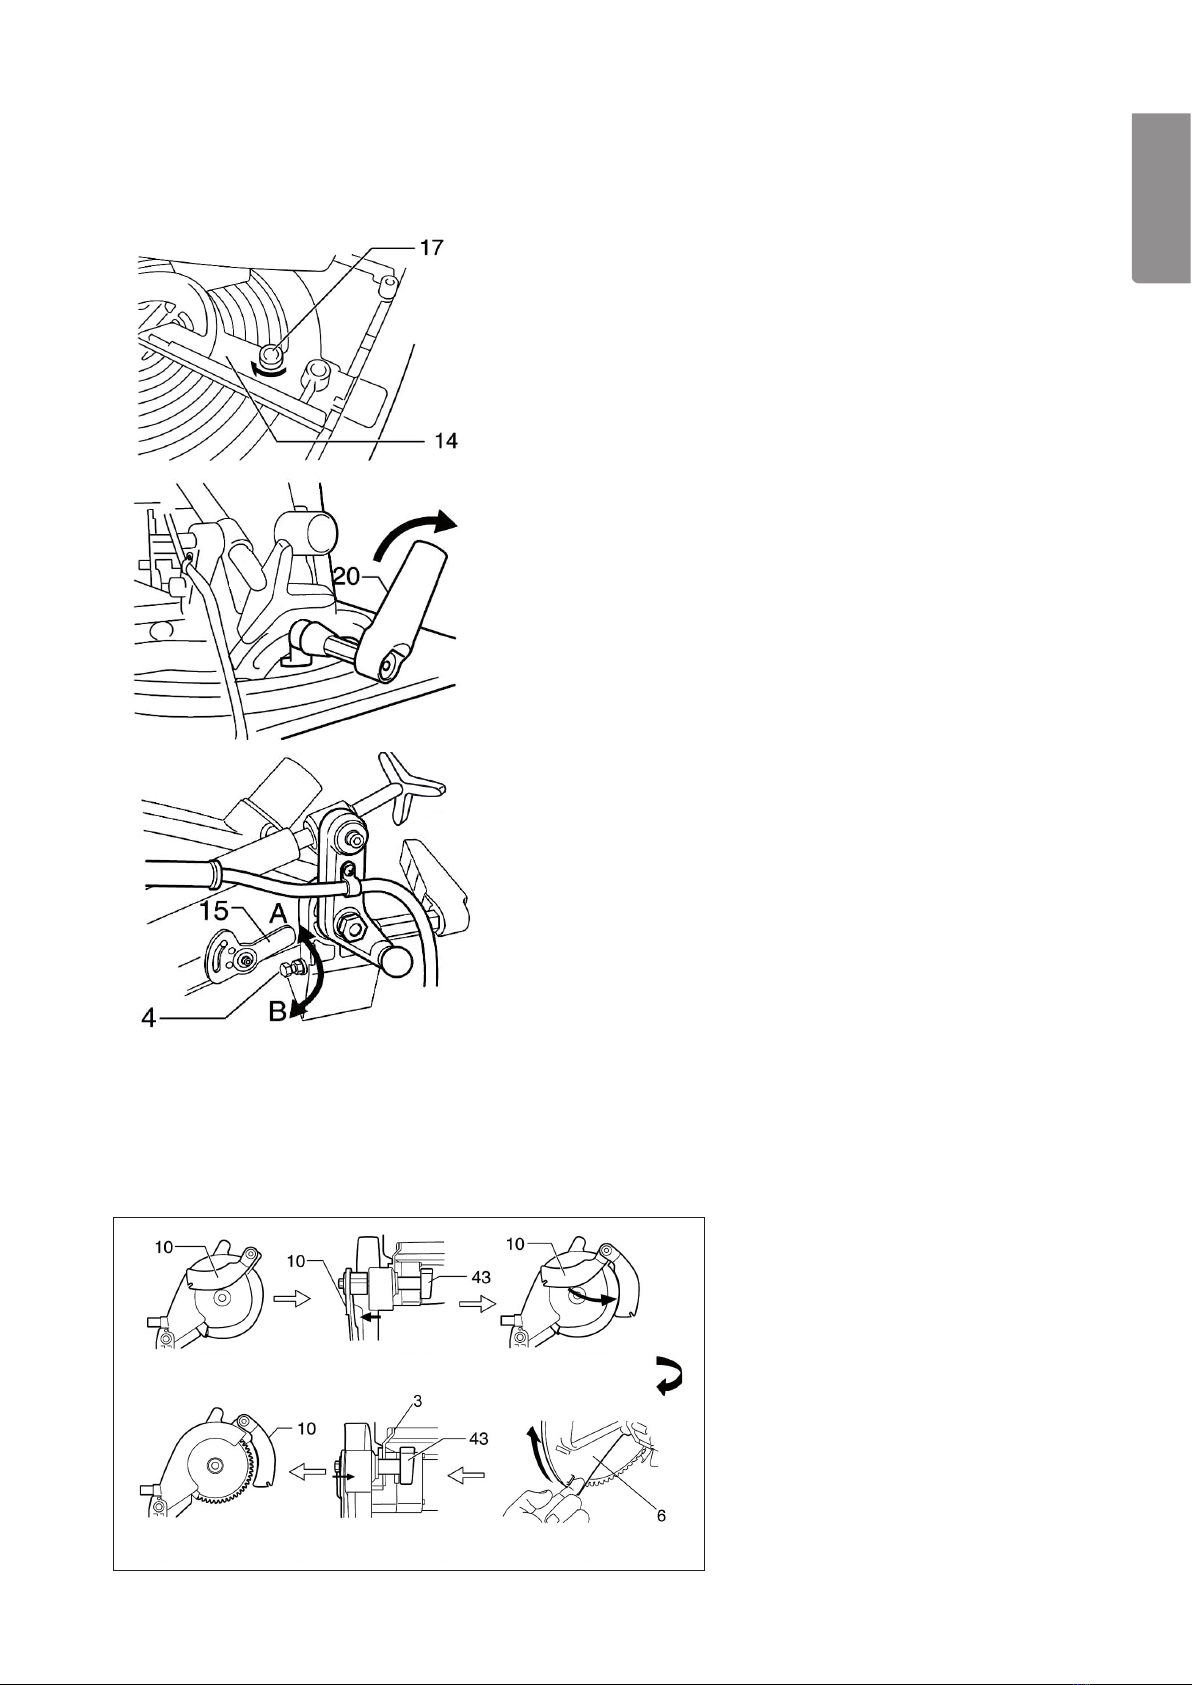
7. Using the combination saw as a circular saw (table saw)
7.1 Setting up the machine as a circular saw
1. Set the table to an angle of 0° and
lock it using the knob (17).
2. Tighten the locking knob (20)
to lock the saw head in place.
3. Lift the depth stop (15) up
towards A so that it is clear of
the bolt (4).
4. Move the riving knife into place.
The upper blade guard (11) (used only in circular saw
mode) attaches to the riving knife (10).
a) The riving knife (10) is moved to the side when
the saw is used as a circular saw (Fig. 43-A).
b) Undo the knob (43) and pull the riving knife to the
side (Fig. 43-B).
c) Move the riving knife in the direction indicated by
the arrow until it just clears the teeth of the saw
blade (Fig. 43-C).
d) Push in the safety catch (3) and raise the blade
guard (6) as far as it will go (Fig.43-D) and lock
the knob (43) (Fig.43-E).
43 A 43 B 43 C
43 F 43 E 43 D
20
ENGLISH
5. Remove the lower blade guard (8).
6. Lock the saw head in place. Pull out the saw head lock (28)
and turn it 90° clockwise as shown by arrow B, push the
handle down until the saw head locks.
Warning: The saw head lock (28) must be on before the
table is turned over. If t is not possible to lock the saw
head down using the lock (28), the cutting depth adjustment
screw (21) must be turned clockwise until the saw head can
be locked.
7. Turning the table over
Warning: Things to consider before turning the table over:
• Switch the machine off using the emergency stop
button. Unplug the machine. Make sure the blade is
not rotating.
• Think about the position of your hands when turning
the table. Hold the middle of the table edge and push
down the control/selector (68). Turn the table carefully.
• Push down far enough to lock the table lock (68) again
8. Attaching the upper blade guard
• Take the upper blade guard (11), press in the lock (9)
and keep it pressed in, place the guard over the notch
in the riving knife and release the lock.
• Check that the guard is secure and able to move up
and down freely.
7.2 Using the combination saw as a table saw
Note:
• Always use a push stick or some other form of “arm extension” instead of taking risks and having your
hands and ngers close to the saw blade.
• Always keep the workpiece pressed against the rip fence and the table top, do not try to bend or lean the
workpiece as it is likely to be ejected from the saw blade towards the operator.
• NEVER pull the workpiece backwards when the saw blade is rotating, turn off the saw, let the blade stop
and then move the workpiece backwards, otherwise it could be thrown backwards towards the operator.
• NEVER try to clear sawdust or offcuts from around the blade when it is rotating.
• NEVER hold hands or ngers close to the blade or on the workpiece in the path of the blade when the
blade is rotating.
• The rip fence must always be securely fastened, otherwise the workpiece could be thrown backwards
toward the operator.
8
Table of contents
Languages:
Other CO/Tech Saw manuals

CO/Tech
CO/Tech TC180C-UK User manual

CO/Tech
CO/Tech MJ10250IV-UK User manual

CO/Tech
CO/Tech J1F-KU04-115-UK User manual

CO/Tech
CO/Tech HF-ZJ-0101 User manual

CO/Tech
CO/Tech M1W-TD2-210E-UK User manual

CO/Tech
CO/Tech RS 18 DMF008C-180 User manual

CO/Tech
CO/Tech JFB10-UK User manual

CO/Tech
CO/Tech 92107L-UK User manual

CO/Tech
CO/Tech ST12 User manual

CO/Tech
CO/Tech J1x-JF2-210 User manual


