CO/Tech LBC 36 User manual

ENGLISH
SVENSKANORSKSUOMI
DEUTSCH
Important!
Read the entire instruction manual carefully
and make sure that you fully understand
it before you use the equipment. Keep the
manual for future reference.
Viktig information:
Läs hela bruksanvisningen noggrant och
försäkra dig om att du har förstått den innan
du använder utrustningen. Spara manualen
för framtida bruk.
Viktig informasjon:
Les disse anvisningene nøye og forsikre deg
om at du forstår dem før du tar produktet i bruk.
Ta vare på anvisningene for seinere bruk.
Tärkeää tietoa:
Lue nämä ohjeet huolellisesti ja varmista
että olet ymmärtänyt ne, ennen kuin alat
käyttää laitetta. Säilytä ohjeet myöhempää
tarvetta varten.
Wichtiger Hinweis:
Vor Inbetriebnahme die komplette
Bedienungsanleitung durchlesen und
aufbewahren.
Art.no Model
40-8677 LBC 36
Brush Cutter/
Grass Trimmer
Sly-/grästrimmer
Busk-/gresstrimmer
Vesakko-/ruohotrimmeri
Freischneider/Motorsense
Ver. 20130724
Original instructions
Bruksanvisning i original
Original bruksanvisning
Alkuperäinen käyttöohje
Original Bedienungsanleitung


3
ENGLISH
4-Stroke Brush Cutter/Grass Trimmer
Art.no 40-8677 Model LBC 36
Please read theentire instruction manual before using theproduct and then save it for future reference.
We reserve theright for any errors in text or images and any necessary changes made to technical data.
If you have any questions regarding technical problems please contact our Customer Services.
Note: Checktheengine oil level before starting theengine, refer to theCare, maintenance and storage - Engine
oil, refilling and changing section below.
Safety
Warning: Children, pets and bystanders should keep adistance of at least 15 metres away from thegrass
trimmer when it is being used. Switchthegrass trimmer off immediately if anyone comes closer.
Product safety labels
Wear protective head gear, protective eyewear/visor and ear defenders.
Wear protective gloves.
Wear safety footwear.
Read theinstruction manual carefully and make sure that you understand its contents before
you use theproduct. Savethemanual for future reference.
Stones and other debris can be ejected by thetrimmer.
Do not permit anyone else to come close to thetrimmer when it is in use. Children, pets and
bystanders should keep adistance of at least 15 metres away from thetrimmer when it is
beingused.
Do not touch theblade whilst it is rotating.
Only accessories approved for speeds up to 8500 rpm should beused.
Warning! Hotsurface. Donottouch.

4
ENGLISH
Safety
Note: Switchoff theengine before all servicing, adjusting and cleaning of thetrimmer.
• Read theentire instruction manual before operating thetrimmer until you understand and can follow all
thesafety instructions and warnings. Makesure that you understand how thetrimmer works and know how
to use all thecontrols.
• Never operate thetrimmer if you are tired or sick. Donot use thetrimmer whilst under theinfluence of drugs,
alcohol or medicine.
• The trimmer is only intended for normal domestic use and only in themanner described in this instruction manual.
• The trimmer must never be used without thedebris shield in place and properly fitted.
• Wear suitable attire. Donot wear loose-fitting clothing or jewellery. Keephair, clothes and gloves away from
moving parts. Loose-fitting clothes, jewellery or long hair could become caught in moving parts.
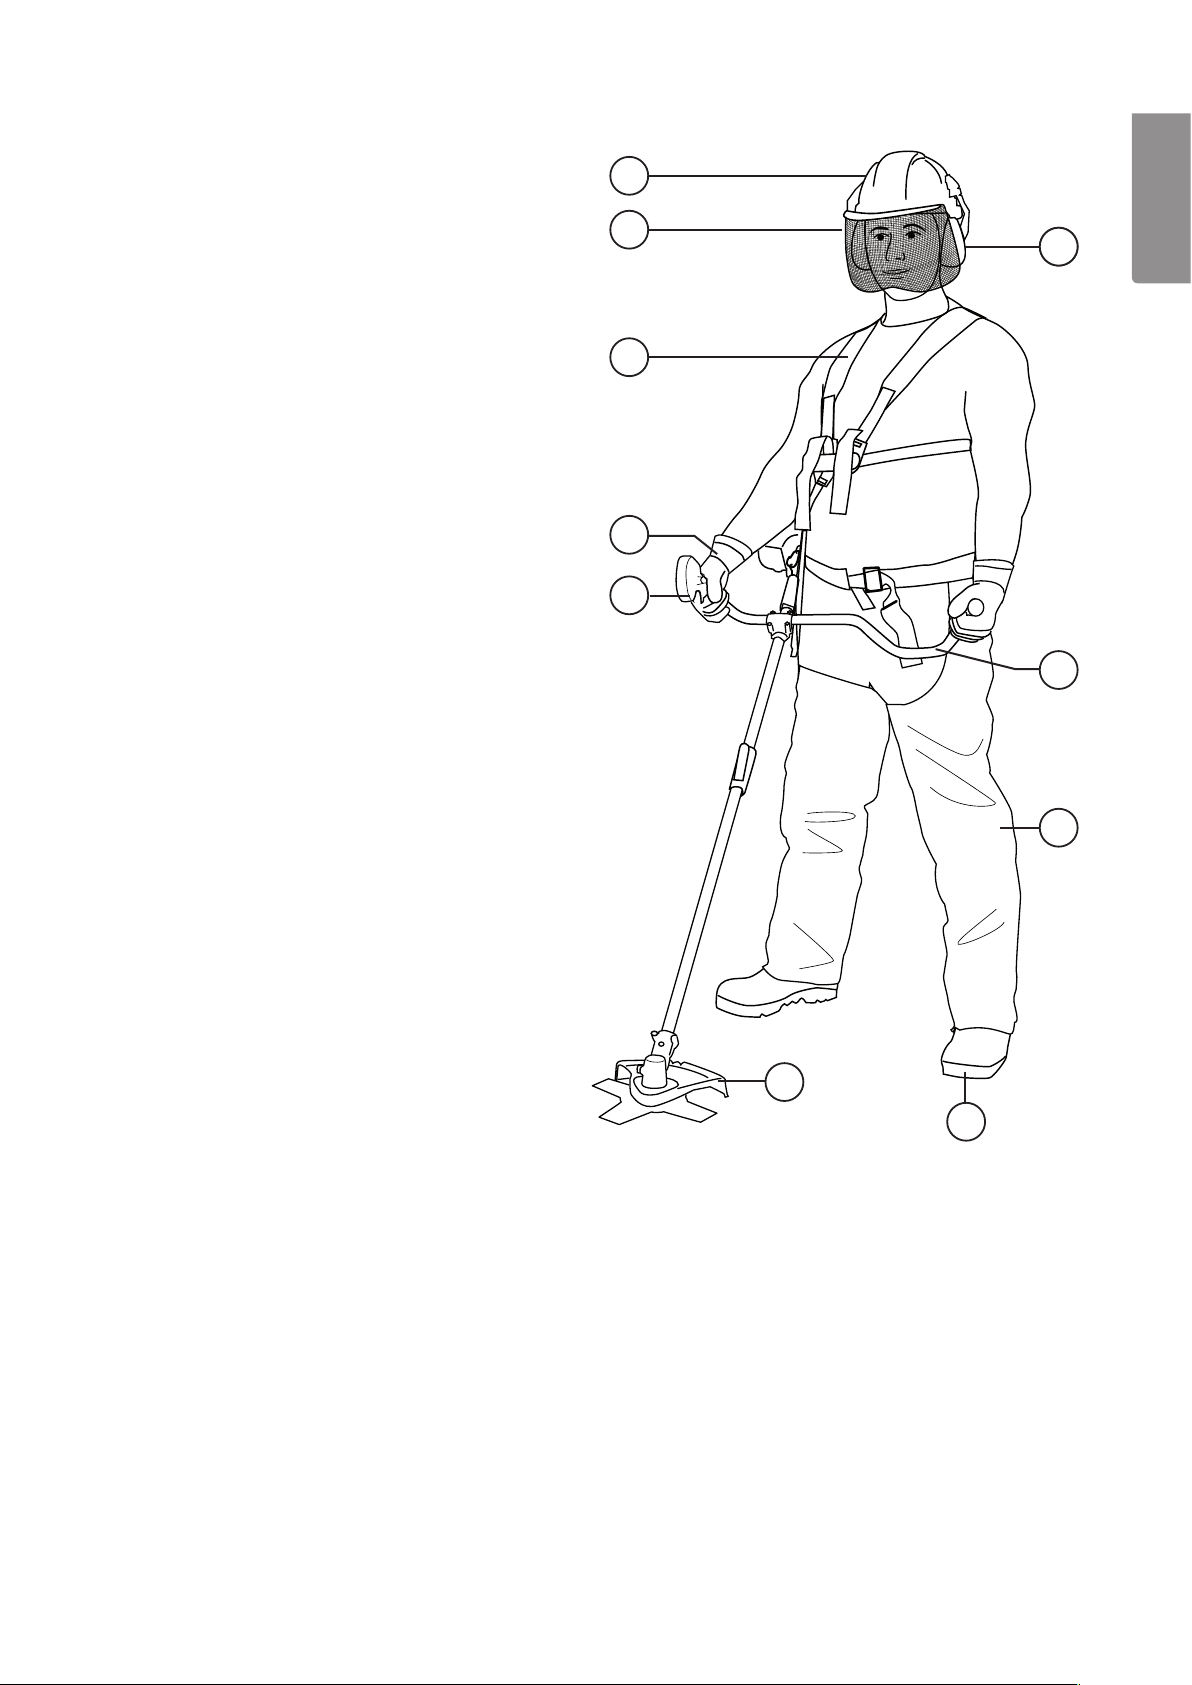
• Wear protective footwear, tight-fitting clothes and safety glasses/visor, ear defenders and ahelmet.
• Always be careful when handling fuel. Openthefuel tank carefully and release any pressure which might
have built up in thetank. Wipeoff any spilt fuel and move thetrimmer at least 3 metres away from
therefuelling location before starting it.
• Remove all easily ignitable/flammable material from thelocation in which fuel is handled or stored.
Neverrefuel thetrimmer or handle fuel in areas where petrol fumes may reach sparks or naked flames.
• Do not smoke while refuelling or using thetrimmer.
• Always hold both handles of thetrimmer firmly with your fingers on one side of thehandle and thumb on
theother side, once theengine is running.
• Always keep thetrimmer head/brush cutter blade below waist height during use.
• Keep all body parts away from thetrimmer head or brush cutter blade when theengine is running.
• Make sure that thetrimmer head or cutter blade is not in contact with any object before starting.
• Only transport/move thetrimmer with theengine switched off.
• Always inspect thetrimmer before starting it. Donot start it if there are worn, missing or damaged parts.
Neveruse thebrush cutter/grass trimmer if it is damaged, incorrectly adjusted or incorrectly assembled.
• Before operating thetrimmer, make sure that all nuts and bolts are tight, that there is no fuel leakage and
that all thesafety features are intact and correctly fitted.
• Check that thebrush cutter blade/trimmer head is intact and correctly fitted before starting.
• Inform anyone who will operate thetrimmer that thebrush cutter blade could possibly bind in thecut
or strike asolid object and stop rotating. Thiscould cause sudden, forceful, uncontrolled kickback.
Everyoperator must be aware of and prepared for this eventuality.
• All service of thetrimmer other than that mentioned in this instruction manual should be carried out by
qualified personnel and only using original spareparts.
• Switch off thetrimmer before laying it on theground.
• Make sure that thebrush cutter blade is sharp and undamaged before usingit.
• Be extra vigilant when cutting small bushes or thick grass. Theycan bind around thebrush cutter blade.
• Keep thehandles clean, dry and free from oil and/orfuel.
• Never start thetrimmer indoors. Exhaust fumes are dangerous to inhale. Theycontain carbon monoxide.
• Avoid running thetrimmer head or brush cutter blade near small objects which can be thrown.
Cleartheworking area of all objects which could be thrown before operating thetrimmer.
• Always stand below thetrimmer if you are using it on aslope. Neveruse thetrimmer on aslope if there is
theslightest risk of you losing your footing, falling or sliding. Holdthetrimmer firmly with bothhands.
• Keep thetrimmer free from grass cuttings and other debris, especially thedebris shield, thearea around
theblade/trimmer head and theengine.
• The trimmer must only be used by adults who have read theinstruction manual.
• Do not use thegrass trimmer without thesilencer or silencer cover.
• The silencer can become very hot, do not touch it with your hands or other parts of yourbody.
• The trimmer must not be used for any other purpose than for clearing brushwood and trimming grass.
• Discard and replace thetrimmer head or brush cutter blade immediately if it is damaged in anyway.
• The trimmer must not be modified or used for any purpose other than that for which it is intended. Doingso
increases therisk of accidents and is not covered by theguarantee.
• Do not use thetrimmer close to flammable gases and liquids since this could cause afire or lead to anexplosion.
• Bear in mind that thetrimmer head/brush cutter blade will continue to rotate after thetrimmer has been switched off.
• Let thetrimmer head/brush cutter blade come to acomplete standstill before putting thetrimmer down
once it has been switched off.
• Fit theblade cover and lash thetrimmer securely whenever transporting it in order to prevent fuel leaks,
damage to thetrimmer or personal injury.

5
ENGLISH
A
C
D
E
J
H
I
10B
F
G
Safety equipment
A. Helmet
B. Earprotectors
C. Visor
D. Harness
E. Gloves
F. Debrisshield
G. Safetyboots
H. Heavy-duty work trousers
I. Anti-vibration handle
J. Throttle with ignition switch

6
ENGLISH
1
2
3
4
5
6
7
8
9
10
11
12
Parts
Motor
1. Air filter
2. Priming bulb
3. Choke
4. Starter handle
5. Fuelcap
6. Fueltank
7. Silencer
8. Oil filler cap/dipstick
Bike handle
9. [On/off] Ignition switch
10. Throttle set button (keeps engine on half power)
11. Throttle
12. Safety switch

7
ENGLISH
Assembly
Attaching the debris shield
1. Remove thetwo screws and theholder from thedebris shield.
2. Make sure that thepeg in theshield bracket
slots into thenotch in theframepipe.
2. Place thebike handle into theclamp and screw
thetop of theclamp back on loosely.
1. Undo theclamp on theupper frame pipe
to release thelocking plate. Insertthelower
frame pipe into theclamp so that thehole in
thepipe lines up with theslot in theclamp and
therelease catch.
3. Attach theholder and tighten thescrews.
3. Adjust theangle of thehandle before tightening
thefour screws.
2. Press therelease catch in and slide thetwo
halves of theframe pipe together.
Attaching the handle
1. Open thehandle clamp by removing thefour screws.
Assembling the frame pipe

8
ENGLISH
3. Release thecatch and then pull on thepipe to make
sure that thecatch has located in thehole and
fastened thepipe inplace.
4. Make sure that thelower frame pipe with thetrimmer
head is at thecorrect angle to theupper frame pipe
with thehandle and engine. Pushthelocking plate
down and tighten thelocking knob (see fig.).
5. To detach thelower frame pipe, undo thelocking knob,
press in therelease catch and pull thepipe out of
theclamp.
1. Fit theinner support washer onto thedrive shaft
so that thehole lines up with thehole in theside
of thehousing.
1. Fit theinner support washer onto thedriveshaft.
3. Lock thedrive shaft by poking thelarger of
thetwo included Allen keys through all three
holes in thecover, housing and theinner
supportwasher.
4. Thread thetrimmer head onto thedrive shaft
and screw it finger-tight (see fig.).
Note: Thetrimmer head has aleft-handed
thread, so you have to tighten it by turning it
the“wrong way”.
5. Remove theAllenkey.
2. Fit thecover over thehousing so that theholes
lineup.
2. Place thebrush cutter blade onto theinner
support washer (the text on theblade should
be face down, against thewasher), make sure
theblade is flat against thewasher.
Fitting the trimmer head
Fitting the brush cutter blade

9
ENGLISH
Operating instructions
Before starting:
Note: Checktheengine oil level before starting theengine, refer to theCare, maintenance and storage - Engine
oil, refilling and changing section below.
Refuelling
Note:
• Always refuel thetrimmer outdoors.
• Petrol is highly flammable.
• Never smoke whilst refuelling thetrimmer or handling thefuel.
• Keep thefuel well away from flames and sparks at alltimes.
• Make sure that thetrimmer has been switched off and has cooled down before it is refuelled.
• Use only 95/98 octane petrol.
1. Lay thetrimmer down in asuitable place for refuelling.
2. Remove thefuel cap and fill thetank with petrol.
3. Screw thefuel cap back on and wipe up any spills immediately.
4. Move thetrimmer at least 3 metres away from therefuelling site before starting it.
3. Fit theouter support washer, face theconcave
side of thewasher down, against theblade.
5. Lock thedrive shaft by poking thelarger of
thetwo included Allen keys through theholes
in thehousing and theinner support washer.
Screwthenut onto thedrive shaft and tighten
itwell.
4. Fit thecover washer onto thedriveshaft.

10
ENGLISH
Starting the engine
Note: Beforestarting thetrimmer, make sure that you have read theentire instruction manual and understood all
thesafety instructions and warnings. Makesure that you understand how thetrimmer works and know how to
use all thecontrols.
Running in the engine
A new engine should be “run in” by using it at low speed and with low resistance for thefirst few hours. Thiswill
help all themoving parts of theengine to loosen up and mate together better and will ultimately lengthen
theuseful life of theengine. After it has been run in, theengine will provide maximum performance and can be
operated at full load. However, theengine should only be operated at full throttle for short periods.
Cold engine
1. Press thepriming bulb repeatedly until fuel runs
back down theclear return tube.
2. Move thechoke lever to theclosed position
(upwards).
3. Set theignition switch to ON (I).
4. Lay thetrimmer on theground so that it is supported by thefuel tank and debris shield. Makesure that
thetrimmer head or brush cutter blade is clear of theground and will not contact anything when thetrimmer
is switched on. Note: Neverstart thetrimmer when it is hanging by theharness or if you are holding it in
such away that you might lose control of thetrimmer when it is started.
5. With your left hand, grip thetrimmer just in front of theengine.
6. Gently pull thestarter handle until you feel some resistance. Onceresistance has been met, finish by
pulling thestarting handle with aquick and powerful motion.
7. Gradually lower thechoke lever as theengine warms up. Lettheengine warm up for afew minutes
after it has been started fromcold.
8. When theengine has warmed up sufficiently that it idles smoothly, it is ready foruse.
Note: Thetrimmer head/brush cutter blade should not rotate when theengine is idling. Ifthetrimmer
head/brush cutter blade rotates with theengine idling, theidling speed needs adjusting, refer to
theCare,maintenance and storage - Idle speed adjustment section below.
Warm engine
1. Check that thechoke is completely open.
2. Set theignition switch to ON (I).
3. Lay thetrimmer on theground so that it is supported by thefuel tank and debris shield. Makesure
that thetrimmer head or brush cutter blade are clear of theground and will not contact anything when
thetrimmer is switched on. Note: Neverstart thetrimmer when it is hanging by theharness or if you are
holding it in such away that you might lose control of thetrimmer when it is started.
4. With your left hand, grip thetrimmer just in front of theengine.
5. Gently pull thestarter handle until you feel some resistance. Onceresistance has been met, finish by pulling
thestarting handle with aquick and powerful motion.

11
ENGLISH
Stopping the engine
1. Release thethrottle so that theengine is just idling.
2. Set theignition switch to OFF (0).
3. Let thetrimmer head/brush cutter blade come to acomplete stop before laying thetrimmer on theground.
Trimmer operation
The harness
Use theharness as follows:
• Put theharness on so that thetrimmer hanging clip is on theright-hand side and thequick release tab is on
yourchest.
• Hold thetrimmer on your right-hand side and hook it onto theharness.
• Adjust theharness so that thetrimmer is balanced. Adjusttheposition and angle of thehandle if necessary.
• When using thegrass trimmer, theharness should be adjusted so that thetrimmer head hangs 0–300 mm
off theground.
• When using thebrush cutter, theharness should be adjusted so that thetrimmer head hangs 100–300 mm
off theground.
Note: Useno other accessories than theincluded trimmer head and brush cutter blade. Whenthese cutting
attachments wear out, they should only be replaced with identical original spareparts.
1. Ensure that you have theappropriate cutting attachment (trimmer head or brush cutter blade) fitted for
thetask athand.
2. With theengine switched off, put theharness on and hook thetrimmer onto it. Adjusttheharness so that
thetrimmer head/brush cutter blade is thecorrect height off theground (see above).
3. Unhook thetrimmer from theharness, lay it on theground and start theengine.
4. When theengine is idling smoothly, hook thetrimmer onto theharness.
5. Hold thetrimmer with bothhands.
6. Depress thesafety switch (12) and thethrottle and let theengine speedup.
7. Keep thetrimmer head parallel to theground and swing thetrimmer back and forth in alevelarc.
• Bear in mind that it is thetip of thetrimmer line which cuts thegrass. Donot force thetrimmer through thick
grass; let thetrimmer work at its ownpace.
• Take care when using thebrush cutter blade not to try and cut through objects which are too coarse for
theblade to handle.
• Hold thethrottle all theway in (full power) whenever using thetrimmer.
• Keep afirm footing and balance at alltimes.
• Do not overreach.
• Keep thecutting attachment below waist height.
• Keep all parts of your body away from therotating parts.
• Adapt your working pattern to theprevalent conditions, do not move thegrass trimmer too quickly and work
at your ownpace.
• Be careful, so thetrimmer line doesn’t cut thebark of trees or plants that you want tokeep.
• Trimming against hard surfaces such as fences, walls and rocks will wear out thetrimmer line sooner.

12
ENGLISH
!
Important considerations when using the brush cutter blade
Use only thesupplied brush cutter blade or anidentical replacement.
Asaw-toothed clearing saw blade must not beused.
The brush cutter blade can be tilted to various angles for cutting brush
from around tree trunks.
• Normal use: Settheblade to position “A” for normal use when
cutting brush.
• Position “B” can also be used if thehandles are held firmly.
Note: Neveruse theblade in position “C”. Thisposition can throw
small objects up towards any people or animals closeby.
Feeding out the trimmer line
1. Let theengine come up to fullpower.
2. Tap thetrimmer head on theground and lift it upagain.
3. The line will be fed out automatically.
4. The line will be cut to thecorrect length by thecut-off knife under thedebris shield.
Care, maintenance and storage
Note:
• Switch thetrimmer off and let it cool down. Disconnect thespark plug cable from thespark plug (refer to
theChanging/servicing thespark plug section below) before cleaning or servicing thetrimmer.
• Clean thetrimmer using alightly moistened cloth. Onlyuse mild cleaning agents, never solvents or
corrosivechemicals.
• Clean thecooling fins and theventilation openings in theplastic housing regularly, so theengine is
properlycooled.
Filling/changing the engine oil
Remove theoil filler cap (8) and pour in 100 ml oil. Useonly SAE 10W-30, APISG.
• The oil level should come up to theedge of thefiller hole when thetrimmer is lying
on theground supported by thefuel tank and thedebris shield.
• Note: Change theoil after thefirst 20 hours operation and then at thebeginning or
end of every working season.
Changing the trimmer line
1. Press in thetwo spring catches on thesides of
thetrimmer head and remove thecover.
2. Lift up theends of any remaining line and guide
them into thenotches on thespool.

13
ENGLISH
3. Pull thespool out of thecover.
4. Remove any remaining line from thespool.
5. Begin by hooking themiddle of thenew line into
thenotch in thecentre of thespool. Makesure
that themiddle of thenew line is notched in.
7. Fit thespool back into thecover and guide
theends of theline through theslots in theside
of thecover.
6. Wind thenew line around thespool in
thedirection marked on thespool and guide
theends of theline into thenotches on theedge
of thespool.
8. Make sure that thespring is seated in thecentre of thetrimmer head and fit thecover back on. Ensurethat
thetwo spring catches lock thecover on securely.

14
ENGLISH
Idle speed adjustment
Any adjustment of theidle speed should be carried out when
theengine iswarm.
Carefully turn theidle speed adjustment screw as follows:
• Clockwise: Higheridlespeed.
• Anticlockwise: Loweridlespeed.
1. Remove theplastic cover over theair filter and
carburettor.
2. Remove theair filter and wash it in mild
soapywater.
3. Allow thefilter to completely dry before refitting it.
Air filter
Lubrication of the head angle adjuster
The head angle adjuster should be lubricated after
every 25 hours of operation.
1. Loosen thehead of thebolt on theside of
thegearbox and smear thepivot with some high
temperature grease.
2. Wipe off any excess grease.
3. Tighten thebolt.

15
ENGLISH
0.60–0.70mm
Changing/servicing the spark plug
Note: Onlyuse aspark plug identical to theone which is factory fitted (NGK CMR7H) or equivalent.
1. Remove thetwo bolts at thebottom of
theplastic cover over thesilencer.
3. Undo thebolt in theplastic cover over theengine and remove thecover.
2. Press in thetop of thecover to release
thespring catch and remove thecover.
4. Disconnect thespark plug cable from thespark
plug and remove thesparkplug.
Fit anew spark plug and tighten to atorque of
9.8–11.8 Nm (1.0–1.2 kgm).
Checking the spark plug gap
Special tools for measuring and adjusting thegap
between theelectrodes of spark plugs can be
purchased.
If necessary, correct thegap as shown in
thefigurebelow.

16
ENGLISH
Carburettor settings
The carburettor has been factory adjusted for optimum power.
Storage
• The fuel tank and carburettor should not be left filled with petrol over thewinter, as this could lead to
startingproblems.
• Empty thefuel tank by starting theengine and letting it run until it is out offuel.
• Clean thetrimmer before putting it away for storage.
• Fit theblade guard onto thebrush cutter blade.
• Store thetrimmer in adry, dust-free environment out of thereach of children.
Troubleshooting guide
Problem Cause
The engine won’t start or
only runs at lowspeed.
• Incorrect starting procedure. Readtheinstruction manual.
• Faulty spark plug. Cleanor change thesparkplug.
• Dirt in thecarburettor. Getaqualified technician to clean thecarburettor.
• Clogged fuel filter. Changethefuel filter (inside thefuel tank).
The engine starts but with
loss ofpower.
• Wrong choke setting. Openthechoke.
• Dirty air filter. Cleanor change theair filter.
• Dirt in thecarburettor. Getaqualified technician to clean thecarburettor.
The engine doesn’t respond
to thethrottle.
• Engine not adequately warmed up. Allowtheengine to idle for aminute.
Loss of power underload. • Faulty spark plug. Cleanor change thesparkplug.
The engine runs irregularly. • Dirt in thecarburettor. Getaqualified technician to clean thecarburettor.
Disposal
This product should be disposed of in accordance with local regulations. Ifyou are unsure how to proceed,
contact your local authority.
Specifications
Brush cutter blade 255mm
Trimmer line 2.4mm
Engine capacity 35.8cc
Power 1.0 kW (1.36 hp)
Weight 8.4kg
Fuel tank capacity 0.65l
Engine oil capacity 0.1l
Engine speed 9300rpm
Noise level LwA,d = 113 dB(A), K = 1.95 dB(A)
Vibration level with brush cutter blade at idle speed: left handle 1,619 m/s², right handle 1,440 m/s².
Vibration level with brush cutter blade at full throttle: left handle 5,190 m/s², right handle 3,043 m/s².
Vibration level with trimmer head at idle speed: left handle 1,639 m/s², right handle 1,432 m/s².
Vibration level with trimmer head at full throttle: left handle 6,187 m/s², right handle 5,696 m/s².
Uncertainty: K = 1,5 m/s²

17
SVENSKA
Sly-/grästrimmer 4-takt
Art.nr 40-8677 Modell LBC 36
Läs igenom hela bruksanvisningen före användning och spara den sedan för framtida bruk.
Vi reserverar oss för ev. text- och bildfel samt ändringar av tekniska data.
Vid tekniska problem eller andra frågor, kontakta vår kundtjänst (se adressuppgifter på baksidan).
Obs! Fyllpå olja imotorn före start, se avsnitt Skötsel, underhåll och förvaring – Motorolja, påfyllning och bytenedan.
Säkerhet
Varning: Barn, husdjur och åskådare ska vara på ettavstånd av minst 15 meter från trimmern när den används.
Stängomedelbart av trimmern om någon kommer närmare.
Produktmärkning med säkerhetssymboler på trimmern
Använd skyddshjälm, skyddsglasögon/visir och hörselskydd.
Använd skyddshandskar.
Använd skyddsskor.
Läs hela bruksanvisningen noggrant och försäkra dig om att du har förstått den innan du
använder utrustningen. Sparaden sedan för framtida bruk.
Stenar och andra föremål kan kastas i väg av trimmern.
Tillåt ingen annan än användaren att vara nära trimmern när den används. Barn, husdjur och
åskådare ska befinna sig på ettavstånd av minst 15 meter från trimmern när den används.
Vidrör inte roterande klinga.
Använd endast tillbehör som är godkända för hastighet upp till 8500rpm.
Varning! Hetyta, risk för brännskada.

18
SVENSKA
Säkerhet
Obs! Stängav motorn före all service, justering och rengöring av trimmern.
• Läs hela bruksanvisningen tills du förstått och kan följa alla säkerhetsföreskrifter och varningar. Försäkra dig
också om att du har förstått hur trimmern ska hanteras och bekantat dig med alla reglage.
• Använd aldrig trimmern om du är trött eller sjuk. Användden heller aldrig om du är påverkad av alkohol,
droger eller medicin.
• Trimmern är endast avsedd för privat bruk på det sätt som beskrivs iden här bruksanvisningen.
• Trimmern får aldrig användas utan att skyddsskärmen är hel och korrekt monterad.
• Bär lämplig klädsel. Bärinte löst sittande kläder eller smycken. Hållhår, kläder och handskar undan från
rörliga delar. Lösakläder, smycken och långt hår kan fastna irörliga delar.
• Använd skyddsskor, åtsittande kläder, skyddsglasögon/visir, hörselskydd ochhjälm.
• Var alltid aktsam vid hantering av bränsle. Öppnatanklocket försiktigt och släpp ut trycket som kan ha
uppkommit itanken. Torkaupp allt spill och flytta sedan trimmern minst 3 meter från tankningsplatsen innan
den startas.
• Avlägsna alla lättantändliga/brandfarliga föremål från de platser där bränsle hanteras eller förvaras.
Tankaeller hantera aldrig bränsle på platser där gnistor eller öppen låga kan förekomma eller uppstå.
• Rök inte under tankning eller under arbete med trimmern.
• Håll alltid trimmern stadigt ibåda handtagen med fingrarna på ensida av handtaget och tummen på andra
sidan när motorn äri gång.
• Se till att trådkassetten/slyklingan alltid håller sig under midjehöjd vid användning.
• Håll undan alla kroppsdelar från trådkassetten/slyklingan när motorn startats.
• Kontrollera före start att trådkassetten/slyklingan inte har kontakt med något föremål.
• Transportera/flytta trimmern med motorn avstängd.
• Inspektera alltid trimmern före start. Användden inte om det finns utslitna, saknade eller skadade delar.
Användaldrig entrimmer som är skadad, feljusterad eller felaktigt monterad.
• Före start, se till att alla skruvar och muttrar är ordentligt åtdragna, att inget bränsleläckage förekommer
samt att alla skyddsanordningar är hela och korrekt monterade.
• Kontrollera att trådkassetten/slyklingan är oskadad och korrekt monterad förestart.
• Informera varje person som ska använda trimmern om att slyklingan kan träffa föremål som gör att klingan
fastnar och inte kan rotera. Dettakan ge upphov till okontrollerade kast. Varjeanvändare måste vara
medveten om och beredd pådetta.
• All annan service på trimmern än den som nämns ibruksanvisningen ska utföras av kvalificerad personal
och endast med originaldelar.
• Stäng av trimmern innan den läggs ner på marken.
• Försäkra dig om att slyklingan är vass och helt oskadad innan den används.
• Var extra uppmärksam när du kapar små buskar eller tjockt gräs som kan fastna kring slyklingan.
• Håll handtagen rena, torra och fria från olja och bränsle.
• Starta aldrig trimmern inomhus. Avgaserna är farliga att andas in, de innehåller koloxid.
• Undvik att föra trådkassetten/slyklingan nära små föremal som kan kastas i väg. Rensaytan som ska
trimmas från främmande föremål innan arbetet påbörjas.
• Stå alltid nedanför trimmern om du använder den på lutande mark. Användaldrig trimmern på lutande mark
om det finns minsta risk för att du tappar fotfästet, ramlar eller glider ner. Hållalltid ibåda handtagen.
• Håll trimmern ren från gräsrester och andra beläggningar, speciellt på skyddsskärmen, området kring
trådkassetten/slyklingan och motorn.
• Trimmern får endast användas av vuxna personer som har läst bruksanvisningen.
• Använd inte grästrimmern utan ljuddämpare eller ljuddämparkåpa.
• Ljuddämparen blir mycket het vid användning, håll undan händer och andra kroppsdelar.
• Trimmern får inte användas till något annat ändamål än röjning av sly och trimning avgräs.
• Kassera omedelbart och byt ut trådkassetten/slyklingan om den skadats på någotsätt.
• Trimmern får inte ändras eller användas för andra arbetsmoment. Riskenför olycksfall ökar och garantin
gäller inte.
• Använd inte trimmern inärheten av brännbara gaser och vätskor eftersom det kan leda till brand eller explosion.
• Tänk på att trådkassetten/slyklingan fortsätter att rotera efter att trimmern slagits av.
• Låt trådkassetten/slyklingan helt sluta rotera innan trimmern ställs ner på markan när den slagits av.
• Montera klingskyddet och spänn fast trimmern ordentligt vid transport för att undvika bränsleläckage, skada
på trimmern och personskada.

19
SVENSKA
A
C
D
E
J
H
I
10B
F
G
Säkerhetsutrustning
A. Hjälm
B. Hörselskydd
C. Visir
D. Sele
E. Handskar
F. Trimmer-/klingskydd
G. Skyddsskor
H. Grovaarbetsbyxor
I. Avvibrerat handtag
J. Gashandtag med stoppknapp

20
SVENSKA
1
2
3
4
5
6
7
8
9
10
11
12
Knappar och funktioner
Motor
1. Luftfilter
2. Primerblåsa
3. Chokereglage
4. Handtag till startsnöre
5. Tanklock
6. Bränsletank
7. Ljuddämpare
8. Lock för oljepåfyllning och oljekontroll
Manöverhandtag
9. [0/I] På/av
10. Spärr för gasreglage (låser gasreglaget på halvgas)
11. Gasreglage
12. Säkerhetsspärr
Other manuals for LBC 36
3
This manual suits for next models
1
Table of contents
Languages:
Other CO/Tech Trimmer manuals

CO/Tech
CO/Tech OB-LR06-230/C-UK User manual

CO/Tech
CO/Tech GT102 B User manual

CO/Tech
CO/Tech YT9071A User manual

CO/Tech
CO/Tech LBC 36 User manual

CO/Tech
CO/Tech M1E-TD3-510-UK User manual

CO/Tech
CO/Tech GTC350B User manual

CO/Tech
CO/Tech HY3315A1 User manual

CO/Tech
CO/Tech MOE-LR02-120-UK User manual

CO/Tech
CO/Tech GT102-GB User manual

CO/Tech
CO/Tech HY33PD-1 User manual