Cocraft HC 242 DZ-2025F User manual

ENGLISHSVENSKANORSKSUOMIDEUTSCH
Ver. 20200918
Original instructions
Bruksanvisning i original
Originalbruksanvisning
Alkuperäinen käyttöohje
Original Bedienungsanleitung
Art.no Model
41-1820 DZ-2025F
Important!
Read the entire instruction manual
carefully and make sure that you fully
understand it before you use the
equipment. Keep the manual for future
reference.
Viktig information:
Läs hela bruksanvisningen noggrant och
försäkra dig om att du har förstått den
innan du använder utrustningen. Spara
bruksanvisningen för framtida bruk.
Viktig informasjon:
Les disse anvisningene nøye og forsikre
deg om at du forstår dem, før du tar
produktet i bruk. Ta vare på anvisningene
for seinere bruk.
Tärkeää tietoa:
Lue nämä ohjeet huolellisesti ja varmista
että olet ymmärtänyt ne, ennen kuin
alat käyttää laitetta. Säilytä ohjeet
myöhempää tarvetta varten.
Wichtiger Hinweis:
Vor Inbetriebnahme die komplette
Bedienungsanleitung sorgfältig
durchlesen und aufbewahren.
HC 242 24 L
41-1820
AIR COMPRESSOR
KOMPRESSOR KOMPRESSORI
MAX WORKING PRESSURE: 8 BAR


ENGLISH
3
Cocraft Air Compressor
Art. no 41-1820 Model DZ-2025F
Please read the entire instruction manual before using the product and then save it for future refe-
rence. We reserve the right for any errors in text or images and any necessary changes made to
technical data. In the event of technical problems or other queries, please contact our Customer
Services (see address details on the back).
Safety
• Always use ear defenders and safety goggles when using thecompressor.
• Reduce therisk of electric shocks. Avoidbody contact with earthed objects such as water
pipes and radiators.
• Use aface mask for dustywork.
• Never use thecompressor in areas where flammable liquids/materials or gases (petrol,
solvents, gas cylinders) are stored orused.
• Never switch thecompressor off by pulling out theplug, always use theON/OFF button.
• Always unplug themains lead and empty thepressure vessel of air before servicing or
repairing thecompressor.
• Always unplug themains lead and empty thepressure vessel of air before moving
thecompressor.
• Make sure that themains lead does not come into contact with heat, oil, or sharpedges.
• Never move thecompressor around by pulling themains lead or airhoses. Thecompressor
must only be moved using thehandle.
• If themains lead is damaged, to prevent any risk of fire or electrocution, it must only be
replaced by aqualified electrician.
• Make sure that any air hoses and air tools connected to thecompressor are rated to
withstand thepressure generated by thecompressor and that they are connected correctly.
• This product must not be used by anyone (including children) suffering from physical
or mental impairment. Thisproduct should not be used by anyone that has not read
theinstruction manual unless they have been instructed in its use by someone who will take
responsibility for their safety.
• Never let children play with theproduct.
• Do not weld or in any way modify thepressure vessel.
• Never aim compressed air at yourself or any other person.

ENGLISH
4
OFF ON
Symbols
Read theentire instruction manual carefully.
Use ear defenders.
Risk of electricshock.
This unit is remote controlled and can start without warning.
Warning: Hot surfaces.
Never switch off thecompressor by pulling out theplug or using theisolator
switch (if fitted). Always use theON/OFF button on thecompressor.
Do not open the cock before the air hose is attached
Product description
Thecompressor increases thepressure of theair which is pumped into thepressure vessel.
Whentheair pressure in thevessel reaches max, apressure switch switches off themotor driving
thecompressor. Atthesame moment, theair in thecompressor is released. Thisoccurs to
reduce thepressure in thecompressor so that it can restart when thepressure drops to below
theminimum pressure. Asafety valve releases theair in thepressure vessel if thepressure switch
should fail to turn themotoroff.

ENGLISH
5
2
1
3
6
4
5
12
9
10
11
7
8
1. Air filter
2. Overload safety cut-out
3. Air tank (pressure vessel)
4. Oil inlet
5. Window for checking oil level
6. Pressure gauge – tank pressure
7. Pressure gauge – working pressure
8. Drain tap
9. [På/av] On/off switch
10. Pressure regulator (working pressure)
11. Air outlet
12. Safety valve
Buttons and functions

ENGLISH
6
4
1
Getting started
1. Attach the wheels, rubber foot and air filter.
Before using the air compressor for the first time: Open the drain tap (8) in the bot-
tom of the air tank, switch the compressor on (by pulling the button of the ON/OFF
switch (9) up) and let it run for 10 minutes to lubricate all the moving parts. Close
the drain tap.
2. If the oil inlet (4) is fitted with a transit bung,
remove it and replace it with the proper oil
filler cap.
3. Pour approximately 200 ml oil into the oil
inlet and fit the proper oil filler cap. Check
the oil level through the oil level window (5).
4.
5. Place the compressor in a clean, dry and
well-ventilated location.
6. Make sure that it is stable and cannot tip
over.
7. Make sure that the oil level is up to the red
circle in the oil level window (5).
8. Connect the mains lead to a 230 V wall
socket.

ENGLISH
7
Instructions for use
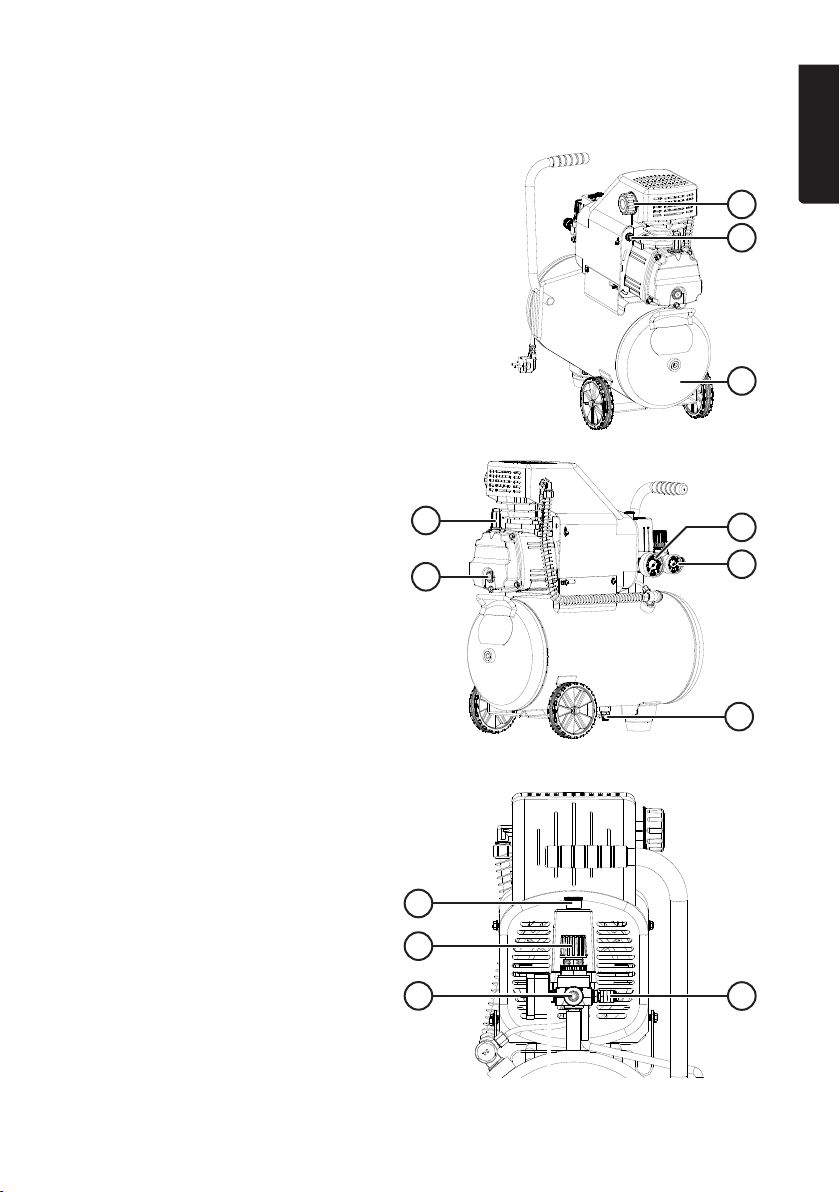
1. Check the oil level in the window (5).
2. Attach the appropriate air tool for the work you wish to undertake: blow gun, spray gun, tyre
inflator, etc.
3. Read the instruction manual of the connected air tool and if necessary, set the recommended
working pressure using the pressure regulator (10).
4. When you have finished work and the compressor has been turned off, the pressure inside
the air tank must be released by pulling out the safety valve (12).
Use an oil suitable for air compressors such as SAE 30, ISO 68 or equivalent.
Care and maintenance
• Repairs must only be carried out by qualified service technicians and only using original spare
parts.
• An initial replacement of the oil in the air compressor should be carried out after 10 hours of
operation.
• Change the oil and clean the air filter after every 120 hours of use. Check the safety valve and
pressure gauges at the same time.
• Test the safety valve by unscrewing the uppermost nut until it is loose and then pulling it out
until the spring-loaded valve opens. If the safety valve is working properly (and the air tank
is under pressure) air should seep out through the safety valve. Once the valve has been
tested, screw the uppermost nut back in again.
• Perform a visual inspection at least once a year to check that the inside and outside of the air
tank is free of corrosion. Under no circumstances must the wall thickness of the air tank be
less than 2 mm.
• Under no circumstances must the safety valve be tampered with or blocked.
• Regularly check that the ventilation hole in the oil filler cap (4) is open.
• Regularly check that all bolts holding the compressor and air tank together are tight.
• Make it a habit to open the drain tap (8) and release any condensation inside the air tank.
• Do not clean the compressor or air tank with solvents or flammable liquids.
• If the compressor is not to be used for a long time: Unplug the mains lead, empty the air tank
and open the drain tap (8).
Motor overload cut-out
• If thesafety cut-out has tripped, themotor has been overloaded in
some way.
• Thebutton on themotor overload cut-out (2) will pop out acouple of
millimetres when it has been tripped and is reset by pushing it back in.
• There are anumber of possible reasons why theoverload cut-out
might trip such as avoltage drop caused by theuse of long exten-
sion leads, low ambient temperature (under10°C), or that thepres-
sure switch is not used to turn thecompressor on/off in theevent of
apower cut for example.

ENGLISH
8
• Changing the oil
• Before changing the oil, make sure that the air compressor is switched off and unplugged
from the wall socket.
• Remove the oil filler cap from the oil inlet (4).
• Tilt the compressor so that oil can run out of the oil filler hole into an appropriate receptacle.
• Drain all the oil from the compressor.
• Replace with new oil until the oil reaches the middle of the oil-display window. Refit the oil
filler cap.
• Oil requirement, approx. 200 ml (not included).
• Use an oil suitable for air compressors such as SAE 30, ISO 68 or equivalent. Compres-
sor oil is especially designed for compressors, amongst other things it has additives that
prevent foaming. If no compressor oil is available then SAE 10-30 engine oil can be used as
a substitute.
Troubleshooting guide
Thecompressor
does not start.
• Is it plugged into awall socket?
• Is thewall socket live?
• Has themotor’s overload protection tripped? Reset by pushing in
thebutton (2).
• Is themains lead damaged?
Heavy vibrations
and/or unusual
sounds.
• Check that all bolts holding thecompressor and pressure vessel
together are tight.
• Check all other joints and connections.
No pressure build-
up in vessel or
pressure too low.
• Make sure thesafety valve is not leaking.
• Make sure thedrain tap is not leaking.
• Check all hose connections for leaks.
• Air filter is clogged.
Oil consumption
too high.
• Too much oil in thecompressor.
• Theventilation hole in theoil filler cap is clogged.

ENGLISH
9
Specications
Voltage 230 V AC, 50 Hz
Motor power 1,5 W
No-load speed 2850 min-1
Air displacement 188 L/min
Free air delivery at 6 bar 89 L/min
Max working pressure 8 bar
Noise level LpA = 74.4 dB(A), KpA = 3 dB(A)
LwA = 95.4 dB(A), KwA = 3 dB(A)
Operating temperature +5°/+40°C
Storage temperature +5°/+40°C
Air tank 24 L
size (L x W x H) 56 x 30 x 59 cm
Oil requirement approx. 200 ml (not included).
Weight 24 kg
Responsible disposal
This symbol indicates that this product should not be disposed of with general
householdwaste. Thisapplies throughout theentire EU. Inorder to prevent any
harm to theenvironment or health hazards caused by incorrect waste disposal,
theproduct must be handed in for recycling so that thematerial can be disposed
of in aresponsible manner. Whenrecycling your product, take it to your local col-
lection facility or contact theplace of purchase. Theywill ensure that theproduct
is disposed of in anenvironmentally sound manner.

SVENSKA
10
Kompressor
Art.nr 41-1820 Modell DZ-2025F
Läs igenom hela bruksanvisningen före användning och spara den sedan för framtida bruk.
Vi reserverar oss för ev. text- och bildfel samt ändringar av tekniska data.
Vid tekniska problem eller andra frågor, kontakta vår kundtjänst (se adressuppgifter på baksidan).
Säkerhet
• Bär alltid skyddsglasögon och hörselskydd vid kompressorarbete.
• Undvik elektrisk stöt! Undvik kroppskontakt med jordade föremål som vattenledningar,
element etc.
• Använd skyddsmask vid dammande arbeten.
• Använd aldrig kompressorn ilokaler där brandfarliga vätskor/ämnen eller gaser (bensin,
lösningsmedel, gasol etc.) förvaras eller används.
• Använd aldrig nätsladden för att starta eller stänga av kompressorn, använd alltid
ON/OFF-knappen.
• Dra alltid ut nätkabeln ur vägguttaget och töm trycktanken på luft innan service eller
underhåll utförs.
• Dra alltid ut nätkabeln ur vägguttaget och töm trycktanken på luft innan kompressorn flyttas.
• Se till att nätsladden inte kommer ikontakt med värme, olja eller vassa kanter.
• Dra inte kompressorn inätkabeln eller ianslutna slangar. Flytta kompressorn endast genom
att använda handtaget.
• Om nätsladden skadats får den, för att risk för elektrisk stöt eller brand ska undvikas, endast
bytas av kvalificerad yrkesman.
• Se till att anslutna verktyg och slangar inte har lägre kapacitet än kompressorn och att de är
korrekt anslutna.
• Produkten får inte användas av personer (inklusive barn) med nedsatt fysisk eller mental förmåga.
Den får inte heller användas av personer utan tillräcklig erfarenhet och kunskap ifall de inte
har fått instruktioner om användningen av någon som ansvarar för deras säkerhet.
• Låt aldrig barn leka med produkten.
• Svetsa inte på trycktanken och gör inga modifieringar.
• Rikta aldrig tryckluft mot kroppen eller mot någon annan person.

SVENSKA
11
OFF ON
Symboler
Läs noggrant igenom bruksanvisningen.
Använd hörselskydd.
Risk för elstötar.
Enheten är fjärrstyrd och kan starta utan förvarning.
Varning!: Heta ytor.
Dra aldrig ur stickproppen eller slå av ev. huvudströmbrytare för att stänga av
kompressorn. Använd alltid ON/OFF-knappen på kompressorn.
Öppna inte kranen innan luftslangen är ansluten.
Produktbeskrivning
Kompressorn bygger upp tryckluft som leds till trycktanken. När lufttrycket når max itanken
stänger entryckströmbrytare av elmotorn som driver kompressorn. Isamma ögonblick släpps
luften ikompressorn ut. Detta sker för att minska trycket så att kompressorn kan återstartas när
trycket itanken sjunker under minimitrycket. Säkerhetsventilen känner av trycket itanken och
släpper ut luft om tryckströmbrytaren inte skulle slå ifrån.

SVENSKA
12
2
1
3
6
4
5
12
9
10
11
7
8
1. Luftfilter
2. Motorskydd
3. Trycktank
4. Oljepåfyllning
5. Fönster för kontroll av oljenivå
6. Tryckmätare tank
7. Tryckmätare arbetstryck
8. Dräneringskran
9. [På/av]
10. Reglerventil (justering av arbetstryck)
11. Luftutlopp
12. Säkerhetsventil
Knappar och funktioner

SVENSKA
13
1
4
Att komma igång
1. Montera hjul, gummifot och luftfilter.
Innan kompressorn används första gången:
Öppna dräneringskranen (8) i botten på trycktanken, starta (genom att dra ON/OFF-
knappen (9) rakt upp) och låt kompressorn gå i 10 min för att alla delar ska smörjas
ordentligt. Stäng därefter dräneringskranen.
2. Om ett transportlock är monterat i oljepåfyll-
ningshålet (4), ta bort det och använd i fort-
sättningen det riktiga locket. Fyll på olja, ca
200 ml, och sätt tillbaka det riktiga locket.
Kontrollera oljenivån i nivåfönstret (5).
3. Placera kompressorn på en ren, torr och
välventilerad plats.
4. Se till att den står stadigt och inte kan välta.
5. Se till att oljenivån ligger i den röda cirkeln i
nivåfönstret (5).
6. Anslut nätkabeln till ett vägguttag som
har 230 V.

SVENSKA
14
Användning
1. Kontrollera oljenivån i nivåfönstret (5).
2. Anslut lämpligt verktyg: blåspistol, färgspruta, luftpåfyllare e.d.
3. Vid behov, läs i det anslutna verktygets bruksanvisning och ställ in det rekommenderade
arbetstrycket med reglerventilen (10).
4. När arbetet är avslutat och kompressorn stängs av ska trycket släppas manuellt genom att
säkerhetsventilen (12) dras ut.
Använd kompressorolja SAE 30, ISO 68 eller motsvarande.
Skötsel och underhåll
• Alla reparationer ska utföras av behörig servicepersonal med originalreservdelar.
• Byt olja i kompressorn första gången efter 10 drifttimmar.
• Byt olja och rengör luftfiltret var 120:e arbetstimme. Kontrollera samtidigt säkerhetsventilen
och tryckmätarna.
• Kontrollera säkerhetsventilen genom att skruva upp den yttre delen så den blir lös, dra den
sedan utåt så den fjäderbelastade ventilen öppnar. Om säkerhetsventilen fungerar (och det är
tryck i tanken) ska luften pysa ut vid säkerhetsventilen. Skruva fast den yttre delen igen efter
kontrollen.
• Kontrollera visuellt att tankens insida och utsida är fria från korrosion minst en gång om året.
Väggtjockleken får under inga omständigheter understiga 2 mm.
• Säkerhetsventilen får under inga omständigheter manipuleras eller blockeras.
• Kontrollera regelbundet att ventilationshålet i oljepåfyllningslocket (4) är öppet.
• Kontrollera regelbundet att alla fästbultar som håller kompressorn mot tanken är ordentligt
åtdragna.
• Ta för vana att regelbundet öppna dräneringskranen (8) för att släppa ut ev. kondensvatten ur
tanken.
• Rengör inte kompressorn eller tanken med lösningsmedel eller antändbara vätskor.
• Om kompressorn inte ska användas under en längre period: dra ur nätkabeln, töm tanken på
tryckluft och dränera tanken med kranen (8).
Motorskydd
• Om motorskyddet löst ut har motorn varit överbelastad av någon orsak.
• Knappen på motorskyddet (2) skjuts ut några millimeter när det har
löst ut och återställs genom att knappen trycks in igen.
• Det kan finnas flera orsaker till att motorskyddet löser ut, t.ex. spän-
ningsfall p.g.a. långa skarvsladdar, låg omgivningstemperatur (redan
under 10°C kan problem uppstå) eller att tryckströmbrytaren inte
har använts vid av-/påslag, t.ex. vid strömavbrott.

SVENSKA
15
Oljebyte
1. Stäng av kompressorn och dra ur stickproppen före oljebyte.
2. Ta bort oljepåfyllningslocket (4).
3. Luta kompressorn så att oljan kan rinna ur påfyllningshålet ner i ett lämpligt kärl.
4. Låt all olja rinna ur kompressorn.
5. Häll i ny olja så att nivån är mitt på kontrollfönstret. Montera oljepåfyllningslocket.
• Oljemängd ca 200 ml (medföljer ej)
• Använd kompressorolja SAE 30, ISO 68 eller motsvarande. Kompressorolja är speciellt an-
passad för kompressorer, bl.a. har kompressoroljan tillsatser som gör att den inte skummar.
Finns inte kompressorolja kan motorolja SAE 10-30 användas.
Felsökningsschema
Kompressorn startar inte. • Sitter nätkabeln ivägguttaget?
• Finns det ström ivägguttaget?
• Har motorskyddet löst ut? Återställ genom att trycka in
knappen (2).
• Är nätkabeln skadad?
Kraftiga vibrationer eller
onormalt ljud.
• Kontrollera att alla fästbultar som håller kompressorn mot
tanken är ordentligt åtdragna.
• Kontrollera alla övriga fästen och anslutningar.
Kompressorn bygger inte
upp tryck itanken och/
eller arbetstrycket är
för lågt.
• Kontrollera att inte säkerhetsventilen läcker.
• Kontrollera att inte dräneringskranen läcker.
• Kontrollera alla slangar och anslutningar så att inga läckage finns.
• Luftfiltret är igensatt.
För hög oljekonsumtion. • För mycket olja ikompressorn.
• Ventilationshålen ioljepåfyllningslocket är igensatta.

SVENSKA
16
Specikationer
Nätanslutning 230 V AC, 50 Hz
Motoreffekt 1,5 W
Varvtal 2850 min-1
Genomlupen cylindervolym 188 l/min
Fri avgiven luftmängd vid 6 bar 89 l/min
Max arbetstryck 8 bar
Ljud LpA = 74,4 dB(A), KpA = 3 dB(A)
LwA = 95,4 dB(A), KwA = 3 dB(A)
Användningstemperatur: +5°/+40°C
Förvaringstemperatur: +5°/+40°C
Tank 24 l
Mått (L × B × H) 56 × 30 × 59 cm
Oljemängd ca 200 ml (medföljer ej)
Vikt 24 kg
Avfallshantering
Denna symbol innebär att produkten inte får kastas tillsammans med annat
hushållsavfall. Dettagäller inom hela EU. Föratt förebygga eventuell skada på
miljö och hälsa, orsakad av felaktig avfallshantering,ska produkten lämnas till
återvinning så att materialet kan tas omhand på ettansvarsfulltsätt. Närdu läm-
nar produkten till återvinning, använd dig av de returhanteringssystem som finns
där du befinner dig eller kontakta inköpsstället. Dekan se till att produkten tas om
hand på ettför miljön tillfredställandesätt.

NORSK
17
Cocraft kompressor
Art.nr. 41-1820 Modell DZ-2025F
Les gjennom hele bruksanvisningen før produktet tas ibruk, og ta vare på den for fremtidigbruk.
Vi tar forbehold om eventuelle feil itekst og bilder, samt endringer av tekniskedata.
Ved tekniske problemer eller spørsmål, ta kontakt med vårt kundesenter (se kontaktopplysninger
på baksiden).
Sikkerhet
• Bruk alltid vernebriller og hørselvern mens kompressoren er igang.
• Unngå elektriskstøt. Unngåkroppskontakt med jordede gjenstander som vannledninger,
ovneretc.
• Bruk støvmaske ved støvete arbeider.
• Bruk aldri kompressoren ilokaler der brannfarlige væsker/stoffer eller gasser (bensin,
løsemidler, parafinetc.) oppbevares eller brukes.
• Bruk aldri ledningen for åstarte/stoppe maskinen, benytt ON/OFF-knappen.
• Trekk alltid ut støpselet og tøm trykktanken for luft før service og vedlikeholdsarbeider på maskinen.
• Trekk alltid ut støpselet og tøm trykktanken for luft når kompressoren skal flyttes til annenplass.
• Påse at strømledningen ikke kommer ikontakt med varme, olje, skarpe kanter eller annet som
kan skadeden.
• Trekk ikke kompressoren etter ledningen eller tilkoblede slanger. Nårkompressoren skal
flyttes på må man bruke håndtaket.
• Dersom strømkabel eller støpsel skades, må det repareres av kyndig fagperson umiddelbart.
Dettepå grunn av fare for brann og elektriskstøt.
• Påse at tilkoblede verktøy og slanger ikke har lavere kapasitet enn kompressoren og at de er
riktig tilkoblet.
• Produktet må ikke brukes av personer (inkl. barn) med begrensede fysiske eller mentale
ferdigheter. Detmå heller ikke benyttes av personer som ikke har tilstrekkelig erfaring og
kunnskap, dersom de ikke har fått instruksjoner om bruken av noen som har ansvaret for
deres sikkerhet.
• La aldri barn leke med produktet.
• Man må ikke utføre sveisearbeider på trykktanken. Maskinen må heller ikke modifiseres.
• Rett aldri lufttrykket mot deg selv eller noen annen person.

NORSK
18
OFF ON
Symboler
Les brukerveiledningen grundig.
Bruk hørselsvern.
Fare for elektriskstøt.
Enheten er fjernstyrt og kan starte uten forvarsel.
Advarsel: Varme flater
Trekk aldri ut støpselet eller skru avev. hovedstrømbryter for åstenge kompressoren.
Brukalltid kompressorens ON/OFF-knapp.
Kranen må ikke åpnes før luftslangen er tilkoblet
Produktbeskrivelse
Kompressoren bygger opp trykkluft som føres til trykktanken. Nårlufttrykket når maks itanken,
vil entrykkstrømbryter stenge elmotoren som driver kompressoren. Samtidig slippes luften ut
fra kompressoren. Dettefor åredusere trykket slik at kompressoren kan startes igjen når trykket
itanken synker til under minimumsnivået. Sikkerhetsventilen føler trykket itanken og slipper ut luft
hvis trykkstømbryteren ikke slår segav.

NORSK
19
2
1
3
6
4
5
12
9
10
11
7
8
1. Luftfilter
2. Motorvern
3. Trykktank
4. Oljepåfylling
5. Vindu for kontroll av oljenivå
6. Trykkmåler tank
7. Trykkmåler arbeidstrykk
8. Dreneringskran
9. [På/av]
10. Ventil (justering av arbeidstrykk)
11. Luftutløp
12. Sikkerhetsventil
Knapper og funksjoner

NORSK
20
4
1
Kom i gang
1. Monter hjul, gummifot og luftfilter.
Før kompressoren brukes for første gang: Åpne dreneringskranen (8) på bunnen av
trykktanken, start ved ådra ON/OFF-knappen (9) rett opp og la kompressoren gå
i10min. forat alle delene skal bli godtsmurt. Lukkderetter dreneringskranen.
2. Dersom det er montert et transportlokk på
påfyllingshullet for oljebeholder (4), så fjern
det og bruk det lokket som er beregnet
for det i framtiden. Fyll på olje, ca. 200 ml,
og sett på plass det rette lokket. Kontroller
oljenivået i nivåvinduet (5).
3. Plasser kompressoren på et rent, tørt og
godt ventilertsted.
4. Pass på at den blir stående stødig og ikke
har mulighet til åvelte.
5. Sjekk at oljenivået ligger iden røde sirkelen
inivåvinduet (5).
6. Apparatets støpsel skal plugges til en230 V
stikkontakt.
This manual suits for next models
1
Table of contents
Languages:
Other Cocraft Air Compressor manuals