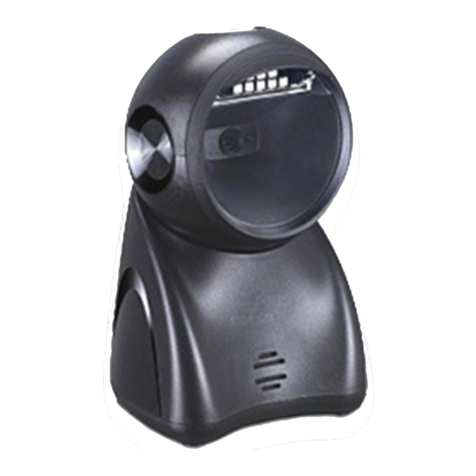
Codesoft CS-8120 User manual

Presentation Imager
User Manual
Version: _UM_EN_V1.1.5
CS-8120
CS-8120


i
Notice
Ensure that the optional DC adapter works at +5V, especially for the RS-232 interface
cable.
1. All software, including firmware, furnished to the user is on a licensed basis.
2. The right is reserved to make changes to any software or product to improve reliability, function, or
design.
3. The material in this manual is subject to change without notice.
4. A standard packing includes an imager, a USB cable and a CD (or a user manual). Accessories
include a RS-232 cable and a 5 V adaptor.

ii

iii
Contents
1 Specifications............................................................................................................................................ 1
1-1 Technical specifications........................................................................................................................... 1
1-2 Default setting for each barcode.............................................................................................................. 2
2 Getting started .......................................................................................................................................... 3
2-1 Cable connector pin-outs descriptions .................................................................................................... 3
2-2 Dimensions .............................................................................................................................................. 4
2-3 Parts of the imager .................................................................................................................................. 5
2-4 Introduction to installation........................................................................................................................ 6
2-4-1 Installation - RS-232 ......................................................................................................................... 6
2-4-2 Installation - USB .............................................................................................................................. 6
2-5 Auto-detection scanning mode ................................................................................................................ 7
2-6 Field of view............................................................................................................................................. 8
3 Parameter programming ........................................................................................................................... 9
3-1 Example 1: Single-parameter setting by scanning 1D barcodes ............................................................ 9
3-2 Example 2: Multiple-parameter setting by scanning a QR code barcode ............................................. 10
3-3 Operate the imager by receiving command via UART .......................................................................... 11
3-4 Interface selection.................................................................................................................................. 12
3-5 RS-232 interface.................................................................................................................................... 13
3-6 USB interface......................................................................................................................................... 15
3-7 Hand-held scan & some global settings ................................................................................................ 18
3-8 LED and Beeper .................................................................................................................................... 25
3-9 Decode illumination and decode aiming pattern ................................................................................... 26
3-10 DPM, Multiple symbols, Structured append, etc. read setting ............................................................ 28
Note 1: The instruction of calibrating the aimer in vertical centering direction. ....................................... 30
Note 2: Scan barcode or send command to enter upgrade mode........................................................... 31
3-11 UPC-A.................................................................................................................................................. 32
3-12 UPC-E.................................................................................................................................................. 34
3-13 UPC-E1................................................................................................................................................ 36
3-14 EAN-13 (ISBN/ISSN)........................................................................................................................... 38
3-15 EAN-8 .................................................................................................................................................. 40
3-16 Code 39 (Code 32, Trioptic Code 39) ................................................................................................. 42
3-17 Interleaved 2 of 5 ................................................................................................................................. 45
3-18 Industrial 2 of 5 .................................................................................................................................... 47
3-19 Matrix 2 of 5 ......................................................................................................................................... 48
3-20 Codabar ............................................................................................................................................... 49
3-21 Code 128 ............................................................................................................................................. 51
3-22 UCC/EAN 128...................................................................................................................................... 53
3-23 ISBT 128.............................................................................................................................................. 55
3-24 Code 93 ............................................................................................................................................... 56
3-25 Code 11 ............................................................................................................................................... 57
3-26 MSI/Plessey......................................................................................................................................... 59

iv
3-27 UK/Plessey .......................................................................................................................................... 61
3-28 China Post ........................................................................................................................................... 62
3-29 GS1 DataBar (GS1 DataBar Truncated) ............................................................................................. 63
3-30 GS1 DataBar Limited........................................................................................................................... 64
3-31 GS1 DataBar Expanded ...................................................................................................................... 65
3-32 China Finance...................................................................................................................................... 66
3-33 PDF417................................................................................................................................................ 69
3-34 MicroPDF417....................................................................................................................................... 70
3-35 QR Code.............................................................................................................................................. 71
3-36 MicroQR Code ..................................................................................................................................... 72
3-37 Data Matrix .......................................................................................................................................... 73
3-38 Han Xin Code ...................................................................................................................................... 74
3-39 Aztec Code .......................................................................................................................................... 75
3-40 G1-G6 & C1-C3 & FN1 substitution string setting ............................................................................... 76
3-41 G1-G4 string position & Code ID position ........................................................................................... 81
3-42 String transmission .............................................................................................................................. 82
4 Maintenance ........................................................................................................................................... 85
5 ASCII Table ............................................................................................................................................ 86
6 Barcode representing non-printable character ......................................................................................... 87
7 Test symbols .......................................................................................................................................... 88
8 Return default parameters & firmware version......................................................................................... 92
9 Configuration alphanumeric entry barcode .............................................................................................. 93

1
1 Specifications
1-1 Technical specifications
Dimensions
Height × Width × Depth: 93 mm ×95 mm ×157 mm
Weight
298.5 g, without cable
Cable
Straight 2.0 m
Connector Type
RJ-45 phone jack connector
Indicator
Beeper, LED
Interface
RS-232, USB Keyboard, USB virtual COM
Operating Mode
Hand-held,Auto-detection
Programming Method
Manual (reading special barcode)
Program Upgrade
Online
Input Voltage
4.6 to 5.5 VDC
Current
110 mA (standby), 370 mA(scanning)
Scan Pattern
Area image
Image Size
1280 × 800 pixels
Field of View
Horizontal: 64°, vertical: 44°
Scanning Angle
±70°, ±70°, 360°(Skew, Pitch, Roll)
Motion Tolerance
1.27 m/s (50 in/s) for 13 mil UPC-E at optimal focal point
Minimum Resolution
1D (Code 39): 5 mil; 2D (PDF417): 6.7 mil
Print Contrast
20% minimum reflectance difference
Decoding Capability
1D:
UPC-A, UPC-E, UPC-E1, EAN-13, EAN-8, ISBN (Bookland EAN), ISSN, Code
39, Code 39 full ASCII, Code 32, Trioptic Code 39, Interleaved 2 of 5, Industrial
2 of 5, Matrix 2 of 5, Codabar (NW7), Code 128, UCC/EAN 128, ISBT 128,
Code 93, Code 11 (USD-8), MSI/Plessey, UK/Plessey, China Post, China
Finance, GS1 DataBar (formerly RSS) variants
2D:
PDF417, MicroPDF417, QR Code, DataMatrix, Han Xin Code,Aztec Code
Decoding Depth
5 mil Code 39 (3 chars):
5 –55 mm
10 mil Code 39 (3 chars):
0 –140 mm
13 mil UPC (6 chars):
0 –150 mm
20 mil Code39 (1 char):
0 –230 mm
6.7 mil PDF417 (20 chars):
15 –60 mm
10 mil QR (20 chars):
0 –40 mm
20 mil QR (20 chars):
0 –150 mm
Temperature
-20°to 55°C (-4°to 131°F), operating; -20°to 75°C (-4°to 167°F), storage
Humidity
5% to 95% (non-condensing)
Safety
EMC: EN55022, EN55024
Electrical Safety: EN60950-1
Photobiological Safety: EN62471:2008
Illumination: 0~100,000 LUX
Drop Resistance: 30+ times of 1.5 m (5 ft.) drops to concrete
Sealing: IP50

2
1-2 Default setting for each barcode
条码类型
识读
确认
校验符
确认
校验符
传送
最小码字
长度
自定义
识别符
AIM
识别符
UPC-A
√
√
√
(12)2
A
]Em
UPC-E
√
√
√
(8)2
D
]Em
UPC-E1
-
√
√
(8)2
D
] Em
EAN-13
√
√
√
(13)2
A
]Em
EAN-8
√
√
√
(8)2
C
] Em
ISBN(Bookland EAN)
/ ISSN1
√
√
√
(13)2
B
]Em
39 码
√
-
-
1
M
]Am
交叉 25 码
√
-
-
6
I
]Im
工业 25 码
-
-
-
4
H
]Im
矩阵 25 码
√
-
-
6
X
]Im
库德巴码
√
-
-
4
N
]Fm
128 码
√
√
-
1
K
]Cm
UCC/EAN 128
√
√
-
1
K
]Cm
ISBT 128
√
√
-
1
K
]Cm
93 码
√
√
-
1
L
]Gm
11 码
-
√
-
4
V
]Hm
MSI/Plessey
-
-
-
4
O
]Mm
UK/Plessey
-
√
-
1
U
]Mm
中国邮政码
√
-
-
(11)2
T
]Im
中国财政码
-
-
-
(10)2
Y
-
GS1 DataBar
√
-
-
(16)2
R
]em
GS1 DataBar Truncated3
√
-
-
(16)2
R
]em
GS1 DataBar Limited
√
-
-
(16)2
R
]em
GS1 DataBar Expanded
√
-
-
1
R
]em
PDF417
√
-
-
-
p
]Lm
MicroPDF417
p
]Lm
DataMatrix
√
-
-
-
d
]dm
QR code
√
-
-
-
q
]Qm
MicroQR 码
-
-
-
-
q
]Qm
汉信码
-
-
-
-
h
]Xm
Aztec 码
-
-
-
-
a
]zm
注1:ISBN/ISSN 的设置参数与 EAN-13 的设置参数总是相同。
注2:定长码。
注3:GS1 DataBar Truncated 的设置参数与 GS1 DataBar 的设置参数总是相同。
Note:1The settings for ISBN/ISSN and EAN-13 must be the same except the code ID.
2Fixed-length barcodes.
3The settings for GS1 DataBar Truncated and GS1 DataBar must be the same.

3
2 Getting started
2-1 Cable connector pin-outs descriptions
Figure 2-1 Cable connector interface pin-outs
Table 2-1 Cable connector pin-outs descriptions
Pin
RS232
USB
1
Power (+5V)
Power (+5V)
2
+3.3V (for interface auto selection purpose)
3
Ground
Ground
4
+3.3V (for interface auto selection purpose)
Ground (for interface auto selection purpose)
5
TxD
Reserved
6
RxD
Reserved
7
Reserved
Reserved
8
Reserved
Reserved
9
CTS
D-
10
RTS
D+
Note: Voltage level of all RS232 Pin-outs (RxD, TxD, CTS and RTS) is 0V for logic low and 3.3V for logic
high.

4
2-2 Dimensions

5
2-3 Parts of the imager
Figure 2-2
Trigger
Scan window
Beeper

6
2-4 Introduction to installation
Note: If any of the below operation is incorrect, turn off the power immediately and check the imager for
any improper connections. Go through all steps again.
2-4-1 Installation - RS-232
1) Connect the RS-232 interface cable to the bottom of the imager.
2) Connect the other end of the interface cable to the serial port on the host. Tighten the two screws
to secure the connector to the port.
3) If the host does not have power supply (on PIN 9), connect the external power supply (DC adapter)
to the RS-232 cable.
Figure 2-3
2-4-2 Installation - USB
The imager attaches directly to a USB host, and is powered by it. If the power supply is not enough,
plesae add additional power.
1) Connect the USB interface cable to the bottom of the imager.
2) Plug the series A connector in the USB host, or an available port of the terminal.
3) Windows will automatically detect the USB device.
Figure 2-4

7
2-5 Auto-detection scanning mode
1) To scan a barcode, present the barcode and ensure that the scan angle from the scan window can
cover the barcode.
2) Upon successful decode, the imager beeps and the LED lights.
3) When the imager stops scanning, the present barcode must be removed to active next scanning.
Figure 2-5

8
2-6 Field of view
Figure 2-6 Field of view
Figure 2-7 Field of view –Front view

9
3 Parameter programming
3-1 Example 1: Single-parameter setting by scanning 1D barcodes
Important notes:
1. During the process of programming, LED is lighting to indicate the programming correctness. LED
will go off if any incorrect programming operation performed.
2. After each successful programming, LED will go off and the imager will beep twice.
3. Throughout the programming barcode menus, the factory default settings are indicated with
asterisks (*).
Two programming modes have been provided as bellows:
❶Single-scan setting
Scan the appropriate Single-scan setting (e.g. %0101D00%) according to the user‘s demand.
Example: to set Flow control to be XON/XOFF.
Steps: Scan the following barcode.
❷Multiple-scan setting
Step 1. Scan the Option barcode barcode (e.g. %0101M%) according to the user‘s demand.
Step 2. To the right of the option barcode, the necessary alphanumeric inputs are listed. Scan two
alphanumeric entries from 0 to 9 or A to F, refer to 9 Configuration alphanumeric entry barcode.
Step 3. Repeat Step 2, if more user parameters input are required.
Step 4. Scan the %END% barcode, listed on the lower left hand corner of each parameter setting
part.
Example: to set Flow control to be XON/XOFF.
Steps: Referring to 3-5 RS-232 interface, scan the following barcodes in order.

10
3-2 Example 2: Multiple-parameter setting by scanning a QR code barcode
User can customize a QR code barcode to set multiple parameters. The imager can set multiple
parameters by scanning this single QR code barcode.
1. The data format of the QR code barcode is as following.
% Parameter set 1 % Parameter set 2 % Parameter set N %
<Option barcode index><D/H><Alpha. entries>
···
Note that:
<Option barcode index> means the corresponding 4 digits of Option barcode.
<D/H> means “D”or “H”character. D means that the type of alphanumeric entry is decimal; and H
means that the type of alphanumeric entry is hexadecimal.
<Alpha. entries> is a character string with various length of 2, 4, or other values.
Example: Set 0401->03 (decimal); 8002->0D0A (hexadecimal); 8202->01 (decimal). The customized
QR code barcode contents and symbol are as following.
%0401D03%8002H0D0A%8202D01%
2. Notes of making QR code barcode
The model is chosen as M2. Other requirements, e.g. ECC level, Start mode, etc, are not specified.
Other notes:
1) The contents of a QR code barcode can include several same <Option barcode index> associated
with same or different <Alpha. entries>. In the case of with different <Alpha. entries>, the latest
<Alpha. entries> is the valid one.
2) If any one of the parameter settings is invalid, the total setting is failed. The invalid setting can be
caused by one of the following problems: invalid <Option barcode index>, invalid type of <D/H>,
invalid type, length or value range of <Alpha. entries>, etc.

11
3-3 Operate the imager by receiving command via UART
Note:
1-
The information in this chapter is provided for the imager with RS232 cable or USB cable.
2-
If the imager is with USB cable, the setting of USB device type must be set as “USB virtual COM”.
Please refer to 3-6 USB interface.
3-
Please read 3-7 Hand-held scan & some global settings about the setting of Scanning mode in
details.
UART parameter should be set as below:
(1)
Baud rate: 9600 bps;
(2)
Data bits: 8 bits;
(3)
Stop bit: 1 bit;
(4)
Parity check bit: None;
(5)
Flow control: None.
Guide of control command: all commands are sent by UART
1) Start command: “0x54”(T)
When the imager received the above command, it will start barcode scanning following the setting of
Scanning mode. If the imager is in the mode of “Auto-detection”, the imager will have a single scan,
then returns to “Auto-detection”mode.
2) Stop command: “0x50” (P)
If the Scanning mode is set as “Alternate continue”or “Continue”, and the imager received the above
command, it will stop barcode scanning and act as in an idle mode.
3) Restart command: “0x35” (R)
Once the imager received the above command, it will restart.
Returning message from the imager
1) A successful decode
Once the imager successfully decoded a barcode, the imager will stop scanning and returns the
barcode data to the Host.
2) Not a successful decode
Once the imager failed to decode a barcode before stopping scanning, the imager will return a
message to the Host. The message is set as “0x25, 0x25, 0x4E, 0x6F, 0x52, 0x65, 0x61, 0x64”
(%%NoRead).

12
3-4 Interface selection
This imager supports interfaces such as RS-232 serial wedge and USB interface. In most of the cases,
simply selecting an appropriate cable provided by the manufacturer will work for a specific interface.
Interface selection:
Auto detection- By setting this function, the imager will automatically detect the RS-232 or USB
interface for user.
Multiple-scan setting
Single-scan setting
Option barcode
Option
Alpha. entry
Interface selection
Auto detection (RS-232/USB)
00*
*
Keyboard wedge
01
RS-232
02
USB
03

13
3-5 RS-232 interface
Flow control:
None-The communication only uses TxD and RxD signals without any hardware or software
handshaking protocol.
RTS/CTS- If the imager wants to send the barcode data to host computer, it will issue the RTS signal
first, wait for the CTS signal from the host computer, and then perform the normal data communication.
If there is no replied CTS signal from the host computer after the timeout duration, the imager will
issue an error indication. By setting (Host idle: Low RTS) or (Host idle: High RTS), the imager can be
set to match the Serial Host RTS line.
XON/XOFF- An XOFF character turns the imager transmission off until the imager receives an XON
character.
ACK/NAK- After transmitting data, the imager expects either an ACK (acknowledge) or NAK (not
acknowledge) response from the host. When a NAK is received, the imager transmits the same data
again and waits for either an ACK or NAK. After three unsuccessful attempts to send data when
NAKs are received, the imager issues an error indication and discards the data.
Inter-character delay: This delay is inserted after each data character transmitted.
Response delay: This delay is used for serial communication of the imager when it waits for a
handshaking acknowledgment from the host.
Multiple-scan setting
Single-scan setting
Option barcode
Option
Alpha. entry
Flow control
None
00*
*
RTS/CTS
(Host idle: Low RTS)
01
RTS/CTS
(Host idle: High RTS)
02
XON/XOFF
03
ACK/NAK
04
Inter-character delay
0 ms
00*
*
5 ms
01
10 ms
02
20 ms
03
40 ms
04

14
Multiple-scan setting
Single-scan setting
Option barcode
Option
Alpha. entry
80 ms
05
Response delay
00-99 (100 ms)
00-99
00*
*
Baud rate
300
00
600
01
1200
02
2400
03
4800
04
9600
05*
*
19200
06
38400
07
57600
08
115200
09
Parity bit
None
00*
*
Odd
01
Even
02
Data bit
8 bits
00*
*
7 bits
01
Stop bit
1 bit
00*
*
2 bits
01
Table of contents
Other Codesoft Laboratory Equipment manuals
Popular Laboratory Equipment manuals by other brands

Weinmann
Weinmann ACCUVAC WM 15261 Description of the equipment and instructions for use

Sartorius Stedim Biotech
Sartorius Stedim Biotech Flexel 3D Bag user manual

Biotage
Biotage ELSD-A120 user manual

Agilent Technologies
Agilent Technologies 1100 Series Reference manual

Zeiss
Zeiss MCU 2008 operating manual

Bio-Optica
Bio-Optica BEC150 Instructions for use

IKA
IKA LR-2.ST operating instructions

Datalogic
Datalogic matrix 450N Product reference guide

Sartorius stedim
Sartorius stedim 16694-2-50-06 operating instructions

Agilent Technologies
Agilent Technologies 1290 infinity user manual

Drucker Diagnostics
Drucker Diagnostics 642E Service manual

imec
imec NEUROPIXELS 1.0 user manual