10 6X-1050
6110 CAMERA INSTALLATION AND OPERATION
Preliminary 3a 4-14-05
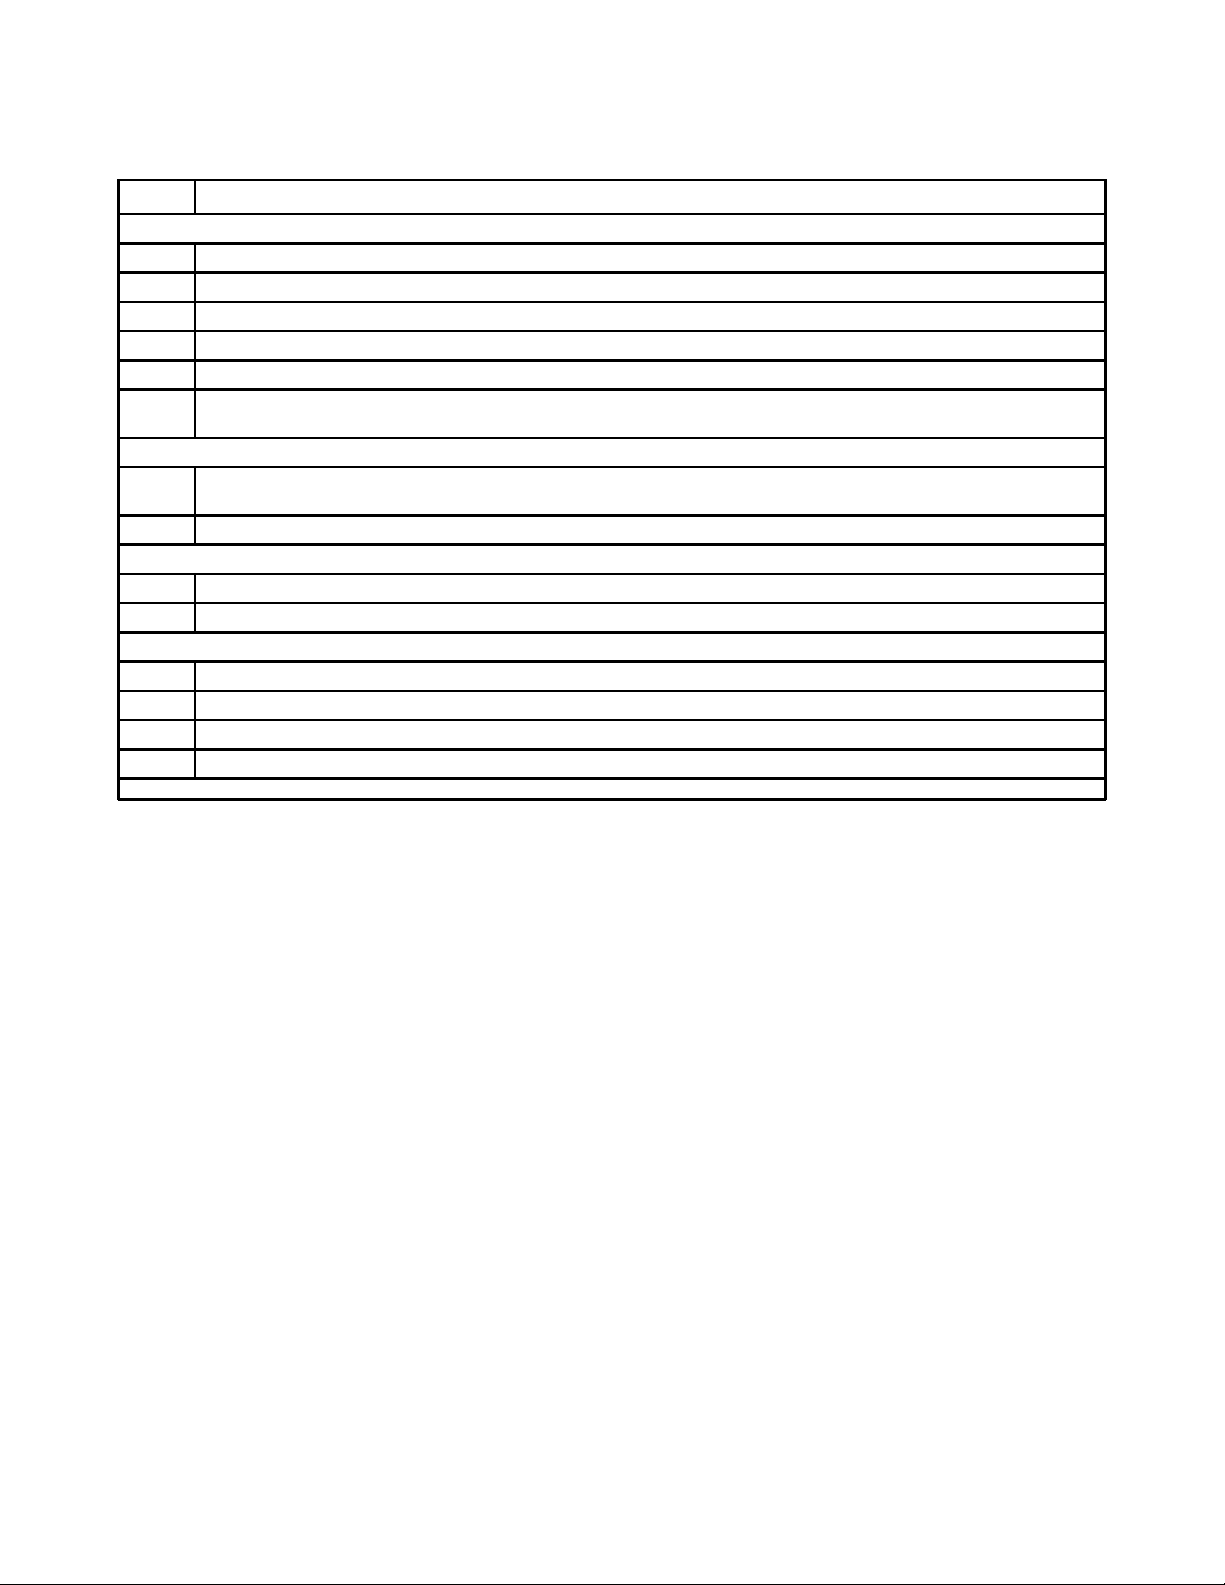
Table 3. Items Supplied
ITEMS TYPICALLY REQUIRED BUT NOT SUPPLIED
ITEM Description Characteristics
1Lens, CS-mount or C-mount
(manual iris only) For 1/2-inch sensor
2Cable, IEEE-1394
(must supplypower) 6-wire version to supply powe
3 Cable, Auxiliary (optional)
Auxiliary cable for using the
triggering and strobe functions
if desired. Mates with RJ-45
connector on rear panel
4Power source for strobe
functions (Vcc). Noiminal 5 V
dc at apporoximately 25 mA.
Via pin 7 of RJ-45 connector.
Return line(s) are the strobe
outputs. (Open collector)
5VideomonitorCompatible with PC video
output
6 PC, laptop or other 6-wire (powered) IEEE-1394a
7Alternate Camera Control
Software
National Instruments Lab View
or custom software written /
modified for the 6100
Table 4. Item Typically Required
But Not Supplied
Table 5 lists the two cables that interconnect
with the Camera rear panel. The RJ-45 cable is
required only if external triggering or strobe
outputs are to be used.
The following is a general description of the
typical installation procedure for a camera.
1. Prepare the auxiliary interface and cable for the
RJ-45 connector if this is required. Use of the
strobe functions requires that power be supplied to
the opto-isolator stages in the camera dedicated to
the strobe circuits. (The trigger input directly drives
the cathode and anode of a photodiode in the
Camera and does not use the Vcc input of the
strobe circuits.)
2. Prepare the PC by verifying that it has an IEEE-
1394a port with power output and also the appro-
priate software to communicate with the camera
3. Install a CS- or C-mount lens on the camera
suitable for use with a 1/2-inch sensor. It may have
to be mechanically back focused once the camera
is operational. Back focus will have been factory
set using the lens that the Camera was ordered
with, but if the Camera was not ordered with a
lens then a typical lens would have been used. A
field supplied lens may have a slightly different
characteristic and thus require back-focusing of
the lens mount adapter. This procedure is de-
scribed in section 2.8.3.
4. Mount the camera
5. Connect the 1394a and if required the auxiliary
cable
6. Obtain a picture from the camera. This requires
use of the Viewer GUI software operating on a PC.
See section 3.0 for Operating instructions.
7. Adjust mechanical back focus by rotating the
lens and C-mount if required. See section 2.8.3.
8. Make any other adjustments to focusing and
mechanical alignment if required.
9. Perform an operational test of the camera
functions. Sections 2.8.1 through 2.8.4 provide
additional installation instructions about the rear
panel connectors, the back focus adjustment for
the lens, and other features.
ITEMS SUPPLIED
Item Description Cohu Part
Number
Kit 8366-7 Supplied Items
1 CS-mount 8359208-001
2Set Screw, stainless steel, hex
head, nylon tipped, 4-40-5/32 2010258-005
3Hex/Allen Wrench, L-style,
0.050-inch across flats 9710010-009
45-mm Extender
(CS to C-mount adapter) 2010695-001
Also Included with Camera (not part of kit 8366-7)
5Mounting Block
(mounts to bottom of Camera) 8369405-003
6 Screws (2), Flat Head, 6-32 x 3/8 0310010-027
7 Camera Control Software on CD Cohu 6100
Viewer
Note: Items 3 & 4 typically supplied loose. Items 5 & 6 ypically part of camera body
when shipped. Item 7, the CD, is supplied loose.