Colop T-150 WH User manual

Polymermaschine, optimiert für die Verwendung von Imagepac
Polymer machine, optimised for the use of Imagepac
Maszyna polimerowa - Optymalna efektywność przy zastosowaniu saszetek Imagepack.
Machine polymère, optimisée pour l‘utilisation avec Imagepac
Benutzerhandbuch • User manual
Instrukcja obsługi • Mode d’emploi


Technische Spezifikationen – Technical specifications –
Specyfikacja techniczna – Données techniques .......................................................................................... p. 4
Installation – Installation – Instalacja – Installation ..................................................................................... p. 5
Allgemeine Zeichnung und Beschreibung – General drawing and description –
Schemat główny wraz z opisem – Dessin général et description .......................................................... p. 6
Beschreibung des Bedienungsfeldes – Description of electronic board –
Opis panelu sterowania – Description du tableau de commandes ...................................................... p. 7
Polymer-Belichtung – Polymer exposure –
Naświetlanie polimeru – Insolation du polymère ........................................................................................ p. 8 - 9
Polymer-Auswaschung – Polymer washout –
Płukanie polimeru – Gravure ou lavage du polymère ................................................................................ p. 10 - 11
Nachbelichtung – Post-exposure – Naświetlanie dolne - utwardzanie – Post-insolation ........... p. 12 - 13
INDEX • INDEX • SPIS TREŚCI • TABLESDESMATIERES

Wymiary: 36 x 40 x 34 cm (Wysokość)
Waga netto: 30 kg
Waga bruto: 36 kg
Zasilanie: 220V 50 Hz
Maksymalny pobór mocy: 500 W
Pole naświetlania: 14,85 x 21 cm (A5)
Dwa zestawy lamp naświetlających : każdy zestaw zawiera 4 lampy UV 15 W
Silnik płukarki: 12 V prąd stały z inwertorem
Grzałka: 220V-200 W z automatycznym
termostatem 35°- 40° C
Regulator czasu: z elektronicznym microprocesorem
SPECYFIKACJA TECHNICZNA
Size: 36 x 40 x 34 cm (Height)
Net weight: 30 kg
Gross weight: 36 kg
Power supply: 220 V 50 Hz
Max. electrical input: 500 W
Plate size: 14,85 x 21 cm (A5)
Exposure lamps: Two series of 4 UV lamps 15 W
Washing motor: 12 V dc with inverter
Water heating: 220 V -200 W resistance with automatic
thermostat at 35°-40° C.
Times control: With electronic microprocessor
TECHNICAL SPECIFICATIONS
Dimensions: 36 x 40 x 34 cm (Hauteur
Poids net: 30 kg
Poids avec emballage: 36 kg
Alimentation: 220 V 50 Hz
Absorption max.: 500 W
Format cliché: 14,85 x 21 cm (A5)
Lampes insolation: Deux séries de 4 tubes UV 15 W
Moteur lavage: 12 V cc avec inversion automatique
Chauffage eau: Résistance électrique 220 V – 200 W avec
thermostat automatique à 35°-40° C.
Réglage des temps: Avec microprocesseur électronique
DONNEES TECHNIQUES
T-150 WH p. 4
Größe: 36 x 40 x 34 cm
Nettogewicht: 30 kg
Bruttogewicht: 36 kg
Spannung: 220 V 50 Hz
Leistung: 500 W
Plattengröße: 14,85 x 21 cm (A5)
Belichtungslampen: Zwei Reihen mit je 4 UV-LAMPEN 15 W
Auswasch- Motor: 12 V Gleichstrom mit Wechselrichter
Wasserheizung: 220 V -200 W Widerstand mit automatischem
Thermostat 35°-40° C.
Zeitsteuerung: Mit elektronischem Mikroprozessor
TECHNISCHE SPEZIFIKATIONEN

• Połóż sprzęt na stole lub innej stabilnej powierzchni.
• Sprawdź czy zamknięty jest zawór spustowy zamontowany w tylnej części maszyny.
Wkręć przezroczysty wężyk do zaworu spustowego.
• Podnieś pokrywę zbiornika i zdejmij folię ochronną z zielonej powierzchni o przyczepnej strukturze.
• Napełnij zbiornik wodą z płynem do płukania tak aby poziom pokrywał powierzchnię szczotek.
(powyżej 2-3 mm ponad powierzchnię szczotek).
• Podłącz urządzenie do prądu: 220V
• Załącz główny włącznik, podświetlany na czerwono.
• Naciśnij włącznik grzałki, podświetlany na zielono.
INSTALACJA
• Put the equipment on a table or on a steady surface.
• Verify that the water drain cock, in the rear of the machine, is closed. Fix the transparent water
drain hose into the cock.
• Open the water tank lid and take off the protective film of the green adhesive plate-holder.
• Fill the water tank with water and wash-out solution till cover the brushes (2-3 mm. over the brushes.
• Connect the equipment to the main line: 220 V.
• Press the general switch, it will light red.
• Press the water heating resistance switch, it will light green.
INSTALLATION
• Mettre la machine sur une table ou sur un support solide.
• Vérifier que le robinet de vidange cuve, sur l‘arrière de la machine, soit bien fermé.
Fixer au robinet le tuyau transparent de vidange.
• Ouvrir le couvercle de la cuve et enlever le film transparent de protection sur le porte-cliché
adhésif permanent vert.
• Remplir la cuve d’eau de solution de lavage, jusqu’à couvrir les brosses de 2-3 mm.
• Brancher la machine à la prise du secteur: 220 V.
• Pousser l’interrupteur général, il s’allumera.
• Pousser l’interrupteur de la résistance chauffage eau, il s’allumera.
INSTALLATION
T-150 WH p. 5
• Setzen Sie die Ausrüstung auf einen Tisch oder auf eine unveränderliche, ebene Fläche.
• Überprüfen Sie, ob der Wasserablasshahn auf der Rückseite der Maschine geschlossen ist.
Fixieren Sie den transparenten Wasserablassschlauch an dem Hahn.
• Öffnen Sie die Wasserbehälterkappe und entfernen Sie die Schutzfolie von dem grünen
selbstklebenden Plattenhalter.
• Füllen Sie den Wasserbehälter mit Wasser und Auswaschungslösung, bis die Bürsten bedeckt sind
(2-3 Millimeter über den Bürsten).
• Schließen Sie die Maschine an das Stromnetz an (220 Volt).
• Betätigen Sie den Hauptschalter, er leuchtet rot.
• Betätigen Sie den Wasserhitzebeständigkeitschalter, er leuchtet grün.
INSTALLATION

1
10
7
8
9
4
2
6
5
3
POLISH
1) Pokrywa zbiornika
2) Powierzchnia przyczepna
3) Zbiornik płukarki
4) Szczotki
5) Włącznik główny
6) Włącznik grzałki
7) Panel sterowania
8) Szyby
9) Szuflada naświetlania dolnego
10) Teleskop
ENGLISH
1) Water tank lid
2) Rotative plate-holder
3) Washout tank
4) Brushes
5) General switch
6) Heating resistance switch
7) Computerized keyboard
8) Exposure glasses
9) Post-exposure drawer
10) Tank lid spring
FRANÇAIS
1) Couvercle de la cuve
2) Porte-cliché orbital
3) Cuve de lavage
4) Brosses de lavage
5) Interrupteur général
6) Interrupteur de la résistance de chauffage eau
7) Tableau de commande électronique
8) Vitres d’insolation
9) Tiroir post-insolation
10) Verin d‘ouverture du couvercle
T-150 WH p. 6
DEUTSCH
1) Deckel Auswascheinheit
2) Rotierender Plattenhalter
3) Auswascheinheit
4) Bürsten
5) Hauptschalter
6) Heizungs-Schalter
7) Bedienungsfeld
8) Belichtungsgläser
9) Nachbelichtungswanne
10) Gasdruckfeder

POLISH
1) Wyświetlacz
2) Przyciski regulacji czasu
3) Włącznik ustawienia czasu
4) Kontrolki ustawienia czasu
5) Włącznik naświetlania górnego (podstawa)
6) Włącznik naświetlania dolnego (treść)
7) Włącznik płukarki
8)
Włącznik naświetalania dolnego (utwardzanie)
ENGLISH
1) Display
2) Keys to increase or decrease times
3) Timing selection key
4) Timing selection leds
5) Back exposure start key
6) Main exposure start key
7) Washout start key
8) Post-exposure start key
FRANÇAIS
1) Ecran (Display)
2) Touches pour augmenter ou diminuer les temps
3) Touche de sélection temps
4) Voyant lumineux de sélection temps
5) Touche départ insolation dorsale
6) Touche départ insolation principale
7) Touche départ lavage
8) Touche départ post-insolation
14
5
3
2
6 7 8
T-150 WH p. 7
DEUTSCH
1) Anzeige
2) Tasten zum Erhöhen oder Verringern der Zeiten
3) Zeiten-Auswahltaste
4) Zeiten-Auswahlanzeige
5) Starttaste Rückseitenbelichtung
6) Starttaste Hauptbelichtung
7) Starttaste Auswaschung
8) Starttaste Nachbelichtung

Patrz rysunek na str 9
• Otówrz szufladę naświetlarki (1) i podnieś górną szybę (2)
• Połóż film (3) na dolnej szybie, czytelną stroną do operatora.
• Połóż saszetkę Imagepack (4) tak aby strona z polimerem przylegała do filmu, natomiast
wierzchnią część stanowiła folia nośna.
• Zamknij szyby używając metalowego docisku a następnie zamknij szufladę.
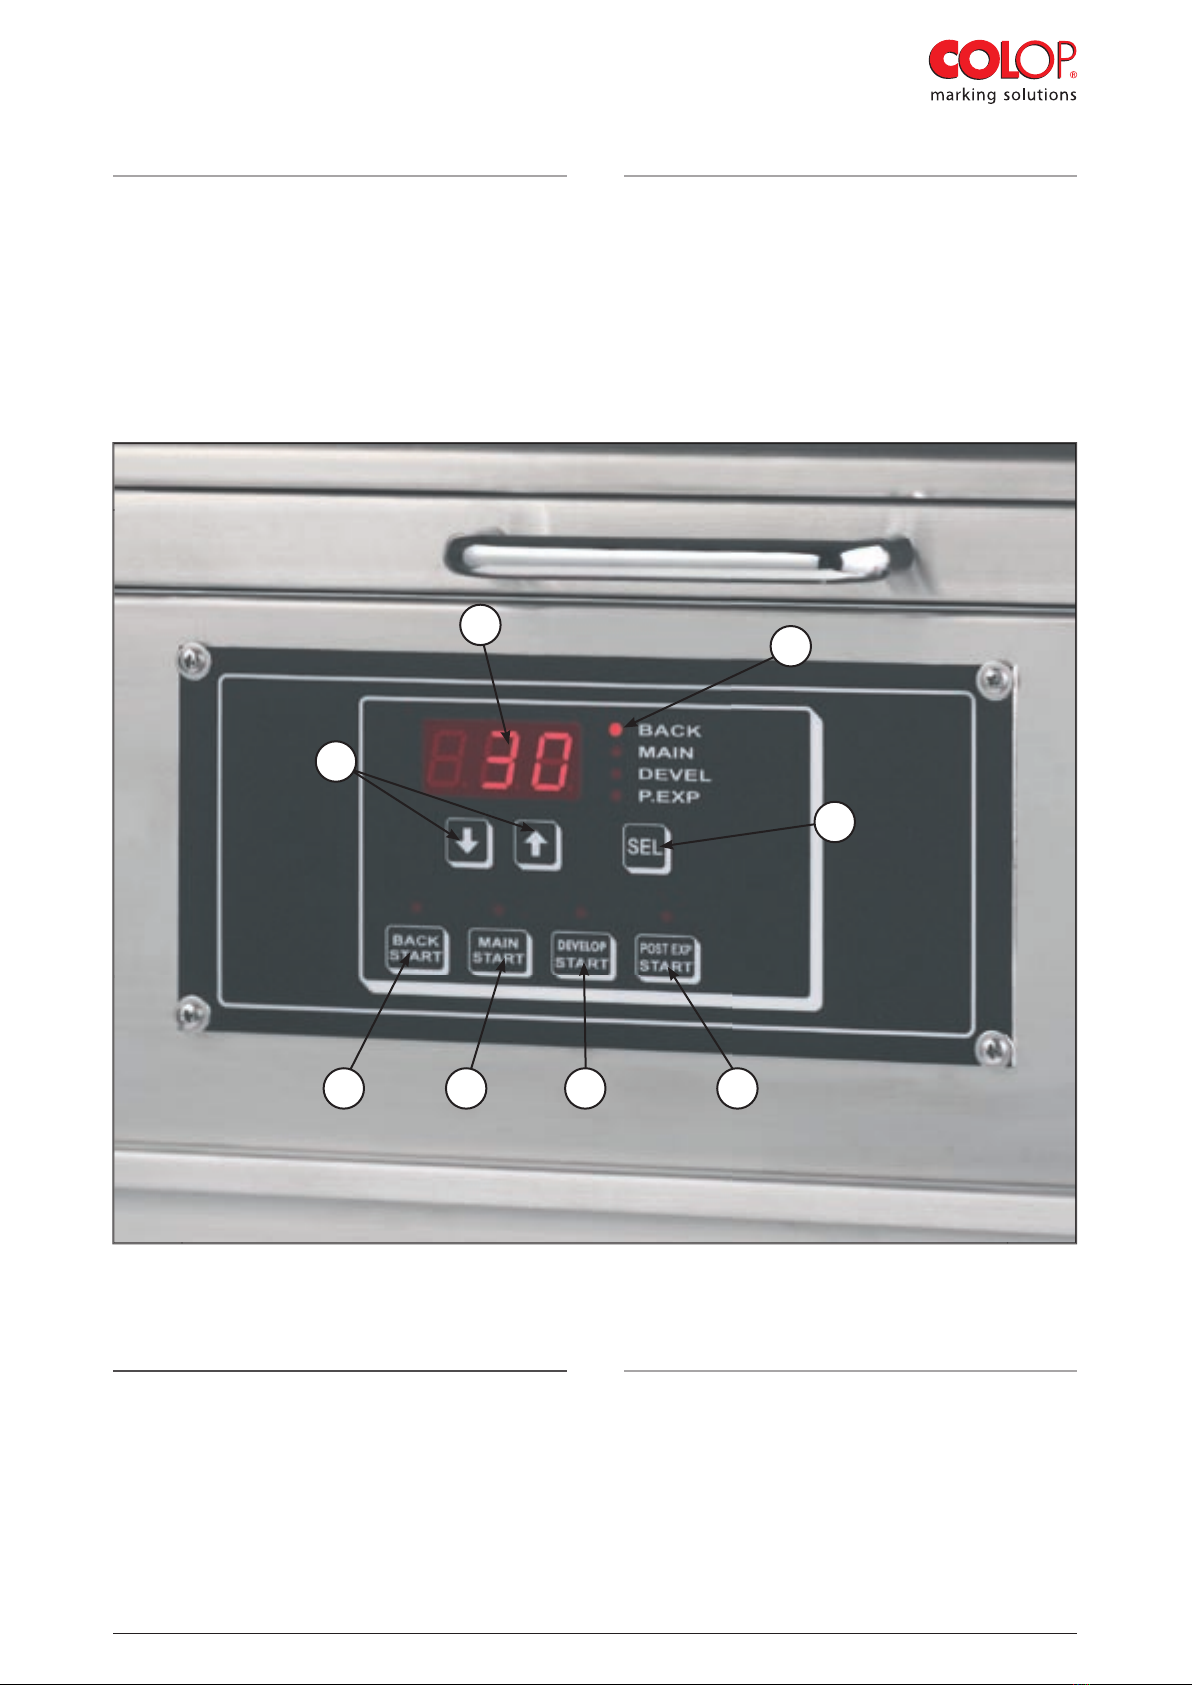
• Wciśnij przycisk„SEL“ (5) i przytrzymaj do momentu, w którym zaświeci się kontrolka„BACK“ (6).
• Ustaw czas naświetlania podstawy pieczątki (naświetlanie górne). Użyj przycisków ze strzałkami (8)
aby zmienić wartości czasu widocznego na wyświetlaczu (9) .
• Włącz ponownie przycisk„SEL“(5) trzymając tak długo aż zaświeci się kontrolka„MAIN“(7).
• Ustaw czas naświetlania treści pieczątki (naświetlanie dolne). Użyj przycisków ze strzałkami (8)
aby zmienić wartości czasu widocznego na wyświetlaczu(9).
• Naciśnij przycisk„BACK START“ (10) aby włączyć naświetlanie podstawy (naświetlanie górne). Tuż
po zakończeniu naświetlania górnego, naciśnij przycisk„MAIN START“ (11) aby włączyć naświetlanie
treści (naświetlanie dolne). Sygnał dźwiękowy informuje o zakończonym czasie naświetlania.
• Otówrz szufladę naświetlarki, zdejmij metalowy docisk i podnieś górną szybę. Wyjmij
naświetloną płytkę tekstową.
NAŚWIETLANIE POLIMERU
• Open the exposure drawer (1) and open the upper glass (2).
• Put the negative film (3) on the lower glass, with the readable part towards operator.
• Put the“Imagepac” bag (4) over the negative film.
• Close the glasses using the apposite metal bar and close the drawer.
• Press the“SEL”key (5) until the “BACK” led (6) is lighted.
• Set the necessary back exposure time. To set the wanted time, use the keys with arrows (8) to
increase or decrease the time marked on the display (9).
• Press again the“SEL”key (5) until the “MAIN”led (7) is lighted.
• Set the necessary main exposure time. To set the wanted time, use the keys with arrows (8) to
increase or decrease the time marked on the display (9).
• First press the“BACK START”key (10) to start the back exposure lamps. Once at the end the back
exposure, press the “MAIN START” key (11) to start the main exposure lamps. At the end a buzzer
sound alerts the operator.
• Open the exposure drawer and upper glass. Take out the exposed textplate.
POLYMER EXPOSURE
T-150 WH p. 8
• Öffnen Sie das Belichtungsfach (1) und heben Sie das obere Glas hoch (2).
• Platzieren Sie das Negativ (3) auf dem unteren Glas; mit der lesbaren Schrift in Richtung Betrachter.
• Legen Sie den Imagepac-Beutel (4) auf das Negativ.
• Schließen Sie die Gläser mit der Metallklemme und schließen Sie das Fach.
• Betätigen Sie die„SEL“ Taste (5), bis die„BACK“ (6) Anzeige beleuchtet ist.
• Stellen Sie die notwendige rückseitige Belichtungszeit ein. Um die gewünschte Zeit einzustellen
verwenden Sie die Cursortasten (8), der Einstellwert erscheint auf der Anzeige (9).
• Betätigen Sie wieder die„SEL“ Taste (5), bis die„MAIN“ (7) Anzeige leuchtet.
• Stellen Sie die notwendige Hauptbelichtungszeit ein. Um die gewünschte Zeit einzustellen,
verwenden Sie die Cursortasten (8), der Einstellwert erscheint auf der Anzeige (9).
• Betätigen Sie zuerst die„BACK START“ Taste (10), um die rückseitige Belichtung zu starten.
• Anschließend betätigen die„MAIN START“ Taste (11), um die Hauptbelichtung zu starten.
• Zum Schluss alarmiert ein Summerton den Benutzer.
• Öffnen Sie das Belichtungsfach sowie das obere Glas. Entnehmen Sie die belichtete Textplatte.
POLYMERBELICHTUNG

2
1
• Ouvrir le tiroir d’insolation (1) et soulever la vitre supérieure (2).
• Poser le film négatif (3) sur la vitre inférieure, coté lisible vers le haut.
• Poser le sachet“Imagepac” (4) sur le négatif.
• Fermer les vitres à l’aide de la barre sur les ressorts prévus à cet effet et fermer le tiroir.
• Appuyer sur la touche“SEL” (5) jusqu’à ce que le voyant“BACK”s‘allume (6).
• Entrer le temps d’insolation dorsale.Pour faire cela utiliser les touches avec les flèches (8) pour
augmenter ou diminuer le temps affiché sur l’écran (9).
• Appuyer sur la touche“SEL” (5) jusqu’à ce que le voyant“MAIN”s‘allume (7).
• Entrer le temps d’insolation principal. Comme précédemment utiliser les touches avec les flèches (8).
• Appuyer sur la touche“BACK START” (10) pour faire partir l’exposition dorsale.
• Ensuite, appuyer sur la touche“MAIN START” (11) pour faire partir l’insolation principale.
• A la fin un signal sonore alerte l’opérateur.
• Ouvrir le tiroir d’insolation et la vitre supérieure et enlever le sachet“Imagepac” exposé.
INSOLATION DU POLYMERE
T-150 WH p. 9
EMPFOHLENE BELICHTUNGSZEITEN • RECOMMENDED EXPOSURE TIMES
ZALECANE CZASY NAŚWIETLANIA • TEMPS D‘INSOLATION PRINCIPALE
Imagepac / Imagepac Xtra
MAIN 180 sec.
BACK 15 - 20 sec.
DEVELOP 180 sec.
POST EXP 400 sec.
4
3
9 6 7 5
10 11 8

Patrz rysunek str 11
• Sprawdź czy włącznik (10) grzałki jest podświetlony.
• Podnieś pokrywę zbiornika (1).
• Umieść naświetloną saszetkę Imagepack na zieloną powierzchnię o przyczepnej strukturze (3).
UWAGA: Aby proces był skuteczny powierzchnia przyczepna musi pozostać sucha. W celu
usunięcia wilgoci użyj gąbki lub miękkiej ściereczki.
• Przetnij folię ochronną wokół saszetki za pomocą nożyka a następnie zdejmij z Imagepack.
• Zamknij pokrywę zbiornika (1).
• Wciśnij przycisk„SEL“ (5) i przytrzymaj do momentu, w którym zaświeci się kontrolka„DEVEL“ (6).
• Ustaw czas płukania używając przycisków ze strzałkami (8) aby zmienić wartości widoczne na
wyświetlaczu (9).
• Naciśnij przycisk„DEVELOP START“ (11). Gdy płukanie zostanie rozpoczęte, na wyświetlaczu
ukaże się czas pozostały do zakończenia procesu.
• Podnieś pokrywę zbiornika (1) i zdejmij wypłukaną płytkę polimerową.
PŁUKANIE POLIMERU
• Verify that the switch (10) of the water heating resistance is lighted.
• Open the water tank lid (1).
• Put the exposed Imagepac textplate (2) on the plate-holder (3) sticking it on the green self adhesive
cover. ATTENTION: to be efficacious the green self-adhesive cover must be dry. If not, wipe it with
a sponge or a soft cloth.
• With a cutter remove the protection film of the“Imagepac” bag (4), without fear to damage it.
• Close the water tank lid (1).
• Press the“SEL”key (5) un til the led “DEVEL”(6) is lighted.
• Set the washing time using the keys with arrows (8) to increase or decrease the time marked on
the display (9).
• Press the“DEVELOP START” key (11). The washout operation shall start and on the display you shall
see the countdown. At the end a buzzer sound alerts the operator.
• Open the water tank lid (1) and take off the polymer plate.
POLYMER WASHOUT
T-150 WH p. 10
• Überprüfen Sie, ob die Anzeige (10) für die Wasserheizung leuchtet.
• Öffnen Sie den Deckel der Auswascheinheit (1).
• Fixieren Sie die bereits belichtete Imagepac-Textplatte (2) auf dem selbsthaftenden Platten-Halter (3).
ACHTUNG: Für eine gute Haftwirkung muss die grüne selbstklebende Platte trocken sein. Wenn nicht,
wischen Sie sie mit einem Schwamm oder einem weichen Tuch ab.
• Mit einem Cutter entfernen Sie den Schutzfilm des Imagepac-Beutels (4) ohne Furcht, es zu
beschädigen.
• Schließen Sie den Deckel (1).
• Betätigen Sie die„SEL“ Taste (5), bis die„DEVEL“ Anzeige (6) leuchtet.
• Um die gewünschte Zeit einzustellen, verwenden Sie die Cursortasten (8), der Einstellwert erscheint
auf der Anzeige (9).
• Drücken sie die„DEVELOP START“ Taste (11). Die Auswaschung beginnt, auf der Anzeige sehen Sie
die verbleibende Zeit. Am Ende des Auswaschvorgangs alarmiert ein Summerton den Benutzer.
• Öffnen Sie den Deckel der Auswascheinheit (1) und entfernen Sie die Textplatte.
POLYMER-AUSWASCHUNG

• Vérifier que l’interrupteur (10) de la résistance de chauffage de l’eau soit allumé.
• Ouvrir le couvercle (1).
• Poser le sachet“Imagepac” exposé (2) sur le porte-cliché (3) le faisant bien adhérer sur la surface verte
autocollante. ATTENTION: la surface verte du porte-cliché doit être bien sèche pour bien tenir. Si elle
est mouillée, essuyez-la avec une éponge ou un chiffon.
• A l’aide d’un cutter détachez la pellicule de protection (4) du sachet “Imagepac”.
• Fermer le couvercle (1).
• Appuyer sur la touche“SEL” (5) jusqu’à ce que le voyant“DEVEL”s‘allume (6).
• Entrer le temps de lavage.Pour faire cela utiliser les touches avec les flèches (8) pour augmenter
ou diminuer le temps affiché sur l’écran (9).
• Appuyer sur la touche“DEVELOP START” (11). L’opération de lavage commence et l’écran montre
le compte à rebours. A la fin un signal sonore alerte l’opérateur.
• Ouvrir le couvercle (1) et détacher du porte-cliche la plaque de texte développée.
LAVAGE DU POLYMERE
1
3
10
T-150 WH p. 11
96 5
11
8

Patrz rys str 13
• Otwórz szufladę naświetlarki (1).
• Włóż płytkę do szuflady, tekstem skierowanym do operatora.
• Nalej do zbiornika 1 cm roztworu utwardzającego.
• Naciśnij przycisk„SEL“ (3) i przytrzymaj do momentu, w którym zaświeci się kontrolka (4)„P.EXP“.
• Ustaw czas naświetlania dolnego używając przycisków ze strzałkami (5) aby zmienić wartości
widoczne na wyświetlaczu (6).
• Naciśnij przycisk„POST-EXP START“(7). Gdy naświetlanie dolne zostanie rozpoczęte na
wyświetlaczu ukaże się czas pozostały do zakończenia procesu.
• Otwórz szufladę i wyjmij utwardzoną płytkę. Wysusz za pomocą ściereczki lub suszarki
zachowując niską temperaturę.
NAŚWIETLANIE DOLNE UTWARDZANIE
• Open the post-exposure drawer (1).
• Put the developed plate (2) into the basin of the drawer, with the letters towards the operator.
• Pour 1 cm. of water and anti-tacking solution in the basin.
• Press the“SEL”key (3) till the “P. EXP”led (4) is lighted.
• Set the post-exposure time using the keys with arrows (5) to increase or decrease the time marked
on the display (6).
• Press the“POST-EXP START” key (7).The post-exposure shall start and on the display you shall see
the countdown. At the end a buzzer sound alerts the operator.
• Open the drawer and take out the finished textplate. Dry it with a cloth or an hair-dryer at low
temperature.
POST-EXPOSURE
• Ouvrir le tiroir de post-insolation (1).
• Mettre le cliché developpé (2) dans la cuvette du tiroir, avec le relief des tampons vers le haut.
• Verser 1 cm. d’eau de solution antiadherente dans la cuvette. Fermer le tiroir.
• Appuyer sur la touche“SEL” (3) jusqu’à ce que le voyant“P. EXP” s‘allume (4).
• Entrer le temps de post-insolation à l‘aide des touches avec les flèches (5) pour augmenter
ou diminuer le temps affiché sur l’écran (6).
• Appuyer sur la touche“POST EXP START” (7). Les lampes s’allument et l’écran commence le compte
à rebours. A la fin un signal sonore alerte l’opérateur.
• Ouvrir le tiroir et sortir la plaque de texte finie. Essuyez les avec un chiffon ou un sèche-cheveux
à basse température.
POST-INSOLATION
T-150 WH p. 12
• Öffnen Sie das Nachbelichtungsfach (1).
• Legen Sie die Textplatte (2) in das Nachbelichtungsfach, mit den Buchstaben in Richtung Benutzer.
• Gießen Sie ca. 1 Zentimeter Wasser und Nachbelichtungssalz in die Wanne.
• Betätigen Sie die„SEL“ Taste (3), bis die„P. EXP“ Anzeige (4) leuchtet.
• Um die gewünschte Zeit einzustellen, verwenden Sie die Cursortasten (8), der Einstellwert erscheint
auf der Anzeige (6).
• Betätigen Sie die„POST-EXP START“ Taste 7). Die Nachbelichtung beginnt, auf der Anzeige sehen
Sie die verbleibende Zeit. Am Ende des Prozesses alarmiert ein Summerton den Benutzer.
• Öffnen Sie das Fach und nehmen Sie die fertige Textplatte heraus. Trocknen Sie sie mit einem Tuch
oder einem Haartrockner bei niedriger Temperatur.
NACHBELICHTUNG

1
6 4 3
7
5
T-150 WH p. 13

T-150 WH p. 14
SCHALTPLAN • ELECTRICAL DIAGRAMM
SCHEMAT ELEKTRYCZNY • SCHÉMA ÉLÉCTRIQUE
POLISH
G Włącznik główny
R Włącznik grzałki
L/B Lampy naświetlające (górne)
I/M Lampy naświetlające (dolne)
I Inwertor
T Transformator 220V/12V
M Silnik płukarki 12 V
R Moc grzałki 200 W
S Termostat
Q Główny panel sterowania
F Bezpiecznik 10 A
R1-LB Przekaźnik naświetlania (górnego)
R2-LM Przekaźnik naświetlania (dolnego)
R3-M 12 V Przekaźnik silnika
ENGLISH
G Main switch
R Water heating resistance switch
L/B Exposure Lamps (Back)
l/M Exposure Lamps (Main + Post Exp)
I Inverter 12V
T Transformer 220V/12V
M Washing motor 12V
R Water resistance 200W
S Thermostat
Q Main keyboard
F Fuse 10A
R1-LB Exposure relay (Back)
R2-LM Exposure relay (Main + Post Exp)
R3-M 12V motor relay
FRANÇAIS
G Interrupteur général
R Interrupteur résistance chauffage eau
L/B Lampes insolation (Back)
l/M Lampes insolation (Main + Post Exp)
I Carte inverseur 12V
T Transformateur 220V/12V
M Moteur lavage 12V
R Résistance eau 200W
S Thermostat
Q Clavier électronique
F Fusible 10A
R1-LB Relais insolation (Back)
R2-LM Relais insolation (Main + Post Exp)
R3-M Relais moteur 12V
DEUTSCH
G Hauptschalter
R Schalter Wasserheizung
L/B Belichtungslampen (Rückseite)
I/M
Belichtungslampen (Vorderseite und Nachbelichtung)
I Wechselrichter 12V
T Umformer 220V/12V
M Auswaschmotor 12V
R Wasser Widerstand 200W
S Thermostat
Q Haupt-Bedienungsfeld
F Sicherung 10A
R1-LB Belichtungsrelay (Rückseite)
R2-LM Belichtungsrelay (Haupt + Nachbelichtung)
R3-M 12V Motor Relay


COLOP Stempelerzeugung Skopek GmbH & Co. KG
Dr.-Arming-Straße 5 • 4600 Wels / Austria
www.colop.com • colop@colop.co.at
Table of contents
Popular Industrial Equipment manuals by other brands

CAVIDYNE
CAVIDYNE Caviblaster 2570-D Operation & maintenance manual

Alfa Network
Alfa Network LU-VE Arctigo ISD Assembly instructions

Allen-Bradley
Allen-Bradley 140G-N-TLH3 Installation

Aventics
Aventics MSC Series Assembly instructions

Emerson
Emerson PACSystems RXi Series user manual

Scheppach
Scheppach hf 50 Translation from the original instruction manual