COLORATO CLHR-20WR User manual

www.colorato.net
INSTRUCTION MANUAL
FOR ELECTRIC
INFRARED HEATERS
MODEL: CLHR-20WR
Read carefully this manual before using the appliance
and keep it for future reference

IMPORTANT INFORMATION
Read carefully this instruction manual before using the infrared heater.
This instruction manual contains important information on your safety, as well as some recommendations
on proper use of the appliance and its maintenance.
Keep the instruction manual along with the warranty certificate, sales receipt, and, if possible, cardboard
package and packing material.
The purchased infrared may somewhat differ from one described in the manual, but this does not affect
the methods of use and operation.
Important precautions and instructions given in this Manual do not include all possible modes and
situations, which can be encountered. It is necessary to understand that common sense, cautiousness,
and carefulness are the factors, which cannot be "integrated" to any product.
1. SAFETY INSTRUCTIONS
Read the instructions before using. During use of the infrared heater, it is necessary to observe some
precautions. Improper operation with disregard of precautions may result in infliction of harm to health
of the user and other people, as well as in infliction of damage to their property.
Use only the voltage specified on the rating plate of the heater.
Connect the appliance ONLY to a properly installed socket-outlet with earth contact.
The heater should be connected to the electric mains equipped with an automatic circuit breaker.
The unit must be handled with care, and avoid vibration or hitting.
WARNING: FIRE RISK EXISTS IF THE HEATER IS COVERED BY ORPOSITIONED CLOSE TO
CURTAINS OR OTHER COMBUSTIBLE MATERIALS.
Do not use the appliance areas where gasoline, paint or other flammable liquids are used or stored.
Do not use the appliance in particularly duty and explosive areas.
Do not use the appliance in a building site, green house, barn or stable where there’s flammable dust.
Do not use the appliance as a sauna heater.
Warning: Do not touch the radiating plate. To avoid burns, do not touch the appliance surface by hand
and other body parts. It is also necessary to exclude the possibility of touching the heater radiating
boards by a person (including accidental) via proper instructions and allocation of the heater in an
inaccessible place.
It keeps hot for a period after shut down. Potential danger would be occurring when touching it during
this period.
Do not place any items of clothing, hand towels or similar over the heater to dry. Risk of overheating
and fire hazard.
Do not leave the heater unattended whilst in use.
Do not use this heater on a wet surface, or where it can fall or be pushed into water.
Do not touch an appliance that has fallen into water. Switch off at supply and unplug immediately.
If the supply cord is damaged, it must be replaced by the manufacturer, its service agent or similarly
qualified persons in order to avoid a hazard.
If the heater is defective, it must be checked and repaired by the manufacturer, its service agent or
similarly qualified persons in order to avoid a hazard.
Do not operate appliance with wet hands.
Use this appliance only as described in this manual. Any other use is not recommended by the
manufacturer and may cause fire, electric shock or injury.
Do not use abrasive cleaning products on this appliance. Clean with a damp cloth (not wet) rinsed in
hot soapy water only. Always remove plug from the mains supply before cleaning.
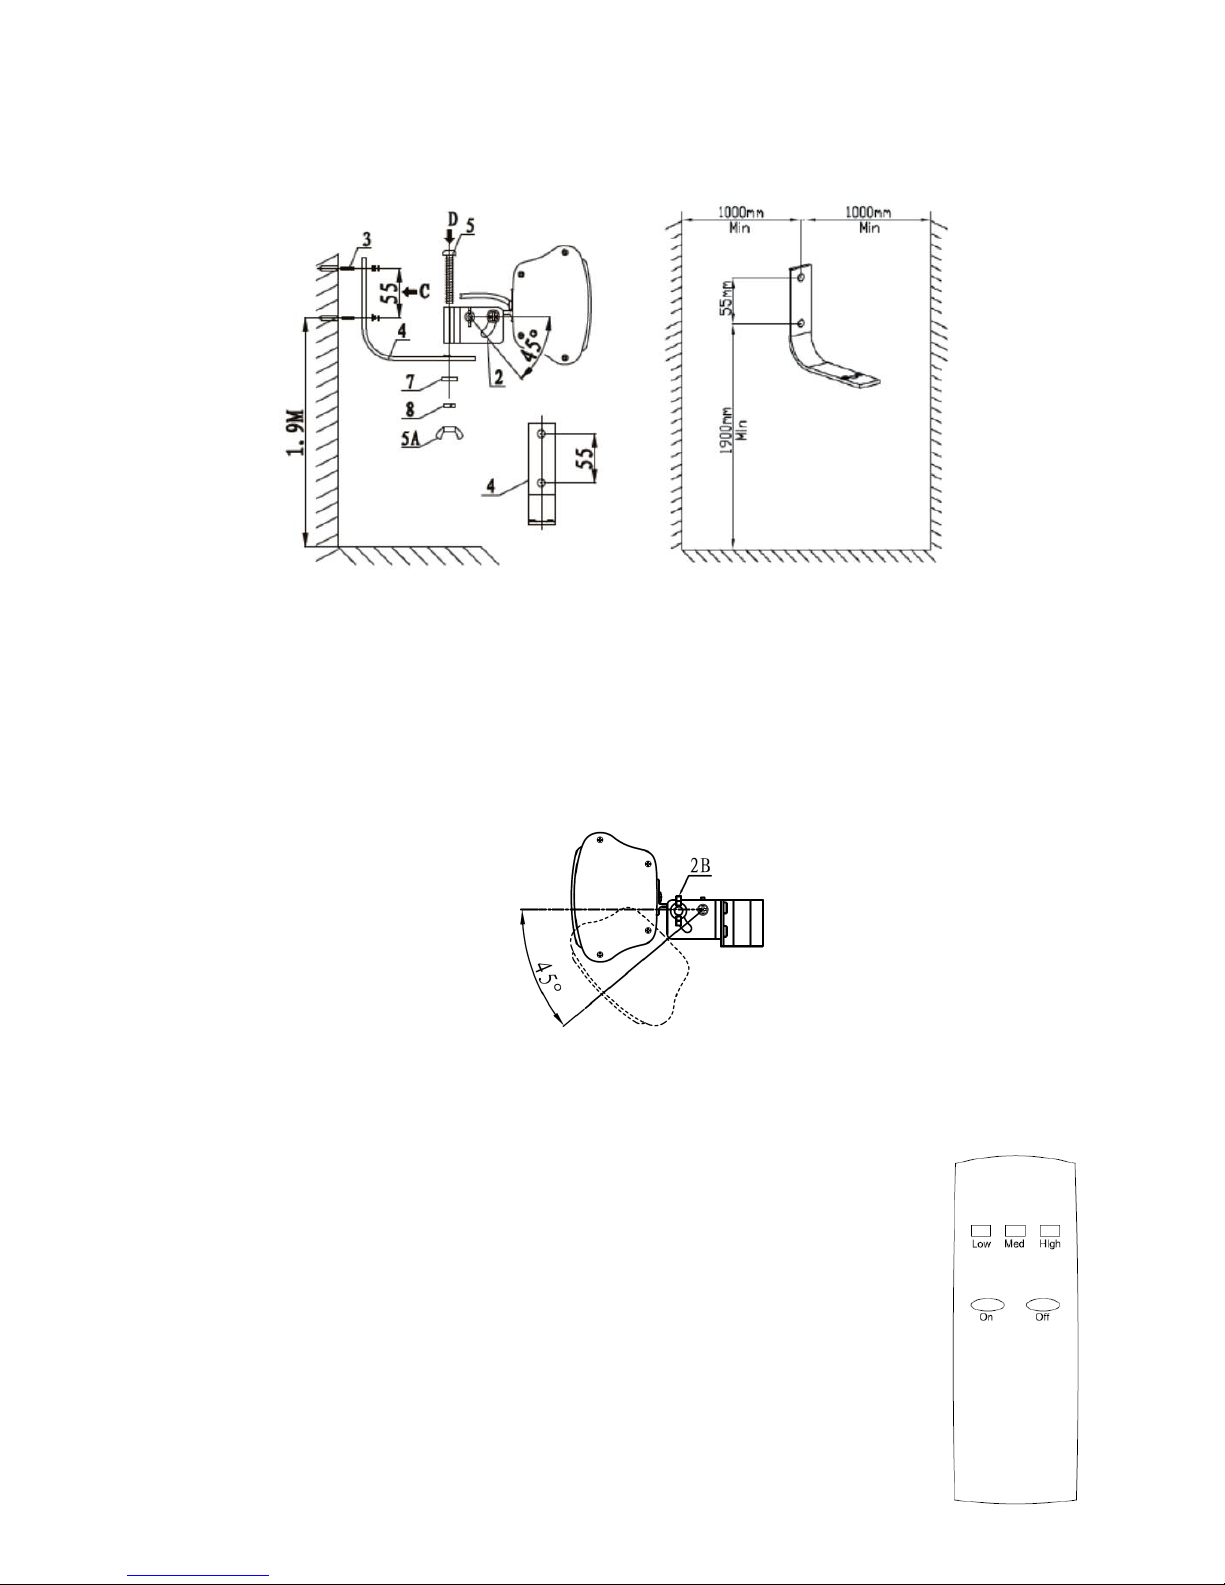
The heater must be installed at least 1.8 m above the floor.
The heater must not be located immediately below a socket-outlet. Socket-outlet should not be located

at the back of the heater. They should be located outside the physical footprint of the units to minimize
heat build-up behind the heater. The installation must be equipped with an all-pole disconnection
mechanism with a break contact distance of at least 3mm. The All-pole disconnection mechanism
must be installed on the height less than 1.8m from the floor.
The heater is to be installed so that switches and other controls cannot be touched by a person in the
bath or shower.
If the heater is to be mounted on an incline (eg. Vaulted ceiling), ensure the electrical connection is
located at that lowest point of the heater.
Do not connect the appliance to the mains source until it has been installed in its final location and
adjusted to the position it will be used in.
Do not operate with the cord coiled up as this could cause a build up of heat, which could pose a
hazard.
The use of an extension cord with this appliance is not recommended.
Do not allow cord to come in contact with heated surfaces during operation.
Do not run cord under carpeting, throw rugs or runners etc. Arrange cord away from areas where it is
likely to be tripped over.
Children and persons with reduced physical, sensory or mental capabilities or lack of experience and
knowledge are not allowed to use the appliance unless they have been given supervision or instruction
concerning use of the appliance in a safe way and understand the hazards involved. Children shall not
play with the appliance. Cleaning and user maintenance shall not be made by children without
supervision.
The appliance is only intended for the purpose described in user manual.
Do not use appliance or any part of the appliance out of the intended use to avoid risk.
The use of attachments which are not recommended or sold by the appliance manufacturer may
cause a risk of injury to persons.
CAUTION — some parts of this product can become very hot and cause burns. Particular attention
has to be given where children and vulnerable people are present.
Install and operate the heater in strictly horizontal position on the ceiling or ceiling structural elements.
At that, thermal resistance of the ceiling coating material should be at least 80 °C.
WARNING: This heater is not equipped with a device to control the room temperature. Do not use this
heater in small rooms when they are occupied by persons not capable of leaving the room on their
own, unless constant supervision is provided.

2. Installation
2.1 Safe distances required for installation
Attention: The appliance must only be operated in a horizontal position with max ±5°slope.
Never install the appliance on a combustible surface (plastics, nylon, carton etc.)
When the electrical connection is outside, it is recommended that a waterproof socket is used for the
connection. Otherwise, the plug should be connected to a socket indoors.
Install the device at a minimum distance of
1.8 m above the ground
0.65m from walls
0.3 m from the ceiling
1.5 m from the combustibles like curtains
1 m from persons or animals
2.2 Heating area
The infrared strip heater produces radiant heat which heats objects rather than the air. Therefore, it is
imperative that objects or people to be heated, are within the direct radiant footprint of the heater.
The below diagrams show the approximate heating area for each model based on an indoor and outdoor
enclosed environment. The diagram shows that the maximum heat output is found directly under the heater,
and the temperature decreases as the user move away from the heater.

3. Installation process
Step 1.: Check the accessories packed with the appliance.
series Parts name Specification Quantity
1 Screw M6x20 1 On the heater
2 Bracket set Aluminum 1 In the package
2A Bolt+Nut M6x100+M6 1 Fixed on the No.2 Bracket set
2B Bolt+Nut M8x100+M8 1 Fixed on the No.2 Bracket set
3 Expansion bolt M6x60 2 In the package
4 Hanger STEEL 1 In the package
5 Bolt M8×60 1 In the package
5A Nut M8 1 Fixed on NO.5 Bolt M8*60
6 Washer Ø6.2xØ14x1 1 Fixed on No.2A Bolt M6*100
7 Washer Ø8.2xØ16x1 3 2 pcs Fixed on Bolt of No.2B
and 1 pc on Bolt of No.5
8 Spring Washer Ø8.2xØ11x1.5 2 Fixed on Bolt of No.2B and
No.5
Tools needed: Screwdriver , spanner. These tools need be prepared by the final user.
Step 2: Take off the screw M6x20 from the heater by screwdriver.
Attention : Please operate in the direction A.
Step 3: Fix the bracket set (No.2 of accessories list) on the heater by the screw M6x20, which is took off from
the step 1.
Attention : Please operate in the direction B.

Step 4: Drill two holes (Ф8*40) on the wall, its distance is 55mm. Install the hanger (No.4 in accessories list) on
the wall with 2pcs M6*60 (No.3 in accessories list) by the spanner.
Step 5: Fix the heater on the hanger with the bolt M8x60 (No.5 in accessories list), fasten the nut M8 (No.5A) by
Hand and screwdriver.
Step 6: Tilting angle adjustment. Loose the nut M8 (No. 2B), then adjust the tilting angle by hand. The angle is
to be set up to 45°.
Step 7: Finally, fasten the nut M8 (No. 2B) by hand and Screwdriver.
4. How to operate
Plug the heater in the main power, and press the switch on, the pilot lamp
will flash and The heater is in stand-by mode;
Press the key “ON” on the remote control, the buzzer responds one sound. The pilot
will be light. The heater will start work in low power mode in first time using, or work
in the pre-set power model;
Press the KEY “LOW”, set the heater work in 33% of the rated power. The buzzer
responds one bee sound;
Press the KEY “MED”, could set the heater work in 66% of the rated power. The
buzzer responds two bee sound;
Press the KEY “HIGH”, could set the heater work in 100% of the rated power. The
buzzer responds three bee sound;
Press the KEY “OFF”, the buzzer responds one bee sound, the heater Is in stand-by
mode;
Push the switch off, the heater will be power off.

Remark:
After switching on the appliance for the first time and following extended periods of non-use, the appliance
may smell for a short time.
A few minutes after switching the heater on, you may notice two dark stains on the bulb element. This is
normal and it will not affect the performance of the unit.
Attention: Do not look directly into the light for a long time.
The installation must be equipped with an all-pole disconnection mechanism with a break contact
distance of at least 3 mm.
5. Cleaning
Disconnect the appliance from the power supply system;
After the appliance has cooled down, the housing can be wiped dry;
Do not touch the bulb element with your fingers, since stains could build up from such a contact.
The reflector should be cleaned regularly by professionals.
Do not use any abrasive or caustic cleaning agents!
Never immerse the appliance in water! Danger to life!
6. Maintenance
Any maintenance or repairs including replacing the bulb element should only be carried out by a qualified
electrician.
7. Specifications
MODEL CLHR-20WR
Switch YES
Remote controller YES
Voltage / Frequency 230V ~ 50 Hz
Power 2000
Insulation Class I
Waterproof protection IP65
8. Correct disposal of the product
The symbol on the product means that at the end of its life, the appliance has not to be considered a
common waste. It is a special waste and has to be demolished in specific recovery and disposal area, as
prescribed by the EC Directive 2002/96/EC(WEEE). By disposing this product correctly, you can avoid negative
consequences for the environment and for the human health, due to the presence of potentially dangerous
substances in the product.
Other COLORATO Heater manuals