Colorlight C6 User manual

C6 LED Player

CONTENT
1 C6 Interface and Hardware Connection ....................................................... 1
1.1 C6 Interface ...................................................................................... 1
1.2 Hardware Connection ....................................................................... 2
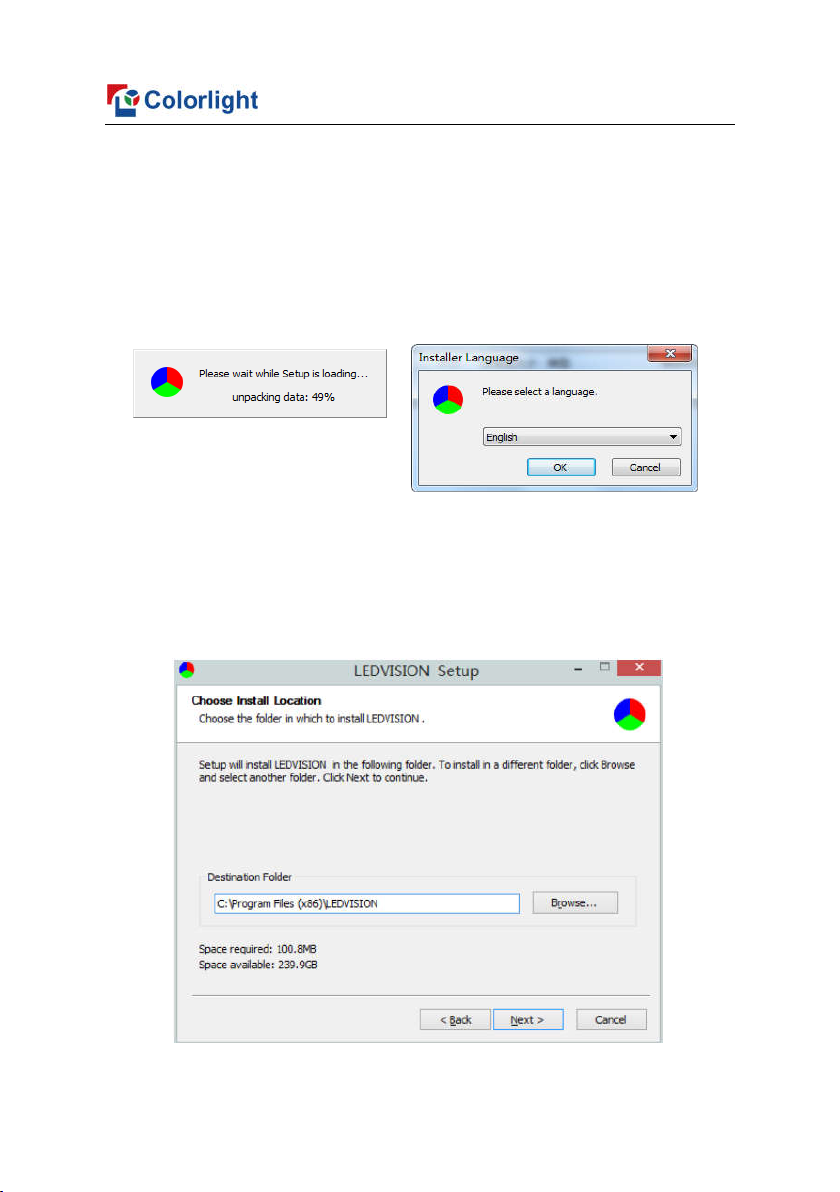
2 LEDVISION Installation ................................................................................ 3
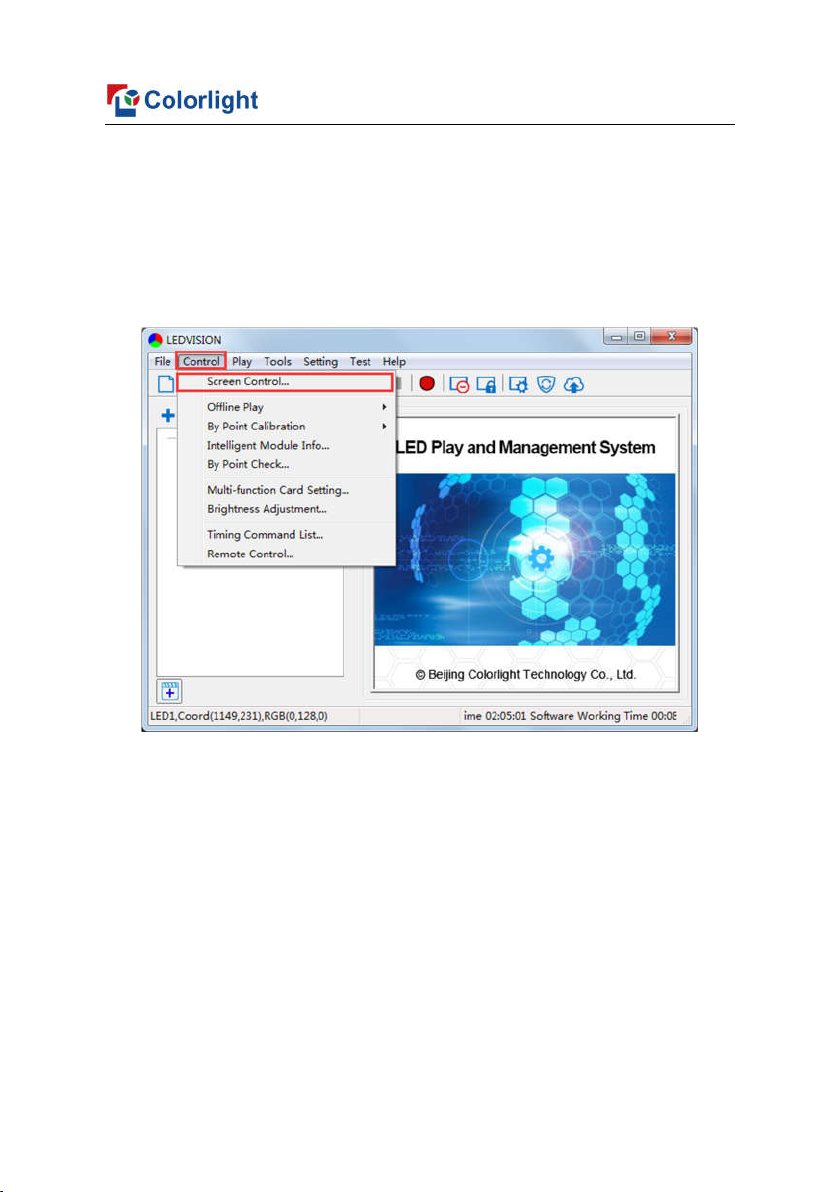
3 C6 Parameter Settings ................................................................................. 5
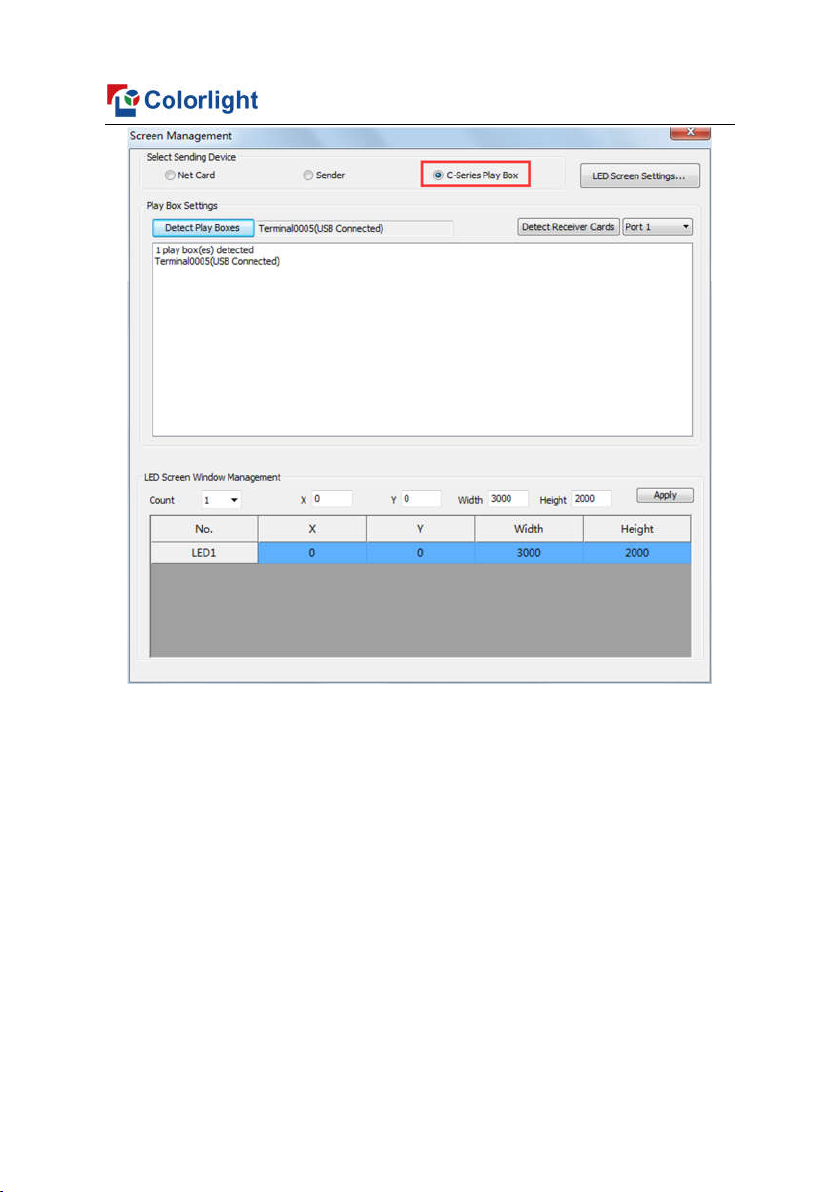
3.1 Connection Settings .......................................................................... 5
3.2 Basic Settings ................................................................................... 7
3.3 Advanced Settings ...........................................................................10
3.3.1 Playing Parameters ..............................................................10
3.3.2 Network ................................................................................ 11
4 Async Program Editing and Sync Playing ...................................................15
4.1 Async Program Editing .....................................................................15
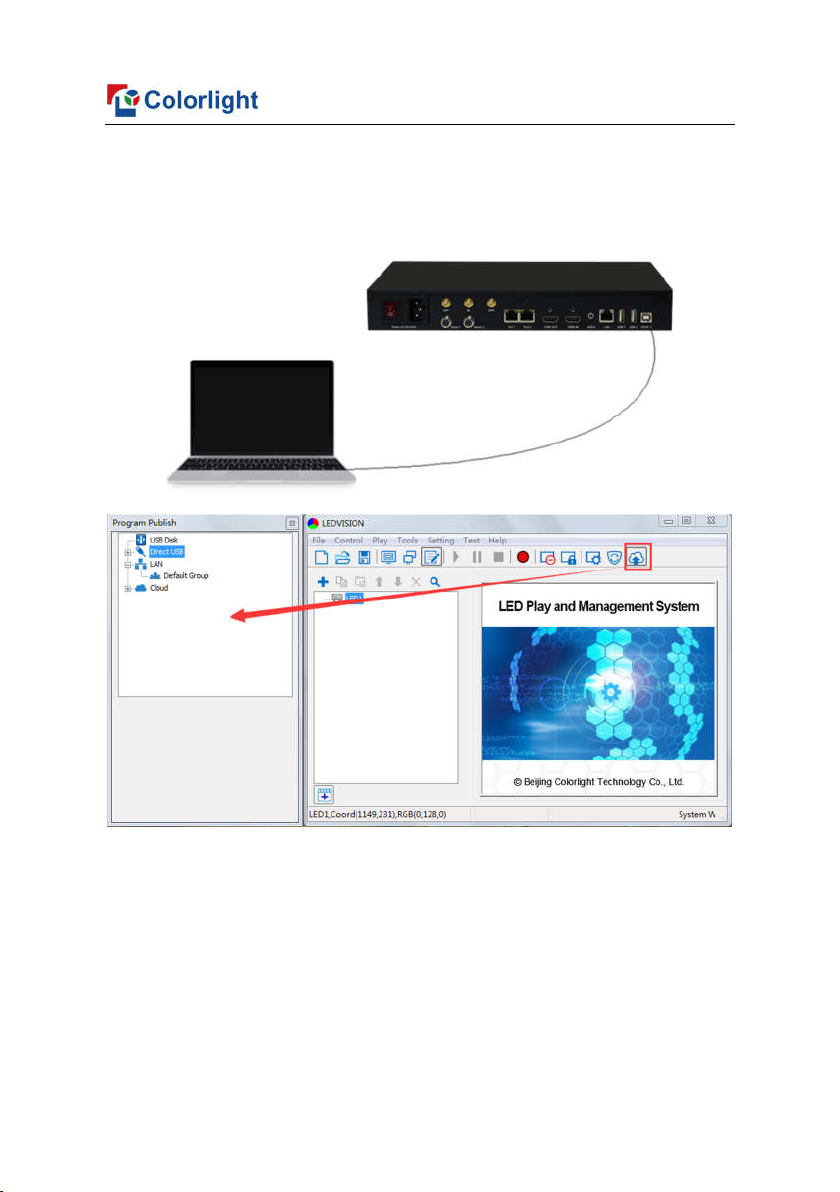
4.2 Async Program Publishing ...............................................................16
4.2.1 Publish Program through Direct USB ...................................16
4.2.2 Publish Program through Ethernet Port ................................17
4.2.3 Publish Program through USB Disk ......................................17
4.3 Sync Playing ....................................................................................20
5 Network Management of C6 ........................................................................21
5.1 Connection and Management ..........................................................21
5.2 Add Group and C6 ...........................................................................21

www.colorlightinside.com
1
1 C6 Interface and Hardware Connection
1.1 C6 Interface
No
Name Functions
1 Indicator Green indicator shows Async or Sync display
2 Switch Button Switch between Async & Sync display
3 WiFi Interface Connect with WiFi antenna
4 4G Interface Connect with 4G antenna (Optional)
5 GPS Interface Connect with GPS antenna (Optional)
6 Sensor Interface
Environmental temperature and brightness monitoring;
Automatic brightness adjustment
7 Ethernet Output RJ45, signal output, connecting with receiving cards
8 HDMI OUT HDMI output, for cascading between players
9 HDMI IN HDMI input, for cascading between players
10
Audio Output HiFi stereo output
11
LAN Port Access network
12
USB Port Program updating through U disc
13
CONFIG Screen parameters setting; Program publishing

www.colorlightinside.com
2
1.2 Hardware Connection

www.colorlightinside.com
3
2 LEDVISION Installation
First download the installation package of LEDVISION software from
Colorlight’s official website www.colorlightinside.com, and complete the
installation according to the diagrams below.
1. Run the software package, and select [ English ] for installer language.
Click [ OK ] to move on.
Note: Run LEDVISION version 5.0 or higher while using C6.
2. After selecting a language, an installation wizard like below will appear. Click
[ Next ]. Then choose installation location, click [ Browse ] to change default
target location, then click [ Next ] after completing;

www.colorlightinside.com
4
Choose components according to your own computer status, click [ Install ]
to complete;
After the installation is complete you are ready to use LEDVISION.

www.colorlightinside.com
5
3 C6 Parameter Settings
3.1 Connection Settings
1. Before connecting C6 to the computer, first click the control menu [ Control ]
– [ Screen Control ], then select [ C-Series Play Box ] in Select Sending
Device, then set up [ LED Screen Window Management ].

www.colorlightinside.com
6
Note: If you do not complete this step, LEDVISION may not function properly
because of a conflict between Net Card mode and C6 CONFIG interface.

www.colorlightinside.com
7
2. Use standard USB A/B cable to connect C6 to computer when C6 is
powered on, one side to connect USB port, another side for C6 CONFIG port.
Click [ Publish Program to C Series Playboxes ] (as shown in the red
box) to enter program publish interface.
3.2 Basic Settings
● Ensure LED display is under normal configuration before setting on C6
parameters.
● When setting C6 parameters, you can connect C6 to your PC through a
standard USB A/B cable, and connect C6 to LED screen through network
cable.

www.colorlightinside.com
8
Time Settings: Click [ Modify ] to set up date and time, or time zone as
well.
Player Time: Display current time.
Uptime: Calculated running time once C6 powered on.
Total/Available: View memory utilization.
Wakeup, Sleep, Reboot: To perform C6 operation like wakeup, sleep and
reboot once clicked.
Program: Use the drop down menu to play programs.
Management: Check, delete and choose program, and much more.
Schedule: Conduct timing settings on command contents like play
program, sleep, wakeup, reboot, brightness adjustment, etc.
1. After connecting C6 to the computer, a C6 player will show up in Direct USB,
you can check the specific information and some basic settings about it
through selecting the player.

www.colorlightinside.com
9
2. In Program Management, you can conduct a comprehensive management
on programs included in C6 player, and all programs can be deleted in
Program Management regardless of the type and source.
3. Schedule Settings:
In Schedule Settings, click [ Add ] to add schedule command, and
schedule command can conduct timing settings on contents like play program,
sleep, wakeup, reboot, brightness adjustment, media volume, switch to
sync/async signal, etc. As shown below:

www.colorlightinside.com
10
Commands can be edited and deleted after completing adding schedule
commands.
3.3 Advanced Settings
3.3.1 Playing Parameters
①LED Resolution
The [ Width ] / [ Height ] you input must be equal to or slightly larger than
the actual screen resolution.
②Input Type: HDMI or Internal Media

www.colorlightinside.com
11
③Output
[ Every Frame ] (Default)
[ Every Other Frame ] (Choose [ Every Other Frame ] can help avoid lag
when image loading area is too large)
④Control Area
Select [ Custom ] in control area, and modify the values according to your
network port control area, click [ Apply ] to complete setting.
3.3.2 Network
①WiFi
Check [ WiFi ] in network tab, and input your WiFi login information for
[ SSID ] and [ Password ], then click [ Apply ] and [ Refresh ] to complete

www.colorlightinside.com
12
setting, click [ Details ] to check connection status.

www.colorlightinside.com
13
②WiFi Hotspot
Input your [ SSID ] and [ Password ] to use a WiFi Hotspot;
[ Band ]: 2.4G or 5G (5G mode will be faster and more reliable if both
smart phone and computer support 5G WiFi)
[ Channel ]: 14 or 24 choices, to avoid network overload.
③LAN (Network Cable)
1. [ Automatically Obtain IP Address ] (Default)
When you connect your C6’s LAN port to a networked router, C6 will
automatically obtain an IP address.
2. [ Use Following IP Address ]
To use a specific IP address, enter information for [ IP ], [ Subnet Mask ],
[ Gateway ], then connect C6 LAN port to the router.

www.colorlightinside.com
14
3. [ Details ]
View network connection information like Status, Mac Address, IP
address, etc.
④4G
Check [ 4G ] in network tab, click [ Apply ] and [ Refresh ] to access 4G
network, click [ Test Network State ] to check connection status.

www.colorlightinside.com
15
4 Async Program Editing and Sync Playing
4.1 Async Program Editing

www.colorlightinside.com
16
When you open LEDVISION, you will see [ LED1 ] in program editing area.
Right-click [ LED1 ] to add [ Normal Page ], you can add [ File Window ] in
[ Normal Page ], then add [ Image ] and [ Video ] under the [ File Window ]
to add media for asynchronous play.
4.2 Async Program Publishing
4.2.1 Publish Program through Direct USB
①In [ Program Editing Area ], after finishing program editing, select the
[ Program Page ] that you are going to publish;
②Click [ C6 ] and then right-click to choose [ Publish current program to the
selected player ], you must rename the program and allow it to finish
uploading to fully publish your program.

www.colorlightinside.com
17
4.2.2 Publish Program through Ethernet Port
①In [ Program Editing Area ], after finishing program editing, select the
[ Program Page ] that you are going to publish;
②Click [ C6 ] and then right-click to choose [ Publish current program to the
selected player ], you must rename the program and allow it to finish
uploading to fully publish your program.
4.2.3 Publish Program through USB Disk
1. To begin publishing through USB, first insert your USB disk to the PC USB
port;
Click [ Publish Program to C-Series Playboxes ] to extend program

www.colorlightinside.com
18
publishing window.
Note: USB disk should be empty before publishing for best performance.
Remove previous updated programs before using it to update or play new
programs, so as to avoid any problems.
Other manuals for C6
1
Table of contents