Comelit DEC0804 User manual

HD
Decoder
User Manual

HD Decoder User Manual
Please read this instruction carefully before operating the unit and keep it for further
reference
Notes
⚫Please read this user manual carefully to ensure that you can use the device correctly and
safely.
⚫There may be several technically incorrect places or printing errors in this manual. The
updates will be added into the new version of this manual. The contents of this manual are
subject to change without notice.
⚫This device should be operated only from the type of power source indicated on the
marking label. The voltage of the power must be verified before using the same. Kindly
remove the cables from the power source if the device is not to be used for a long period of
time.
⚫Do not install thisdevice near anyheat sources such as radiators, heat registers, stoves or
other devices that produce heat.
⚫Do not install this device near water. Clean only with a dry cloth.
⚫Do not block any ventilation openings and ensure proper ventilation around the
machine.
⚫This machine is for indoor use only. Do not expose the machine in rain or moist
environment. In case any solid or liquid get inside the machine’s case, please turn off the
device immediately and get it checked by a qualified technician.
⚫Do not try to repair the device by yourself without technical aid or approval.
⚫This manual is suitable for many models. All examples and pictures used in the manual
are from one of the models for reference.

HD Decoder User Manual
Contents
1Introduction.............................................................................................................. 1
1.1 Summary........................................................................................................... 1
1.2 Features............................................................................................................. 1
1.3 Front-panel Descriptions................................................................................... 2
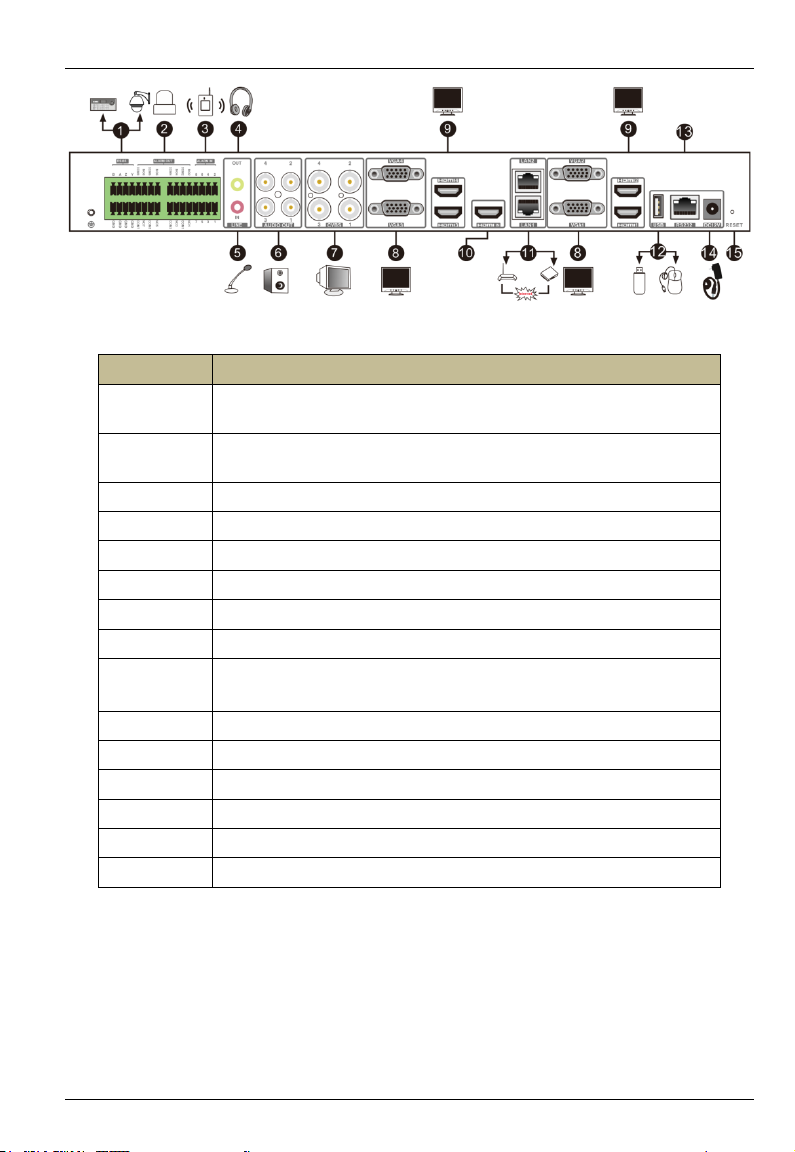
1.4 Real-panel Descriptions.................................................................................... 2
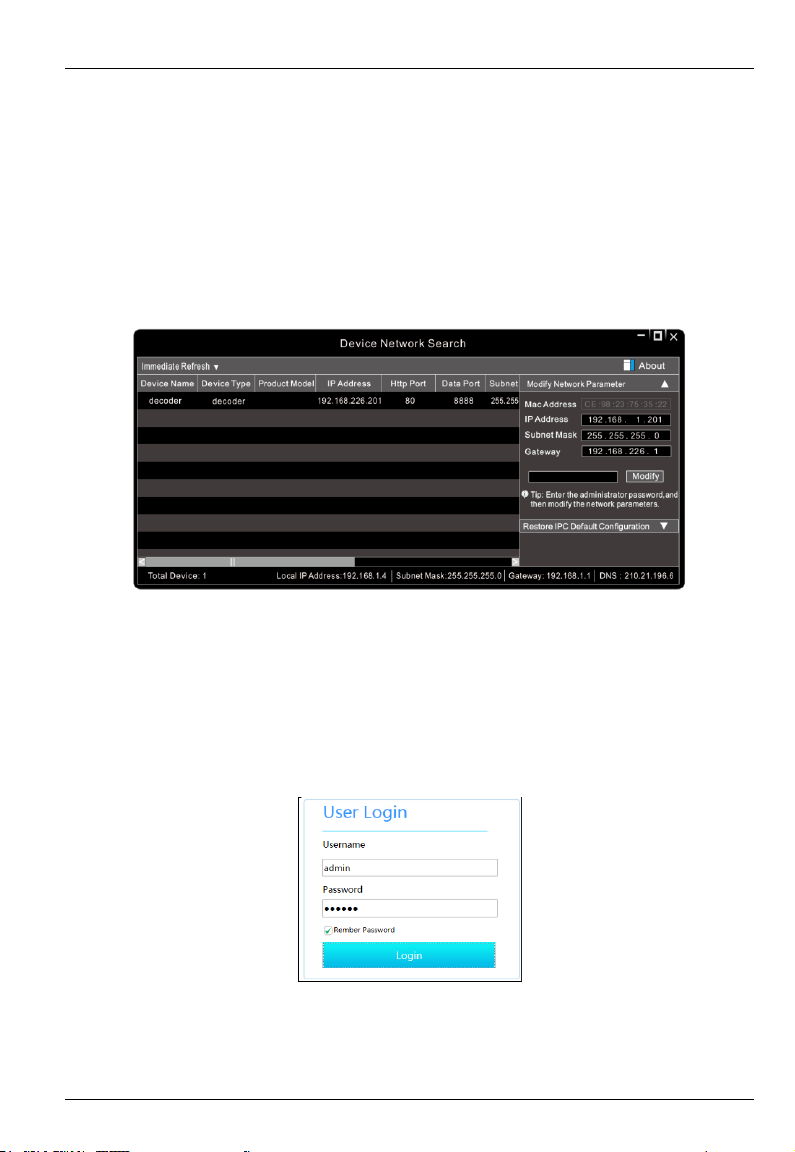
2Login ......................................................................................................................... 4
3Device Running Mode.............................................................................................. 5
3.1 Video Settings................................................................................................... 5
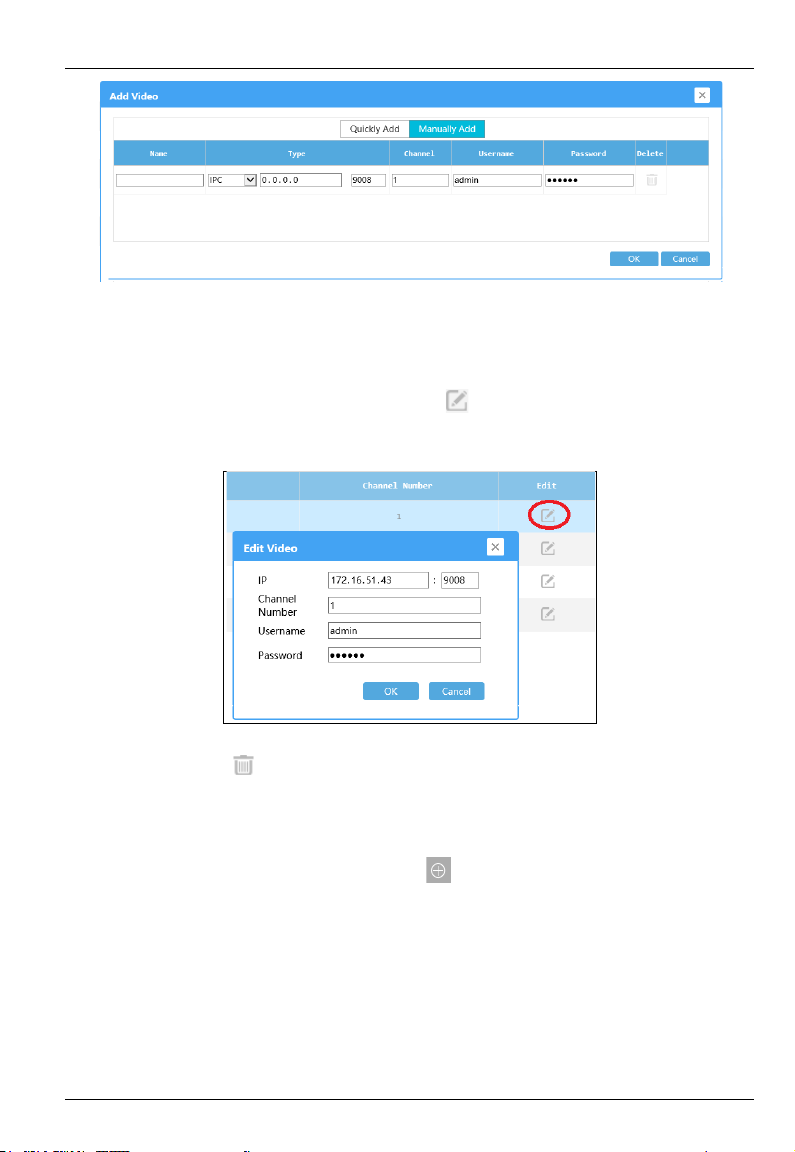
3.1.1 Video Management.............................................................................................................. 5
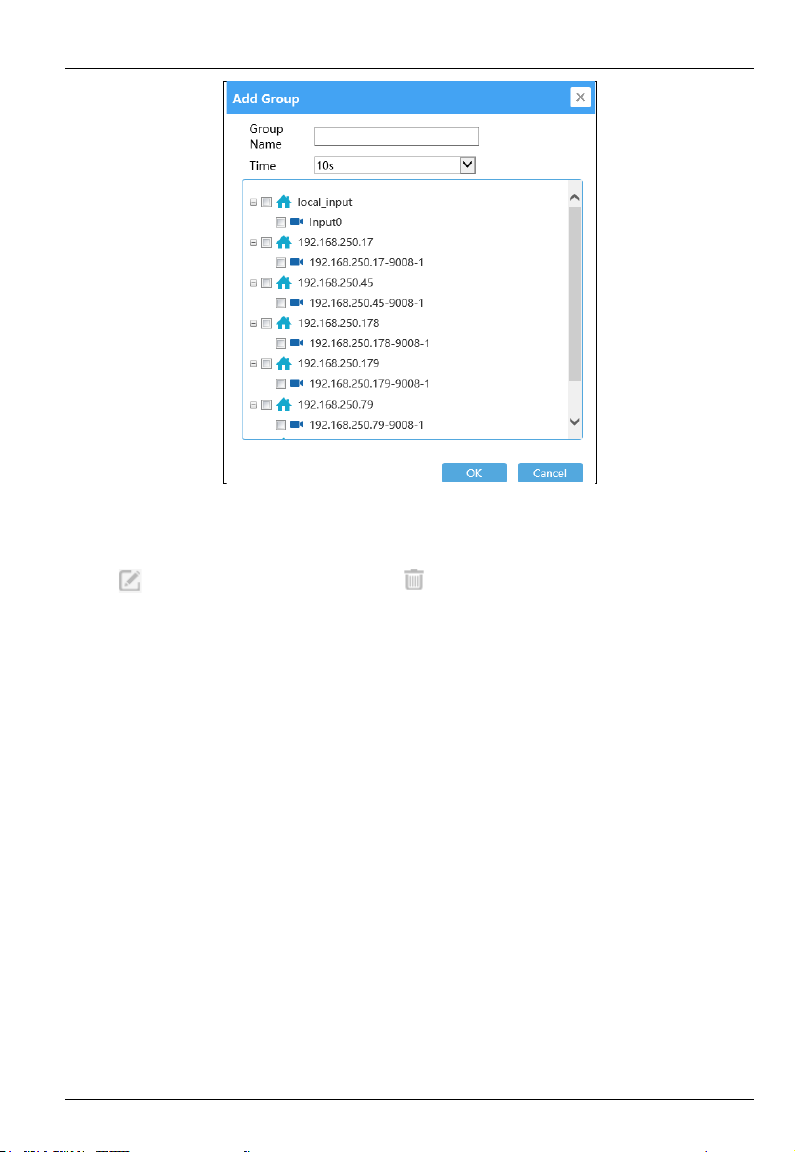
3.1.2 Video Group Settings........................................................................................................... 6
3.2 Decoding Settings............................................................................................. 7
3.2.1 Plan Settings........................................................................................................................ 7
3.2.2 Output Settings.................................................................................................................. 12
3.3 Device Settings ................................................................................................13
3.3.1 Upgrade Settings ............................................................................................................... 13
3.3.2 Reboot Settings.................................................................................................................. 13
3.3.3 Reset Settings.................................................................................................................... 13
3.3.4 Affiliation Settings ............................................................................................................ 14
3.4 System Settings................................................................................................15
3.4.1 Basic Settings.................................................................................................................... 15
3.4.2 Display Settings................................................................................................................. 15
3.4.3 Time Settings..................................................................................................................... 16
3.4.4 Network Settings............................................................................................................... 16
3.4.5 User Settings...................................................................................................................... 17
3.4.6 Backup Settings................................................................................................................. 17
3.4.7 Alarm Settings................................................................................................................... 17
4Platform Running Mode.........................................................................................19
4.1 Affiliation Settings...........................................................................................19
4.2 Network Settings..............................................................................................19
4.3 Other Settings...................................................................................................20
4.4 Connect to Platform.........................................................................................20
5Specifications...........................................................................................................22

HD Decoder User Manual
1
1Introduction
1.1 Summary
The decoder is a 4-channel professional decoder, which adopts high-performance SOC
decoding chip. It not only supports multi-channel standard-definition and high-definition
network videos decoded on TV wall independently (in device running mode), but also it can
be managed in an integrated way by video surveillance management platform (in platform
running mode). Therefore, this decoder can be widely used in banks, schools, intelligent
buildings, transportation, environmental protection, supermarkets, gasoline stations, housing
estates, factories, etc.
1.2 Features
Decoding & Display
⚫4*HDMI@1080P; HDMI1 and HDMI3 support 4K
⚫4*VGA output, 4*BNC output
⚫Support PS, RTP,TS,ES package format(in platform running mode)
⚫Support NTSC&PAL video format
⚫H.265 HP/MP/BP and H.264 HP/MP/BP
⚫8CH 8MP@30fps or 16 CH 4MP@30fps or 32CH1080P@30fps 64CH 720 P@30fps
⚫G.711A/G.711U
⚫1 CH audio input; 4 CH audio output
⚫1 CH talkback
Decoding Control
⚫Support live view and playback decoding
⚫1/4/9/16/25/36 screen display mode
⚫Splicing, picture-in-picture, roaming
⚫View cameras or camera groups in sequence
⚫A&V streams can be acquired actively and passively
⚫A&V streams can be directly acquired from IPC/DVR/NVR by SDK private protocol
⚫A&V streams can be acquired from NVMS platform or encoding devices by RTSP/RTP
protocol
⚫A&V streams can be acquired from IPC by ONVIF protocol
Device Management
⚫Superior-subordinate management
⚫A maximum of 64 decoders can be manageable

HD Decoder User Manual
2
⚫Access
⚫Provide HTTP API protocol to third-party platform
⚫Support platform running mode and device running mode
Operation and Maintenance
⚫Support device search
⚫Support WEB client access, configuration and management
⚫Support time zone, time and date settings
⚫Support IP address, subnet mask and gateway settings
⚫Support data port and HTTP port settings
⚫Support data backup and restoration
⚫Support remote reboot and one-button reset
⚫Support online and U-disk upgrade
⚫Support dual gigabit Ethernet ports, load balancing
1.3 Front-panel Descriptions
Front panel
Name
Description
REC
Record indicator (unavailable)
NET
Network indicator. The light will go on when it is connected to
network.
PWR
Power indicator. The light will go on when it is powered.
USB interface
1.4 Real-panel Descriptions

HD Decoder User Manual
3
Rear panel
Number
Description
1
RS485 interfaces. Connectors for speed domes.Y is TX+; Z is TX-;
Connects for keyboards.A is TX+; B is TX- (unavailable temporarily)
2
8CH alarm output (unavailable temporarily); Relay output. Connect to external
alarms.
3
8CH alarm input (unavailable temporarily)
4
Connector for audio output (used for two-way talk)
5
Connector for audio input (used for two-way talk)
6
Audio output × 4
7
CVBS output × 4
8
VGA output × 4 (1920×1080,1280×1024)
9
HDMI output × 4 (HDIM1/HDMI3:3840×2160,1920×1080,1280×1024;
HDMI2/HDMI4:1920×1080,1280×1024)
10
HDMI input× 1
11
Gigabit Ethernet port× 2
12
Connector for external USB devices (like USB mouse)
13
RS232 serial port
14
DC12V power input
15
Reset

HD Decoder User Manual
4
2Login
The login settings are as follows.
①Make sure the PC and decoder are connected to the LAN.
②Find the IP-Tool from the CD and then install it on your computer.
③Run the IP-Tool. Then the decoder can be searched. If the decoder can’t be searched,
please check whether the PC and the device are connected to the network or not. Click the
device to check its detail information as shown below.
④Modify the IP address. Click the information of the decoder listed in the above table to show
the network information. Modify the IP address and gateway of the decoder and make sure its
network address is in the same local network segment as the computer’s. Please modify the IP
address of your device according to the practical situation.
Double click the decoder information in IP-Tool or directly enter IP address in the web browser
to access. Here we take IE client for example.
Username:The default username is admin.
Password:The default password is 123456.
Enter the default username and password and then click [Login].

HD Decoder User Manual
5
3Device Running Mode
3.1 Video Settings
In device running mode, video settings can be set. If the decoder is platform running mode,
please skip this chapter.
Note: The decoder runs in platform mode by default. Video and decoding settings cannot be
configured in this mode. If you want to manage videos by your local device, please switch the
running mode to device mode (See Basic Settings).
3.1.1 Video Management
Go to Video Settings→Video. Then click to add videos.
Videos can be quickly add or manually add through the above interface.
Quickly Add: Click [Refresh] to search video devices (like IPC, DVR, NVR, etc.) in the same
local network. Select the desired video devices and then enter username, password and
channel number of the devices. Then click [OK] to save the settings.
Manually Add: Click the “Manually Add”tab to add the video devices manually.

HD Decoder User Manual
6
Users can add IPC, NVR and DVR of our company or the video devices supporting ONVIF or
RTSP protocol. Please select as needed. Then enter the corresponding IP address, port, channel
number, username and password.
Modify the information of a video device: Click behind the channel number to change
the IP address, channel number, username and password.
Delete videos: Click to delete the added videos.
3.1.2 Video Group Settings
Go to Video Settings→Video Group. Then click to assign channels for the desired group.

HD Decoder User Manual
7
Enter the group name, select the dwell time and then check videos. After that, click [OK] to
save the settings.
Click to modify the added group; click to delete the added group.
3.2 Decoding Settings
In device running mode, decoding settings can be set. If the decoder is platform running mode,
please skip this chapter.
3.2.1 Plan Settings
Click Decoding Settings→Plan to go to the plan settings interface as shown below.
Set the screen display mode and then drag a video to a window to decode the video.

HD Decoder User Manual
8
Local input: Input the video source through HDMI IN interface in the real panel and then drag
input-0 to a window to bind the input-0 and the monitor in the plan settings interface as shown
below.
Video group view: Drag a video group to a window and then videos in this group will be
decoded in this window one by one according to the preset dwell time (See 3.1.2 Video Group
Settings for details).

HD Decoder User Manual
9
Descriptions of the buttons:
: 1/4/9/16/25/36 screen display mode
:Enable or disable Picture-in-Picture mode
:Clear all video display.
:Merge screens
:Split a screen
:Save a plan
:Create a plan
: Exit all full screen.
: Start auto-switch.
PIP (Picture-in-Picture): After enabling PIP function, click the left mouse on a window and
drag it to draw a rectangle and then release it until the size of the rectangle meets your need.
Next, drag the desired video to this rectangular window to decode.

HD Decoder User Manual
10
Roaming: Drag the PIP window to anywhere of the current logic output. Then the location of
the PIP window will be updated while the decoder is decoding the image of the PIP window
on a monitor.
Plan settings: There are two ways to set a plan.
①Drag videos to the left windows separately and then click to save the plan.
②Click to enter the plan name and then drag videos to the left windows separately.
After that, click to save the plan.
These saved plans will be listed on the plan list as shown below.
Click a plan to quickly call up this plan. Choose the dwell time and then click to view
these plans in sequence.
Merge screens: Press Ctrl, select two output screens or four output screens and click to
merge these two or four screens.

HD Decoder User Manual
11
Split a merged screen: Select a merged screen and then click to split this screen.
Full Screen: In multi-display mode, select a window which is decoding video and then right
click on it to pop up a menu as shown below. Select “Full Screen” and then this window will
display in full screen.

HD Decoder User Manual
12
Exit Full Screen: Right click on the full screen to exit full screen mode.
Exit All Full Screen: If there is one or more than one output in full screen mode, click
to make all outputs exit full screen mode.
Main Stream/Sub Stream: The main/sub stream can be switched by right clicking on the
window which is decoding video.
3.2.2 Output Settings
Go to Output Settings→Output interface as shown below.
Drag the output in the right output list to the window so as to bind the output to the window.
If the decoder is set as “Master”in device running mode and many general decoders are added
to this decoder, the output list will appear four or more than four outputs. Thus, users need to
click “Set”to customize output layout as shown below.

HD Decoder User Manual
13
Please enter the number of row and column displayed on the screen. The number ranges from
1 to 10.
3.3 Device Settings
3.3.1 Upgrade Settings
To upgrade the decoder, please go to Device Settings→Upgrade.
Click [Browse] to select the path of the upgrade files and then click [Upgrade] to upgrade the
decoder. Please do not disconnect the device when upgrading. And the device will reboot
automatically after finishing upgrading.
3.3.2 Reboot Settings
The device can be restarted manually by clicking Device Settings→Reboot.
3.3.3 Reset Settings
The system can be restored to the default settings by clicking [Reset] in the following interface
(Device Settings→Reset).

HD Decoder User Manual
14
3.3.4 Affiliation Settings
Go to Device Settings→Affiliation.
Click [Refresh] to automatically search the decoders in the same local network. When the
decoder is set as “Master”, other searched decoders set as general decoders can be added into
this master decoder and governed by it.
Click “+” to add the decoder. Click “Add All”to add all searched decoders. Click “ ” to
delete the added decoder.
In this interface, you can view the status of the added decoder, including “online”, “offline”,
etc.
Note: ①The added general decoders cannot add other general decoders.
②The master decoder cannot be added to other master decoders.
③The added general decoder which is working cannot be added to other master
decoders.

HD Decoder User Manual
15
3.4 System Settings
3.4.1 Basic Settings
In the basic settings interface, the running mode and user permission can be set up. Device
information can be viewed here too, like MAC address, device type, software version and so
on. Go to System Settings→Basic.
Running Mode: Device mode and platform mode are selectable. The default running mode is
platform mode. To switch the running mode to device, select “Device”and click [Apply].
Then the running mode will be switched successfully after reboot.
In device mode, video and decoding settings can be configured.
User Permission: If “General” is selected, the running mode cannot be changed.
3.4.2 Display Settings
The resolution and video format of monitors can be set up by choosing Display
settings→Display.

HD Decoder User Manual
16
Draw Border: If “ON” is selected, a red box will flash on the window once triggering alarms
in platform running mode.
Show Window ID: If “ON” is selected, the window ID will appear on the decoding window in
platform running mode.
3.4.3 Time Settings
Go to System Settings→Time. In this interface, time zone and the system time can be set up.
3.4.4 Network Settings
Click System Settings→Network to go to the network settings interface as shown below.
IP Address: In device mode, this IP address must be in the same local network segment as the
IP address of the computer used to log in the web client.
Subnet Mask:The default value is 255.255.255.0.
Gateway:In device mode, it must be the same with the gateway of the computer used to log
in the web client.
Data Port:The default number is 8888. This port shall be used when you want to add this
device to a surveillance platform (like CMS/NVMS).
HTTP Port: The default number is 80. It is recommended to change (for example: 81). This
port is used to log in the Web client (for example: http://192.168.1.201:81).

HD Decoder User Manual
17
3.4.5 User Settings
Click System Settings→User to enter user settings menu.
Username: The default username is “admin”.
Current Password: The default password is “123456”.
It is necessary for you to set your new password here if this is your first login and then
confirm and apply it. Next time, you can use your new password to log in.
3.4.6 Backup Settings
Go to System Settings→Backup.
Export Settings: Click [Browse] to select the path of the files you want to export and then
click [Export].
Import Settings: Click [Import] to select the path of the files you want to import and then
click [Import].
3.4.7 Alarm Settings
Go to System Settings→Alarm.
Table of contents
Popular Media Converter manuals by other brands

LevelOne
LevelOne Infinity IEC-1020 Quick installation guide

evertz
evertz 7700 Series manual

National Instruments
National Instruments NI PXI-5600 Getting started guide

Rockwell Automation
Rockwell Automation Allen-Bradley ALEC 4100-5.3 Installation and setup manual

Allen-Bradley
Allen-Bradley 842E-SIP*BA installation instructions

MiLAN
MiLAN MIL-9100X user guide