ARMSTÖDET FÅR ALDRIG MONTERAS PÅ SAMMA
SIDA ELLER RAKT ÖVER AIRBAGEN!
ÅTERSTÄLL ALLTID VAJRAR OCH CLIPS SOM LOSSAS I
SAMBAND MED MONTERINGEN.
UNDVIK STÖTAR OCH SLAG PÅ STOLEN UNDER MONTERINGEN.
VIKTIG INFORMATION !
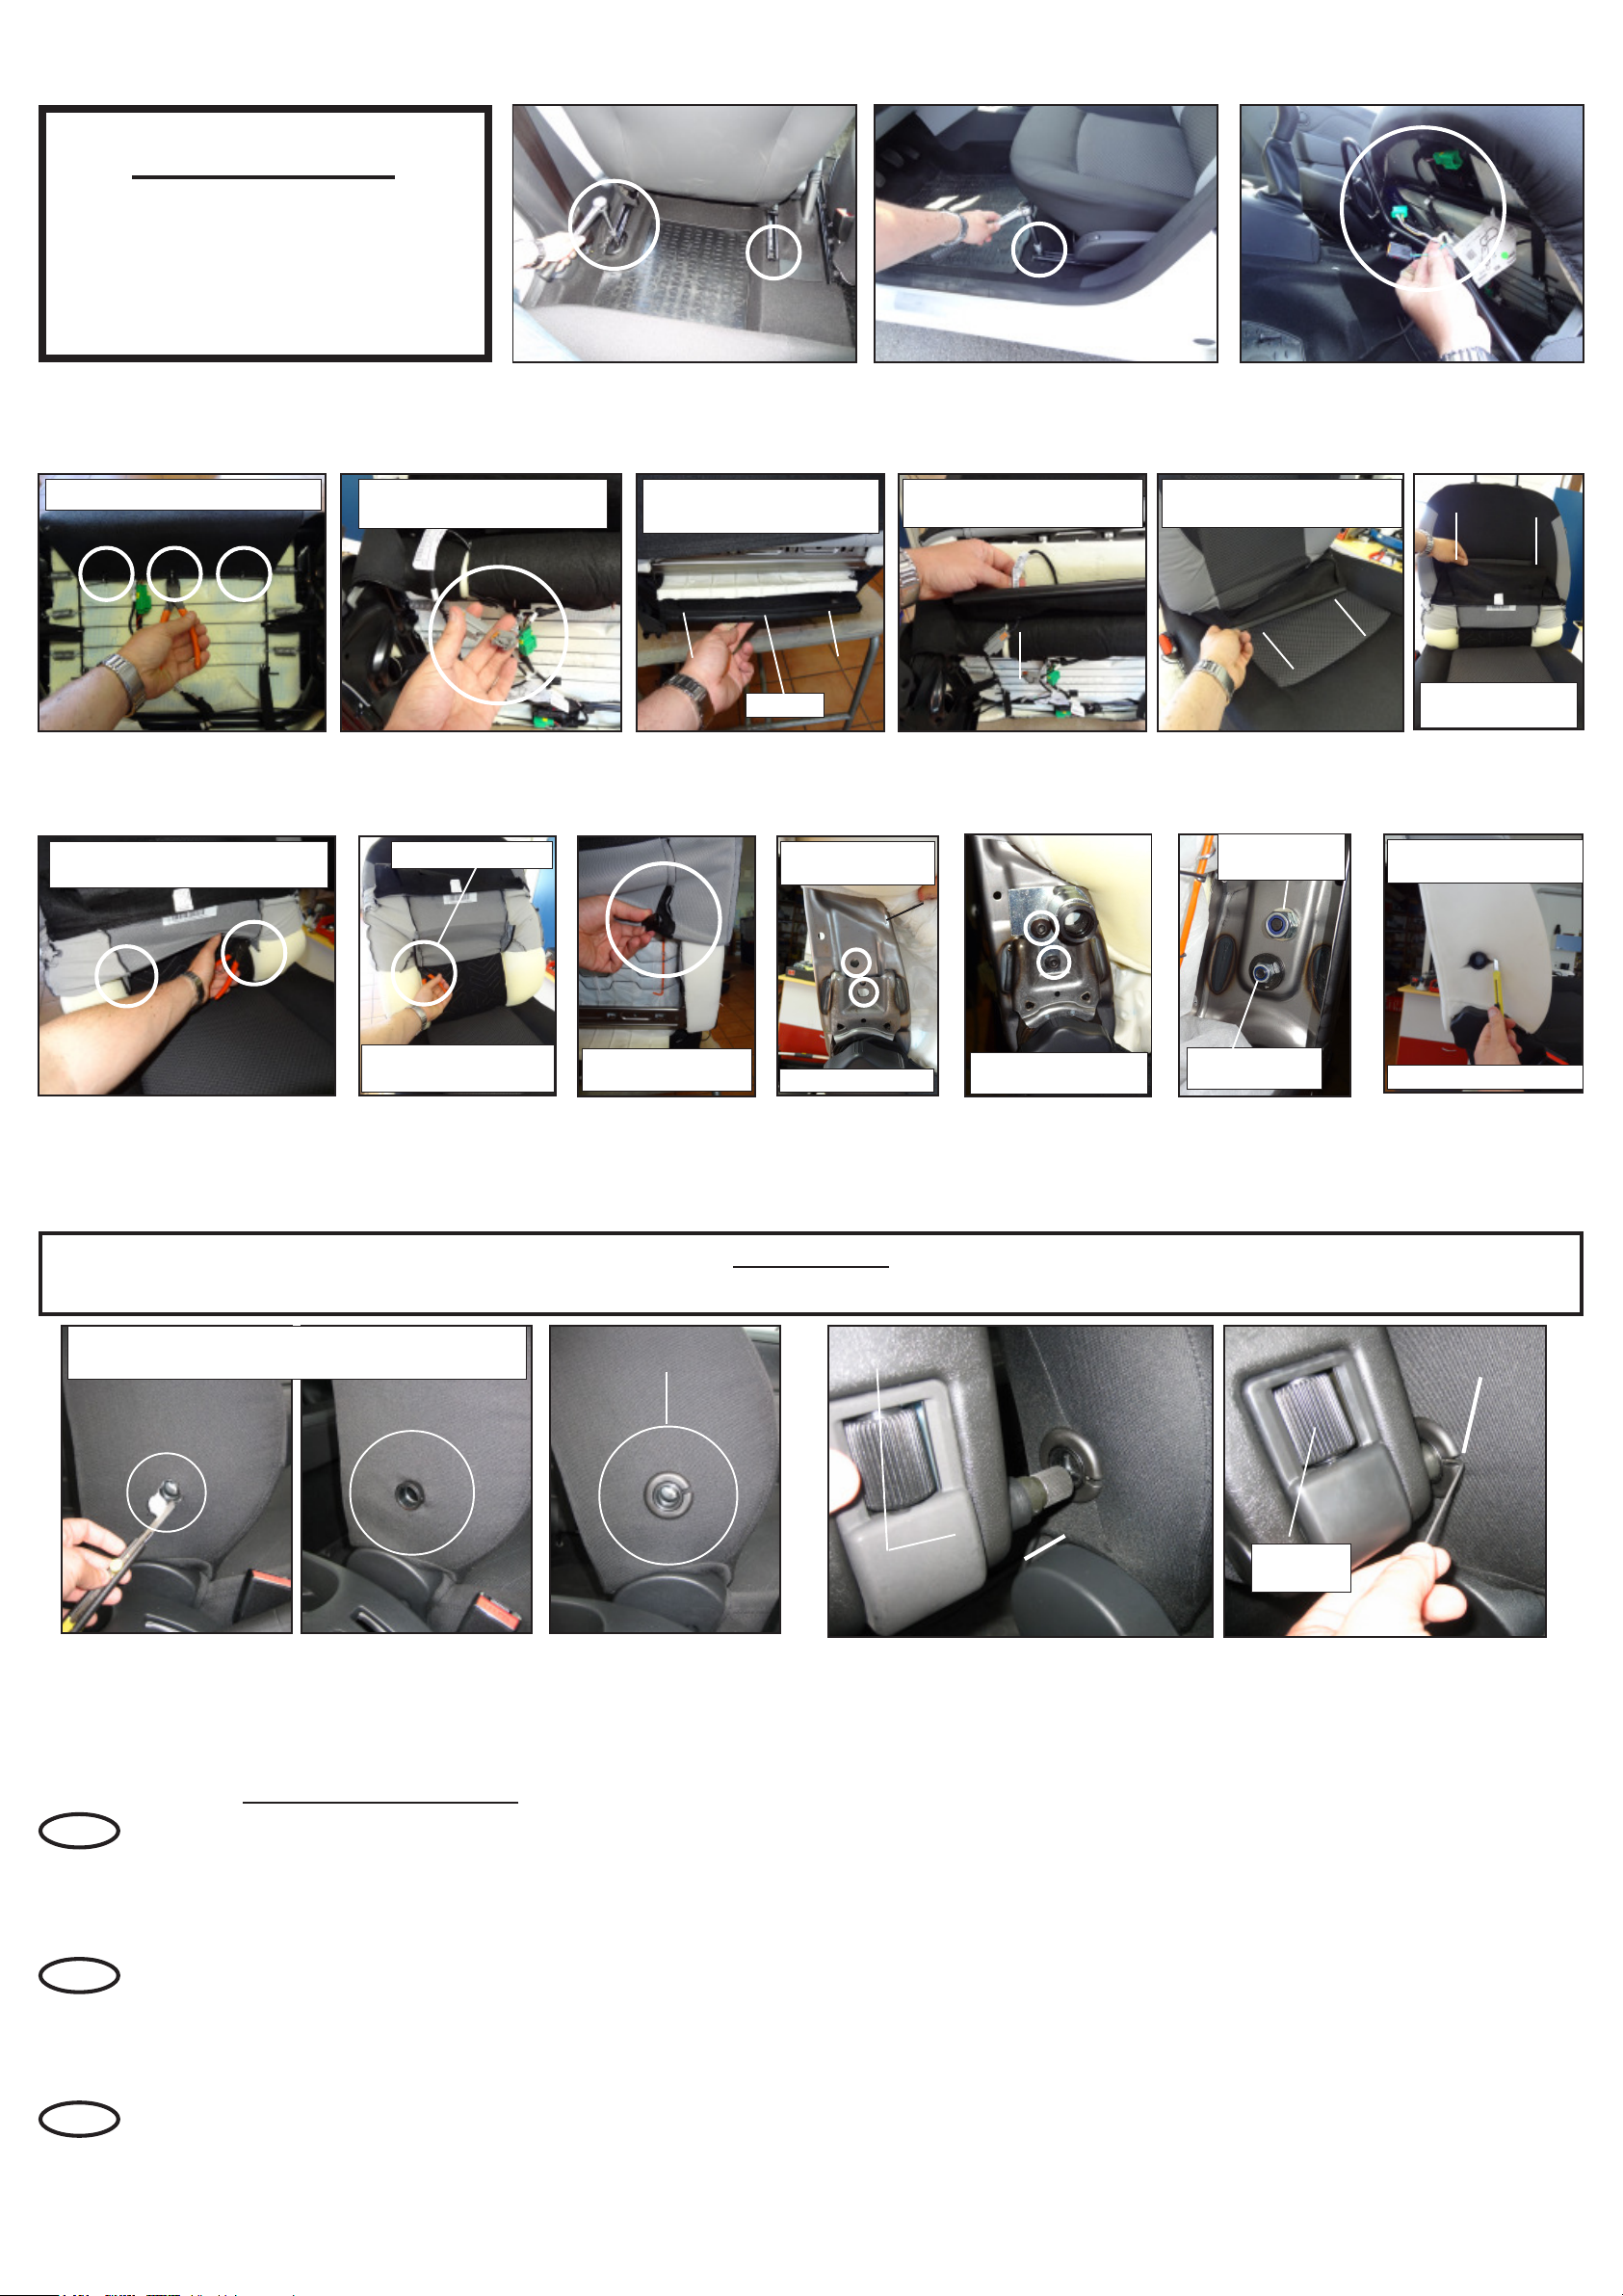
Monteringen av armstödet är vanligtvis en mycket enkel operation och
kan i de flesta fall utföras direkt i bilen -utan att stolen behöver tagas ur.
Svårighetsgraden mellan de olika bilmodellerna kan dock variera något.
Är ni osäker på hur man skall gå tillväga -rekommenderar vi att
ni anlitar en auktoriserad bilverkstad som utför monteringen åt er.
Kontrollera om stolen är utrustad med sidoairbag.
Läs bilens instruktionsbok eller kontrollera om det sitter en insydd
märkning, mot dörrsidan, på stolens ryggstöd med texten “AIRBAG”.
Om stolen har sidoairbag bör man iakttaga viss försiktighet vid
installationen. Det säkraste sättet är att koppla ur airbagen innan man
påbörjar monteringen av armstödet.
Airbagen skall inte kunna utlösa med anledning av att man delar
ryggstöds-klädseln och monterar ett armstöd. Vill man dock vara riktigt
säker på detta bör man koppla ur airbagen innan man påbörjar
monteringen av armstödet.
Skall stolen demonteras (tagas ur) från bilen bör man alltid koppla ur
airbagen innan man påbörjar monteringen.
Läs bilens instruktionsbok eller kontakta din återförsäljare för korrekt
information om hur man kopplar ur airbagen i just din bil. Nedan följer en
instruktion som gäller för de flesta bilar:
Koppla ifrån minuskabeln på bilbatteriet så att bilen blir helt strömlös.
Vänta därefter ca 15-30 minuter innan ni påbörjar monteringen.
Om stolen skall demonteras ur bilen måste även kontakterna under stolen
kopplas isär. Tänk på att alltid återställa kontakterna igen -innan minuskabeln
återansluts till batteriet. Gör man ej detta kommer bilens dator att registrera ett
“felmeddelande” -vilket endast kan avprogrammeras av din märkesverkstad.
Behöver ni råd & tips inför monteringen är ni välkomna att besöka
Comforts hemsida: www.armrest.info
Tillverkaren tar inget ansvar för skador på egendom eller person som kan
uppstå i samband med felaktigt handhavande vid montering av adaptern.
IMPORTANT INFORMATION!
To mount the armrest is usually a very easy operation. On most cars the
mounting can be done directly in the car -without having to remove the seat.
The degree of difficulty to mount the armrest can vary between the different
car models. If you are unsure on how to carry out the mounting –we
recommend that you contact you local dealership and let them carry
out the mounting for you.
Before starting the mounting procedure, check if the seat is equipped
with a side-airbag. This information can be found in your vehicle manual, or
by contacting you local dealership. Usually you can also check if the seat
comes with the “AIRBAG” label affixed directly to the seat.
If the seat has airbag mounted, we recommend that you are careful during the
mounting procedure. The airbag is not supposed to be able to inflate because
of the necessary mounting steps in this instruction. But if you want to be
absolutely sure that the airbag won´t inflate –we recommend that you
disconnect the side-airbag before starting the mounting procedure.
If you have to remove the seat from the car –always disconnect the airbag
before starting the mounting operation. Read the car instruction book or
contact your dealer for information on how to disconnect it safely. Below are
instructions on how you normally would disconnect the side airbag in most
cars -but always check your car manual first!
Disconnect the minus (-) cable on the battery -so that the car is
powerless. Then wait appr. 15-30 minutes before you start mounting
the armrest.
If you are going to remove the seat from the car, you will also have to
disconnect the cable-contacts under the seat. Don’t forget to always restore
all disconnected cables and contacts before you connect the minus (-) cable to
the battery again. If you start the car with an open contact, the computer in
the car will register a “fault” and only your dealer workshop can reset the
computer.
If you are unsure what applies on your car or need a tip –please visit the
Comfort homepage www.armrest.info
The manufacturer takes no responsibility for damage on person or property
that is caused because of wrong handling during installation of the adapter.
NEVER MOUNT THE ARMREST ON THE SAME SIDE,
OR OVER THE SIDE-AIRBAG.
ALWAYS RESTORE WIRES, STEELCLIPS AND CONTACTS THAT
ARE DISCONNECTED DURING THE MOUNTING PROCEDURE.
NEVER PUSH OR HIT THE SEAT IN AFORCEFULL MANNER
WHILE MOUNTING THE ARMREST.
SE GER
ENG ACHTUNG!
Die Montage der Armlehne ist in der Regel sehr einfach und kann in den
meisten Fällen direkt im Fahrzeug erfolgen, ohne dass der Sitz dafür aus dem
Fahrzeug ausgebaut werden muss. Der Schwierigkeitsgrad der Montage kann
bei verschiedenen Fahrzeugmodellen aber etwas unterschiedlich sein. Wenn
Sie nicht ganz sicher sind, wie Sie vorgehen sollen, empfehlen wir
allerdings, die Montage einer autorisierten Fachwerkstatt zu
überlassen.
Überprüfen Sie, ob der Sitz mit einem Seitenairbag ausgerüstet ist.
Dazu das Handbuch des Fahrzeugs lesen oder nachsehen, ob eine
entsprechende Kennzeichnung mit dem Text AIRBAG an der Türseite des
Sitzes festgenäht ist.
Wenn der Sitz mit einem Seitenairbag ausgerüstet ist, muss die Montage mit
besonderer Sorgfalt durchgeführt werden.Am sichersten ist es, den Airbag zu
deaktivieren, bevor die Montage derArmlehne begonnen wird. DerAirbag darf
nicht dadurch ausgelöst werden, dass der Bezug der Rückenlehne geöffnet und
eine Armlehne montiert wird. Um ganz sicher zu gehen, sollte derAirbag
deaktiviert werden, bevor die Montage der Armlehne begonnen wird.
Wenn der Sitz aus dem Fahrzeug herausgenommen (ausgebaut) wird, muss
der Airbag in jedem Fall deaktiviert werden, bevor mit der Montage
angefangen werden darf. Lesen Sie im Handbuch Ihres Fahrzeugs nach oder
fragen Sie IhrenAutohändler, wie derAirbag in Ihrem Fahrzeug deaktiviert
werden kann. Die folgendeAnweisung ist für die meisten Fahrzeuge gültig:
Das Minuskabel von der Autobatterie abklemmen, so dass das
Fahrzeug keinerlei Stromversorgung mehr hat. Vor dem Beginn der
Montage anschließend noch 15–30 Minuten abwarten.
Wenn der Sitz aus dem Fahrzeug ausgebaut werden soll, müssen auch alle
elektrischen Anschlüsse unter dem Sitz getrennt werden. Nicht vergessen, die
Anschlüsse nach der Montage wieder zu verbinden, bevor das Minuskabel (-)
an die Batterie angeschlossen wird. Falls dies vergessen wird, registriert der
Bordcomputer eine Fehlermeldung, die nur von einer Vertragswerkstatt wieder
gelöscht werden kann.
Falls Sie weitere Tipps oder Hinweise für die Montage benötigen, besuchen
Sie die Homepage von Comfort im Internet: www.armrest.info
Der Hersteller ist nicht für Schäden auf Person oder Eigentum
verantwortlich, die im Zusammenhang mit falscher Handhabung bei
der Montierung des Adapters entstehen.
DIE ARMLEHNE DARF NIEMALS AUF DER GLEICHEN SEITE WIE DER
AIRBAG ODER DIREKT ÜBER DEM AIRBAG MONTIERT WERDEN!
IMMER SÄMTLICHE DRÄHTE UND KLAMMERN WIEDER
ANBRINGEN, DIE FÜR DIE MONTAGE GELÖST WORDEN SIND,
BEVOR DER SITZBEZUG GESCHLOSSEN WIRD!
DEN SITZ WÄHREND DER MONTAGE VOR STÖßEN UND
SCHLÄGEN SCHÜTZEN.
R -registered trademark of Sydmeko Industri AB
Tillverkare / Manufacturer / Hersteller:
Sydmeko Industri AB
Santessonsv. 3, S-232 61Arlöv, Sweden
Phone: +46 40 83640, Fax: +46 40 89090
Homepage: www.sydmeko.com
Adapter /
Mounting-kit No:
F1330-40009R (LHD)
F1330-40009L (RHD)
Bil-Car-Auto / Model-Typ / År-Year-Jahre
Dacia / Duster II 09/2013 -
Renault Logan II 09/2012 -
Sandero II 09/2012
Symbol III 1/2013 -
INSTRUCTION M AN U AL
Innehåll / Content / Inhalt:
1 st Adapter / Bracket
1 st M10x20(K6S) + M10 Locknut
1 st M10 Washer (10,5x22x2)
1 st M8x20(MC6S) + M8 Locknut
1 st Washer M8 ”Special” (8x25/13x4)
1 st Cover-ring + 1 st Blade knife
8 st Steel-clips + 1 st Insex-tools
VIKTIGT / IMPORTANT / ACHTUNG
SE Läs informationen på baksidan av denna instruktion
innan du påbörjar monteringen av armstödet.
ENG Read the information text on the back of this instruction
before you start mounting the armrest.
GER Sämtliche Informationen auf der Rückseite dieser
Anweisung lesen, bevor mit der Montage der
Armlehne begonnen wird.
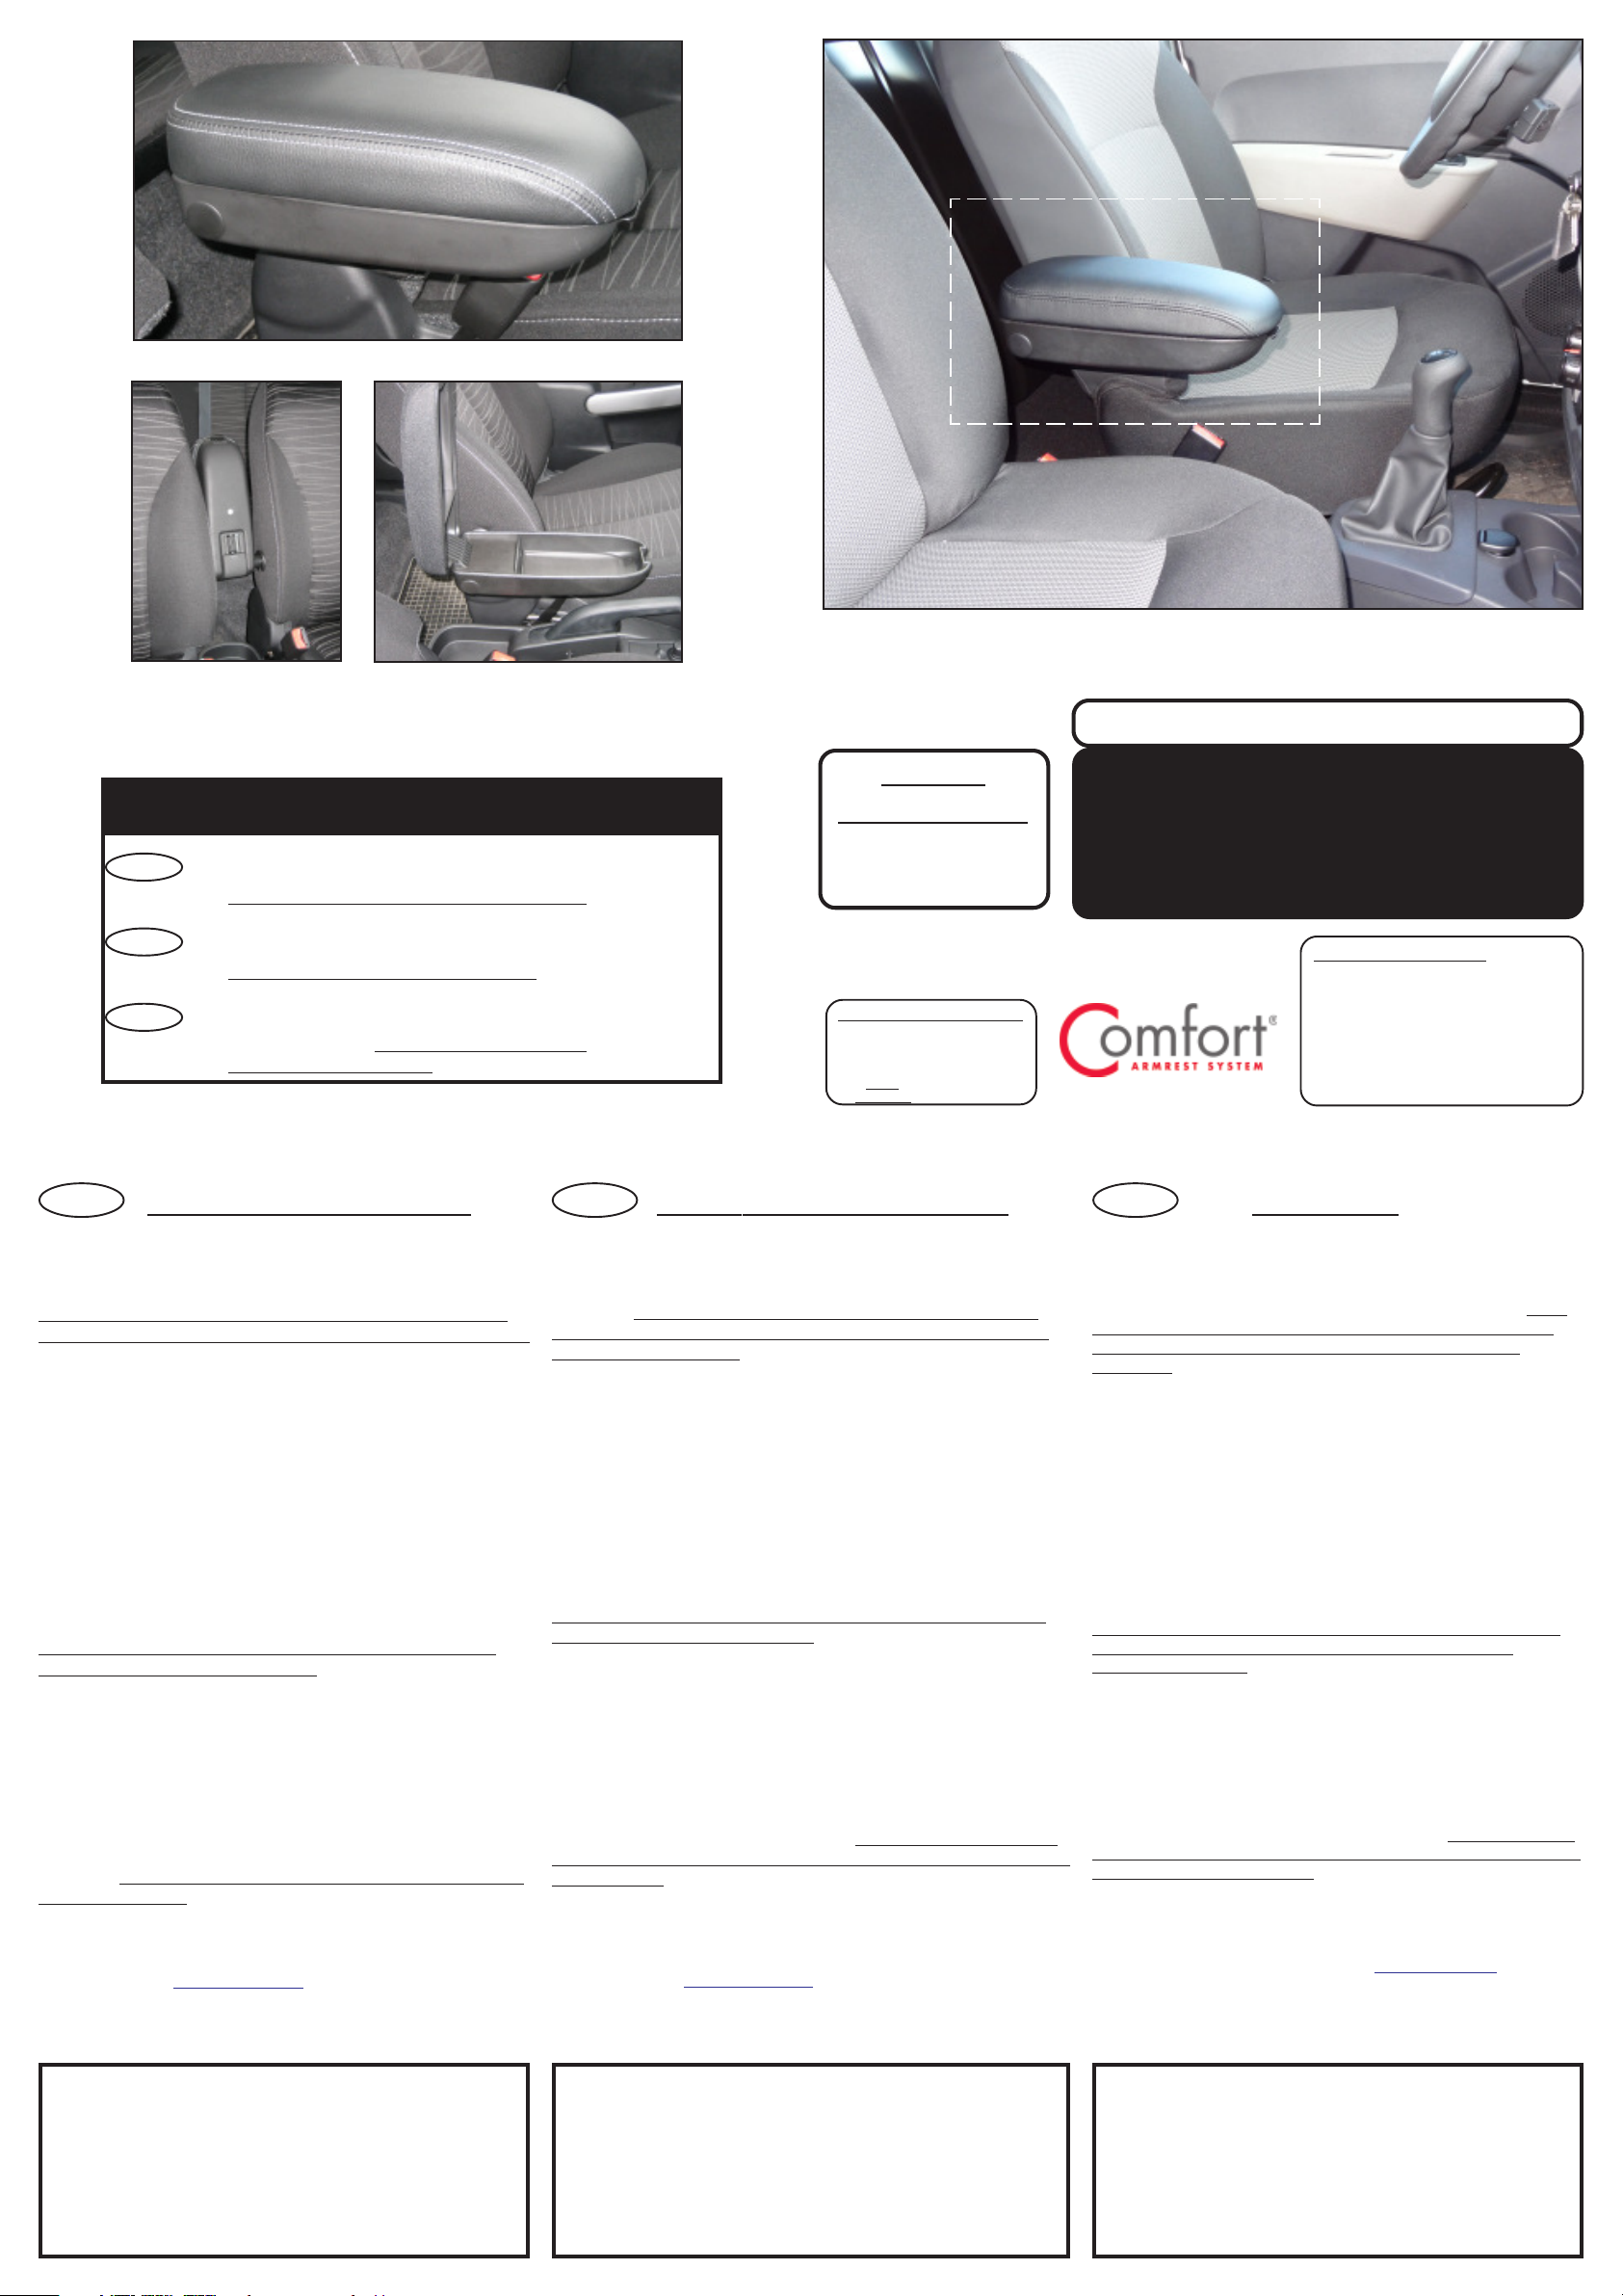
Foldable &
Adjustable
Practical Storage
Compartment
www.armrest.info