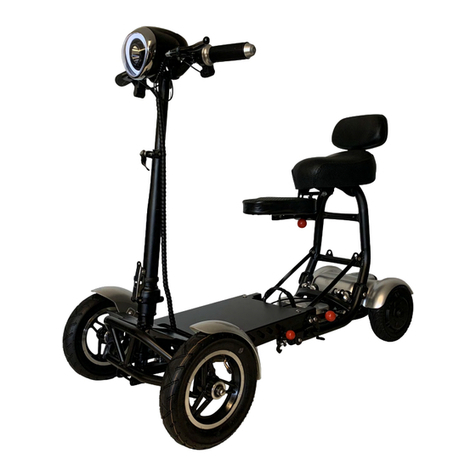
ComfyGo Mobility Z-1 User manual

User Manual / Warranty

Table of Contents
1
Preface 2
Product Performance 3
Safety Instructions 5
Usage and Operation 9
Battery and Charger 14
System Diagnostics 17
Controller 19
Maintenance Areas 21
Tech Support 23
Warranty 24
For all your spare parts needs, please visit
www.ComfyGoMobility.com
Don't forget to register your product to activate your warranty, detailed
information can be found on page 33.
If you need technical support, please contact our customer support
team. Detailed information is on the back of the user manual and is
found on page 33.

Preface
2
Please read the user manual carefully before using this product.
- This manual contains the operation, assembly methods, and simple
faults solutions. The manual applies to our model: Z-1
- This manual contains scooter maintenance information and self-checking
methods. Please be sure to keep this manual in a safe location for future refer-
ence.
- The annotations and illustrations in this manual may vary slightly from your
actual model because we continuously improve and upgrade our components
and design.
- Please provide this manual to all users of this scooter and make sure all
users understand how to operate this scooter.
- Please contact with your dealer if there is any ambiguity or questions about
this produce or manual.
- Improper use of any vehicle may lead to injury. Unsafe driving could harm
yourselves and others.
- The electric scooter is intended to comfortably transport those with walking
difficulties or those with limited or no walking abilities.
- This electric scooter is designed to transport only one person.
Follow the instructions next to his symbol closely.
Please pay attention to these instructions, otherwise, it may result in physical
harm or damage to the user, scooter, or the environment.

1. Product Performance
3
- This series of electric scooter is powered by a Li-Ion battery that sup-
plies power to a DC drive motor(s). Users control the direction and
adjust the speed by using an analog speed controller. This scooter is
suitable for use at low speeds, on good road conditions, and moder-
ate slopes.
Performance Parameters and Technical Specs, Z-1
Overall size 43” x 20.5” x 38” (1100x520x970mm)
Fold size 43“ x 20.5” x 20” (1100x520x510mm)
Seat size* 16.5” x 15” (420x380mm)
Net Weight 90 lbs (40.8 kg) without battery
Net Weight 98 lbs (44.5 kg) with battery
Speed (0.62 mph - 3.7 mph (1 - 8km/h) Max 5 mph
Seat height 18.5” (460mm) from ground
Armrest height 9” (230mm), from cushion
Backrest height 15.5” (395mm)
Max loading weight 330 lbs (150 kg)
Front wheel diameter 7.5 inch (190 mm)
Rear wheel diameter 8.5 inch (216 mm)
Battery 12AH Li-ion
Motor DC 24V / 250W
Battery charge AC 220 (110V) ±10% 50-60HZ, 1.5 - 5A
Controller DC 18.5V-30.5V 25A MAX
Max distance** 13 miles (20 km)
Degree of protection IPX3
Max safe slope 10°
Turning radius ≤47 inches (≤1.2m)
Static stability 10°
Reversing width ≤59 inches (≤1.5m)
Climbing angle 12v°
Ground clearance 2 inches (50mm)
Obstacle climbing 2 inches (50mm)
* seat width is the distance between armrests
** varies based on weight, incline, speed factors

1. Product Performance
4
Main Structure
This series of electric scooter is composed of two main parts:
1) The Frame: Frame, Wheels, Footrest, Armrests, Seat, Steering
Column, Steering Handlebar etc.
2) The Electrical: Controller, Motor, Battery, Electrical Wires, etc.
Application Range
This electric scooter is designed for individuals who have physical
disabilities that limits their mobility. This scooter is designed to carry
individuals weighing less than 150 kg (330 lbs.). This scooter is
intended to be used as substitution to walking and is not intended to
be used a substitution of a motorized vehicle. This scooter is intended
to be used indoors and outdoors in a safe and suitable location.

2. Safety Instructions
5
2.1 Main Security Features
- Classified based on the type of protection: Against electric shock, Inter-
nal power.
- Classified based on the type of protection: Against electric shock, Type
B application.
- Classified based on the degree of inlet liquid protection: IPX3
- Classified based on the safe use of in a flammable anesthetic mixture
with air or gas mixed with oxygen or nitrous oxide flammable a esthetic
gases occurs: Non-AP/APG type.
- Classified based on operation mode: Continuous operation.
- Rating voltage: DC 24V.
- Have no protective effect on the application of defibrillator discharge
section.
- No signal output or input part.
- Safety of any non-permanent equipment installed.
2.2 Driving Notice
General Riding Cautions
- Please keep your arms and hands on the direction bar at all times to
properly control the scooter.
- To avoid injury, first practice using this scooter in a safe and open envi-
ronment, such as a park. Practice moving forward, backward, stopping,
and turning. As you gain skill and become comfortable with the controls,
you can begin to use this scooter in other suitable environments.
- Before riding on any roads, be sure to have a caregiver with you and
be sure to always ride safely.
- Please follow all pedestrian traffic rules, the scooter is not considered
an automobile.
- Please ride on the sidewalk and the zebra crossings only. Do not ride
on vehicle lanes.
- Ride at steady speeds and avoid sharp turns or zig zagging.
- If your model comes equipped with a seat belt, please fasten it while in
use
- Please maintain proper tire pressure. The lower or higher than recom-
mended pressures may cause unsafe conditions or excessive power
loss.
Order #17880 - 281111097940 - Lost Item

2. Safety Instructions
6
Avoid Riding in These Conditions Unless Accompanied by a
Caretaker
- Riding in inclement weather such as rain, heavy fog, strong winds,
snow, etc. If your scooter gets wet, electronic functions may be dam-
aged so please wipe off all water immediately.
- Riding in sub optimal conditions such as muddy areas, trails, sand,
gravel, etc.
- Riding in crowded areas, riding on unfenced roads, near ditches,
near bodies of water, or near any other dangerous areas.
- Riding over railroad tracks. If you must cross a railroad track, inspect
the tracks to confirm it is safe to cross. Turn the scooter off and disen-
gage the wheels from the motor so that you or your caregiver can
freely push the scooter across the tracks. Cross at an angle that en-
sures your tires will not get stuck in the track.
- Carrying people or cargo. This electric scooter is designed to be
used by only one person. It is not designed to carry additional people
or cargo.
Precautions for Uphill and Downhill
-Avoid riding on steep hills, uneven surfaces, high steps, channels or
any other steep areas.
- Avoid riding on steep slopes, the slope range should be less than 9
degrees.
- If possible, please keep the scooter moving forward during uphill
climbs. It may be difficult to restart an uphill climb from a stand still.
- Use slow speeds during downhill descent.
- Avoid driving sideways on steep areas.
- Avoid riding on or nearby stairs.
- Avoid crossing ditches.
- If you must cross a ditch, try to cross at a 90° angle.
Do not set the scooter to manual mode during uphill or
downhill use. If the scooter malfunctions at traffic crossing,
please immediately ask passersby for help. Set scooter to
manual mode by disengaging the wheels from the motor, then push
scooter to a safe location.

Precautions for Caregivers
- Caregivers should confirm that the users’ feet are in the proper posi-
tion on the footrest.
- Caregivers should make sure the user is in the seat properly and
that the user is properly secured
- Caregivers should confirm that there are no loose clothing articles
that can get tangled by the wheels or drive motor.
- Caregivers should use caution while pushing the scooter and be
always mindful of the surrounding environment to avoid injury.
2.3 Other Important Notices
Repair and Refit
Repair and Reform: If a repair or modification is necessary, please
contact your dealer. Do not modify this scooter yourself, it may lead to
injury or malfunction.
Protect Environment: In order to protect environment, do not casual-
ly discard the wheelchair and/or discard the battery. If necessary,
please contact your local dealer for replacement battery.
Keep the Storage Environment Dry: Do not store the scooter in
damp conditions, such as near a bathroom. If the scooter gets wet,
wipe the water off immediately.
Pushing Someone Else in the scooter: When user is sitting on the
scooter, make sure the scooter is set to manual mode by disengaging
the motors. Do not push the scooter if the motors are engaged.
Do not replace parts or material randomly.
Do not add weight randomly, as it may cause an imbalance.
Do not use other vehicles to pull or push the scooter when
somebody is sitting on the scooter.
If there are abnormal sounds coming from the scooter, con-
tact service immediately.
2.4 Service Lifetime
- The service lifetime is 5 years from date of manufacture. To avoid
injury or accidents, users should not use this scooter for more than
the service lifetime.
2. Safety Instructions
7

2.5 Electromagnetic Compatibility
- The scooter should away from strong magnetic fields and large in-
ductive electrical equipment, such as radio station, TV stations, under-
ground radio stations, or cell phone transmitting radio stations. Please
avoid any strong electromagnetic fields. The electric scooter should
always avoid electromagnetic interference.
2.6 Compatibility with Other Devices
- Electric scooters should not be used together in conjunction with any
other devices. If you need to connect a device to it, please contact
ComfyGO Mobility, so that we may confirm that the scooter will not be
adversely affected.
When using the scooter, please do not exceed the rated
obstacle height. When crossing obstacles, please remain a
low speed and the angle between the vehicle body and
obstacles is 90°.
When using the scooter on the uneven ground, please slow
down. The scooter cannot wade into the water. If the water
level submerges the controller, electric motor or circuit, it
may lead to short circuit and damage the electrical
appliance.
2. Safety Instructions
8

3. Usage and Operation
9
Please visit YouTube channel for a detailed Usage and Operations ex-
planation. Simply search "ComfyGO Mobility Electric Scooter
(Model # Z-1)" on YouTube.
www.youtube.com/c/ComfyGO
Picture 1

3. Usage and Operation
10
Direction Bar
Direction Bar includes: Key switch, throttle control, horn button, speed
regulation knob and indicator of battery power (Picture 1).
The console of the direction cannot be exposed to moisture
or a humid environment. If it is exposed to moisture or a
humid environment, do not operate the scooter until the
direction bar console is completely dry.
1. Horn button
2. Key swithc
3. Indicator of battery power
4. Speed regulation knob
5. Throttle control
6. Light switch
Picture 1

Horn button
Press this button to activate the horn. In order to prevent accidents or
injuries, please use the warning horn as necessary.
Key switch
Insert the key to the key switch and rotate it clockwise. The scooter is
now ready for use. Rotate the key counterclockwise to turn off the
scooter.
Always come to a complete stop before turning off the
scooter. If the scooter is turned off while in motion, the
electronic brake will engage causing the scooter to stop
suddenly.
Indicator of battery power
When the power is on, the indicator of battery power will show the re-
maining battery power.
Speed regulation knob
You can select the speed of the scooter by using the speed regulation
dial. Turn the dial counterclockwise for slower speeds and clockwise
for higher speeds.
Throttle control
You may control the forward and reverse speed of the scooter by
using the throttle control on the direction bar. To move forward, pull
the right side of the throttle control down with your right hand. To re-
verse, pull the left side of the throttle control down with your left hand.
To stop the scooter, release the throttle control and allow the throttle
to return to the middle position.
Light switch
You may control the lighting system of the scooter by pressing the
light switch
3. Usage and Operation
11

Picture 2
3. Usage and Operation
12
Rear components
The rear components include manual free bar, anti-rollover wheel and
motor (Picture 2).
1. Manual free bar
2. Anti-rollover wheel
Manual free bar
Lift the manual free bar to adjust the scooter to the freewheel mode.
While in freewheel mode you can push the scooter freely. In freewheel
mode, the drive system and braking system are disengaged. Push the
manual free bar down to reengage the drive system and the braking
system.

3. Usage and Operation
13
Before entering the scooter into freewheel mode, please turn off the
scooter and remove the key. When entering or exiting freewheel
mode, do not sit on the scooter. While in freewheel mode, do not sit
on the scooter. Do not enter in to freewheel mode if the scooter is on
a slope. Freewheel mode allows the user to push the scooter freely.
Once the scooter is placed in the desired location, please reengage
the drive and brake system.
Anti-rollover wheel
The anti-rollover wheel is an important safety device of the scooter.
Users must not dismantle the anti-rollover wheel nor modify
the scooter in any way.
Adjustment of the direction bar angle (Picture 3)
To adjust the angle of the direction bar, loosen the round dial near the
base of the direction bar where it connects to the scooter platform.
Loosen the dial by turning it counterclockwise then adjust the direction
bar to your desired location. Tighten the dial by turning it clockwise
and make sure that the direction bar is locked in place.
Chair rotation adjustment
To rotate the chair, lift the rotation rod handle located under the chair
on the right side. Rotate the chair to a desired location and release
the rotation rod handle. The seat will be in a fixed position (Picture 4).
Step 1: Pull rotation rod up to rotate the chair.
Step 2: Rotate the chair to the ideal position.
Step 3: Release the rotation rod to lock the chair in position.

Picture 3 Picture 4
Adjustment of handrail width
The handrail width may be adjusted inward or outward.
Step 1. Loosen the adjusting knob of the handrail (Picture 4)
Step 2: Pull the ring remove the location pin.
Step 3: Slide the handrail inward or outward to your ideal width.
Step 4: Insert the location pin back into the regulation hole.
Step 5: Tighten the adjustment knob.
Lift the handrails up to help you get on or off the chair
1. Adjusting knob
of the handrail
2. Location pin
3. Rotating rod of
the chair
Height adjustment of the chair (Picture 5)
Step 1: Remove the battery pack on the travel scooter.
Step 2: Loosen and remove the bolt at the base of the seat post.
Step 3: Adjust the seat post up or down to your ideal seat height.
Step 4: After selecting your ideal height, target at the regulation hole
and insert the bolt and tighten.
Step 5: Reinsert the battery pack.
3. Usage and Operation
14

Picture 5
3. Usage and Operation
15
Fixed point
When transporting the travel scooter in a vehicle, the scooter must be
in a fixed location and facing forward in the vehicle. Please tie the four
fastening belts to designated fixed points (Picture 6). The fastening
belts needs to be fully fastened, without any slack in the belts. Do not
tie any fastening belts to any adjustable, movable, detachable or
washable component of the scooter. The fixed points of the rear fas-
tening belts are located on the rear of the travel scooter near the rear
wheels. The fixed points of the front fastening belts are located on the
front of the travel scooter near the front wheels.
In the process of folding the scooter for transportation, please ensure
that the scooter is correctly fixed within the motor vehicle. If improper-
ly fixed, the travel scooter may turn over or slide out its original posi-
tion which may cause a danger while driving.
1. Upper seat post
2. Lower seat post
3. Location pin
1. Front fixed point (four-wheel vehicle)
2. Rear fixed point
Picture 6

4. Battery and Charger
16
Battery Pack
The top of the battery pack is equipped with the handle. You can
remove the battery by lifting the battery pack up from the scooter. The
battery pack includes two rechargeable cells, charging port, main cir-
cuit breaker (reset button), and a battery fuse (Picture 7).
1. Battery pack
2. Battery pack handle
3. Charging port
4. Battery pack fuse
5. Main circuit breaker (reset button)
6. Wire harness of battery cable
7. Wire terminal
Charging
The charging port is located on the battery pack. Insert the charging
plug from the wall charger into the charging port of the battery.
Front view Bottom view
Picture 7

4. Battery and Charger
17
Main circuit breaker (reset button)
Low battery voltage or battery overload may cause the main circuit
breaker to trip. This is to prevent damage to the motor or electronics.
If the main circuit breaker trips, the breaker reset button might pop up
and disable the entire electrical system. If the main circuit breaker has
tripped, leave the scooter off for a minimum of two minutes then press
the breaker reset button. If the main circuit breaker repeatedly trips,
please contact an authorized supplier or repair facility to conduct a
load test to your scooter.
Fuse for the direction bar console
The fuse for the controls on the direction bar is located below the bat-
tery pack. This fuse protects the electronic console on the direction
bar may protect the electronic device of the tiller console. If any elec-
tronic component on your direction bar is unresponsive, please check
the fuse.
Off-board battery charger
Connect the battery charging port to the charging wire of the wall
charger plug the wall charger into a standard power outlet. (Picture 8
and 9)
Picture 8 Picture 9

Picture 10
- The scooter has two maintenance-free sealed 12V deep-cycle bat-
teries.
- Please charge the battery with the off-board charging system provid-
ed with the scooter. To ensure proper recharging in the safest and the
most effective way, please use the original charger provided.
- Before the first use, charge the battery between 8-14 hours. Re-
charge the battery after each use to ensure the
stable operation of the scooter battery.
- The battery meter is located on the console.
Green indicates that the battery has been fully
charged, yellow indicates that the power is low
and needs recharging, and red indicates that
the power is near empty and immediate
charging is needed (Picture 10).
* Please do not use an extension cord to connect the battery charger.
* Please insert the battery charger into the normal standard power outlet.
When the battery is being charged, children should not play on or around the
scooter.
* Do not charge the battery when someone sitting on the scooter as there
could be the explosive gases from the battery charging process. Please ensure
that the scooter and the battery are away from fire sources such as flames or
sparks, and always provide sufficient ventilation. Before each use, please
check whether the battery charger, wiring and connector for damage. If they
are damaged, please contact the authorized supplier.
* Do not try to open the shell of the battery charger. In the charging process,
the shell of the battery charger may emit heat. Please avoid contact with the
battery while charging.
* Do not place the battery charger on the surface that could be affected by the
high temperatures.
* Do not expose the battery to the unfavorable or extremely weather condi-
tions. If it is exposed to extreme weather conditions, allow the battery to a
normal room temperature before charging.
4. Battery and Charger
18

- Please charge the battery according to steps shown in Picture 11.
The scooter has a disabling function while charging. When
the battery is being charged and the battery pack is on the
scooter, the scooter will not operate.
Battery and Charger, Frequently Asked Questions
How does the charger work?
When the battery level is low, the charger works transmits more cur-
rent more rapidly to the battery to quickly increase the electric charge.
When the battery near its full charge, the charger gradually reduces
the transmission of current. When the battery is fully charged, the cur-
rent transmitted by the charger is close to 0 amps. The charger should
maintain the full electric charge within the battery, without excessively
charging the battery. For complete charging instructions, please refer
to the instruction manual provided with the battery charger.
Picture 11
4. Battery and Charger
19
Table of contents
Other ComfyGo Mobility Mobility Aid manuals
Popular Mobility Aid manuals by other brands

aidapt
aidapt VP122 Fixing and maintenance instructions

lifestyle mobility aids
lifestyle mobility aids P1400 quick start guide

EasyStand
EasyStand Bantam Y5500 Medium Assembly manual

BENOIT SYSTEMS
BENOIT SYSTEMS Mobili Kit Maintenance manual

Herdegen
Herdegen 430920 manual

Liftkar
Liftkar MTK 190 instruction manual

Lumex
Lumex Walkabout LT RJ4300 Series instructions

mart cart 1
mart cart 1 280-3500 Owner's manual and technical documentation

SmitCare
SmitCare LSR24 Instructions for the assembly

Golden
Golden PATRIOT GR575 Service guide

Sunwa
Sunwa SC-5 Operation manual

Schuchmann
Schuchmann fridolin 1. Instructions for use