CommRadio CTX-10 User manual

CommRadio CTX-10 User Manual – Rev PRELIMINARY 05 APR 2018
1
USER’s MANUAL
CommRadio
CTX-10 Amateur Radio Transceiver
AeroStream Communications –CommRadio Division
New Castle, Colorado USA
www.commradio.com
303-279-3671
Email: support@commradio.com
Copyright © 2018
Commradio div. AeroStream Communicatons All Rights Reserved
No portion of this manual bay be reproduced without permission
of CommRadio / AeroStream Communications

CommRadio CTX-10 User Manual – Rev PRELIMINARY 05 APR 2018
2
Revision Status
REVISION
DATE
COMMENTS
PRELIM
05/05/2018
Pre-Release Copy

CommRadio CTX-10 User Manual – Rev PRELIMINARY 05 APR 2018
3
Contents
CommRadio........................................................................................................................ 1
CTX-10 Amateur Radio Transceiver ................................................................................... 1
Revision Status....................................................................................................................... 2
IMPORTANT WARNINGS.................................................................................................. 5
Introduction............................................................................................................................ 7
Firmware and Manual Updates.............................................................................................. 8
Actions, Abbreviations & Symbols Used in this Manual...................................................... 9
Quick Start Guides............................................................................................................... 10
Quick Start Guide - Receiver Setup................................................................................. 10
Quick Start Guide – CW Transceiver Setup.................................................................... 11
Quick Start Guide – SSB Transceiver Setup ................................................................... 12
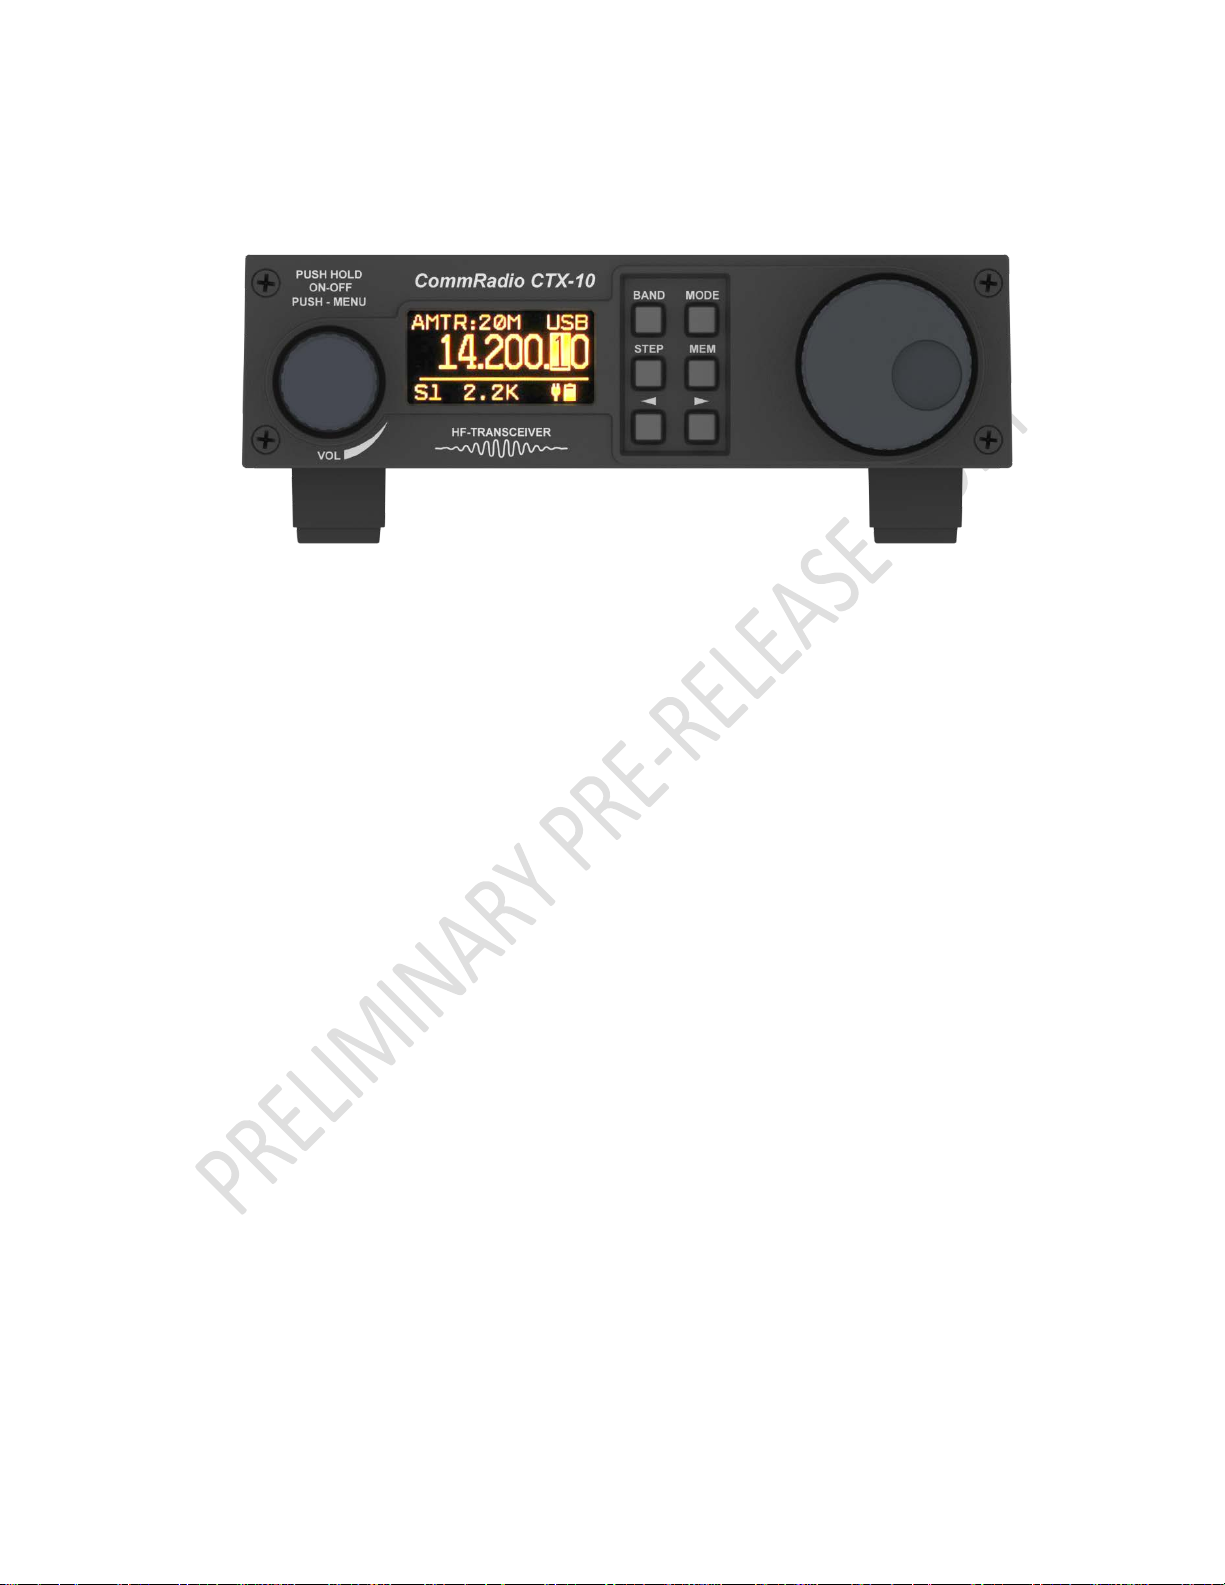
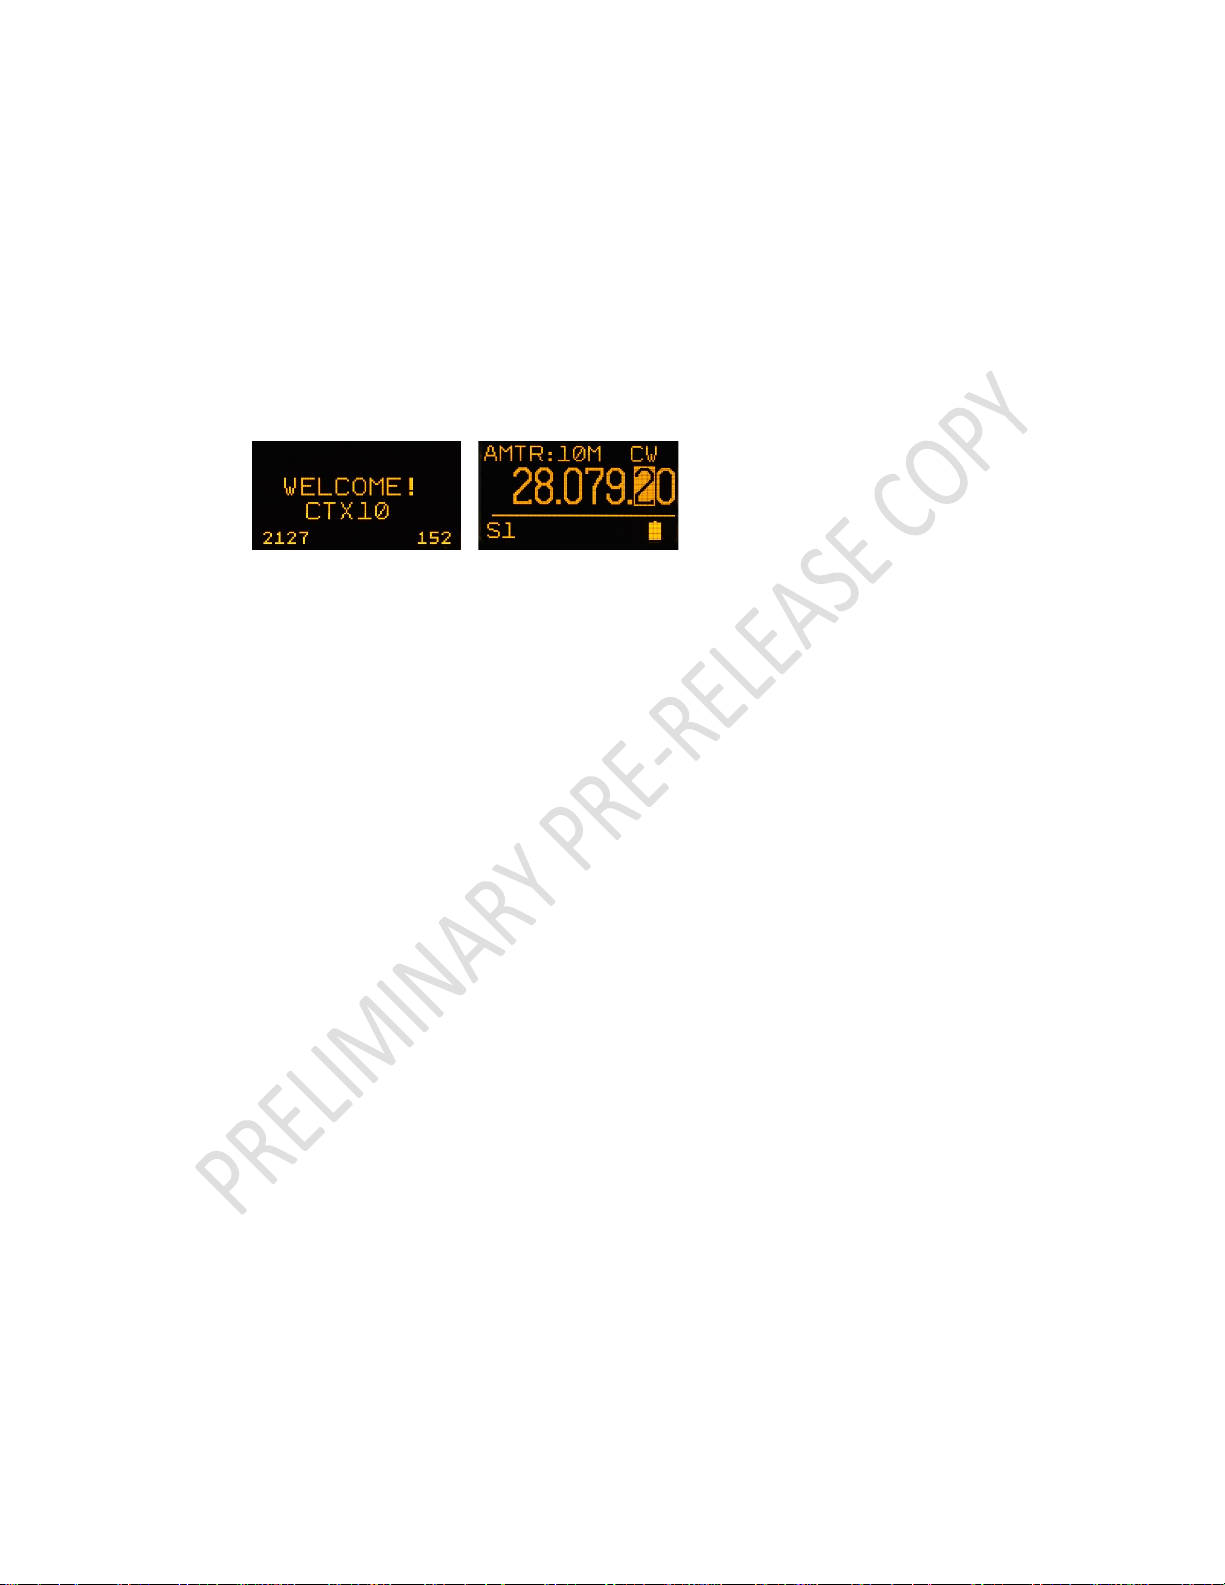
Display................................................................................................................................. 13
Control Knob [M]................................................................................................................ 14
Transmitter........................................................................................................................... 15
Keyer................................................................................................................................ 16
PTT AUDIO..................................................................................................................... 16
TUNING MODE ............................................................................................................. 16
Receiver ............................................................................................................................... 17
Filter................................................................................................................................. 17
AGC Speed ...................................................................................................................... 17
SQUELCH....................................................................................................................... 18
BRIGHTNESS................................................................................................................. 18
STEP TIMING................................................................................................................. 18
TIMEOUT........................................................................................................................ 18
RAPID TUNE.................................................................................................................. 18
Key Pad................................................................................................................................ 19
Key Pad - BAND............................................................................................................. 19
Key Pad - MODE............................................................................................................. 19
Key Pad - STEP............................................................................................................... 19
Key Pad - MEM............................................................................................................... 19
Key Pad - <LEFT ARROW>........................................................................................... 20
Key Pad - <RIGHT ARROW>........................................................................................ 20
Tuning Knob [T].................................................................................................................. 20

CommRadio CTX-10 User Manual – Rev PRELIMINARY 05 APR 2018
4
Rear Panel............................................................................................................................ 20
Power Input...................................................................................................................... 20
USB.................................................................................................................................. 20
Headphone ....................................................................................................................... 21
SPKR................................................................................................................................ 21
KEY ................................................................................................................................. 21
ACC ................................................................................................................................. 21
MIC.................................................................................................................................. 23
HF .................................................................................................................................... 23
Ground ............................................................................................................................. 23
CTX-10 Technical Notes..................................................................................................... 24
CTX-10 Power................................................................................................................. 24
Battery Protection Circuit................................................................................................ 24
Internal Li-ION Battery Charger ..................................................................................... 24
Monitoring Voltage Input at power jack and Battery Charging ...................................... 25
CTX-10 Specifications......................................................................................................... 25
CTX-10 Control Knob [M] Functional Logic Tables (maybe)............................................ 26

CommRadio CTX-10 User Manual – Rev PRELIMINARY 05 APR 2018
5
IMPORTANT WARNINGS
READ THIS MANUAL CAREFULLY to learn all of the features of the CTX-10. Understanding
that you’ll want to use the radio immediately, we’ve included several Quick Start Guides
right up front.
SAVE THIS MANUAL as it contains important safety and operating instructions.
FCC INFORMATION This equipment has been tested and found to comply with the limits
for a Class B digital device, pursuant to part 15 of the FCC Rules. These limits are designed
to provide reasonable protection against harmful interference in a residential installation.
This equipment generates, uses and can radiate radio frequency energy and, if not
installed and used in accordance with the instructions, may cause harmful interference to
radio communications. However, there is no guarantee that interference will not occur in
a particular installation. If this equipment does cause harmful interference to radio or
television reception, which can be determined by turning the equipment off and on, the
user is encouraged to try to correct the interference by one or more of the following
measures:
•Reorient or relocate the receiving antenna.
•Increase the separation between the equipment and receiver.
•Connect the equipment into an outlet on a circuit different from that to which the
receiver is connected.
•Consult the dealer or an experienced radio/TV technician for help.
CAUTION: Changes or modifications not expressly approved by
AeroStream/CommRadio could void the user's authority to operate this transceiver under
FCC regulations.
WARNING RF EXPOSURE! This device emits Radio Frequency (RF) energy. Extreme
caution should be observed when operating this device. If you have any questions
regarding RF exposure and safety standards please refer to the Federal Communications
Commission Office of Engineering and Technology’s report on Evaluating Compliance with
FCC Guidelines for Human Radio Frequency Electromagnetic Fields (OET Bulletin 85).
WARNING HIGH VOLTAGE! NEVER touch an antenna or internal antenna connector
during transmission. This may result in an electrical shock or burn.
WARNING! NEVER operate the transceiver while driving a vehicle. Safe driving requires
your full attention—anything less may result in an accident.

CommRadio CTX-10 User Manual – Rev PRELIMINARY 05 APR 2018
6
NEVER apply more than 20 V DC, such as a 24 V battery, to the power input jack on the
transceiver rear panel. This could cause a fire or damage the transceiver.
NEVER let metal, wire or other objects touch any internal part or connectors on the rear
panel of the transceiver. This may result in an electric shock or could cause a fire or
damage the transceiver.
NEVER expose the transceiver to rain, snow or any liquids.
DO NOT use or place the transceiver in areas with temperatures below –10°C (+14°F) or
above +60°C (+140°F). Be aware that temperatures on a vehicle’s dashboard can exceed
+80°C (+176°F), resulting in permanent damage to the transceiver if left there for
extended periods.

CommRadio CTX-10 User Manual – Rev PRELIMINARY 05 APR 2018
7
Introduction
Thank you for purchasing the CTX-10 amateur radio transceiver. Tracing its
evolutionary roots to the commercial/military/avionics worlds, and borrowing
receiver and design elements from the highly successful CommRadio CR-1 and
CR-1a receivers, the CTX-10 is the latest product from the mind of Don Moore,
N0HDX.
The CTX-10 was designed to be rugged and user-friendly with a minimum number
of user interface interactions to produce the desired system functional change.
Standard equipment user replaceable internal Lithium Ion batteries provide power
for a day’s casual operation. The ability to provide operational power and
simultaneously recharge the batteries from most any 5 to 20 VDC source provides
low-cost portable expansion capability and unlimited field operation. Standard
equipment internal wide-range automatic antenna tuner and CW keyer provide
everything you need for full functionality in one lightweight, die-cast aluminum
package with no need for supplementary cooling solutions during high duty cycle
operations.
It is the purpose of this manual to provide you with one source for basic through
advanced operations, trouble-shooting, fielding notes and FAQs. This manual will
be maintained as an up-to-date online PDF document, suitable for printing or
reference on most any electronic device.

CommRadio CTX-10 User Manual – Rev PRELIMINARY 05 APR 2018
8
Firmware and Manual Updates
Contact support@commradio.com to register your warranty and to automatically
receive automated email notices when updates to firmware or this manual are
available. The most recent version of this manual, system firmware, additional
support information and related topics of interest can always be found on our
website: www.commradio.com

CommRadio CTX-10 User Manual – Rev PRELIMINARY 05 APR 2018
9
Actions, Abbreviations & Symbols Used in this Manual
[AGC] Automatic Gain Control – automatically adjusts RF gain
[ATU] Antenna Tuning Unit – matches CTX-10 to antenna
[BAND] The [BAND] key on the keypad
Click Rotate the Control Knob [M] one detent {CW} or {CCW}
CW Continuous Wave, as in Morse Code
{CW}Clockwise rotation of a knob
{CCW} Counter Clockwise rotation of a knob
<LEFT ARROW> The lower left button on the key pad
[M] Control Knob, the left knob on the front panel
[MEM] The [MEM] key on the keypad
[MODE] The [MODE] key on the keypad
PUSH Quickly push in and release (holding for less than ½ second)
<RIGHT ARROW> The lower right button on the key pad
[STEP] The [STEP] key on the keypad
[T] Tuning Knob, the right knob on the front panel

CommRadio CTX-10 User Manual – Rev PRELIMINARY 05 APR 2018
10
Quick Start Guides
Quick Start Guide - Receiver Setup
Connect a suitable 5 – 20 VDC power source to the Power Input jack on the rear panel.
Connect an antenna to the HF jack on the rear panel.
Press Control Knob [M] in for two seconds and release. You will see the
WELCOME! Screen and the standard frequency display screen.
Turn Control Knob [M] {CW} until a suitable audio volume level is heard. Select
the desired mode by pressing keypad button MODE repeatedly. Select the desired
amateur band by pressing the keypad button BAND repeatedly. Turn Tuning Knob [T]
to select the desired frequency.
In this PRELIMINARY User’s Guide, Text in RED ITALIC are works in process
Adjust step size of tuning.
Turn off when done.

CommRadio CTX-10 User Manual – Rev PRELIMINARY 05 APR 2018
11
Quick Start Guide – CW Transceiver Setup
Complete steps shown in Quick Start Guide - Receiver. Change to Stand Alone Process
Connect compatible microphone to MIC jack on rear panel.
Push [M] momentarily to enter Menu Selection Mode, then rotate [M] one click {CW} to
enter TX ON_OFF mode. Push [M] to select current Transmitter status (ON or OFF). Rotate [M]
one click {CW} or {CCW} to show ON status. Push [M] to select the displayed status.
SELECT POWER OUT
Edit text and screen images to show CW operations vice SSB. Push [M] momentarily to enter Menu
Selection Mode, then rotate [M] four clicks {CW} to
enter PTT AUDIO mode. Push [M] to select current PTT AUDIO mode. Rotate [M] to cycle to ON.
PTT ON enables use of a compatible Push-To-Talk microphone.
TURN OFF

CommRadio CTX-10 User Manual – Rev PRELIMINARY 05 APR 2018
12
Quick Start Guide – SSB Transceiver Setup
Complete steps above in Quick Start Guide - Receiver. Connect compatible microphone to
MIC jack on rear panel. One suggested microphone is the Yaesu MH-31 A8J.
Push [M] momentarily to enter Menu Selection Mode, then rotate [M] one click {CW} to
enter TX ON_OFF mode. Push [M] to select current Transmitter status (ON or OFF). Rotate [M]
one click {CW} or {CCW} to show ON status. Push [M] to select the displayed status.
SELECT POWER OUTPUT LEVEL
Push [M] momentarily to enter Menu Selection Mode, then rotate [M] four clicks {CW} to
enter PTT AUDIO mode. Push [M] to select current PTT AUDIO mode. Rotate [M] to cycle to ON.
PTT ON enables use of a compatible Push-To-Talk microphone.
TURN OFF

CommRadio CTX-10 User Manual – Rev PRELIMINARY 05 APR 2018
13
Display
The display is a low power, 64 x 128 pixel, 1.5” diagonal amber Organic Light Emitting
Diode (OLED) component. The glass screen is Electromagnetic Interference (EMI) shielded.
This adjustable intensity display was selected for it’s extremely lower power consumption
and easy viewing indoors in dark environments as well as outdoors under varying ambient
lighting conditions. It is not intended for viewing under direct sun.
Above is an example of the display during normal receive conditions. The band selected is
the Amateur 10 Meter band. The mode is CW. The signal strength on the digital ‘S’ meter
is S1. The battery status is fully charged. The display you see will probably be different
based on your selection of operational parameters but the locations of the data will
remain the same.

CommRadio CTX-10 User Manual – Rev PRELIMINARY 05 APR 2018
14
Control Knob [M]
Description: Rotary Encoder, 12 detents per revolution with push-in switch
ON/OFF Control
Push and Hold [M] two seconds to turn - ON
The two numbers at the bottom of the display are the software revisions of the DSP and PIC.
Push and Hold [M] two seconds to turn - OFF
Volume Control
Simple rotation of the Control Knob [M] raises or lowers the headset and speaker volume.
There is no indication of the volume level on the display.
Menu
With power on, Push [M] momentarily to enter Menu Selection Mode. If you wait too long without
action, the display will revert to Display Frequency mode.
The default, first Menu entry visible is the Antenna Tuning Unit (ATU).
Push [M] to select (highlight) ATU OFF. Rotate [M] {CW} or {CCW} to turn begin the tuning
process. The ATU screen displays running until the ATU has finished tuning for the attached
antenna, or until [M] is pushed again, ending the tuning process.
Other Menu selections are grouped by the selected rotation of [M].
{CW} rotation of [M] shows Transmit Menus
{CCW} rotation of [M] shows Receive Menus

CommRadio CTX-10 User Manual – Rev PRELIMINARY 05 APR 2018
15
{CW} rotation of [M] showing Transmit Menus
Transmitter
Push [M] momentarily to enter Menu Selection Mode, THEN:
TX ON_OFF
Rotate [M] one click {CW} to enter TX ON_OFF mode. Push [M] to select current Transmitter status
(ON or OFF). Rotate [M] one click {CW} or {CCW} to reverse ON / OFF status. Push [M] to select the
displayed status. If you want to use CTX-10 as receiver only, leave Transmitter OFF.
TX POWER
Rotate [M] two clicks {CW} to enter TX POWER mode. Push [M] to select current TX POWER level.
Rotate [M] {CW} or {CCW} to cycle through the TX POWER levels -1W, 5W, 10W. Stop rotating the
knob when the desired power level is selected. Push [M] to select displayed TX POWER level.

CommRadio CTX-10 User Manual – Rev PRELIMINARY 05 APR 2018
16
Keyer
Rotate [M] three clicks {CW} to enter KEYER mode. Push [M] to select current KEYER speed, or OFF.
Rotate [M] to cycle through the options – OFF, 5 WPM through 50 WPM in one WPM increments.
Select OFF if you will be using a straight key. Push [M] to select displayed Keyer status or speed.
PTT AUDIO
Rotate [M] four clicks {CW} to enter PTT AUDIO mode. Push [M] to select current PTT AUDIO mode.
Rotate [M] to cycle through ON OFF. PTT ON enables use of a compatible Push-To-Talk microphone.
TUNING MODE
Rotate [M] five clicks {CW} to enter TUNING MODE mode. Push [M] to select current TUNING MODE.
Rotate [M] to cycle through AUTOMATIC or MANUAL.

CommRadio CTX-10 User Manual – Rev PRELIMINARY 05 APR 2018
17
{CCW} rotation of [M] showing Receive Menus
Receiver
Push [M] momentarily to enter Menu Selection Mode, THEN:
Filter
Rotate [M] one click {CCW} to enter FILTER mode. Push [M] to select current receive FILTER
bandwidth. Rotate [M] one click {CW} or {CCW} to cycle through bandwidths available based on the
receiver mode selected (AM, CW, USB, LSB). Push [M] to select the currently displayed level.
AM 5/7.5/15 kHz SSB (USB/LSB)1.8/2.2/2.6 kHz CW 0.5/1/1.8/2.2/2.6 kHz
AGC Speed
Rotate [M] two clicks {CCW} to enter AGC Speed mode. Push [M] to select current receive AGC
Speed. Rotate [M] one click {CW} or {CCW} to cycle through AGC Speeds available. Push [M] to select
the currently displayed level. AGC Speeds: SLOW MEDIUM FAST OFF

CommRadio CTX-10 User Manual – Rev PRELIMINARY 05 APR 2018
18
SQUELCH
Rotate [M] three clicks {CCW} to enter SQUELCH mode. Push [M] to select current SQUELCH level.
Rotate [M] {CW} or {CCW} to change the SQUELCH level based on the lighted bar on the screen. Push
[M] to select the currently displayed level.
BRIGHTNESS
Rotate [M] four clicks {CCW} to enter BRIGHTNESS mode. Push [M] to select current BRIGHTNESS
level. Rotate [M] {CW} or {CCW} to change the BRIGHTNESS level based on the lighted bar on the
screen. Push [M] to select the currently displayed level.
STEP TIMING
Rotate [M] five clicks {CCW} to enter STEP TIMING mode. Push [M] to select current STEP TIMING
selection. Rotate [M] {CW} or {CCW} to change STEP TIMING. Push [M] to select the currently
displayed time.
STEP TIMING FUNCTION – wait for revised s/w
TIMEOUT
Rotate [M] six clicks {CCW} to enter TIMEOUT mode. Push [M] to select current TIMEOUT selection.
Rotate [M] {CW} or {CCW} to change TIMEOUT. Push [M] to select the currently displayed time.
RAPID TUNE
Rotate [M] seven clicks {CCW} to enter RAPID TUNE mode. Push [M] to select current RAPID TUNE
selection. Rotate [M] {CW} or {CCW} to change RAPID TUNE. Push [M] to select the currently
displayed RAPID TUNE.
Rapid Tune Options: OFF/2/4/6 Revolutions before beginning to RAPID TUNE

CommRadio CTX-10 User Manual – Rev PRELIMINARY 05 APR 2018
19
Key Pad
The Key Pad is a set of six position momentary contact push button switches. Each of the buttons’
functions are described below.
Key Pad - BAND
With the current frequency displayed, pressing the BAND button will change the
active frequency to the amateur radio band displayed in the upper left corner of the display.
The options are: AM RADIO/160M/80M/60M/40M/30M/20M/17M/15M/12M/10M
NOTE: 160M and AM RADIO are receive only.
Key Pad - MODE
With the current frequency displayed, pressing the MODE button will change the
demodulation method used by the DSP. The currently active mode is displayed in the upper right
corner of the display. The options are: AM/CW/LSB/USB
Key Pad - STEP
With the current frequency displayed, pressing the STEP button causes the receiver to
immediately begin incrementing the displayed frequency (frequency STEPPING). The size of the
STEP is determined by the location of the highlighted digit on the displayed frequency immediately
before pressing the STEP button. To terminate the STEP function, either rotate [T], the Tuning
Knob or press the STEP key again. This function is useful for casually listening to an amateur band
to determine how active it is. Appropriate selection of STEP size allows you to select your desired
level of resolution. The upper and lower frequency limits for each amateur band selected for the
STEP function cannot be changed by the user.
Key Pad - MEM
With the current frequency displayed, pressing the MEM button button brings up the
Memory screen. Memory is divided into eight pages of eight entries for a total of 64 separate
memory locations. With the Memory screen active, use the <LEFT ARROW> and <RIGHT ARROW>
to select the desired page of memory. The currently tuned frequency is displayed in the upper
right corner of the display.– wait for revised s/w

CommRadio CTX-10 User Manual – Rev PRELIMINARY 05 APR 2018
20
Key Pad - <LEFT ARROW>
With the current frequency displayed and one digit highlighted with arectangular lighted box,
pressing the <LEFT ARROW> causes the highlighted box to move one digit to the left.
This highlighted box indicates the digit to be changed when rotating [T] the Tuning Knob.
Tuning Resolutions: 1MHz, 100, 10, 1 kHz, 100, 10 Hz
Key Pad - <RIGHT ARROW>
With the current frequency displayed and one digit highlighted with a rectangular lighted box,
pressing the <RIGHT ARROW> causes the highlighted box to move one digit to the right.
This highlighted box indicates the digit to be changed when rotating [T] the Tuning Knob.
Tuning Resolutions: 1MHz, 100, 10, 1 kHz, 100, 10 Hz
Tuning Knob [T]
Is a precision low torque digital optical encoder. Also, [T] incorporates an axial momentary push
button switch. Rotation of [T] {CW} increases the displayed frequency with a step size as indicated
by the highlighted display digit. Similarly, rotation of [T] {CCW} decreases the displayed frequency.
Pressing [T] inward activates the highlighted digit, causing it to flash. {CW} or {CCW} of [T] will cause
the flashing digit to move left or right, changing the tuning resolution of the CTX-10.
This is an alternative to using <LEFT ARROW> and <RIGHT ARROW> for same the function.
Tuning Resolutions: 1MHz, 100, 10, 1 kHz, 100, 10 Hz
Rear Panel
Power Input
The power input jack is a standard 2.5mm pin x 5mm barrel, pin positive (+) power
receptacle. Recommended input voltage range is 5 – 20 VDC, 20 VDC is the absolute
maximum. A recommended power supply should provide at least 2 Amps.
USB
The USB receptacle is a standard mini-B 2.0 jack. This USB receptacle is the input jack for
software updates to the CTX-10. Additionally, the jack provides IQ data out from the
receiver, and provides bi-directional radio control capabilities. NOTE: USB receptacle does
not provide power out and does not accept power in.
Other manuals for CTX-10
1
Table of contents
Other CommRadio Transceiver manuals