COMNET ERICSSON JAGUAR 700P User manual

AE/LZT 123 5271/1 R1A
Operator’s Manual
JAGUAR 700P
System/Scan Portable
Radio

2
Table Of Contents
Page
Safety Training Information...........................................................3
Operating Rules And Regulations ..................................................6
Operating Tips .................................................................................7
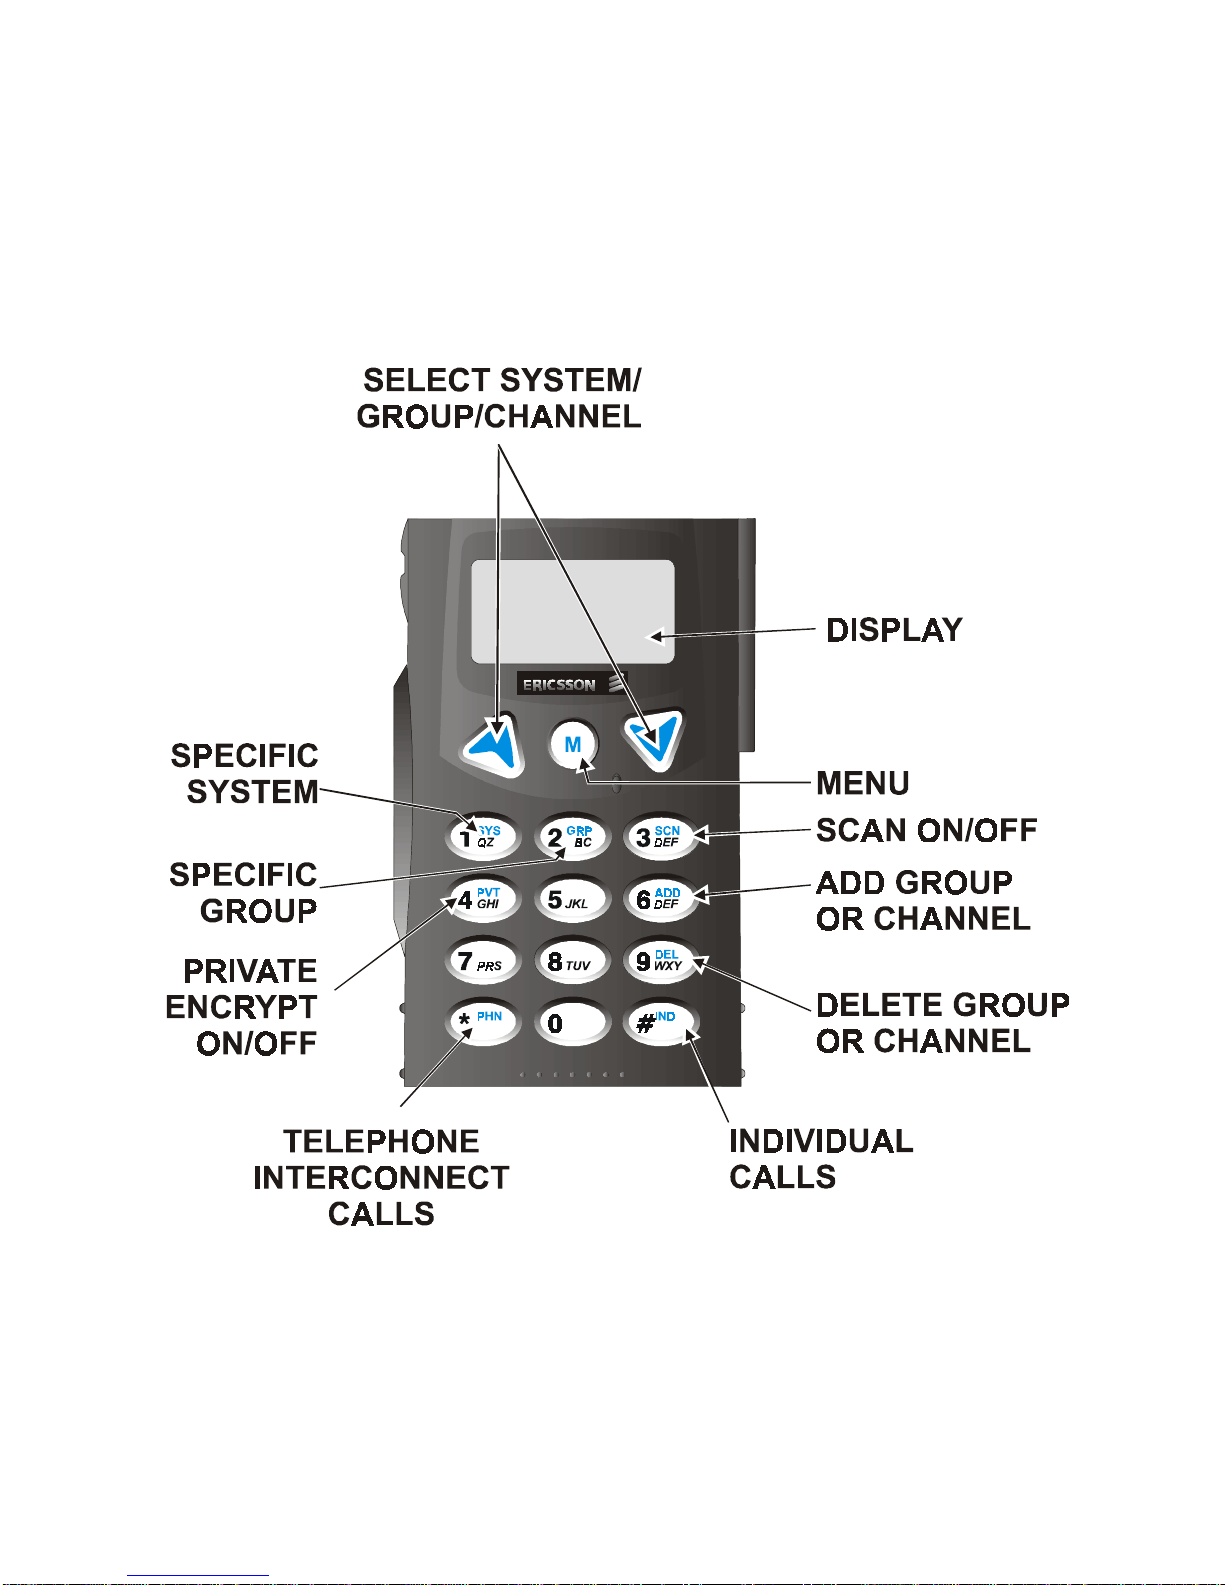
User Interface...................................................................................8
Basic Operation..............................................................................13
Transmitting A Call In Trunked Mode........................................17
Receiving A Call In Trunked Mode..............................................18
Conventional Operation ................................................................19
Alert Tones .....................................................................................20
Changing The Battery Pack..........................................................21
The software contained in this device is copyrighted by
Ericsson Inc. Unpublished rights are reserved under the
copyright laws of the United States.
NOTICE!
This manual is published by Ericsson Inc., without any warranty. Improvements and
changes to this manual necessitated by typographical errors, inaccuracies of current
information, or improvements to programs and/or equipment, may be made by Ericsson
Inc., at any time and without notice. Such changes will be incorporated into new editions
of this manual. No part of this manual may be reproduced or transmitted in any form or
by any means, electronic or mechanical, including photocopying and recording, for any
purpose, without the express written permission of Ericsson Inc.
Copyright © 2000 Com-Net Ericsson Critical Radio Systems, Inc.
All rights reserved.

3
SAFETY TRAINING INFORMATION
Your Com-Net Ericsson radio generates
RF electromagnetic energy during
transmit mode. This radio is designed
for and classified as “Occupational Use
Only” meaning it must be used only
during the course of employment by
individuals aware of the hazards and the ways to
minimize such hazards. This radio is NOT intended for
use by the “General Population” in an uncontrolled
environment.
This radio has been tested and complies with the FCC RF
exposure limits for “Occupational Use Only.” In addition,
your Com-Net Ericsson radio complies with the following
Standards and Guidelines with regard to RF energy and
electromagnetic energy levels and evaluation of such
levels for exposure to humans:
•FCC OET Bulletin 65 Edition 97-01 Supplement C,
Evaluating Compliance with FCC Guidelines for Human
Exposure to Radio Frequency Electromagnetic Fields.
•American National Standards Institute (C95.1 – 1992),
IEEE Standard for Safety Levels with Respect to Human
Exposure to Radio Frequency Electromagnetic Fields, 3
kHz to 300 GHz.
•American National Standards Institute (C95.3 – 1992),
IEEE Recommended Practice for the Measurement of
Potentially Hazardous Electromagnetic Fields – RF and
Microwave.
WARNING

4
CAUTION
To ensure that your exposure to RF
electromagnetic energy is within the
FCC allowable limits for occupational
use, always adhere to the following
guidelines:
•DO NOT operate the radio without a proper antenna
attached, as this may damage the radio and may also
cause you to exceed FCC RF exposure limits. A
proper antenna is the antenna supplied with this radio
by the manufacturer or an antenna specifically
authorized by the manufacturer for use with this radio.
•DO NOT transmit for more than 50% of total radio use
time (“50% duty cycle”). Transmitting more than 50%
of the time can cause FCC RF exposure compliance
requirements to be exceeded. The radio is
transmitting when the “TX” light appears in the display.
You can cause the radio to transmit by pressing the
“PTT” button.
•ALWAYS use Com-Net Ericsson authorized
accessories (antennas, batteries, belt clips,
speaker/mics, etc). Use of unauthorized accessories
can cause the FCC RF exposure compliance
requirements to be exceeded.
•ALWAYS keep the antenna at least 1 cm (0.4 inches)
away from the body when transmitting to ensure FCC
RF exposure compliance requirements are not
exceeded. To provide the recipients of your

5
transmission the best sound quality, hold the antenna
at least 5 cm (2 inches) from mouth, and slightly off to
one side.
The information listed above provides the user with the
information needed to make him or her aware of a RF
exposure, and what to do to assure that this radio operates
within the FCC RF exposure limits of this radio.
Electromagnetic Interference/Compatibility
During transmissions, your Com-Net Ericsson radio
generates RF energy that can possibly cause interference
with other devices or systems. To avoid such interference,
turn off the radio in areas where signs are posted to do so.
DO NOT operate the transmitter in areas that are sensitive
to electromagnetic radiation such as hospitals, aircraft, and
blasting sites.

6
OPERATING RULES AND REGULATIONS
Two-way FM radio systems must be operated in
accordance with the rules and regulations of the Federal
Communications Commission (FCC). As an operator of
two-way radio equipment, you must be thoroughly familiar
with the rules that apply to your particular type of radio
operation. Following these rules will help eliminate
confusion and will assure the most efficient use of existing
radio channels. This will provide a smooth operating radio
network.
When using the radio, remember these rules:
1. It is a violation of FCC rules to interrupt any distress or
emergency message. As the radio operates in much
the same way as a telephone "party line", always listen
and/or observe the absence of the “BSY” display to
make sure that the line is clear before sending any
messages. If someone is sending an emergency
message, such as reporting a fire or asking for help in
an accident, KEEP OFF THE AIR! Emergency calls
have priority over all other messages.
2. Use of profane or obscene language is prohibited by
Federal Law.
3. It is against the law to send false call letters or a false
distress or emergency message.

7
4. The FCC requires that conversations be brief and
confined to business. To save time, use coded
messages whenever possible.
5. Using the radio to send personal messages (except in
an emergency) is a violation of FCC rules. Send only
those messages essential for the business operation.
6. It is against the Federal law to repeat or otherwise
make known anything overheard on the radio.
Conversations between others sharing your channel
must be regarded as confidential.
OPERATING TIPS
The following conditions tend to reduce the effective
range of two-way radios and should be avoided whenever
possible.
•Operating the radio in low terrain areas or while
under power lines or bridges.
•Operating the radio inside of a vehicle or inside metal
or steel framed building unless using an outside
antenna.

8
User Interface
This manual describes the basic functions and
operation of the 700P System/Scan portable radio. For
detailed information about the features and operation refer
to the appropriate 700P Maintenance Manual or contact
your System Administrator.
Figure 1: Top View

9
Figure 2: Side View

10
Figure 3: 700P System Keypad

11
Figure 4: 700P Scan Keypad

12
Three Line Display
Icon Descriptions
ON – transmitting or
receiving
Flashing – call queued
ON – special call mode
(individual or
telephone)
ON – during all radio
transmissions ON – transmit at low
power
Off – transmit at high
power
On – auto power mode On – group or channel
in scan list
On – low battery On – priority 2 group or
channel
On – trunked system in
Failsoft mode On – priority 1 group or
channel
On – transmit in
encrypt mode
Flashing – receiving
an encrypted call
On – Channel Guard
enabled
Off – Channel Guard
disabled
On – scan mode
(rotates clockwise)
Off – scan disabled

13
Basic Operation
System Select – Method 1 (System)
1. Press
!to access system list.
2. Enter system id number from keypad.
3. Press
"to select desired system.
System Select – Method 2
1. Rotate System/Group/Channel knob.
If this knob is not programmed for systems:
2. Press the
#$buttons to change systems.
Group Select – Method 1 (System)
1. Press
%to access group list.
2. Press #$to scroll through the list of groups.
3. Press
"to select desired group.
Group Select – Method 2
1. Rotate System/Group/Channel knob.
If this knob is not programmed for groups:
2. Press the
#$buttons to change groups.

14
Channel Select
1. Rotate System/Group/Channel knob.
If this knob is not programmed for channels:
2. Press the #$buttons to change channels.
Modify Scan List (System)
1. Press
&to toggle scan OFF and verify is not
displayed..
2. Select group or channel.
3. Press
'once to remove group or channel from list.
4. Press
(once to add as a normal group or channel.
Press (twice to add as a Priority 2 group.
Press (three times to add as a Priority 1 group.
5. Press &to re-start scanning.
Nuisance Delete
A channel can temporarily be deleted from the scan list,
if it is not the currently selected channel
1. Turn Scan ON.
2. When the radio receives a call on the channel, press
the '. The channel is removed from the scan list
until the radio is power cycled.

15
Modify Scan List (Scan)
1. Press
)to toggle scan OFF and verify is not
displayed.
2. Select group or channel.
3. Press
*once to remove group or channel from the
list.
4. Press *once to add as a normal group or
channel.
Press *twice to add as a Priority 2 group.
Press *three times to add as a Priority 1 group.
5. Press )to re-start scanning.
Backlight On/Off
1. Press
"to access the menu.
2. Press
#$to scroll through menu until “BCKLGHT”
appears.
3. Press "to select Backlight menu.
4. Press
#$to toggle backlight ON and OFF.
5. Press "to select new setting.

16
Contrast Adjust
1. Press
"to access the menu.
2. Press #$to scroll through menu until
“CONTRAST” appears.
3. Press "to select Contrast menu.
4. Press #$to adjust contrast setting from 1 - 4.
5. Press
"to select new contrast setting.
Declaring An Emergency
1. Press and hold the red Emergency/Home button (the
length of time is programmable; check with the system
administrator).
2. *TXEMER* flashes in the display until the emergency
is cleared.
3. Press PTT and and momentarily turns on.
4. Release PTT when the transmission is complete.
Locking/Unlocking Keypad
1. Press
"button.
2. Within 1 second, press the Option button on the side
of the radio.

17
Transmitting A Call In Trunked Mode
Group Call
1. Select desired group.
2. Press Push-To-Talk button.
3. The and icons will appear.
Individual Call (System)
1. Press
+to access the individual call list.
2. The icon will appear.
3. Press #$to scroll through individual call list or
Enter LID from keypad.
4. When the desired ID appears in the display press the
Push-To-Talk button.
5. The and icons will appear.
Phone Call (System)
1. Press
,to access the phone call list.
2. The icon will appear.
3. Press
#$to scroll through phone call list or Enter
number from keypad.
4. When the desired phone number appears in the
display press the Push-To-Talk button.
5. The and icons will appear.

18
Receiving A Call In Trunked Mode
Group Call
1. Select a group or Turn scan ON and make sure group
is in scan list.
2. The group name or “GR xxxxx” will appear to indicate
a call.
Phone Calls
1. When the call is received, the receive audio sounds
and the display reads: *PHONE*
2. Respond by pressing PTT. If you do not respond,
radio will continue to ring to indicate an incoming call.
Individual Calls
1. When the call is received, the receive audio sounds
and the display reads : ID xxxxx
*INDV*
2. Respond by pressing PTT. If you do not respond,
radio will ring to indicate an incoming call.
3. If the call is cleared with no response, the radio will
store Who Has Called and display:
*WHC*
4. Press the
+key to display the ID.
5. Press the Push-To-Talk button to return the call or
Press the Clear/Monitor button to clear the *WHC*.

19
Conventional Operation
Receiving A Call
1. Select desired conventional system and channel or
Turn scan ON and make sure desired channel is in
scan list.
2. When the radio receives a call, the radio will unmute
and the channel name will appear in the display.
Sending A Call
1. Select desired system and channel.
2. Ensure the channel is not busy by pressing the
Monitor/Clear button momentarily. If you hear audio
or if the icon is on, the channel is busy.
3. When you are sure the channel is not busy, press the
Push-To-Talk button and speak into the microphone.

20
Alert Tones
Name Tone Description
Call
Originate (B) one short
mid-
pitched
OK to talk after pressing the push-
to-talk button
Call
Queued (T) one high-
pitched call in a queue for processing
Autokey (T) one mid-
pitched queued call received channel
assignment
System
Busy (T) three low-
pitched system busy or unable to
complete call
Call Denied (T) one low-
pitched radio is not authorized on the
system or group
Carrier
Control
Timer
(B) five high-
pitched /
one long
low-
pitched
PTT depressed for maximum
length of time
Low
Battery (B) one low-
pitched /
one short
mid-
pitched
low battery
Low
Battery
Alert
(B) one low-
pitched after PTT - battery too low to
tranmsmit
(T) = trunked mode only (B) = both trunked and conventional modes
Table of contents
Other COMNET ERICSSON Portable Radio manuals