Compac K3 Touch User manual

molinos de café
moulins à café
kaffeemühlen
macinadosatori
moinhos de café
к о ф е м о л к и
μαδοι αδσησ καε
coffee grinders
12 Declaration of EC Conformity
K-3
K-3 Elite
K-3 Touch
In accordance with European
commu-nity directives, quality
certificates have been applied. All
materials have been adapted and
technical reports are available at
our offices.
04/108/EC on the approximation
of the laws of the Member
States relating to electromagnetic
compatibility.
98/37/EC amending Directive
89/392/EC on the approximation
of the laws of the Member States
relating to machinery.
REG. 1935/2004 amending Direc-
tive 89/109/CE on the approxima-
tion of the laws of the Member
States relating to material and ob-
jects destinated to make contact
with nutritional products.
03/108/EC amending Directive
2002/96/EC on waste electrical
and electronic equipment (WEEE).
06/95/EC of 12/12/2006 on the
harmonization of the laws of
Member States relating to electrical
equipment designed for use within
certain voltage limits.
02/96/EC of 27/01/2003 on the
approximation of the laws of the
Member States on waste electrical
and electronic equipment (WEEE).
Environment
Do not throw the
appliance away with
the normal household
waste; hand it in at an
official recycling collection point.
By doing this, you will help to pre-
serve the environment.
The Legal Representative
Instructions Manual
K-3 / K-3 Elite / K-3 Touch

2.1. The purpose of this manual is to provide the necessary
information for the correct installation, handling and maintenance
of the machine, and to emphasize the precautions that should be
taken into consideration by the operator.To ensure the best use of
the coffee grinder, it is essential to carefully follow the instructions
included in this manual. In the event of a problem, please contact
your local technical service.
The manual should be kept until the machine is changed and
should always be available to the operator.
2.2. Different terms are used in the manual, such as:
– Characters in bold type, to emphasize importance.
– Numbers in brackets following a word, to indicate the position
of the item shown in the adjoining drawing or external compo-
nents diagram.
Example:(1) Hopper lid.
- Icons (information,warning)
Index
1 - Machine description
2 - Instructions manual
3 - Identification
4 - Technical characteristics
5 - External components
6 - Installation
7 - Regulation
8 - Operation
9 - Cleaning
10 - Maintenance
11 - Safety measures
12 - EC Conformity
Description PROC-CAL/002/03
This coffee grinder has been designed using the latest computer
and engineering technology. The result is a high quality product
offering exceptional grinding and dispensing capabilities. It has
been manufactured using high quality materials (aluminum, steel,
etc.) ideal for use with foodstuffs. For optimal operation of the
grinder described in this manual, maximum work duty cycles
should be:
Instruction manual
K-3 / K-3 Elite &
K-3 Touch
WORK STOP
2 min. 10 min.
CYCLE
1
2
information warning
Version May 2008
!
i

Identification
3
The following information is printed indelibly on the technical
features plate:
NOTE: The manufacturer reserves the right to modify the
components of the machine according to the requirements
of specific markets or due to the results of technological
advances.
4.1. Scope of application
The coffee grinders are intended for use on commercial premises
and facilities where ground coffee is required, or in small stores
that sell coffee. The grinder must only be used to grind coffee
beans. Any use other than this will be considered improper and
dangerous.
*NOTE: The manufacturer is not responsible for any damage
caused to people, objects or the machine itself that results
from improper use or failure to comply with the safety
guidelines described in this manual.
*Production is based on a medium-roasted coffee and an espresso grind.
MODEL SERIAL NUMBER
ELECTRICAL DATA DATE OF MANUFACTURE
OPTIONS
TEL. FAX:
Technical characteristics
4
K-3 Touch K-3 K-3 Elite
MODEL P in / P out P in / P out P in / P out
Burrs (in / mm) 2.3 / 58
Production (lb/h Kg/h)* 11-15 / 5-7
Hopper capacity (lb / gr) 1.76 / 800
Net weight (lb / kg) 12 / 5.5 14.3 / 6.5 19 / 8.5
Height x width x depth 19.5 x 6.5 x 12 in
(in / mm) 495 x 165 x 305 mm
110 v
60 hz
175w/80w
1640 rpm
175w/80w
1640 rpm
175w/80w
1640 rpm
250w/93w
1650 rpm
250w/93w
1650 rpm
250w/93w
1650 rpm
240w/93w
1340 rpm
240w/93w
1340 rpm
240w/93w
1340 rpm
250w/93w
1375 rpm
250w/93w
1375 rpm
250w/93w
1375 rpm
220 v
60 hz
230 v
50 hz
240 v
50 hz
Ground coffee capacity (lb / gr) 0.44 / 200
Lever position Right
---------
Hopper capacity
with mini hopper (lb / gr)
Total height with
mini hopper (in / mm)
0.6 / 27
16.5 / 420
---------
i
i

External components K-3 & K-3 Elite
55External components K-3 Touch
12
11
10 9
8
7
6
5
4
3
2
1Hopper lid
Coffee bean
hopper
Hand protector
Hopper
shutter Setting roller
Grind regulator
Dispenser lid
Dispenser
regulator
Ground
coffee dispenser
Dispenser
handle Tamper
Position
indicator
13 Support crutch
14
On-Off
Switch
15 Coffee
collection tray
9
8
7
6
5
4
3
2
1Hopper lid
Coffee bean
hopper
Hand protector
Hopper
shutter Setting roller
Grind regulator
Front push
lever
Support
crutch
Position
indicator
10
3-Position
Switch
11 Coffee
collection tray

6Installation
K-3 / K-3 Elite & 25.6 / 650 12.1 / 310 14.4 / 365
K-3 Touch With mini-hopper
22.6 / 575
6.1. General warnings
The installer should read this instruction manual carefully before
installing the machine.The machine must be installed by qualified,
authorized staff, respecting the applicable safety and hygiene
guidelines.
6.2. Important warnings
The operator must be a responsible adult and under no cir-
cumstances a minor or a person unable to deal with said respon-
sibility.
When handling the grinder, the following precautions must be
taken into consideration:
• Do not handle with bare feet
• Hands or feet must not be wet
• Do not submerge the machine in water
• Do not expose the machine to sunlight or other atmospheric
conditions
• Never insert any object into the coffee input or output
openings when the machine is turned on. (Please bear in mind
that when the grinder stops, the burrs continue to turn for a
few seconds.)
• To disconnect the grinder, always pull out the plug and never
the electrical cable, to avoid the possibility of a short circuit.
6.3. Putting the grinder into place
The grinder should be installed on a smooth flat surface. In order
Height (in / mm.) Width (in / mm.) Depth (in / mm.)
6.4. Installation of the coffee grinder
Before connecting the coffee grinder, check the following:
• That the data on the features label coincides with those of the
power supply.
to guarantee the optimum performance of the appliance, the
minimum dimensions of the work place should be as follows:
i
i
i
!
6.5in / 165mm
With normal hopper: 19.5in / 495mm
With mini-hopper: 16.5in / 420mm
12in / 305mm
6.5in / 165mm
With normal hopper: 19.5in / 495mm
With mini-hopper: 16.5in / 420mm
12in / 305mm

Connect the machine to the power supply, press the On-Off
switch (14 Elite -10 Touch position 2) and open the shutter (4)
to let the coffee through. Remove the dispenser lid (8) and turn
the grind regulator (6) to the required grind setting. By turning it
clockwise, the coffee grind will be coarser and turning it counter-
clockwise, the grind will be finer. Note that you should only change
grind settings when the machine is on and burrs are in motion.
If you do not do this, the burrs will gunk up and cleaning will be
required. Changing the grind settings when the burrs are not in
motion will cause the grinder to only make very coarse grinds or
no grinds at all. Fig. 3.
Remove the hopper lid (1), fill the hopper (2) with coffee and
replace hopper lid. Fig. 2.
7.1. Preparing the coffee grinder
Place the hopper (2) on the grind regulator (6) and check that the
shutter (4) is closed. Anchor the hopper by threading the setting
roller (5) by hand. Fig 1.
Fig. 1
7Regulation
*The coffee grinder should be used in areas with a room
temperature below 25/30ºC ( 77/86ºF ) and should not be
installed in places (SUCH AS INDUSTRIAL KITCHENS) where
cleaning with water jets is used.
• That the electrical current is appropriate for the machine.
• That the connection point to the power supply network is
protected with appropriate fuses.
• That the equipment is properly connected to a grounded so-
cket in accordance with the applicable safety guidelines.
i
Fig. 2
Coffee
beans
Open-
Closed
Anchored
Free
Coarse
Fine
Fig. 3

Fig. 5
More
Less
For security reasons the regulator is limited to a single turn.
In the Stepped models, the grinding positions are set by the place-
ment of the holes shown in the photo. Using these holes, select the
grind point you desire. Fig. 4.
NOTE: If a lot of coffee comes out slowly, this is because the
coffee is set to grind very fine. If a little comes out very fast, it
is because the grind is very thick.A perfect espresso is achieved
with a grinding point of 25 ml of coffee brewed in 25 seconds.
Less
Fig. 4
7.2. Regulating the coffee servings K-3 & K-3 Elite
The dispensers are factory adjusted to serve an amount of
approximately 7 gr of ground coffee, but this quantity can be
regulated between 6 and 10 gr, as follows: Remove the ground
coffee dispenser lid (8) and turn the dispensing regulation screw
(9) clockwise to obtain a smaller amount of coffee, and counter-
clockwise to obtain a larger amount. Once the quantity of each
serving has been regulated, replace the ground coffee dispenser
lid (8). Fig. 5.
i

8Operation
8.1. Using the K-3 & K-3 Elite
To turn the machine on and off, use the On-Off switch (14).The
machine will start to grind the coffee. If the automatic stop option
is incorporated, the grinder will stop grinding when the dispenser
reaches the maximum level, and will restart after 8 portions of
coffee have been served, grinding again to the maximum level. If
the machine does not incorporate the automatic stop option, we
recommend that you fill the doser 75% of its capacity in order to
guarantee consistent dosing.
To serve the coffee servings, place the portafilter on the support
crutch (13) as far in as possible so that it is positioned under the
ground coffee discharge tube. Pull the dispensing handle (11) to
obtain one coffee serving (one serving is equal to one cup of
coffee), and release it so it returns to its normal position. Fig. 7.
Take the portafilter and place it under the coffee tamper (12),
pressing upwards to pack the coffee. Fig. 8.
Fig. 7
7.3. Coffee regulation for the K-3 Touch
The K-3 Touch model grinding time is factory regulated to serve
portions of approximately 7 g.To change the grinding time, turn off
the machine using the 3-position switch (10).
Turn the plastic axle located on the underside of the machine. If
turned clockwise, the quantity of coffee will be increased and if
turned counter-clockwise, the amount will be reduced. Fig. 6.
Turn the 3-position switch to position 1. Check that the amount of
ground coffee is correct. If not, repeat the operation.
Fig. 6

8.2. Using the K-3 Touch
The K-3 Touch model has 2 operating positions:
Switch in position 1: Grinds individual coffee servings.
Switch in position 2: Grinds coffee continuously until the switch is
changed back to 0.
Fig. 10
In position 1, press the front push lever once with the portafilter
(8), rest it on the support crutch (9) and a single serving of freshly
ground coffee is obtained, and by pushing twice, the serving will
be double. Fig. 10.
9Cleaning
9.1. General cleaning
To guarantee the correct operation of the machine as well as the
quality of the ground coffee, we should periodically clean the parts
that come into contact with the coffee (at least once a week).
Before performing any type of maintenance work, the following
indications must be taken into consideration:
• Always turn off the machine using the On-Off switch (14 Elite
-10 Touch).
Fig. 9
When using the telescopic coffee press option, place the portafilter
on the crutch and push the coffee tamper downwards. Fig. 9.
Fig. 8

10
10.1. General warnings
Before performing any type of maintenance work, the following
indications should be taken into consideration:
• Always turn off the machine using the On-Off switch (14 Elite
-10 Touch).
• Disconnect the machine from the power supply.
In the event of a breakdown or malfunction, turn the machine off.
Do not try to repair it or intervene directly. Please call your local
technical service.
NOTE: Failure to respect this warning could endanger the
safety of both the machine and user.
10.2. Regular maintenance
To guarantee the efficiency and correct operation of the grinder,
it is essential to follow manufacturer instructions and ensure that
all maintenance work is carried out by qualified staff. Regular,
programmed inspections are recommended of the parts subject
to wear and tear. Systematically check the usage level of the burrs.
The perfect condition of the burrs guarantees an even grind of
the coffee and optimum quality of the product served. It also
reduces electrical consumption and the risk of the motor and
burrs overheating.
NOTE: Based on extensive experience and a medium-hard
coffee blend, we recommend replacing the burrs after grinding
300 Kg/660 Lb of coffee.
Maintenance
• Disconnect the machine from the power supply.
• Do not submerge the machine in water.
• We recommend the use of cleaning tablets to remove excess
grounds.
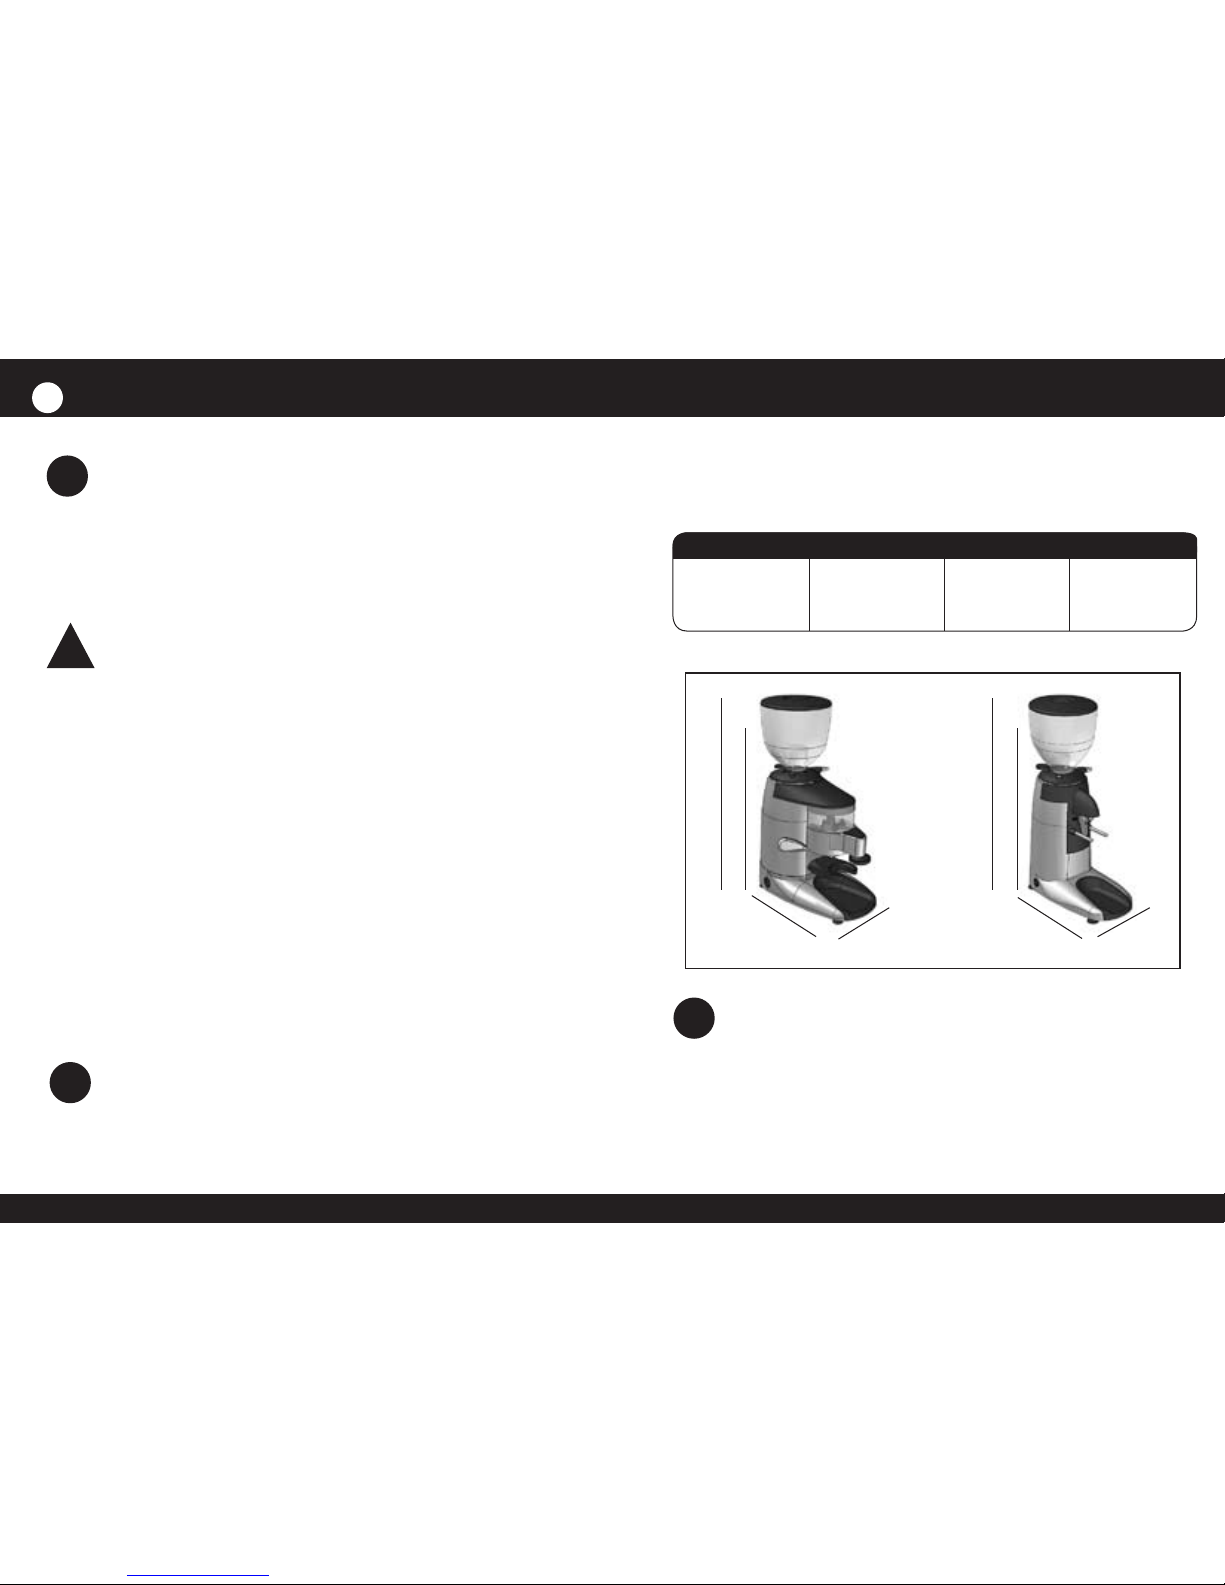
9.2. Cleaning of the coffee bean hopper
Before cleaning, make sure that there are no beans left in the
hopper (2).
Loosen by hand the setting roller (5) and remove the coffee bean
hopper (2) from the grind regulator (6) as in Fig.1 and clean it with
a damp cloth or soap and water to eliminate the oil residues from
the coffee, washing it carefully and then drying.
Put the hopper back on the grind regulator (6) and adjust the
setting roller (5) by hand.
9.3. Cleaning the ground coffee deposit
To clean the ground coffee holder, first empty all the coffee inside
it. Remove the ground coffee dispenser lid (8) and clean the inside,
using a small brush.
9.4. Exterior cleaning
To clean the exterior, use a brush or a cloth dampened with a little
bit of soap and water.
NOTE: Never use damp clothes to clean the coffee deposit.
Conserve the brush in a protected place and only use it to
clean the grinder to avoid it being contaminated from other
substances. Not following these instructions could affect the
taste and aroma of the coffee.
i

10.3. Grinding group maintenance
For grinding group maintenance, follow these instructions:
Turn off the machine using the On-Off switch (14 Elite – 10 Touch
position 0). Disconnect the machine from the power supply. Loos-
en the setting roller (5), as shown in Fig. 1, and remove the hopper
(2) from the grind regulator (6).
Release the position indicator cover (7) with a flat-head screw-
driver as shown in Fig. 11 and loosen the screw below it with a
Phillips screwdriver.
Turn the grind regulator (6) clockwise as in Fig. 12, until it lifts off.
Using a small brush or vacuum, clean the inside of the grinding
chamber. Check the condition of the burrs and change them, if
necessary. If not, put the regulator back in place, turning it counter-
clockwise until the burrs touch and replace the position indicator
screw and cover (7) as shown in Fig. 11 &12.
10.4.Accessing the burrs
Follow the instructions in 10.3. in order to remove the grind regu-
lator (6), removing the position indicator screw and cover (7) as
explained in Fig. 11. Once you have removed the grind regulator,
you will see that it is attached to the upper burr holder allowing
you to manipulate the upper and lower burrs as shown in Fig. 13.
After changing the burrs, assemble the upper burr holder by
threading it counter-clockwise, replace the grind regulator (6) and
follow the instructions as shown in Fig 11 & 12.
Fig. 13
Fig. 11
Unthreading
direction
Threading
direction
Fig. 12

Notes
NOTE: The manufacturer cannot accept responsibility for any
damage caused by improper use of the machine or failure to
respect the safety measures indicated below.
Users are asked to pay careful attention to the following
indications:
Additional safety elements incorpated into our grinder models:
• Hand protector located in the doser in order to avoid ngers
accidentally getting caught in the grinding burrs
• The coffee grinder should only be used for grinding coffee
beans.
• Do not use the machine to grind other types of foods such as
nuts, dried fruits or to fine-grind granulated foods such as sugar,
etc.
• Do not allow minors or disabled people to use the machine.
• Any other use of the machine will be considered improper and
dangerous.
• Do not allow liquids to come into contact with the internal or
external surfaces of the machine at any time, except for those
parts that have been expressly referred to in the “CLEANING”
section. If, for any reason, this should occur, immediately disconnect
the machine from the power supply and dry all surfaces carefully.
Should it be necessary to access the internal parts of the machine,
where the electrical components are located, take the machine to
your local technical service.
• In the event of any broken components or intervention, we
recommend that you contact your local technical service, who will
repair or replace the part, guaranteeing the maintenance of the
safety standards.
• Replacement of the main power cable of any grinder model
should only be done by an authorized supplier.
11 Safety measures
i
!
Other manuals for K3 Touch
1
This manual suits for next models
1
Table of contents
Other Compac Coffee Grinder manuals