Compac K3 Touch User manual

PROFESSIONAL GOURMET
K3 TOUCH
K3 PUSH
K3 TOUCH ADVANCED
coffee grinders
instructions manual

index
1. SAFETY MEASURES 1
2. DESCRIPTION 2
3. INSTRUCTIONS 3
4. IDENTIFICATION 3
5. TECHNICAL CHARACTERISTICS 4
6. EXTERNAL COMPONENTS 6
7. INSTALLATION 7
8. REGULATION 9
9. OPERATION 12
10. CLEANING 14
11. MAINTENANCE 16
12. EC CONFORMITY 19

K01070 | v. 22/09/2014 | Ref. quality process 002/03 | ORIGINAL INSTRUCTIONS 1
1. SAFETY MEASURES
NOTE: The manufacturer will not be held responsible for any damages resulting from
improper use of the equipment, or for not following the safety measures as outlined
below.
Safety measures incorporated into our grinders:
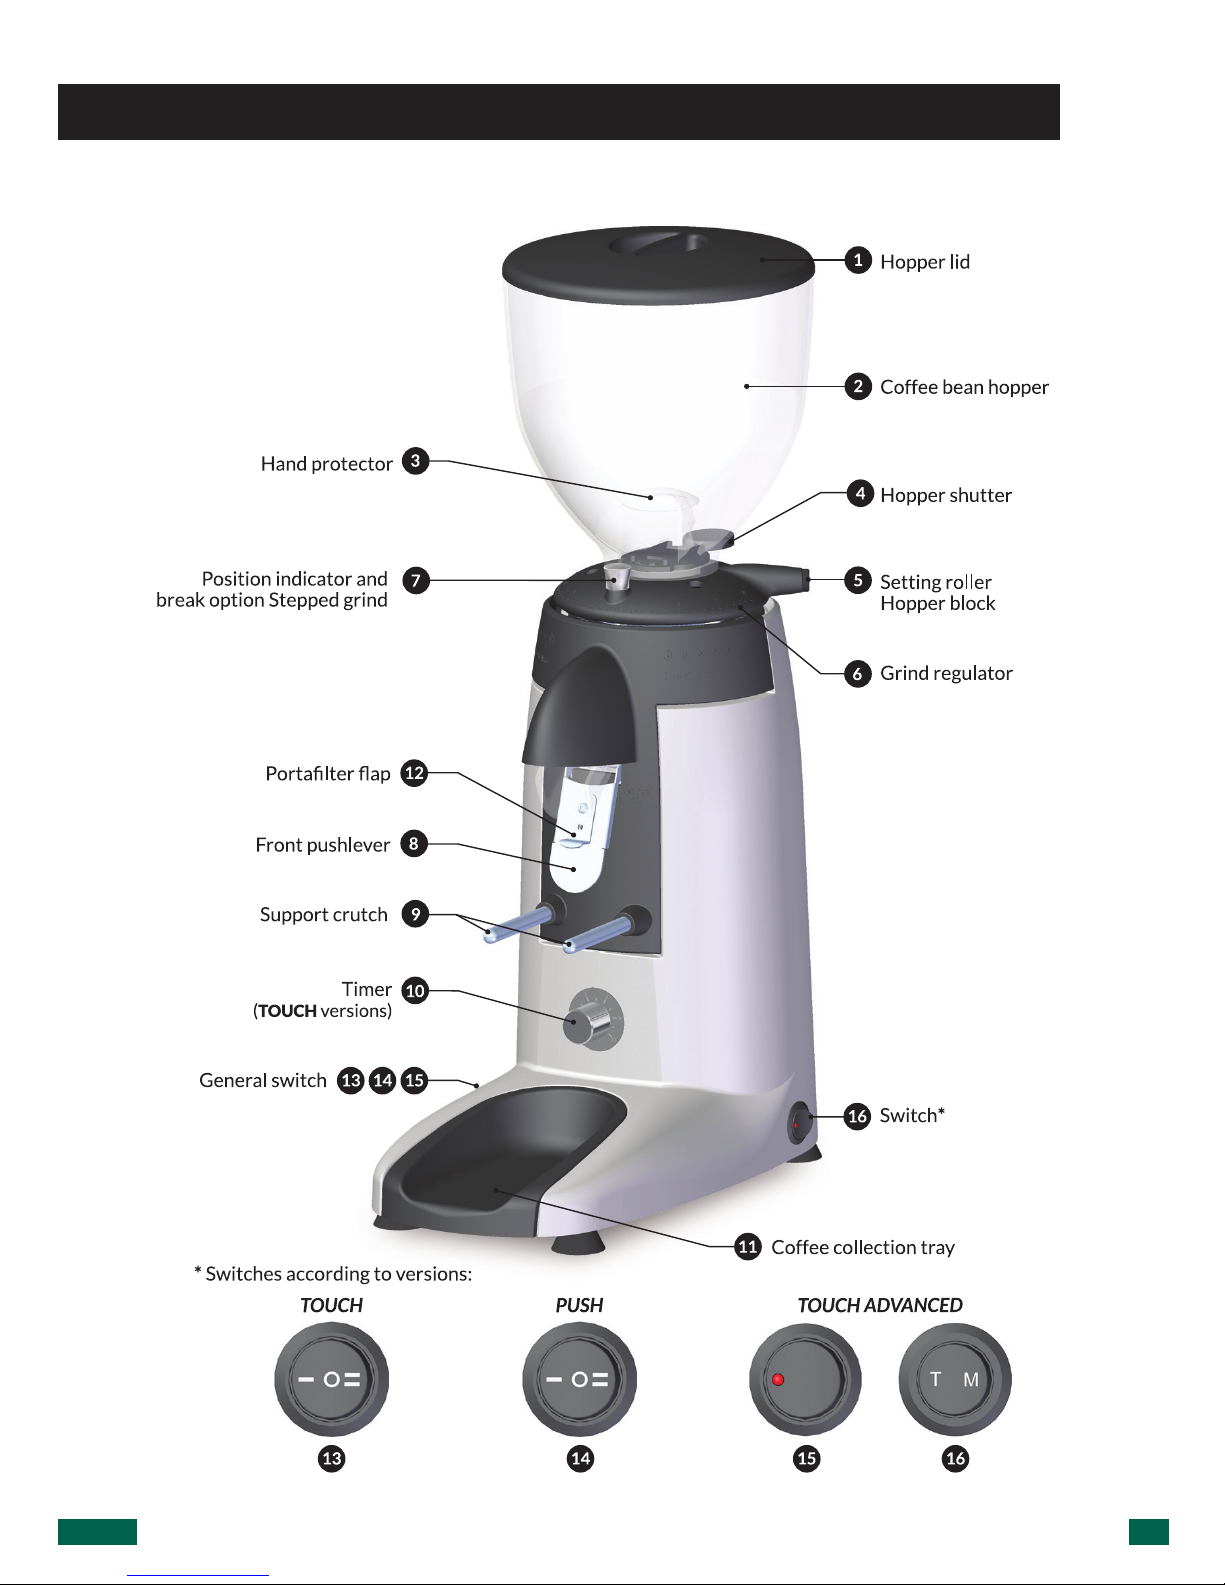
• Specialscrewtomaintainthehopperxedinplace.
• Accessrestrictorinthegrindgroup.
Owners: Please pay careful attention with the following instructions:
• The grinder should be used exclusively for the function for which it was
designed:grindingwholebeancoffee.
• Donotusethisgrindertogrindothertypesoffoodproductssuchasdryfruit,
sugarorspices.
• The grinder should not be used by children or individuals with physical, or
mentallimitationsthatcouldresultinriskofinjuryormisuse.
• Anyotheruseofthemachinewillbeconsideredimproperanddangerous.
• Donotputliquidsincontactwithinternalorexternalpartsofthisgrinderwhile
ON or OFF,withtheexceptionofpartsexpresslyoutlinedinthe“CLEANING”
section of this manual. If liquids do come in contact with the grinder,
immediatelydisconnectelectricalconnectionandcarefullycleantheaffected
areas.Ifitisnecessarytoaccesstheinteriorpartsofthegrinder,contactyour
localserviceprofessional.
• Incaseofanydamagetopartsorcomponents,werecommendcontactingyour
local service professional to help with repair or replacement of such parts,
therebyguaranteeingthemaintenanceofthesecuritystandardsofthegrinder.
• Only an authorized distributor should replace the main power cable of the
grinder.

ORIGINAL INSTRUCTIONS | Ref. quality process 002/03 | v. 22/09/2014 | K01070
2
SOUNDDECIBELLEVEL
The level of sound emitted in different models is:
Sounddecibellevel With coffee
K3 TOUCH
74,8 dBK3 PUSH
K3 TOUCH ADVANCED
2. DESCRIPTION
Your new grinder has been designed using the most sophisticated technologies in
existence. The result is a product of high quality that offers the assurance of the best
results possible. Our products are manufactured by hand, one by one, following
the strictest quality requirements. In the manufacturing process, we use only the
highest quality materials (aluminum, stainless steel, etc.) especially designated for
being in contact with food stuff.
For the optimum functionality of the grinder models described in this user manual,
the maximum work cycles are as follows:
Model
Workingcycle
Function Stop
K3 TOUCH
2 min. 10 min.K3 PUSH
K3 TOUCH ADVANCED

K01070 | v. 22/09/2014 | Ref. quality process 002/03 | ORIGINAL INSTRUCTIONS 3
3. INSTRUCTIONS
3.1. This manual is designed to provide the necessary information to correctly
install, use and maintain the grinder, as well as to highlight precautions for users to
keep in mind. To ensure the best operation of the coffee grinder, please follow the
instructions as outlined in this manual. This manual should be saved for the life of the
grinder, and should always be at the disposal of the operator.
3.2. This manual contains special terminology such as:
• Words in BOLD indicate important points or terminology.
• Numbers in parenthese after a word, indicate the location of this item in a parts
diagram.
Example: ( ) - Hopper lid
• Icons:
Information Atention
4. IDENTIFICATION
In the grinder information plaque is the following manufacturing/product information.
NOTE: Themanufacturerreservestherighttochangecomponents/congurationsof
any model, according to the different geographic market demands.

ORIGINAL INSTRUCTIONS | Ref. quality process 002/03 | v. 22/09/2014 | K01070
4
5. TECHNICAL CHARACTERISTICS
5.1.Usage
The coffee grinders are intended for use on commercial premises and facilities where
ground coffee is required, or in small stores that sell coffee. The grinder must only be
used to grind coffee beans. Any use other than this will be considered improper and
dangerous.
NOTE: The manufacturer will not be held responsible for any damages resulting from
improper use of the equipment, or for not following the safety measures as outlined
below.
5.2.Technicaldata
Model 100V
50Hz
100V
60Hz
110V
60Hz
220V
60Hz
230V
50Hz
240V
50Hz
K3 TOUCH,
K3 PUSH,
K3 TOUCH
ADVANCED
Electrical
power 200 200 230 210 210 225 (W)
Spin speed 1320 1620 1650 1640 1340 1345 rpm

K01070 | v. 22/09/2014 | Ref. quality process 002/03 | ORIGINAL INSTRUCTIONS 5
Model
K3 TOUCH
K3 PUSH
K3 TOUCH ADVANCED
ØBurrs 2.3
58
in
mm
Production50Hz* 8.16
3,71
lb/h
Kg/h
Production60Hz* 9.54
4,33
lb/h
Kg/h
Dosetime50Hz
(7gr)* 6.79 Seconds
Dosetime60Hz
(7gr)* 5.81 Seconds
Hoppercapacity 1.76
800
lb
gr
Hoppercapacity
with mini hopper
0.6
275
lb
gr
Net weight 13.7
6,1
lb
Kg
HeightxWidthxDepth 19.5 x 6.7 x 14.37
495 x 170 x 365
in
mm
HeightxWidthxDepth
(mini hopper)
16.5 x 6.7 x 14.37
420 x 170 x 365
in
mm
*Production is based on a medium-roasted coffee and an Espresso grind.

ORIGINAL INSTRUCTIONS | Ref. quality process 002/03 | v. 22/09/2014 | K01070
6
6. EXTERNAL COMPONENTS

K01070 | v. 22/09/2014 | Ref. quality process 002/03 | ORIGINAL INSTRUCTIONS 7
7. INSTALLATION
7.1.GeneralWarnings
The person installing the grinder should carefully read this instruction manual
before installation. The installation of this machine should be completed by
qualiedandauthorizedpersonnel,andallnormsofsafetyandsanitationshouldbe
followed.
7.2.ImportantWarnings
The operator of the grinder should be a responsible adult, and a never a minor
or person incapable of safely using such equipment. Whenusingthegrinder,
the following precautions should be followed:
• Nobarefeet.
• Nowethandsorfeet.
• Donotsubmergeinwater.
• Donotexposethegrindertosunorotheratmosphericconditions.
• Donotplaceanytypeofobjectinthecoffeeentranceorexitwhilethegrinder
isrunning.(Itshouldbekeptinmindthatthecuttingburrscontinueturningfor
acouplerevolutionsafterthegrinderispoweredoff).
• To disconnect the grinder, use the main power switch and never the power
cable,toavoidapossibleshortcircuit.

ORIGINAL INSTRUCTIONS | Ref. quality process 002/03 | v. 22/09/2014 | K01070
8
7.3.WheretoUse
The grinder should be installed on a at, stable surface. The minimum
dimensions of the work space should be as follows:
Model
K3 TOUCH, K3 PUSH,
K3 TOUCH ADVANCED
K3 TOUCH, K3 PUSH,
K3 TOUCH ADVANCED
(MINI HOPPER)
Height 20.27
515
17.31
440
in
mm
Width 7.28
185
7.28
185
in
mm
Depth 15.15
385
15.5
385
in
mm
7.4.GrinderInstallation
Before grinder installation, the following should be considered:
• The grinder information plaque data coincides with the electrical system on
site.
• Theelectricaloutletcoincideswiththegrinderplug.
• The electric power at the location of installation should meet the minimum
requiredtoproperlyrunthegrinder.
• Theinstallationsiteshouldhavetheproperelectricaloverloadprotections.
• Thegrindershouldbeproperlygroundedasspeciedbylocalcode.
NOTE: The grinder should be used in environments with mínimum temperature
of 77-86F and should not be installed in places (such as industrial kitchens) where
cleaning is done with direct water spray cleaning.

K01070 | v. 22/09/2014 | Ref. quality process 002/03 | ORIGINAL INSTRUCTIONS 9
8. REGULATION
8.1.Grindersetup
Place the hopper ( ) on the grind regulator ( ) and make sure the bean trap ( )
is in the closed position. Lock the hopper ( )inplaceusingaatheadscrewdriver
to gently tighten the hopper security screw making it match to the hole at the bean
hopper collar ( ) (Fig. 1).
Remove the hopper lid ( ),lltheHopperwithcoffee( ), and replace the lid on the
hopper ( ) (Fig. 2).
Plug in the grinder, and place the main power switch ( or ) to position Iand open
the bean trap ( ) to allow coffee to pass into the grind chamber. In the TOUCH
ADVANCED model, place the main power switch ( ) ON-OFF in position ON and
place the mode switch ( ) on mode MANUAL (M).
In the PUSH /TOUCH models, the power switch I-0-II is situated on the right side
and on the TOUCH ADVANCED the main power switch is situated on the right side
while the MODE switch is on the left hand side

ORIGINAL INSTRUCTIONS | Ref. quality process 002/03 | v. 22/09/2014 | K01070
10
8.2.Grindadjustmentsystem
8.2.1.Micrometricalsystem
Rotate the grind regulator ( ) until reaching the grind level desired.
Rotating the grind regulator clockwise will result in a courser grind; turning the
regulatorcounterclockwisewillresultinanergrinder*(Fig. 3).
*Itisrecommendedthatthemotorberunningwhenadjustingtonergrindsetting.
This helps to avoid jamming the burrs, which can occur when coffee beans are in the
grindchamber,andthegrindregulatorisadjustedtowardsne.
8.2.2.SteppedGrindadjustment(optional)
In the stepped adjustment versions, the positions on the grind regulator are limited
by“steps”thataredenedbytheholeandpinpoints(Fig. 4).
The instructions detailed in section 8.2.1. on adjusting the regulator should be
followed, while at the same time, pulling the brake post ( ) (Fig. 4) up to release the
locking action of the post.

K01070 | v. 22/09/2014 | Ref. quality process 002/03 | ORIGINAL INSTRUCTIONS 11
NOTE: If the output is very slow, it could mean that the coffee is being ground too
ne.Iftheoutputisveryfast,itcouldmeanthatthecoffeeisbeinggroundtoo
coarse. A perfect espresso grind is found when the grind point gives an infusion of
25 ml of coffee in 25 seconds using 7 grams of ground coffee.
8.2.3.Parallelmicrometricalsystem(optional)
Rotate the grind regulator ( ) until reaching the grind level desired.
Rotating the grind regulator clockwise will result in a courser grind; turning the
regulatorcounterclockwisewillresultinanergrinder*(Fig. 4).
Onceyoureachthedesiredgrindingpoint,youcanxthegrindingregulation( )
using the regulation break ( ) (Fig. 5).
*Itisrecommendedthatthemotorberunningwhenadjustingtonergrindsetting.
This helps to avoid jamming the burrs, which can occur when coffee beans are in the
grindchamber,andthegrindregulatorisadjustedtowardsne.

ORIGINAL INSTRUCTIONS | Ref. quality process 002/03 | v. 22/09/2014 | K01070
12
8.3.AdjustingthedoseofK3 TOUCH /K3 TOUCH ADVANCED
On the K3 TOUCH / K3 TOUCH ADVANCED models, the grind time is pre-set at the
factory to grind 7 grams of coffee in 6-7 seconds.
To adjust the grind time, simply turn the timer knob ( ) found on the front of the
grinder (Fig. 5 and 6). Turning clockwise will increase the grind time, and turning the
knob counter-clockwise decrease the grind time. The numbers on the dial correspond
with motor run time in seconds.
8.4.Adjustingtheportalterholderclip
Itispossibletolowerorraisetheportalterholderclip( ) using the Allen Key
2,whichwillaccommodatethevastmajorityofportaltersfoundonthemarket
(Fig. 7).
9. OPERATION
9.1.UsingtheK3 PUSH
The main power switch on the K3 PUSH ( ) has 3 positions, I - 0 - II (Fig. 8).
IContinuous grind.
0Off.
II Push Mode which will grind while the front activation panel ( ) is pushed
inwiththeportalter.

K01070 | v. 22/09/2014 | Ref. quality process 002/03 | ORIGINAL INSTRUCTIONS 13
9.2.UsingtheK3 TOUCH
The main power switch on the K3 TOUCH ( ) has 3 positions, I - 0 - II (Fig. 8).
IContinuous grind.
0Off.
II Time grind.
Giving one gentle tap to the front activation panel ( ) will deliver one freshly ground
timed dose of coffee ( ). A double tap will deliver a freshly ground dose that is double
the pre-set grind time (Fig. 11).Usingtheportaltersupport( ), it is possible to run
the timed grind cycle hands free.
9.3.UsingtheK3 TOUCH ADVANCED
The main power switch ( ) has 2 positions, ON - OFF (Fig. 9).
ON
OFF
The K3 TOUCH ADVANCED a 2 position power button (Fig. 10):

ORIGINAL INSTRUCTIONS | Ref. quality process 002/03 | v. 22/09/2014 | K01070
14
SwitchonMANUAL-PUSH:
The machine will grind while the front activation panel ( ) is pushed in.
SwitchonAUTOMATIC-TOUCH:
Timed grind using the timer on the front of the grinder (see section 8.3.).
Giving one gentle tap to the front activation panel ( ) will deliver one freshly ground
timed dose of coffee ( ). A double tap will deliver a freshly ground dose that is double
the pre-set grind time (Fig. 11).Usingtheportaltersupport( ), it is possible to run
the timed grind cycle hands free.
1 tap: 1 dose
2 taps: 2 doses
10. CLEANING
10.1.Generalcleaning
To ensure that the grinder functions properly, and produces the highest quality grind
possible, the parts that come into contact with coffee should cleaned periodically.
General Cleaning guidelines as follows:
• Always turn the main power switch to the off position ( , and ).
• Unplug the machine from the power source.
• Do not submerge the grinder in water or use power washing devises.

K01070 | v. 22/09/2014 | Ref. quality process 002/03 | ORIGINAL INSTRUCTIONS 15
10.2.Beanhoppercleaning
In order to properly clean the bean hopper ( ),rstemptyoutallremainingbeans
and fragments.
Toremovethehopper,rstclosethebeantrap( ), and then loosen the hopper lock
screw ( ) and lift the hopper straight up.
Clean the hopper ( ) with a moist soft cloth or with a small amount of water and
soap to eliminate any oily residue from the beans.
Replace the bean hopper ( ) following the same steps as the removal process, but
in reverse.
10.3.Cleaningthegrindchamber
It is recommended that the grind chamber be cleaned monthly with a cleaner as
recommended by Compak. This process will eliminate smelly residues from the
coffee remains, which can negatively affect the quality of the brewed coffee.
The steps to follow are:
In order to properly clean the bean hopper ( ),rstemptyoutallremainingbeans
and fragments.
• Close the bean trap on the hopper ( ) and grind out the remaining coffee in the
grind chamber.
• Remove any remaining coffee beans from the bean hopper ( ).
• Pour the recommended grinder cleaning product into the bean hopper ( ) and
open the bean trap ( ), allowing the cleaning product to pass into the grind
chamber.
• Grindthecleaningproductatamediumcoursegrindsettinguntiltherecommended
amount is passed through the system and nothing remains in the grind chamber.
• Clean the hopper ( )andrellwithcoffeebeans.
• Discardtherst2-3dosesofcoffeetoassurethattheresidualcleaningproduct
is removed from the grind chamber and set the grind regulator to the desired
setting ( ).
Following these steps will ensure that the grinder is clean and ready for use.
We do not recommend the taking apart of the grind assembly unless changing burrs,
or removing a blockage/obstruction in the grind chamber. Removal of the grind
assemblyshouldbeperformedbyaqualiedservicetechnician.

ORIGINAL INSTRUCTIONS | Ref. quality process 002/03 | v. 22/09/2014 | K01070
16
10.4.Cleaningtheoutsideofthegrinder
Tocleantheexteriorofthegrinder,rstwipewithadrysoftcloth,andthengently
wipe with a damp soapy cloth.
11. MAINTENANCE
11.1.Generalwarning
Before performing any type of maintenance you should:
• Always turn OFF the main power switch to the off position ( , and ).
• If the grinder is jammed, unplug it from the power source and contact an
authorizedservicetechnician.
Not following these warnings can compromise the safety of the grinder as well as
the user.
11.2.Generalmaintenanceofthegrindchamber
To guarantee the efciency and correct operation of the grinder, it is essential to
follow manufacturer instructions and ensure that all maintenance work is carried
outbyqualiedstaff.
Dull burrs will result in; a lower quality grind, greater heat generation in the coffee
andgrinder,increasedelectricalconsumption,andnallyitputsadditionalstresson
the grinder motor.
NOTE: Based on extensive experience and a medium-hard coffee blend, we
recommend replacing the burrs after grinding 350 Kg/770 lb of coffee.
Burrchange
K3 TOUCH, K3 PUSH, K3 TOUCH ADVANCED 350 Kg

K01070 | v. 22/09/2014 | Ref. quality process 002/03 | ORIGINAL INSTRUCTIONS 17
11.3.Grindinggroupmaintenance
Not following the recommended burr life guidelines can compromise the safety of
the grinder.
Theseoperationsshouldbedonebyaqualiedservicetecnician.
To perform grind chamber maintenance please observe the following steps:
Turn off the grinder by making sure the main power switch ( , and )is on
the OFF position. Disconnect the plug from the power source. Loosen the hopper
security screw ( ) using a flat head screw driver as seen in Fig.1 and remove
the hopper ( ) from the grind regulator ( ). Loosen the screws on the grind
regulator ( ) using an Allen key A3 series following Fig.12.
Rotate the grind regulator clockwise until it is completely unscrewed. Clean the
grind chamber and threads of the housing using a soft cloth and vacuum cleaner until
all of the oils and residue has been removed.
Make sure to put new food grade lubricant on the clean threading of the housing and
upper assembly. Insert the upper burr assembly into the grind chamber, and turn
counter clockwise.

ORIGINAL INSTRUCTIONS | Ref. quality process 002/03 | v. 22/09/2014 | K01070
18
Position the regulator collar ( ) leaving about 45º between the grind point lock
screw ( ) and regulator limit stop (Fig. 15). In that position, tighten the regulator
() on the upper burr carrier and with an Allen key A3 series.
For the models with the micrometric Parallelsystem,rstmakesurethatthegrind
point lock screw ( ) is lined up with the locking foot. This will ensure that the lock
screw ( ) and locking foot move in conjunction with one another, and that the
locking mechanism works properly.
This process should be performed with extreme caution, making sure that there
are no coffee particles or debris in the housing threading. Also the placement of the
upper burr assembly should be done with caution, making sure it is perfectly level
and screwed in patiently. Failure to clean, lubricate or properly place the upper burr
assembly prior to screwing in, can result in blockage or locking of grind adjustment
system.
Other manuals for K3 Touch
1
This manual suits for next models
2
Table of contents
Other Compac Coffee Grinder manuals