manuals.online logo
Brands
  1. Home
  2. •
  3. Brands
  4. •
  5. COMPX
  6. •
  7. Lock
  8. •
  9. COMPX Pearl KEYPAD User manual

COMPX Pearl KEYPAD User manual

Pearl – installation instructions
Electronic push button cabinet lock
Pearl — Installation instructions: KEYPAD version
1
KEYPAD version
Powered by 2-AAAA batteries (included),
Pearl operates using a 4 to 8 digit code.
Operation is simple: type a valid code
and press (enter). Then just turn the
knob to the unlocked or locked position.
Pearl is easy to install, and offers:
wProgrammable user
and supervisor codes
wProgrammable modes of operation
wProgrammable reset features
Pearl is intended for interior use only.
Operating Temperature: 50°F – 120°F
(10°C – 48°C)
Note:
It is strongly recommended that
batteries be replaced on an annual
basis. In the event the batteries are
exhausted, they can be replaced via
the external battery compartment.
Thank you for purchasing the CompX®Pearl™
.The Pearl is an innovative solution
for locking cabinet doors and drawers. It can mount to cabinet doors or drawers
with a material thickness of 1/32" to 1-7/16".
Pearl – installation instructions
Electronic push button cabinet lock
Pearl — Installation instructions: KEYPAD version
2
KEYPAD version
Contents – Manual Lock Version:
2 AAAA alkaline batteries
1 Offset locking cam / 1 Straight
locking cam
FlexaCam adapters
Collar – Intended for surface
mount applications
Mounting hardware
Each lock is shipped with two green
stickers that are needed for resetting
Pearl. Place one of these green stickers
on the back of the device, in case Pearl
ever needs to be reset. The remaining
green sticker should be saved in a safe
and secure location for future reference.
(See page 9 for reset instructions.)
To clean the Pearl surface, apply non-
acid based cleaner to a clean cotton
cloth; do not spray cleaner directly on
the Pearl. Wipe down keypad and its
respective housing surfaces of excess
cleaner.
Packaged Components
Care and Cleaning
FlexaCam adaptors (if so equipped) can
be attached to the cam to provide up
to 12 different dimensional variations.
See image to the left.
FlexaCam Adaptors
FlexaCam
adaptor
The Pearl
serial number
can be found
by sliding the
housing base.
Pearl – installation instructions
Electronic push button cabinet lock
Pearl — Installation instructions: KEYPAD version 3
KEYPAD version
Pearl is shipped with two AAAA batteries.
While Pearl features a low battery
indicator, annual battery replacement
is recommended. Mixing batteries
of different chemistries or age could
damage the Pearl resulting in lock failure.
To power up Pearl, remove the red tag.
Lock is now ready for use.
Pearl batteries can be changed when
locked or unlocked. A small tool, like a
paper clip or eyeglass screwdriver, will
be required to open the battery cover.
(Not Included)
To change batteries:
1. Slide down housing base, see figure 1.
2. Release housing flip up by pressing
housing latch, tool required, see
figure 2 & 3.
3. Remove the two AAAA batteries and
install the new batteries.
4. Close housing flip up and move
housing base to the closed position,
see figure 3.
Figure 1 Figure 3Figure 2
Housing Latch
Batteries must be installed correctly for lock
to function. Make note of correct battery
installation before removing the old batteries.
Powering Up and Battery Installation
Pearl – installation instructions
Electronic push button cabinet lock
Pearl — Installation instructions: KEYPAD version
4
KEYPAD version
Pearl is easy to program and operate.
Type the user code (factory default
1234) and press (enter) to unlock
or lock the cabinet.
The supervisor can change operating
codes, modes and restore lock
settings.While Pearl is easy to program,
we highly recommend reading the
complete programming instructions
prior to making any changes. Remember
to keep track of any programming
changes.
Button locations, indicator lights and
knob referenced in the programming
instructions are shown below.
Programming – Introduction
Indicator Lights
Green:
Indicates button
input and valid
code
Yellow:
Indicates low
battery or
program mode
Red:
Indicates
incorrect entry is the enter button
and is used to
complete code and
begin programming
Knob is always
rotated clockwise
to unlock and
counter clockwise
to lock
(clear) button and
erases any key input
made in error
Pearl – installation instructions
Electronic push button cabinet lock
Pearl — Installation instructions: KEYPAD version 5
KEYPAD version
Follow the directions below to unlock
and lock the Pearl.
To operate the Pearl:
To unlock, type a valid code,
press (enter) and rotate
knob clockwise 90°.
To lock, rotate knob 90°
counter clockwise.
To enter programming mode you
must know the supervisor code. The
default supervisor code is 12345.
Once in programming mode, multiple
changes can be made prior to exiting
programming.
There is a 10 second programming time
limit between each step. If Pearl times
out or an error is made, programming
will end and you will need to enter
programming mode again.
1. Lock must be in the locked position
prior to entering programming mode.
2. Type supervisor code and press
(enter)
.
Rotate the knob to the unlocked
position and press and hold
(enter)
for 3seconds (yellow
indicator light will illuminate).
3. With the yellow indicator light
illuminated, programming can begin.
Programming – Introduction continued
Pearl Programming Mode
Pearl – installation instructions
Electronic push button cabinet lock
Pearl — Installation instructions: KEYPAD version
6
KEYPAD version
To change the user code, follow the
steps on page 5to enter programming
mode.
The factory default user code is 1234
(User codes must be 4 to 8 digits in
length.)
There is a 10 second programming time
limit between each step. If Pearl times
out or an error is made, programming
will end and you will need to enter
programming mode again.
1. Place Pearl into programming
mode (see page 5).
2. Press 1and then press (enter).
3. Type the current user code and
press
(enter)
.
4. Type the new user code and
press
(enter)
.
5. Retype the new user code and
press
(enter)
.
6. If successful, the green indicator
light will illuminate for 1 second.
Continue programming or press 9and
then
(enter)
to exit programming.
To change the supervisor code,
follow the steps on page 5to enter
programming mode.
The factory default supervisor code is
12345 (supervisor codes must be 4 to
8 digits in length.)
There is a 10 second programming time
limit between each step. If Pearl times
out or an error is made, programming
will end and you will need to enter
programming mode again.
1. Place Pearl into programming
mode (see page 5).
2. Press2andthen press (enter).
3. Type the current supervisor code
and press
(enter)
.
4. Type the new supervisor code
and press
(enter)
.
5. Retype the new supervisor code
and press
(enter)
.
6. If successful, the green indicator
light will illuminate for 1second.
Continue programming or press 9and
then
(enter)
to exit programming.
Pearl features a reset code which will restore
the default supervisor code and user code.
Pearl was shipped with reset stickers – one
should be attached to the back of the Pearl, and
the extra sticker should be saved in a safe and
secure location for future reference.
To restore the factory default supervisor and
user code, type the Reset Code assigned to the
Pearl and press (enter).
Changing the User Code
Changing the Supervisor Code
Pearl – installation instructions
Electronic push button cabinet lock
Pearl — Installation instructions: KEYPAD version 7
KEYPAD version
Single Use Mode allows for a revolving
user code so multiple people may use
the lock without having to reprogram
the Pearl each time.
Standard Mode operates with a fixed
code. To change the code, follow the
Changing the User Code steps on
page 5.
To change the Pearl to Single Use or
Standard Mode, follow the steps on
page 5 to enter programming mode.
There is a 10 second programming time
limit between each step. If Pearl times
out or an error is made, programming
will end and you will need to enter
programming mode again.
1. Place Pearl into programming
mode (see page 5).
a. To turn Single Use Mode
“ON”: type 51 and then
press
(enter)
.
OR
b. To return to Standard
Mode: type 50 and
then press
(enter)
.
2. If successful, the green indicator
light will illuminate for 1 second.
Note: Returning to Standard Mode
will reset the factory user default
code (1234).
Continue programming or press 9and
then
(enter)
to exit programming.
CompX Pearl features several modes of operation. These functions can be
changed using the following instructions with a valid supervisor code.
Programming Single Use Mode / Standard Mode
Pearl – installation instructions
Electronic push button cabinet lock
Pearl — Installation instructions: KEYPAD version
8
KEYPAD version
Warning: Manual Lock - Single Use
Timeout ON is a feature to prevent
users from occupying a shared use
locker or cabinet for a prolonged
period of time. Turning this feature
on will disable the user code after a
programmable amount of time. After
this time elapses, Pearl can only be
opened with the supervisor code.
To change the Pearl to Single Use
Timeout ON or OFF, follow the steps on
page 5 to enter programming mode.
There is a 10 second programming time
limit between each step. If Pearl times
out or an error is made, programming
will end and you will need to enter
programming mode again.
1. Place Pearl into programming
mode (see page 5).
a. To set Timeout ON, type
2XX and then press
(enter)
.
(XX represents a time
period from 04 to 48 in
whole hours.)
OR
b. To turn Timeout OFF, type
20 and then press
(enter)
.
3. If successful, the green indicator
light will illuminate for 1 second.
Continue programming or press 9and
then
(enter)
to exit programming.
Warning: Security Timeout ON will
disable the Pearl from use for 5 minutes
when 5 invalid attempts to unlock Pearl
occur. During this time, Pearl will not
unlock with either the valid user or
supervisor code.
To change the Pearl to Security Timeout
ON or OFF, follow the steps on page 5
to enter programming mode.
There is a 10 second programming time
limit between each step. If Pearl times
out or error is made, programming
will end and you will need to enter
programming mode again.
1. Place Pearl into programming
mode see page 5).
a. To turn Security Timeout
ON, type 11 and then
press
(enter)
.
OR
b. To turn Security Timeout
OFF, type 10 and then
press
(enter)
.
2. If successful, the green indicator
light will illuminate for 1 second.
Continue programming or press 9and
then
(enter)
to exit programming.
Programming Single Use Timeout ON / Single Use Timeout OFF
Programming Security Timeout ON / Security Timeout OFF
Pearl – installation instructions
Electronic push button cabinet lock
Pearl — Installation instructions: KEYPAD version 9
KEYPAD version
To reset the User Code to the factory
default 1234 follow the steps on page
5 to enter programming mode.
There is a 10 second programming time
limit between each step. If Pearl times
out or error is made, programming
will end and you will need to enter
programming mode again.
1. Place Pearl into programming
mode (see page 5).
2. Type 8888 and then press the
(enter)
button.
3. If successful, the green indicator
light will illuminate for 1 second.
Continue programming or press 9and
then
(enter)
to exit programming.
The Supervisor Code memory location
is called Slot 01 and the first User
Code is called Slot 02.
Any additional User Codes reside in
memory slots 03-20.
To add a user code without specifying a
memory slot (03 -20), follow the steps
on page 5 to enter programming mode.
User codes must be 4 to 8 digits in
length and must be different from
all existing codes (including Slot 01
Supervisor & Slot 02 User codes).
There is a 10 second programming time
limit between each step. If Pearl times
out or an error is made, programming
will end and you will need to enter
programming mode again.
1. Place Pearl into programming
mode (see page 5).
2. Press 410 and then press
(enter)
.
3. Type the new user code and
press
(enter)
4. Retype the new user code and
press
(enter)
.
5. If successful, the yellow indicator
light will illuminate.
Continue programming or press 9and
then
(enter)
to exit programming.
Reset User Code to Factory Default 1234 (Does not apply to Single Use Mode)
Add User Without Specifying Memory Slot
Pearl – installation instructions
Electronic push button cabinet lock
Pearl — Installation instructions: KEYPAD version
10
KEYPAD version
The Supervisor code memory location
is called Slot 01 and the first User
code is called Slot 02.
Any additional user codes reside in
memory slots 03-20.
To add a user code to a specific
memory slot (03 -20), follow the steps
on page 5 to enter programming mode.
User codes must be 4 to 8 digits in
length and must be different from
all existing codes (including Slot 01
Supervisor & Slot 02 User codes).
There is a 10 second programming time
limit between each step. If Pearl times
out or an error is made, programming
will end and you will need to enter
programming mode again.
1. Place Pearl into programming
mode (see page 5).
2. Press 411, then press (enter).
3. Type memory slot to be added
followed by (enter) (for memory
slots 03 - 09, you must type leading
“0” – e.g. “07” for slot 7)
4. Retype memory slot to be added
followed by
(enter)
5. Type the new user code and
press
(enter)
.
6. Retype the new user code and
press
(enter)
.
7. If successful, the yellow indicator
light will illuminate.
Continue programming or press 9and
then
(enter)
to exit programming.
The Supervisor code memory location
is called Slot 01 and the first User
code is called Slot 02.
The additional user codes reside in
memory slots 03-20.
To delete a user code without specifying
a memory slot (03 -20), follow the steps
on page 5 to enter programming mode.
There is a 10 second programming time
limit between each step. If Pearl times
out or an error is made, programming
will end and you will need to enter
programming mode again.
1. Place Pearl into programming
mode (see page 5).
2. Press 400 and then press
(enter)
.
3. Type the user code to be deleted
and press
(enter)
.
4. Retype the user code to be
deleted and press
(enter)
.
5. If successful, the yellow indicator
light will illuminate.
Continue programming or press 9and
then
(enter)
to exit programming.
Add User to Specific Memory Slot (03 – 20)
Delete User Without Specifying Memory Slot
Pearl – installation instructions
Electronic push button cabinet lock
Pearl — Installation instructions: KEYPAD version 11
KEYPAD version
The Supervisor code memory location
is called Slot 01 and the first User
code is called Slot 02.
The additional user codes reside in
memory slots 03-20.
To delete a user code from a specific
memory slot (03 -20), follow the steps
on page 5 to enter programming mode.
There is a 10 second programming time
limit between each step. If Pearl times
out or an error is made, programming
will end and you will need to enter
programming mode again.
1. Place Pearl into programming
mode (see page 5).
2. Press 401,then press (enter).
3. Type memory slot to be vacated
followed by (enter) (for memory
slots 03 - 09, you must type leading
“0” – e.g. “07” for slot 7)
4. Retype memory slot to be
vacated followed by
(enter)
.
5. If successful, the yellow indicator
light will illuminate.
Continue programming or press 9and
then
(enter)
to exit programming.
This feature shows the number of
times the lock has been operated. The
number of operations are displayed in
yellow light blinks and separated by a
green blink to determine the next value.
Example; yellow, yellow, yellow, green,
yellow, yellow, green, yellow, green,
yellow, green would equal 3211 lock
operations.
There is a 10 second programming time
limit between each step. If Pearl times
out or an error is made, programming
will end and you will need to enter
programming mode again
4. Place Pearl into programming
mode (see page 5).
a. To display number of lock
operations Type 60 and
then press
(enter)
.
OR
b. To reset to zero type
61 and then press
(enter)
.
Continue programming or press 9and
then
(enter)
to exit programming.
Delete User From Specific Memory Slot (03 – 20)
Display Number of Lock Operation
Pearl – installation instructions
Electronic push button cabinet lock
Pearl — Installation instructions: KEYPAD version
12
KEYPAD version
This template is for surface mounting.
For flush mounting, please see Pearl
mounting sheet online at:
http://compx.com/downloads
Template for Surface Mounting
WARNING: Print this
page and measure the line
above. It is ONE INCH
LONG. If it measures less
than or more than one inch,
the template measurements
also need to be scaled
accordingly.
FAILURE TO DO SO
COULD RESULT IN
MISDRILLED HOLES.
1"
Part #: 334363000000
Copyright 2021 © CompX Security Products / 847.752.2600 / compxpearl.com / 715 Center St.,Grayslake,IL 60030
Any companies and/or products referred to herein are marks or registered trademarks of their respective companies, owners and/or mark holders.

Other COMPX Lock manuals

COMPX CB084-184 User manual

COMPX

COMPX CB084-184 User manual

COMPX Timberline CB-284 User manual

COMPX

COMPX Timberline CB-284 User manual

COMPX MFW 23118 Guide

COMPX

COMPX MFW 23118 Guide

COMPX Timberline CB-235 User manual

COMPX

COMPX Timberline CB-235 User manual

COMPX C8142 Guide

COMPX

COMPX C8142 Guide

COMPX Stock Locks C8054 Guide

COMPX

COMPX Stock Locks C8054 Guide

COMPX Stock Locks C1702 Guide

COMPX

COMPX Stock Locks C1702 Guide

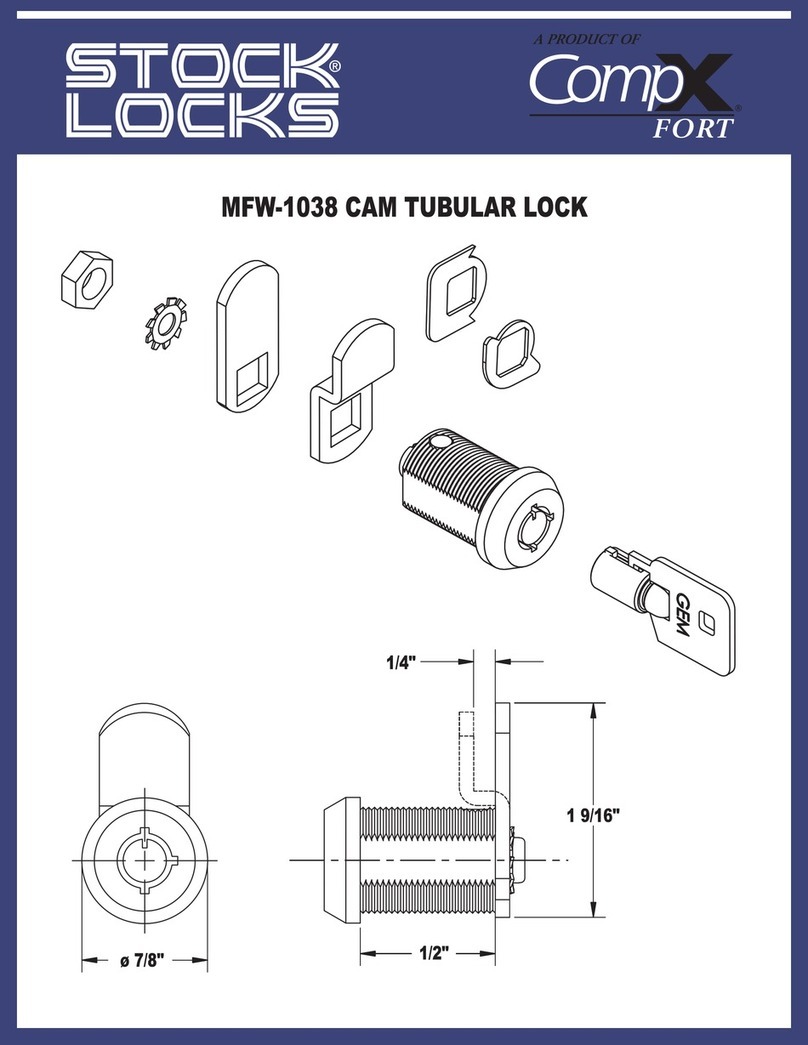
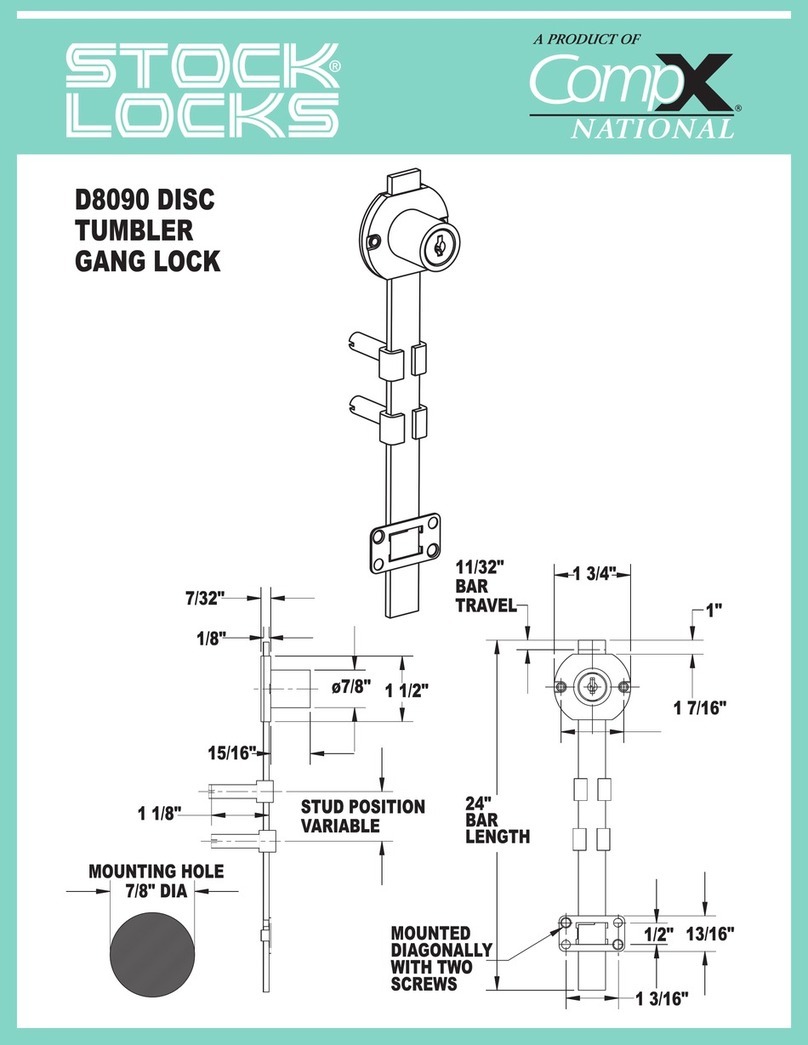
COMPX National D8090 User manual

COMPX

COMPX National D8090 User manual

COMPX Stock Locks C5170 Guide

COMPX

COMPX Stock Locks C5170 Guide

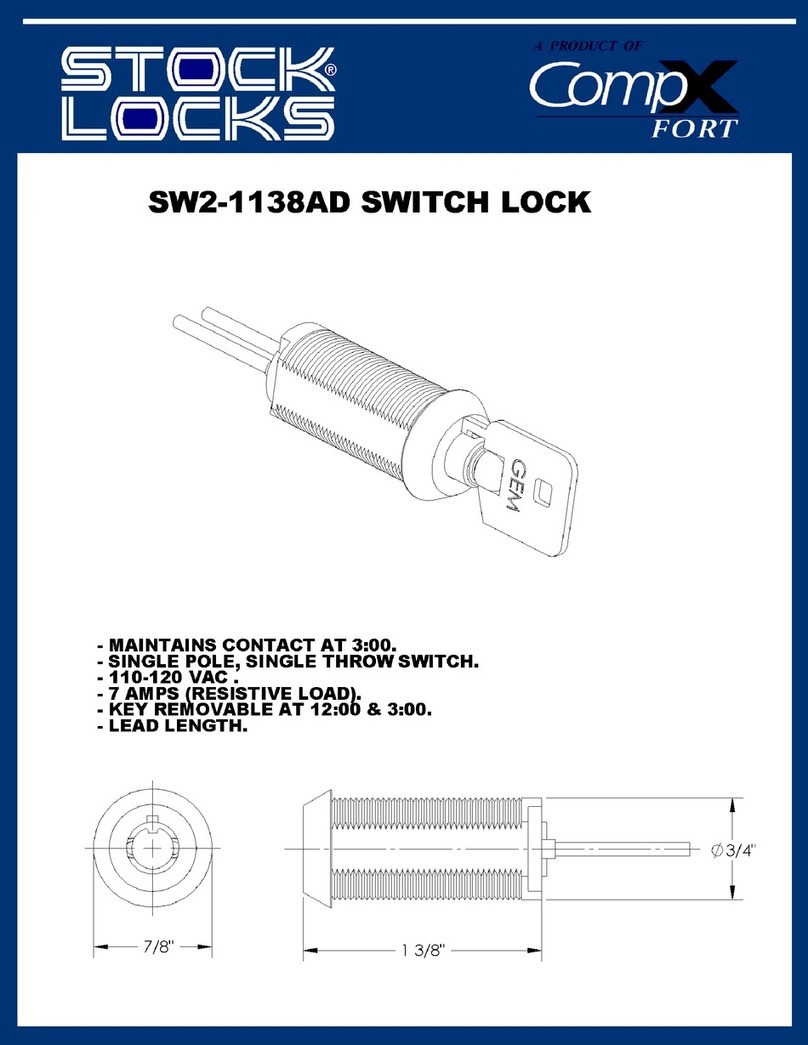
COMPX MFSW3-1138 User manual

COMPX

COMPX MFSW3-1138 User manual

COMPX MFW 29138 Guide

COMPX

COMPX MFW 29138 Guide

COMPX OU-4200-NA Guide

COMPX

COMPX OU-4200-NA Guide

COMPX TYPE370 Guide

COMPX

COMPX TYPE370 Guide

COMPX C8384 Guide

COMPX

COMPX C8384 Guide

COMPX TS1058BD Guide

COMPX

COMPX TS1058BD Guide

COMPX National CB-250 User manual

COMPX

COMPX National CB-250 User manual

COMPX RC-4842 Guide

COMPX

COMPX RC-4842 Guide

COMPX Stock Locks C2174-1DC-KD Guide

COMPX

COMPX Stock Locks C2174-1DC-KD Guide

COMPX T8871 Guide

COMPX

COMPX T8871 Guide

COMPX TL-37 Guide

COMPX

COMPX TL-37 Guide

COMPX C8207 Guide

COMPX

COMPX C8207 Guide

COMPX Stock Locks C2174-2DC-KD Guide

COMPX

COMPX Stock Locks C2174-2DC-KD Guide

COMPX T-HANDLE User manual

COMPX

COMPX T-HANDLE User manual

COMPX Timberline CB-265 User manual

COMPX

COMPX Timberline CB-265 User manual

Popular Lock manuals by other brands

AboLife M15 Operation guide

AboLife

AboLife M15 Operation guide

Griffon GRIFFON manual

Griffon

Griffon GRIFFON manual

Metro DataVac Flexline FL420 user guide

Metro DataVac

Metro DataVac Flexline FL420 user guide

Waferlock C210 user manual

Waferlock

Waferlock C210 user manual

Hama Cable Lock Operating	 instruction

Hama

Hama Cable Lock Operating instruction

Sargent ASSA ABLOY PR100 installation instructions

Sargent

Sargent ASSA ABLOY PR100 installation instructions

BUILDONE BO-DP8100VSK user manual

BUILDONE

BUILDONE BO-DP8100VSK user manual

iLoq G50S.2x1 Installation, Operating and Care Instructions

iLoq

iLoq G50S.2x1 Installation, Operating and Care Instructions

Roger RWL-2 operating manual

Roger

Roger RWL-2 operating manual

Guldmann 557600 manual

Guldmann

Guldmann 557600 manual

Assa Abloy Securitron CEPT-10-10 installation instructions

Assa Abloy

Assa Abloy Securitron CEPT-10-10 installation instructions

Burg Wächter RS 110 C SB Assembly and user manuals

Burg Wächter

Burg Wächter RS 110 C SB Assembly and user manuals

Safelock Systems MiniTech instructions

Safelock Systems

Safelock Systems MiniTech instructions

FREAKELECS DH-S1 user guide

FREAKELECS

FREAKELECS DH-S1 user guide

CDVI V1SR installation manual

CDVI

CDVI V1SR installation manual

iKAMPER Mounting Bracket Lock Installation

iKAMPER

iKAMPER Mounting Bracket Lock Installation

Dormakaba GL10 operating instructions

Dormakaba

Dormakaba GL10 operating instructions

Unicor UN-6500 Series user manual

Unicor

Unicor UN-6500 Series user manual

manuals.online logo
manuals.online logoBrands
  • About & Mission
  • Contact us
  • Privacy Policy
  • Terms and Conditions

Copyright 2025 Manuals.Online. All Rights Reserved.