Condair Cube User manual

2603017-0 EN 2110
OPERATION MANUAL
Air Quality Measuring Device
Condair Cube

Proprietary Notice
This document and the information disclosed herein are proprietary data of Condair Group
AG. Neither this document, nor the information contained herein shall be reproduced, used,
or disclosed to others without the written authorisation of Condair Group AG, except to the
extent required for installation or maintenance of recipient's equipment.
Liability Notice
Condair Group AG does not accept any liability due to incorrect installation or operation of
the equipment or due to the use of parts/components/equipment that are not authorised
by Condair Group AG.
Copyright Notice
© Condair Group AG, All rights reserved.

Contents
1 Introduction 4
1.1 Thank you for purchasing your Condair Cube 4
1.2 Notes on the operation manual 4
2 For your safety 5
3 Quickstart 6
4 Product overview 7
4.1 Components 7
4.2 Main screen view 8
4.3 Application overviews 10
4.3.1 View health chart 10
4.3.2 View historical readings 11
4.3.3 Settings 11
5 Calibration 12
5.1 Manual Calibration 12
5.2 Auto calibration 14
6 Time and date setting 15
7 Options 17
7.1 SD card 17
7.2 Power bank 17
7.3 Display on large screen 17
8 Scope of delivery 18
9 Disposal/Recycling 19
10 Productspecication 20
10.1 Technical data Sensirion SCD40 20
10.1.1 CO2Sensing Performance 20
10.1.2 Humidity Sensing Performance 20
10.1.3 Temperature Sensing Performance 20
11 Appendix 21
11.1 CE declaration of conformity 21

4For your safetyIntroduction
1 Introduction
1.1 Thank you for purchasing your Condair Cube
The Condair Cube uses a sensor to detect COhumidity and temperature
in the ambient environment and is primarily intended for indoor use.
The Condair Cube incorporates the latest technical advances and meets all rec-
ognized safety standards. Nevertheless, improper use of the Condair Cube may
result in danger to the user or third parties. Further, Condair shall not be liable for
any incorrect readings and any damage resulting therefrom.
To ensure a safe, proper, and economical operation of the Condair Cube please
observe and comply with all information contained in the present documentation
as well as in the separate documentations of the components installed in the
Condair Cube.
If you have questions after reading this documentation, please contact your Condair
representative. They will be glad to assist you.
1.2 Notes on the operation manual
Limitation
The subject of this operation manual is the Condair Cube. The various op-
tions and accessories are only described as necessary for proper operation of the
equipment.
This operation manual is restricted to the operation of the Condair Cube and is
meant for users of this device.
Please note that some illustrations in this manual may include options and acces-
sories that may not be standard or available in your country. Please check with
Safekeeping
Please keep this operation manual in a safe place, where it can be immediately
accessed. If the equipment changes hands, the documentation must be passed
on to the new owner
If the documentation gets misplaced, please contact your Condair representative.
Language versions
This operation manual is available in various languages. Please contact your
Condair representative for information.

5For your safety
2 For your safety
General
Every person operating the Condair Cube must have read and understood these
instructions before use.
Knowledge of the contents of this manual for the Condair Cube is a basic require-
ment for protecting against any kind of danger, to prevent faulty installations, and
to operate the Condair Cube safely and correctly.
All symbols, signs and markings applied to the components of the Condair Cube
must be observed and kept in readable state.
Intended use
The Condair Cube is intended exclusively for indoor use. Any other type of ap-
plication is considered as not conforming with the intended purpose and may lead
to deviating results being displayed by the Condair Cube. Any warranty claim will
be voided if the device is not used for its intended purpose. Intended use also
includes observing all the information contained in this manual.
Prohibitedmodicationstotheunit
Nomodicationsmustbeundertaken on the Condair Cube without the express
written consent of the manufacturer.
For the replacement of defective components only use original accessories and
spare parts available from your Condair representative.
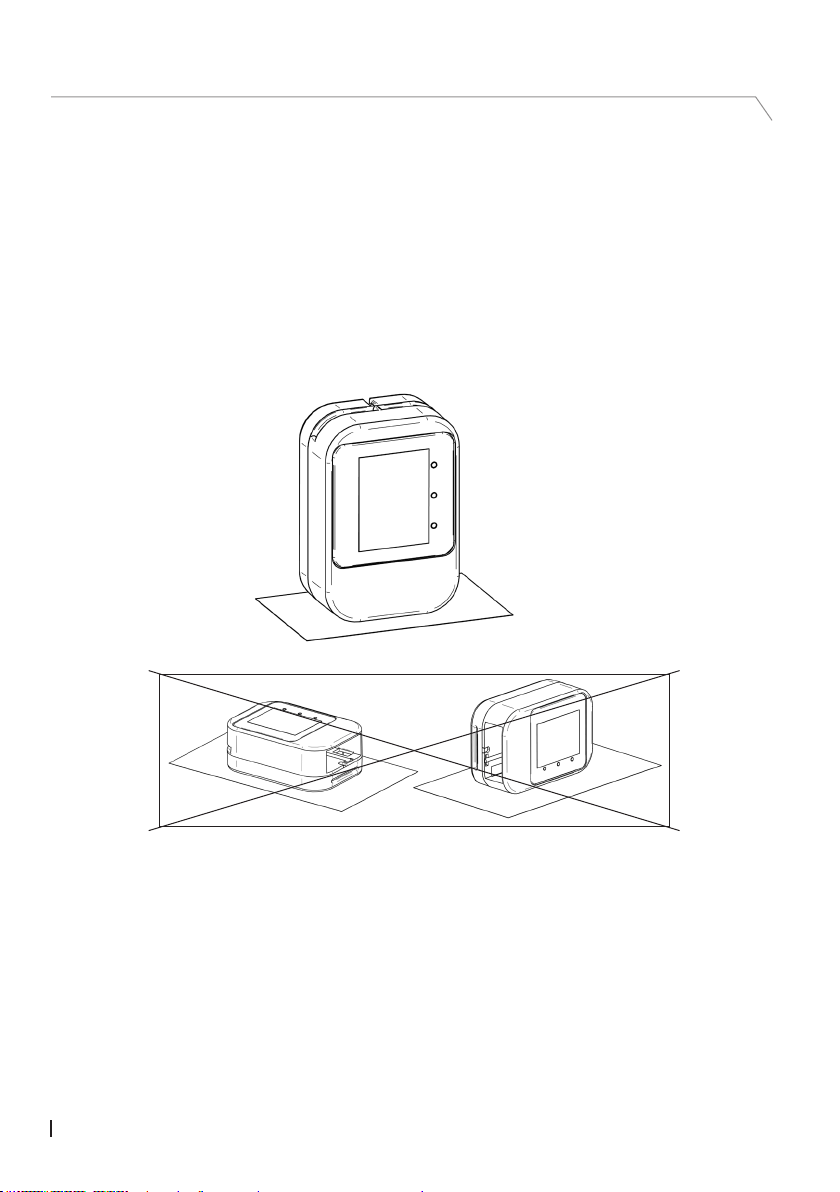
6Product overviewQuickstart
3 Quickstart
1. Switch on the Condair Cube: To do this, press the power button inside
the cavity on the lower, left side of the cube (see product overview).
Note:
When the Condair Cube is plugged in via the USB cable, it switches on
2. Place the Condair Cube upright in the room where you want to check
that the sensor on the back of the Cube is reached by the room air and
the excess heat can escape through the ventilation slots.
3. Once the Condair Cube is in place, it requires an adjustment time of ap-
prox. 20 minutes until all values are displayed correctly. In particular, the
the sensor is not yet at operating temperature.
4.
calibrated. This procedure is described in chapter 5.
7Product overview
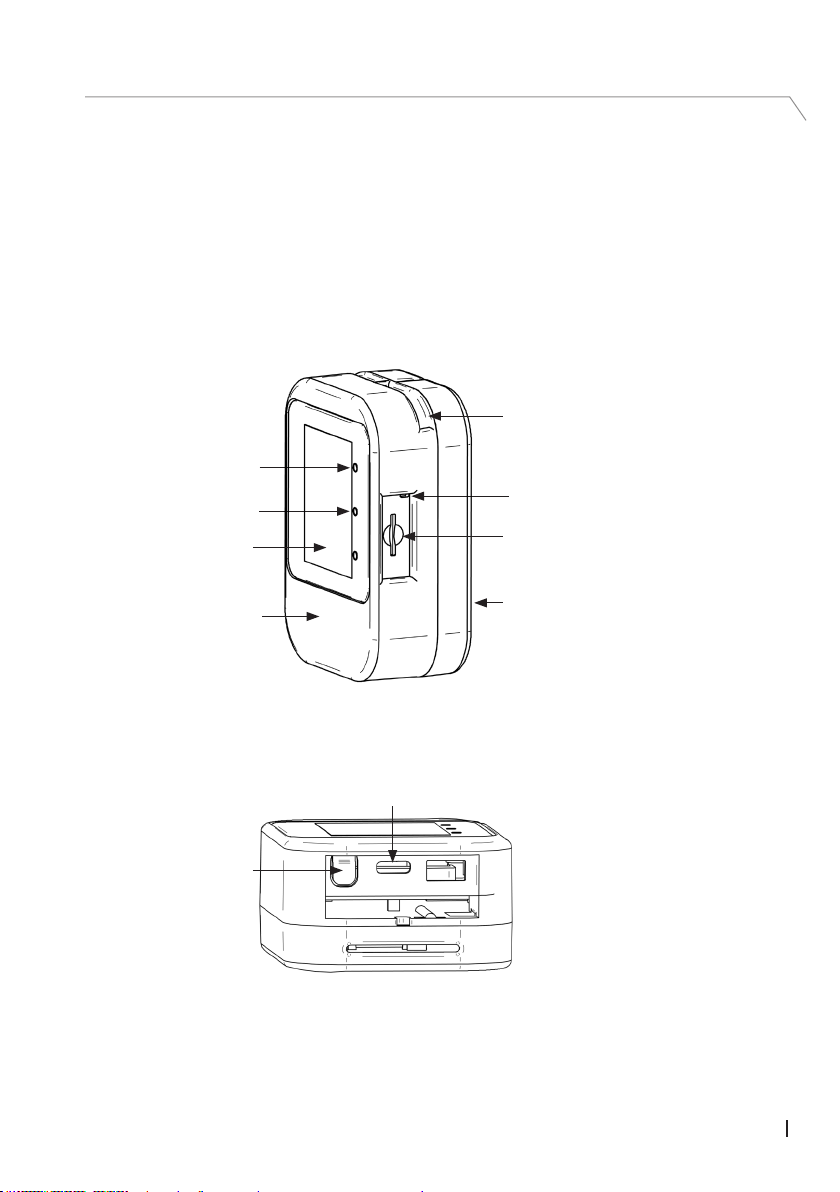
4 Product overview
4.1 Components
– 1 housing from 2 parts
– Display with rechargeable battery (M5core2)
– Sensor (Sensirion SCD40)
– USB charging cable
– Optional Micro SD card (not included in delivery)
Button1
Button 2
LED (green)
Ventilation slots
Slot for Micro SD card
Sensor
Housing
Display
Power button
USB charging cable port

8Product overviewProduct overview
4.2 Main screen view
ppm
%RH °C
CO
2
10:15
21.08.2021 85%
ppm
%RH °C
28 21
1092
CO
2
CO2value
Time
Date
Battery status
Menu
Humidity value Temperature value
Time/Date: Shows the current time and date.
Battery status: Shows the current state of charge of the battery. The display
ranges from 0-100 %.
CO2value: Displays the current CO2content in the air. The value is
given in ppm (parts per million).
Temperature value: Displays the current temperature value in °C (Celsius).
Humidity value: Displays the current relative humidity of the ambient air.
Indication in %RH.
Menu bar: Via the menu bar you can access the various submenus.
– Health chart
– Settings
– Graphical view of the temporal courses of CO2,
humidity and temperature
Button 1: Turn on screen and increase brightness
Button 2:
LED: When the display is darkened via button 2, the LED lights
up green as an operating indicator.
9Product overview
4.2.1 Traclightdisplayofthemeasuredvalues
The circles around the values show the current state of the value in the manner
Green – Healthy (Everything in the optimal range)
Yellow –
Red – Critical (Critical readings)
CO2
CO2content of the ambient air is optimal.
CO2content in the ambient air is increased. Ventilation recom-
CO2content in the ambient air is critical. Ventilation necessary.
(value is > 1200 ppm)
Relative humidity
Relative humidity of the ambient air is at an optimum.
Relative humidity of the ambient air is rather low or rather high.
Relative humidity of the ambient air is too low or too high.
Temperature
Comfortable ambient temperature.
(value is between )
Ambient temperature is rather low or high.
(value is )
The comfortable temperature range is undershot or overshot.
(value is )
Note:
Please note that the sensor requires an adjustment time of up to 20 minutes after
reading is displayed correctly.

10 Product overviewProduct overview
4.3 Application overviews
4.3.1 View health chart
18°C
22°C
26°C
20%
40%
60%
80%
ppm
CO2
800
1200
10:15
21.08.2021 85%
CO2display in bar format
Currently measured value
Range "healthy"
Range "acceptable"
Temperature
Air humidity
The range "healthy" represents the air quality, which provides increased health
protection and is perceived as pleasant.
The ranges "healthy, "acceptable" and "critical" are distinguished.
The aim is that the current measured value (red point) of the room air is in the inner
green diamond and thus in the "healthy" range.
In the upper area of the view, the currently measured COcontent of the room air
is displayed in a bar view. If the current measured value is outside the green range,
the room should be ventilated to reduce the COcontent in the room.
Note:
If the currently measured value is displayed as a gray dot at the edge of the diagram,
it indicates that the measured value is outside the displayed range.
Other manuals for Cube
1
Table of contents
Other Condair Measuring Instrument manuals


