Connect Plantronics User manual

Plantronics Wireless Headset Installation Guide
F o r S e r v i c e C a l l : ( 8 0 0 ) 5 9 5 - 8 8 8 2 / E m a i l : d i s p a t c h @ o k t e l e p h o n e . c o m
Page 1
Take the AC Power Supply adapter and plug one end into your wall outlet or power strip. The
other end will plug into the back of the headset base, as shown in the following picture. Place
the headset into the base. You will feel a snug pull when the two magnets pull ensuring a
perfect fit. The charging LED will flash green when charging and turn solid green when fully
charged. They will vary in time, fully charge prior to set up. After that, put on charger when
not using. Battery will beep when it is getting low.
If not using a
handset lifter
toggle this switch
to the right so
that headset
turns on
automatically
when taken out
of base
Basic Set Up:
Flashing Green = Charging
Solid Green = Fully Charged
Locate the Telephone Interface Cable. It will have plastic modular plugs on each end
and a black connector in the middle of the cable. Take the larger modular plug and
insert it into the base that shows a picture of a telephone.
Plug the Telephone Interface Cable into the headset port (usually located on the bottom
of the phone)
You will have to program a headset Key on your phone using this option. To program a headset
button, without lifting the handset, press SPEAKER, Enter 751, Touch the key you are going to
program, enter 05, press SPEAKER. A headset key is not required when using a handset lifter.

Plantronics Wireless Headset Installation Guide
F o r S e r v i c e C a l l : ( 8 0 0 ) 5 9 5 - 8 8 8 2 / E m a i l : d i s p a t c h @ o k t e l e p h o n e . c o m
Page 2
Can adjust how high the Handset Lifter lifts handset
when answering calls by using the 3-position
adjuster on the back of the lifter, typically the lowest
position works best
Set up with A Handset Lifter:
Locate the Telephone Interface Cable. It will
have plastic modular plugs on each end and
a black connector in the middle of the
cable. Take the larger modular plug and
insert it into the base that shows a picture of
a telephone. Unplug handset curly cord from
the phone and plug the small modular
adapter of the Telephone Interface Cable into
the port where you just removed the curly
cord.
Plug your telephone handset cord into
the middle of the Telephone Interface
Cable (black box).
Plug the HL10 cable into the back of the
headset base. Attach your HL10 Handset
Lifter to your phone using the 3 included
adhesive strips. The lifter should be
mounted as close to the handset earpiece
as possible
To make a call, push the button on the earpiece of the wireless headset. You will hear a dial
tone. When finished, you can push the button on the side of the wireless headset to hang-up. The
lifter listens to the noise from the speaker of your phone and transmits a beep in your ear when
hears your phone ringing. When you have an incoming call, you will hear beeps in your ear
indicating a call. If the ringing volume on your phone is too low, the lifter will not transmit the beeps.
If you choose to take the call, push the button on the wireless headset to answer the call and press
again when finished to hang-up the call. If you need to put the call on hold, or transfer the call, walk
back to your phone and press the desired buttons.

Plantronics Wireless Headset Installation Guide
F o r S e r v i c e C a l l : ( 8 0 0 ) 5 9 5 - 8 8 8 2 / E m a i l : d i s p a t c h @ o k t e l e p h o n e . c o m
Page 3
Set up with an EHS Cable:
Plug the Electronic Hookswitch (EHS)
cable with the large modular clip and
stereo plug into the back of the
headset base.
Plug the other end of the Electronic
Hookswitch Cable (EHS) into your
telephone's Headset Interface Port.
NOTE: A technician will need to
program your phone so that the
EHS cable will function

Plantronics Wireless Headset Installation Guide
F o r S e r v i c e C a l l : ( 8 0 0 ) 5 9 5 - 8 8 8 2 / E m a i l : d i s p a t c h @ o k t e l e p h o n e . c o m
Page 4
Wireless Headset Function:
If you not using the optional lifter and have toggled the right hand switch on the back of the
base to the right, you headset should turn on automatically when taken out of the charger.
The Call Control Button is how you answer and hang up from calls when using the HL10
Handset Lifter or EHS Cable to answer/hang-up calls remotely while away from your
desk. When the headset is in use, the LED indicator light will flash white.
The second button (or rocker switch) is located at the back of the headset and controls your
speaker volume. When pushed up, it raises your speaker volume, and pushed down
decreases the volume. You have 3 levels, so continue pressing for increased or decreased
volume levels. The second button (or rocker switch) also acts as your microphone mute
button when pushed in. You will hear three high tone beeps indicating the microphone is
muted and the LED light on the base will turn solid red. Pushing the button in again will
deactivate the mute feature allowing your caller to hear you again.

Plantronics Wireless Headset Installation Guide
F o r S e r v i c e C a l l : ( 8 0 0 ) 5 9 5 - 8 8 8 2 / E m a i l : d i s p a t c h @ o k t e l e p h o n e . c o m
Page 5
(What you hear)
(What your callers hear)
Understanding Wireless Headset Base:
The Speaker Volume dial (settings 1-4) is the major adjustment for what you hear. If you
need to adjust it, turn the dial until you feel the dial slide into the next numbered
position. Once you find a comfortable setting, remember from Step 4, you also have a fine
tune speaker adjustment on the headset which allows you to make small volume
adjustments from call to call. As you know each call you take is different so having a
volume control on the headset and on your phone lets you easily adjust as needed.
The Microphone Volume dial (settings 1-6) is what controls your microphone volume, or
how well your caller hears you. Make sure to call a friend or co-worker for your first call
and ask how you sound. Once you set this, your voice rarely changes, so you'll usually set
this during installation and never touch it again.
NOTE: If you hear an echo or feedback with your headset, it may be caused by your Microphone
Volume being set slightly louder than it needs to be. You will always hear a little of your voice
come through your headset speaker, which is called side tone. If you have too much side tone
causing echo, turn down your Microphone Volume enough so your caller still hears you
comfortably, but enough so the side tone is not distracting to you.
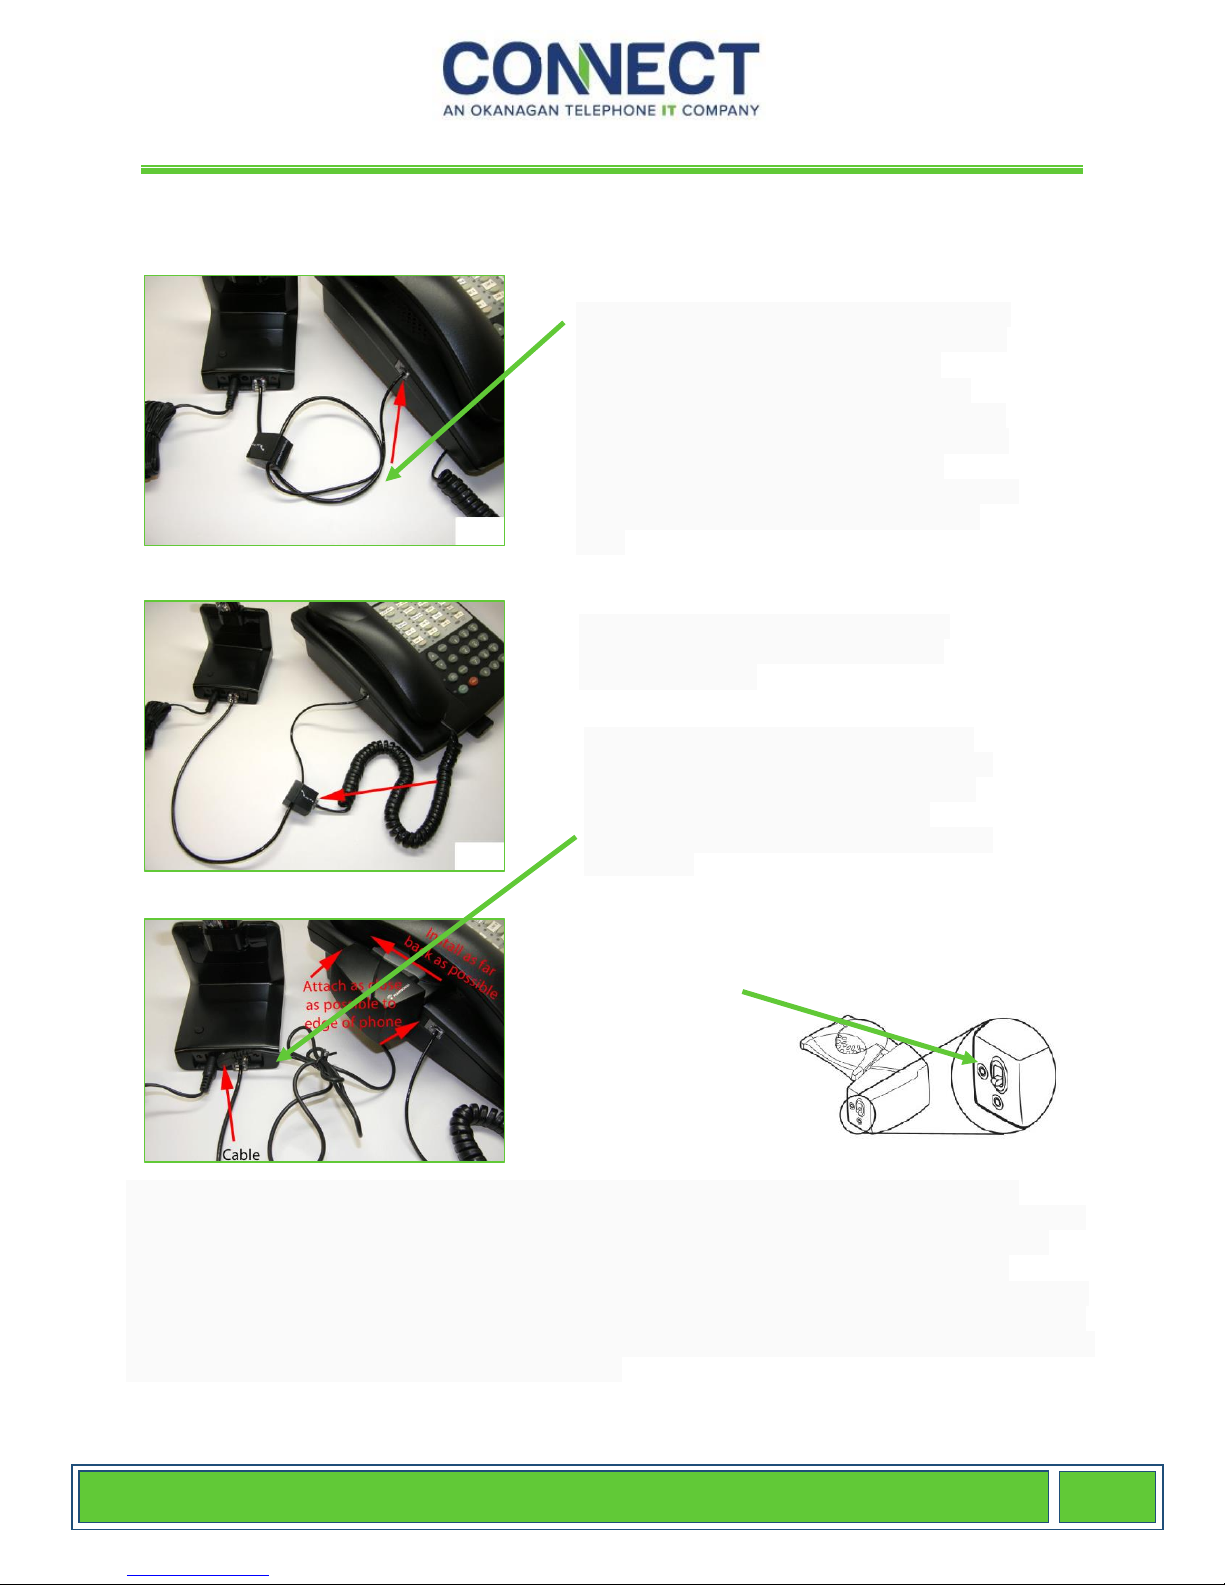
The Compatibility Slide Switch (settings A-G) is the true "Brains" of the Plantronics
CS540. This adjustment is what configures the CS540 to work with hundreds, if not
thousands of telephones currently on the market. Setting "A" is the default setting that
works with most telephones. If you find you can't hear you caller, your caller can't hear
you, or it sounds distorted, continue sliding to the next letter until you find the setting that
sounds the best. Once set, you will not need to adjust the Compatibility Slide Switch
again, unless you change phones.
Table of contents