ConnectGear WA300 User manual

11Mbps Wireless Access Point
(Color of this AP may vary with regions)
User’s Manual
Version 1.0
February 19, 2002

11Mbps Wireless Access Point User's Manual
FCC Warning
This equipment has been tested and found to comply with the limits for a Class B digital
device, pursuant to part 15 of the FCC Rules. These limits are designed to provide
reasonable protection against harmful interference in a residential installation. This
equipment generates, uses and can radiate radio frequency energy and, if not installed and
used in accordance with the instructions, may cause harmful interference to radio
communications. However, there is no guarantee that interference will not occur in a
particular installation. If this equipment does cause harmful interference to radio or
television reception, which can be determined by turning the equipment off and on, the user
is encouraged to try to correct the interference by one or more of the following measures:
Reorient or relocate the receiving antenna.
Increase the separation between the equipment and receiver.
Connect the equipment into an outlet on a circuit different from that to which the receiver
is connected.
Consult the dealer or an experienced radio/TV technician for help.
You are cautioned that changes or modifications not expressly approved by the party
responsible for compliance could void your authority to operate the equipment.
FCC Radiation Exposure Statement
This equipment complies with FCC radiation exposure limits set forth for an uncontrolled
environment and should be installed and operated with minimum distance 20cm between
the radiator & your body.
FCC ID: O6M-WA300
CE Marking Warning
This is a Class B product. In a domestic environment this product may cause radio
interference in which case the user may be required to take adequate measures.
2

11Mbps Wireless Access Point User's Manual
Table of Contents
1. INTRODUCTION....................................................................................................... 5
THE WIRELESS ACCESS POINT FEATURES..................................................................................................... 5
PACKAGE CONTENTS....................................................................................................................................... 6
2.HARDWARE INSTALLATION....................................................................... 7
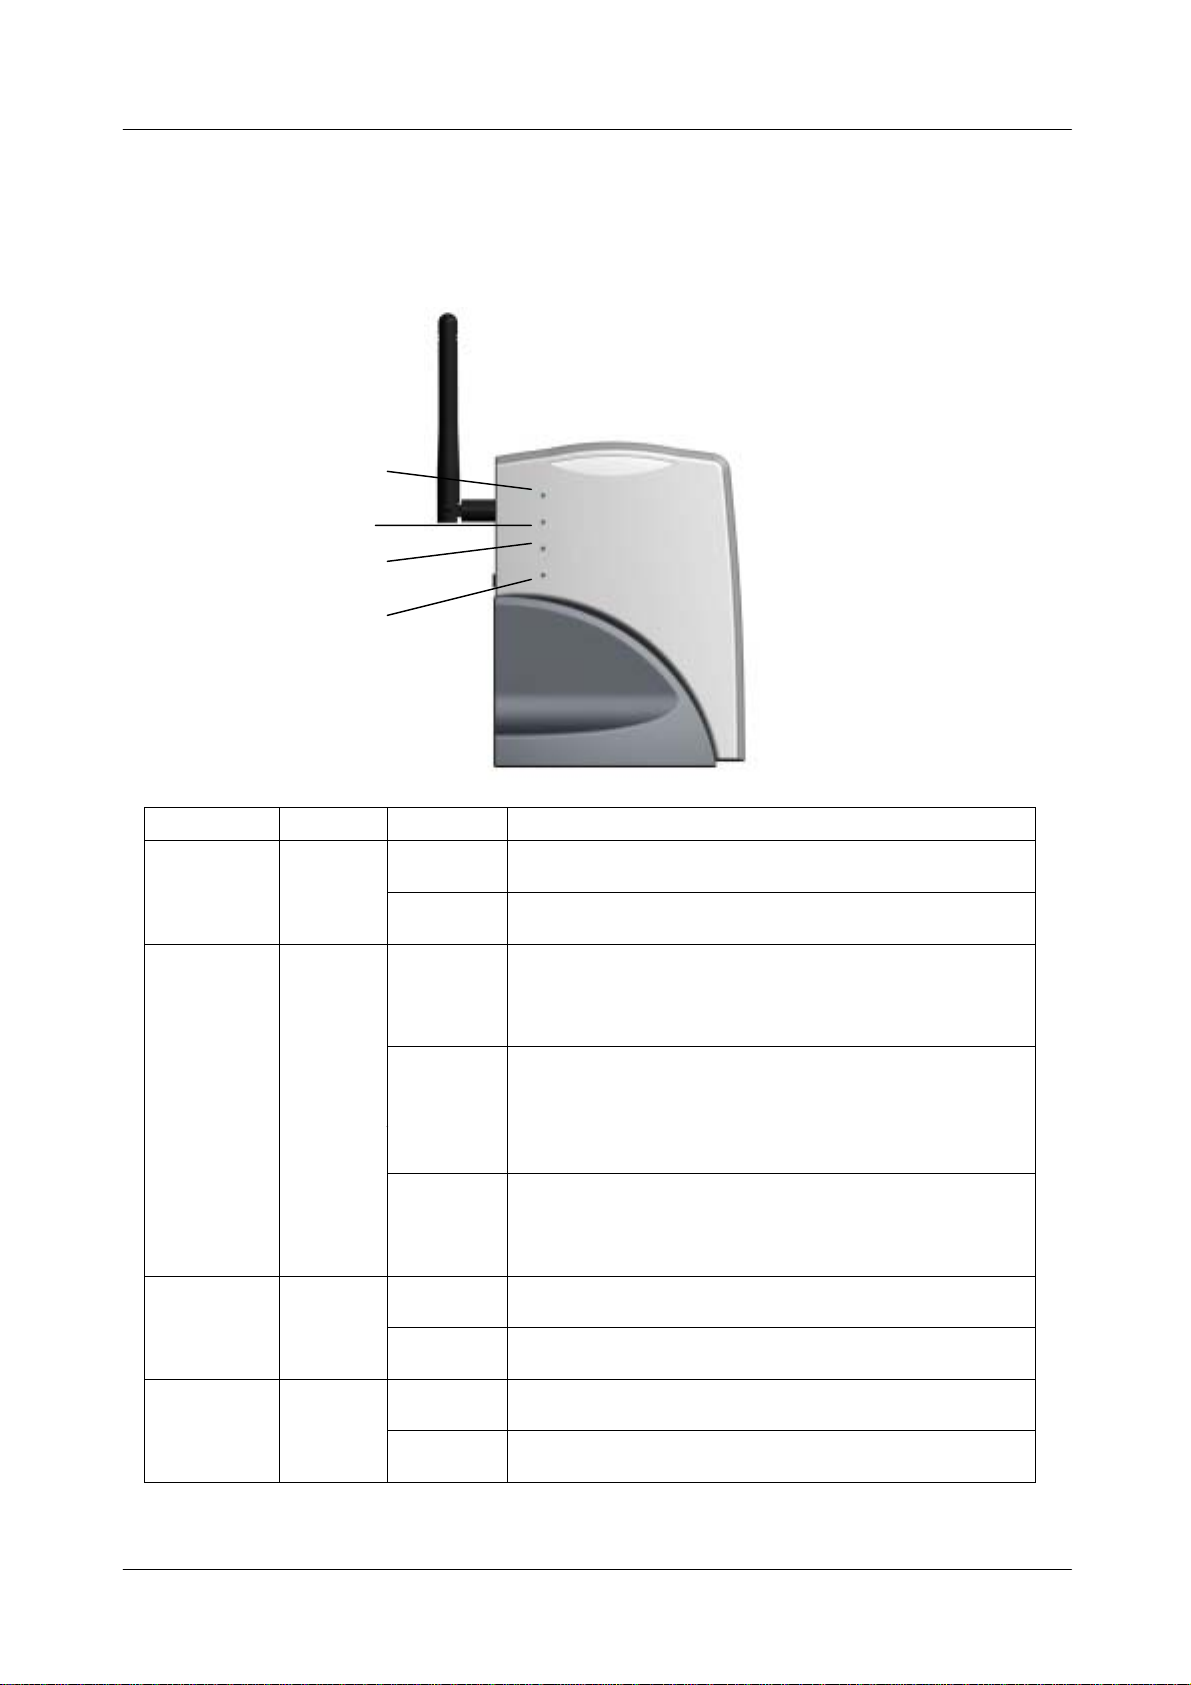
PHYSICAL DETAILS.......................................................................................................................................... 7
HARDWARE INSTALLATION............................................................................................................................. 9
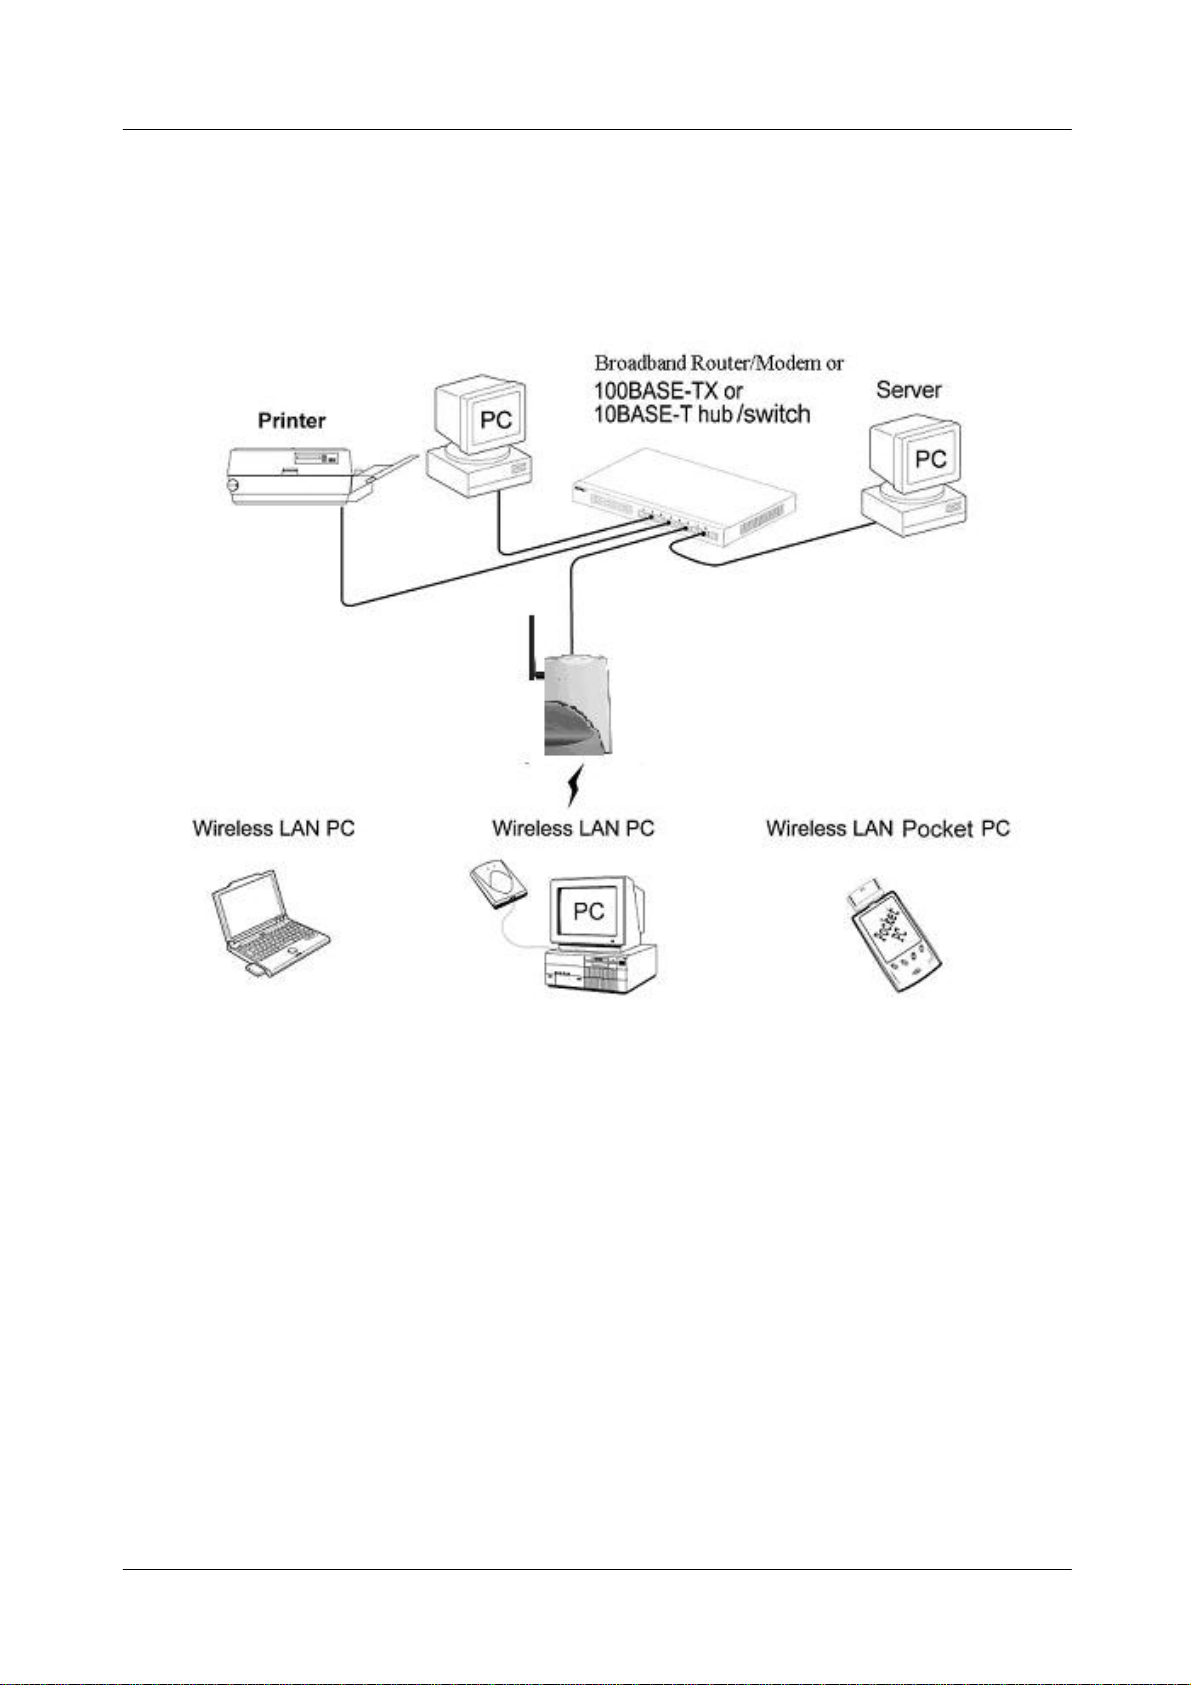
CONNECTING THE ACCESS POINT TO YOUR NETWORK ................................................................................. 9
3. WIRELESS NAVIGATOR INSTALLATION.............................11
INSTALL TCP/IP PROTOCOL......................................................................................................................... 11
INSTALL THE WIRELESS NAVIGATOR ............................................................................................................ 14
STARTUPAND LOGIN ..................................................................................................................................... 17
4. CONFIGURING THE ACCESS POINT.......................................... 20
THE INFO TAB................................................................................................................................................ 20
THE ASSOC TAB............................................................................................................................................. 20
THE WIRELESS TAB....................................................................................................................................... 21
THE ADVANCED TAB...................................................................................................................................... 22
THE SECURITY TAB ....................................................................................................................................... 23
THE IPADDR TAB.......................................................................................................................................... 25
THE ADMIN TAB ............................................................................................................................................ 26
THE HELP TAB............................................................................................................................................... 27
5. FIRMWARE UPGRADE PROCEDURE......................................... 28
6. FAQ & TROUBLESHOOTING................................................................... 30
7. GLOSSARY.............................................................................................................................. 32
8. PRODUCT SPECIFICATIONS.................................................................... 34
3

11Mbps Wireless Access Point User's Manual
About this manual
This user’s manual describes how to install and operate the Wireless Access Point (AP).
Please read this manual before you install the product.
This manual includes the following topics:
Product description, features and specifications
Hardware installation procedures
Software installation procedures
Trouble shooting procedures
4

11Mbps Wireless Access Point User's Manual
1. Introduction
Congratulations on your purchase of this 11Mbps Wireless Access Point (AP). This product
is designed specifically for your 11Mbps wireless LAN environment needs. It is easy to
configure and operate even for non-technical users. Instructions for installing and
configuring this product are included in this manual. Before you install and use this product,
please read the manual carefully so you may take full advantage of its functions.
The Wireless Access Point Features
LAN Features
DHCP Client – Enable the AP to act as a DHCP client to receive IP address from
DHCP Server in the wired Ethernet LAN.
Built-in 10BaseT LAN Port – It’s designed to bridge between wired and wireless LAN.
Wireless Features
Standard Compliant – The AP complies with IEEE802.11b standard, and it is
interoperable with IEEE802.11b-Compliant Equipment
High Speed Wireless Connection – Using Diversity Dipole Antenna to secure reliable
11Mbps wireless data rate connection.
Data Rate Auto Fall-Back - Provides 11, 5.5, 2 and 1Mbps wireless data rate shifting
dynamically to guarantee availability and reliability of wireless connections
Roaming – Provides seamless roaming within 802.11b wireless LAN infrastructure.
Long Distance Reach – Support 80M indoor and 300M outdoors long operating
distance under normal environment condition.
Configuration & Management
Easy to Setup – With windows-based Wireless Navigator Utility, user can easily setup
the IP address of this AP, and upgrade the firmware.
Easy to manage – User can use any WEB browser from anywhere on the wired or
wireless LAN to configure the AP easily.
Security
Configuring Protection – Provides password protection to prevent unauthorized users
from changing the configuration
Wireless LAN Security - Provide 64-bit & 128-bit Wired Equivalent Privacy encryption
to protect the wireless data transmissions.
5

11Mbps Wireless Access Point User's Manual
Package Contents
One 11Mbps Wireless Access Point
One Dipole Antenna with Reversed SMA Connector
One CD-ROM (Wireless Navigator utility software & user’s manual included)
One RJ-45 straight LAN Cable
One Power Adapter
One Quick Installation Guide
If any of the above items are damaged or missing, please contact your dealer immediately.
6

11Mbps Wireless Access Point User's Manual
2.Hardware Installation
Physical Details
Rear Panel
Antenna Connection
LAN Connection
INIT Button
LAN Cable
Selection Switch
Power Input
Antenna Connection Please install the dipole antenna directly into the reversed SMA
connector of AP. After AP start to work, you may adjust the angle of
the antenna or reposition the AP to get a better performance and
reach.
INIT Button “INIT” mean “Initiation”. While pressing the button, the AP will
reboot and reset current settings to factory default settings. The left
indicator “DIAG” on AP will be off and then begin blinking. Then
this initiation action will be completed when the indicator “ DIAG” is
always green instead of blinking.
LAN Cable
Selection Switch X Crossover: the RJ-45 port Tx and Rx lines are
reversed. Use this setting when you have a straight
cable connected. It is also the factory default
setting.
II Straight: the RJ-45 port Tx and Rx lines are normal.
Use this setting when you have a crossover cable
connected.
Power Input Only use the power adapter supplied with the Access Point
7

11Mbps Wireless Access Point User's Manual
LAN Connection Use standard Ethernet cable (RJ-45 connector) to connect your
PC, hub/switch or broadband router/modem to this port.
LED Indications
Wireless LAN
Diagnostic
LAN
Powe
r
LED Color Status Description
ON The Access Point power on
Power Green
OFF The Access Point power off
ON 1) The AP is in normal operation mode.
2) While in firmware upgrade process, it indicates the
AP is writing the firmware into Flash ROM
DIAG
Green
Blinking
1) The AP is in self-diagnostic mode.
2) While in firmware upgrade process, it indicates the
AP is waiting the Wireless Navigator sending
firmware image
OFF 1) The AP starts to boot up the system.
2) While in firmware upgrade process, it indicates the
firmware upgrade process is finished.
ON The LAN port is linked
LAN Green
Blinking The LAN port is sending or receiving data
OFF No data forwarding between wireless and LAN ports.
WLAN Green
Blinking Sending or Receiving data via wireless
8

11Mbps Wireless Access Point User's Manual
Hardware Installation
Following illustration is an example showing how to install AP with hub/switch.
Be sure to use the supplied power adapter.
Connecting the Access Point to your Network
For optimal performance, usually the center of your wireless network is the best place for
your AP, with line of sight to all of your mobile stations. Try to place it in a position where can
best cover your wireless network and is away from any potential source of interference. And
normally, the higher you place the AP, the better the wireless signal coverage will be.
9

11Mbps Wireless Access Point User's Manual
The following picture describes how to use the AP when communicating between wireless
LAN and wired LAN.
10

11Mbps Wireless Access Point User's Manual
3. Wireless Navigator Installation
Install TCP/IP Protocol
TCP/IP Protocols are necessary for computers to communicate on LAN and Internet.
Note!
If your PC already has TCP/IP protocol installed, please skip this section. Please
contact your administrator for details if you have problems of setting up this TCP/IP
protocol in your PC.
1. From the Start Menu, select Settings and bring up the Control Panel. From the Control
Panel, double-click on the Network icon.
11

11Mbps Wireless Access Point User's Manual
2. The screen shows the network components you have installed. Click the Add button to
continue.
3. Highlight Protocol and click the Add button.
12

11Mbps Wireless Access Point User's Manual
4. Select Microsoft from the list of “Manufacturers” and TCP/IP from the list of “Network
Protocols” and click the OK button to finish the installation.
13

11Mbps Wireless Access Point User's Manual
Install the Wireless Navigator
The Wireless Navigator Utility is provided to allow user(s) easily to configure the AP through
any Windows-based PC over wired or wireless LAN port. This section describes procedures
for installing the Wireless Navigator Utility to PC.
Step 1: Insert the installation CD-ROM into the CD-ROM drive. Run SETUP.EXE program
on the CD-ROM. The following window will be shown automatically.
Step 2: After InstallShield Wizard preparation finished, the following window will be shown.
Click the Next button to continue.
14

11Mbps Wireless Access Point User's Manual
Step 3: Key in your User Name and Company Name, and click Next button to continue.
Step 4: The screen will show you the default destination chosen by the utility. If you want to
install the Wireless Navigator in another location, click the Browse button and select
an alternate destination. Click the Next button, when you are ready to continue. The
setup program will then begin to install the programs into the destination folder.
15

11Mbps Wireless Access Point User's Manual
Step 5: The screen will show you the Program Folder that the utility will use. You may type
a new folder name to create a new program folder, or select one from the existing
folder list, and click Next button to continue.
Step 6: The Wireless Navigator has been installed now. Please click the Finish button to
complete installation.
Note: To remove Wireless Navigator Utility, click the Start button, and select Programs,
Wireless Navigator, and Uninstall, and then follow the instruction on screen.
16

11Mbps Wireless Access Point User's Manual
Startup and Login
Follow the procedures below to startup Wireless Navigator and find the AP. Before you start
the following procedures, please be sure to connect the Ethernet cable, connect the power
cord, and then turn on the AP. All wireless clients shall be requested to set the their SSIDs
same as the AP SSID in advance before starting the following procedures.
1.Refer to previous section " Install the Wireless Navigator to your PC" in order to
startup the configuration.
2.Click Start and select Programs,Wireless Navigator and then Wireless Navigator. Or,
just double-click the Wireless Navigator icon on your desktop screen.
3.The Wireless Navigator starts up, and search via wired LAN or Wireless LAN (depend.
17

11Mbps Wireless Access Point User's Manual
4. The utility will show the AP and other wireless devices found in the same network,
where your PC is located.
Note!
If the AP is not shown in the list, please make sure all the cables are well
connected.
5.Double-click on the AP, then you will access into its built-in web server, and it will show
as below. Then directly click OK button. (Default setting is no user name and password
needed).
Note!
If you cannot access into AP’s built-in web server, please make sure if your
PC now is in the same subnet with AP. Please us right-click of mouse to click
on the AP listed in Wireless Navigator. “Set IP address” option will pop out,
and then change IP address of AP to the same subnet as your PC.
18

11Mbps Wireless Access Point User's Manual
6. Then following screen will be shown. Now you have entered the built-in web server of
this AP, and you can start to configuration procedures.
19

11Mbps Wireless Access Point User's Manual
4. Configuring the Access Point
The Info Tab
INFORMATION: displays the basic information of this AP.
Firmware revision: displays current firmware version of this AP.
MAC address of AP: displays the unique serial number burned into this AP that
identifies itself from other Ethernet devices
Current IP address: displays current IP address of this AP.
The Assoc Tab
ASSOCIATIONS: displays all the wireless clients, which are currently associated with
this AP.
Mac address: displays the MAC address of associated wireless client.
Time idle: displays the idle time of each associated wireless client
20
Table of contents
Other ConnectGear Wireless Access Point manuals
Popular Wireless Access Point manuals by other brands

TRENDnet
TRENDnet TEW-455APBO - 9dBi High Power Wireless Outdoor PoE Access... Quick installation guide

D-Link
D-Link DWR-923 user manual

TRENDnet
TRENDnet TEW-430APB - Wireless Access Point Quick installation guide

Grandstream Networks
Grandstream Networks GWN7610 Quick installation guide

LevelOne
LevelOne WAP-3101 quick start guide

TRENDnet
TRENDnet TEW-690AP Quick installation guide