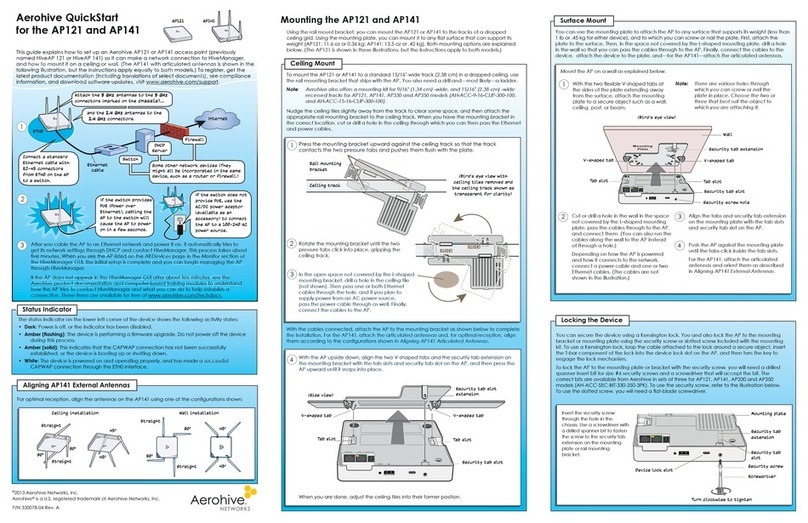
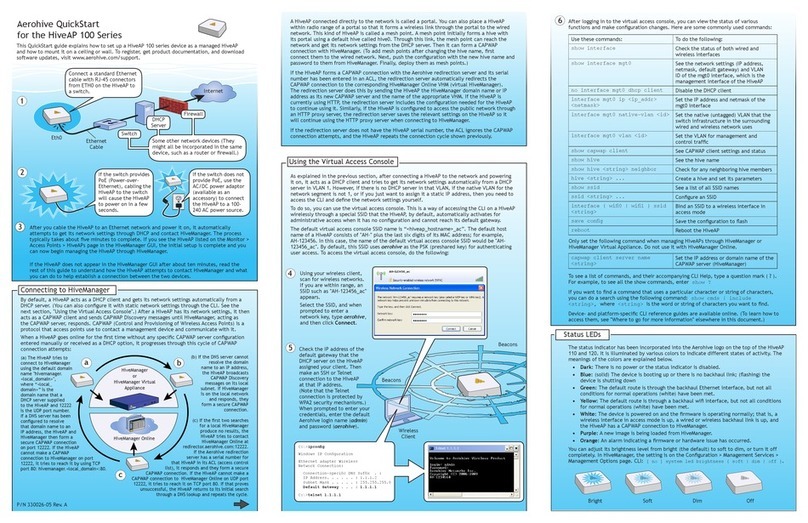
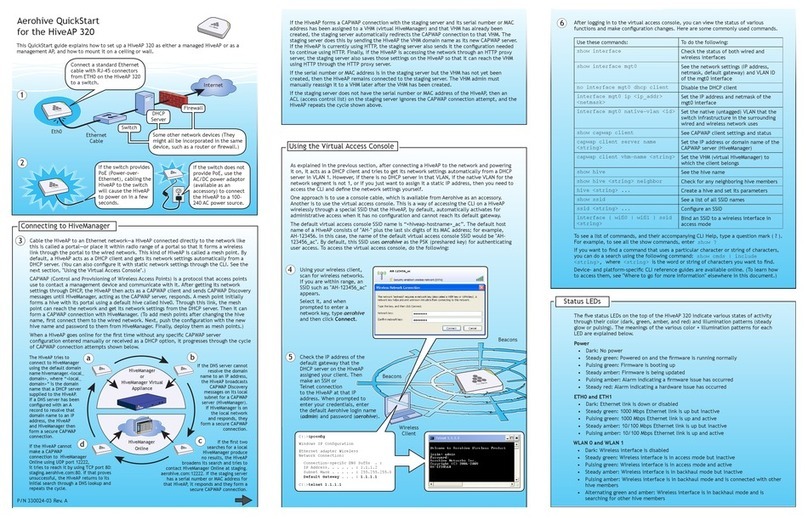
Aerohive Networks Aerohive AP121 Operating and maintenance manual

Aerohive Hardware
Reference Guide

1
Aerohive Hardware
Reference Guide
For Aerohive APs, Routers, and HiveManager Devices
Aerohive Technical Publications
To register, get the latest product documentation, see compliance information, and download software
updates, visit www.aerohive.com/support.
Copyright Notice
Copyright © 2012 Aerohive Networks, Inc. All rights reserved.
Aerohive Networks, the Aerohive Networks logo, HiveOS, HiveAP, and HiveManager are trademarks of
Aerohive Networks, Inc. All other trademarks and registered trademarks are the property of their respective
companies.
Information in this document is subject to change without notice. No part of this document may be
reproduced or transmitted in any form or by any means, electronic or mechanical, for any purpose, without
receiving written permission from:
Aerohive Networks, Inc.
330 Gibraltar Drive
Sunnyvale, CA 94089
P/N 330016-03, Rev. B

2Aerohive
About This Guide
This guide describes Aerohive hardware devices, including component descriptions, installation and
mounting instructions, wiring diagrams, and hardware specifications for each device. This guide is a useful
resource for all Aerohive administrators.

Hardware Reference Guide 3
Contents
Chapter 1 AP121 and AP141 Platforms .................................................................................... 7
AP121 and AP141 Product Overview ..................................................................................... 8
Ethernet and Console Ports............................................................................................. 10
Status Indicator................................................................................................................. 10
Port LEDs ............................................................................................................................ 10
Antennas ........................................................................................................................... 11
Mounting the AP121 or AP141............................................................................................... 12
Ceiling Mount ...................................................................................................................12
Surface Mount .................................................................................................................. 13
Locking the AP121 and AP141........................................................................................ 14
Device, Power, and Environmental Specifications............................................................. 15
Chapter 2 The AP170 Platform ................................................................................................ 17
AP170 Product Overview ....................................................................................................... 18
Ethernet Port ..................................................................................................................... 19
Antennas ........................................................................................................................... 19
Installing the AP170 ................................................................................................................. 20
Kit Contents, Required Accessories, and Tools ............................................................. 20
Safety Instructions and Site Hazard Warnings ............................................................... 20
Mounting the AP170 ............................................................................................................... 21
Vertical Pole Mount ......................................................................................................... 22
Horizontal Pole Mount...................................................................................................... 23
Flat Surface Mount ........................................................................................................... 24
Attaching External Antennas................................................................................................. 25
Attaching the Ethernet Cable Waterproof Housing ........................................................... 26
PoE and Ethernet Protection ................................................................................................. 26
Accessing the Internal Reset Switch ..................................................................................... 28
Device, Power, and Environmental Specifications............................................................. 29
Chapter 3 AP110 and AP120 Platforms .................................................................................. 31
AP110 and AP120 Product Overview ................................................................................... 32
Ethernet Port ..................................................................................................................... 33
Status Indicator................................................................................................................. 34
Antennas ........................................................................................................................... 34
Mounting an AP110 or AP120 ................................................................................................ 35
Ceiling Mount ...................................................................................................................35
Locking the AP ........................................................................................................... 36
Surface Mount .................................................................................................................. 37
Device, Power, and Environmental Specifications............................................................. 38

Contents
4Aerohive
Chapter 4 AP330 and AP350 Platforms .................................................................................. 39
AP330 and AP350 Product Overview ................................................................................... 40
Ethernet and Console Ports............................................................................................. 42
USB Modem Port............................................................................................................... 42
Status Indicator................................................................................................................. 42
Antennas ........................................................................................................................... 43
Mounting the AP330 or AP350............................................................................................... 44
Ceiling Mount ...................................................................................................................44
Surface Mount .................................................................................................................. 45
Locking the AP330 and AP350 ................................................................................. 46
Device, Power, and Environmental Specifications............................................................. 46
Chapter 5 The BR100 Router.................................................................................................... 49
Product Overview ................................................................................................................... 50
Radio and Antennas........................................................................................................ 52
USB Modem Port............................................................................................................... 52
Status LEDs......................................................................................................................... 53
Mounting and Installation ...................................................................................................... 53
Device, Power, and Environmental Specifications............................................................. 54
Chapter 6 BR200 and BR200-WP Routers................................................................................ 55
Product Overview ................................................................................................................... 56
Radio and Antennas........................................................................................................ 58
Ethernet and Console Ports............................................................................................. 58
USB Modem Port............................................................................................................... 59
BR200-WP PoE LAN Ports .................................................................................................. 59
Status LEDs......................................................................................................................... 60
Mounting and Installation ...................................................................................................... 60
Device, Power, and Environmental Specifications............................................................. 61
Chapter 7 The AP340 Platform ................................................................................................ 63
AP340 Product Overview ....................................................................................................... 64
Ethernet and Console Ports............................................................................................. 66
Smart PoE.................................................................................................................... 67
Aggregate and Redundant Interfaces .................................................................. 67
Console Port ............................................................................................................... 69
Status LEDs......................................................................................................................... 70
Antennas ........................................................................................................................... 70
Configuring Antennas...................................................................................................... 71
MIMO........................................................................................................................... 72
Using MIMO with Legacy Clients.............................................................................. 74
Mounting the AP340 ............................................................................................................... 75
Ceiling Mount ...................................................................................................................75
Locking the AP340 ..................................................................................................... 76
Plenum Mount .................................................................................................................. 77
Suspended Mount............................................................................................................ 79
Hardware Reference Guide 5
Surface Mount .................................................................................................................. 81
Device, Power, and Environmental Specifications............................................................. 82
Chapter 8 The AP320 Platform ................................................................................................ 83
AP320 Product Overview ....................................................................................................... 84
Ethernet and Console Ports............................................................................................. 86
Status LEDs......................................................................................................................... 86
Antennas ........................................................................................................................... 87
Mounting the AP320 ............................................................................................................... 87
Ceiling Mount ...................................................................................................................88
Locking the AP320 ..................................................................................................... 89
Surface Mount .................................................................................................................. 89
Device, Power, and Environmental Specifications............................................................. 90
Chapter 9 The HiveManager Platform.................................................................................... 91
Product Overview ................................................................................................................... 92
Ethernet and Console Ports............................................................................................. 93
Status LEDs......................................................................................................................... 94
Rack Mounting the HiveManager ........................................................................................ 95
Device, Power, and Environmental Specifications............................................................. 96
Chapter 10 The High Capacity HiveManager....................................................................... 97
Product Overview ................................................................................................................... 98
Rack Mounting the High Capacity HiveManager ............................................................ 100
Replacing Power Supplies.................................................................................................... 103
Replacing Hard Disk Drives .................................................................................................. 104
Device, Power, and Environmental Specifications........................................................... 105
Index ....................................................................................................................................... 107

Contents
6Aerohive

Hardware Reference Guide 7
Chapter 1 AP121 and AP141 Platforms
The AP121and AP141 wireless access points are designed for excellent throughput and range. They provide
dual concurrent 802.11b/g/n and 802.11a/n radios for 2x2 MIMO (Multiple Input Multiple Output) antenna
configurations. When you enable 802.11n high-throughput options such as wide-channel mode (40-MHz
channels), A-MPDU and A-MSDU packet aggregation, short guard interval, and MCS15 data rates, they can
provide a PHY data rate up to 300 Mbps per radio. The AP121 has four internal antennas, and the AP141 has
four detachable external antennas (two 2.4 GHz and two 5 GHz in both cases). Both models have an RJ-45
10/100/1000 Ethernet port, an RJ-45 console port, and a USB modem port (reserved for future use).
This chapter covers the following topics relating to the AP121 and AP141:
•"AP121 and AP141 Product Overview" on page 8
•"Ethernet and Console Ports" on page 10
•"Status Indicator" on page 10
•"Port LEDs" on page 10
•"Antennas" on page 11
•"Mounting the AP121 or AP141" on page 12
•"Ceiling Mount" on page 12
•"Surface Mount" on page 13
•"Locking the AP121 and AP141" on page 14
•"Device, Power, and Environmental Specifications" on page 15

Chapter 1 AP121 and AP141 Platforms
8Aerohive
AP121 AND AP141 PRODUCT OVERVIEW
The AP121 and AP141 models provide excellent throughput and coverage. The AP121has two internal
antennas, and the AP141 has four detachable external antennas. You can see these hardware
components in Figure 1. Each component is described in Table 1 "AP121 and AP141 component
descriptions".
Figure 1 AP121 and AP141 hardware components
To meet federal radiation exposure requirements, these devices should be installed at a minimum
distance of 23 cm or 9.06" from your body.
Table 1 AP121 and AP141 component descriptions
Component Description
Status Indicator The status indicator conveys operational states for system power, firmware updates,
Ethernet and wireless interface activity, and major alarms. For details, see "Status
Indicator" on page 10.
2.4 and 5 GHz
RP-SMA connectors
(AP141)
You can connect up to four detachable single-band antennas (two 2.4 GHz and
two 5 GHz) to the male 802.11a/b/g/n RP-SMA (reverse polarity-subminiature
version A) connectors. The antennas and the connectors are labeled for easy
identification. For details, see "Antennas" on page 11.
Console port
ETH0 LAN port
AP121 and AP141 components (chassis shown upside down)
AP141
Reset
External antenna
connectors
(AP141 only, two 2.4
GHz and two 5 GHz) USB modem port Device lock slot
Security tab cavity
Mounting tab
Power connector
Security screw hole
Mounting tab
AP121
Status indicator

Hardware Reference Guide 9
AP121 AND AP141 PRODUCT OVERVIEW
Console Port You can access the CLI by making a serial connection to the RJ-45 console port.
The management station from which you connect to the device must have a VT100
emulation program, such as Tera Term Pro©(a free terminal emulator) or Hilgraeve
Hyperterminal®(provided with Windows®operating systems from Windows 95 to
Windows XP). The serial connection settings are: bits per second: 9600, data bits: 8,
parity: none, stop bits: 1, flow control: none. For details, see "Ethernet and Console
Ports" on page 10.
Power Connector There are two ways to power an AP121 or AP141 devices. You can connect a
device to a 100 – 240-volt AC power source by connecting an AC/DC power
adaptor (available as an extra option) to the 12 V (1.1A) DC connector. You can
also power the device through the ETH0 port from PSE (power sourcing equipment)
that is compatible with the 802.3af and 802.3at standards. Because there is no
on/off switch, these devices automatically power on when you connect them to
power.
ETH0 10/100/1000
Mbps Port
The 10/100/1000-Mbps Ethernet port—ETH0—receives an RJ-45 connector. The AP
can receive power through an Ethernet connection to the ETH0 port from PSE that is
compatible with the 802.3af standard. Aerohive provides suitable PoE injectors as
an optional accessory. (If you connect the AP to a power source through the
power connector and the ETH0 PoE port simultaneously, the device draws power
through the power connector and automatically disables PoE.)
The ETH0 port is compatible with 10/100/1000Base-T/TX and automatically
negotiates half- and full-duplex connections with the connecting device. It is
autosensing and adjusts to straight-through and cross-over Ethernet cables
automatically. For details, see "Ethernet and Console Ports" on page 10.
Reset Button The reset button allows you to reboot the device or reset it to its factory default
settings. Insert a paper clip, or similar tool, into the Reset pinhole and press the reset
button. To reboot the device, hold the button down for 5 seconds. To return the
configuration to the factory default settings, hold it down for at least 10 seconds.
After releasing the button, the indicator light goes dark, and then glows steady
amber while the firmware loads and the system performs a self-test. After the
software finishes loading and the AP has connected to HiveManager, the status
indicator glows steady white.
To disable the reset button from resetting the configuration, enter this command: no
reset-button reset-config-enable Pressing the button for 5 seconds will still
reboot the AP, but pressing it for more than 10 seconds will not reset its
configuration.
USB Port Reserved for future use.
Security Tab Cavity
and Security Screw
When mounting the AP on a ceiling track or flat surface, insert the security tab
extension on the rail mount or mounting plate into the security tab cavity and then
fasten the AP to the mounting equipment by inserting the security screw through
the security screw hole and tightening it. See "Locking the AP121 and AP141" on
page 14.
Device Lock Slot You can physically secure the AP by attaching a lock and cable (such as a
Kensington®notebook lock) to the device lock slot.
Table 1 AP121 and AP141 component descriptions (Continued)
Component Description

Chapter 1 AP121 and AP141 Platforms
10 Aerohive
Ethernet and Console Ports
The AP121 and AP141 models have one RJ-45 10/100/1000Base-T/TX Ethernet port and an RJ-45 console
port.
The pin assignments in the
10/100/1000Base-T/TX Ethernet port
follow the TIA/EIA-568-B standard (see Figure 2
on page 66). The port accepts standard types of Ethernet cable—cat3, cat5, cat5e, or cat6—and can
receive power over the Ethernet cable from PSE (power sourcing equipment) that is 802.3af-compatible.
Such equipment can be embedded in a switch or router, or it can come from purpose-built devices that
inject power into the Ethernet line en route to the AP. Because the PoE port has autosensing capabilities, the
wiring termination in the Ethernet cable can be either straight-through or cross-over. Aerohive provides
several PoE injectors as accessories that you can order: AH-ACC-INJ-20W-EU, AH-ACC-INJ-20W-UK,
AH-ACC-INJ-20W-US, AH-ACC-INJ-20W-AU, and AH-ACC-INJ-20W-IL.
If an AP is connected to both an AC power source and PSE, the AC power source takes priority. If the device
loses power from that source, it automatically switches to PoE. If the AC power comes back online, the AP
automatically switches back to AC. Each time the AP switches from one power source to another, it must
reboot.
Through the RJ-45 console port, you can make a serial connection between your management system and
the AP. The pin-to-signal mapping of the RJ-45 console port is the same as that for the AP340, which is shown
in Figure 2 on page 66. Similarly, cabling and connection details for the AP121 and AP141 are the same as
those for the AP340 (see Figure 2 on page 11)
Status Indicator
The AP121 and AP141 have a triangular status indicator light on the top left corner of the chassis. The colors
of this light indicate the following states of activity:
•Dark: There is no power or the status indicator is disabled.
•Amber (flashing): This is an alert that indicates that the device is performing a firmware upgrade. Do
not power off the device during this process.
•Amber (steady): This is an alert that indicates that the CAPWAP connection has not been
successfully established, or the device is booting or shutting down.
•White: The device is powered on, a successful CAPWAP connection has been made, and the
firmware is operating normally.
Port LEDs
The ETH0 port has two status LEDs to indicate port operation (yellow for 10/100 Mbps and green for 1000
Mbps). The meanings of the LED colors and patterns are described here:
•Dark: No link is detected for this port.
•Yellow (steady): This port has made a successful 10/100 Mbps link.
•Yellow (flashing): This port is sending and receiving traffic at 10/100 Mbps.
•Green (steady): This port has made a successful 1000 Mbps link.
•Green (flashing): This port is sending and receiving traffic at 1000 Mbps.

Hardware Reference Guide 11
AP121 AND AP141 PRODUCT OVERVIEW
Antennas
The antennas for the AP121 and AP141 are described below.
AP121
The AP121 has four internal single-band antennas. The 2.4 GHz band antennas (IEEE 802.11b/g/n) have a
2-5 dBi gain. The 5 GHz antennas (IEEE 802.11a/n) have a 3-6 dBi gain. All antennas are omnidirectional
and provide fairly equal coverage in all directions.
AP141
The AP141 has four male 802.11a/b/g/n RP-SMA (reverse polarity-subminiature version A) external
antenna connectors and four external articulated antennas (two 2.4 GHz and two 5 GHz). The external
antennas have a 4-dBi gain, are omnidirectional, and provide fairly equal coverage in all directions in a
toroidal (donut-shaped) pattern. The antennas and connectors are labeled for easy identification and
connection, and swivel in all directions, as shown in Figure 2.
Figure 2 AP141 antenna articulation and labels
For optimal coverage, align the antennas as shown in Figure 3. For more information about configuring
antennas for the best coverage, see "Configuring Antennas" on page 71.
Figure 3 Aligning the articulated antennas for AP141 devices
Length when
fully extended:
5 3/4” (14.6 cm)
Length when
hinged at 90°:
4 7/8” (12.4 cm)
Antennas and
connectors are
labeled for easy
identification.
2.4 GHz (0)
2.4 GHz (1)
5 GHz (0)
5 GHz (1)
Antennas swivel horizontally and vertically.
Ceiling mount Wall mount
90°
90°
90°
90°
45°
45°
45°
45°
Straight
Straight
Straight
Straight

Chapter 1 AP121 and AP141 Platforms
12 Aerohive
MOUNTING THE AP121 OR AP141
Use the rail mounting brackets to mount the AP121 or AP141 to the tracks of a dropped ceiling grid. Use the
mounting plate to mount the AP to any surface that can support its weight (AP121: 11.6 oz or 0.36 kg;
AP141: 13.5 oz or 0.42 kg).
Ceiling Mount
To mount the AP121 or AP141 to a standard 15/16"-wide track (2.38 cm) in a dropped ceiling, use one of the
two rail mounting brackets that ship with the product, depending on whether the ceiling track is flush with
the ceiling tiles or recessed:
• 15/16" flush ceiling rail mounting bracket
• 15/16" recessed ceiling rail mounting bracket
Nudge the adjacent ceiling tiles slightly away from the track to clear some space and then attach the
appropriate rail mounting bracket to the track. When you have the mounting bracket in the correct
location, cut or drill a hole in the ceiling tile, through which you will pass the power and Ethernet cables, as
shown in Figure 4.
Figure 4 Attaching the rail mounting bracket to a ceiling track
For narrower tracks, you can order a pair of 9/16" rail mounts for AP121, AP141, AP330, and AP350
models from Aerohive (AH-ACC-9-16-CLIP-330-AP350). The kit contains a bracket for flush ceilings
and a bracket for recessed ceilings.
You can slide the mounting bracket along the ceiling track if you need to adjust its location.
Press the mounting bracket against the ceiling track so that the track contacts
the two pressure tabs and pushes them flush with the rail mount.
(Bird’s eye view with the ceiling tiles
removed and the ceiling track
shown as transparent for clarity)
Rotate the mounting bracket until the pressure
tabs click into place, gripping the ceiling track.
2
In the open space not covered by the
L-shaped rail mount, drill a hole in the ceiling
tile (not shown). Then the Ethernet cable
through the hole, and if you plan to supply
power from an AC power source rather than
through PoE, pass the power cable through
as well. Finally, connect the cables to the AP.
3
1
Rail mounting
bracket
Ceiling track
CLICK!
CLICK!

Hardware Reference Guide 13
MOUNTING THE AP121 OR AP141
With the AP upside down, align the two flexible V-shaped tabs and the security tab extension on the rail
mounting bracket with the two tab slots and the security screw cavity on the underside of the AP, and then
push the AP upward until it clicks into place as shown in Figure 5.
Figure 5 Attaching the AP to the rail mount
When you are done, adjust the ceiling tiles back into their former position.
Surface Mount
You can use the flat mounting plate to attach the AP121 or AP141 to any surface that supports its weight
(AP121: 11.6 oz or 0.36 kg; AP141: 13.5 oz or 0.42 kg), and to which you can screw or nail the plate. First,
mount the plate to the surface, and then attach the device to the plate, as shown in Figure 6.
Figure 6 Mounting the AP on a wall
Security tab extension
Security screw cavity
Tab slot
Tab slot
V-shaped tab
V-shaped tab
(Side view)
Security tab slot
Security screw
cavity
Tab slot
Tab slot
Security tab
extension
V-shaped
tab
V-shaped tab
(Bird’s eye view)
2
3
1With the two flexible V-shaped tabs at the
sides of the plate extending away from the
surface, attach the mounting plate to a secure
object such as a wall, ceiling, post, or beam.
Cut or drill a hole in the space not covered by
the L-shaped mounting plate, pass the cables
through to the AP, and connect them. (You can
also run the cables along the wall to the AP
instead of through a hole.)
Depending on how the AP is powered and
how it connects to the network, connect a
power cable and an Ethernet cables. (The
cable is not shown in this illustration.)
Align the tabs and security tab extension on
the mounting plate with the tab slots and
security screw cavity on the AP.
Push the AP against the mounting plate until
the tabs click inside the tab slots. For the
AP141, attach and align the antennas.
4

Chapter 1 AP121 and AP141 Platforms
14 Aerohive
Locking the AP121 and AP141
To lock the AP to the rail mount or mounting plate, use either a Kensington lock or the security screw that is
included with the mounting kit. To use a Kensington lock, loop the cable attached to the lock around a
secure object, insert the T-bar component of the lock into the device lock slot on the AP, and then turn the
key to engage the lock mechanism.
To lock the AP to the rail mounting bracket or mounting plate, you can use either the slotted screw or the
pan-head security screw, both of which are included in the mounting kit. If you use the security screw, you
will need a drilled spanner insert bit for size #6 security screws and a screw driver that will accept the bit. The
correct bits are available from Aerohive in sets of three for AP121, AP141, AP330, and AP350 models
(AH-ACC-SEC-BIT-330-AP350-3PK). If you use the slotted screw, you can install it with a standard flat-blade
screwdriver or pan-head driver bit.
1. Insert the security screw or slotted screw through the hole in the chassis.
2. Use a screwdriver with a drilled spanner bit or a flat-blade screwdriver to tighten the screw to the security
tab extension on the rail mount, as depicted in Figure 7, which shows the AP121.
Figure 7 Locking the AP121 to the mounting plate
Turn clockwise to tighten
USB port Security screw
Device lock slot
Rail mounting bracket
or mounting plate
Screwdriver
Security tab extension
Security tab cavity

Hardware Reference Guide 15
DEVICE, POWER, AND ENVIRONMENTAL SPECIFICATIONS
Understanding the range of specifications for the AP121 and AP141 is necessary for optimal deployment
and device operation. The following specifications describe the physical features and hardware
components, the power adapter and PoE (Power over Ethernet) electrical requirements, and the
temperature and humidity ranges in which the devices can operate.
Device Specifications
• Chassis dimensions:
• AP121: 6.69" W x 1.63" H x 6.69" D (170 mm W x 41 mm H x 170 mm D)
• AP141: 6.69" W x 1.63" H x 7.3 (with antenna connectors) D - (170 mm W x 41 mm H x 185.6 mm D)
•Weight
• AP121: 11.6 oz (0.36 kg)
AP141: 13.5 oz (0.42 kg)
• Antennas:
• AP121: Two internal omnidirectional 802.11b/g/n antennas, and two internal omnidirectional
802.11a/n antennas
• AP141: Two 2.4 GHz and two 5 GHz external omnidirectional 802.11b/g/n articulated antennas
• Console serial port: RJ-45 (9600 bits per second, 8 data bits, parity: none, 1 stop bits, no flow control
• Ethernet port
• Eth0: autosensing 10/100/1000Base-T/TX Mbps, with IEEE 802.3af-compliant PoE
• USB port: (reserved for future use)
Power Specifications
• AC/DC power adapter:
• Input:100 – 240 VAC
• Output: 12V/1.1A
• PoE nominal input voltages: 48 V
• RJ-45 power input pins: Wires 4, 5, 7, 8 or 1, 2, 3, 6
Environmental Specifications
• Operating temperature: 32 to 104° F (0 to 40° C)
• Storage temperature: -40 to 185° F (-40 to 85° C)
• Relative Humidity: 5 to 95% RH (noncondensing)

Chapter 1 AP121 and AP141 Platforms
16 Aerohive

Hardware Reference Guide 17
Chapter 2 The AP170 Platform
The AP170 is a multi-channel mesh wireless access point with a watertight chassis that can be deployed in
virtually any outdoor setting, including extreme environments. With four antennas and the ability to provide
service concurrently on both 2.4 GHz and 5 GHz bands, the AP170 supports 802.11n and legacy 802.11a, b,
and g clients. The device provides 2x2 MIMO (multiple input, multiple output) and a single 10/100/1000
Ethernet port through which it is powered using PoE (Power over Ethernet) that follows the IEEE 802.3at
standard.
This chapter covers the following topics relating to the AP170 device:
•"AP170 Product Overview" on page 18
•"Ethernet Port" on page 19
•"Antennas" on page 19
•"Installing the AP170" on page 20
•"Kit Contents, Required Accessories, and Tools" on page 20
•"Safety Instructions and Site Hazard Warnings" on page 20
•"Mounting the AP170" on page 21
•"Vertical Pole Mount" on page 22
•"Horizontal Pole Mount" on page 23
•"Flat Surface Mount" on page 24
•"Attaching External Antennas" on page 25
•"Attaching the Ethernet Cable Waterproof Housing" on page 26
•"PoE and Ethernet Protection" on page 26
•"Accessing the Internal Reset Switch" on page 28
•"Device, Power, and Environmental Specifications" on page 29

Chapter 2 The AP170 Platform
18 Aerohive
AP170 PRODUCT OVERVIEW
The Aerohive AP170 is specifically designed for outdoor high-bandwidth wireless deployments in harsh
environments. The AP170 supports a variety of authentication and security protocols, including Wi-Fi
CERTIFIED™ WPA™ and WPA2™, 802.11i, WEP, 802.1X, PSK, Aerohive’s patented PPSK, and AES:CCMP, TKIP,
and RC4 (WEP only) encryption.
Figure 1 shows the AP170 hardware components (antennas must be ordered separately). Each component
is described in Table 1 "AP170 hardware components".
Figure 1 AP170 hardware components
Table 1 AP170 hardware components
Component Description
AP170 chassis The durable, weatherproof AP170 chassis is designed for deployment in extreme
conditions. Features include six grounding lugs, four antenna connectors, and a
waterproof 10/100/1000 Ethernet connector. The device ships with a complete
mounting kit (see "Kit Contents, Required Accessories, and Tools" on page 20.)
Outdoor antennas The AP170 supports four external antennas, two 2.4 GHz band (IEEE 802.11b/g/n)
with a 5 dBi gain, and two 5 GHz band (IEEE 802.11a/n) with a 7 dBi gain. You
can order antennas from Aerohive (AH-ACC-170-ANT-KIT) or you can provide
your own antennas.
Antenna connectors The AP170 chassis provides four antenna connectors. Two connectors on the top
panel support 5 GHz antennas. Two connectors on the bottom panel support 2.4
GHz antennas. Note: You must install an antenna in every connector.
2.4 GHz
antenna
connector
10/100/1000
Ethernet
connector
2.4 GHz
antenna
connector
2.4 GHz 2.4 GHz 5 GHz 5 GHz
5 GHz
antenna
connector
5 GHz
antenna
connector
Outdoor antennas
2.4 GHz (2)
5 GHz (2)
5 GHz 2 4 GHz
5 GHz 2 4 GHz
Bottom panel Top panel
Ground lugs
Ground lugs

Hardware Reference Guide 19
AP170 PRODUCT OVERVIEW
Ethernet Port
The 1X PoE 10/100/1000Base-T/TX Ethernet port accepts standard cat5, cat5e, or cat6 Ethernet cable and is
powered from 802.3at-compatible power sourcing equipment (PSE). PSE can be embedded in a switch or
router, or can be a separate device that injects power into the Ethernet line en route to the Aerohive
device.
With 802.3at, the 1/2 and 3/6 wire pairs connect to DC source 1, and 4/5 and 7/8 pairs to DC source 2 in PSE.
Although the exact polarity depends on the PSE design, the AP170 Ethernet port can support all possible
options.
Antennas
The AP170 supports four external antennas, two 2.4 GHz band (IEEE 802.11b/g/n) with a 5 dBi gain, and two 5
GHz band (IEEE 802.11a/n) with a 7 dBi gain. The antennas are omnidirectional, providing fairly equal
coverage in all directions in a toroidal (donut-shaped) pattern around each antenna. For greater coverage
on a horizontal plane, it is best to orient the device so that the antennas are vertical.
The two 2.4 GHz antennas link to a 2.4 GHz radio for 802.11b/g/n, and the two 5 GHz antennas link to the a 5
GHz radio for 802.11a/n. The two radios can operate concurrently.
Although hive members automatically adjust their signal strength according to their environments, you can
manually resize the area of coverage by increasing or decreasing the signal strength. To resize the coverage
area, enter the interface { wifi0 | wifi1 } radio power <number> command, where <number>
can be from 1 to 20 and represents a value in dBm.
For more information about configuring antennas, see "Configuring Antennas" on page 71.
10/100/1000 Ethernet
port
The waterproof 10/100/1000 Ethernet port accepts standard Ethernet cat5,
cat5e, or cat6 Ethernet cable, and is powered from 802.3af-compatible power
sourcing equipment (PSE). The pin assignments follow the TIA/EIA-568-B
standard. To further protect your Ethernet connection from extreme weather
conditions, install the waterproof cable housing on the Ethernet cable. See
"Attaching the Ethernet Cable Waterproof Housing" on page 26.
Table 1 AP170 hardware components (Continued)
Component Description
This manual suits for next models
13
Table of contents
Other Aerohive Networks Wireless Access Point manuals

Aerohive Networks
Aerohive Networks HiveAP 100 Series Instruction manual

Aerohive Networks
Aerohive Networks Aerohive APs Operating and maintenance manual

Aerohive Networks
Aerohive Networks HiveAP 320 User manual

Aerohive Networks
Aerohive Networks Aerohive AP141 User manual

Aerohive Networks
Aerohive Networks AP650 Installation manual