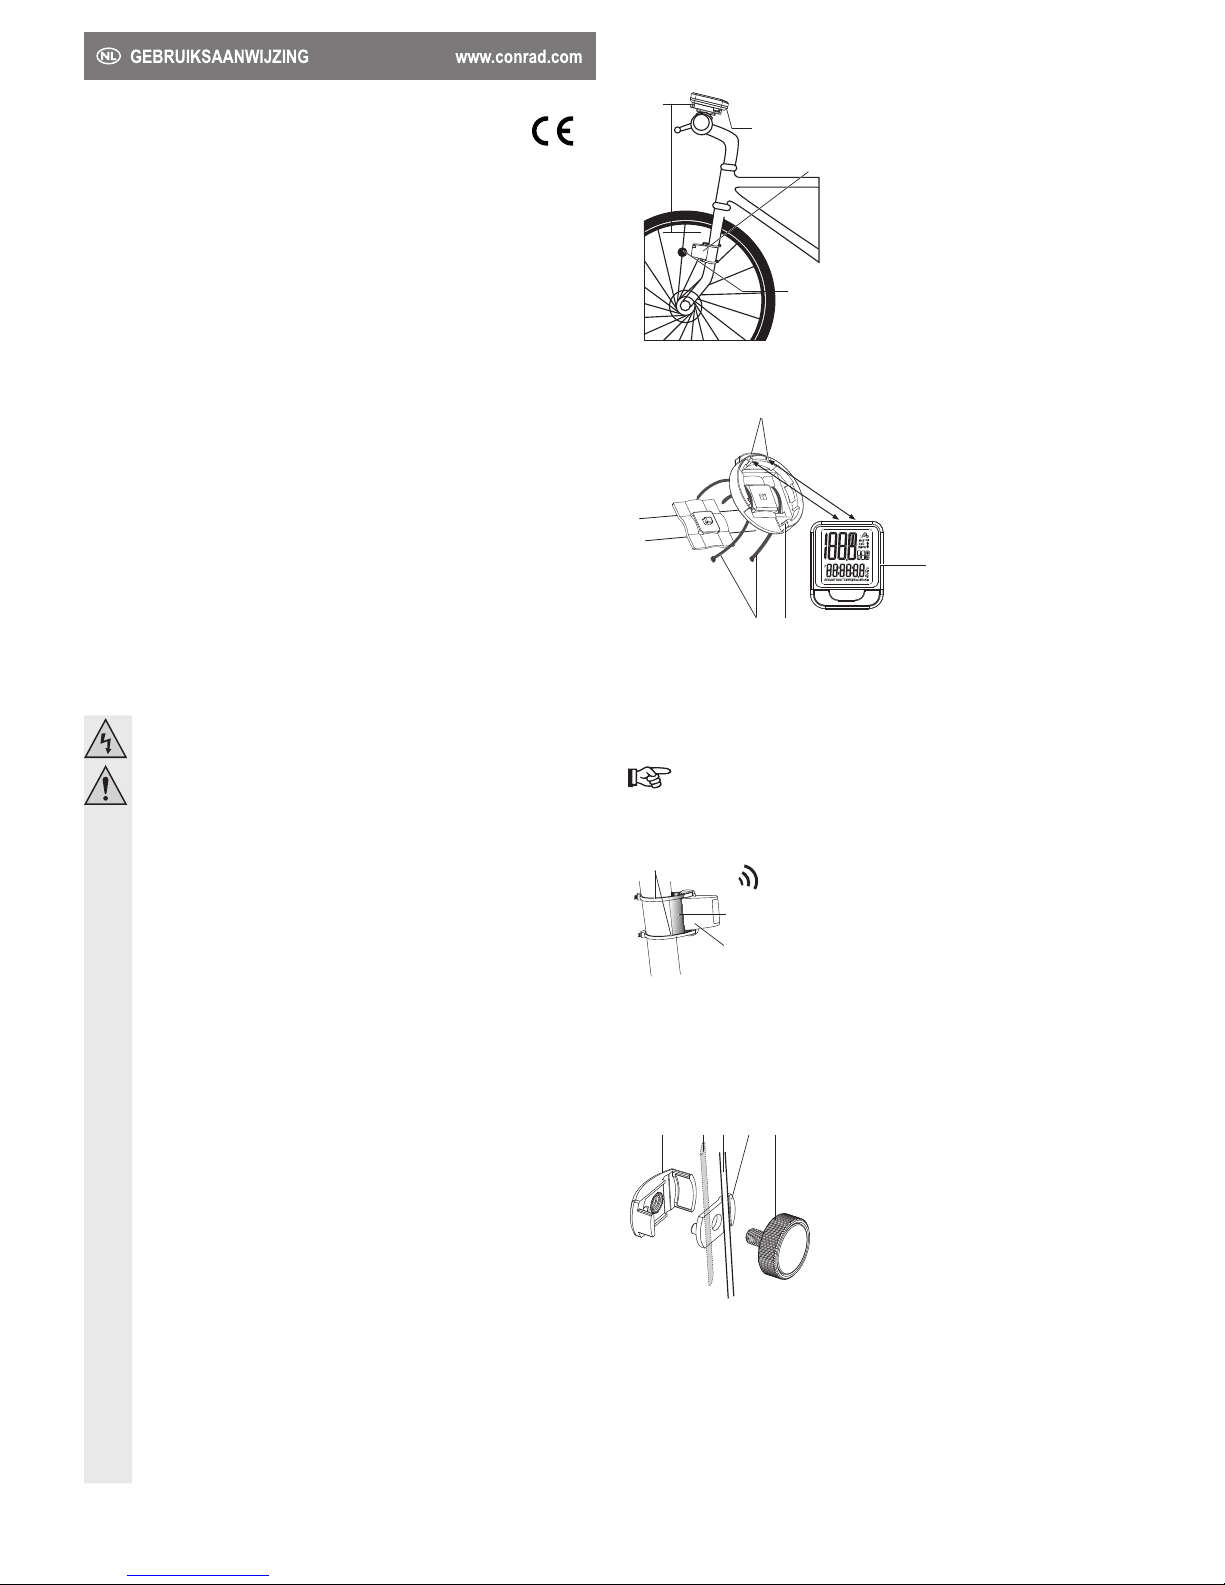
Conrad 1217430 User manual

Installation and mounting
a) Overview of individual components
Attaching the bicycle computer
Attaching the speed sensor
Attaching the magnet
max. 70 cm
b) Attaching the bicycle computer
MOD E SET
1
23
4
Contacts on the
rear side 1 Bicycle computer
2 Mount
3 Cable ties
4 Contacts
1. Secure the mount (2) to the handlebar with two cable ties (3), as shown in the picture. Ensure that the
cable ties sit securely.
2. Insert the bicycle computer (1) into the bayonet mount and lock it into place by turning it in a clockwise
direction. Ensure that the two contacts (4) on the mount and the bicycle computer are securely
connected to each other so that they conduct electricity. Dirt may impair the transmission of data.
Remove the bicycle computer from the bayonet mount and take it with you if you park and leave
your bicycle in publicly accessible places.
c) Attaching the speed sensor
sensor
5
3
6
3 Cable ties
5 Rubber sheet
6 Speed sensor
1. Place the rubber sheet (5) under the speed sensor (6) in the correct orientation.
2. Secure the speed sensor sideways to the front fork of the bicycle with two cable ties (3), as shown in
the picture. The part of the speed sensor marked with "SENSOR" must face inwards. Ensure that the
cable ties sit securely.
d) Attaching the magnet
7 1098a 8b 7 Mount
8 a/b Cross section of spoke
9 Rubber sheet
10 Magnet
1. Secure the magnet (10) to a round spoke (8 a) on the front wheel, as shown in the picture. If the spokes
of your bicycle have an oval cross section (8 b), attach the magnet to the other side of the mount (7).
The different mounting locations for both types of spoke are shown in the picture.
2. In all cases, ensure that the rubber sheet (9) is straight and uncreased. The magnet must sit securely
and must not slip out of place when cycling at high speeds.
Bicycle computer, wireless Version 08/15
Item no. 1217430
Intended use
Thisbicyclecomputerisdesignedtomeasureanddisplayspecicdataonthebicycle(e.g.time,ridingtime,
distance travelled and calories burned). A magnet is mounted to the front wheel of the bicycle and a speed
sensor is attached to the rigid fork. The speed sensor detects the rotations of the wheel and sends impulses
to the bicycle computer. A tachometer and stopwatch are integrated into the bicycle computer. The bicycle
computer and its accessories are only designed for use on a standard bicycle. Mounting and operating the
device on another type of vehicle, e.g. a motorbike is not permitted! The product is only intended for private
use. It is not designed for commercial use. The product is weatherproof.
For safety and approval purposes (CE), you must not rebuild and/or modify this product. If you use the
product for purposes other than those described above, the product may be damaged. In addition, improper
usecancausehazardssuchasshortcircuiting,re,electricshocketc.Readtheinstructionscarefullyand
keep them. Make this product available to third parties only together with its operating instructions.
This product complies with the statutory national and European requirements. All company names and
product names are trademarks of their respective owners. All rights reserved.
Delivery content
• Bicycle computer with mount
• Speed sensor
• Rubber sheet
• Magnetic unit
• 4 x cable ties
• 2 x batteries (CR2032)
• Operating instructions
Safety instructions
Read the operating instructions carefully and especially observe the safety information.
If you do not follow the safety instructions and information on proper handling in this
manual, we assume no liability for any resulting personal injury or damage to property.
Such cases will invalidate the warranty/guarantee.
a) Persons / Product
• The device is not a toy. Keep it out of the reach of children and pets.
• Do not leave packaging material lying around carelessly. These may become dangerous
playing material for children.
• Protect the product from extreme temperatures, direct sunlight, strong jolts, moisture,
ammablegases,vapoursandsolvents.
• Do not place the product under any mechanical stress.
• If it is no longer possible to operate the product safely, take it out of operation and protect it from
any accidental use. Safe operation can no longer be guaranteed if the product:
- is visibly damaged,
- is no longer working properly,
- has been stored for extended periods in poor ambient conditions or
- has been subjected to any serious transport-related stresses.
• Please handle the product carefully. Jolts, impacts or a fall even from a low height can damage
the product.
• Also observe the safety and operating instructions of any other devices which are connected
to the product.
b) Batteries
• Correct polarity must be observed while inserting the batteries.
• Batteries should be removed from the device if it is not used for a long period of time to avoid
damage through leaking. Leaking or damaged batteries might cause acid burns when in
contact with skin, therefore use suitable protective gloves to handle corrupted batteries.
• Batteries must be kept out of reach of children. Do not leave batteries lying around, as there is
a risk that children or pets may swallow them.
• Batteries must not be dismantled, short-circuited or thrown into re. Never recharge non-
rechargeable batteries. There is a risk of explosion!
c) Miscellaneous
• Consult an expert when in doubt about operation, safety or connection of the device.
• Maintenance,modicationsandrepairsaretobeperformedexclusivelybyanexpertorata
qualiedshop.
• If you have questions which remain unanswered by these operating instructions, contact our
technical support service or other technical personnel.

Fork
Magnet
5 mm max
3. The magnet must pass directly over the part of the speed sensor marked with the word "SENSOR"
when the wheel turns.
4. Adjust the air gap between the speed sensor and the magnet to no more than 5 mm by gently turning
the speed sensor. In order to ensure reliable operation, they must not touch one another, neither should
they be too far apart. Otherwise, the magnetic sensor in the speed sensor will not detect the passing
of the magnet properly.
5. Check that the magnet does not rub against the speed sensor.
Operating elements
MODE SET
-
MODE button Switches between the clock display and riding time "RTM", total trip time "TTM", trip
distance "DST", total distance travelled "ODO" and calories burned "Kcal".
SET button Activates the light for a few seconds.
Switch between the current speed , maximum speed "MAX" and average speed
"AVG".
Theridingspeedisdisplayedwhencycling.Thebikesymbolashestogetherwithan
arrow symbol on the trend indicator (faster or slower).
Operation
a) Inserting/changing the battery
When the battery level symbol is displayed, you are advised to change the battery in the
bicycle computer promptly.
1. Remove the battery compartment cover from the underside of the bicycle computer by turning
anticlockwise. Use a suitable tool or other aid, e.g. a coin.
2. Remove the battery.
3. Insert a CR2032 battery with correct polarity in the battery compartment (observe plus/+ and minus/-).
The positive terminal (+) faces outwards towards you.
4. Close the battery compartment.
5. Repeat the same steps to insert the battery in the same way for the speed sensor.
b) Determining the wheel circumference
The wheel circumference must be entered into the bicycle computer in order for it to be able to display
distances and speeds. You must measure or calculate the wheel circumference before inputting it into the
computer.
Measuring the wheel circumference
Find a level and smooth surface (e.g. garage oor) to make the measurement. Mark a position on the
outsideofthetyrewithaline;dothesameontheoor(pointA).Pushthebicycleforwarduntilthetyrehas
completedafullrevolution.Markthispointontheoor(pointB).MeasurethedistancefrompointAtoBwith
a tape measure or similar measuring tool. This is the wheel circumference that must be input into the bicycle
computer (the value in centimetres).
Calculating the wheel circumference
Alternatively, the wheel circumference can be calculated using the following formulae:
Ø in centimetres × 3.1416 = wheel circumference (cm)
Ø in inches × 2.54 × 3.1416 = wheel circumference (cm)
Example: 26 inches × 2.54 × 3.1416 = wheel circumference of 207.5 cm
c) Turning on/off, energy saving mode / sleep mode
• The bicycle computer is ready to use after inserting the battery.
• If only the time is displayed or the "SLEEP" status is shown, turn on the bicycle computer
bybrieypressinganybutton.Thespeedsensorcannotbeturnedoff.Itconsumessolittle
energy in standby mode that it is not necessary to turn it off.
• If no button is pressed or no movement is detected by the speed sensor, the bicycle
computer switches into standby mode after approximately 5 minutes to save electricity. Only
the time is displayed on the LCD.
• If the period of inactivity lasts for 7 days, the bicycle computer switches itself into sleep
mode. "SLEEP" is displayed on the LCD.
• To place the bicycle computer into sleep mode manually, hold down the MODE and SET
buttons for approximately 6 seconds. After 4 seconds the LCD will show all the display
elements. 2 seconds later, “SLEEP” will appear on the LCD.
• Press any button to wake the computer from sleep mode.
d) Display modes
• Press the MODE button to move through the display cycle (in a clockwise direction).
Time Journey time Total journey time Distance travelled
Total distance travelledCalories burned
• Press the SET button to toggle between current speed , the last saved maximum speed value "MAX"
and average speed “AVG“.
e) Basic settings
Make these settings when the bike to which the bicycle computer is mounted is stationary.
There are two ways to enter the settings mode (see 1.a) and 1.b) below).
1. a) The bicycle computer will enter the settings mode automatically after the battery has been inserted. The
LCDwillshowalldisplayelementsatthesametime.Thetimedisplayformatashesafterapproximately
2 seconds. Press the SETbuttontochangethetimedisplayformat.Conrmyourselectionbypressing
the MODEbutton.Theminutevaluebeginstoash.Proceeddirectlytostep2.
1. b) To enter the settings mode manually, hold down the MODE and SET button for approx. 4 seconds
until all display elements appear on the LCD. All display values will be deleted (see section f) “Clearing
savedvaluesandreset”).Thetimedisplayformatashesafterapprox.2seconds.PresstheSET button
tochange thetimedisplayformat.ConrmyourselectionbypressingtheMODE button. The minute
valuebeginstoash.
If no button is pressed for approx. 30 seconds when in the settings mode, the bicycle computer
will automatically revert to the time display.
2. Press the SET button to change the minute value. Press the MODEbuttontoconrmthesetting.The
secondvalueashes.
3. Press the SET button to reset the second value to zero. Press the MODEbuttontoconrmthesetting.
4. Theunitsettingsash;"UNIt" is displayed. Press the SET button to change the format of the units. Both
metric and imperial units can be chosen. Press the MODEbuttontoconrmthesetting.
5. Thedigits for thewheelcircumference ash.Pressthe SETbuttonto settherst digitofthe wheel
circumference. The digits 0-9 can be chosen in succession. Press the MODE button to conrm the
settingofeachdigit.The next digit ashes. Repeat this procedureuntilalldigitshavebeenset.The
value to be input in centimetres should be determined as described in the section "Determining the
wheel circumference".
6. Afterconrmingthelastdigitthekilometredisplayashes;"SEt OdO" is displayed. Press the SET button
tomanuallysettherstdigitofthetotaldistancetravelled.Thedigits0-9canbechoseninsuccession.
Press the MODEbuttontoconrmthesettingofadigit.Thenextdigitashes.Repeatthisprocedure
until all digits have been set.
7. Afterconrmingthelastdigitthetimedisplayashes;"SEt ttM" is displayed. Press the SET button to
settherstdigitofthetotaltimetravelled(inhours).Thedigits0-9canbechoseninsuccession.Press
the MODEbuttontoconrmthesettingofadigit.Thenextdigitashes.Repeatthisprocedureuntilall
digits have been set. Press the MODEbuttontoconrm;thebicyclecomputerreturnstothenormal
display (time display).
f) Clearing saved values and reset
• Press the MODE button for about 3 seconds when one of the values for "DST", "ODO", "TTM", "RTM"
or "Kcal" is displayed on the bicycle computer. "reset" is displayed on the LCD. Release the button
after 3 seconds; the saved data values for trip distance "DST", total distance travelled "ODO", total trip
time (TTM), riding time (RTM) and calories burned (Kcal) have now been deleted The time settings are
retained.
• Press and hold the MODE and SET buttons at the same time until all display segments are shown on the
LCD. Let go of the button immediately to delete all data.
• Removing the battery from the bicycle computer also deletes all data.

This is a publication by Conrad Electronic SE, Klaus-Conrad-Str. 1, D-92240 Hirschau
(www.conrad.com).
Allrightsincludingtranslationreserved.Reproductionbyanymethod,e.g.photocopy,microlming,
or the capture in electronic data processing systems require the prior written approval by the editor.
Reprinting, also in part, is prohibited. This publication represent the technical status at the time of
printing.
© Copyright 2015 by Conrad Electronic SE.
V2_0815_02_JH
g) Troubleshooting
Nothing shown on the bicycle computer display
• Press any button to switch on the computer.
• Check the battery in the bicycle computer and replace it with a new one if necessary.
No recognition of wheel rotations, no data transmission by the wireless sensor.
• The distance between the wireless sensor and the magnet should be approximately 5 mm. You should
hear a soft click when the magnet passes the speed sensor. If necessary, mount the magnet on another
bicycle spoke. Turn the speed sensor inwards slightly to decrease the distance between the speed sensor
and the magnet (see "Installation and mounting")
• Check the position of the magnet and speed sensor relative to one another. The magnet must pass over
the part marked "SENSOR" in the front section.
• Check the battery in the speed sensor and replace it with a new one if necessary.
Black display
• The display was exposed to direct sunlight for too long. The display will work again when the screen
cools down.
Maintenance and cleaning
• The product does not require maintenance except for occasional cleaning. For cleaning, use a soft, anti-
static and lint-free cloth.
• Do not use abrasive or chemical cleaning agents.
• Do not immerse the product in water.
Declaration of Conformity (DOC)
We, Conrad Electronic SE, Klaus-Conrad-Straße 1, D-92240 Hirschau, hereby declare that this product
conforms to the fundamental requirements and the other relevant regulations of the directive 1999/5/EC.
The Declaration of Conformity for this product can be found at www.conrad.com.
Disposal
a) Product
Electronic devices are recyclable waste and must not be disposed of in the household waste.
At the end of its service life, dispose of the product according to the relevant statutory regulations.
Remove any inserted batteries and dispose of them separately from the product.
b) Batteries
As the end user, you are required by law (Battery Ordinance) to return all used batteries; disposal of them in
the household waste is prohibited!
Contaminated batteries are labelled with this symbol to indicate that disposal in the domestic
waste is forbidden. The designations for the heavy metals involved are: Cd = Cadmium, Hg =
Mercury, Pb = Lead (name on batteries, e.g. below the trash icon on the left).
Used batteries can be returned to collection points in your municipality, our stores or wherever
(rechargeable) batteries are sold.
Youthusfullthelegalrequirementsandmakeyourcontributiontoprotectingtheenvironment.
Technical data
a) Bicycle computer
Battery................................................................... CR2032
Operating conditions.............................................. 0 to +40 °C, 0 - 90 % RH
Storage conditions................................................. -10 to +50 °C, 0 - 100 % RH
Dimensions (W x H x D) ........................................ 39 x 16 x 49 mm
Weight ................................................................... 22 g (with battery)
b) Speed sensor
Battery................................................................... CR2032
Transmitting frequency.......................................... 125 kHz
Range.................................................................... max. 70 cm

Installation et montage
a) Aperçu des pièces
Montage de l'ordinateur
Fixation du capteur de vitesse
Fixation de l'aimant
max. 70 cm
b) Montage de l'ordinateur
MOD E SET
1
23
4
Contacts à l’arrière 1 Compteur ordi de vélo
2 Support
3 Attaches de câble
4 Contacts
1. Montez le support (2) sur le guidon du vélo à l'aide de deux attaches de câble (3), comme sur
l'illustration. Assurez-vous que les attaches de câble tiennent bien en place.
2. Emboîtez l'ordinateur (1) dans la fermeture à baïonnette du support, puis verrouillez-le en le tournant
dans le sens des aiguilles d'une montre jusqu'à la butée. Veillez à ce que les deux contacts (4) situés
derrièrel’ordidevélo reposent biensurles contacts correspondantsdusupportan d’assurer une
transmission correcte des données. La transmission peut être perturbée si les contacts sont encrassés.
Quand vous souhaitez laisser votre vélo stationné dans un espace public, décrochez
l'ordinateur de la fermeture à baïonnette et prenez-le avec vous.
c) Fixation du capteur de vitesse
sensor
5
3
6
3 Attaches de câble
5 Base en caoutchouc
6 Capteur de vitesse
1. Placez la base en caoutchouc (5) sous le capteur de vitesse (6), en faisant attention à l'orienter dans
le bon sens.
2. Montez le capteur de vitesse latéralement sur la fourche avant du vélo à l'aide de deux attaches de
câble (3), comme sur l'illustration. La partie du capteur marquée SENSOR est orientée vers l'intérieur.
Veillez particulièrement à ce que les attaches de câble tiennent bien en place.
d) Fixation de l'aimant
7 1098a 8b 7 Support
8 a/b Section des rayons
9 Base en caoutchouc
10 Aimant
1. Si les rayons du vélo ont une section ronde (8 a), montez l'aimant (10) de la manière indiquée sur
l'illustration. Si les rayons du vélo ont une section ovale (8 b), montez l'aimant de l'autre côté du
support (7). L'illustration vous indique les emplacements de montage possibles selon le type de rayon.
2. Dans les deux cas, veillez à ce que la base en caoutchouc (9) soit montée bien droit et sans pli.
L'aimant doit tenir en place sans risquer de glisser, même lorsque vous roulez très vite.
Compteur ordi de vélo, sans l Version 08/15
Nº de commande 1217430
Utilisation prévue
Cecompteurordidevélosertàmesureretafcheruncertainnombrededonnéesenrapportaveclevélo
(heure, temps de trajet, distance parcourue, calories consommées). Un aimant est monté sur la roue avant
duvélo,etuncapteurdevitessesurlafourchexe.Cecapteurdevitessedétectelesrotationsdelaroueet
envoie des signaux radio à l’ordinateur. L'ordinateur comporte également un tachymètre et un chronomètre.
L’ordinateur et ses accessoires sont conçus pour être utilisés sur un vélo ordinaire seulement. N'essayez en
aucun cas de les monter et de les utiliser sur un autre type de véhicule (ex : une moto)! Ce produit est conçu
pour une utilisation dans un environnement privé. Il n'est pas destiné à un usage commercial. Ce produit
est à l'épreuve des intempéries.
Pour des raisons de sécurité et d'homologation (CE), toute transformation et/ou modication du produit
est interdite. Si vous utilisez le produit à d'autres ns que celles décrites précédemment, cela risque
d'endommager le produit. Par ailleurs, une utilisation incorrecte peut être source de dangers tels que court-
circuit, incendie, électrocution. Lisez attentivement le mode d'emploi et conservez le. Ne transmettez le
produit à des tiers qu'accompagné de son mode d'emploi.
Le produit est conforme aux exigences des directives européennes et nationales en vigueur. Tous les noms
d'entreprises et appellations de produits contenus dans ce mode d'emploi sont des marques déposées des
propriétaires correspondants. Tous droits réservés.
Contenu d'emballage
• Compteur ordi de vélo avec support
• Capteur de vitesse
• Base en caoutchouc
• Dispositif aimanté
• 4 x attaches de câble
• 2 x piles CR2032
• Mode d'emploi
Consignes de sécurité
Lisez le mode d'emploi avec attention en étant particulièrement attentif aux consignes de
sécurité. En cas de non-respect des consignes de sécurité et des informations données
dans le présent mode d'emploi pour une utilisation correcte de l'appareil, nous déclinons
toute responsabilité en cas de dommage personnel ou matériel consécutif. En outre, la
responsabilité/garantie sera alors annulée.
a) Personnes / Produit
• Ce produit n'est pas un jouet. Gardez-le hors de portée des enfants et des animaux
domestiques.
• Ne laissez pas traîner le matériel d'emballage. Cela pourrait devenir un jouet pour enfants
très dangereux.
• Le produit ne doit pas être exposé à des températures extrêmes, à la lumière directe du soleil,
àdeschocsviolents,àl’eau,àdesgazinammables,àdesvapeursetdessolvants.
• N'exposez pas le produit à des contraintes mécaniques.
• Si une utilisation en toute sécurité n'est plus possible, cessez d'utiliser le produit et protégez-le
d'une utilisation accidentelle. Une utilisation en toute sécurité n'est plus garantie si le produit :
- présente des traces de dommages visibles,
- le produit ne fonctionne plus comme il devrait,
- a été stocké pour une période prolongée dans des conditions défavorables ou bien
- a été transporté dans des conditions très rudes.
• Maniez le produit avec précaution. À la suite de chocs, de coups ou de chutes, même de faible
hauteur, l'appareil peut être endommagé.
• Respecter également les informations concernant la sécurité et le mode d'emploi pour les
autres appareils connectés à cet appareil.
b) Piles
• Respecter la polarité lors de l’insertion des piles.
• Retirerlespilesdel’appareils’iln’estpasutilisépendantlongtempsand’éviterlesdégâts
causés par des fuites. Des piles qui fuient ou qui sont endommagées peuvent provoquer des
brûlures acides lors du contact avec la peau ; l’utilisation de gants protecteurs appropriés est
par conséquent recommandée pour manipuler les piles corrompues.
• Garder les piles hors de portée des enfants. Ne pas laisser traîner de piles car des enfants ou
des animaux pourraient les avaler.
• Les piles ne doivent pas être démontées, court-circuitées ou jetées au feu. Ne jamais recharger
des piles non rechargeables. Il existe un risque d’explosion !
c) Divers
• Adressez-vous à un technicien spécialisé si vous avez des doutes concernant le mode de
fonctionnement, la sécurité ou le raccordement de l`appareil.
• Tout entretien, ajustement ou réparation ne doit être effectué que par un spécialiste ou un
atelier spécialisé.
• Si vous avez encore des questions auxquelles ce mode d`emploi n`a pas su répondre, nous
vous prions de vous adresser à notre service technique ou à un expert.

Fourche
Aimant
5 mm max
3. Lorsque la roue tourne, l'aimant doit passer juste devant la partie du capteur de vitesse marquée
SENSOR.
4. L'interstice entre l'aimant et le capteur ne doit pas dépasser 5 mm; corrigez-le si besoin est en tournant
légèrement le capteur. Pour que le système fonctionne correctement, les deux ne doivent pas se
toucher, mais ne doivent pas non plus être trop éloignés l'un de l'autre, sinon le détecteur d'aimant du
capteur ne pourra pas détecter correctement le passage de l'aimant.
5. Assurez-vous que l'aimant ne risque pas de toucher le capteur.
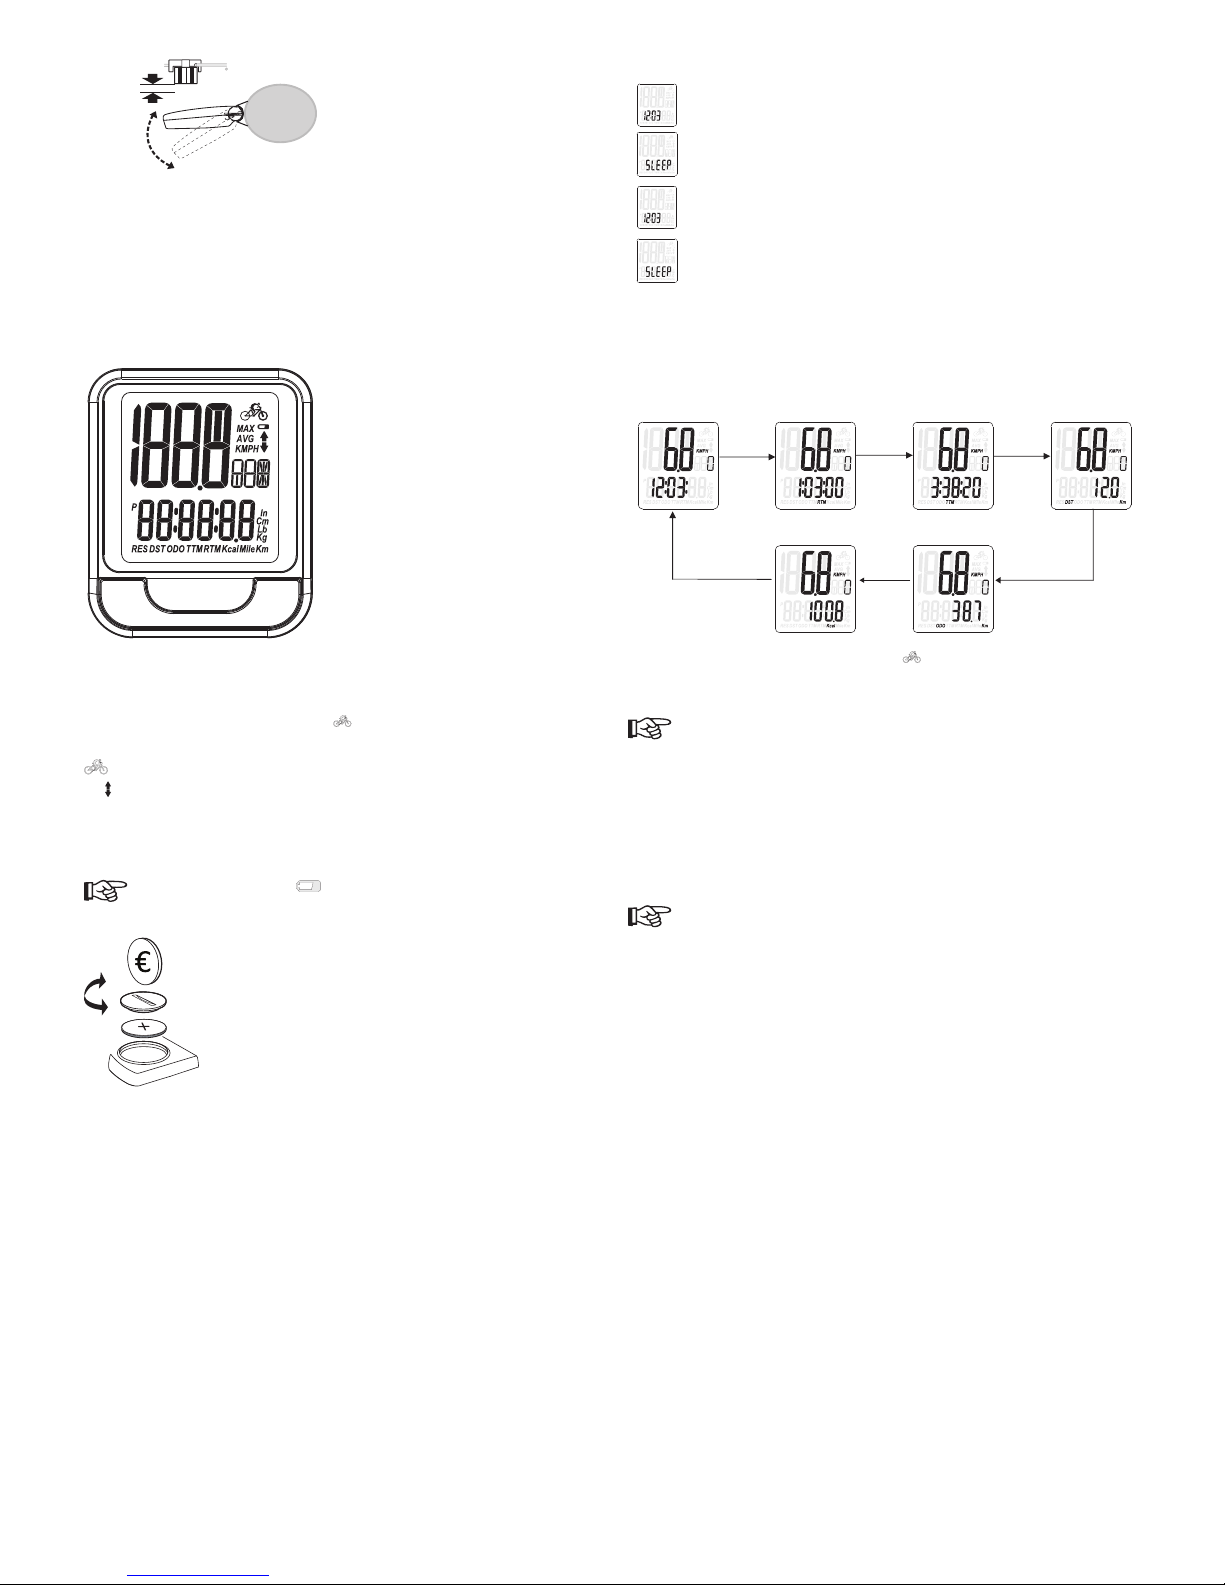
Eléments de fonctionnement
MODE SET
-
Touche MODE Permetd'afcherlesdifférentsparamètresàl'écranl'unaprèsl'autre:duréeécoulée
RTM, durée totale TTM, distance parcourue DST, distance totale ODO, calories
consommées Kcal.
Touche SET Éclairer l'écran quelques secondes.
Permetd'afcheralternativementlavitesseinstantanée , la vitesse maximale (MAX)
et la vitesse moyenne (AVG).
Quand vous roulez, l'écran indique la vitesse en cours. L'icône de vélo clignote,
accompagnéed'uneècheindiquantsivousêtesentraind'accélérerouderalentir.
Mise en service
a) Installer/changer la pile
Lorsque l'icône de niveau de charge s'afcheàl'écran,ilestconseillédechangerlapile
le plus rapidement possible.
1. Le compartiment des piles est situé sous l'ordinateur; enlevez le couvercle en le tournant dans le sens
inverse des aiguilles d'une montre à l'aide d'un outil ou d'un objet adéquat (une pièce, par exemple).
2. Enlevez la pile.
3. Mettez une pile de type CR2032 dans le compartiment, en respectant les indications de polarité (plus/+
et moins/-). Le pôle plus (+) est orienté vers l'extérieur.
4. Remettez le couvercle en place.
5. Procédez de la même manière pour installer la pile du capteur de vitesse.
b) Déterminer la circonférence des roues
Anque l'ordinateurpuisse afcheravec précisionla vitesseet ladistance parcourue, il est nécessaire
d'enregistrer la circonférence des roues dans l'ordinateur. Pour cela, vous devez mesurer ou calculer la
circonférence au préalable.
Mesure de la circonférence
Choisissez une surface plane et lisse (ex : le sol de votre garage). Marquez un trait de repère sur le pneu,
et également sur le sol (point A). Faites rouler le vélo jusqu'à ce que le pneu ait effectué un tour complet.
Marquez un trait de repère sur le point d'arrivée (point B). Maintenant, mesurez la distance entre les points A
et B à l'aide d'un mètre ruban ou d'un mètre pliant. Cette distance correspond à la circonférence de la roue,
que vous saisirez ensuite dans l'ordinateur (en centimètres).
Calcul de la circonférence
Une autre méthode consiste à calculer la circonférence de l'une des manières suivantes :
Ø en centimètres × 3,1416 = circonférence (en cm)
Ø en pouces × 2,54 × 3,1416 = circonférence (en cm)
Exemple : 26 pouces × 2,54 × 3,1416 = 207,5 cm de circonférence
c) Marche/arrêt/mode économie d'énergie/mode sommeil
• Une fois la pile installée, l'ordinateur est prêt à l'emploi.
• Lorsquel'écranafcheseulementl'heureoulemot«SLEEP », un appui bref sur n'importe
queltouchesuftpourallumerl'ordinateur.Lecapteurdevitessenepeutpass'éteindre.
Néanmoins, sa consommation d'énergie en mode veille est si faible qu'il n'est pas
nécessaire de l'éteindre.
• Si aucune touche n'est appuyée et si le capteur de vitesse ne détecte aucun mouvement
pendant environ 5 minutes, l'ordinateur passe automatiquement en mode veille an
d'économiserlapile.L'écranLCDn'afchealorsquel'heure.
• Au bout de 7 jours d'inactivité, l'ordinateur passe automatiquement en mode sommeil et
l'écranindique«SLEEP ».
• Pour mettre l’ordinateur manuellement en mode sommeil, appuyez en même temps sur les
touches MODE et SETpendant6secondes.Auboutd’env.4secondes,l’écranafchetous
lesélémentsafchablessimultanément.2secondesplustard,l’écranindique«SLEEP ».
• Pour réactiver l'ordinateur, appuyez sur n'importe quelle touche.
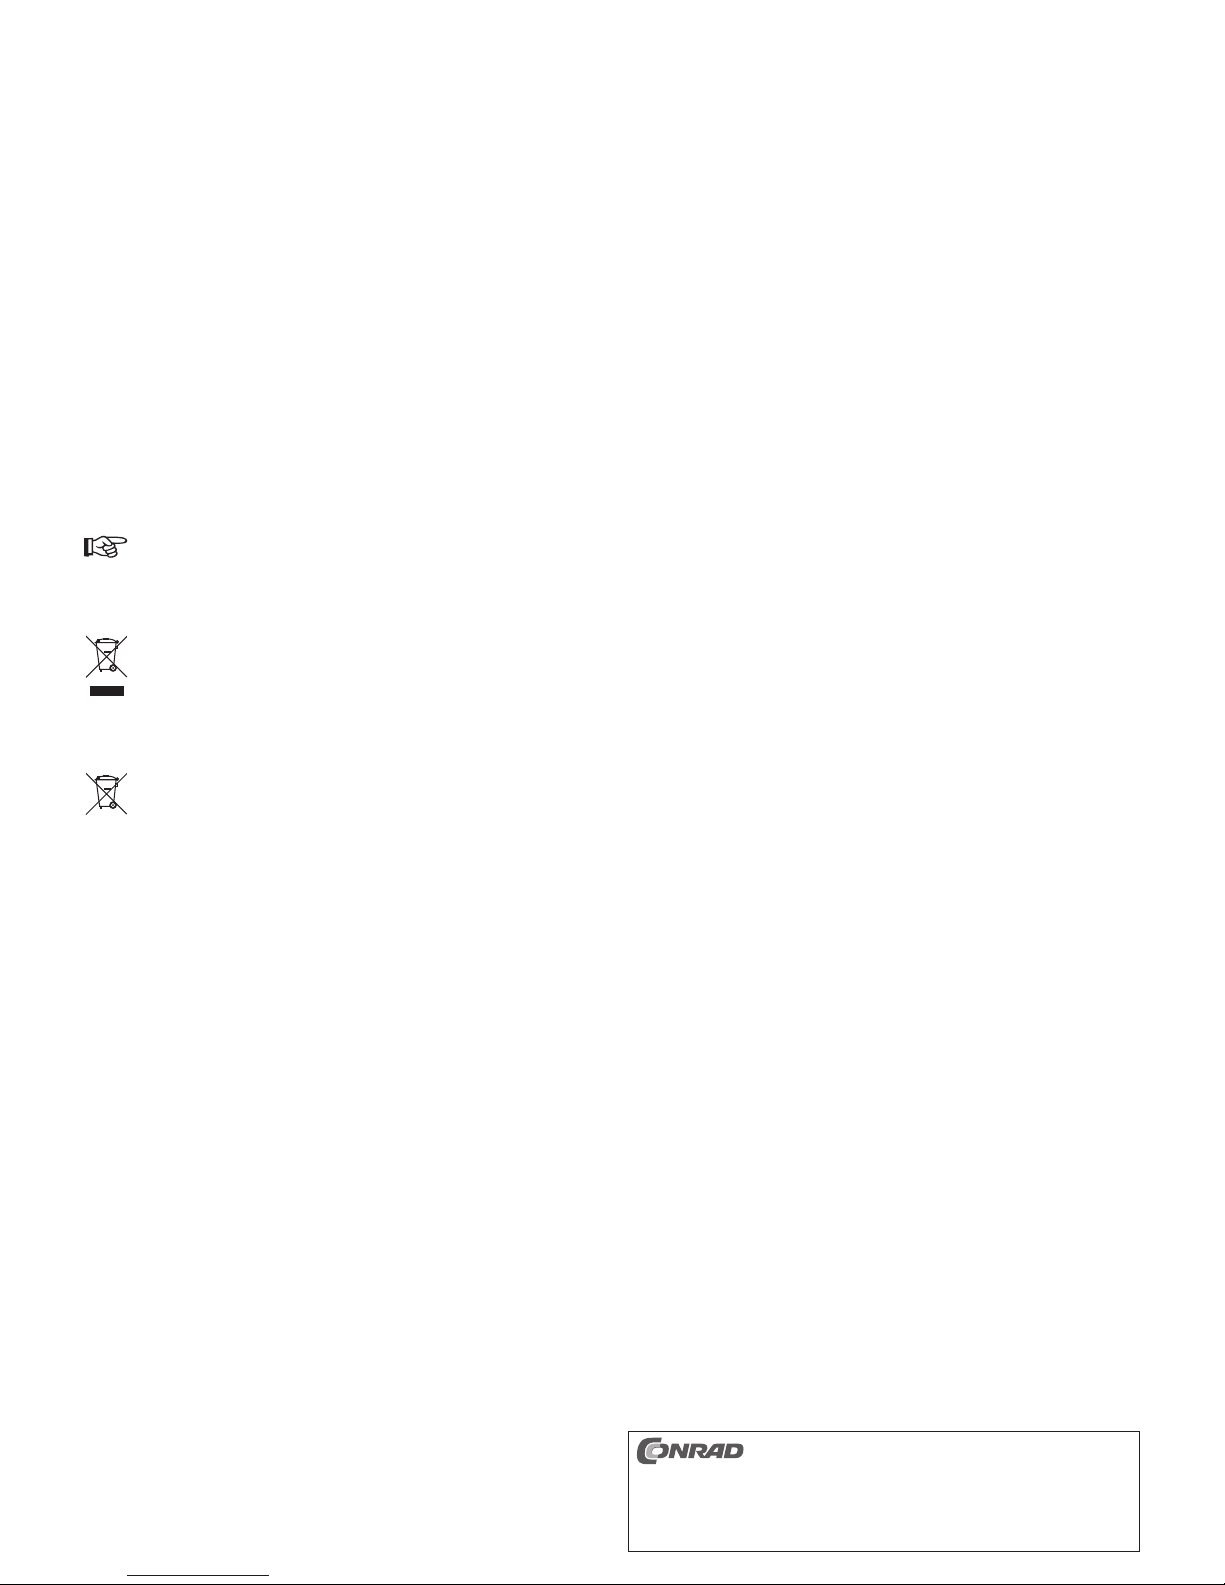
d) Modes d'afchage
• La touche MODEpermetd'afcherlesdifférentsparamètresdansl'ordresuivant(sensdesaiguillesd'une
montre)
Heure Temps de trajet Durée totale Distance
Distance totaleCalories consommées
• La touche SET permet d'afcher successivement les différents paramètres : vitesse instantanée ,
dernier relevé de vitesse maximale (MAX) et vitesse maximale (AVG).
e) Réglages de base
Les réglages suivant de l'ordinateur doivent s'effectuer avec le vélo à l'arrêt. Les réglages de
base peuvent s’effectuer de deux manières différentes (voir point 1.a) et 1.b)).
1. a)Unefoislapileenplace,lemodederéglageselanceautomatiquementetl’écranafchetousles
éléments afchables en même temps. Env. 2 secondes plus tard, les chiffres du format d’afchage
horaire clignotent. Appuyez sur SETpourchangerleformatd’afchagehoraire,puisappuyezsurMODE
pourconrmerleréglage.Leschiffresdesminutesclignotent.Allezdirectementàl’étape2.
1. b) Pour passer manuellement en mode réglage, appuyez en même temps sur les touches MODE et
SETpendant4secondes,jusqu’àcequetouslesélémentsafchabless’illuminentàl’écran.Toutesles
valeursafchéess’effacent(cfsectionf)«Réinitialisationetremiseàzérodesparamètresenregistrés»).
Leschiffresduformatd’afchagehorairesemettentàclignoterauboutd’env.2secondes.Appuyezsur
SETpourchangerleformatd’afchagehoraire,puisappuyezsurMODEpourconrmerleréglage.Les
chiffres des minutes clignotent.
Dans les deux méthodes de réglage, si aucune touche n’est appuyée pendant 30 secondes,
l’ordidevélorevientautomatiquementàl’afchagehorairenormal.
2. Réglez les minutes à l'aide de la touche SET. Appuyez sur MODEpourconrmerleréglage.Leschiffres
des secondes se mettent à clignoter.
3. Appuyez sur SET pour remettre les secondes à zéro. Appuyez sur MODEpourconrmerleréglage.
4. L'écranafchel'icône«UNIt » et les chiffres de l'unité de mesure clignotent. Réglez l'unité de mesure
à l'aide de la touche SET. Vous avez le choix entre le système métrique et le système de mesure
américain. Appuyez sur MODEpourconrmerleréglage.
5. La mesure de la circonférence des roues se met à clignoter. Appuyez sur SET pour régler le premier
chiffredelacirconférence.Leschiffres0à9délentdansl'ordre.AppuyezsurMODEpourconrmerle
premier chiffre. Le chiffre suivant clignote. Procédez de même avec tous les autres chiffres restant. Pour
déterminerlavaleurdelacirconférence(encentimètres),veuillezvousréféreràlasection«Déterminer
la circonférence des roues ».
6. Une fois le dernier chiffre réglé, le nombre de kilomètres clignote et l'écran indique « SEt OdO ».
Appuyez sur SET pour régler manuellement le premier chiffre de la distance totale. Les chiffres 0 à 9
délentdansl'ordre.AppuyezsurMODEpourconrmerlepremierchiffre.Lechiffresuivantclignote.
Procédez de même avec tous les autres chiffres restant.
7. Unefoisledernierchiffreréglé,laduréeclignoteetl'écranindique«SEt ttM ». Appuyez sur SET pour
réglermanuellementlepremierchiffredeladuréetotale.Leschiffres0à9délentdansl'ordre.Appuyez
sur MODEpourconrmerlepremierchiffre.Lechiffresuivantclignote.Procédezdemêmeavectous
les autres chiffres restant. Appuyez sur MODE pour conrmer les réglages; l'ordinateur retourne à
l'afchagenormal(celuidel'heure).
f) Réinitialisation et remise à zéro des paramètres enregistrés
• Lorsquel'écran del'ordinateurafchel'undesparamètres suivants:DST, ODO, TTM, RTM ou Kcal.,
faites un appui long (env. 3 secondes) sur la touche MODE. L'écran indique reset. Relâchez la touche
au bout de 3 secondes; les données enregistrées pour les paramètres de distance (DST), distance totale
(ODO), durée écoulée (RTM) et calories consommées (Kcal) sont effacées. En revanche, le réglage de
l'heure reste inchangé.
• Faites un appui long sur les touches MODE et SETsimultanément;touslesélémentss'afchentenmême
temps à l'écran. Relâchez les deux touches; toutes les données sont maintenant effacées.
• Le fait d'enlever la pile de l'ordinateur aboutit également à effacer toutes les données.

Ceci est une publication de Conrad Electronic SE, Klaus-Conrad-Str. 1, D-92240 Hirschau
(www.conrad.com).
Tous droits réservés, y compris de traduction. Toute reproduction, quelle qu‘elle soit (p. ex.
photocopie, microlm, saisie dans des installations de traitement de données) nécessite une
autorisation écrite de l‘éditeur. Il est interdit de le réimprimer, même par extraits. Cette publication
correspond au niveau technique du moment de la mise sous presse.
© Copyright 2015 par Conrad Electronic SE.
V2_0815_02_JH
g) Dépannage
L'écran de l'ordinateur est vide.
• Faites un appui court sur n'importe quelle touche pour l'allumer.
• La pile de l'ordinateur est peut-être épuisée; remplacez-la par une pile neuve, le cas échéant.
Aucun transfert de données, le capteur ne détecte pas la rotation de la roue.
• L'aimant doit passer à environ 5 mm du capteur. Lorsque l'aimant passe devant le capteur, vous devez
entendre un léger bruit de déclic. Si nécessaire, montez l'aimant sur un autre rayon de la roue. Tournez
légèrement le capteur de vitesse vers l'intérieur pour réduire la distance entre l'aimant et le capteur de
distance(voirsection«Installationetmontage»).
• Vériezlapositiondel'aimantparrapportaucapteurdevitesse.L'aimantdoitpasserjusteau-dessusde
la partie marquée SENSOR à l'avant du capteur.
• La pile du capteur de vitesse est peut-être épuisée; remplacez-la par une pile neuve, le cas échéant.
L'écran est noir
• L'écranestrestéausoleilpendanttroplongtemps.Unefoisl'écranrefroidi,l'afchageredeviendranormal.
Entretien et nettoyage
• Ce produit ne nécessite aucun entretien à part un nettoyage occasionnel. Pour le nettoyage, utilisez un
chiffon doux, antistatique et non pelucheux.
• N'utilisez pas de produit de nettoyage chimique ou abrasif.
• Le produit ne doit en aucun cas être plongé dans l'eau.
Déclaration de conformité (DOC)
Conrad Electronic SE, Klaus-Conrad-Strasse 1, D-92240 Hirschau, Allemagne, déclare que l'appareil est en
conformité avec les exigences fondamentales et les autres prescriptions pertinentes de la directive 1999/5/
CE.
La déclaration de conformité (DOC) de cet appareil peut être consultée sur le site www.
conrad.com.
Elimination des déchets
a) Produit
Les appareils électroniques sont des matériaux recyclables et ne doivent pas être éliminés avec
les ordures ménagères.
Enndevie,éliminezl'appareilconformémentauxdispositionslégalesenvigueur.
Retirez les piles insérées et éliminez-les séparément du produit.
b) Piles
Leconsommateurnalestlégalementtenuderapportertouteslespiles(ordonnancerelativeàl’élimination
des piles usagées); il est interdit de jeter les piles dans les ordures ménagères.
Lespilescontenantdessubstancestoxiquessontmarquéesparlesymboleci-contre,quisignie
qu’elles ne doivent pas être jetées avec les ordures ménagères. Les désignations pour le métal
lourdprépondérantsont:Cd=cadmium,Hg=mercure,Pb=plomb(ladésignationguresurles
piles, par ex. sous le symbole de poubelle ci-contre).
Vous pouvez rapporter gratuitement vos piles usagées aux centres de récupération de votre
commune, à nos succursales ou à tous les points de vente de piles.
Vous respectez ainsi les ordonnances légales et contribuez à la protection de l'environnement.
Caractéristiques techniques
a) Compteur ordi de vélo
Pile......................................................................... CR2032
Conditions de service ............................................ 0 à +40 °C, 0 - 90 % HR
Conditions de stockage ......................................... -10 à +50 °C, 0 - 100 % HR
Dimensions (L x H x P).......................................... 39 x 16 x 49 mm
Poids...................................................................... 22 g (avec la pile)
b) Capteur de vitesse
Pile......................................................................... CR2032
Fréquence d'émission ........................................... 125 kHz
Portée.................................................................... max. 70 cm

Installatie en montage
a) Overzicht van de afzonderlijke componenten
Fietscomputer bevestigen
Snelheidssensor bevestigen
Magneet bevestigen
max. 70 cm
b) Fietscomputer bevestigen
MOD E SET
1
23
4
Contacten aan de
achterkant 1 Fietscomputer
2 Houder
3 Kabelbinder
4 Contacten
1. Bevestigdehouder(2)mettweekabelbinders(3)aandestuurstangvandeets,zoalsweergegeven
op de afbeelding. Let hierbij in het bijzonder op een veilige bevestiging van de kabelbinders.
2. Plaats de etscomputer (1) in de bajonetsluiting van de houder, vergrendel hem door rechtsom te
draaien.Controleer,dattelkensdetweecontacten(4),aandehouderendeetscomputer,stevigen
goed elektrisch geleidend met elkaar zijn verbonden. Verontreinigingen kunnen de correcte overdracht
van gegevens beïnvloeden.
Haaldeetscomputeruitdebajonetsluitingvandehouderenneemhemmee,alsudeetsop
vrij toegankelijke plekken parkeert en onbeheerd achter laat.
c) Snelheidssensor bevestigen
sensor
5
3
6
3 Kabelbinder
5 Rubberen onderlegger
6 Snelheidssensor
1. Plaats de rubberen onderlegger (5) in de juiste richting onder de snelheidssensor (6).
2. Bevestig de snelheidssensor met twee kabelbinders (3) zijdelings aan de vork van de ets, zoals
weergegeven op de afbeelding. Het met "SENSOR" gekenmerkte onderdeel van de snelheidssensor
moet naar binnen wijzen. Let hierbij op een veilige bevestiging van de kabelbinders.
d) Magneet bevestigen
7 1098a 8b 7 Houder
8 a/b Doorsnede van de spaken
9 Rubberen onderlegger
10 Magneet
1. Bevestig de magneet (10) aan een ronde spaak (8 a) van het voorwiel, zoals weergegeven op de
afbeelding. Als de spaken van uw wiel een ovale dwarsdoorsnede (8 b) hebben, dient u de magneet
aan de andere zijde van de houder (7) aan te brengen. De diverse bevestigingsplekken voor beide
spaakvormen worden weergegeven op de afbeelding.
2. Let er in ieder geval op, dat de rubberen onderlegger (9) recht en zonder plooien zit. De magneet moet
stevig zitten en mag tijdens het rijden ook bij hoge snelheden niet bewegen.
Fietscomputer, draadloos Versie 08/15
Bestelnr. 1217430
Bedoeld gebruik
De etscomputer wordt gebruikt voor het meten en de weergave van specieke gegevens op de ets
(bijvoorbeeld tijd, reistijd, de afgelegde afstand, calorieverbruik). Een magneet wordt gemonteerd op
hetvoorwielvandeets,eensnelheidssensor op de vastevork.Desnelheidssensorherkenthetaantal
omwentelingenvanhetwielenstuurimpulsennaardeetscomputer.Deetscomputerbeschikteveneens
overeengeïntegreerdetachometereneenstopwatch.Deetscomputerendeaccessoireszijnuitsluitend
geschiktvoorgebruikopeengangbareets.Demontageenhetgebruikopeenandervoertuig,bijv.een
motor, is niet geoorloofd! Het product is alleen bestemd voor privédoeleinden. Het is niet geschikt voor
commercieel gebruik. Het product is weerbestendig.
In verband met veiligheid en normering (CE) zijn geen aanpassingen en/of wijzigingen aan dit product
toegestaan. Indien het product voor andere doeleinden wordt gebruikt dan hiervoor beschreven, kan het
product worden beschadigd. Bovendien kan bij verkeerd gebruik een gevaarlijke situatie ontstaan met als
gevolg bijvoorbeeld kortsluiting, brand, elektrische schok enzovoort. Lees de gebruiksaanwijzing volledig
door en gooi hem niet weg. Het product mag alleen samen met de gebruiksaanwijzing aan derden ter
beschikking worden gesteld.
Het product voldoet aan de nationale en Europese wettelijke voorschriften. Alle vermelde bedrijfs- en
productnamen zijn handelsmerken van de respectievelijke eigenaren. Alle rechten voorbehouden.
Leveringsomvang
• Fietscomputer met houder
• Snelheidssensor
• Rubberen onderlegger
• Magneeteenheid
• 4 x Kabelbinder
• 2 x Batterij (CR2032)
• Gebruiksaanwijzing
Veiligheidsinstructies
Lees de gebruiksaanwijzing zorgvuldig door en let vooral op de veiligheidsinstructies.
Indien de veiligheidsinstructies en de aanwijzingen voor een juiste bediening in deze
gebruiksaanwijzing niet worden opgevolgd, kunnen wij niet aansprakelijk worden gesteld
voor de daardoor ontstane schade aan apparatuur of persoonlijk letsel. Bovendien vervalt
in dergelijke gevallen de garantie.
a) Personen / Product
• Het apparaat is geen speelgoed. Houd het buiten bereik van kinderen en huisdieren.
• Laat verpakkingsmateriaal niet zomaar rondslingeren. Dit kan gevaarlijk materiaal worden voor
spelende kinderen.
• Bescherm het product tegen extreme temperaturen, direct zonlicht, sterke schokken, vocht,
ontvlambare gassen, dampen en oplosmiddelen.
• Zet het product niet onder mechanische druk.
• Als het niet langer mogelijk is het apparaat veilig te bedienen, stel het dan buiten bedrijf en zorg
ervoor dat niemand het per ongeluk kan gebruiken. Veilige bediening kan niet langer worden
gegarandeerd wanneer het product:
- zichtbaar is beschadigd,
- niet langer op juiste wijze werkt,
- tijdens lange periode is opgeslagen onder slechte omstandigheden, of
- onderhevig is geweest aan ernstige vervoergerelateerde druk.
• Behandel het apparaat met zorg. Schokken, botsingen of zelfs een val van een beperkte
hoogte kan het product beschadigen.
• Neem alstublieft ook de veiligheids- en gebruiksaanwijzingen van alle andere apparaten in acht
die met het product zijn verbonden.
b) Batterijen
• Let op de juiste polariteit bij het plaatsen van de batterijen.
• De batterijen dienen uit het apparaat te worden verwijderd wanneer het gedurende langere tijd
niet wordt gebruikt om beschadiging door lekkage te voorkomen. Lekkende of beschadigde
batterijen kunnen brandend zuur bij contact met de huid opleveren. Gebruik daarom
veiligheidshandschoenen om beschadigde batterijen aan te pakken.
• Batterijen moeten uit de buurt van kinderen worden gehouden. Laat batterijen niet rondslingeren
omdat het gevaar bestaat dat kinderen en/of huisdieren ze inslikken.
• Batterijen mogen niet worden ontmanteld, kortgesloten of verbrand. Probeer nooit gewone
batterijen te herladen. Er bestaat dan explosiegevaar!
c) Diversen
• Raadpleeg een expert wanneer u twijfelt over het juiste gebruik, de veiligheid of het aansluiten
van het apparaat.
• Onderhoud, aanpassingen en reparaties mogen alleen uitgevoerd worden door een expert of
in een daartoe bevoegde winkel.
• Als u nog vragen hebt die niet door deze gebruiksaanwijzingen zijn beantwoord, neem dan
contact op met onze technische dienst of ander technisch personeel.

Vork
Magneet
5 mm max
3. De magneet moet precies boven de met het woord "SENSOR" gekenmerkte deel van de
snelheidssensor lopen, als het wiel draait.
4. Stel de luchtspleet tussen de snelheidssensor en de magneet door een lichte draaiing van de
snelheidssensor op niet meer dan 5 mm in. Beide mogen zich niet aanraken, maar ook niet te ver
uit elkaar zijn, om een betrouwbare werking te garanderen. Anders herkent de magneetsensor in de
snelheidssensor het voorbij lopen van de magneet niet correct.
5. Controleer of de magneet niet over de snelheidssensor schuurt.
Bedieningselementen
MODE SET
-
Toets MODE Omschakelen tussen tijdweergave en de weergave van reistijd “RTM”, totale tijd “TTM”,
afgelegde afstand “DST” evenals de totaal afgelegde afstand “ODO”, calorieverbruik
“Kcal”.
Toets SET Verlichting gedurende enkele seconden activeren.
Omschakelen tussen de weergave van de momentele snelheid
, maximum snelheid "MAX" en gemiddelde snelheid "AVG".
Tijdenshetrijdenwordtdeactuelesnelheidgetoond.Hetetssymboolknippertsamen
met een pijlsymbool van de trendweergave (sneller of langzamer).
Ingebruikname
a) Batterij plaatsen/vervangen
Als het symbool van de batterij-indicatie verschijnt, is het aan te raden de batterij van de
etscomputerzosnelmogelijktevervangen.
1. Verwijderhetbatterijvakdekselaandeonderkantvandeetscomputerdoordezelinksomtedraaien.
Gebruik hiervoor een geschikt gereedschap of bijv. een muntstuk.
2. Verwijder de batterij.
3. Plaats een nieuwe batterij, type CR2032 in overeenstemming met de pooltekens (plus/+ en min/-) in
het batterijvak. De pluspool (+) is telkens in uw richting naar buiten toe gericht.
4. Plaats het deksel terug.
5. Herhaal dezelfde stappen om de batterij op dezelfde manier voor de snelheidssensor te vervangen.
b) Wielomtrek vaststellen
Omdeafgelegdeafstandenensnelhedenmetdeetscomputerweertekunnengeven,dientudewielomtrek
indeetscomputerintevoeren.Hiervoormoetudewielomtrekvoordeinvoermetenofberekenen.
Wielomtrek meten
Zoek voor het meten een vlak, glad oppervlak (bijv. de vloer van de garage). Markeer de buitenkant van de
bandmeteenstreepje,netzoalsopdevloer(puntA).Schuifdeetsnuzovernaarvoren,totdatdeband
een volledige omwenteling heeft uitgevoerd. Markeer dit punt op de vloer (punt B). Meet nu de afstand van
puntAnaarBmeteenmeetlat,meetlinto.i.d.Zokrijgtudewielomtrek,dieindeetscomputermoetworden
ingevoerd (de waarde in centimeters).
Wielomtrek berekenen
De wielomtrek kan alternatief ook met de volgende formules worden berekend:
Ø in centimeter × 3,1416 = wielomtrek (cm)
Ø in inch × 2,54 × 3,1416 = wielomtrek (cm)
Voorbeeld: 26 inch × 2,54 × 3,1416 = wielomtrek 207,5 cm
c) Aan-/uitschakelen/stroomspaarmodus/sleep-modus
• Nahetplaatsenvandebatterijisdeetscomputergereedvoorgebruik.
• Schakeldeetscomputerdooreventjesopeenwillekeurigetoetstedrukkenaan,wanneer
alleen tijd, of de melding "SLEEP" wordt getoond. De snelheidssensor kan niet worden
uitgeschakeld. Hij heeft in de standby modus echter zo weinig energie nodig, dat het
uitschakelen niet nodig is.
• Als er op geen enkele toets wordt gedrukt of geen beweging via de snelheidssensor wordt
geregistreerd,schakeltdeetscomputernaca.5minutenoveropdestandbymodus,om
stroom te sparen. Alleen de tijd wordt weergegeven op het LCD-display.
• Alsderustperiodelangerdan7dagenduurt,schakeltdeetscomputerzelfstandiginde
sleep-modus. "SLEEP" verschijnt op het LCD-display.
• Omdeetscomputermanueelindesleep-modustezetten,druktudetoetsenMODE en
SET en houdt deze gedurende ca. 6 seconden ingedrukt. Na ca. 4 seconden worden op
het LCD-display alle weergave-elementen gelijktijdig getoond. 2 seconden later verschijnt
“SLEEP” op het LCD-display.
• Druk op een willekeurige toets om de computer te activeren.
d) Weergavemodi
• Druk op de toets MODE, om door de weergavecycli te schakelen (met de klok mee).
Tijdweergave Reistijdweergave Totale reistijdweergave Afstand
Totaal afgelegde afstandCalorieverbruik
• Druk de toets SET, om tussen de weergaven van momentele snelheid , de laatst opgeslagen maximale
waarde van de snelheid "MAX" en gemiddelde snelheid "AVG" te schakelen.
e) Basis instelling
Voerdezeinstellingenuitalsdeets,waaropdeetscomputergeïnstalleerdis,stilstaat.Er
bestaan twee mogelijkheden met de basisinstelling te beginnen (zie 1.a) en 1.b)).
1. a) Na het plaatsen van de batterij start de instelmodus automatisch. Het LCD-display geeft alle
weergave-elementen tegelijk aan. Na ca. 2 seconden knippert de instelling van het tijdweergaveformaat
zelfstandig. Druk op de toets SET om het tijdweergaveformaat te veranderen. Druk op de toets MODE
om de instelling te bevestigen. De minuteninstelling knippert. Ga nu direct naar stap 2.
1. b) Om de instelmodus met de hand in te schakelen, drukt u de toetsen MODE en SET tegelijkertijd en
houdt u deze gedurende ca. 4 seconden ingedrukt totdat alle weergave-elementen op het LCD-display
verschijnen. Alle weergegeven waarden worden gewist (vergelijk alinea f) “Resetten van opgeslagen
waarden en reset”). De instelling van het tijdweergaveformaat knippert na ca. 2 seconden. Druk op
de toets SET om het tijdweergaveformaat te veranderen. Druk op de toets MODE om de instelling te
bevestigen. De minuteninstelling knippert.
Als tijdens het instellen in beide gevallen gedurende ca. 30 seconden geen toets wordt gedrukt,
gaatdeetscomputerweerautomatischterugnaardetijdweergave.
2. Druk op de SET-toets om de instelling van de minuten te veranderen. Druk op de MODE-toets om de
instelling te bevestigen. De secondeninstelling knippert.
3. Druk op de SET-toets om de instelling van de seconden terug te zetten op nul. Druk op de MODE-toets
om de instelling te bevestigen.
4. De informatie van de meeteenheid knippert; "UNIt" wordt weergegeven. Druk op de SET-toets om het
weergaveformaat van de meeteenheid te veranderen. Metrische en U.S. eenheden zijn mogelijk. Druk
op de MODE-toets om de instelling te bevestigen.
5. De cijfers voor de wielomtrek knipperen. Druk op de SET-toets om het eerste cijfer van de wielomtrek in
te stellen. De cijfers 0 - 9 kunnen na elkaar worden geselecteerd. Druk op de MODE-toets om telkens
de instelling van een cijfer te bevestigen. Het volgende cijfer knippert. Herhaal deze instellingsprocedure
totdat alle cijfers zijn ingesteld. De instelde waarde in centimeters, dient zoals beschreven in het
hoofdstuk "Wielomtrek vaststellen", te worden bepaald.
6. Na de bevestiging van het laatste cijfer knippert de kilometerweergave; "SEt OdO" wordt weergegeven.
Druk op de SET-toets om het eerste cijfer van de totaal afgelegde afstand manueel in te stellen. De
cijfers 0 - 9 kunnen na elkaar worden geselecteerd. Druk op de MODE-toets om de instelling van een
cijfer te bevestigen. Het volgende cijfer knippert. Herhaal deze instellingsprocedure totdat alle cijfers
zijn ingesteld.
7. Na de bevestiging van het laatste cijfer knippert de tijdweergave; "SEt ttM" wordt weergegeven. Druk
op de SET-toets om het eerste cijfer van de totale reistijd (in uren) in te stellen. De cijfers 0 - 9 kunnen
na elkaar worden geselecteerd. Druk op de MODE-toets om de instelling van een cijfer te bevestigen.
Het volgende cijfer knippert. Herhaal deze instellingsprocedure totdat alle cijfers zijn ingesteld. Druk ter
bevestiging op de MODE-toets,deetscomputerkeertterugnaardenormaleweergave(tijdweergave).
f) Resetten van opgeslagen waarden en reset
• Houd de MODE-toets van de etscomputer gedurende ongeveer 3 seconden gedrukt, als één van
de waarden voor "DST", "ODO", "TTM", "RTM", “Kcal” wordt weergegeven. "reset" verschijnt op het
LCD-display. Laat de toets na 3 seconden los; de opgeslagen gegevens voor de afstand “DST”, Totaal
afgelegde afstand “ODO”, totale tijd “TTM”, afgelegde afstand “RTM”, calorieverbruik “Kcal” zijn nu gewist.
• Druk gelijktijdig op de MODE- en SET-toets en houd deze ingedrukt,t totdat alle displaysegmenten op het
LCD-display worden weergegeven. Laat vervolgens direct los om alle gegevens te wissen.
• Verwijderdebatterijuitdeetscomputer.Hierdoorwordeneveneensallegegevensgewist.

Dit is een publicatie van Conrad Electronic SE, Klaus-Conrad-Str. 1, D-92240 Hirschau
(www.conrad.com).
Alle rechten, vertaling inbegrepen, voorbehouden. Reproducties van welke aard dan ook, bijvoorbeeld
fotokopie,microverlmingofderegistratieinelektronischegegevensverwerkingsapparatuur,vereisen
de schriftelijke toestemming van de uitgever. Nadruk, ook van uittreksels, verboden. De publicatie
voldoet aan de technische stand bij het in druk bezorgen.
© Copyright 2015 by Conrad Electronic SE.
V2_0815_02_JH
g) Probleemoplossing
Geen weergave op het display van de etscomputer
• Druk kort op een willekeurige toets om hem in te schakelen.
• Controleerdebatterijindeetscomputerenvervangdezedooreennieuwemochtdatnodigzijn.
Geen registratie van een draaibeweging van het wiel, geen gegevensoverdracht van de draadloze
zender
• De afstand tussen de draadloze sensor en magneet dient ongeveer 5 mm te bedragen. Er moet een lichte
klik te horen zijn als de magneet voorbij gaat aan de snelheidssensor. Gebruik indien nodig een andere
spaak ter montage. Draai de snelheidssensor iets naar binnen om de afstand tussen de snelheidssensor
en de magneet te verminderen (hoofdstuk "Installatie en montage") te verminderen.
• Controleer de positie van de magneet en de snelheidssensor ten opzichte van elkaar. De magneet moet
de met "SENSOR" gemarkeerde kant aan de voorkant voorbij gaan.
• Controleer de batterij in de snelheidssensor en vervang deze door een nieuwe mocht dat nodig zijn.
Zwart display
• Het display werd te lang blootgesteld aan direct zonlicht. Als het display afkoelt, verschijnt de weergave
weer.
Onderhoud en reiniging
• Het product is, met uitzondering van af en toe schoonmaken, onderhoudsvrij. Gebruik voor het
schoonmaken een zachte, anti-statische en niet pluizende doek.
• Gebruik in geen geval schurende of chemische schoonmaakmiddelen.
• Dompel het product niet in water.
Verklaring van Conformiteit (DOC)
Hierbij verklaren wij, Conrad Electronic SE, Klaus-Conrad-Straße 1, D-92240 Hirschau, dat dit product in
overeenstemming is met de algemene eisen en andere relevante voorschriften van de richtlijn 1999/5/EG.
De bij dit product behorende verklaring van conformiteit kunt u vinden op www.conrad.com.
Verwijdering
a) Product
Elektronische apparaten zijn recyclebare stoffen en horen niet bij het huisvuil.
Als het product niet meer werkt, moet u het volgens de geldende wettelijke bepalingen voor
afvalverwerking inleveren.
Verwijder de eventueel geplaatste batterijen en gooi deze afzonderlijk van het product weg.
b) Batterijen
Als eindverbruiker bent u conform de KCA-voorschriften wettelijk verplicht om alle lege batterijen in te
leveren; batterijen mogen niet met het huisvuil meegegeven worden.
Batterijen die schadelijke stoffen bevatten, zijn gemarkeerd met nevenstaand symbool. Deze
mogen niet via het huisvuil worden afgevoerd. De aanduidingen voor irriterend werkende, zware
metalen zijn: Cd = cadmium, Hg = kwik, Pb = lood (de aanduiding staat op de batterijen, bijv.
onder het links afgebeelde vuilnisbaksymbool).
Ukuntverbruiktebatterijengratisbijdeverzamelpuntenvanuwgemeente,onzelialenofoveral
waar batterijen worden verkocht, afgeven.
Zo voldoet u aan de wettelijke verplichtingen en draagt u bij aan de bescherming van het milieu.
Technische gegevens
a) Fietscomputer
Batterij ................................................................... CR2032
Bedrijfscondities .................................................... 0 tot +40 °C, 0 - 90 % relatieve luchtvochtigheid
Opslagcondities..................................................... -10 tot +50 °C, 0 - 100 % relatieve luchtvochtigheid
Afmetingen (B x H x D).......................................... 39 x 16 x 49 mm
Gewicht.................................................................. 22 g (met batterij)
b) Snelheidssensor
Batterij ................................................................... CR2032
Zendfrequentie ...................................................... 125 kHz
Bereik .................................................................... max. 70 cm
Table of contents
Languages:
Other Conrad Bicycle Accessories manuals