Conrad CARRY HDD PRO318 User manual

V 2.0
2014/10/5
PRO318
(1-3)
HDD Duplicator
User Guide
EN


Content
3
Content 3
1Product Introduction
1. Features 4
2. Product Overview 5
A. System Overview 5
B. LCD Configuration 5
2 Function Table
Function Table 6
3 How to Start Duplicating HDD?
1. Start Duplication 8
2. Set-up before Start Duplication 9
❶
Set Copy area of HDD 9
System and Files 10
All Partitions 10
Whole HDD 11
Percentage(%) 12
❷
Set Tolerance of Bad Track 13
3. Troubleshooting of Copy Fails 13
4 How to Confirm Copy Accuracy?
1. To Confirm Accuracy by
Compare Function 14
2. Setting of Compare Function 15
5 How to Erase HDD?
1. How to Erase? 16
2. Setting of Erase Function 17
Quick Erase 17
Full Erase 17
DoD Erase 18
DoD EraseComp 18
3. Select Random Pattern 19
Overwrite by Fixed Method 19
Overwrite by Random Method 19
6Update BIOS
1. How to Update BIOS? 20
※Update by HDD 20
Specification
Specification 22

1 Product Introduction
4
1. Features
• High copy speed supports up to 6.6GB/min.
• Auto power control to protects your HDD.(HDD only powered during
operation.)
• Support 2.5" and 3.5" SATA HDD, IDE HDD and SSD. (IDE HDD needs
convertor)
• Support 4 different duplicator mode; quick copy (System and files), All
Partitionss , Whole HDD and Percentage (%) copy.
• Support Linux(ext2/ext3/ext4), Windows(NTFS/FAT16/FAT32/FAT64) , Mac
(HFS/HFS+/HFSX), GPT, and Dynamic HDD. quick copy mode copies only Data
and System area can highly increase the copy efficiency.
• Compatible with various file system formats including 3TB above advanced
format HDD.
• Support DoD and advanced DoD standard erase function.
• Auto detect and shows the bad sector quantity.
• Automatic power control to protect HDD from damage during insertion/
removal.

Product Introduction 1
5
2. Product Overview
A. System Overview
Red : Fill
Yellow : Power Supplying
Flashing Green : Operating
Remain Green : Pass
Port 4
(Target 3)
Port 1
(Source)
Port 2
(Target 1)
Port 3
(Target 2)
B. LCD Configuration
Total Size
(Source)
Target HDDFunction
Copied Processed Size
(Target)
Copy Progress %Time
(mm:SS)
Copy x3 2047M
0:11 41% 860M

2 Function Table
6
Function Table
Function Description
1. Copy Copy data from source HDD to targets. (there are four copy modes for selection at function 6.1)
2. Compare Comparison between the source and targets to make sure copy accuracy.
3. Copy+Compare Execute compare function automatically after copy.
4. Erase
It is able to enable/disableerase
o f source HDD at function 6.3
4.1 Quick Erase
To erase the INDEX of HDD, and take very short time.
4.2 Full Erase
To erase the whole HDD.
4.3 DoD Erase
Erase HDDs three times complying with USA Department of Defense (DoD) standard.
4.4 DoD EraseComp
Erase HDDs three times complying with USA Department of Defense (DoD) standard and bit by bit
to check if data is completely erased.
5. Utility
5.1 Show Disk Info
Shows HDD’s basic information such as HDD model name and capacity.
5.2 Update System
5.2.1 Update BIOS
To update the system firmware via the HDD.
5.2.2 Create Update HDD
To format the HDD with a 2GB FAT partition in order to quickly save
firmware in the HDD.
5.3 System Info
This function will show information of the duplicator system, including controller model number
and software version.
6. Setup
6.1 Copy Area
Setup copy mode.
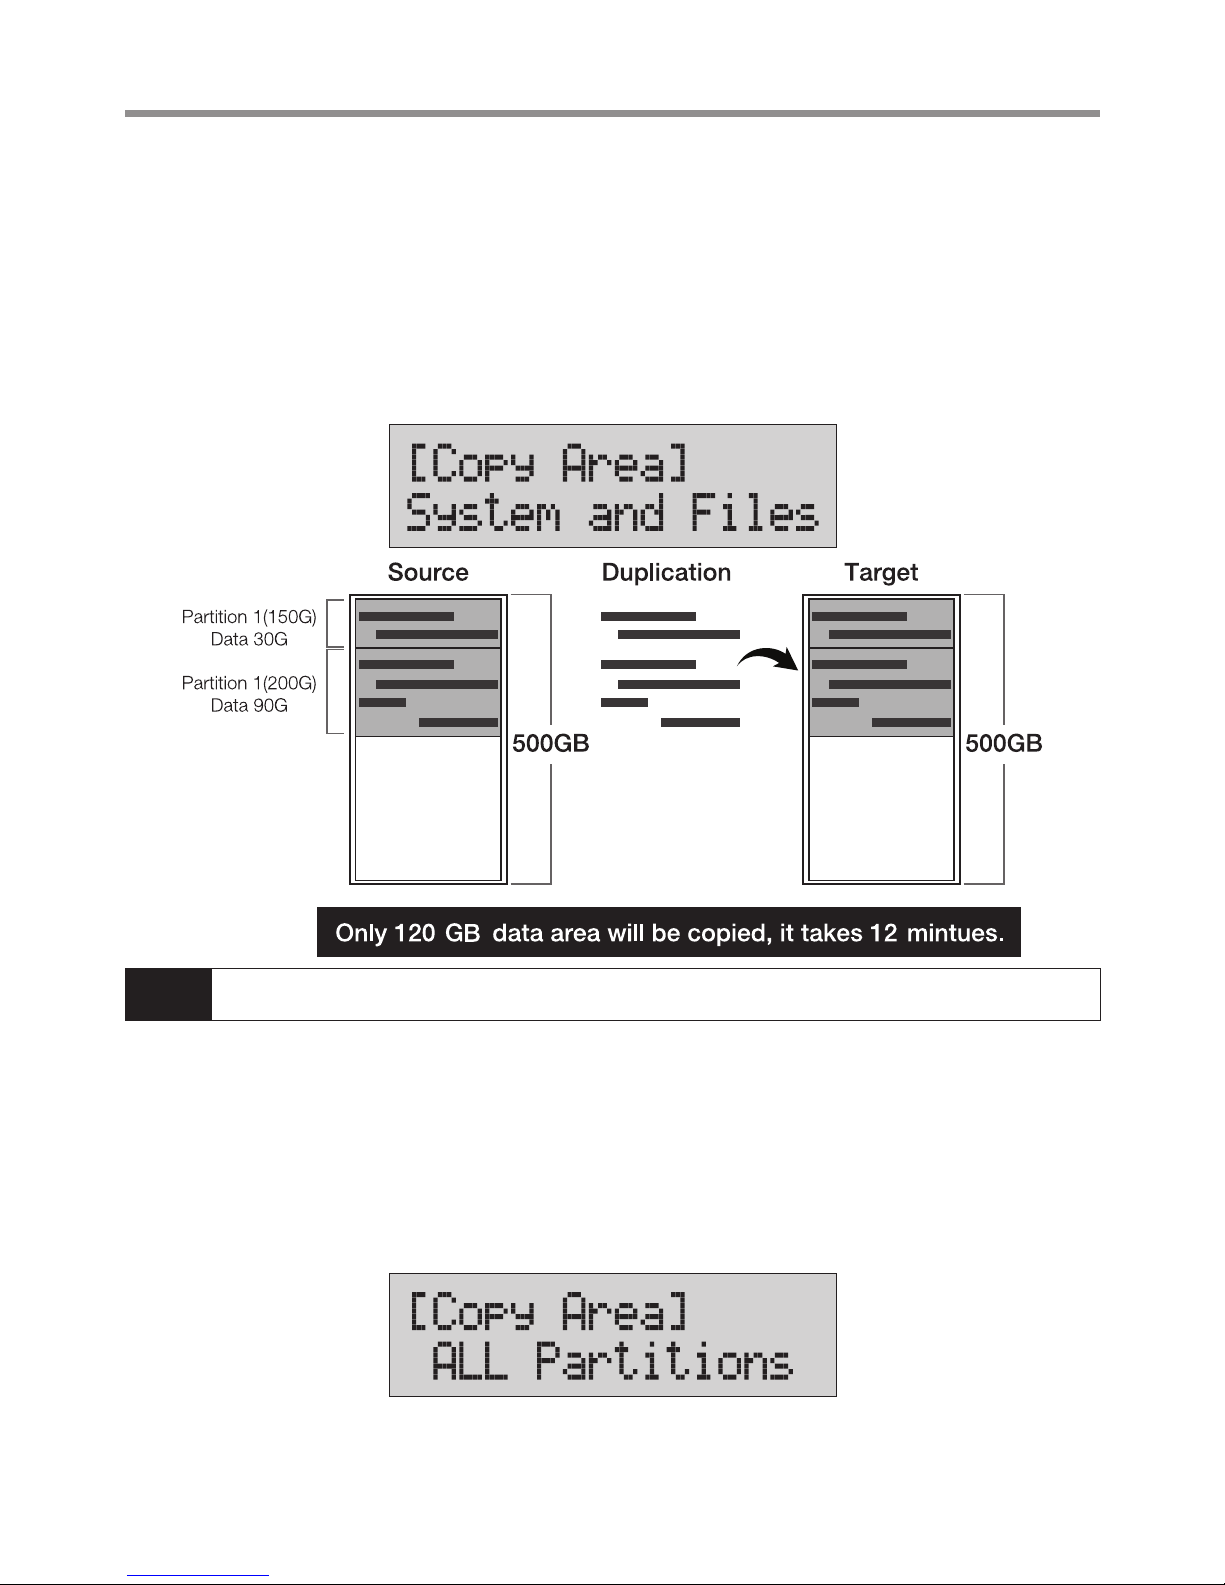
6.1.1 System and files
Set to copy source HDD's data area only.
6.1.2 All Partitions
Set to copy source HDD's.
6.1.3 Whole HDD
Set to copy the whole source HDD.
6.1.4 Percentage(%)
Set up percentage range of HDD for copy.
6.2 Skip Error
Set to ignore error of source HDD while copying. (0-65535 or unlimited.)
6.3 Language
Select preferred language. (English and Japanese are available for selection)
6.4 Advanced Setup 6.4.1 Unknown Format
6.4.1.1 Copy unknown
Copy unknown area when the device
can not identify the format.
6.4.1.2 Skip unknown
Skip copy unknown area when the
device can not identify the format.

Function Table 2
7
6. Setup
6.4 Advanced Setup
6.4.2 Erase Master
Setup to erase source HDD or
not.
6.4.2.1 Disable
Disable erase source HDD.
6.4.2.2 Enable
Enable erase source HDD.
6.4.3 Erase Pattern
6.4.3.1 ONE Byte
A random character to be written into
every byte.
6.4.3.2 Big Random Data
A set of random character to be
written into a set of area.
6.4.4 Wait HDD Time
Auto start time after plugging in HDD. Able to set from 3 to 30 seconds.
6.4.5 Transfer Rate
Select the proper transfer rate UDMA2-7. 7 is the fastest.
6.4.6 Stop Motor Time
To set the time waited for the motor to stop from 1-~20 seconds after
executing funciotn.
6.5 Restore Default
Back to original manufacturer setting.

8
3 How to Start Duplicating HDD
How to Start Duplicating HDD?
1. Start Duplication
Step 1
Prepare a source HDD and target HDD (*It is strongly recommended to the size of
source and target are the same)
Source HDD Target HDD
Note
ㅦSATA interface applies on the duplicator, no matter SATA 1.0/2.0/3.0 are all supported.
ㅦAssemble adaptor is required if user needs to copy device with other interface, e.g. IDE.
Step 2
Place source HDD at source port, targets HDD to other ports.

9
How to Start Duplicating HDD 3
Step 3
Use ▲▼ to select "1. Copy" then press "OK". Duplication will proceed.
Note When all the target HDD ports are plugged, duplicator would start copying automatically. If
not all are plugged, the number of targets shows on LCD. Press "OK" to start.
The information below shows on LCD during duplication.
Step 4
Quantity of copy OK/Fail and duplication time would show on LCD after
duplication completes.
Note
ㅦData in the target HDD will be damaged after the copy process completed. Users need to
backup the existing data before duplication processing.
ㅦWe do not suggest that user removes HDD during copy process because this action may
damage HDD.
2. Set-up before Start Duplication
Please pay attention to the following 2 settings before copy.
❶Set Copy Area of HDD
Choose appropriate copy area can greatly reduce operation time and have better
efficiency. There are four copy modes with different copy area : ①System and
Files, ②All available partition area, ③Whole HDD, ④User set the percentage
range of HDD.

10
3 How to Start Duplicating HDD
System and Files (Quick Copy or Compare)
It will copy source HDD's System and Files instead of the whole HDD. The system
will analyze the source HDD and identify the data area to copy. As long as the
source HDD's data within the target HDD's space, the copy will be processed.
FAT16/32/64, NTFS (ext2/3/4), HFS+, HFS, HFSX are supported for this copy
mode.
Note Duplication time is affected by "transfer speed of HDD".
All Partitions
This mode will bit by bit copy all of the partitions no matter there is data exist
or not. The capacity of target HDD has to be bigger than the partition required
capacity.

11
How to Start Duplicating HDD 3
500GB 500GB
Source
Partition 1(150G)
Data 30G
Partition 1(200G)
Data 90G
Duplication Target
Only 350 GB partition area will be copied, it takes 48 mintues.
Note Duplication time is affected by "transfer speed of HDD".
Whole HDD
It is to copy the whole source HDD, no matter of the content, format, partition or
empty space. This mode will take much more time to duplicate the source HDD
completely.
Note Duplication time is affected by "transfer speed of HDD".

12
3 How to Start Duplicating HDD
Percentage(%)
Copy the percentage selected of source HDD.
Note Duplication time is affected by "transfer speed of HDD".
Below is one example of copy area selection e.g. There are two partitions in one
500GB HDD. Data and OS(120GB) are saved in the partition.
Note
ㅦIt is recommended to execute Compare after Copy to confirm the accuracy.
ㅦIt is recommended to copy data by function 3.Copy+Compare.

13
How to Start Duplicating HDD 3
❷Set Tolerance of Bad Track
Select function 6.2 Skip Error to set the number of error you accept to skip
during copy process. If the HDD is very critical for content correctness, it is
strongly recommended to keep the Skip Error to be "0".
3. Troubleshooting of Copy Fails
ㅦToo many bad track in HDD causes copy fail.
ㅦTo check the setting of 6.2 Skip Error.
ㅦMake sure SATA cable is connected properly.
ㅦMake sure the capacity of source HDD is smaller than target.

14
4 How to Confirm Copy Accuracy?
How to Confirm Copy Accuracy?
1. To Confirm Accuracy by Compare Function
Step1
Prepare source HDD and target HDD.
Source HDD Target HDD
Step 2
Place source HDD at source port, targets HDD to other ports.
Step 3
Use ▲▼ to select "2.Compare" then press "OK". Data compare will proceed.
Note When all the target HDD ports are plugged, duplicator would start copying automatically. If
not all are plugged, the number of targets shows on LCD. Press "OK" to start.

15
How to Confirm Copy Accuracy? 4
2. Setting of Compare Function
It is able to set compare area of HDD at function 6.1
There are four different compare area for selection : ①System and Files, ②All
available partition area, ③Whole HDD, ④Percentage Compare.
Note It is recommended to execute Compare after Copy to confirm the accuracy.

16
5 How to Erase HDD?
How to Erase HDD?
Note Please notice the data within the HDD will be erased after executing the function.
1. How to Erase?
Step1
Prepare the HDD for erasure.
Step 2
Insert the HDD into target port.
Note Function 6.4.2 Erase Master is to determine erase source HDD or not. The default
setting is "Disable erase source HDD".

17
How to Erase HDD? 5
Step 3
Use ▲▼ to select the desired erase method, then press "OK". Data Erase will
proceed.
2. Setting of Erase Function
There are four erase methods: Quick Erase, Full Erase, DoD Erase,
and DoD EraseComp.
Quick Erase
The function will ONLY erase the index of the HDD. It is the quickest way to erase
HDD. It will damage the data in HDD, please make sure you have backup all
important data before using this function.
Full Erase
The function will erase the whole sectors on the target HDD. It will take longer
time than quick erase. It will damage the data in HDD, please make sure you
have backup all important data before using this function.

18
5 How to Erase HDD?
DoD Erase
This is to comply with the U.S.A. Department of Defense (DoD 5220) standard to
fully erase the HDD three times bit by bit to rewrite HDD to guarantee the data
was deleted. It will damage the data in HDD, please make sure you have backup
all important data before using this function.
Note We do not suggest that user removes HDD during erase process because this action may
damage HDD.
DoD EraseComp
Besides DoD erase, this function will also execute compare function to make
sure the random bit was correctly written. This way of erase is to erase HDD over
each sector three times: the first time with zeros (0x00), second time with 0xFF
and the third time with random characters. There is one final pass to compare
random characters by reading. It will damage the data in HDD, please make sure
you have backup all important data before using this function.

19
How to Erase HDD? 5
3. Select Random Pattern
Overwrite by Fixed Method
Overwrite by Random Method

20
6 Update BIOS
Update BIOS
1. How to Update BIOS?
※Update by HDD
Step 1
Prepare one HDD and connect it to source port, then select function 5.2.2 Create
update HDD.
Step 2
Format the HDD.
Note
ㅦBefore updating firmware, one FAT, 2GB partition will be formatted in the HDD. That would
reduce searching time, and speed up firmware update.
ㅦThe data saved in this HDD will be erased.
Step 3
Download the latest firmware from PC and save it in the HDD.
Table of contents
Other Conrad Disc Duplicator manuals
Popular Disc Duplicator manuals by other brands

BD Laser
BD Laser MAX Use and maintenance manual

Creasol
Creasol Sender manual

MicroBoards Technology
MicroBoards Technology GX-2 installation quick reference guide

MF DIGITAL
MF DIGITAL DIRECTOR series Operator's guide

Addonics Technologies
Addonics Technologies HDUSI325 user guide

Tascam
Tascam CD-D4000 MKII owner's manual