Vinpower Digital SharkCopier DC User manual

User Manual
For Daisy Chain Duplicator
V 3.5.4

WARNING!
VINPOWER DIGITAL’S CD/DVD/BLU-RAY/LIGHTSCRIBE DUPLICATOR IS
MEANT FOR BACK UPAND DISTRIBUTION OF ORIGINAL DATAAUTHORED OR
OWNED BY THE USER. ANY DUPLICATED DISCS MADE FROM AVINPOWER
DIGITAL’S CD/DVD/BLU-RAY/LIGHTSCRIBE DUPLICATOR IS THE COPYRIGHT
OWNERSHIP OF THE AUTHOR OR COMPANY WHICH OWNS THE SOURCE DISC.
ANY UNAUTHORIZED COPYING, EDITING, OR ANY PART THEREOF OF A
COPYRIGHT DISC IS STRICTLY PROHIBITED. WE DISCOURAGE THE USE OF
ANY SUCH ACTION THAT GIVES RISE TO CRIMINAL INTENTAND PROSECUTION.
VINPOWER DIGITAL IS NOT RESOPONSIBLE FOR ANY POTENTIAL ILLEGAL
ACTIONS OF THE USER DUE TO ACTIVITIES BEYOND THE SCOPE OF THE
PRODUCTS INTENDED USE.
Copyrights and Trademarks
ALL RIGHTS RESERVED. NO PART OF THIS PUBLICATION MAY BE
REPRODUCED IN ANY MEDIUM PRINTED OR ELECTRONIC WITHOUT THE PRIOR
WRITTEN PERMISSION FROM VINPOWER, INC. COPYRIGHT©2000-2008 BY
VINPOWER, INC. ALL RIGHTS RESERVED.

Table of Contents
Title Page
Chapter 1: Introduction & Manual Overview……………………………….……… 1
¾Before you start………………………………………………………….……. 1
¾Package Content……………………………………………………………… 3
¾Chapter Overview……………………………………………………….……. 3
Chapter 2: Getting to know your system…………………………………………… 4
¾System Overview………………………………………………….………….. 4
¾LCD Front Panel………………………………………………………………. 5
¾Input Characters/Numbers…………………………………………………. 6
¾Understanding the Boot up Screen Display………………………………. 7
Chapter 3: Setup your Daisy Chain Systems……………………………………… 8
Chapter 4: Basic Operations……………………………………………………….. 10
¾Make Disc-to-Disc Copies……………………………………………………. 10
oSection 1: Selecting the Copy Source…………………………….…… 10
oSection 2: Making Copies from Reader (when the Reader is
selected as the source drive)……………………..................…………. 11
¾Make Hard Drive-to-Disc Copies………………………………………….. 14
oSection 1: Loading Master Disc content into the Hard Drive as a
partition/image…………....................................….……………………. 14
oSection 2: Selecting the Copy Source to the Hard Drive……………... 17
oSection 3: Making Copies from an existing partition/image of the
Hard Drive……………………..………….……………………………….. 17
¾Select the Duplication Speed.…..…………………………………………… 21
¾Change the Setup settings………..…………………………………………. 23
Chapter 5: Menu Overview………………….……………………………………….. 25
Appendix A: Installing additional tower(s) to existing Daisy Chain
configurations………………………………………………………………………….. 31
Appendix B: Troubleshooting……………………………………………...………… 33
¾Frequently Asked Questions…..…………………………………..………… 33
¾Error Code………………………….…..…………….……………………….. 36
Appendix C: Safety & Regulatory information……………………………………... 41

Chapter 1: Introduction & Manual Overview
Your Daisy Chain Duplication System is a reliable, scaleable, ultra-high performance standalone
multi-tower system. It consists of 2 or more Daisy Chain capable duplication towers
Before you start:
Before you start using this system, please read the following to ensure proper operation:
1. Important Notice:
The type of system you purchase will determine the type of discs you are able to copy. For
example, if you purchased a CD only system, then you will only be able to copy onto
recordable CD formats. If you purchased a DVD system, then you can copy on to
recordable DVD and CD formats. If you purchased a Blu-ray system, then you can copy
onto recordable Blu-ray, DVD, and CD formats.
If you have a Blu-ray capable system, the terms CD or DVD can be substituted for Blu-ray
within the text of this user manual.
2. System Limitations:
The system will not copy any CD, DVD, or Blu-ray discs that have Copy Protection encoded
inside. Typically, the movies you purchase or rent from the store will contain copy protection.
In addition to the copy protection limitation, the system cannot copy across formats. This
means that you cannot copy a DVD master onto a recordable CD or vice versa. In addition,
you cannot copy the same formats if the discs have different maximum capacity
limitations. This means that you cannot copy a single layer DVD or Blu-ray Disc onto a
double/dual layer DVD or Blu-ray Disc or vice versa. The recordable blanks must be the
same format and maximum capacity as the master disc you intend to duplicate.
3. Temperature Warning:
If the system was stored in a location where the temperature dropped below 32oF (0oC)
within the past 24 hours, please leave the system in a warm room with temperatures at least
65oF (19oC) for 4 hours prior to powering it on for the first time. Failure to do so may cause
irreparable harm and prevent the system from functioning.
4. Maintenance:
It is very important to operate and keep the system in a dust free, clean environment since
dust is the number 1 killer for optical recording devices. Failure to do so may severely
damage your system. We strongly suggest you place an Air Cleaner next to the system and
constantly use theAir Duster (Can Air) to clear off any dust on the surface of the system.
Do not try to use the Air Duster to clean the system while the reader/writer
trays are open. In doing so, you may inadvertently blow dust into the recording
device and damage the recording device.
- - 1 - -

5. Proper Shutdown:
To avoid possible system failures, you need to shutdown the system properly. To shutdown
the system, you need to press the Up or Down Arrow button to “16. Shutdown”, then press
“ENT”/Enter and follow instructions on the screen to shutdown the system properly. Turning
off your system without performing this function will increase the risk of damaging your
system.
- - 2 - -

- - 3 - -
Package Contents:
Quick Start Guide
Daisy Chain Connection
OR
Standard Operation User Manual Booklet or CD
Power Cord Cable
Chapter Overview:
Chapter 2: Getting to know your system
This chapter describes the physical features and instructions on how to operate your
system
Chapter 3: Setup your Daisy Chain Systems.
This chapter describes how to setup and connect 2 or more DaisyChain Towers together.
Chapter 4: Basic Operations Guide
This chapter describes how to perform basic operations like Making Copies, Changing
Speed, etc.
Chapter 5: Menu Overview
This chapter describes what every function/setting does.
Appendix A: Installing additional tower(s) to existing Daisy Chain configurations (Optional)
This section describes how to add an additional DaisyChain tower into an existing chain.
Appendix B: Troubleshooting
This section provides many solutions on frequently asked questions and provides
insights on system error codes.
Appendix C: Safety & Regulatory information
This section provides environment, health, safety and other regulatory information.

Chapter 2: Getting to know your system
System Overview
The below image is one representation of the duplicator casing. Your case’s
outlook may vary but will have similar principles.
Figure 1-1 CD/DVD System Controls and Display
The components shown in Figure 1-1 are:
. System Power On/Off Button
er” throughout this manual)
3. r” throughout this manual)
4.
en s
itch (110v/220v) (not available on all models)
all models)
1
2. Optical Disc Reader
(Referred to as “Read
Optical Disc Writers
(Referred to as “Write
Eject Button
5. Keypad
6. LCD Scre
7. System Ventilation Vent
8. Power Supply Fan
9. Ventilation Fans
10. Power Voltage Sw
11. Power Supply On/Off Switch (not available on all models)
12. DaisyChain Connection Ports
13. Stability Feet (not available on
- - 4 - -

LCD Front Panel
*The below image is for reference only. Your key assignment and appearance may differ.
: Up (Menu/Option Scroll Up)
: Down (Menu/Option Scroll Down)
: Forward; Enter; OK; Execute the function
: Backward; Escape; go back to the previous function
: Shortcut to make a copy
: Shortcut to make simulation of copying process
: Shortcut to change the duplication speed
: Shortcut to change your master reading source
- - 5 - -

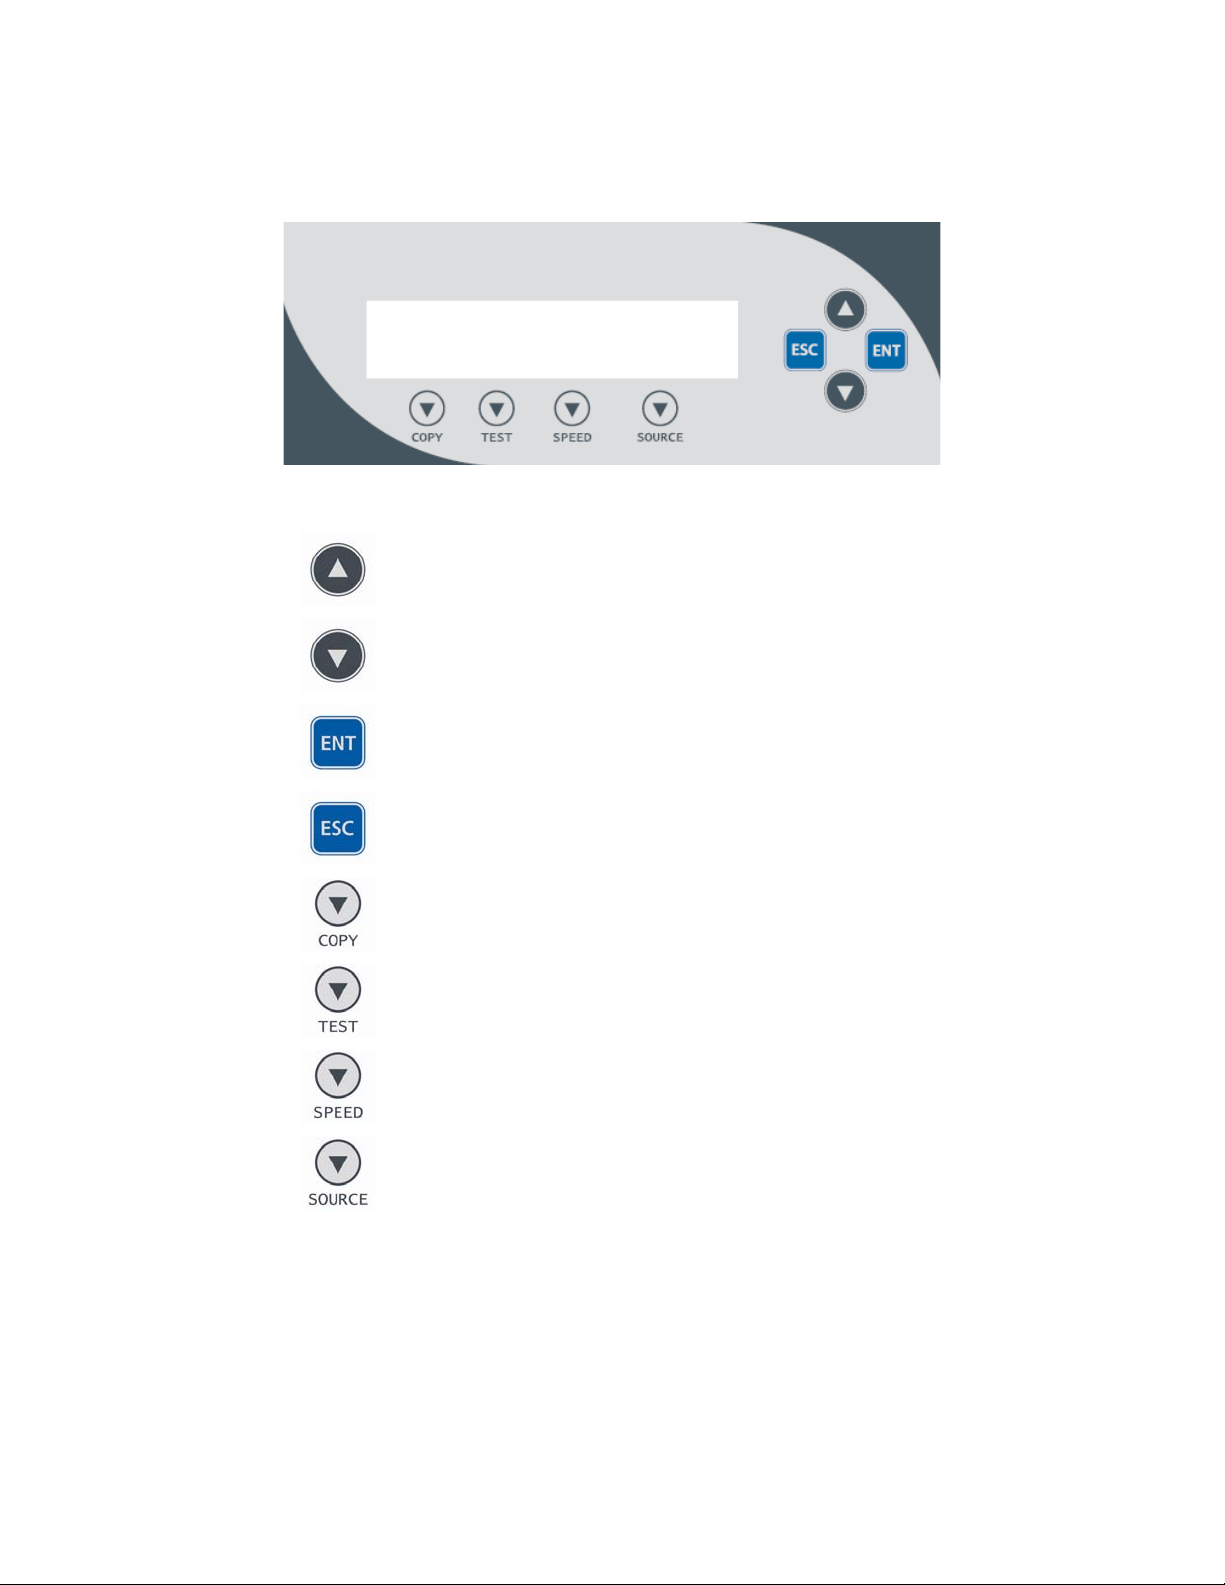
Input Characters/NInput Characters/Numbers
hen you operate this system, there are cases when a number or a name is required to be
ntered by you. Such cases could be entering the Counter quantity or a Hard Drive
artition/Image name.
o enter an alpha numeric character, you need to use the up or down button to scroll through
aries numbers or letters then use the “ENT”/Enter or “ESC”/Escape button to move the cursor
osition right or left. Once you’ve finished, move the cursor to OK and press the “ENT”/Escape
utton.
The below example is meant to illustrate how to enter a partition/image name. For
detail procedures on how to create a new partition/image or rename an existing
partition/image, please refer to; Section 1: Loading Master Disc content into the
Hard Drive as a partition/image on page 14.
For example, if you want to enter a partition name of “FUN1”, do the following:
a) Press the down button repeatedly until “F” is displayed.
b) Press the “ENT”/En
c) Press the down button repeatedly until “U” is displayed.
d) Press the “ENT”/Enter button once to move the cursor to the next position.
e) Press the down button repeatedly until “N” is displayed.
f) Press the “ENT”/En cursor to the next position.
g) Press the down button repeatedly until “1” is displayed.
h) Press the “ENT”/Enter button repeatedly to move the cursor to OK. Then, press the
“ENT”/Enter button step.
When you e ber, normally it asks for a 4 digit number. If your number is
less than 4 digit eed to fill the leading spaces with 0s (any leading zeros will
be skipped). An thirty four) or
0010(ten).
- - 6 - -
umbers
hen you operate this system, there are cases when a number or a name is required to be
ntered by you. Such cases could be entering the Counter quantity or a Hard Drive
artition/Image name.
o enter an alpha numeric character, you need to use the up or down button to scroll through
aries numbers or letters then use the “ENT”/Enter or “ESC”/Escape button to move the cursor
osition right or left. Once you’ve finished, move the cursor to OK and press the “ENT”/Escape
utton.
The below example is meant to illustrate how to enter a partition/image name. For
detail procedures on how to create a new partition/image or rename an existing
partition/image, please refer to; Section 1: Loading Master Disc content into the
Hard Drive as a partition/image on page 14.
For example, if you want to enter a partition name of “FUN1”, do the following:
a) Press the down button repeatedly until “F” is displayed.
b) Press the “ENT”/En
c) Press the down button repeatedly until “U” is displayed.
d) Press the “ENT”/Enter button once to move the cursor to the next position.
e) Press the down button repeatedly until “N” is displayed.
f) Press the “ENT”/En cursor to the next position.
g) Press the down button repeatedly until “1” is displayed.
h) Press the “ENT”/Enter button repeatedly to move the cursor to OK. Then, press the
“ENT”/Enter button step.
When you e ber, normally it asks for a 4 digit number. If your number is
less than 4 digit eed to fill the leading spaces with 0s (any leading zeros will
be skipped). An thirty four) or
0010(ten).
WW
ee
PP
TT
vv
pp
bb
Edit Partition Name:
[ ],OK?
ter button once to move the cursor to the next position.ter button once to move the cursor to the next position.
ter button once to move theter button once to move the
once to submit your selection and proceed to nextonce to submit your selection and proceed to next
nter a numnter a num
s, you ns, you n
example of that would be 0234 (Two hundred andexample of that would be 0234 (Two hundred and
- - 6 - -

Understanding the Boot up Screen Display:
en:
Master Tower:
Slave
ples are for Master Tower ONLY.
Upon successful boot up of your Daisy Chain system(s), you shall see following scre
DUPLICATOR ( 3)
1.Copy
The“(3)”indicatesthereareatotalof3Towersinthis
chain.
The“1.Copy”indicatesthecurrentmenu.
Tower(s):
DC
14 Drive / 0 Disc
Link Mode (#002) The“DCLinkMode”indicatesthisparticulartowerhasbee
linkedbyamate
n
rtowerinthischain.
nd inthischain.(The
The“14Drive”indicatesthereare14writersdetectedinthis
particulartower.
The“0Disc”indicatesthereare14discsdetectedinthis
particulartower.
The“#002”indicatesthisisthe2tower
#001ToweristheMasterTower).
Through out this User Manual, all screen shots exam
- - 7 - -

Chapter 3: Setup your Daisy Chain Systems.
1. Unpack all the towers and place them on a secure elevated surface.
2. Arrange all of the towers in order ba uration located
on the back of every tower: sed on the preset Daisy Chain config
a. Locate the configuration label on each box that identifies that tower as the FIRST,
MIDDLE (Optional), or END unit. When setting up, the duplication towers should
be arranged according to its label.
Note: If your system has ONLY 2 towers, the MIDDLE tower will not exist and all
mention of it can be ignored throughout this guide.
b. The system labeled as FIRST should be the first and primary tower in the Daisy
Chain configuration. The system labeled END should be the last tower positioned
in the Daisy Chain configuration.
- - 8 - -

c. If any system(s) are labeled MIDDLE, they
FIRST and END towers (there is no particular or
should be arranged between the
der for the MIDDLE towers as
3. Connect all towers together using the included Daisy Chain Cables per the instruction
label on the back of each tower. The instructions are listed below as well:
long as they are placed between the FIRST and END towers).
a. All Daisy Chain Ports & Daisy Chain Cable Connecters are color-coded as Blue
or Black. The Blue cable connector should be plugged into the Blue port on the
back of the tower while the Black cable connector should be plugged into the
Black port on the back of the tower.
b. For the First Tower, connect the Blue Cable Connector to the Blue Port on the
back of the tower, leaving the Black Port empty. Connect the Black Cable
Connector from the same cable to the Black Port on the next tower (MIDDLE or
END) in the Daisy Chain.
c. If there are more than 2 Daisy Chain towers which need to be connected, then
continue the same connection method throughout all towers except for the END
tower. On the END tower, connect the Black Cable Connector from the previous
tower to the Black Port on the back of the tower leaving the Blue Port empty.
4. Attach the Power Cord provided to the back of each tower.
- - 9 - -

Chapt
Make
g
For a disc-to-disc copy, the copy source can be either of these devices:
¾The reader: The reader normally is the 1st drive from the top of the system and is most often
the source typically used when making disc-to-disc copies.
¾Any of the writers: One of the writers can also be used as the copy source when making
disc-to-disc copies. This option is typically only used when the reader is either bad or unable
to read the master disc.
It will simultaneously load the master disc image into the hard drive while copying from the
reader drive to the writer drives during the first round of the copy process; then starting from the
2nd round, all copies will be made from the hard drive for enhanced performance and reliability.
Section 1: Selecting the Copy Source.
When you turn on your system, after it has booted up, you should see the following
signifying your system is ready.
or down button to locate
Drive 0 (1st drive) and press “ENT”/Enter button to select it.
er 4: Basic Operations
Disc-to-Disc Copies
This process will copy your master disc onto one or multiple blank discs simultaneously.
However, due to its simultaneous nature, a good conditioned master disc and a lower recordin
speed is recommended for higher success rates and better quality duplications.
DUPLICATOR ( 3)
1.Copy
The“(3)”indicatesthereare atotalof3Towersinthis
chain.
Step 1: Use the up or down arrow button to navigate to the Select Source menu.
DUPLICATOR ( 3)
7.Select Source
Step 2: Press “ENT”/Enter button to enter the Select Source menu and you shall see a
screen similar to below:
Drive 0 Port x.x
ASUS DVD-E818A
Step 3: If you plan to use the Reader as the source, use the up
Drive 0 Port x.x
ASUS DVD-E818A
- - 10 - -

If you would like to use one of the Writers as the source, use the up or down button
p and press “ENT”/Enter button to select it.
If the drive you’ve selected is same as the original source, the system will NOT
ape button to go back
hen the Reader is selected as the
NT”/Enter button to ent the Copy menu. You should then see the
how many copies you want to make for your project.
er of copies you’ve made for this job and prompt you
chieved.
re
so required.
his
”/Enter button when
e of the screen below:
Or, you can choose to enter the desired number of copies for this job by following the simple
procedure below:
to locate Drive 1 or u
Drive 1 Port x.x
Pioneer DVD-RW DV
R
-
1
respond to the “ENT”/Enter button. Please press “ESC”/Esc
to the main menu.
Once the source has been selected, you will be guided to the main menu. You
should see the following screen:
DUPLICATOR ( 3)
7.Select Source
Section 2: Making Copies from the Reader (w
source drive).
Step 1: Use the up or down arrow button to navigate to the Copy menu:
Step 2: Press the “E
DUPLICATOR ( 3)
1.Copy
er
Counter feature screen.
Counter:
No Counter
The Counter feature will let you choose
numbIt
when the desired number has been a
allows the system to count the
The Counter feature is for your convenience only, and will allow you to make mo
copies than the amount desired, if
You can choose not to input your desired number of copies if you prefer to copy
continuously with no interruption. (It will still count the number of copies you’ve made for t
b, but it will not notify you when to stop.) To do so, simply press “ENTjo
you see the “No Counter” on the 2nd lin
Counter:
No Counter
- - 11 - -

a) Simply press the up or down button to the following screen:
ton to submit. You should see the following Specify
P put Name and Number” section of “Chapter 2: Getting to know
your System” on how to enter the desired amount. Then press “ENT”/Enter to
tep 3: ollowing Preparation
t do not contain disc(s) in them will automatically be
ejected:
OR
ither one of the above screens is displayed for more than 2 minutes after you
e quality of the
5-
all
s
o activity within 30 seconds, or if all
writers are filled and the system detects this, the system will start automatically.
If the number of blank discs you inserted does not match the number of discs
discs.
b) Then press the “ENT”/Enter but
Counter screen:
c) lease refer to the “In
continue to the next step.
Once the Counter selection is submitted, you shall see the fS
sc een and the corresponding trays thar
If e
have inserted your master disc or blank discs, please check th
discs.
Counter:
Specify Counter
S
[
pecify Counter:
] OK?
Preparing
P
reparing
Waiting for Master Waiting for Blanks
Step 4: After you’ve placed your master disc and blank discs in the drive(s), please allow
10 seconds for the system to detect them. After they have been recognized, then you sh
ee the following screen:
Preparing
7 Disc Detected, Go?
The“7”indicatestherearesevendiscsrecognizedbytheWriter.
Actualquantitymaybedifferentdependingonthesizeofyour
machineorthenumberofdiscs
y
ouinserted.
By default, the “Auto Start” setting is set to “Auto”. Therefore, if your system is not
completely filled with blank discs and there is n
Once the number of blank discs you inserted matches the number of discs
detected on the screen, press “ENT”/Enter (if you are not usingAuto Start or wish
to speed up the process) to confirm and the following Processing screen will
appear.
Processing...
Please Wait
detected on the screen, please give 10-15 seconds for the system to recognize all of
your blank
- - 12 - -

- - 13 - -
4012MBindicatesthetotalcapacityofyour
havemadezero
copiesthusfar.
copiedfromthemaster
masterdisc.
0/21indicatesyouhaveaprojectsizeof
twenty‐onecopiesandyou
10%indicatesthecurrentpercentageofthe
copyingprogress.
401MBindicatesthecurrentamountof
datathathasbeen
disc.
4012MBindicatesthetotalcapacityofyour
esthusfar.
10%indicatesthecurrentpercentageofthe
copyingprogress.
athat
Copy progress screens
will ppe nd screen is shown when “Specify Counter” is selected and the right-
and sc Counter” is selected.
gress ato r
approximately 30 seconds for CD duplication and up to 1 minute for DVD
Once the duplication run is completed, the successful copies will be ejected and you
shall see the following screen.
Remove the successful copies and refill the trays with additional blank media to
your proj
If you’ve specified a counter value for your project and your project is completed, you shall
see the f
You can then press “ENT”/Enter to go back to main menu.
If you happen to have any failed discs (bad copy), the failed disc(s) will not be
if
Step 5: After 2 or 3 seconds of processing time, one of the following
a ar. The left-ha
h reen is shown when “No
“Specify Counter” “No Counter”
masterdisc.
0indicatesyouhavemadezerocopi
401MBindicatesthecurrentamountofdat
hasbeencopiedfromthemasterdisc.
It is normal to see the pro indic r stay at 0-10% and 100% fo
duplication. That is caused by the initializing and finalizing stages.
Step 6:
Step 7:
continue making more copies. You can also press the “ESC”/Escape button to terminate
ect and go back to the main menu.
ollowing screen:
ejected automatically. You need to manually eject them and throw them away
they are write once recordable disc(s).
“PASS7”indicatesthatyou’vejustmade7successful
havenofailureinthisrun.
copies.
“FAIL0”indicatesthatyou
“7”indicatesthatyou’vesuccessfullycopied7copiesso
far.
PASS 7 FAIL 0( 7)
Waiting for Blanks
Pass 21 Fail 0
Job Completed! Press OK to Finish
Copying... 4
10%
012MB
401MB
C
opying ... 4012MB
00/21
1
0% 401MB

- - 14 - -
. Overall, there are four benefits of
¾Performa ve will enable pying
performan
Stability. lize the dupli isc-to-
Durability drive is a more durable storage device than recordable discs. The
recording sed and
while hard
incidental d
Conveni
a copy; th
Throughout this manual, the term partition(s) is also used to refer to image files in
h
A partition will be created whenever you begin to load the master disc content into the hard drive.
The size of the created partition will be the same as the size of your master disc rounded up to
size of every partition you created.
The he capacity difference between the advertised
cap city and the ac
version rate of 1GB = 1 Billion Bytes or 1000^3
By plication System use a
sta 4^3 Bytes. Therefore, for an
advertised 160GB Hard Drive (160 Billion Bytes), the true capacity base on our system’s
standard is actually 149GB.
2. In addition, we round off all fractions of a GB to the lower whole number. That means for
B.
ur master disc into the installed hard drive as
an image and copy the stored image onto blank discs.
Section 1: Loading Master Disc content into the Hard Drive as a partition/image.
hen you turn on your system, after it has booted up, you should see the following
signifying your
Step 1: U
Make Hard Drive-to-Disc Copies
Copying from the hard drive is the best way to make copies
copying from the hard drive.
nce. Copying from the hard dri the writer dives to boost the co
ce to its limit.
Copying from hard drive will stabi cation process compared to d¾disc duplication.
– The hard
surface of a recordable disc is expo
drives are covered with metal and mo
amage.
¾can easily be scratched on its surface,
unted inside the system protecting it from
ence – With your master disc(s) stored i
snside the hard drive, you can have access¾to each one easily. There i no need to carry your master discs every time you want to make
ey are all stored inside the system.
e hard drive.t
the next Gigabyte. The number of partitions the hard drive can hold is determined by the
capacity of your hard drive and the
re are many factors that could contribute to
tual capacity: t
a
1. Hard Drive Manufactures use a con
tes. However, most Operating Systems, including our Du
ndard conversion rate of 1GB = 1.074 Billion Bytes or 102
a hard drive that has a 149.5GB system capacity, we only recognize and utilize 149G
The following steps will show you how to load yo
Wsystem is ready.
DUPLICATOR ( 3)
1.Copy
se the up or down arrow button to navigate to the Hard Drive Setup menu.
D
9.Hard Drive Setup
UPLICATOR ( 3)

Step 2: Press “ENT”/Enter button to enter the Hard Drive Setup menu.
If the current source is not Hard Drive, you will see the screen below. Please press
Step 4: Press the “ENT”/Enter key to enter the Load Partition menu and you should see the
llowing screen.
g the
the “ENT”/Enter button once to proceed.
Select HDD as source
OK?
Once you’ve entered the Hard Drive Setup menu, you will see following screen:
Step 3: Use the up o
Hard Drive Setup
1.Select Partition
r down button to locate the Load Partition menu; as shown in the
reference screen shot below.
Hard Drive Setup
2.Load Partition
fo
You have a choice when loading your master disc content into the hard drive by pressin
up or down button to find your desired partition naming method:
Option 1:
Load Partition[004/149]
Loa
d
►New Partition
The“004”indicatesthenumberofGByou’vealreadyusedon
theHardDrive.
numberwillvarybasedonthesizeofthe
yourduplicator.
The“149”indicatesthetotalavailablecapacityofthesystem’s
harddriveinGB.This
harddriveinstalledin
A new partition/image
Screen Shot (New Partition)
Option 2:
Overwrite one of the existing partitions/images (if any exists, including the reserved
partition/image)
Screen Shot (Overwrite)
Option 3:
hooseC
for you.
Auto Generate to have the system automatically generate a partition/image name
Screen Shot (Auto Gen)
.
¾If yo partition/image, you should see the following screen
after
From 1 of the 3 choices above, press the “ENT”/Enter button to submit your selection
u have chosen to create a new
you submit your selection.
- - 15 - -

Ple e refer to the “Input Name and Number” section of “Chapter 2: Getting to know
ou System” to enter the desired title. Then press the “ENT”/Enter to continue to the
ext step.
e the
following screen after you submit your selection.
to the next step.
¾If you have chosen Auto Generate, Then precede to the next step.
st
ill be displayed, as show below:
Once the loading process is completed, you should see the following screen:
ou can then press the “ENT”/Enter button to go back to the Hard Drive Setup
as
ry
n
Edit Partition Name
[ ]OK?
¾If you have chosen to overwrite one of the existing partitions/images, you should se
Then press “ENT”/Enter to continue
This Will Overwrite
[FUN1]OK?
Step 5: Please place your master disc into the Reader or the 1 Writer if there’s no Reader
installed in your system. Once the system recognizes your master disc, the loading
progress screen w
ofthe
themasterdiscthathasbeenloadedintothe
harddrive.
4012MBindicatesthetotalcapacityofyour
masterdisc.
Loading... 401
FUN1 10% 401
2MB
MB
FUN1indicatesthenameofthepartition/image
wherethedataisbeingloadedinto.
10%indicatesthecurrentpercentage
masterdiscthathasbeenloadedintothehard
drive.
401MBindicatesthecurrentamountdatafrom
Step 6:
Load Partition OK!
Press OK to Continue
Y
menu. And then press the “ESC”/Escape button to return to the Main menu. You
should see the following screen:
DUPLICATOR ( 3)
9.Hard Drive Setup
- - 16 - -

Section 2: Selecting the Copy Source to the Hard Drive.
Ignore this section and proceed to Section 3 if you have just completed Section 1:
Loading Master Disc content into the Hard Drive as an image as this process will
Step 1: Use the up or down arrow button to navigate to the Select Source menu.
Step 2: Press “ENT”/Enter button to enter the Select Source menu and you shall see a
screen similar to below:
ected as the source, the system will NOT
r s the “ESC”/Escape button to go
ll be guided to the Main menu. You
Section 3: Making Copies from an existing partition/image of the Hard Drive.
automatically switch the source to the hard drive.
DUPLICATOR ( 3)
7.Select Source
Drive 0 Port x.x
ASUS DVD-
E
818A
Step 3: Use the up or down button to locate the Hard Drive and press the “ENT”/Enter
button to select it.
HARD DRVIE Port x.x
HITACHI HDS721616PL
If the hard drive has already been pre-sel
pond to thee “ENT”/Enter button. Please press
back to the main menu.
Once the source has been selected, you wi
should see the following screen:
Step2: P
Step1: Use the up or down arrow button to navigate to the Copy menu:
ress the “ENT”/Enter button to enter the Copy menu. You should then see the
Choose Partition menu.
DUPLICATOR ( 3)
7.Select Source
DUPLICATOR ( 3)
1. COPY
Choose Partition:
[FUN1] DVD 4012MB
- - 17 - -
This manual suits for next models
1
Table of contents
Other Vinpower Digital Disc Duplicator manuals