Consciot ZL100010006 User manual

Ver 1.1
Smart LED A19 Bulb
User Guide
Smart LED Bulb (Dimmable White)
Model: ZL100010006
FCC ID: 2ASHKZL100010006
Smart LED Bulb (Tunable White)
Model: ZL100010004
FCC ID: 2ASHKZL100010004
If you have any questions of the installation or usage, contact us in the following ways:
Phone: 1-855-955-7007 (24x7)
Website: www.consciot.com
Email: [email protected]

Content
Cautions ……………………………………………………………………… 1
Products Overview……………………………………………………… 2
Consciot APP ……………………………………………………………… 3
Add Mini Hub and Smart Bulb Separately………………… 4
Control the Smart Bulb ……………………………………………… 7
Remove the Smart Bulb……………………………………………… 8
Scenes ………………………………………………………………………… 9
Timer …………………………………………………………………………… 10
Home…………………………………………………………………………… 12
Room …………………………………………………………………………… 14
Work with Alexa ………………………………………………………… 16
FCC Compliance Information Statement ………………… 18

1
To avoid personal injury and/or possible product damage, the following cautions must be followed:
1. Risk of electrical shock. Disconnect power at fuse or circuit breaker before installing or servicing.
2. To prevent early lamp failure, lamp should only be installed in operating environments ranging between -20°C and +40°C (-4°F
and +104°F).
3. Not for use with dimmers.
4. Lamp dims via wireless control and will not operate with a dimmer switch.
5. Not for use in totally enclosed luminaires.
6. Not for use in emergency light fixtures or exit signs.
7. Ensure fixture can support the added weight of the lamp/bulb.
Cautions

2
Products Overview
Model ZL100010006 ZL100010004
Type Dimmable White Tunable White
Hub Required YES YES
Wattage 9W 9W
Lumens 800lm 800lm
Light Appearance Warm White
2700K
Warm White to Daylight
2700-6500K
Light Dimming 1%-100% 1%-100%
Timing √ √
Scenes √ √
Work with Alexa √ √

3
1. Download Consciot APP
Get the "Consciot" app from App Store or Google Play.
Consciot app is applicable for iOS 8 or higher, Android 4.1 or
higher.
2. Register and Log in
At Welcome page, tap "Create account", then "Agree" the
Terms of Service and Privacy Policy. Input your Email address
and password. To guarantee your account safety, ensure the
password comply with the followings:
- At least 6 characters
- 1 uppercase letter
- 1 lowercase letter
- 1 number or symbol
After entering the Email address and password, tap "Create".
Your email box will receive a verification link. Click the link and
return to the Consciot APP to sign in.
Consciot APP

4
Before adding a Smart Bulb(Zigbee 3.0 compatible) on
Consciot APP, please set up a Mini Hub(sold separately) first
so as to connect the bulb. If you already have a Mini Hub
added on the APP, please skip this step and turn to Step 6.
Step 1
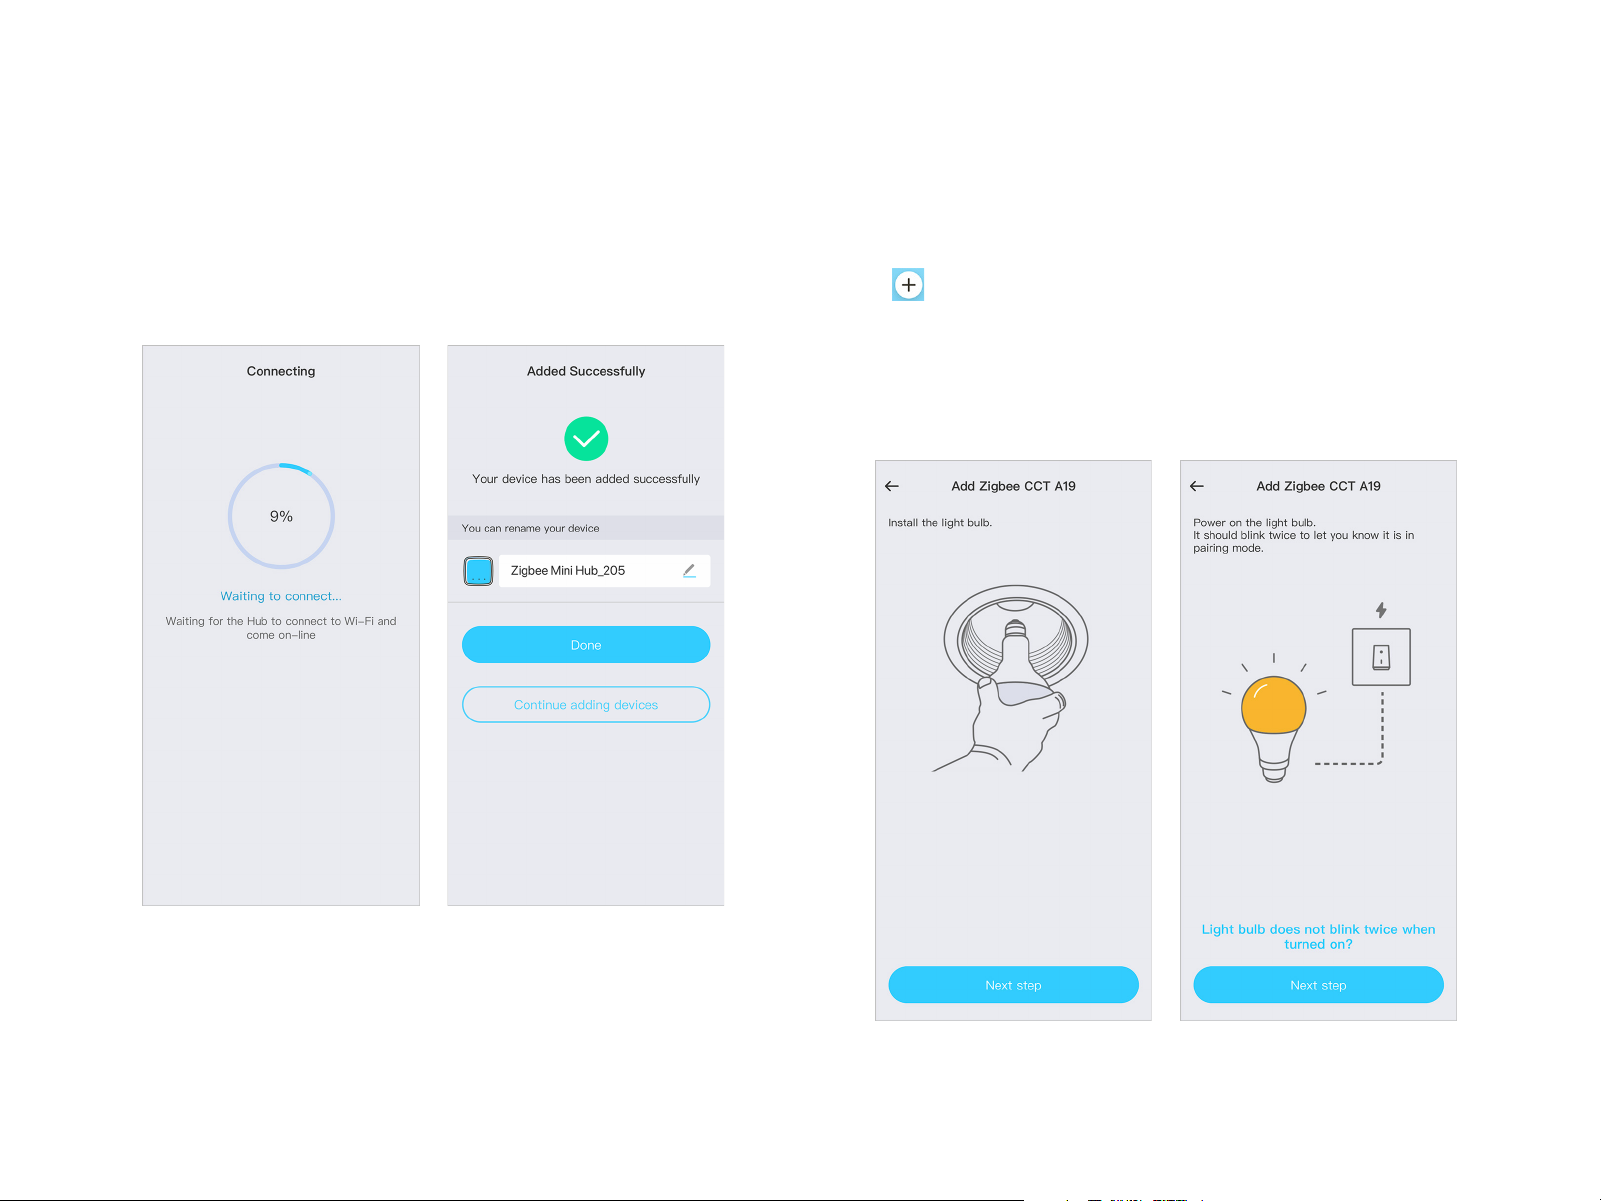
Add Mini Hub first. Tap at the top right corner of Home
page, select "Zigbee Mini Hub" in the Device List. Plug in the
Mini Hub, tap "Next step";
Add Mini Hub and Smart Bulb Separately
Step 2
Wait for the indicator on the right end of the Mini Hub to flash
once per second in green, then tap "Next step";
Step 3
Select your Wi-Fi network and enter the right password, tap
"Next step".
Step 4
Select Wi-Fi: tap "Take me to my settings", select "Mini-Hub-**"
in the WLAN settings page. After your phone is connected to
"Mini-Hub-**", return to Consciot APP.

5
Step 5
Wait for about 1 minute, the APP will add the Mini Hub
automatically. Then you can choose to assign it to a room, or
tap "+" to create a new room.
Add Mini Hub and Smart Bulb Separately
Step 6
After adding the Mini Hub, the next step is to add Smart Bulbs.
Tap at the top right corner of Home page, select "Zigbee
DIM A19"/"Zigbee CCT A19" in the Device List;
Re-plug in the smart bulbs and it will blink twice. If not, you
need to power on and off the bulb consecutively for 6 times
until it blinks twice. Tap "Next step";

6
Step 7
The APP will automatically search for and add the smart bulb. Once the bulb is found, it will blink once and be added in the APP. If all
bulbs appear at the "Searching For Device" page, tap "Stop searching" to stop the search. Tap "Test" to check where the connected
bulb is. Tap to rename the device. In the last step, tap "Done" to finish the adding.
Warm Tips:
If you keep failing to add the device, please turn off then turn on the device when the APP is searching.
Add Mini Hub and Smart Bulb Separately

7
On/off
You can turn on/off the smart bulb at Home page.
Dimming
Tap the smart bulb at Home page into the bulb page. Then
you can adjust the brightness, color temperature and color of
the bulb.
Dimmable smart bulb (DIM): brightness adjustable only.
Tunable smart bulb (CCT): both brightness and color
temperature adjustable
Control the Smart Bulb
Settings of the smart bulb
Tap at the top right corner of bulb page for setting change.
You can set the name, change the icon of the bulb, change
the group it is listed in and so on.

8
The smart bulb, if removed, will restore its factory defaults and no longer be listed on your account. Two ways to remove the bulb:
Method 1
Long press the bulb you want to remove at Home page, tap at the top left, tap "Yes" to delete the bulb. Or tap "Remove" in the
setting page of the smart bulb.
Method 2
Power on and power off the smart bulb consecutively for 6 times, will blink twice showing it restores to factory default.
Remove the Smart Bulb

9
Scenes function enables you save many customized smart
home scenes you like. You can quickly switch to the scene
you prefer if needed.
Add Scene
At Scenes page, tap one of the 6 default templates or tap
at the top right corner to add a new Scene.
At Add Scene page, fill in a Scene name and select a Scene
icon. Tap to select Devices you want to include in this
scene, then tap on the left, to designate specific status of
Devices in the Scene.
Scenes
Set all Devices you need, then tap "Save" to complete the
Scene settings. At Scene page, taping the corresponding
Scene allows you to switch quickly to relevant Scenes.
Edit or Remove Scene
At Home page, tap at the top right corner or long press
any one of the Scenes. icons will appear. Tap to
remove the relevant Scene. You can also tap a Scene card in
the middle to edit it.

10
Set the timer
At Automation page, tap at the top right corner, select
"Time of Day" into timer creating page.
Fill in the name of the timer, schedule the time and select a
repeat mode. You can set it at a specific time, or choose the
sunrise and sunset time based on your location. You're also
able to select "Before/After" at given sunrise or sunset option.
For Effects, tap "Make this happen" into a new page, then tap
to select Devices or Scenes you want to trigger by the
Timer
timer. Tap on the left to set the status of Devices when
triggered. If you want to remove a Device, swipe it to the left,
and tap "Remove".
With all settings done, you can tap "Preview" at Time of Day
page to preview all the effects going to be triggered. In the
last step, tap "Save" at the top right corner to save the timer.
All timers saved will be listed at Automation page. You can
enable or disable relevant automation options by taping .

11
Timer
Remove Automation
Swipe the Automation card to the left at Automation page.
You can remove that card by tapping "Remove".
View/Edit Automation
At Automation page, tap the Automation option into details
page. You can view or edit this Automation then. After editing,
please remember to tap "Save" at the top right corner.

12
Home
Home Setting
In "Home Management", tap the "Home" you want to edit to
do the settings. At here, you can change the Home name,
share your Home with others and customize wallpaper of the
AP P.
Create Another Home
Tap the "Home" you created(default name: My Home) at
Home page, turn to "Home Management". Tap "Create" at
the top right corner to create a new "Home". Once it is done,
you're able to switch quickly between Homes, which are
independent with each other, and manage the smart devices
within.

13
Home
Accept Invitation
Invitee needs to open the letter subjected with "Home Share
Invitation". Click "Accept invitation" to confirm the acceptance.
Then the invitee is able to log in his Consciot account to
control the shared Home.
Note: If the Invitee didn't register Consciot account, he or she
will be guided by the Invitation letter to done the registration.
Home Share
"Home share" option allows you to share the control over the
smart devices to others.
Tap "Home share" in Settings page of the room you want to
share, then "Add a person" in "Family management" page.
In "Invite" page, fill in the name and E-mail of the Invitee you
want to add. The "Name" here works as a note, not necessarily
to be the same as that used in the APP. Lastly, tap "Invite". An
invitation letter will be sent to the Invitee's Email box.
Note: The Invitee's email could be both a registered Consciot
account or unregistered one.

14
Room
"Room" helps you organize the devices within "Home". If you
have too many devices to remember where they are, use
"Room" to manage them.
Create Room
Tap at the top right in Home page to go to "Room
Management". Tap "Create Room", select an icon for the
"Room", fill in the Room name, choose the devices belong to
that Room. Save it.
Note: One device is exclusive to only one "Room".
Edit Room
In "Room Management" page, choose a "Room", edit or
remove the "Room" in "Room Settings". Remember to tap
"Save" in the last step.
Note: "Everything Else" is not editable. Devices not distributed
to a "Room" will be put into "Everything Else".

15
Room
Room Switch
In Home page, slide horizontally to view "ALL", "EVERYTHING
..." and Room created in the list, switch to one with a single
tap.
All Control
All control is a function allows you to control all devices,
especially smart light, included in the same Room together.
In Home page, tap to turn on/ off the devices in the
Room. Tap "All control" into the detailed page, where you can
adjust the brightness, color temperature or color to the same
simultaneously for these devices. If the light doesn’t support
color temperature or color adjustment, it will not respond to
the change.

16
Step 1
Go to Alexa app, tap the icon at the top left, select "SKILLS
& GAMES" and tap the search icon at the top right. Enter
"consciot" and search.
Work with Alexa
Step 2
Choose the displayed "Consciot", then tap "ENABLE TO USE".
In the new page, fill in your Consciot account and password,
then tap "Log in".
After that, a message telling you "Consciot Smart Home has
been successfully linked" will appear. Tap "Done".

17
Step 3
Tap "Discover Devices" in the new page, Alexa will begin discovering your Consciot devices. Once the devices are found, you’re able
to voice control them with Alexa.
Another way to "Discover Devices": Tap the "+" at the top right corner of "Devices" on Alexa APP, choose "Add Devices", scroll to the
bottom to select "Other". Tap "Discover Devices" to start the search.
Work with Alexa

18
FCC Compliance Information Statement
Smart LED A19 Bulb (Dimmable White) FCC ID: 2ASHKZL100010006
Smart LED A19 Bulb (Tunable White) FCC ID: 2ASHKZL100010004
Responsible party:
Company name: LEEDARSON AMERICA INC
Street Address: 300 Technology Ct., Suite 100, Smyrna GA, United States
Website: www.consciot.com
E-mail: [email protected]
FCC Compliance Statement (for products subject to Part 15)
This device complies with Part 15 of the FCC Rules. Operation is subject to the following two conditions: (1) This device may not cause
harmful interference, and (2) this device must accept any interference received, including interference that may cause undesired
operation.
NOTE: The grantee is not responsible for any changes or modifications not expressly approved by the party responsible for
compliance. Such modifications or changes could void the user's authority to operate the equipment.
NOTE: This equipment has been tested and found to comply with the limits for a Class B digital device, pursuant to part 15 of the FCC
Rules. These limits are designed to provide reasonable protection against harmful interference in a residential installation.
This equipment generates uses and can radiate radio frequency energy and, if not installed and used in accordance with the
instructions, may cause harmful interference to radio communications. However, there is no guarantee that interference will not occur
in a particular installation. If this equipment does cause harmful interference to radio or television reception, which can be determined
by turning the equipment off and on, the user is encouraged to try to correct the interference by one or more of the following
measures:
- Reorient or relocate the receiving antenna.
- Increase the separation between the equipment and receiver.
-Connect the equipment into an outlet on a circuit different from that to which the receiver is connected.
-Consult the dealer or an experienced radio/TV technician for help.
RF Exposure Statement: This equipment complies with FCC radiation exposure limits set forth for an uncontrolled environment. This
equipment should be installed and operated with minimum distance of 20 cm between the radiator and your body.
This manual suits for next models
3
Table of contents
Other Consciot Home Automation manuals