CONSTRUCTA CVC762ST User manual

CVC762ST
USER MANUAL
VACUUM CLEANER
ИНСТРУКЦИЯ ПО ЭКСПЛУАТАЦИИ
ПЫЛЕСОС
6–14
15–23
24–31
EN
RU
HE
пылесос
VACUUM CLEANER
CVC762ST
קבא באוש
הלעפה תוארוה
קבא באוש

пылесос
VACUUM CLEANER
CVC762ST
Fresh air and perfectly clean house
תיבה לש םלשומ יוקינו חצ ריווא
קבא באוש
www.constructa.com

24
22
23
21
15
25
16 17
18
32
34
33
31
26
29
30
27
28
14
13
20
19
BA
A
8
11
12
10
9
7
6
3
4
2
1
5

1
C
2
3
5 6 7 8
121110
9
16151413
D
1 2 3 4
1 2 3 4
B
4

G H
1 12 2
E
1 2
3 4
I
1 2 3 4
F
1
5
2
6
3
7
4
8

6
Dear Customer,
Congratulations on your choice of our appliance, and
welcome among the users of Constructa products.
In order to achieve best possible results we recommend
using exclusively original Constructa accessories. They have
been specially designed for this product.
Please read this instruction manual carefully. Pay special
attention to important safety instructions. Keep this instruction
manual for future reference.
Important safety instructions
●The appliance can only be repaired by
qualied service personnel. Improper
servicing may cause a serious hazard
to the user. In case of defects please
contact a qualied service center.
●Do not touch the appliance with wet
hands when it is connected to the
mains supply.
●Do not use the vacuum cleaner to
clean people or animals, pay special
attention to keep the nozzles away
from eyes and ears.
●Only use the appliance indoors at
room temperature and up to 2000 m
above sea level.
DANGER! / WARNING!
Health hazard
●If the supply cord is damaged, it must
be replaced by the manufacturer, its
service agent or similarly qualied
persons in order to avoid a hazard.
●Always the plug must be removed
from the socket-outlet before
cleaning, maintaining, assembling or
dismantling the appliance.
●Turn off the device and unplug it
from an outlet before replacing the
equipment or approaching moving
parts during use.
●This appliance can be used by
children aged from 8 years and
above and persons with reduced
physical, sensory or mental
capabilities or lack of experience and
knowledge if they have been given
supervision or instruction concerning
use of the appliance in a safe
way and understand the hazards
involved. Children shall not play with
the appliance. Cleaning and user
maintenance shall not be made by
children without supervision.
●Do not operate the appliance if it has
a damaged cord or if the housing is
visibly damaged.
CAUTION!
Not observance can result in
damage to possessions
●Connect the vacuum cleaner only to a 230 V mains
supply equipped with a 16 A fuse.
●Do not unplug by pulling on cord.
●Do not allow the plug to have contact with water.
●Do not run the vacuum cleaner or the brushes over the
cord, it may cause damage to the cord insulation.
●Do not pick up: matches, cigarette butts, hot ash. Avoid
picking up sharp objects.
●Do not vacuum ne dust such as: our, cement,
gypsum, toners for printers and copy machines etc.
●Do not pick up corrosive and toxic materials, petrol,
kerosene and other ammable or explosive liquids.
●The pump may only be switched on when the
cleaning liquid container is lled with the solution of
cleaning liquid and water. The lack of cleaning liquid is
manifested in a loud operation of the pump.
●During operation pay attention not to knock the
vacuum cleaner over or to spill water on the appliance.
●Do not expose the vacuum cleaner to atmospheric
conditions (rain, frost).
●Do not use the vacuum cleaner without the foam lter
installed in the ltration unit.
●Do not leave a switched on and operating vacuum
cleaner unattended.
●The vacuum cleaner may only operate in a natural
position i.e. when it is placed with four wheels on the
surface.
EN

7
SUGGESTION
Information on the product and
suggestions for its use
●This appliance is intended for domestic use only.
●Periodically clean the wheels. The dirt which
accumulates on the wheel axis may cause difculties
in the wheel movement.
●Move the vacuum cleaner carefully on doorsteps and
uneven surfaces, not to cause an excessive rippling of
the water inside the tank. This might lead to a slight
water overow.
Static electricity
In the process of vacuuming of some surfaces in areas of
low air humidity the device may become electrically charged.
It is a natural phenomenon – it does not damage the device,
and it is not considered to be a fault.
In order to minimize the phenomenon, we recommend
you to:
●discharge the device by touching metal items in the room
with the pipe,
●increase air humidity in the room,
●use widely available antistatic agents.
Appliance features
The vacuum cleaner is intended to pick up dirt from oors,
carpets, ceramic tiles, slots in wood paneling, skirting
boards, heaters. The vacuum cleaner is also used to vacuum
furniture, curtains, to pick up liquids and to wet clean tiles,
oorings, carpets, tted carpets and upholstery.
Technical parameters
The type of the vacuum cleaner and the technical parameters
are indicated on the rating label. Mains protection 16 A.
Does not interfere with radio and TV reception.
Noise level: 85 dB(A).
Appliance elements A
1Handle
2Container lid opening button
3Combination brush fastening
4Plug and cord
5Accessory compartment
6Pump operation indicator
7Pump switch
8ON/OFF button
9Power adjustment button +/-
10 Power level indicator
11 Cord rewind button
12 Clogged air inlet indicator
13 Parquet brush
14 Combination brush with small item separator
15 Turbo brush
16 Small brush
17 Small nozzle
18 Crevice nozzle
19 Telescopic suction tube
20 Suction hose
21 SAFBAG dust bag holder
22 Water lter module:
AFiltration unit
BPartition
23 Container
24 Cleaning liquid container
25 Spray unit – suction hose handle attachment
26 Large atomizing nozzle
27 Small atomizing nozzle
28 Water pick up nozzle
29 Rubber slat to the large atomizing nozzle
30 Washing set
31 Foam lter I (installed in the vacuum cleaner)
32 Foam lter II (installed in the vacuum cleaner)
33 Motor lter (installed in the vacuum cleaner)
34 HEPA outlet lter (installed in the vacuum cleaner)
Preparing the vacuum cleaner for
operation
1Insert the end of the suction hose to the vacuum cleaner
opening so that the markings on the hose end and on the
vacuum cleaner housing are opposite each other and turn
the hose clockwise to the position .
2Connect the other end of the hose (handle) with the
telescopic suction tube.
3Hold the ring on the pipe and set chosen length putting it
in or out.
4Assemble the appropriate nozzle or brush to the other
end of the suction tube.
5Use the following nozzles and brushes for traditional
vacuum cleaning with the SAFBAG dust bag and vacuum
cleaning with the use of the water lter module: combination
brush with small item separator, small nozzle, small brush,
crevice nozzle, parquet brush or turbo brush.
6You may assemble a basket for picking up small objects
in the combination brush with small item separator. In order
to do so remove the basket cover and insert the basket.
7 To clean hard surfaces – wooden oors, plastic oors,
ceramic tiles etc. pull out the brush by pressing the switch on
the nozzle according to the gure .
B

8
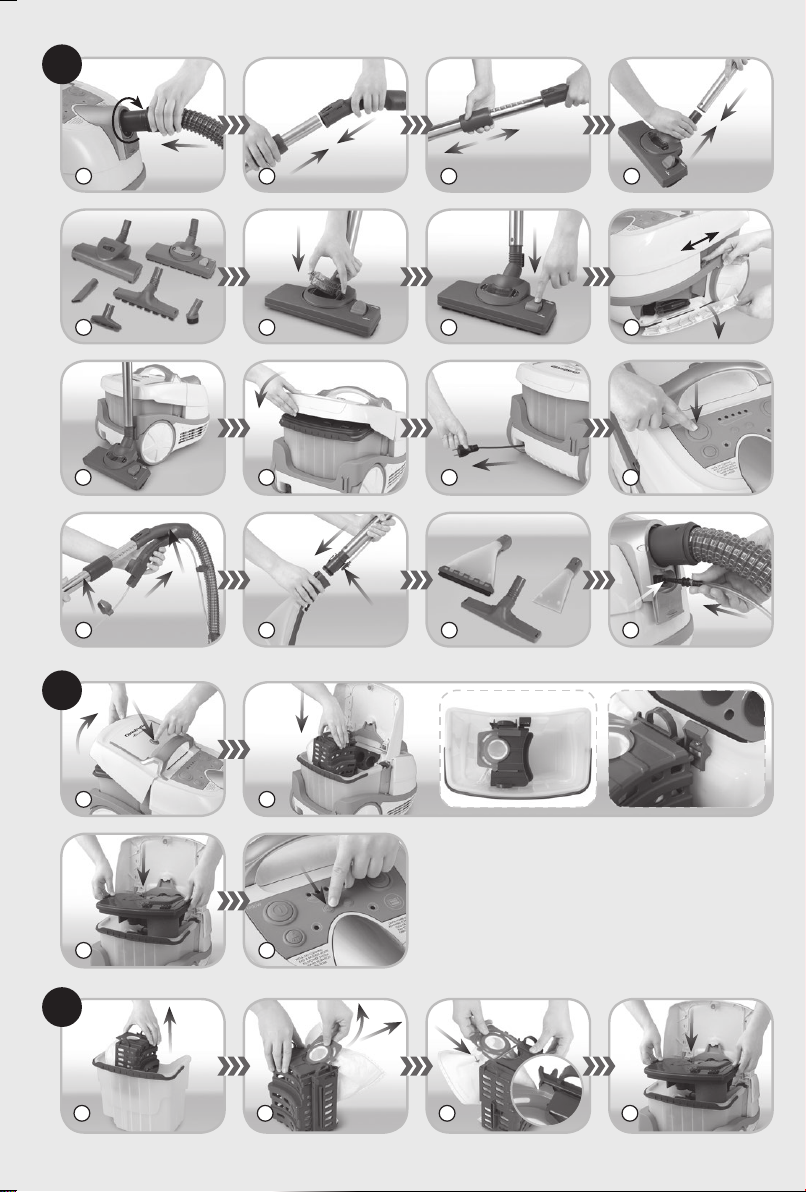
8The vacuum cleaner is equipped with an accessory
compartment. The compartment opens/closes with the use
of a slider. To open/close the compartment side the slider
downwards/upwards and take out/ put away the desired
nozzle.
9The vacuum cleaner may be stored in a horizontal
position; in order to this, place the fastening hook of the
combination nozzle/brush into its fastening. The hose may
be left attached to the vacuum cleaner, but it is important to
pay attention not to leave it heavily bent during storage.
10 Close the lid.
11 Grab the plug (4) and pull the cord out of the vacuum
cleaner.
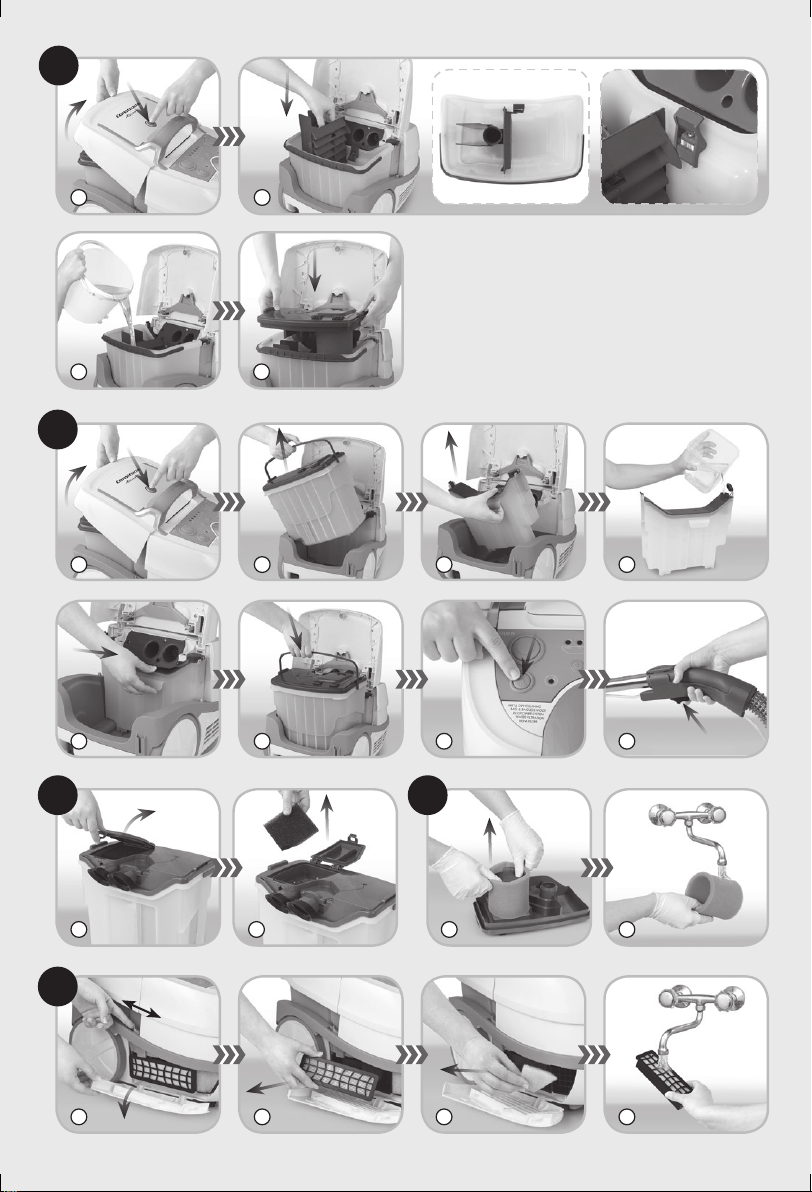
●Plug in the appliance.
Before switching on the vacuum cleaner
with the on/off button (8), make sure that the
appropriate module is installed in the container
(see section C, E, or F).
12 Switch on the vacuum cleaner by pressing the “on/off”
button (8).
In order to prepare the vacuum cleaner for wet operation
additionally:
13 Assemble the spray unit – the suction hose handle
attachment (25).
●Attach the hose fastenings to the suction hose and the
telescopic suction tube.
14 Attach the end of the hose (sleeve) to the telescopic
suction tube and insert the other end of the hose in the small
atomizing nozzle or the large atomizing nozzle until you hear
a characteristic click.
15 Use the following nozzles for the wet vacuuming and wet
cleaning function or to pick up water: large atomizing nozzle,
small atomizing nozzle or the water pick up nozzle.
16 Slide the stub pipe valve plug downwards.
●Insert the stub pipe of the hose to the valve in the
vacuum cleaner housing.
●Make sure the stub pipe fastenings snap shut.
Incaseofdifcultiesinconnectingthe above
mentioned elements moisten the gaskets e.g.
with technical vaseline, water, etc.
Vacuum cleaner functions
TRADITIONAL CLEANING WITH SAFBAG
DUST BAG
1Press and hold the container lid opening button (2) and
lift the container lid.
2Put the SAFBAG holder (21) into the container. Make
sure the holder is inserted correctly in the container guide
slots and the safety lock is engaged. Unfold the bag in the
container.
C
Do not put SAFBAG holder into a wet container.
Thoroughly dry a wet container. SAFBAG dust
bag must not get wet.
3 Cover the container with the ltration unit.
If the SAFBAG holder is not attached properly,
the safety lock will prevent covering the
containerwiththeltrationunit.
●Prepare the vacuum cleaner for operation according
to section B.
4The vacuum cleaner starts at the same power level it
had been working before it was turned off. Set the desired
power value by pressing the power adjustment buttons +/- (9).
The vacuum cleaner is equipped with a power
level memory function. When you turn off the
vacuum cleaner using the ON/OFF button
(8), the power level is going to be stored in
memory. After the vacuum cleaner is turned
on next time, it is going to start working at the
same power level it had been working before it
was turned off.
The vacuum cleaner is equipped with the
adjustment function for LED brightness of
the power level indicator (10) and the clogged
air inlet indicator (12) situated on the control
panel. To set demanded brightness of LEDs
you should simultaneously press the power
adjustment buttons + and – (9), and then
holding them down you should turn on the
vacuum cleaner by pressing the “ON / OFF”
button (8). The LED for power levels MIN, 2,
and MAX turn on, and the motor stays turned
off. Next by pressing the power adjustment
buttons +/– (9) you can respectively increase
or decrease the brightness of power level
indicator (10), and the clogged air inlet
indicator (12). It is not possible to change LED
brightness for the pump operation indicator
(6). After setting a desired LED brightness, it is
necessary to turn off the vacuum cleaner using
the ON/OFF button (8). In this way you leave
the LED brightness adjustment function mode,
and the set LED brightness level is stored.
The vacuum cleaner is equipped with a power
limiting function should the inlet opening be
clogged or the SAFBAG dust bag full. It is
manifested by a pulsing limitation of the motor
power and the lighting up of the clogged air
inlet indicator (12) while the vacuum cleaner is
operating at full power. In such a case switch
off the vacuum cleaner by pressing the on/off
button (8), unplug the appliance and clear the
tubes or replace the SAFBAG dust bag.

9
SAFBAG dust bag disassembly/assembly
1 Remove the ltration unit from the container and pull out
the SAFBAG holder (21).
2Lift the SAFBAG tab and slide the dust bag from the
holder guide.
3Slide the new SAFBAG tab all the way into the holder
guide as directed by the arrow printed on the bag until tab
locks in the guide.
4Put the SAFBAG holder (21) in the container and cover
with the ltration unit in accordance with paragraphs C2
and C3.
If the SAFBAG dust bag is not properly attached
to the holder, the safety lock will prevent
coveringthecontainerwiththeltrationunit.
VACUUM CLEANING WITH THE USE OF
THE WATER FILTER MODULE
1Press and hold the container lid opening button (2) and
lift the container lid.
2Insert the partition in the container. Make sure the
partition is inserted correctly in the container guide slots and
the safety lock is engaged.
3Fill the container with 1,3–1,5 liter of water. The water
level should be in the range marked on the wall of the
container.
Do not operate the appliance with an empty
container while vacuum cleaning with the use
ofthewaterltermodule.
4 Cover the container with the ltration unit.
If the partition is not inserted properly, the
safety lock will prevent covering the container
withtheltrationunit.
●Prepare the vacuum cleaner for operation according
to section B.
●The vacuum cleaner starts at the same power level
it had been working before it was turned off. Set the
desired power value by pressing the power adjustment
buttons +/- (9).
Do not operate the appliance for too long
without replacing the water in the container.
WET VACUUMING AND WET CLEANING
Before using the wet cleaning function thoroughly vacuum
the surface to be cleaned.
Before operating the vacuum cleaner make sure the
container is empty and the water lter module and the lters
are clean.
1Press and hold the container lid opening button (2) and
lift the container lid.
2 Remove the container together with the water lter
module (ltration unit and partition) from the vacuum cleaner.
D
E
F
3Remove the cleaning liquid container (24) by pulling it by
the handle and lifting it upwards.
4 Open the ller cap and ll the cleaning liquid container
(24) with cleaning agent (a mixture of cleaning uid G 500
O Tens (30) and cold water). Use the amounts stated on the
uid bottle label:
–“G 500 O Tens” manufactured by BUZIL, Germany.
●Close the ller hole of cleaning liquid container with the
cap.
Before wet cleaning the carpet, check the
colour fasteness of cleaned carpet. Put a small
amount of prepared solution on white cloth and
clean manually the carpet at least visible place.
If the cloth is dyed, it means that the carpet
colours are not permanent and the carpet
cannot be cleaned using cleaning uid G 500
O Tens.
5Insert the cleaning liquid container (24) back to the
previous position and press the container to x it correctly
(proceed in the reverse order as in case of removing the
container).
6 Insert the container together with the water lter module
(ltration unit and partition) to the vacuum cleaner.
For protection against the formation of foam or at its
formation,whencleaninglltherearcontainerwithan
anti-foaming agent (30) recommended by the company
Constructa,intheamountsspeciedonthelabel:
–“G 478 Buz®Defoam” manufactured by company BUZIL,
Germany.
●Prepare the vacuum cleaner for operation according
to section B.
Use only the large or small atomizing nozzle for
wet vacuum cleaning.
●The vacuum cleaner starts at the same power level
it had been working before it was turned off. Set the
desired power value by pressing the power adjustment
buttons +/- (9).
7Press the pump switch (7).
The pump may only be switched on when
the cleaning liquid container is lled with the
solution of cleaning liquid and water. The lack
of cleaning liquid manifests in a loud operation
of the pump.
If the nozzle does not atomize water although the pump
is switched on, check if the following items are correctly
installed: the cleaning liquid container (press the container),
the fastening of the stub pipe in the valve in the base of
the vacuum cleaner or the fastening of the hose end in
the atomizing nozzle, check if the atomizing nozzle is not
clogged.
8 Press the button adjusting the inow of water to the
nozzle on the hose handle.

10
If you press the button in a pulsating manner, the water shall
temporarily ow in a slower manner to the nozzle, if you
press and slide the button backwards, the water shall be
continuously supplied to the nozzle.
The handle is also equipped with a slider to adjust the
suction power. Do not uncover this opening while picking up
water or using the wet cleaning function.
Do not spray the cleaning liquid in one place
on the carpet for too long in order not to soak
the carpet.
●You should to clean the carpet in such a way that during
and immediately after cleaning nobody walks on the
cleaned surface. After cleaning one part of the carpet
stop the spraying process and dry the carpet by sliding
the nozzle back and forth. Repeat until the whole surface
of the carpet is dried.
●After ending the spraying process switch off the pump
and press the button adjusting the water inow to the
nozzle for a moment to “release the pressure”.
The vacuum cleaner is equipped with a oat
which will automatically block the suction if the
foam lter II (32) is heavily dirty or the liquid
exceeds the maximum level. It is manifested
by a pulsing limitation of the motor power and
the lighting up of the clogged air inlet indicator
(12). In such a case switch off the vacuum
cleaner by pressing the on/off button (8),
unplugtheappliance,cleanthelterandempty
the container.
Make sure the carpet is not soaked. It may
lead to a permanent deformation of the carpet
(folding).
PICKING UP WATER
If you want to use the vacuum cleaner to vacuum liquid in
the container, the vacuum cleaner should be prepared as in
the case of vacuum cleaning with the use of the water lter
module except that:
1. The container should be empty (without water).
2. You are to use atomizing nozzles (large or small), large
atomizing nozzle with the gathering attachment or the
nozzle for picking up water.
Do not operate the vacuum cleaner with a full
container! Do not vacuum large amounts of
liquid at a time (e.g. with the hose immersed
into water).
If the water exceeds the maximum level during vacuuming,
the oat will automatically block the suction. The maximum
capacity of the container is about 5 l. In such a case proceed
in the manner described above in the part concerning the
blocking of suction caused by a dirty foam lter (pulsating
motor speed).
END OF OPERATION CLEANING AND
MAINTENANCE
●Switch off the vacuum cleaner by pressing the on/off
button (8) and unplug the appliance.
●Wind the cord by pressing the cord rewind button (9).
While doing this hold the cord to make sure it is not tangled
and the plug does not hit the vacuum cleaner housing.
●Turn the end of the hose until the tops of the marks
on the end of the hose end and on the vacuum cleaner
housing are in the same position and pull the hose out
of the opening.
●Remove the stub pipe of the hose by pressing the red
button on the valve and pull the stub pipe.
●Disconnect the telescopic tube from the hose and the
nozzle or brush.
●Pour the dirty water out of the container.
●It is recommended to wash the container, lters
(disassembly below) and partition thoroughly after each
use – changing water several times.
●After using the wet cleaning function thoroughly wash
all attachments used in this process (hose, tubes,
accessories).
If you do not clean the above-mentioned parts
orcleantheminsufciently it may lead tothe
lossoftheltrationcapabilitiesoftheinserts
and foam and cause the formation of bacteria
and mites.
Dry all the cleaned parts thoroughly before
reassembly.
FILTER DISASSEMBLY
FOAM FILTER I
1 Open the lid of the ltration unit by pulling the handle
upwards.
2 Take out the lter, wash it under running water, dry and
reinsert.
●Close the ltration unit lid by pressing it until you hear
a characteristic click.
FOAM FILTER II
It is recommended to wear rubber protective gloves while
dismantling the lter.
1 Grab the foam lter with your ngers and remove it from
the ltration unit body.
2Wash under running water, dry and reinsert.
Donothandwashthelterfoam,donotwring
it, do not wash it in washing machines. Avoid
crumpling, stretching and deforming. After
cleaning dry the foam in room temperature.
Never dry the foam on heaters, stoves, etc.
G
H

11
HEPA OUTLET FILTER AND COOLING AIR FILTER
The HEPA outlet lter should be replaced after about 30
hours of operation (6 months) or earlier in case of heavy dirt.
1 Slide the slider of the lter cover interlock downwards
and open the lter cover.
2 Remove and replace the HEPA lter with a new one
when the lter becomes dirty.
3 Remove and replace the motor lter with a new one
when the lter becomes dirty.
4 It is possible to rinse the HEPA lter and the cooling
air lter under running water. Remember to dry the above
mentioned lters before reassembly.
●Close the lter cover and slide the interlock slider
upwards.
ITURBOBRUSH
J
A
B
12
3
4
6
5
4

12
Safety instructions
When using the turbobrush observe the following safety
precautions:
DANGER! / WARNING!
Health hazard
●Do not touch the rotating brush.
●Do not touch power cords of electrical
devices with the turbobrush. This may
damage insulation of these cords.
●Do not allow children near the
working turbobrush.
●Touching the rotating brush may
cause injury.
●This appliance can be used by
children aged from 8 years and
above and persons with reduced
physical, sensory or mental
capabilities or lack of experience and
knowledge if they have been given
supervision or instruction concerning
use of the appliance in a safe
way and understand the hazards
involved. Children shall not play with
the appliance. Cleaning and user
maintenance shall not be made by
children without supervision.
Never use the turbobrush to:
●Polish oors.
●Suck:
●liquids,
●wet or damp dust,
●hot ash,
●burning objects, such as cigarettes,
matches,
●sharp and hard items, such as:
razors, pins, thumbtacks, pieces
of glass, etc.,
●our, cement, plaster, printer or
photocopier toner, etc.
1 2
3 4
M
1 1
2 3
K L
Turbobrush description
Turbobrush is a suction nozzle with rotating, turbine driven
brush. It is intended only for vacuum cleaners to clean
carpets and tted carpets. Plastic casing ensures esthetic
appearance. Rotating brush enables removing difcult
rubbish, such as threads, rags, paper, etc. It is especially
useful in houses with animals (cats, dogs), where removing
fur from carpets is very burdensome. Brush roller is driven
by turbine placed in the joint, by means of belt transmission.
Proper position of the regulator ensures correct work of the
turbobrush, depending on height of carpet hair and facilitates
its movement along the carpet.

13
CAUTION!
Not observance can result in
damage to possessions
●During work the roller of the rotating brush or suction
inlet may get obstructed with rags, papers, etc.
SUGGESTION
Information on the product and
suggestions for its use
●Turbobrush is equipped with wheels that prevent
damage in case of unintentional use on hard oor.
Product description J
1Regulator
2Connector
3Fastening hook
4Wheels
5Rotating brush
6Turbine cover
Assembling the turbobrush and the vacuum
cleaner
Assemble the turbobrush and the vacuum cleaner according
to instruction manual.
Using the turbobrush
To avoid obstruction of rotating element
remove big rubbish from the cleaned surface
before cleaning.
●Switch the vacuum cleaner on.
●Set the regulator on the turbobrush body depending on
the height of carpet hair.
●Short hair carpet – move the regulator towards the
sign .
●Long hair carpet – move the regulator towards the
sign .
In order to use the vacuum cleaner with the
turbobrush safely, especially while cleaning long
hair carpets and animal skins, it is recommended
to test the suction power of the turbobrush on
a small area of the cleaned surface.
●Slowly push the turbobrush back and forth.
Do not hold the working turbobrush for a longer
time in one place, but constantly move it, so as
nottodamagethecarpet(ttedcarpet).
While cleaning carpet fringes always move the
turbobrush in the direction indicated by the
arrow (Fig. K). It prevents getting the fringes
into the rotating brush.
The speed of the brush roller rotation depends
on the amount of dust in the dust bag and
cleanliness of lters. The roller may stop
rotating on the carpet. Then the dust bag and
ltersshouldbereplaced.
Maintenance and cleaning of the turbobrush
Before cleaning and maintenance of the
turbobrush it must be disassembled from the
vacuum cleaner.
CLEANING OF THE ROTATING BRUSH
Duringoperationthebrushcollectspiecesof:
threads, strings, hair, rags, etc. They reduce
cleaningefciency.
To remove dirt from the rotating brush follow the steps below:
1Place tips of scissors into the slot of the rotating brush.
2Move the scissors so as to catch the threads and hair
tangled on the brush.
3Cut them and take out manually or using small tongs.
Be careful not to damage the bristle of the rotating brush.
Dirt such as matches, pieces of paper or
clothing may obstruct the suction duct of the
turbobrush,leadingtosignicantreductionof
the suction power and reduced speed or brush
roller rotation (until it completely stops).
CLEANING OF THE SUCTION DUCT OF
THE TURBOBRUSH
To remove dirt from the suction duct of the turbobrush follow
the steps below:
1Turn the turbobrush with wheels upward.
2Press the fastening in the turbine cover and take the
cover out from the turbobrush.
3Remove dirt from the suction duct, turbine blades and
turbine chamber.
4Place the turbine cover so that its two ledges match
the holes in the turbobrush body, press the cover until the it
latches on the body. Characteristic clicking sound indicates
the correct assembly of the turbine cover.
CLEANING THE TURBOBRUSH
Never clean the turbobrush with gasoline,
solvents, oils and other chemicals that may
cause discoloring of the housing.
L
M

14
Do not use granular cleaning agents that may
scratch the housing.
●The turbobrush may be cleaned with damp cloth
(possibly moisten with a washing-up liquid).
Store the turbobrush away from hot ovens,
radiators, heaters, etc. High temperature
may lead to permanent deformation of the
turbobrush housing.
Disposal
Dispose of packaging in an environmentally-
friendly manner. This appliance is labelled
in accordance with European Directive
2012/19/EU concerning used electrical and
electronic appliances (waste electrical and
electronic equipment – WEEE). The guideline
determines the framework for the return and recycling of
used appliances as applicable throughout the EU. Please
ask your specialist retailer about current disposal facilities.
The manufacturer does not accept any liability for any damages
resulting from unintended use or inappropriate handling.
The manufacturer reserves his rights for modifying the product any
time in order to adjust it to law regulations, norms, directives, or due
to construction, trade aesthetic or other reasons, without notifying it
in advance.

15
Уважаемые Клиенты,
Поздравляем Вас с выбором нашего устройства и при-
ветствуем среди пользователей товарами Constructa.
Чтобы достичь наилучших результатов, мы рекомендуем
использовать только оригинальные аксессуары компа-
нии Constructa. Они спроектированы специально для
этого продукта.
Просим внимательно ознакомиться с настоящей
инструкцией по обслуживанию. Особое внимание необ-
ходимо обратить на правила техники безопасности.
Просим сохранить инструкцию, чтобы ею можно было
пользоваться в ходе дальнейшей эксплуатации прибора.
Указания по технике безопасности
ВНИМАНИЕ!
Несоблюдение этих требований
может привести к нанесению
ущерба собственности
●Подключайте пылесос только к сети переменного
тока 230 V, защищенной предохранителем 16 A.
●Не вынимайте вилку из розетки, вытягивая ее за
провод.
●Не допускайте до замокания вилки питающего
электропровода.
●Запрещается наезжать пылесосом на питающий
провод или прижимать его щеткой, т.к. это может
привести к повреждению изоляции провода.
●Не допускайте до всасывания пылесосом спичек,
окурков, горячего пепла, а также острых предметов.
●Не используйте пылесос для всасывания муки,
цемента, гипсового порошка, тонера для принтеров
и копиров или других мелких частиц.
●Запрещается использовать пылесос для всасыва-
ния едких, ядовитых, легковоспламеняющихся или
горючих жидкостей, таких как бензин и керосин.
ОПАСНОСТЬ! / ВНИМАНИЕ!
Несоблюдение правил грозит
травмами
●Если несъемный провод питания
будет поврежден, его следует
заменить у производителя или
у работника сервисной службы
или квалифицированным лицом,
чтобы избежать возможных угроз.
●Перед очисткой и уходом за пылесо-
сом, его сборкой и разборкой убеди-
тесь, что пылесос отключен от сети.
●Перед заменой оснащения или
приближения к движущимся
частям следует выключить устрой-
ство и отключить его от питания.
●Данный прибор может использо-
ваться детьми в возрасте с 8 лет
и лицами с ограниченными физи-
ческими и умственными способно-
стями, лицами без опыта работы
с прибором, если будет осущест-
вляться контроль или проведен
инструктаж по эксплуатации при-
бора и связанными с этим угро-
зами. Запрещается детям играть
с прибором. Не допускать проведе-
ния чистки и консервации прибора
детьми без присмотра взрослых.
RU ●Не включайте прибор, если пита-
ющий подсоединительный про-
вод или корпус имеют видимые
повреждения.
●Ремонт прибора могут выполнять
только квалифицированные специ-
алисты. Неправильно выполнен-
ный ремонт может создать серьез-
ную угрозу для пользователя.
В случае появления неполадок
рекомендуем обратиться в специ-
ализированный сервисный пункт.
●Не прикасайтесь к пылесосу и вилке
питающего сетевого провода
мокрыми или влажными руками.
●Не пылесосьте пылесосом людей
и животных, в особенности, не
прикладывайте всасывающие
насадки к глазам или ушам.
●Используйте прибор только вну-
три помещений при комнатной
температуре на высоте не выше
2000 м над уровнем моря.

16
●Насос можно включать только в том случае, если
в контейнере для детергентов имеется раствор
чистящей жидкости и воды. Отсутствие жидкости сиг-
нализируется повышенным уровнем шума насоса.
●Если пылесос перевернулся или опрокинулся,
немедленно верните его в вертикальное положе-
ние. Не допускайте до залития пылесоса водой.
●Не подвергайте пылесос воздействию атмосфер-
ных факторов (дождь, мороз).
●Запрещается использовать пылесос без
cепараторной пенки в фильтрующем модуле.
●Не оставляйте включенный и работающий пылесос
без присмотра.
●Пылесос может работать только в горизонтальном
положении, то есть, стоя на основании на четырех
колесах.
Электростатичность
Уборка пылесосом некоторых поверхностей в условиях
низкой влажности воздуха может вызвать незначитель-
ную наэлектризованность устройства. Это естественное
явление, оно не повреждает устройство и не является
его дефектом.
Для минимизирования этого явления рекомендуется:
●разрядить устройство путём многократного касания
трубой металлических объектов в комнате,
●увеличить влажность воздуха в помещении,
●использовать общедоступные антиэлектростатиче-
ские средства.
Описание пылесоса
Пылесос предназначен для удаления пыли с пола и ков-
ров, керамических плиток, из щелей и плинтусов, с обо-
гревателей, для очистки от пыли мебели, штор, тюле-
вых занавесок, а также для сбора жидкостей и мокрой
очистки керамических плиток, ковров и ковролина, тек-
стильной обивки мягкой мебели.
СОВЕТЫ
Информация об изделии и реко-
мендации по его применению
●Этот прибор предназначен только для домашнего
использования и в бытовых условиях.
●Регулярно очищайте колесики. Грязь, которая нака-
пливается на оси колесика, может препятствовать
их вращению.
●Соблюдайте осторожность, переезжая пылесо-
сом через пороги и другие неровности, чтобы не
допустить до расплескивания воды из контейнера
наружу.
Техническая характеристика
Tип пылесоса и технические параметра пылесоса ука-
заны на заводском щитке. Сетевой предохранитель 16 A.
Не вызывает помех при приеме телевизионных программ.
Уровень шума: 85 дБ(A).
Устройство и оснащение пылесоса A
1 Ручка для переноса
2 Кнопка для открывания крышки пылесоса
3 Держатель для крепления универсальной щётки пол/
ковёр
4 Питающий провод с вилкой
5 Отделение для аксессуаров
6 Индикатор работы насоса
7 Выключатель насоса
8 Кнопка включить/выключить
9 Регулятор мощности +/-
10 Уровни мощности всасывания
11 Кнопка сматывания электропровода
12 Индикатор засорения воздухозаборного отверстия
13 Щетка для паркета
14 Насадка с фильтром для задержки мелких предметов
15 Tурбощетка
16 Мягкая щетка
17 Малая насадка
18 Щелевая насадка
19 Телескопическая всасывающая труба
20 Всасывающий шланг
21 Корзина с установленным пылесборником SAFBAG
22 Mодуль водяного фильтра (аквафильтра):
A Фильтрующий элемент
B Перегородка
23 Камера
24 Контейнер для детергентов
25 Распылительная система – накладка на рукоятку
всасывающего шланга
26 Распылительная насадка большая
27 Распылительная насадка малая
28 Всасывающая насадка для сбора воды
29 Резиновое уплотнение для большой распылитель-
ной насадки
30 Cтиральный состав
31 Сепараторная пенка I (вмонтирована в пылесос)
32 Сепараторная пенка II (вмонтирована в пылесос)
33 Фильтр защиты двигателя (вмонтирован в пылесос)
34 Выходной фильтр HEPA (вмонтирован в пылесос)

17
Подготовка пылесоса к работе B
1 Вставьте наконечник всасывающего шланга в отвер-
стие в контейнере таким образом, чтобы знаки на
наконечнике шланга и корпусе пылесоса оказались
напртив друг друга, и поверните наконечник по часовой
стрелке до положения .
2 Второй конец шланга (рукоятку) соедините с телеско-
пической всасывающей трубой.
3 Держась за кольцо на телескопической трубе, путём
засовывания или высовывания трубы установите соот-
ветствующую для себя длину.
4 На другой конец всасывающей трубы наденьте нуж-
ную щетку или насадку.
5 Для традиционной сухой уборки с использованием
пылесборника SAFBAG и уборки с модулем водяного
фильтра используйте следующие насадки и щетки:
универсальную щетку с фильтром для задержки мел-
ких предметов, малую насадку, мягкую щетку, щелевую
насадку, щетку для паркета или турбощетку.
6 Для задержки мелких предметов в щетке можно
установить специальный фильтр. Для этого снимите
накладку фильтра и вложите фильтр.
7 Для очистки твердых поверхностей – деревянных
и пластиковых полов, керамических плиток и т.п. - наи-
более пригодна универсальная щетка с выдвинутым
ворсом .
8 В пылесосе имеется специальное отделение для
аксессуаров. Отделение открывается и закрывается
при помощи задвижки. Для того, чтобы открыть/закрыть
отделение, передвиньте движок защелки вниз/вверх
и выньте/уберите нужную насадку.
9 Пылесос можно хранить в горизонтальном поло-
жении; для этого вставьте держатель универсальной
щётки-насадки в специальное гнездо для крепления
универсальной щётки-насадки. Шланг может быть закре-
плён на пылесосе, однако необходимо следить за тем,
чтобы во время хранения он не был сильно согнут.
10 Закройте крышку.
11 Придерживая за вилку, выньте питающий электро-
провод (4) из пылесоса.
●Вложите вилку электропровода в розетку.
Прежде чем включить пылесос кнопкой
включить/выключить (8), убедитесь, что
в камере установлен соответствующий
модуль(см.разд.C,EилиF).
12 Включите пылесос, нажимая на кнопку включить/
выключить (8).
С целью подготовки пылесоса к мокрой очистке:
13 Наденьте распылительную накладку на рукоятку вса-
сывающего шланга (25).
●Прикрепите жидкостный шланг к всасывающему
шлангу и всасывающей трубе при помощи специаль-
ных держателей.
14 Вставьте наконечник жидкостного шланга (штуцер)
с телескопической всасывающей трубой, а второй конец
шланга соедините с малой или большой распылитель-
ной насадкой, пока не услышите характерный щелчок -
«клик».
15 Для сбора воды и мокрой очистки используйте следу-
ющие насадки: большую распылительную насадку, малую
распылительную насадку и насадку для сбора воды.
16 Передвиньте заслонку штуцера вниз.
●Вставьте сединительный штуцер в жидкостный кла-
пан в основании пылесоса.
●Убедитесь, что штуцер правильно закреплен в жид-
костном клапане.
Если появятся трудности при подсоедине-
нии в/у элементов, то необходимо увлаж-
нитьуплотнительныепрокладки,напр.,сма-
затьвазелиномилиувлажнитьводойит.п.
Функции пылесоса
ТРАДИЦИОННАЯ УБОРКА С ИСПОЛЬЗО-
ВАНИЕМ ПЫЛЕСБОРНИКА SAFBAG
1 Придерживая нажатую кнопку (2), откройте крышку
камеры пылесборника.
2 Вставьте в камеру корзину с пылесборником SAFBAG
(21). Убедитесь, что корзина установлена в правильном
положении, т.е. вставлена в пазы камеры и передвинута
защитная блокировка. Разложите пылесборник в камере.
Запрещается вставлять корзину с пылес-
борником SAFBAG в мокрую камеру. Если
камера внутри мокрая, ее нужно осушить.
ПылесборникSAFBAGнедолженнамокнуть.
3 Вставьте фильтрующий элемент.
Если корзина с пылесборником SAFBAG
установлена неправильно, защитная бло-
кировка не даст возможности закрыть
камеруфильтрующимэлементом.
●Подготовьте пылесос к работе в соответствии
с пкт. B.
4 Пылесос включится на таком уровне мощности
всасывания, на каком он работал в момент последнего
выключения. При помощи регулятора мощности +/- (9)
установите требуемый уровень мощности.
Пылесос оснащен функцией запоминания
заданного уровня мощности всасыва-
ния. Во время выключения пылесоса при
помощи кнопки «включить/выключить»
(8) произойдет запоминания текущего
заданного уровня мощности всасывания.
Приследующемвключениипылесос вклю-
чится на таком уровне мощности вса-
сывания, на каком он работал в момент
последнеговыключения.
C

18
Пылесос оснащен функцией установки
яркости свечения индикатора уровня
мощности всасывания (10) и индикатора
засорения воздухозаборного отверстия
(12) на панели управления. Для установки
яркости свечения индикаторов следует
одновременно нажать кнопки регулировки
мощности + и – (9), а затем, удерживая
кнопки нажатыми, включить пылесос при
помощикнопки«включить/выключить»(8).
Загорятся индикаторы уровня мощности
всасыванияMIN,2,MAX,адвигательпыле-
сосаостанется выключенным. Затемпри
помощи регулятора мощности +/– (9) сле-
дует уменьшить или увеличить яркость
свечения индикатора (10) и индитора (12).
Нельзя изменить яркость свечения инди-
катораработынасоса(6).Послеустановки
требуемойяркостисвеченияиндикаторов
следуетотключитьпитаниепылесосапри
помощикнопки«включить/выключить»(8).
Такимобразомпылесосвыйдетизрежима
установкияркостисвеченияиндикаторов,
азаданныйуровеньзапомнится.
Пылесос оснащен функцией уменьшения
мощности в случае, когда полностью
засоряется всасывающий шланг или под-
соединенныекнемуэлементыоснащения,
а также в случае чрезмерного заполнения
пылесборника SAFBAG. Это сигнализиру-
етсякратковременнымуменьшениеммощ-
ностидвигателяисвечениеминдикатора
засорения воздухозаборного отверстия
(12) в то время, как пылесос работает
на полную мощность. В таком случае
необходимо выключить пылесос кнопкой
включить/выключить(8),вынутьвилкуиз
сетевой розетки и очистить трубы или
заменитьпылесборникSAFBAG.
Замена пылесборника SAFBAG
1 Снимите с камеры фильтрующий элемент и извле-
ките корзину с пылесборником SAFBAG (21).
2 Приподнимите вверх пластинку пылесборника
SAFBAG и извлеките его из направляющих.
3 Вставьте пластинку нового пылесборника SAFBAG
в направляющие согласно стрелке, указанной на пылес-
борнике, и протяните ее до упора, пластинка должна
заблокироваться в направляющих.
4 Вставьте в камеру корзину с пылесборником
SAFBAG (21) и накройте камеру фильтрующим элемен-
том – как указано в п. C2 и C3.
ЕслипылесборникSAFBAGнебудетуста-
новленвкорзине,защитнаяблокировкане
позволит закрыть камеру фильтрующим
элементом.
D
УБОРКА С ИСПОЛЬЗОВАНИЕМ МОДУЛЯ
ВОДЯНОГО ФИЛЬТРА
1 Придерживая нажатую кнопку (2), откройте крышку
камеры пылесборника.
2 Вставьте в камеру перегородку. Убедитесь, что пере-
городка правильно установлена, т.е. вставлена в пазы
камеры и передвинута защитная блокировка.
3 Залейте в контейнер воду в количестве 1,3–1,5 л.
Уровень воды должен находиться между отметками на
стенке контейнера.
Запрещается включать пылесос без
воды во время очистки с использованием
модуляводяногофильтра.
4 Вставьте фильтрующий элемент.
Если перегородка установлена непра-
вильно,защитнаяблокировканедаствоз-
можностизакрытькамеруфильтрующим
элементом.
●Подготовьте пылесос к работе в соответствии
с пкт. B.
●Пылесос включится на таком уровне мощности вса-
сывания, на каком он работал в момент последнего
выключения. При помощи регулятора мощности +/-
(9) установите требуемый уровень мощности.
Не используйте пылесос слишком долго
безсменыводывконтейнере.
МОКРАЯ ОЧИСТКА ОТ ПЫЛИ
Перед мокрой очисткой поверхности следует тщательно
пропылесосить.
Прежде чем включить пылесос, убедитесь, что контей-
нер пустой, модуль водяного фильтра и сами фильтры
чистые.
1 Придерживая нажатую кнопку (2), откройте крышку
камеры пылесборника.
2 Извлеките из камеры модуль водяного фильтра.
3 Извлеките контейнер для детергентов (24), слегка
потягивая его за ручку по направлению к себе и вытяги-
вая вверх.
4 Откройте затычку наливной горловины и наполните
резервуар для моющего средства (24) моющим сред-
ством (смесью моющего средства G 500 O Tens (30)
и холодной воды) в количестве, указанном на этикетке
средства:
–«G 500 O Tens» фирмы BUZIL, Германия.
●Закройте колпачком заливное отверстие в контей-
нере для детергентов.
Доначаламокройочисткиковрапроверьте
прочность цветов ковра. Нанесите на
белую тряпку небольшое количество под-
готовленного раствора и чистите ковер
E
F

19
в самом невидимом месте. Если тряпка
оцветится,этоозначает,чтоцветаковра
непрочны и нельзя чистить ковер при
помощимоющегосредстваG500OTens.
5 Вставьте контейнер для детергентов (24) на свое
место и прижмите, чтобы он плотно осел (действуйте
в обратной очередности, чем при вынимании).
6 Вставьте контейнер с модулем водяного фильтра
(фильтрующий элемент и перегородку) в пылесос.
Для предотвращения образования пены или
в случае её образования во время уборки влейте
в задний резервуар средство против пены (30),
рекомендуемое компанией Constructa, в количе-
ствах,указанныхнаэтикетке:
–«G 478 Buz® Defoam» компании BUZIL, Германия.
●Подготовьте пылесос к работе в соответствии
с пкт. B.
Для мокрой очистки можно использовать
исключительно распылительные насадки
–малуюилибольшую.
●Пылесос включится на таком уровне мощности вса-
сывания, на каком он работал в момент последнего
выключения. При помощи регулятора мощности +/-
(9) установите требуемый уровень мощности.
7 Включите насос, нажимая на кнопку включить/выклю-
чить (7).
Насосможновключатьтольковтомслу-
чае, если в контейнере для детергентов
имеется раствор чистящей жидкости
иводы.Отсутствиежидкостисигнализи-
руетсяповышеннымуровнемшуманасоса.
Если окажется, что несмотря на включенный насос
насадка не распыляет воду, проверьте правильность
установки контейнера для детергентов (необходимо его
сильно прижать) и закрепление штуцера в основании
пылесоса или крепление наконечника шланга к распы-
лительной насадке, убедитесь, что нет необходимости
в очистке сопла.
8 Нажмите на рукоятке шланга кнопку подачи воды
в насадку.
Нажимая и отпуская кнопку можно прерывать подачу
воды в насадку, а нажатие и передвижение кнопки назад
вызывает непрерывную подачу воды в насадку.
На рукоятке имеется отверстие с клапаном для регули-
рования мощности всасывания воздуха. Не рекоменду-
ется заслонять это отверстие во время всасывания воды
и при мокрой очистке.
Нераспыляйтемоющийрастворслишком
долго в одном месте. Нельзя допускать,
чтобыпромоклаосноваковра.
●Проводите очистку ковра таким образом, чтобы
во время очистки и непосредственно после нее не
ходить по очищенной поверхности. Очистив фраг-
мент ковра, прервите распыление чистящего сред-
ства и осушите это место с помощью всасывающей
насадки. Повторяйте эту операцию, пока вся поверх-
ность ковра не будет сухой. Передвигайте насадку по
ковру возвратно-поступательными движениями.
●Окончив распыление, выключите насос и и коротко
нажмите на кнопку регулирования подачи воды
в насадку с целью «разрядки давления».
Пылесос оснащен предохранительным
поплавком, который автоматически
заблокирует всасывание в случае, если
сепараторная пенка II (32) сильно загряз-
нена или уровень жидкости поднимется
выше максимальной отметки. Это сигна-
лизируется кратковременным уменьше-
нием мощности двигателя и свечением
индикатора засорения воздухозаборного
отверстия (12). В таком случае необ-
ходимо выключить пылесос кнопкой
включить/выключить (8), вынуть вилку
из сетевой розетки, очистить фильтр
иопорожнитьконтейнер.
Нельзядопускать,чтобыпромоклаоснова
ковра. Это может довести до его дефор-
мации(появленияволн).
ВСАСЫВАНИЕ ЖИДКОСТЕЙ
Чтобы использовать пылесос для всасывания жидкости,
необходимо подготовить его как для уборки с исполь-
зованием модуля водяного фильтра, однако, помните,
чтобы:
1. Контейнер был всегда пустым (без воды).
2. Использовать распылительные насадки (большую или
малую), распылительную насадку с резиновой уплотни-
тельной накладкой или насадку для сбора воды.
Категорически запрещается включать
пылесос с полным контейнером Не вса-
сывайтеза одинразбольшоеколичество
жидкости (напр. шлангом, погруженным
вводу).
Если во время всасывания уровень жидкости превысит
максимальный уровень, предохранительный поплавок
автоматически заблокирует всасывание. Максимальняа
емкость контейнера – это ок. 5 л. В таком случае следует
поступать также, как описано в разделе о блокировке
всасывания, вызванной загрязнением сепараторной
пенки (прерывистая работа двигателя).
ОКОНЧАНИЕ УБОРКИ, ОЧИСТКА
И КОНСЕРВАЦИЯ
●Выключите пылесос кнопкой включить/выключить
(8) и выньте вилку питающего электропровода из
розетки.
●Нажмите на кнопку сматывания электропровода (11)
и смотайте питающий провод. Выполняя эту опера-

20
ВЫХОДНОЙ ФИЛЬТР HEPA И ВОЗДУШНЫЙ
ФИЛЬТР ЗАЩИТЫ ДВИГАТЕЛЯ
Выходной воздушный фильтр необходимо заменять
новым через oколо 30 часов работы пылесоса (6 меся-
цев), а в случае сильного загрязнения еще раньше.
1 Освободите зацеп, фиксирующий корпус фильтра,
и откройте крышку фильтра.
2 Извлеките отработанный выходной фильтр HEPA
и замените его новым.
3 Извлеките отработанный воздушный фильтр
системы охлаждения двигателя и замените его новым.
4 При загрязнении фильтра HEPA и воздушного филь-
тра их можно промыть под струей воды. Перед повтор-
ным использованием не забывайте тщательно просу-
шить в/у фильтры.
●Закройте крышку фильтра и зафиксируйте.
I
цию необходимо следить за тем, чтобы провод не
спутался и чтобы вилка не ударилась резко о корпус
пылесоса.
●Поверните наконечник шланга так, чтобы совпали
знаки на наконечнике шланга и на корпусе пыле-
соса, и выньте шланг из корпуса.
●Нажмите на красную кнопку на клапане и выньте
наконечник шланга.
●Разъедините всасывающие трубы, а также отсоеди-
ните насадку или щетку от шланга.
●Вылейте грязную воду из контейнера.
●После каждой уборки рекомендуется тщательно про-
мыть контейнер, фильтр (демонтаж описан ниже)
и перегородку, меняя несколько раз воду.
●После мокрой уборки тщательно промойте все
используемые в этом процессе элементы (шланг,
трубы, аксессуары).
Еслипослеуборкив/уэлементынебудут
вымыты или будут вымыты нетща-
тельно,тоэтоможетпривестикпотери
фильтрационных свойств вкладышей
ипенки,атакжестатьпричинойразвития
бактерийипылевыхклещей.
Несобирайтепылесос,поканебудутосу-
шенывсеегоэлементы.
ЗАМЕНА ФИЛЬТРОВ
СЕПАРАТОРНАЯ ПЕНКА I
1 Oткройте крышку фильтрующего вкладыша.
2 Извлеките сепараторную пенку, промойте под про-
точной водой, просушите и вложите на прежнее место.
●Закройте крышку фильтрационного вкладыша, нажи-
мая, пока не услышите характерный щелчок - «клик».
СЕПАРАТОРНАЯ ПЕНКА II
При замене фильтра рекомендуем пользоваться резино-
выми перчатками.
1 Возьмитесь пальцами за сепараторную пенку и сни-
мите ее с корпуса фильтрационного вкладыша.
2 Промойте пенку под проточной водой, просушите
и вложите на прежнее место.
Запрещается стирать сепараторную
пенку в стиральных машинах, а также
выкручивать при ручной стирке. Не сми-
найте и не растягивайте пенку, не допу-
скайтедоеедеформирования.Очищенную
пенкупросушитеприкомнатнойтемпера-
туре.Несушитепенкунарадиаторах,обо-
гревателях, печках и других источниках
теплаит.п.
G
H
Table of contents
Languages:
Other CONSTRUCTA Vacuum Cleaner manuals
Popular Vacuum Cleaner manuals by other brands

Taurus
Taurus Exeo Compact manual

Sauber
Sauber SF-100 manual

Hayward
Hayward RC34 series owner's manual

Hoover
Hoover SteamVac All Terrain Carpet and Hard Floor Cleaner with Auto Rinse Feature Steam... owner's manual

cecotec
cecotec Conga Quick&Clean Vital instruction manual

cecotec
cecotec Conga PopStar 12200 Ash instruction manual