Contemporary Research SSV-101 User manual

Product Manual
SignStream Media Express
Installing and using SignStream Technology
Media Express Version 2.0.5
March 24, 2008
Contemporary Research 1 SignStream Installation and Operation

Contemporary Research 2 SignStream Installation and Operation
Table of Contents
SignStream Media Player Setup .........................................................................................................3
Ethernet................................................................................................................................................3
PCI Card Slots for SSM-ATSC Modulator Cards..........................................................................................3
ATSC Media Files.................................................................................................................................4
Encoding ATSC Media Files......................................................................................................................4
MainConcept MPEG Encoder....................................................................................................................4
SignStream ATSC Modulator Cards.....................................................................................................5
SSM-ATSC .............................................................................................................................................5
Head End Installation.........................................................................................................................6
RS-232 Control.......................................................................................................................................6
Ethernet Control.....................................................................................................................................7
Reset IP Address....................................................................................................................................7
RF Setup ...............................................................................................................................................7
SignStream Zones...............................................................................................................................8
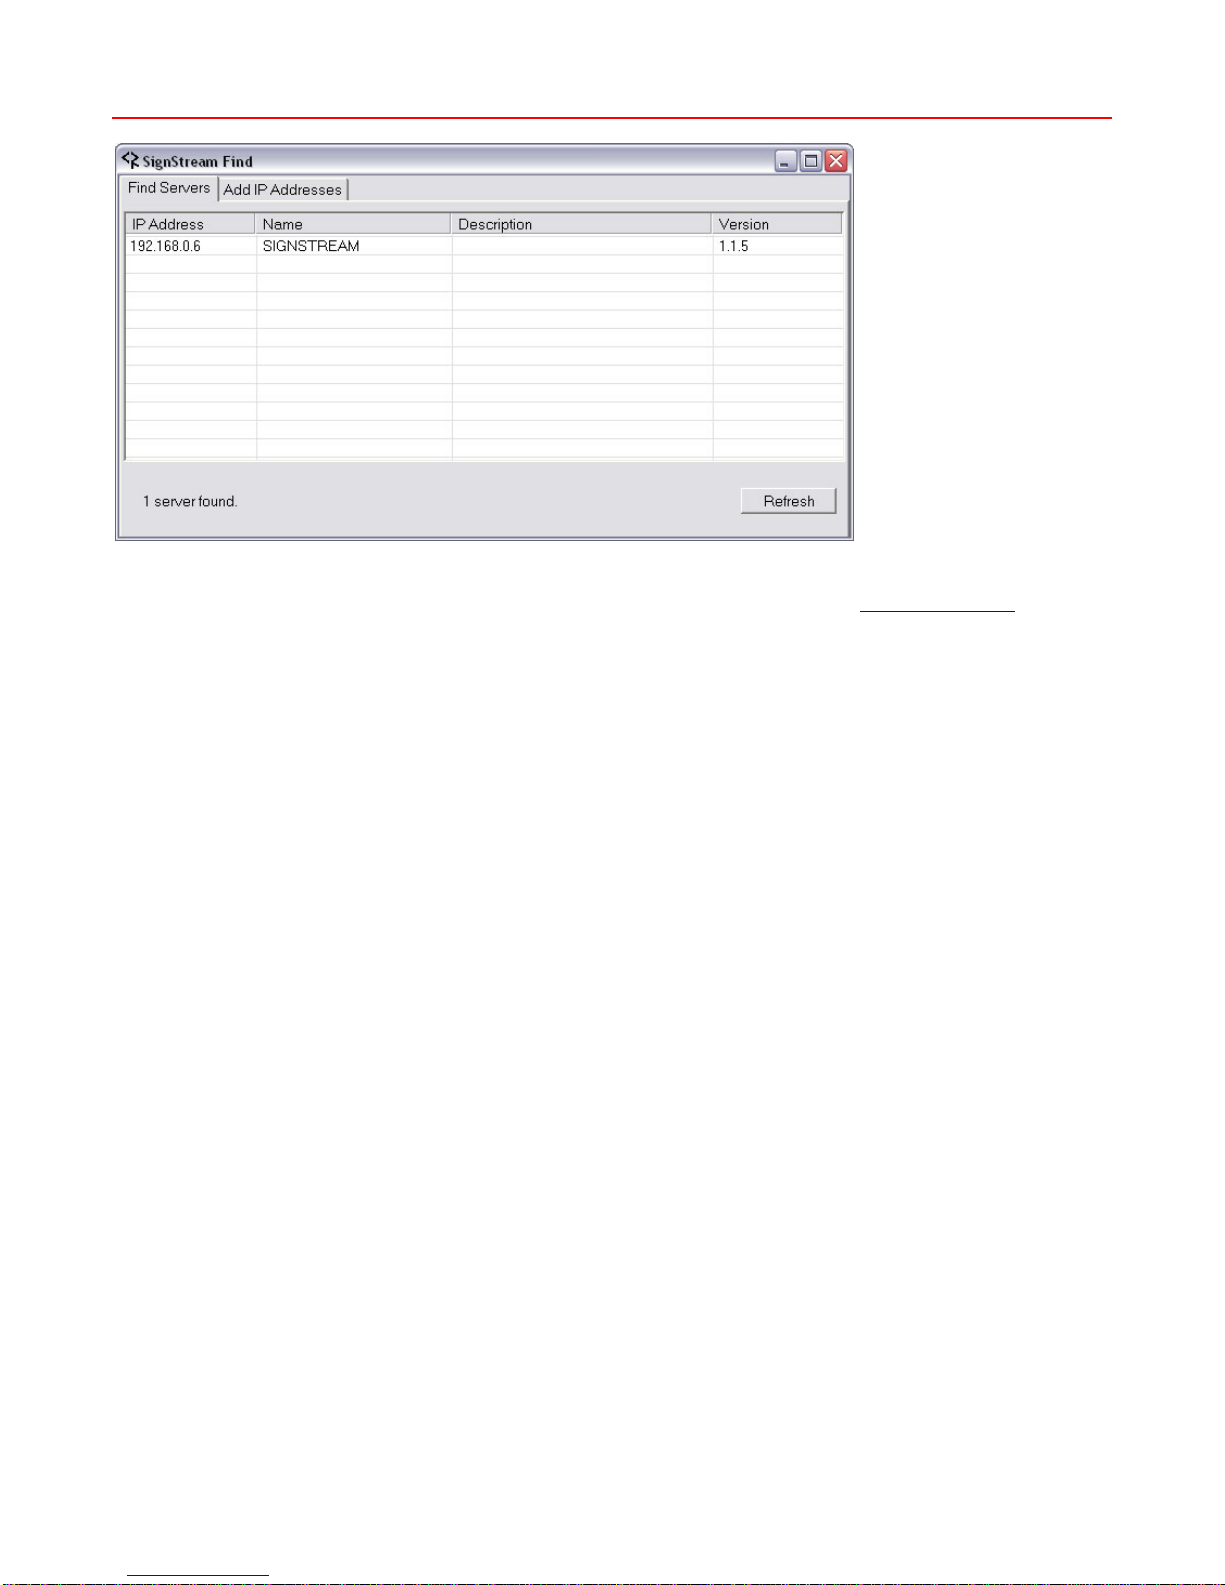
SignStream Find .................................................................................................................................9
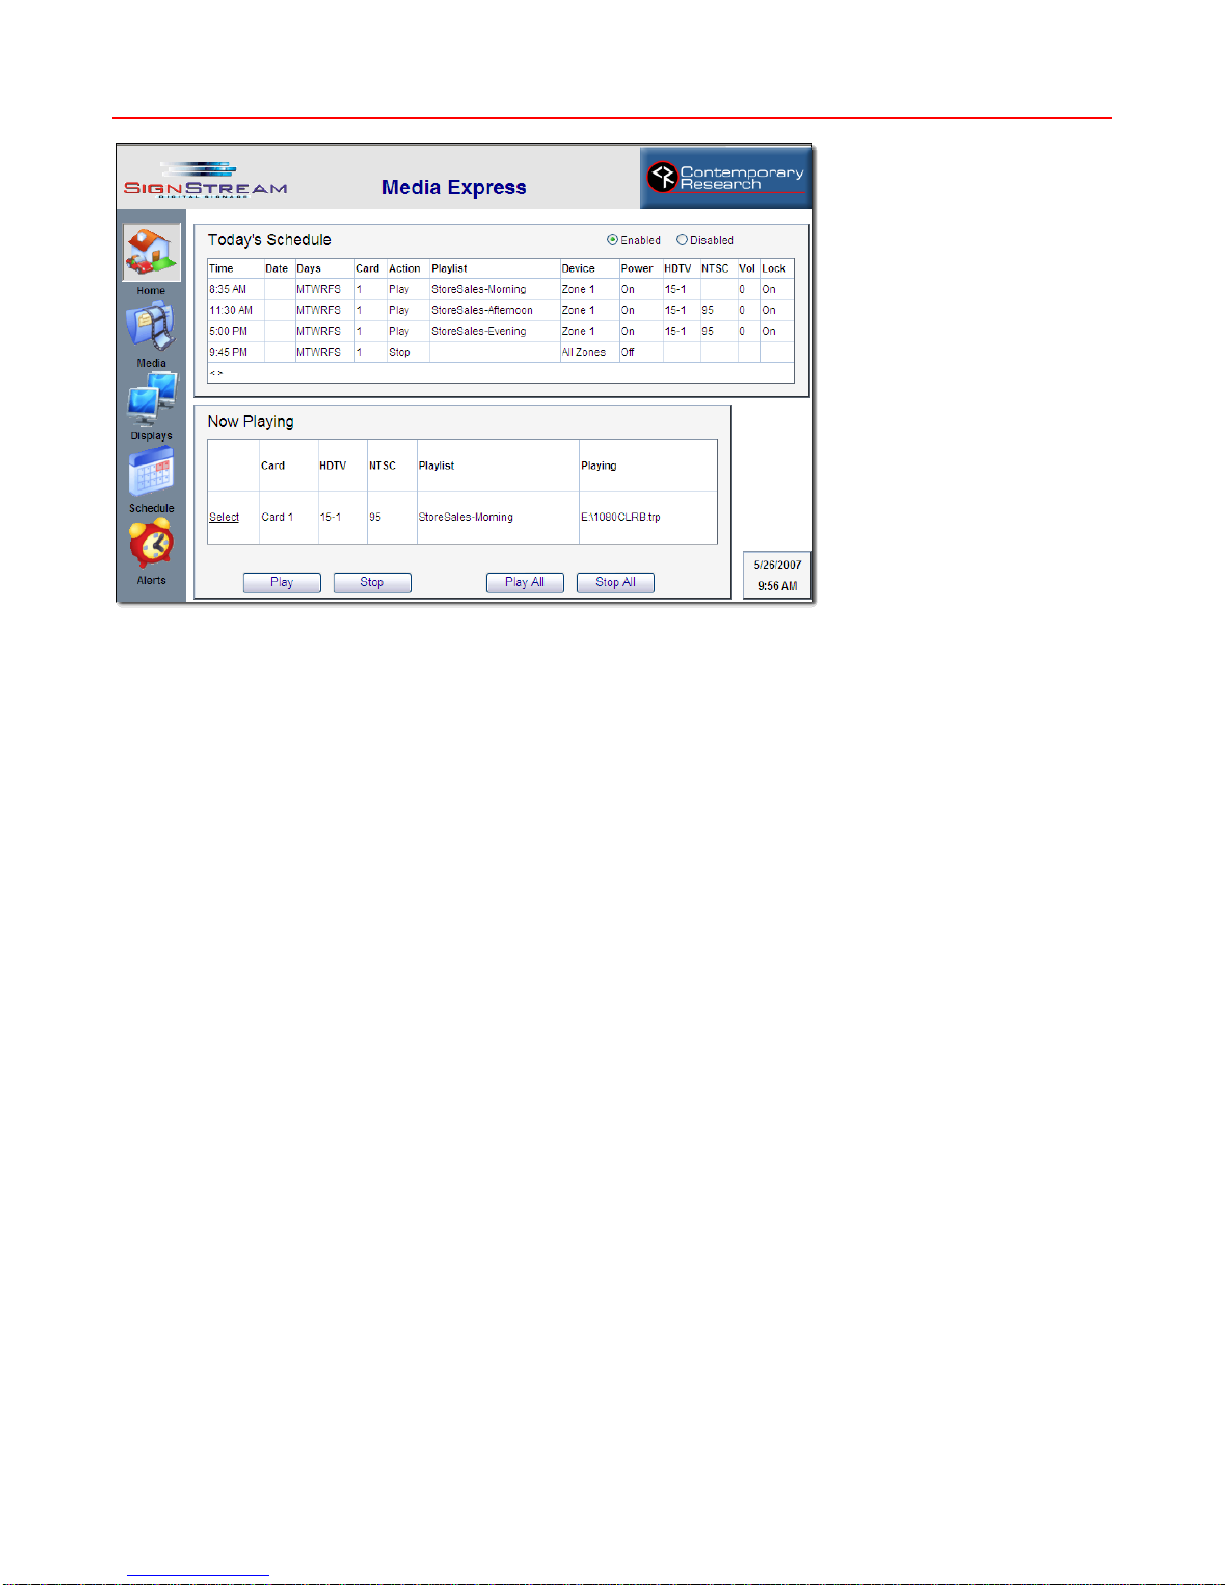
SignStream Media Express ...............................................................................................................10
Version 2.0..........................................................................................................................................10
Local Access ........................................................................................................................................10
Media - Control ....................................................................................................................................12
Current Playlist .................................................................................................................................12
Media Files .......................................................................................................................................12
All Cards...........................................................................................................................................12
Media - Edit.........................................................................................................................................13
Editing Modes...................................................................................................................................13
Playlist Library ..................................................................................................................................13
Media Files .......................................................................................................................................13
Media - Setup ......................................................................................................................................14
Card Channels ..................................................................................................................................14
Options............................................................................................................................................14
Displays – Control ................................................................................................................................15
Special Commands............................................................................................................................16
Displays – Edit .....................................................................................................................................17
Editing Modes...................................................................................................................................17
Preset Parameters.............................................................................................................................17
Displays – Setup...................................................................................................................................18
Head End Communication..................................................................................................................18
Broadcast Settings ............................................................................................................................18
Changing Zone Names.......................................................................................................................18
Schedule - Control................................................................................................................................19
Note to Users of Pre 1.7 Software ......................................................................................................19
Schedule - Edit.....................................................................................................................................20
Editing Modes...................................................................................................................................20
Event Parameters..............................................................................................................................20
Alerts - Control.....................................................................................................................................21
Alerts - Edit..........................................................................................................................................22
Editing Modes...................................................................................................................................22
Alert Parameters...............................................................................................................................22
Technical Specifications ...................................................................................................................23

SignStream Media Player Setup
While SignStream media players may vary in appearance and configuration, all share common attributes:
•Windows XP Pro software installed
•SignStream Web operation provided by Localhost IIS service
•Operating system in C: drive
•SignStream media, playlist, and schedule files in E: drive
Ethernet
IP Address: 192.168.1.245
Subnet Mask: 255.255.255.0
Gateway Address: 000.000.000.000
Telnet TCP Port: 2728 Telnet Access
UDP Port: 2729 For remote Find SignStream access
80ForWebAccess
Web Access: Internal Access - http://localhost/SignStream
External Access - http://<IP address>/SignStream
External Access - http://<Computer Name>/SignStream
Hard Drives
SSV-101 80 GB hard drive for OS, software, and media, 50 GB media partition
SSV-300/304: Windows: 80 GB SATA II hard drive, 7200 RPM
Media: 250 GB SATA II hard drive, 7200 RPM
SSV-306R: Windows: Two 80 GB SATA II hard drives, 7200 RPM, RAID 1
Media: Four 80 GB SATA II hard drives, 7200 RPM, RAID 5
PCI Card Slots for SSM-ATSC Modulator Cards
SSV-101: 1 PCI
SSV-300: 3 PCI
SSV-300: 4 PCI
SSV-306R: 6 PCI (5 PCI, 1 PCI-X)
1 PCIe for RAID 5 controller
Contemporary Research 3 SignStream Installation and Operation

ATSC Media Files
SignStream plays ATSC 1080i or 720p MPEG-2 Transport Stream files, the same standard digital media file used
by all broadcast TV stations, and is compatible with all ATSC HDTV tuners.
In basic terms, most MPEG-2 videos played on PCs are Program Streams, designed for playback on a device. An
MPEG-2 Transport Stream is similar, but is formatted to maintain signal integrity when sent over long distances.
Encoding ATSC Media Files
Most HDTV video production houses have studio-level software that formats digital media into ATSC streams
required by television broadcasters. Costs for conversion software range from expensive studio programs
(which include features not required for SignStream, such as inserting channel ID information), and low-cost
applications such as MPEG Encoder by MainConcept.
All ATSC files must use the extension .trp for playback. The modulator card can play 720p-format media, but
for smooth, seamless transitions in playback, all files should be in 1080i format.
To estimate hard drive storage needs, assume that every 10 GB will host 60 minutes of content.
MainConcept Reference MPEG Transcoder
The MainConcept Reference MPEG Transcoder is not included with SignStream, and is available for $450 from
www.mainconcept.com, for Windows operating systems. Key features include:
•Converts AVI, MPEG-2, QuickTime (video), and WMV video files. Graphics and vector based “video”
files, such as Flash, cannot be converted.
•Encodes 1920 x 1080 (and smaller) digital video files into ATSC 1080i format. This means you can
convert 1280 x 720 and DVD-quality 16:9 (856 x 480) video files for use with SignStream. Generally
speaking, the lower-resolution formats work well for graphic presentations, less for pure video shows.
Ready-made 1080i and 720p presets, and instructions for converting files are available from the SignStream
Content page.
Contemporary Research 4 SignStream Installation and Operation

Contemporary Research 5 SignStream Installation and Operation
SignStream ATSC Modulator Cards
SignStream ATSC Modulator Cards install into the player’s PCI and PCI-X card slots. SignStream media players
employ two types of SSM Modulator Cards, the SSM-ATSC or the SSM-ATSC2. Only one type of card can be run
within the same Media player, the cards cannot be mixed within the same media player.
SSM-ATSC
General: Broadcasts ATSC and simultaneous NTSC analog channels
Modes: Cable, IRC, HRC, Off-Air
ATSC RF Out: F connector, +24 dbmV
ATSC Channels: Off-air Channels 14-22 or Cable channels 66-73
NTSC RF Out: F connector, +24 dbmV, mono audio
NTSC Channels: Off-air Channels 3-13, 95-99, Cable 3-22, 95-99
NTSC Formats: Auto, 4:3 (center), cropped, letterbox, or full

Head End Installation
Some SignStream applications run HDTV playlists only, other applications include CR iC-Net technology to
control displays through the same RF coax as the HDTV channels. In systems that provide control a
Contemporary Research ICC-HE Head End is installed near the SignStream media player. This unit receives
control commands via RS-232 and inserts the commands into the RF system as a small control channel between
TV channels 4 and 5. If your SignStream system is not used to control displays, ignore this section. Refer to the
ICE-HE manual for Ethernet communication to Head End.
RS-232 Control
Most applications will use RS-232 communication, connected to an ICC-HE Head End. Check the front panel of
the Head End, as shown above, and see if the last 3 DIP switches under the RS-232 LED are set as follows:
•Switch 6 Off (Down)
•Switch 7 On (Up)
•Switch 8 On (Up)
This sets the speed of communication to 19,200 baud.
Next, connect the included RS-232 cable between the 9-pin RS-232 port at the SignStream back panel to the
RS-232 Remote Control port on the back of the ICC-HE.
Contemporary Research 6 SignStream Installation and Operation

Contemporary Research 7 SignStream Installation and Operation
Ethernet Control
The ICE-HE typically communicates over a network using a static IP address, and is shipped set to a default
address:
IP Address: 192.168.1.251
Subnet Mask: 255.255.255.0
Gateway Address: 000.000.000.000
Odds are, at least the IP address will change when the ICE-HE is connected to the client’s network. One your
first steps will be to obtain a static address from the client’s IT department, as well as an external gateway IP
address if you intend on supporting the system from your office or anywhere outside the site’s firewall.
Once you change the settings, create a label noting the settings and attach to the back of the ICE-HE.
Reset IP Address
If you change the default address and forget what it is later on, you can always reset the ICE-HE back to the
default settings using the unit’s front-panel DIP switch 2. While the power is on, flip the switch off, then back
on to reset the IP address. The IP and Subnet Mask will change, the Gateway will stay at its current setting.
Since its possible another network device is using the default IP address, the best approach is to enter the new
settings offline, outside the network. You can use one of two, requiring one of two offline options:
1. Direct PC Connection. Use an Ethernet “Crossover” cable to make a direct connection to the ICE-HE
Ethernet port and your PC. Two pairs of wires are reversed at one end to create a direct send/receive
path for data.
2. Hub or Switch Connection. Another approach for connection is to use a standard Ethernet hub or switch
between your computer and the ICE-HE. Using standard Cat5 Ethernet cables, connect your PC to one
port, then connect the ICE-HE to the second port.
RF Setup
The Head End sends the control channel at a level of 50 dBmV. In virtually all installations, the system installer
has installed filters to the RF Out connection to match the level to the SignStream channels. The manual that
was shipped with the Head End provides more detail, if needed, can be downloaded from the Head End page in
the www.crwww.com Web site.

Contemporary Research 8 SignStream Installation and Operation
SignStream Zones
Media Express assigns control to three entities:
•All Zones – All displays respond to a single command
•Zones – All displays within one of 15 Zones respond to a single command
•Single Display – Sends command to one display address
When you design your SignStream system, arrange your display addresses into one of the 15
zones
. This allows you to control a group of displays as if they were one display.
Note that you can change the default names for Zones in Media Express – see Display – Setup in the Media
Express section.
You’ll discover that the ICC1-IR and ICC1-232 controllers typical for many SignStream display control systems
are designed to follow this Zone address format. You can use the 4 top switches in the second DIP switch to
define the controller’s Zone. You could stop at that point, or use the upper switches to define the controller’s
address within the Zone. For example, setting S2/1 On and S1/2 On defines that the controller is part of Zone 1
(256), and is the second unit in the Zone (2). The unique address of the controller would be 258 (256 + 2). The
ICC2-ATSC follows a similar procedure – using front-panel programming, you set the unique Unit address (1-
255), then the Zone (1-15).
Use the chart below as a guide to setting your Zones and addresses.
Zone Device # Unit Total Device #
1 256 1-255 257-511
2 512 1-255 512-767
3 768 1-255 769-1023
4 1024 1-255 1025-1279
5 1280 1-255 1281-1535
6 1536 1-255 1537-1791
7 1792 1-255 1793-2047
8 2048 1-255 2049-2303
9 2304 1-255 2305-2559
10 2560 1-255 2561-2815
11 2816 1-255 2817-3071
12 3072 1-255 3073-3327
13 3328 1-255 3329-3583
14 3584 1-255 3585-3839
15 3840 1-255 3841-4000
All Zones 4095

SignStream Find
Contemporary Research offers an alternative way to find SignStream media players, called SignStream Find.
This application can be downloaded from the SignStream MX or Download pages at www.crwww.com. When
launched, SignStream Web will find all the SignStream media players in your network.
Simply click on the desired media player to bring up the SignStream Web pages from that media player. You
can also add SignStream media players outside your network with the Add IP Addresses tab. To allow external
access the IT department needs provide access:
•Make sure the SignStream Media player’s Windows Firewall exceptions allows access to TCP 2728, UDP
2728 and TCP 80, set Change Scope to Any Computer, or My Network if you want to limit access to
within your network.
•The network firewall needs to be set up for remote access to the media player and UDP ports.
Contemporary Research 9 SignStream Installation and Operation

SignStream Media Express
SignStream Media Express manages playlists via Web pages accessed from the local SignStream Media player,
any computer on the network, or remotely from a distant location.
Version 2.0.5
•You can now define with a scheduled Event ends. The Event will be removed from the schedule at
11:59 PM at the end of the day.
•All data for playlist, control, and schedule operation are now included in the Data folder in the media
directory. Copy this folder along with media files to “clone” other SignStream Media players
•The Configuration file is now in the SignStream root directory so it can’t be accidently copied to other
media players
Local Access
•Connect a USB keyboard and mouse (or PS2 versions) and RGB Monitor to the SignStream Media
player.
•Launch Internet Explorer
•The browser will automatically display the SignStream Web pages
•Click on the Setup link at the top
•Note the System IP Address of the media player
•The IP Address can be changed via Windows Network tools, and should normally be set as a static IP
address for remote access.
Remote Access
To access SignStream Web pages within the network, just browse to the computer by
•Enter http://
Computer Name
/SignStream
•Enter http://
IP Address
/SignStream
You’ll need to communicate with your IT department to set up access to SignStream from outside the network.
Users only need access to the IP address, not to the media file directory.
Contemporary Research 10 SignStream Installation and Operation

Contemporary Research 11 SignStream Installation and Operation

Media - Control
The first page in SignStream Web offers control of media playlists. A Playlist is a list of media files that play in
sequence, then repeat as a continuous loop until operation is stopped.
Current Playlist
•Cards – Drop-down list selects SignStream Modulator card to view playlist operation
•Playlist – Shows the sequence of titles, with the current title highlighted
•Channels – Shows the current HDTV and NTSC channels assigned to the card
•Current Video – Shows the location and name of the current video and the percent completed.
•Control – Features Play, Play Next, and Stop playlist control functions
•Change Playlist To – Changes playlist for currently selected card
Media Files
•Files – displays a list of all media files, user may highlight one file for Play Selection Now control
•Card – Selects SignStream Modulator Card to control
•Control – Click
Play Selection Now
to play selected file once, the card’s playlist will resume when
you click
Stop
.
All Cards
•Play – Starts all cards playing at the beginning of the playlists
•Stop – Stops all cards
•Reset – Re-reads the playlist files, then starts playing at the beginning
Contemporary Research 12 SignStream Installation and Operation

Media - Edit
The Edit page creates the playlists and assigns the list to each SignStream Modulator Card.
Editing Modes
•Create New– Clears items in Playlist
•Edit Existing – Change existing Playlist and Save.
•Copy Existing– Copies the values of the selected Playlist. Change and Save.
Playlist Library
•Highlight a title from Media Files and click the right arrow to add the file to the current playlist
•Use the Up and Down arrows in Playlist to order the sequence of files
•Click the left arrow to remove a title from the playlist
•Save – Saves the Playlist
•Delete – Removes Playlist
Note that you can’t Save a playlist that does not have at least one title.
Media Files
Displays the list of media files available. If the Enable Windows Media Player option in Setup is checked,
You can select Media Player in Media Files to see and create a playlist with a variety of file types, including
MPEG, AVI, WMV, and music files. If TV is selected, you can only view and select files with the .TRP extension.
Add only .TRP files to a playlist intended for Card 1-6 playback.
Tip
: After you add new files to the SignStream Media drive, press RESET at the bottom of the
Media Control page. This will force SignStream to re-scan the directory. All playlists will reset as
well.
Contemporary Research 13 SignStream Installation and Operation

Media - Setup
Defines basic operation of the SignStream Media player and cards.
Card Channels
•Card – Select SignStream Modulator card
•Mode – Select type for RF channel spacing
•HDTV Channel – Physical channel used for HDTV broadcasting
•NTSC Channel – Channel used for simultaneous analog 4:3 channel
•NTSC Format – Auto, Full, 4:3, Cropped, and Letterbox
Options
•Enable Automatic Startup – playlists will automatically run whenever media player is booted up
•Enable Windows Media Player – Typically used to preview playlists from a media player’s monitor
•Enable Logging – Creates a daily comma-separated playlist log file that includes when each title was
run, plus a summary of how many times each title was played during the day
Description
Changes description of SignStream MX – used only for identification, does not change the name of the
computer as defined in Windows. The information box at the bottom of the page reflects the Computer Name,
IP address, and Media Express Version
Contemporary Research 14 SignStream Installation and Operation

Displays – Control
The Display pages offer the ability to send control commands to displays and projectors throughout the
SignStream system.
The Control page includes three types tools for display control.
•Presets. Sends a saved Preset group of commands to displays
•Preset Buttons. The first 12 saved commands appear on the right side. Just click to send.
•Special Command. In addition to typical display commands, there are other rarely used commands
that can be sent when needed, provided with system documentation. This includes:
oSet display code - instructs a controller to use a different set of control codes for a different
make and model of display.
oTune analog or digital only - can lock an HD display to only tune digital or analog channels.
oUse CableCard tuning - switch to the 5-digit CableCard style digital tuning from normal two-part
dashed (XX-XX) digital channel tuning
Contemporary Research 15 SignStream Installation and Operation

Contemporary Research 16 SignStream Installation and Operation
Special Commands
The chart below covers the most command commands that can be sent via the Special Commands tool. Many
more are available from the product manual or product page at www.crwww.com. Some commands can be
sent with no other information, such as P1 for Power On. Most other commands need an added parameter,
such as volume level or control type.
Command Description
All Controllers
Power Off P0
Power On P1
Tune Analog TC, 2-127
Example: TC,33
Tuning Format
All S0, 0=CATV
1=Off-Air
2=IRC
3=HRC
4=Auto
Volume
VL, Sets TV volume level
0 = Mute
1 – 63 = Minimum level (1) to maximum volume (63)
RS-232 ICC1-232, ICC2-ATSC, ICC2-VDC
RS-232 Control
T0, Selects control make and model for RS-232 control. Check Manual or
www.crwww.com product Install page for codes
Tuning Style
ICC1-232 H1= 1 = 5-digit CableCard style tuning (1-9999)
2 = Virtual HD Major-Minor tuning (tunes to virtual channel ID in display)
3 = Physical HD Major-Minor tuning (physical channel, minor digital)
HD Tuning
TH, <Major>,<Minor>
Example: TH,15,1 tunes channel 15-1
HD Tune Style
ICC1-232 TH <Style>,<Major>,<Minor>
Once a Style parameter is included in tuning command, the ICC1-232 will stay in
that mode until the Style is changed
<Style> 0=No change in tuning style
1=5 digit channel (Major=high byte, Minor=low byte)
2=Virtual channel (Major-Minor)
3=Physical channel (Major=Physical - Minor=minor)
Example: TH,3,15,1 tunes the digital channel physically broadcasting on 15
The ICC2-ATSC always tunes the virtual channel
IR ICC1-IR, ICC2-IRC
IR Code T1, Sets IR control code.
Check Manual or www.crwww.com product Install page for codes

Displays – Edit
The Display Edit page offers the ability to create, copy, or edit new display control Presets. Note that Media
Express assigns control Presets to three entities:
•All Zones – All displays respond to a single Preset
•Zones – All displays within one of 15 Zones respond to a single Preset
•Single Display – Sends Preset to one display address
Editing Modes
•Create New Preset – Clears values in the Preset fields.
•Edit Existing Preset – Fills in the values from the selected Preset. Change and Save.
•Copy Existing Preset – Copies the values from the selected Preset. Change and Save.
Preset Parameters
Add or change values to an existing or new Preset. Presets that are checked on the left will be sent, those
unchecked will not be saved or sent.
•Name – Enter a name for a new or copied Preset. Hint – Use numbers 1-12 at the beginning of text to
allocate Presets to buttons on the front page.
•Zone – Select from 15 Zones or All Zones.
•Single Display – use radio button to select a Preset to a specific display.
•Power - Set Power On or Off.
•HDTV Channel – Enter HDTV channel in dashed (XX-X) or CableCard format (XXXXX)
•NTSC Channel – Enter desired analog channel (digital TVs will ignore this Preset)
•Volume - Set volume level 0 (Mute) to 63 (Full)
•Control Lock - Enable or disable display’s front-panel and IR control (not all sets have this feature)
Contemporary Research 17 SignStream Installation and Operation

Displays – Setup
The Display Setup page defines how the SignStream connects to the system Head End and basic channel
tuning operation.
Head End Communication
Sets the form of communication to an ICC-HE or ICE-HE Head End. The ICC-HE communicates via RS-232,
while the ICE-HE can handle data via Ethernet and RS-232. The RS-232 baud rate is normally set to 19,200.
Broadcast Settings
Defines the type of cable system (Air, Cable, Cable HRC, or Cable IRC frequencies), and overall style of digital
tuning (1-Part CableCard, 2-Part virtual channels, or 2-part physical channels).
Changing Zone Names
The names of the Zones can be changed here. It’s useful to start the text with the Zone number to remember
which Zone the name represents. The list will always be sorted by the numeric order of the actual Zones.
Contemporary Research 18 SignStream Installation and Operation

Schedule - Control
The Schedule Control page launches Events by date or recurring cycle. Events are similar to Presets, but include
media commands and an assigned date, cycle, and time.
•Schedule displays the list of Events by date and time.
•Enabled/Disable – click to run or stop the schedule
•Today’s/All Events – Displays just the events for today or all Events
•Click Select to select an Event – selected Event text turns red.
•Event Name – displays selected Event, click Edit to change, Remove to delete.
•Events – Use the pull-down list of Events, select, then click Add to add to schedule
Note to Users of Pre 1.7 Software
In earlier versions, Events did not have names. To add names to Events that are currently scheduled:
•Select the first Event
•Click Edit in the Event Name box below
•Go to the Edit page, add the Name to the Event, then Save.
•This will create a database of Events you can re-use later on
Contemporary Research 19 SignStream Installation and Operation

Schedule - Edit
The Schedule Edit page creates a database of Events.
Editing Modes
•Create New Event – Allows creation of a new Event, clears values in Event data
•Edit Existing Event – Fills in the values of the selected Event. Change and Save.
•Copy Existing Event – Copies the values of the selected Event. Change and Save.
Event Parameters
Add or change values to an existing or new Command. Commands that are checked on the left will be sent.
•Save – Saves changes
•Delete – Removes Event
•Send Now – Launches Event immediately
•Name – Enter a name for a new or copied Event.
•Use Preset – uses the values of the selected Preset
•Zone – Select from 15 Zones or All Zones.
•Single Display – use radio button to select a command to a specific display.
•Power - Set Power On or Off.
•HDTV Channel – Enter HDTV channel in dashed (XX-X) or CableCard format (XXXXX)
•NTSC Channel – Enter desired analog channel (digital TVs will ignore this command)
•Volume - Set volume level 0 (Mute) to 63 (Full)
•Control Lock - Enable or disable display’s front-panel and IR control (not all sets have this feature)
•Media – defines how media starts
oCard – select one or All Modulator cards
oAction – Play, Stop, or Reset media playback
oPlaylist – select a playlist to assign to Card(s)
•One-Time – Event is launched on one date only
•Recurring – Check days of week for cycle
•Start Date – When Event or cycle begins
•End Date – The day the Event ends (removes from Schedule at 11:59 PM on specified day
•Time – AM or PM
Contemporary Research 20 SignStream Installation and Operation
This manual suits for next models
2
Table of contents