Contracor 10112910 User manual

CONTRACOR GmbH
42327 Wuppertal,
Germany Art. 10112910
Portable Suction Blast Tool
POWER GUN
OPERATION MANUAL
Version 6.1
EN
DE
Mobiles Injektor Strahlgerät
POWER GUN
BEDIENUNGSANLEITUNG
Version 6.1
Seite 14
RU
Пистолет абразивоструйный
эжекторного типа
POWER GUN
РУКОВОДСТВО ПО ЭКСПЛУАТАЦИИ
Версия 6.1
стр. 26

2CONTRACOR®Version 6.1
ATTENTION!
READ AND FULLY UNDERSTAND THIS MANUAL BEFORE STARTING WORK.
THE FOLLOWING INFORMATION IS IMPORTANT FOR SAFETY AND HEALTH
OF OPERATOR AND PERSONNEL IN VICINITY.
ATTENTION!
AFTER PURCHASING THE BLAST MACHINE, PLEASE FILL IN THE
GUARANTEE CARD CORRECTLY!
FAILURE TO PRODUCE A FILLED-IN FORM WILL MAKE YOUR GUARANTEE
INVALID.
Contents
1. Safety 3
2. Package and Specication 4
3. General Description 6
4. Compressed Air and Abrasive 7
5. Set-Up and Operation 8
6. Adjustments 9
7. Maintenance 10
8. Troubleshooting 11
9. Spare Parts 12

3
CONTRACOR®POWER GUN Art. 10112910
1. Safety
ATTENTION!
IMPORTANT WARNING FOR SAFER BLAST CLEANING
1. Tool operator and anyone within 50 feet of work area must wear
safety goggles.
2. Check for possible silicosis or other toxic hazards.
3. Do not blast with damaged or worn equipment.
4. Point nozzle only at area being cleaned.
5. Use only proper dry and well-screened abrasives specically
intended for blasting.
6. Keep unprotected workers out of the blast area.
7. Before blasting check ttings and hose for wear.
8. Do not substitute for parts from other manufacturers, or modied
equipment in any way.

4CONTRACOR®Version 6.1
2. Package and Specication
2.1 Package and Assembly
Pos.
#
Order Code Model Description
–10112910 Power Gun Portable suction type blast tool. Complete package incl. suction
lance and 5m suction hose
– 10112930 Power Set Portable Suction Blast Tool with blast media container
1 Air gun assembly
2 10112912 Lance
3 10112903 Hose, material
4 10112904 Clamp
5 10112970* PG-25 Blast media container
6 10151009* AirFlex-19 Air Hose ID=19mm, 5m
7 10150019* SKG-19 Compressed air coupling
8 10150011* Hose clamp 3/4” with safety claws
* Option, included in Power Gun Set, Article 10112930
2.2 Specication
Parameter Value
Air hose I.D. 19mm (3/4")
Suction hose I.D. 25mm (1")
Blast nozzle I.D. 12.5mm (1/2")
Air jet I.D. 6.4mm (1/4")
Max. working pressure 10 bar
Weight 8 kg (in box)

5
CONTRACOR®POWER GUN Art. 10112910
1
2
5
4
3
7
6
8
8
4
Fig. 2.1 Power Gun Set

6CONTRACOR®Version 6.1
3. General Description
The CONTRACOR POWER GUN is a suction blast tool ideally suited to small jobs
or locations with limited air supplies. Thanks to its light weight and compact dimensions,
the CONTRACOR POWER GUN can be used in places where erecting a conventional
pressure blast machine would be awkward or inconvenient.
The POWER GUN can be used with all common blast media, to clean or etch metal, glass,
stone or other hardwearing surfaces.
To operate the POWER GUN, just connect it to a compressed air source, and submerge
the suction lance to which the abrasive hose is connected partially into a container of blast
media.
To commence blasting, simply depress the lever on the POWER GUN. The tool operates
according to Bernoulli’s principle, where a low-pressure area is created by the compressed
air rushing past the abrasive-injection point, where the abrasive hose is connected to the
gun. This low-pressure area draws abrasive into the airstream, where mixing takes place.
The air-abrasive mix is then exhausted out of the gun and strikes the blasting surface.

7
CONTRACOR®POWER GUN Art. 10112910
4. Compressed Air and Abrasive
4.1 Compressed Air Requirements
The table below shows approximate air consumption (m3/min) at various pressures (bar)
for the power gun alone.
Table 4.1.1 Air consumption in m3/min
bar 2.8 3.5 4.2 5.2 6.2 6.9 8.3 9.7
m3/min 1.15 1.4 1.7 2 2.3 2.6 3 3.4
4.2 Abrasive
Abrasive Size: The POWER GUN utilizes common abrasives that are 1.6mm and ner.
Limited air supply, low blast pressure, or heavy abrasive may limit abrasive to smaller sizes.
Use only abrasives specically manufactured for blast cleaning, that are compatible with
the surface being blasted. Abrasive produced for other applications may be inconsistent
in size and shape, and produce an unsatisfactory nish. Some abrasive may contain salts,
corrosives, or other materials that could contaminate the surface being blasted.

8CONTRACOR®Version 6.1
5. Set-Up and Operation
5.1 Set-Up
An air lter is recommended in the air supply to remove condensed moisture from the air
line.
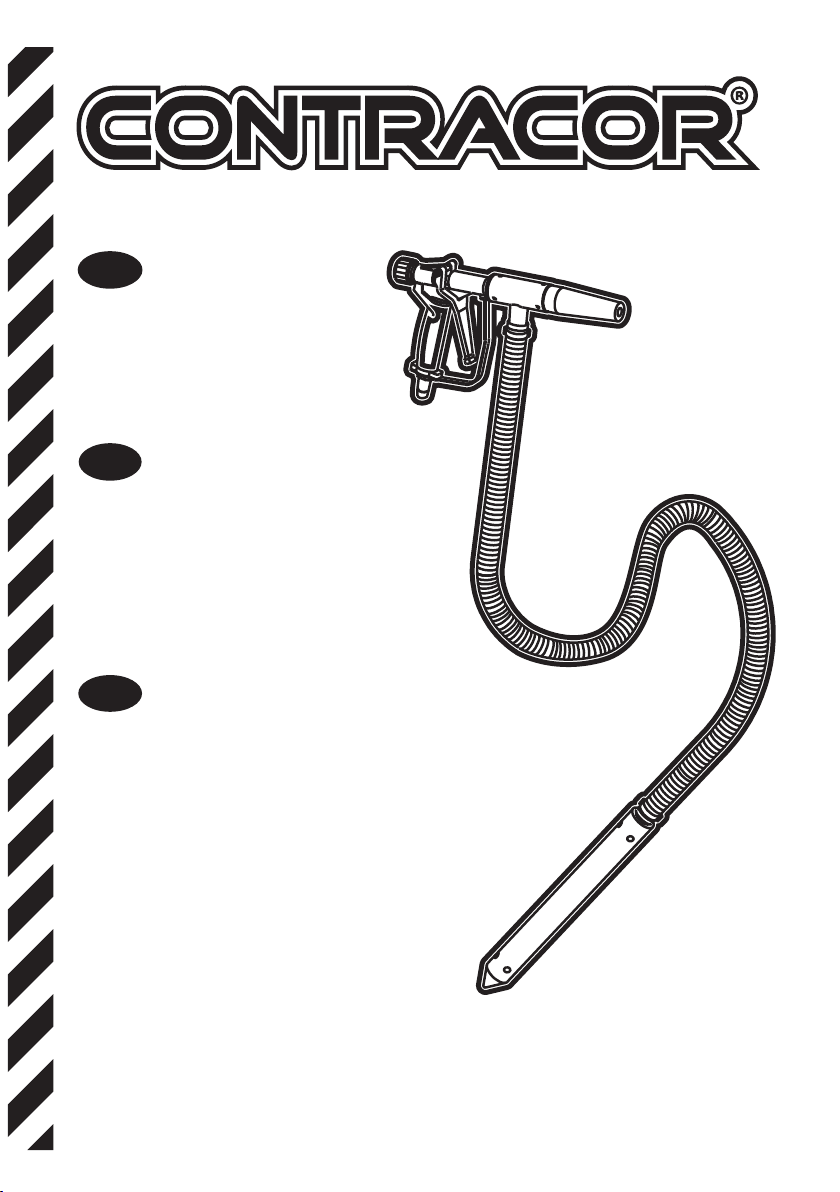
Connect POWER GUN to a 19mm (3/4") lD air hose. An isolation valve is required at the air
source to enable depressurization.
Secure all compressed-air supply hose connections with safety lock pins to prevent
accidental disconnection.
5.2 Operation
Use the pointed end of the lance to pierce the bag of abrasive. Insert the lance into the
abrasive. The upper (air-intake) holes must remain open, and outside of the abrasive.
Pressurize the air supply line.
Put on the appropriate protective gear, including supplied-air respirator, abrasive resistant
clothing, leather gloves, and hearing protection as required.
Hold the gun approximately 150mm from the blast surface, and squeeze the trigger lever.
Adjust the stand off distance and angle for optimum performance.
5.3 Shutdown
When nished blasting, remove the lance from the abrasive and shake abrasive from the
material hose. If conditions are safe to do so, pull the trigger to further empty the hose.
When nished blasting, and after cleanup is completed, remove the respirator outside the
blasting area, where the air is safe to breathe.
Depressurize the air supply line and shutdown the compressor.

9
CONTRACOR®POWER GUN Art. 10112910
6. Adjustments
6.1 Air Control Knob
The control knob adjusts
the force of air (blast pressure)
coming out the nozzle. Turning
the knob clockwise decreases the
blasting force for delicate jobs,
and turning it counterclockwise
increases the blast force for
tougher jobs.
6.2 Hand Positioning
Loosen the three setscrews (S)
securing the mixing chamber (M)
to the air jet assembly.
Rotate the mixing chamber (M)
to obtain the most comfortable
position while holding the grip
assembly and material hose.
Make sure the jet is fully seated
into the mixing chamber before
tightening the setscrews.
S M
S M
Fig. 6.1.1 Air Control Knob
Fig. 6.2.1 Hand Positioning

10 CONTRACOR®Version 6.1
7. Maintenance
ATTENTION!
Failure to observe the following procedure before performing any
maintenance or service could cause serious injury or death from
the sudden release of compressed air.
– Lock out and tag out the compressed air supply.
– Bleed the air supply line.
Periodically inspect the air jet, mixing chamber, nozzle, and material hose for wear.
A new nozzle has a 12.5mm (1/2") ID orice. Replace the nozzle when its diameter has
increased by more than 1.5mm or sooner if suction diminishes noticeably.
Periodically inspect the grip and trigger assembly for air leaks. Repair at the rst sign
of leaks.

11
CONTRACOR®POWER GUN Art. 10112910
8. Troubleshooting
Problem Reason Solution
No Abrasive Flow Foreign material in the mixing
chamber assembly.
Remove nozzle and check for
blockage in the suction head
and nozzle.
Abrasive blockage in the
material hose. If the material
hose packs with abrasive, it is
a sign that the abrasive mixture
is too rich.
Make sure the air-intake holes
in the lance are open.
Worn nozzle. Replace nozzle when the
orice is worn to 9/16", or
sooner if production decreases
noticeably.
Air jet worn. Inspect end of air jet and
replace when wear reaches the
orice.
Air jet and/or nozzle not seated
correctly.
The jet and nozzle must be
fully seated into the mixing
chamber, and the setscrews
must be tight.
Abrasive bridging at the lance’s
abrasive inlet holes. Frequent
bridges or blockage are most
likely caused by damp abrasive.
Empty the material hose and
hopper of abrasive, and store
the abrasive in an airtight
container when not in use.
Hole worn in material hose. Inspect hose for holes and
inspect the clamps for leaks.
Repair as needed.

12 CONTRACOR®Version 6.1
9. Spare Parts
9.1 Blast Gun Assembly
Table 9.1.1
Pos. # Order Code Description
1 10112915 Air gun assembly
2 10112916 Nozzle
3 10112917 Air jet
4 10112918 Mixing chamber
Fig. 9.1.1 Blast Gun Assembly
1
3
4
2
1
2
3
45
6
7
8
9
10
11 12


14 CONTRACOR®Version 6.1
VORSICHT!
LESEN UND VERSTEHEN SIE DIESE BEDIENUNGSANLEITUNG
VOLLSTÄNDIG VOR BEGINN DER ARBEIT.
DIE HIERAUF FOLGENDEN INFORMATIONEN SIND
FÜR DIE ARBEITSPLATZSICHERHEIT UND GESUNDHEIT
DES BEDIENERS UND DER SICH IN DER ARBEITSUMGEBUNG
BEFINDENDEN MITARBEITER VON HÖCHSTER BEDEUTUNG.
VORSICHT!
FÜLLEN SIE BITTE DIE GARANTIEKARTE AUS NACH ERHALT
DES GERÄTS.
BEI NICHT VOLLSTÄNDIG AUSGEFÜLLTER GARANTIEKARTEN KÖNNEN
GARANTIELEISTUNGEN NICHT IN ANSPRUCH GENOMMEN WERDEN.
Inhaltsverzeichnis
1. Sicherheitshinweise 15
2. Lieferumfang/Ersatzteile und technische Daten 16
3. Übersicht 18
4. Druckluftbedarf und Strahlmittel 19
5. Aufbau und Bedienung 20
6. Feinjustierung 21
7. Wartung 22
8. Fehlerbeseitigung 23
9. Ersatzteile 24

15
CONTRACOR®POWER GUN Art. 10112910
1. Sicherheitshinweise
VORSICHT!
WICHTIGE INFORMATIONEN FÜR SICHERES SANDSTRAHLEN.
1. Die Bedienungsperson und alle sich innerhalb eines Kreises
von 15m um den Arbeitsplatz sich bendenden Personen müssen
Sicherheitsbrillen tragen.
2. Überprüfen Sie auf Silikose oder sonstige Risiken.
3. Stahlen Sie nicht mit verschlissenem oder beschädigtem
Material.
4. Die Düse soll nur auf die zu strahlende Fläche gerichtet werden.
5. Nur trockene, reine, zweckbestimmte Strahlmittel dürfen verwen-
det werden.
6. Unbeschützte Mitarbeiter sollen den Arbeitsplatz nicht betreten.
7. Überprüfen Sie Kupplungen und Schläuche auf Verschleiß
vor Beginn der Arbeit.
8. Nur Contracor Ersatzteile dürfen verwendet werden; der Ersatz
durch Teile anderer Hersteller oder durch modizierte Teile kann
erhebliche Sicherheitsrisiken bergen!

16 CONTRACOR®Version 6.1
2. Lieferumfang/Ersatzteile
und technische Daten
2.1 Lieferumfang
Pos.
#
Bestellungs-
nummer
Modell Beschreibung
–10112910 Power Gun Portables Saugstrahlgerät Inkl. Strahlmittelsauglanze und 5m
Strahlmittelschlauch.
– 10112930 Power Set Power Set Mobiles Injektor Strahlgerät mit Strahlmittelbehälter
1 Luftpistole
2 10112912 Strahlmittelsauglanze
3 10112903 Strahlmittelschlauch
4 10112904 Schlauchschelle
5 10112970* PG-25 Strahlmittelbehälter
6 10151009* AirFlex-19 Luftschlauch ID=19mm, 5m
7 10150019* SKG-19 Schlauchkupplung
8 10150011* Schlauchklemmen 3/4" mit Sicherungsklauen
* Option, enthalten in Power Gun Set, Artikel 10112930
2.2 Technische Daten
Parameter Wert
Luftschlauch I.D. 19mm (3/4")
Saugschlauch I.D. 25mm (1")
Strahldüse I.D. 12.5mm (1/2")
Luftdüse I.D. 6.4mm (1/4")
Max. Arbeitsdruck 10 bar
Gewicht 8 kg (mit Verpackung)

17
CONTRACOR®POWER GUN Art. 10112910
1
2
5
4
3
7
6
8
8
4
Abb. 2.1 Power Gun Set

18 CONTRACOR®Version 6.1
3. Übersicht
Das Contracor Power Gun ist ein Saugstrahlgerät das sich hervorragend zu kleinen
Anwendungen oder Orten mit begrenzten Druckluftversorgungen eignet. Dank seinen nied-
rigen Gewichts und kompakter Abmaßen kann der Contracor Power Gun an Stellen benutzt
werden wo das aufbauen einen konventionellen Strahlgeräts zu aufwendig oder unnötig sei.
Der Power Gun kann mit allen gebräuchlichen Strahlmittel benutzt werden um Metalle,
Glas, Stein oder andere harte Oberächen zu säubern.
Das Strahlen mit dem Power Gun ist verblüffend einfach; das Power Gun muss bloß
an eine Druckluftversorgung angeschlossen werden, und die Strahlmittelsauglanze in
ein Strahlmittelbehälter eintauchen.
Um den Strahlvorgang zu starten, den Schalter einfach betätigen. Die Funktionsweise
des Power Guns beruht auf das Bernouilliprinzip, in dem ein Niederdruckgebiet durch
das Beschleunigen der Luft an der Strahlmitteleinspritzstelle entsteht und Strahlmittel
in den Luftstrom eingesaugt wird, wo das Strahlmittel mit der Luft vermischt wird.
Die Mischung aus Luft und Strahlmittel tritt folgend mit hoher Geschwindigkeit aus
der Düse des Power Guns und prallt auf die zu reinigende Oberäche.

19
CONTRACOR®POWER GUN Art. 10112910
4. Druckluftbedarf und Strahlmittel
4.1 Druckluftbedarf
Aus der Tabelle können Sie den Druckluftbedarf des Injektor Strahlgeräts bei verschiede-
nen Drücken entnehmen.
Tabelle 4.1.1. Druckluftverbrauch (m³/min)
Bar 2,8 3,5 4,2 5,2 6,2 6,9 8,3 9,7
m3/min 1,15 1,4 1,7 2 2,3 2,6 3 3,4
4.2 Strahlmittel
Mit dem Power Gun können Strahlmittel mit einer Körnung 1,6 mm oder kleiner benutzt
werden. Beim Betrieb bei niedrigen Drücken oder niedriger Luftmenge muss eventuell
Strahlmittel mit kleinerem Querschnitt verwendet werden.
Benutzen Sie nur Strahlmittel die explizit für das Sandstrahlen geeignet sind, und die für
die zu reinigende Oberächen geeignet sind. Strahlmittel für andere Zwecke kann in Größe
und Form der Partikel Unregelmäßigkeiten aufweisen, und ein nicht-zufriedenstellendes
Ergebnis ergeben. Einige Strahlmittel enthalten Salze oder andere korrosiv-wirkende Stoffe
die die zu reinigende Oberächen kontaminieren könnten.

20 CONTRACOR®Version 6.1
5. Aufbau und Bedienung
5.1 Aufbau
Es wird empfohlen einen Luftlter in die Luftversorgung einzubauen, um Kondenswasser
aus der Leitung zu entfernen.
Verbinden sie das Injektor Strahlgerat mit der Luftversorgung mit einer Leitung mit
Durchmesser 19mm (3/4"). Benutzen Sie ein Isolierventil um das Druckablassen
zu ermoglichen.
Sichern Sie alle Verbindungen mit Sicherheitsschlossstifte um unbeabsichtigte Trennungen
der Schläuche zu vermeiden.
5.2 Bedienung
Benutzen Sie das spitze Ende der Strahlmittelsauglanze um einen Sack Strahlmittel durch-
zustechen. Tauchen Sie die Strahlmittelsauglanze in den Strahlmittelsack. Die obersten
Lufteinlasslöcher der Sauglanze müssen noch frei zu sehen sein, dürfen nicht durch
Strahlmittel geschlossen werden.
Erhöhen Sie den Luftdruck in der Luftleitung.
Schützen Sie sich mit geeigneter Schutzkleidung. Hierzu gehört eine Atemschutzmaske,
Strahlmittelfeste Bekleidung, Lederhandschuhe und Gehörschutz.
Halten Sie das Injektor Strahlgerät ca. 150mm über der Oberäche und ziehen Sie den
Abzugshebel. Ändern Sie den Abstand und Winkel zur Arbeitsäche für optimale Strahlefzienz.
5.3 Abschalten
Ist der Strahlvorgang beendet, ziehen Sie die Strahlmittelsauglanze aus dem Strahlmittelsack/-
behälter und durch schütteln lösen Sie restliche Strahlmittel aus der Strahlmittelleitung. Wo
keine Gefahr besteht, ziehen Sie kurz den Abzugshebel um die Leitung vollständig zu leeren.
Nach dem Aufräumen von dem Arbeitsplatz können Sie die Atemschutzmaske außerhalb des
Arbeitsbereiches entfernen.
Lassen Sie den Druck in der Druckluftleitung ab und schalten Sie die Druckluftversorgung ab.
Table of contents
Languages:
Other Contracor Tools manuals
Popular Tools manuals by other brands

REMS
REMS Ax-Press 25 22 V ACC instruction manual

GF
GF iLITE MAPAX2LJRG instruction manual

Coopers of Stortford
Coopers of Stortford F858 Instructions for use

Omer
Omer PL 92 SJC Use, maintenance and spare parts manual

Sealey
Sealey AUTO SERVICE MS034 instructions

TE Connectivity
TE Connectivity CXP 2018681-1 instruction sheet