Convaid Carrot 3 User manual

CARROT 3 - CHILD RESTRAINT SYSTEM
For Children with Special Needs
Instruction Manual
WARNING!
Read all instructions
before using this
restraint system.
!

Table of Contents
CARROT 3 CHILD RESTRAINT SYSTEM
The Carrot 3 is designed to provide additional support for children who have
diculty sitting correctly in conventional car seats. Always consult your doctor
to make sure that this restraint system is suitable for your child.
Your child’s safety is very important to us. To ensure that your restraint system
is installed correctly, please read all the instructions in this manual before use.
If you require additional assistance, please call Convaid at (888) 266-8243.
WARNINGS. . . . . . . . . . . . . . . . . . . . . . . . . . . . . . . . . . . . . . . . . . . . . . . . . . . . . . . 1
SAFETY INFORMATION . . . . . . . . . . . . . . . . . . . . . . . . . . . . . . . . . . . . . . . . . . 3
Important Notes . . . . . . . . . . . . . . . . . . . . . . . . . . . . . . . . . . . . . . . . . . . . . . . . . . 3
Certication . . . . . . . . . . . . . . . . . . . . . . . . . . . . . . . . . . . . . . . . . . . . . . . . . . . . . . 4
FEATURES. . . . . . . . . . . . . . . . . . . . . . . . . . . . . . . . . . . . . . . . . . . . . . . . . . . . . . . . 6
INSTALLATION . . . . . . . . . . . . . . . . . . . . . . . . . . . . . . . . . . . . . . . . . . . . . . . . . . . 8
LATCH Installation . . . . . . . . . . . . . . . . . . . . . . . . . . . . . . . . . . . . . . . . . . . . . . . . 8
Using LATCH Top Tether Strap . . . . . . . . . . . . . . . . . . . . . . . . . . . . . . . . . . . . . 9
Aircraft Installation. . . . . . . . . . . . . . . . . . . . . . . . . . . . . . . . . . . . . . . . . . . . . . . . 9
HEAD SUPPORT. . . . . . . . . . . . . . . . . . . . . . . . . . . . . . . . . . . . . . . . . . . . . . . . . . 10
Head Support Depth Adjustment. . . . . . . . . . . . . . . . . . . . . . . . . . . . . . . . . . 10
Head Support Contour Adjustment. . . . . . . . . . . . . . . . . . . . . . . . . . . . . . . . 10
Head Pillow Adjustment. . . . . . . . . . . . . . . . . . . . . . . . . . . . . . . . . . . . . . . . . . . 10
SHOULDER SUPPORT . . . . . . . . . . . . . . . . . . . . . . . . . . . . . . . . . . . . . . . . . . . . 11
Harness Strap Adjustment. . . . . . . . . . . . . . . . . . . . . . . . . . . . . . . . . . . . . . . . . 11
Seatbelt Length Adjustment . . . . . . . . . . . . . . . . . . . . . . . . . . . . . . . . . . . . . . 11
Shoulder Strap Comfort Pad. . . . . . . . . . . . . . . . . . . . . . . . . . . . . . . . . . . . . . . 12
Shoulder Protector Wing . . . . . . . . . . . . . . . . . . . . . . . . . . . . . . . . . . . . . . . . . . 12
Shoulder Protector Wing Installation. . . . . . . . . . . . . . . . . . . . . . . . . . . . . . . 13
i

Table of Contents
CHEST SUPPORT . . . . . . . . . . . . . . . . . . . . . . . . . . . . . . . . . . . . . . . . . . . . . . . . 14
Chest Support Pad Adjustment . . . . . . . . . . . . . . . . . . . . . . . . . . . . . . . . . . . 14
Harness Buckle - Fastening / Releasing . . . . . . . . . . . . . . . . . . . . . . . . . . . . 14
LATERAL SUPPORT . . . . . . . . . . . . . . . . . . . . . . . . . . . . . . . . . . . . . . . . . . . . . . 15
Lateral Support Adjustment . . . . . . . . . . . . . . . . . . . . . . . . . . . . . . . . . . . . . . . 15
BACKREST . . . . . . . . . . . . . . . . . . . . . . . . . . . . . . . . . . . . . . . . . . . . . . . . . . . . . . . 16
Backrest Height Adjustment. . . . . . . . . . . . . . . . . . . . . . . . . . . . . . . . . . . . . . . 16
Backrest Extensions . . . . . . . . . . . . . . . . . . . . . . . . . . . . . . . . . . . . . . . . . . . . . . . 16
SEAT . . . . . . . . . . . . . . . . . . . . . . . . . . . . . . . . . . . . . . . . . . . . . . . . . . . . . . . . . . . . . 17
Seat Length Adjustment . . . . . . . . . . . . . . . . . . . . . . . . . . . . . . . . . . . . . . . . . . 17
Seat Extensions . . . . . . . . . . . . . . . . . . . . . . . . . . . . . . . . . . . . . . . . . . . . . . . . . . . 17
Rodded Seat Extension - Long. . . . . . . . . . . . . . . . . . . . . . . . . . . . . . . . . . . . . 18
Rodded Seat Extension - Short . . . . . . . . . . . . . . . . . . . . . . . . . . . . . . . . . . . . 18
Pommel . . . . . . . . . . . . . . . . . . . . . . . . . . . . . . . . . . . . . . . . . . . . . . . . . . . . . . . . . . 18
Pommel Attachment . . . . . . . . . . . . . . . . . . . . . . . . . . . . . . . . . . . . . . . . . . . . . . 18
Seat Depth Adjustment . . . . . . . . . . . . . . . . . . . . . . . . . . . . . . . . . . . . . . . . . . . 19
Footrest Adjustment (Small / Medium / Large) . . . . . . . . . . . . . . . . . . . . . 19
Support Tray . . . . . . . . . . . . . . . . . . . . . . . . . . . . . . . . . . . . . . . . . . . . . . . . . . . . . 19
Wedge Cushion . . . . . . . . . . . . . . . . . . . . . . . . . . . . . . . . . . . . . . . . . . . . . . . . . . . 19
Pads and Cushions . . . . . . . . . . . . . . . . . . . . . . . . . . . . . . . . . . . . . . . . . . . . . . . 20
Securing Your Child . . . . . . . . . . . . . . . . . . . . . . . . . . . . . . . . . . . . . . . . . . . . . . . 21
CARE AND MAINTENANCE . . . . . . . . . . . . . . . . . . . . . . . . . . . . . . . . . . . . . . 23
Upholstery, Cushions, Pillow & Pads . . . . . . . . . . . . . . . . . . . . . . . . . . . . . . . 23
Harness Buckle . . . . . . . . . . . . . . . . . . . . . . . . . . . . . . . . . . . . . . . . . . . . . . . . . . . 23
Harness & Straps . . . . . . . . . . . . . . . . . . . . . . . . . . . . . . . . . . . . . . . . . . . . . . . . . 23
WARRANTY . . . . . . . . . . . . . . . . . . . . . . . . . . . . . . . . . . . . . . . . . . . . . . . . . . . . . . 24
Consumer Information Record. . . . . . . . . . . . . . . . . . . . . . . . . . . . . . . . . . . . . 24
Warranty . . . . . . . . . . . . . . . . . . . . . . . . . . . . . . . . . . . . . . . . . . . . . . . . Back Cover
Warranty Limitations . . . . . . . . . . . . . . . . . . . . . . . . . . . . . . . . . . . . . Back Cover
Limitation of Damages . . . . . . . . . . . . . . . . . . . . . . . . . . . . . . . . . . . Back Cover
ii

• Failure to follow all instructions and product labels can result in death or serious injury in a
crash. Carefully read and understand all instructions on this child restraint and in the written
instructions. If you have questions, contact Convaid at 1-888-CONVAID (266-8243).
• Use only with children who weigh between 30 and 108 pounds (mass between 13.6 and 49
kg) and whose height is between 37 and 60 inches (94 and 152 cm).
• Use only in a forward-facing position.
• Use restraint ONLY with forward-facing vehicle seats. Do not use restraint with side-facing,
rear-facing or ip-down vehicle seats.
• According to accident statistics, the National Highway Traffic Safety Administration
recommends the vehicle’s rear seat is the safest location for a properly installed child
restraint system.
• Do not use a child restraint in the front seat of the vehicle unless the passenger air bag is
turned off. Death or serious injury can occur. Refer to your vehicle owner’s manual for
instruction, warnings, and precautions.
• Adjust the harnesses and belts for a comfortable and snug t around your child. There should
not be any slack or twist in the straps, and the straps should not press on the child’s skin or
push the child’s body into an unnatural position.
• Never leave a child unattended in the vehicle even if they are secured in the child restraint.
• Secure this restraint to the vehicle’s seat with the upper top tether strap and lower anchor
straps (LATCH).
• Use this child restraint only with vehicles with lap shoulder 3-point safety belts approved
by FMVSS 209.
• Rigid items & plastic parts of the restraint system must be located and installed so they do
not become trapped by a movable seat or in a door of the vehicle.
WARNING !
DEATH or SERIOUS INJURY can occur
!
1

• Discontinue use of your child restraint if it has been involved in ANY type of accident. It
may no longer be effective and should be replaced immediately.
• This child seat must not be used in the home, in boats, or other non-certied
applications.
• Always keep this child restraint secured in the vehicle, even when not in use. In an
accident, an unsecured child restraint system may injure other occupants.
• Do not use the child restraint in a vehicle with passenger air bags unless the air bags are
turned off. Death or serious injury can occur. Refer to your vehicle’s owner’s manual for
instructions, warnings and precautions.
• When using this child restraint in a vehicle with side air bags, refer to your vehicle’s
owner’s manual for instructions, warnings and precautions.
• This restraint must not be used without the upholstery cover.
• The child restraint upholstery cover should only be replaced with one recommended
by the manufacturer.
• Follow all instructions on this child restraint and in the written instruction manual
located in the pocket behind the unit.
• Never use the adjustment straps to lift or carry this restraint. This can damage the
mechanism and the webbing.
• Do not remove the harness and straps from the child seat. Never remove the buckles
and/or the buckle clasps from the harness or the straps.
• The primary protection for occupants of a vehicle in a collision is the body of the vehicle
itself; a child restraint will not protect a child when a vehicle is seriously impacted.
However, correctly installed, a child restraint will substantially improve chances for
survival in most crashes. Make sure all users fully understand the correct ways to use
this child restraint in a vehicle.
・ Register your child restraint with the manufacturer.
WARNING !
DEATH or SERIOUS INJURY can occur
!
2

· This child restraint system conforms to U.S. Federal Motor Vehicle
Safety Standard FMVSS 213.
· This restraint is certied for use in motor vehicles and aircrafts.
· Register this restraint with the manufacturer.
Child restraints could be recalled for safety reasons. To be reached directly in the event of a recall,
you must register your restraint with the manufacturer. Send your name, address, email address
if available, child restraint’s serial number and manufacturing date to:
Convaid Product Registration
2830 California Street
Torrance, CA 90503
Or call Convaid at 1-888-CONVAID (266-8243).
For recall information, call the U.S. Government’s Vehicle Safety Hotline at 1-888-327-4236
(TTY: 1-800-424-9153) or go to http://www.NHTSA.gov.
Important Notes
Correctly set up and install the child restraint before using. Before each use, verify it is securely
installed to the vehicle seat and the harness is properly adjusted around child.
• Adjust harness to t securely around the clothes the child is wearing. Remove bulky coats
and/or jackets before putting child in restraint system.
• Cover child restraint when vehicle is parked in direct sunlight. Parts of the restraint could
become hot and cause injury to a child.
• Store restraint in a safe place when not in use. Avoid placing heavy objects on top of it.
• Never leave children alone in a vehicle, even for a short time.
• Do not attempt to disassemble any part of the child restraint or change the way its harness
or vehicle’s seat belts are used, except as described in this manual.
• Do not leave loose objects, e.g. books, bags, etc., in the back of a vehicle. In the event of a
sudden stop, loose objects will keep moving, potentially causing serious injuries.
• Make sure vehicle seats that fold forward are securely locked in their open position.
An unsecured vehicle seat back could prevent the restraint from protecting the
child completely.
• Do not use anything to raise child seat off vehicle seat except as described in this manual.
In an accident, the child restraint may not adequately protect the child.
• Do not allow children to play with this or any child restraint system.
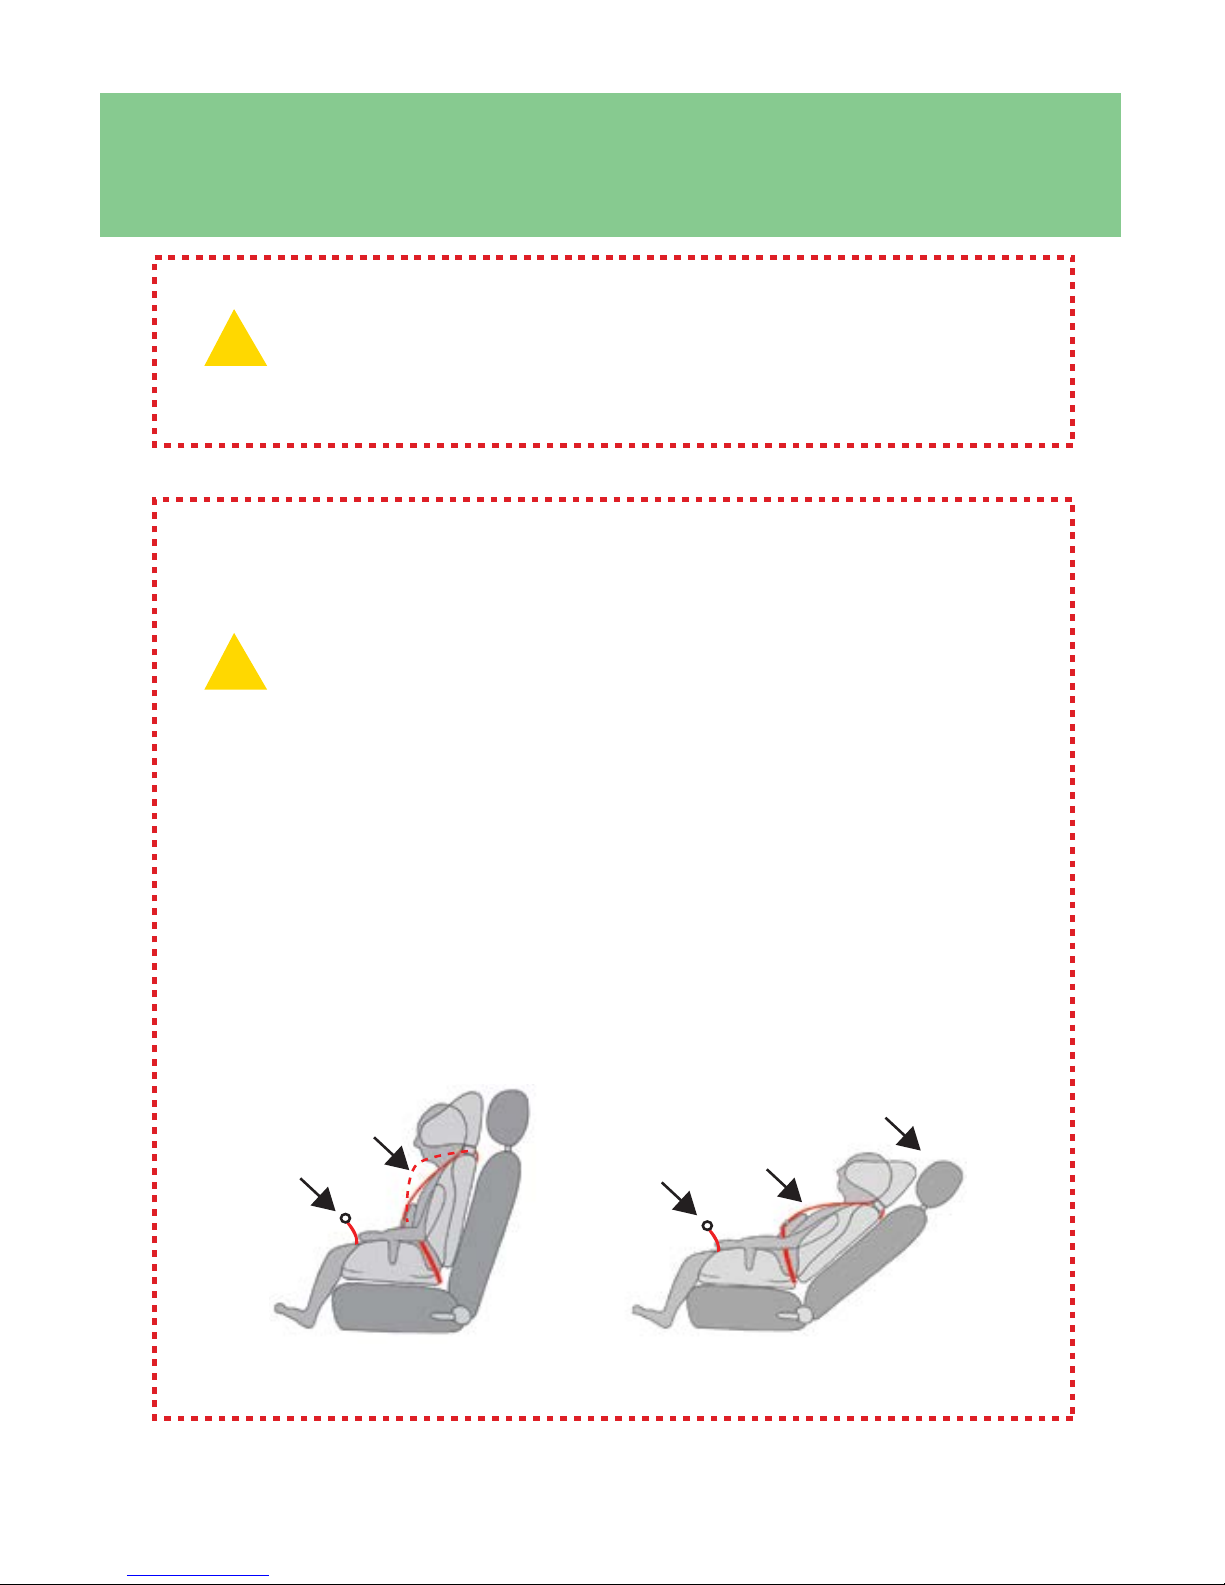
• This child seat is recommended to be used in the upright position.
Certication
This child restraint system conforms to U.S. Federal Motor Vehicle Safety Standard
FMVSS 213 and European Safety Standard ECE R44/04.
Safety Information
3

Safety Information
4
belt path
belt path
belt path
belt path
belt
path
WARNING!
It is your RESPONSIBILITY to use the
Vehicle’s Safety Belts at the same time.
DO NOT secure a child only with the harness straps (5-point) of the child restraint;
ALWAYS use the vehicle’s lap shoulder (3-point) safety belt at the same time to secure
the child restraint and the child.
Not using vehicle’s lap shoulder (3-point) safety belt could cause your child restraint
to not perform as intended, and increase the potential of Serious Injury or Death.
Figure A. below illustrates a vehicle lap and shoulder (3-point safety) belt secured
over the child restraint. Child restraint is shown at its smallest and largest
congurations.
IMPORTANT: Upper belt path should be above occupant’s shoulder for
proper securement.
!
Fig. A

WARNING!
This child restraint must be used in a forward-facing position only.
WARNING!
Before reclining the back, you must release and loosen the harness straps.
Once reclined, re-tighten the harness straps. Reclining the back without
loosening the harness straps may cause choking.
The Carrot 3 was tested at a 30º recline from vertical, and should not be
transported in a moving vehicle past this point.
!
!
loosen
loosen
tighten
tighten
recline
Safety Information
5

Features: Carrot 3 Standard Model
Backrest Height 11.8” 12.8” 13.8” 14.8” 15.8” 16.8”
Seat Depth 9.8” 11.2” 11.8” 13.2” 13.8” 15.2”
Measurements
shown are with the
extensions added.
* Extensions not
included with
standard model.
with 2” extensions with 4” extensions
6
Shoulder Strap
Comfort Pads
Body Balance Pads
Seat
Chest Pad
Support
Harness Adjuster
Chest Pad Support
Height Adjuster LATCH Connector
Harness Yoke
Backrest
Top Tether Strap
(Optional Accessory)
Harness Buckle
Head Support
Vehicle’s Belt Path
Head Pillow

Measurements
shown are with the
extensions added.
* Extensions not
included with
standard model.
Features: Carrot 3 Standard Model
Backrest Height 17.7” 18.7” 19.7” 20.7” 21.7” 16.8”
Seat Depth 9.8” 10.8” 11.8” 12.8 13.8” 15.2”
with 6” + 2“ extensions
with 2” extensions
with 6” + 4“ extensions
with 4” extensions
with 6” extensions
7
Hip Pads
Sholuder
Harness
Comfort
Seat
Cushion
Lap Belt Guide
Backrest
Seat Depth
Adjustment Knob
Instruction
Guide (inside)
Storage
Pocket
Shoulder Width
Adjustment Button
Shoulder Protector Wings
(Optional Accessory)
Top Tether Strap
(Optional Accessory)

Installation
LATCH Installation
This child restraint system is recommended for use in a vehicle
with LATCH anchors. Verify that your vehicle is equipped with
LATCH anchors.
Lower Anchor Straps Installation:
1. Press and hold the rst LATCH adjuster release
button, then pull the LATCH strap to full length.
Repeat for the remaining LATCH connector (Fig. A).
2. Place the child restraint forward-facing on the
vehicle seat.
3. Attach one LATCH connector to its adjacent vehicle
LATCH anchor (Fig. B).
a. An audible click conrms attachment
b. Ensure that the LATCH strap is not twisted.
4. Attach the remaining LATCH connector to its
adjacent vehicle LATCH anchor.
a. An audible click conrms attachment
b. Ensure that the LATCH strap is not twisted.
5. Push the child restraint into the vehicle seat while
pulling each LATCH strap tight (Fig. C).
NOTE:
If an audible click is not heard when connecting either LATCH
connector, the LATCH strap may be twisted, or there may be
debris in the LATCH connector. Correct either situation before
continuing with the installation process.
IMPORTANT:
Ensure the LATCH strap does not fold into the LATCH adjuster
while tightening.
Fig. A
Fig. B
Fig. C
8
Lower Anchor and Tethers for CHildren

Installation
USING LATCH Top Tether Strap
If your vehicle is equipped with LATCH Top Tether Anchor points,
you can use the Top Tether Strap to attach the Head Support.
NOTE:
All vehicles manufactured since September 1, 2002 are
equipped with tether anchors located behind the rear seats.
1. Consult your vehicle owner’s manual to locate the
tether anchor points.
2. Pull and fully extend the top tether strap (Fig. A or B).
3. Locate the hook on the strap and loosely attach the
tether strap to the anchor point.
4. Pull the tether strap to remove ALL slack (Fig. B).
5. Make sure the tether strap is taut and that child seat
is properly secured.
NOTE:
The child restraint is secure when it cannot be moved
front-to-back or side-to-side more than 1 inch (2.5 cm) at
the belt path. If the child restraint is not secure, repeat the
installation process or use an alternate seating location.
Aircraft Installation
This restraint is certied for use in an aircraft. Most airlines allow
the use of a child restraint if it has been approved for airline use
and properly ts into the aircraft. Contact your airline about their
child restraint policy before traveling.
· The FAA recommends that a child weighing up to 40 lbs
(18.1 kg) use a certied harness child seat while traveling
on an aircraft.
· Install child restraint in a window seat.
· If the aircraft lap belt is too short, ask the ight attendant
for a belt extender.
Fig. A (Car)
Fig. B (Van)
9

Functions
Head Support Depth Adjustment
The Head Support can be adjusted forward or backward by 0.6”(1.5 cm) increments to provide a
better t and added protection for the occupant (Fig. A).
To Adjust: Remove screws on each side of the head support with a Phillips screwdriver. Move the
head support to selected position, and reinsert screws (Figs. B & C).
Head Support Contour Adjustment
The head support can be contoured to better t and protect the head.
This adjustment must be performed on limited bases (to not weaken
the head support structure) by the dealer.
Head Pillow Adjustment
The Head Pillow provides added comfort and positioning.
To reposition: Grasp the head pillow and pull it away from the head
support. Place the head pillow where desired and press down to
ax Velcro.
Head Support
Fig. A
Fig. B
Fig. C
(Use holes 1,2 or 3 on both sides)
10
3
2
1

Functions
Harness Strap Adjustment
The Harness Strap comfortably positions the child in place.
To tighten the shoulder harness strap, pull on the harness adjustment
strap (Fig. A).
To loosen the harness strap, press and hold the harness release lever
(Red), while pulling the shoulder harness strap (Fig. B).
NOTE: Do not pull on the padded covers or chest support pad when
loosening the harness strap.
Seatbelt Length Adjustment
1. Turn knob counter clockwise and remove (Fig. A).
2. Separate the Carrot seat from the back.
3. Pull webbing (strap) o of seat tube.
4. Replace webbing (strap) utilizing the lower loop. Before replacing,
fold the webbing loop inward so the attachment area is not
covered by the strap (Fig. B).
5. Reattach knob. It is very important to make sure that the back’s
tube is in between the seat’s tube and gray plastic cover before
reassembling (Fig. C).
Shoulder Support
Harness Strap
Shoulder
Harness
Strap (B)
Harness
Adjustment
Strap (A)
Press & Hold
Red lever
Harness
Release
Lever
Fig. B
Fig. C
Fig. A
11

Functions
Shoulder Strap Comfort Pad
The shoulder strap comfort pad can be moved by readjusting
the Velcro attached to the back of the Head Support.
Shoulder Protector Wing (OPTIONAL ACCESSORY)
The Shoulder Wing has up to 4” of width adjustment.
To adjust the width, press/ hold the yellow button on the
back of the shoulder wing, and pull the shoulder wing
outward to the desired position. (Fig. A).
IMPORTANT :
As your child grows and the Shoulder Protector Wing
is utilized, you may need to adjust the length of the
Harness Strap (see page 13).
Fig. A
12

Functions
Shoulder Protector Wing Installation
1. Detach straps from shoulder strap harness bracket. Remove
straps and padded covers from chair (Fig. A & B).
2. Press and hold height adjustment buttons, and remove head
support (Fig. C & D).
3. Remove 2 screws located on the rods (Fig. E)
4. Insert head support rods into the shoulder wing rods, and press
together (Fig. F).
5. Align the holes located on the rods, insert 2 screws and tighten.
(Fig. G).
7. Attach shoulder wings/head support to the base unit (Fig. H).
8. Re-thread shoulder straps and padded covers, and reconnect
to the shoulder strap harness bracket.
Fig. A
Fig. B
Fig. C
Fig. D Fig. E Fig. F
Fig. G Fig. H
13

Functions
Chest Support
Chest Support Pad Adjustment
To raise the height of the Chest Support Pad, press & hold the Height
Adjustment Lever (Yellow) on the front of the child seat, and pull on
the pad (Fig. A). To lower the chest support pad, pull the chest
support strap (Fig. B).
Harness Buckle - Fasten / Release
1. Fasten: Hold the harness buckle with one hand. Use the other hand
to insert buckle clasps into the harness buckle (Fig. C). Proper
connection is conrmed when you hear a positive click after
inserting each buckle clasp.
2. Release: Hold the harness buckle with one hand. With the other
hand, press the release button and remove both clasps from the
buckle (Fig. D).
Press & Hold
Yellow lever
Harness
Release
Lever
Fig. C
Fig. D
Fig. B
Fig. A
WARNING!
The top of the Chest Support Pad must be at armpit
level or lower. Positioning the support pad too high
may cause choking
!
14

Functions
Lateral Support
Lateral Support Adjustment (OPTIONAL ACCESSORY)
Lateral supports are used to maintain midline positioning of the
trunk.
To adjust:
1. Unfasten the Velcro and the zipper on the back upholstery.
2. Pull back the upholstery. (Fig. A)
3. Loosen 2 screws with a 7/64”Allen Wrench. (Fig. B)
4. Slide lateral to desired height and width. (Fig. C)
5. Retighten the screws. (Fig. D)
6. Repeat steps 2 - 5 on opposite side.
7. Secure the upholstery.
Fig. A Fig. B
(Fig. C) Fig. D
15

Functions
IMPORTANT:
· Height of the shoulder harness strap moves with the height
of the backrest.
· The Shoulder Harness Strap must be at or above the child’s
shoulders, and parallel to the ground.
· The Shoulder Harness Strap is for positioning only, and not
designed to support occupant in a crash.
Backrest Height Adjustment
The height of the backrest can be adjusted as the child grows.
To adjust: Pull and hold the black “D”shaped ring at the top of the
backrest to release lock. While pulling the release strap, move
backrest to desired height and let go of release strap. To fully
engage the lock, slightly move backrest until it “clicks”into place.
Note: The seat belt may need to be lengthened. To lengthen the
seat belt, remove the retaining screw and gray plastic cover on
each side of the restraint system. Pull seat and back apart, and
adjust strap to desired length. Slightly tuck the loop on the strap
to prevent strap from interfering with the retaining screw.
Reinstall the strap, align the silver bars of seat & back, replace gray
plastic cover, and reinsert screws.
Backrest Extensions - 2” or 4” (OPTIONAL ACCESSORY)
Backrest Extensions are designed to ll the space
exposed between the backrest and the seat when you
extend the backrest.
To add an extension, snap the Backrest Extension(s) onto
exposed rods.
Backrest
16
Backrest Extensions snaps
into place by pushing.

Functions
When the child is sitting with knees bent, the total seat length
should be slightly shorter than the length from the pelvis, to the
rear of the knee.
Seat Length Adjustment – 2” or 4”
Release lock by pulling the black “D” shaped ring - Seat Depth
Release Strap on the front of the child restraint, and while pulling
the strap, adjust the position of the rodded seat extension.
Seat Extensions (OPTIONAL ACCESSORY)
Seat Extensions are designed to ll the space around the metal
rods created when you use a rodded seat extension seat and/or
extend the footrest.
Seat
17
Seat
Depth
Release
Strap
Seat Extension snaps into place
when used with the Rodded
Seat Extension
Seat Extension snaps into place
when used with the with Footrests
Other manuals for Carrot 3
5
Table of contents
Other Convaid Car Seat manuals
Popular Car Seat manuals by other brands

RECARO
RECARO Style operating instructions

Kinderkraft
Kinderkraft I-CARE i-Size user guide

Britton
Britton SafeWay instruction manual

BEBE CONFORT
BEBE CONFORT Pebble Instructions for use & warranty

DJG
DJG Alpha Omega All in One instruction manual

RECARO
RECARO Monza Nova 2 Seatfix Instructions for installation and use