Convergent Convergys X3 User manual

Convergys®X3
Hematology analyzer ’
User’s Manual
Release 1.5
X3User20140304
Convergent Technologies GmbH & Co. KG
Ringstrasse 14, 35091 Coelbe, Germany
Tel.: +49 6421 8869948
Fax: +49 6421 8869958
www.convergent-technologies.de
info@convergent-technologies.de
CT_X3_ENG_Ver1.5

Convergent Technologies GmbH & Co. KG User manual
1
Table of contents
1 INTRODUCTION...................................................................................................... 3
1.1 Intended Use.....................................................................................................3
1.2 The Instrument ..................................................................................................3
1.3 Patient Testing...................................................................................................4
1.4 Reagents...........................................................................................................4
1.5 Technical Operation ..........................................................................................5
1.6 Calibration and Quality Control..........................................................................5
1.7 Instrument features............................................................................................6
1.8 Parts of the Analyzer……………………..............................................................………….…….8
1.9 Function of the Fluidics......................................................................................8
1.10 Control Panels.................................................................................................9
1.11 Display.............................................................................................................9
1.12 Keyboard.........................................................................................................9
1.13 Control Material.............................................................................................12
1.14 Accessories...................................................................................................12
1.15 Specifications ................................................................................................13
2 INSTALLATION ..................................................................................................... 14
2.1 General information.........................................................................................14
2.2 Environmental factors......................................................................................14
2.3 Electrical requirements....................................................................................14
2.4 Space requirements ........................................................................................14
2.5 Peripherals......................................................................................................15
2.6 Reagents and waste handling.........................................................................15
2.7 Maintenance....................................................................................................16
2.7.1 Cleaning....................................................................................................16
2.7.2 General points...........................................................................................16
2.8 Unpacking and installation...............................................................................16
2.8.1 Keyboard and external printer...................................................................17
2.8.2 Host Computer..........................................................................................17
2.8.3 Power supply ............................................................................................17
2.8.4 Reagent Containers..................................................................................17
2.9 Turning the Instrument ON..............................................................................18
2.10 Turning the Instrument OFF..........................................................................19
2.11 Preparing for shipment..................................................................................19
2.12 Emergency handling......................................................................................20
3 MENU SYSTEM ..................................................................................................... 21
3.1 General Information.........................................................................................21
3.2 Navigating in the Menu System.......................................................................21
3.3 Menu structure.................................................................................................22
4 OPERATING PRINCIPLES ................................................................................... 24
4.1 Impedance Method..........................................................................................25
4.2 Principle of HGB Measurement.......................................................................25
4.3 Parameters......................................................................................................25
4.4 Absolute and Linearity Ranges of Measured Parameters ...............................26

Convergent Technologies GmbH & Co. KG User manual
2
5 ROUTINE UTILIZATION and MEASUREMENT ................................................... 27
5.1 Sample handling..............................................................................................28
5.2 Sample analysis ..............................................................................................30
5.2.1 Sample preparation...................................................................................30
5.2.2 Modifying lyse quantity..............................................................................30
5.2.3 Sample information...................................................................................31
5.3 Results ............................................................................................................32
5.4 Measurement...................................................................................................34
5.4.1 Measure local menu..................................................................................34
5.4.1.1 Blank Measurement ...........................................................................34
5.4.1.2 Using Pre-diluted Mode......................................................................35
6 DATABASE ........................................................................................................... 38
7 UTILITIES .............................................................................................................. 40
7.1 Maintenance....................................................................................................40
7.1.1 Regular Maintenance Jobs.......................................................................40
7.1.2 Cleaning....................................................................................................40
7.2 Priming............................................................................................................41
7.3 Draining chamber............................................................................................41
7.4 Reagent status................................................................................................41
7.4.1 Empty waste container..............................................................................42
8 MAINTENANCE..................................................................................................... 43
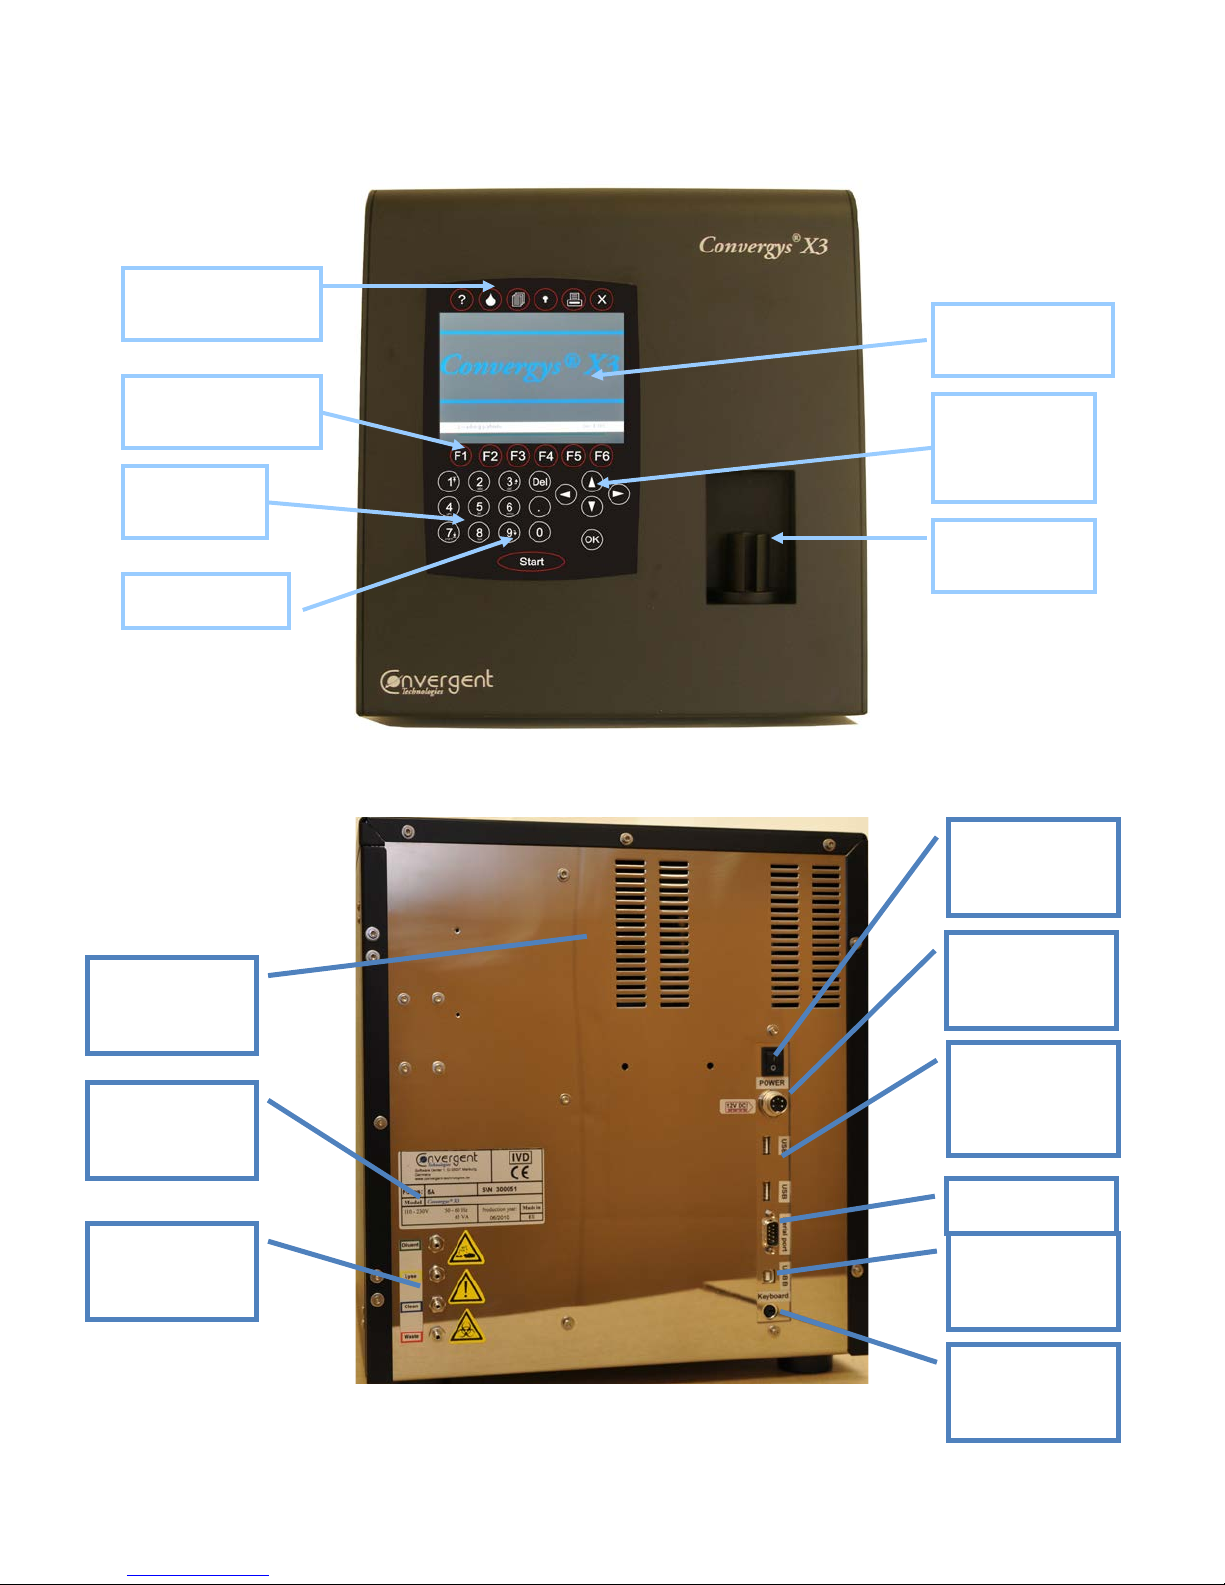
8.1 User-accessible parts......................................................................................43
8.2 Maintenance schedule.....................................................................................44
8.2.1 Daily, before daily routine:.........................................................................44
8.2.2 Daily, after daily routine: ...........................................................................44
8.2.3 Weekly:.....................................................................................................44
8.2.4 Semi-annual:.............................................................................................45
8.3 Calibration.......................................................................................................45
8.4 Quality Control Procedure...............................................................................48
8.5 Diagnostics......................................................................................................49
8.5.1 Device Information....................................................................................49
8.5.2 Self Test....................................................................................................49
8.6 Settings ...........................................................................................................49
8.6.1 Printer settings..........................................................................................50
8.6.2 Customize.................................................................................................51
8.6.3 Units..........................................................................................................53
8.6.4 Laboratory information..............................................................................54
8.6.5 User mode settings...................................................................................54
8.6.6 Date and time............................................................................................55
9 Printing ................................................................................................................. 56
9.1 Printouts..........................................................................................................56
10 Fluidic Schematics ............................................................................................. 58
11 Warning labels on the analyzer......................................................................... 59
12 Warranty Information………………………………………………………………...58

Convergent Technologies GmbH & Co. KG User manual
3
1 INTRODUCTION
1.1 Intended Use
Convergys®X3 hematology analyzer is a fully automated cell counter designed for in vitro
diagnostic use. The instrument was developed for small clinics or laboratories.
1.2 The Instrument
Convergys®X3 is a fully automated, bench top hematology cell counter.
It implements the so-called Coulter-method for counting cells passing through a small
aperture, and measures the hemoglobin content of red blood cells.
The analyzer features a color graphical LCD display module and a foil keypad of 29 keys
including 6 software buttons (with icons), 6 function keys (above LCD) and has a START
button.
The instrument allows printing reports to an external printer (USB port), or can have an
optional built-in printer module.
Its internal memory is capable of storing 5000 records with full histograms, and individual
patient data. QC measurements are stored in a separate database. Upgrade of the software
operating the instrument is possible USB flash memory device. The instrument allows
connecting to a host computer for uploading records stored in its memory through a USB
SLAVE port (USB B) or serial link (RS232). Archiving and restoring of records to and from
USB flash memory device is also possible.
NOTE: If the equipment is used in a manner different from which the manufacturer
specified, the protection provided by the equipment may be impaired. Misuse of
equipment or use other than its intended purpose will invalidate conditions of
warranty. The accuracy and precision may also be impaired.

Convergent Technologies GmbH & Co. KG User manual
4
1.3 Patient Testing
The analyzer can process 60 samples per hour. Samples can have individual sample data,
and additional parameters. You can print results to an external or to the optional built in
printer. The user can customize the report format.
Convergys®X3 determines 20 hematology parameters including three-part WBC differential.
The instrument requires 25µl of whole blood sample:
WBC total white blood cell count
LYM lymphocytes count
MID MID count
GRA granulocyte count
LYM% lymphocytes percentage
MID% MID percentage
GRA% granulocyte percentage
HGB hemoglobin
RBC red blood cell count
HCT hematocrit
MCV mean corpuscular volume
MCH mean corpuscular hemoglobin
MCHC mean corpuscular hemoglobin concentration
RDWcv red cell distribution width
RDWsd red cell standard deviation
PLT platelet count
PCT platelet percentage
MPV mean platelet volume
PDWcv platelet distribution width
PDWsd platelet standard deviation
1.4 Reagents
Accuracy is guaranteed only if reagents supplied by the manufacturer are used
Convergys®
Dil-DIFF (diluent): Isotonic saline solution, used to dilute whole blood
samples
and to rinse the fluidic system between measuring
procedures.
Convergys®
Lyse-DIFF (lyse): Creates hemolysate for 3-part WBC differential and for
total WBC and HGB.
Convergys®
Cleaner (cleaner): For cleaning process of the fluidi

Convergent Technologies GmbH & Co. KG User manual
5
1.5 Technical Operation
As Convergys ®X3 is a fully automated instrument, operating it requires minimal training or
technical support. Operator interaction is reduced to the following:
- Perform a Blank Measurement in case the instrument is not used for a specific time
- Enter sample and/or patient data
- Apply the sample for analysis
- Print results either one-by-one, or in groups by selecting records from the database
- Perform simple weekly maintenance, as described later in this description (8.2).
1.6 Calibration and Quality Control
Convergys ®X3 arrives to your laboratory factory-calibrated and ready to use. However,
calibration needs updating whenever you find that the results have slightly changed, or a
different or new control material is used. With each control material you receive for the
instrument, you will find a control sheet listing the parameters the instrument should match.
Perform these calibrations as explained in a later chapter (8.3).
Use Quality Control procedures to check for proper calibration and performance of the
analyzer. Running these samples should happen on a regular basis, as also explained in a
later chapter (8.4).

Convergent Technologies GmbH & Co. KG User manual
6
1.7 Instrument features
1-1 Front view
1-2 Rear view
HARD Shortcut
keys
SOFT Shortcut
keys
Numerical
keypad
START key
Graphical
LCD
Cursor keys
&
OK key
Sample rotor
with adapter
Power
adapter
connector
USB ports for
printer,
keyboard
Power switch
Reagent
connectors
RS232 port
USB port
Instrument
label
Vent holes
PS2 port
(keyboard)

Convergent Technologies GmbH & Co. KG User manual
7
Figure 1-3 shows the open built-in printer using roll paper inside.
Press the protruding button to
open the lid. Let the thermal
printer paper fall into the
housing with its open end
toward the paper tearing
(towards the front of the
instrument). Hold the open end
of the paper and close the lid
so that the end of the paper
gets clipped between the black
paper guide and the printer
mechanics.
You can select to use this
printer in the “Printer
Settings” menu (see chapter
8.6.2).
The analyzer works with an external power supply. Figure 1-4 shows the power supply unit
generating 12VDC. The power supply module has a so-called auto range input, allowing
operation on 230V or 115V power system. The power supply complies CE and UL safety
certifications.
The input socket is a standard power cable
connection shipped with the analyzer, the
output is a special, lockable socket as
shown in the picture.
Only the provided power supply shall be
used with the instrument. (“Protek
Electronics Corp.” Model ID: PUP80-12-
N8, or “GLOBTEK INC”, Model ID: GT-
81081-6012-T3”)
1-4
Power supply
Printer lid with
rubber roller
Insert for
thermal paper
Printer
mechanics
Lid opener
button

Convergent Technologies GmbH & Co. KG User manual
8
1.8 Parts of the Analyzer
Convergys®X3 hematology analyzer is composed of three main units:
Fluidic System: Performs sampling, diluting, mixing, and lysing functions.
Generates the regulated vacuum used for moving cells through
the aperture during the counting process.
Data Processing System: Counts, measures and calculates blood parameters, generates
and stores numerical results and histograms.
Control Panel: Features an LCD display, a 29-button keypad, and USB ports
and serial (computer) interfaces.
1.9 Function of the Fluidics
For the Schematics of the fluidics system, see Section 9.
Sample aspiration and dilution:
Stages of the blood testing process
a.
25 μl of anti-coagulated (K3-EDTA) whole blood sample is aspirated through the sampling
needle and mixed with 4 ml of diluent and stored in the mix chamber (mix dilution).
b.
35 μl of primary dilution is aspirated and then added with 4 ml of diluent into the RBC
chamber (RBC dilution)
c.
The primary dilution remaining in the mixing chamber flows via the tubing into the WBC
chamber where the necessary (preset) amount of lysing reagent is added (WBC dilution).
Table 1.
Dilution rates used within Convergys®X3:
- Primary dilution 1:160
- RBC dilution 1:18 000
- WBC dilution 1:192 (dependent on lyse amount, default volume is
0.8 ml)
Measurement times:
- WBC count 2-6 seconds (depends on the total WBC count)
- HGB measurement 2 seconds
- RBC/PLT count 5 seconds

Convergent Technologies GmbH & Co. KG User manual
9
1.10 Control Panels
START button - Pressing and releasing the START button triggers an analysis cycle.
Status indicator - A two-color (red/blue) LED is located near the START button.
Its actual color indicates the status of the analyzer.
1.11 Display
The display is 320 x 240 dots, high contrast backlit color graphic LCD module.
1.12 Keyboard
The foil keypad is composed of the following (shown in Section 1.3 - Figure 1):
- Numeric keys for entering numerical data, and selecting menu items
- Function keys with specific functions. These functions are menu-dependent and
are indicated by icons appearing above the keys
- Hardware function keys (short-cut keys) for easier navigation between menus
- Cursor control keys and for moving between database items, and , for moving
between parameter columns or menu levels
- START key for initiating an analysis cycle
- OK key for confirming data
- Del key for deleting characters
- Help key for HELP function

Convergent Technologies GmbH & Co. KG User manual
10
Function keys
Below is a list of icons and functions assigned to the soft-keys (function keys)
Information
Measuring process
Data base
Utilities menu
Print function
Exit menu

Convergent Technologies GmbH & Co. KG User manual
11

Convergent Technologies GmbH & Co. KG User manual
12
1.13 Control Material
Convergys®X3 allows continuous monitoring with
Convergys®
Check-3P (control blood). Specification
for this material (assay values and allowed tolerances along with expiry date) is always enclosed with
the approved control material.
1.14 Accessories
Below is a list of accessories shipped with your Convergys®X3
Convergys®X3 Hematology Analyzer
Convergys®X3 User's Manual (this booklet)
Convergys®X3 Reagent Tubes (with colored connector caps)
Diluent tube (green)
Lyse tube (yellow)
Clean tube (blue)
Waste tube (red)
Convergys®X3 Cleaning Tube Kit.
Convergys®X3 Caps for reagent containers (matching connector colors).
Convergys®X3 Waste Container (20 L).
Convergys®X3 External power supply and power cable.
Convergys®X3 Spare part: pump tube.
Convergys®X3 Tube adapters.
Convergys®X3 Thermal roll-paper.

Convergent Technologies GmbH & Co. KG User manual
13
1-5 Reagent tubing 1-6 Cleaning tube kit
1.15 Specifications
Sample volume 25 μl of whole blood, 50 μl of whole blood in pre-diluted mode
Chambers 3 chambers for diluting whole blood and counting; 1: MIX, 1: RBC, 1: WBC
Reagent system Isotonic Diluent, Lyse, Cleaner
Aperture diameter 80 μm (RBC/PLT), 100 μm (WBC)
Throughput 60 tests/hour
Sampling method
Open tube system with automatic sample rotor.
Sample types
Human(general), male, female, baby, toddler and child (built-in reference ranges)
Clog prevention
High-voltage pulse on aperture in each analysis cycle; chemical cleaning; high-
pressure backflush of aperture with Cleaner reagent.
Cleaning procedure
High-voltage burst of the aperture, high-pressure back-flush, chemical cleaning of the
aperture using Cleaner reagent.
Quality control
6 QC levels, QC parameters include: mean, ± range, SD and CV for all measured and
calculated parameters, 16- and 64-day Levey-Jennings charts. Separate QC database.
Calibration
1 or 3-measurement automatic and manual (factors) calibration of WBC, HGB, RBC,
PLT, MCV, RDW and MPV absolute. Independent calibration of pre-diluted mode.
Multi-user feature (advanced
feature)
3-level multi-user operation with selective privilege levels, user identification with ID
and password.
User interface
Easy-to-use, menu driven user interface with 6 software buttons (with graphic icons),
6 hardware function buttons, cursor and numeric keys.
Languages available
English, German, Arabic, Russian, French, Greek, Hungarian, Indonesian, Italian,
Polish, Portuguese, Romanian, Slovensky, Spanish, Turkish, Vietnamese
Data capacity
Up to 5000 results, with RBC, PLT, WBC 3-part histogram
Host computer interface
USB B port or RS-232 serial link.
Data back-up method
USB mass storage device; Convergent Technologies Lab data management software.
Software upgrade method
USB A port using USB mass storage device
Printer interface
USB with support for HP printers, color and monochrome printout.
Built-in printer
Seiko LPTH-245 „Easy Paper Operation” thermal printer module, 58 mm wide roll
paper, full report with histograms
Display
320x240 -dots, high-contrast, backlit, color graphics LCD
Keypad
29 foil keys + separate START button, red/green/orange machine state light.
External keyboard
Standard PS/2 compatible or USB
Power requirement
12VDC, 6A, 72W max. operating power.
Power supply unit
External, auto-ranging power unit for 100-120 or 200-240 VAC, 50–60Hz.
Operating temperature
59–86 °F (15–30 °C). Optimal temperature is 77 °F (25 °C).
Dimensions (W x D x H)
340 x 414 x 380 mm
Net weight
15 kg.

Convergent Technologies GmbH & Co. KG User manual
14
2 INSTALLATION
2.1 General information
This chapter provides instructions for the installation of the Convergys®X3 hematology
analyzer. Follow the procedures described below correctly to ensure proper operation and
service. Please carefully read and follow all instructions in this User’s Manual before
operating Convergys®X3.
The Convergys®X3 hematology analyzer is a precision instrument. Handle accordingly.
Dropping or other improper handling of the instrument will disturb calibrated mechanic and
electronic components and/or cause other damage.
Always handle the instrument with care.
2.2 Environmental factors
Operate Convergys®X3 within the ambient temperature range of 15-30°C and relative humidity
of 20%- 80%. The optimum operating temperature is 25°C.
Avoid using the instrument in areas of extreme high or low temperatures or where it is
exposed to direct sunlight. If kept at a temperature lower than 10°C, the instrument should sit
for an hour at the correct room temperature before use.
Reagents should be stored at a temperature range of 15-30°C.
Place the instrument in a well-ventilated location. Do not place it near potentially interfering
devices capable of emitting radio frequencies (e.g. radio or television receiver, radars,
centrifuge, X-ray devices, fans, etc.).
Operation at an altitude over 3000 meters (9000 ft) not recommended.
Instrument is safe for transient voltages to INSTALLATION CATEGORY II and POLLUTION
DEGREE 2.
Environmental and electrical characteristics provide accuracy and precision of the instrument
and maintain a high level of operational safety for lab personnel.
2.3 Electrical requirements
Convergys®X3 comes with a power cord appropriate for your power system. Proper use of the
appropriate power cord assures adequate grounding of the system.
WARNING: Improper grounding of Convergys®X3 bypasses important safety features and may
result in electrical hazard.
2.4 Space requirements
It is important to install the instrument in a suitable location. A poor location can adversely
affect its performance. Consider the following space requirements:
- Select a location near a power source and close to a suitable drain.
- Place the unit on a clean and level surface.

Convergent Technologies GmbH & Co. KG User manual
15
- Leave at least 0.5 m space on both sides and above the instrument to access pneumatics
and (optional) built in printer. Provide a minimum of 0.2 m between the rear panel and the
wall to allow for heat dissipation and tube clearance.
-Install the reagents in a suitable place that will make your work easy. The best place is on
the ground, below the supporting desk of the instrument. The pneumatics system is
capable of aspirating reagents from containers being 1.0 m below the reagent inputs.
Make sure the reagent tubes are not bent, broken, twisted or blocked in between the desk
the instrument is on and the wall behind. Such circumstances can result in instrument
operation failure.
-DO NOT PLACE the reagents above the instrument, as there can be a risk of falling and
spilling.
WARNING: Install the unit on a table or workbench. If the unit was installed without a
supporting desktop under the unit, there is a possibility that the analyzer could accidentally
fall.
2.5 Peripherals
Connect external peripherals only when both the instrument and the peripheral device are
off. Possible peripherals are:
- external printer
- the printer must be recommended by authorized technician
- the printer must be approved and listed
- the printer must have a CE mark
- external keyboard
- the external keyboard must be approved
- the external keyboard must have a PS2 connector, or suitable USB adapter
- link to host computer via serial or USB port
- serial link cable must be approved by technician
- USB B port (linking to host computer) requires a USB A-B cable and USB driver
software (contact service)
2.6 Reagents and waste handling
Reagents should be handled according to national or international regulations.

Convergent Technologies GmbH & Co. KG User manual
16
Waste generated by the unit is biohazard material. Handling and disposal must happen
according to regulations regarding reagent systems.
2.7 Maintenance
The user should check the following components weekly:
- bottom of washing head for salt build up – should be wiped off with a damp cloth
- tubing system – by opening the side door and looking for any liquid leakage. If you
experience leakage, contact authorized technician.
Caution:
The following parts must NOT be opened or serviced by the user:
- power supply
- instrument housing, and electronic boards
2.7.1 Cleaning
Clean the instrument and its power supply on the outside only, using a damp cloth with a soft
detergent. DO NOT let liquids get inside the units.
2.7.2 General points
The manufacturer guarantees work safety reliability and general characteristics under the
following conditions only:
- services and repairs are performed by an authorized technician
- the electrical system of the laboratory follows national and/or international
regulations
- the system is operated according to instructions contained herein
2.8 Unpacking and installation
Carefully remove Convergys®X3 from the shipping carton. Inspect the instrument for any visible
signs of damage incurred during shipping. Would you find any damage, file a claim with the
carrier or your distributor immediately. Check the accessories received against the packing
list. Contact Service if anything is missing.
CAUTION! Prior to initial operation, allow the instrument to reach room temperature
(approx. 2 hours). Rapid temperature changes in an operating unit can lead to water
condensation, which may damage electronic parts.

Convergent Technologies GmbH & Co. KG User manual
17
Place the instrument on a firm work surface in the designated work area, near an appropriate
AC electrical outlet. The connection MUST be grounded.
NOTE: Before making connections: Make sure that all power is in “OFF” setting before
connections (printer, external keyboard) are made. Carefully read all literature
accompanying the instrument and its accessories. Pay particular attention to the
operating procedures for the external printer.
2.8.1 Keyboard and external printer
Attach the keyboard cable to the round “KEYBOARD” port on the back of the instrument.
Attach both ends of the printer cable to the appropriate ports on the printer and Convergys®X3.
Attach the AC adapter to the printer (if required) and plug it into an AC outlet.
2.8.2 Host Computer
The instrument has a built-in serial port that allows connection to a host computer. Results,
including histograms, may be exported. Serial (USB) I/O settings can be found in Settings.
For installation instructions, please contact Service.
2.8.3 Power supply
Connect the power supply to the instrument. Attach power cord outlet to the external power
supply of Convergys®X3 and plug the other end into a properly grounded AC outlet.
Do not switch on the instrument before connecting the external power supply to the
instrument and to the AC outlet, as well as before connecting an external printer or a
keyboard to the instrument.
2.8.4 Reagent Containers
Place the reagent containers near the instrument, to an accessible location. Do not place the
containers to a higher position than that of Convergys®X3, because would a tube come off its
connector, the fluids spoil out. Use the supplied connecting tubes and special bottle caps. Be
sure that the color on each tube, cap and connector in the back of the instrument match. You
can for example, place the reagent containers below the desk the analyzer is installed on, as
the instrument has sufficient power to draw the liquids from a lower location.
All containers should be left open (do not block the small air vent hole on the special
container caps) in order to provide free airflow. (For connections, see below)

Convergent Technologies GmbH & Co. KG User manual
18
2.9 Turning the Instrument ON
In case you use an external printer (for information, read manual shipped with the printer)
connect it and turn it on.
Turn Convergys®X3 on using the power switch on the rear panel. The On position is marked by
the ( I ) symbol.
During start-up, the following screen is
displayed. The software version number
appears few seconds later, when the
software starts.
When the software version is loaded, the
DATABASE is displayed without any
pneumatic initialization (default setting).
Pneumatic movement is initiated only when
necessary for the relating process.
The default setting can be changed at
Service Menu level, in this case the
instrument will start with pneumatic
initialization giving the possibility to
In some cases, a priming cycle is necessary prior to sample introduction. The instrument will
perform the cycle automatically if the fluid sensors are on and additional liquid in the tubing
system is required. Run a priming cycle in case of:
installation
extended time out of use
replacement of any component related to the Fluidic System
replacement of reagents with instrument turned on

Convergent Technologies GmbH & Co. KG User manual
19
2.10 Turning the Instrument OFF
The instrument should never be switched off by simply flipping the power switch on the rear
panel. Doing so may result in erroneous operation during later use. It can be so, because the
instrument uses different kinds of solutions, one of which is the so-called diluent. This liquid
is an isotonic saline solution containing salt. Would it not be washed out of special units of
the instrument, or would chambers not be filled with this solution may lead to dust
condensation or salt build up.
Therefore always follow the instructions below when switching the instrument off.
Press EXIT key on the front panel. The following screen is displayed.
Select Shut down. A message appears:
(Warning 5905). When prompted, press
to confirm. Convergys®X3 will display
a message (Warning 5906) and give a
tone indicating that it is safe to shut it off.
Turn off the instrument using the power
switch on the rear panel. The Off position
is marked by O symbol.
Item three (3) is only available in multi-
user mode.
2.11 Preparing for shipment
The second item in the shut down menu should be used when the instrument is to be
shipped or left unused for a longer time (more than 1 week). The instrument will ask you to
use the cleaning tube kit and 100ml of distilled water.
Follow the instructions appearing on the display.
EXIT
Preparing for shipment (2)
The user must remove tubing
connectors, so the system could be
drained.
Leave the waste connector attached.
Table of contents
Other Convergent Measuring Instrument manuals