Cooke & Lewis CLFSMW20LUK User manual

3663602632436
CLFSMW20LUK
3663602632597
CLFSMW20LEU
V10818
This file is the property of Kingfisher Group Plc. No copying, alteration or amendment is permitted without
written authorisation from the Kingfisher Brand Team.
V1.1
翠丰集团不会以专色(PMS)作参考,请参照已提供的印刷 标准及Lab色彩数值生产以符合印刷品之标准。
本文件的版权归翠丰集团所有。未经翠丰品牌团队的书面同意,不得对本文件进行复制、变更或修改。
PROCESS
BLACK
SEPARATIONS JOB INFO
VERSION #
PID #: 00001
Agency job #: GALA11139
Product Description: GALA11139
Microwave IM FS
Brand: Cooke & Lewis
Barcode: 3663602632436 3663602632597
Vendor: GALA
No. of new line drawings: xx
Page size A5 / No. of printed pages 16
2 3 4 5 6 7 R
12/03/18
DLS
23/03/18
JT
10/04/18
TjB
20/04/18
AM
23/04/18
TjB
00/00/18
INITIALS
24/08/18
JACKIE
10/09/18
JACKIE
1

Preparation
Vorbereitung
Preparación
Préparation
Preparação
Przygotowanie
Hazırlık
3
Installation
Installation
Installation Montaż
Установка
Instalare
5
BenutzungUtilisationUse
Utilizare Uso Utilização
9
16
23
30
37
44
51
58
65
Entretien et maintenance
ș ţinere
Cuidados y Mantenimiento
Bakım ve Onarım
15
22
29
36
43
50
57
64
71

IMPORTANT-
Please read
carefully
the separate
safety guide
before use.
IMPORTANT -
Vărugăm săcitiţi
cu atenţie ghidul
de siguranţă
separat înainte
de utilizare.
IMPORTANT -
Lire attentivement
le guide de
sécurité séparé
avant utilisation.
IMPORTANTE -
Lea atentamente
la guía de
seguridad
separado antes
de utilizer.
WAŻNE -
Przed użyciem
proszędokładnie
zapoznaćsię
z instrukcja
bezpieczeństwa.
IMPORTANTE -
Leia atentamente
o guia de
segurança
separado antes
de usar.
ÖNEMLİ-
Kullanmadan
önce emniyet
kurallarini lütfen
dikkatle okuyun.
WICHTIG -
Bitte lesen sie die
die separaten
sicherheitsanweisungen
vor gebrauch.
1 2
ВАЖНО -
Nожалуйста,
внимательно
прочитайте
отдельное
pуководство по
теxнике
безопасности
перед
использованием.
x1
[01] x 1 [02] x 1 [03] x 1

4
[01]
[03] [04]
[02]
[06][07]
[05]
Front view
1. Door Safety Lock 2. Microwave Window 3. Motor Shaft 4. Roller Ring 5. Control Panel 6. Microwave Guide
7. Glass Platter
Vue de face
1. Verrou de sécurité de la porte 2. Vitre du four à micro-ondes 3. Arbre du moteur 4. Anneau à roulettes 5. Panneau de
commande 6. Guide du four à micro-ondes 7. Plateau en verre
Widok z przodu
1.Blokadabezpieczeństwadrzwi 2. Okno kuchenki mikrofalowej 3.Ośsilnikanapędowego 4.Pierścieńobrotowy 5. Panel
sterowania 6.Płytkamikowa 7. Szklany talerz obrotowy
Vorderansicht
1. Türsicherheitsverriegelung 2. Mikrowellenfenster 3. Motorwelle 4. Rollring 5. Bedienfeld 6. Kurzanleitung für die Mikrowelle
7. Glasplatte
1.Дверцасзащелками 2.Окномикроволновойпечи 3.Валдвигателя 4.Поворотныйстол 5.Панель
управления 6.Направляющаядлямикроволновойпечи 7.Стекляннаяподставка
1.Încuietoaredesiguranţăuşă 2.Fereastrăcuptorcumicrounde 3. Arbore motor 4. Inel rotativ 5. Panou de control 6. Ghid
cuptor cu microunde 7.Platoudinsticlă
Vista frontal
1. Bloqueo de seguridad de la puerta 2. Ventana del microondas 3. Eje del motor 4. Anillo giratorio 5. Panel de
control 6. Guía del microondas 7. Plato de cristal
Vista frontal
1. Bloqueio de segurança da porta 2. Janela do micro-ondas 3. Eixo do motor 4. Anel dos roletes 5. Painel de controlo 6. Guia
do micro-ondas 7. Prato de vidro
Önden görünüm
1. Kapak Güvenlik Kilidi 2.MikrodalgaCamı 3. Motor Gövdesi 4. Döner Halka 5. Kontrol Paneli 6.MikrodalgaKılavuzu
7. Cam Tabak

Installation
Installation
Installation Montaż
Установка
Instalare
5
WARNING: Do not use the microwave without any food or drink inside the cavity to avoid damaging the appliance and
invalidating your guarantee.
Carefully remove all packaging materials from within the microwave and ensure all parts are received intact.
Ensure that all seals are clean and free of grease and avoid placing any items between the door and seal as this can damage
the seal.
Use warm soapy water and a soft damp cloth to clean the surface of the product. Wipe dry with a clean cloth. Immediately clean any
stains or food from within the microwave cavity.
Avoid using steam cleaners and cleaning products such as abrasive powders, glass wool or scouring pads, as well as domestic
chemicals containing acetone, chlorine or solvents.
WARNING:Ifthedoorordoorsealsaredamaged,themicrowavemustnotbeoperateduntilithasbeenrepairedbyaqualied
service technician. Operate the appliance for its intended purpose only as described in this manual.
This microwave oven is intended for domestic use of heating and cooking of food and drink.
Donotplacethemicrowaveoncookinghobsorotherheatgeneratingappliances.Placeitonaatstablesurfacesuchasakitchen
worktoporspecicallydesignedmicrowaveshelfonly.
The microwave must not be placed in a cabinet that is not in compliance with the installation instructions. Before maintenance,
deactivate the appliance and disconnect the mains plug from the mains socket.
Do not place the microwave where heat, moisture, or high humidity are generated, or near combustible materials.
Do not operate the microwave without its glass tray, roller support and motor shaft in their proper positions.
Make sure that the power supply cord is undamaged and does not run under the oven or over any hot or sharp surface.
The mains socket must be readily accessible so that the plug can be easily removed in an emergency.
Do not use the oven outdoors.
AVERTISSEMENT : ne pas utiliser le four à micro-ondes sans nourriture ou boisson à l’intérieur de la cavité pour éviter
d’endommager l’appareil et de mettre un terme à sa garantie.
Retirer soigneusement tous les matériaux d’emballage de l’intérieur du four à micro-ondes et s’assurer que toutes les pièces sont
reçues intactes.
S’assurer que tous les joints sont propres et exempts de graisse. Éviter de placer des éléments entre la porte et le joint car cela
peut endommager le joint.
Nettoyer la surface du produit à l’eau savonneuse avec un chiffon doux et humide. Sécher à l’aide d’un chiffon propre. Nettoyer
immédiatement les taches ou les restes de nourriture dans la cavité du four à micro-ondes.
Éviter l’utilisation de nettoyeurs à vapeur et de produits de nettoyage tels que poudres abrasives, laines de verre ou tampons à
récurer, ainsi que de produits chimiques ménagers contenant de l’acétone, du chlore ou des solvants.
AVERTISSEMENT : il ne faut pas mettre le four à micro-ondes en marche si la porte ou des joints de porte sont endommagés,
avantd’enavoirconélaréparationàuntechniciend’entretienqualié.Utiliserl’appareilpoursonbutprévuetuniquementcomme
décrit dans ce manuel.
Ce four à micro-ondes est destiné à l’utilisation ménagère pour chauffer et cuire des aliments et des boissons.
Ne pas placer le four à micro-ondes sur des plaques de cuisson ou d’autres appareils produisant de la chaleur. Le placer plutôt sur
une surface stable, telle qu’un plan de travail de cuisine ou une étagère spécialement conçue pour four à micro-ondes.
Le four à micro-ondes ne doit pas être placé dans un élément de cuisine non conforme aux instructions d’installation. Avant
l’entretien,désactiverl’appareiletdébrancherlachesecteurdelaprisesecteur.
Ne pas placer le four à micro-ondes à proximité d’une source de chaleur ou d’humidité ni près de matériaux combustibles.
Ne pas faire fonctionner le four à micro-ondes sans son plateau en verre, son support à roulettes et l’arbre du moteur dans leur
bonne position.
S’assurer que le cordon d’alimentation est intact et ne passe pas sous le four ni sur une surface chaude ou tranchante.
Laprisesecteurdoitêtrefacilementaccessibleanquelachepuisseêtreretiréeaisémentencasd’urgence.
Ne pas utiliser le four en plein air.
Abyuniknąćuszkodzeniaurządzeniaiunieważnieniagwarancji,nienależyuruchamiaćpustej
kuchenki mikrofalowej.
Ostrożnieusunąćześrodkaurządzeniawszelkieelementyopakowanioweiupewnićsię,żeżadnazczęściniezostałauszkodzona.
Utrzymywaćwszystkieuszczelkiwczystości(usuwaćzabrudzeniaztłuszczu)inieumieszczaćżadnychprzedmiotówmiędzy
drzwiamiurządzeniaauszczelką,ponieważmożespowodowaćtojejuszkodzenie.
Doczyszczeniapowierzchniproduktunależyużywaćciepłejwodyzmydłemorazmiękkiej,wilgotnejszmatki.Wytrzećdosucha
czystąszmatką.Natychmiastusuwaćzwnętrzakuchenkimikrofalowejresztkijedzenia.

6
Nieużywaćdoczyszczeniaurządzeniamyjekparowychaniśrodkówczyszczącychtakichjakproszkiścierne,wataszklanaczy
szorstkieczyściki.Unikaćtakżestosowaniaśrodkówchemiigospodarczejzawierającychaceton,chlorlubrozpuszczalniki.
OSTRZEŻENIE:Jeślidrzwilubuszczelkidrzwisąuszkodzone,nienależyuruchamiaćurządzeniadoczasujegonaprawieniaprzez
wykwalikowanegospecjalistę.Używaćurządzeniawyłączniezgodniezprzeznaczeniemopisanymwniniejszejinstrukcji.
Kuchenkamikrofalowajestprzeznaczonawyłączniedoużytkudomowego.
Niestawiaćkuchenkinapłytachkuchennychaninainnychurządzeniachgrzejnych.Ustawićkuchenkęnarównejistabilnej
powierzchni,takiejjakblatkuchennylubspecjalniezaprojektowanawtymcelupółka.
Nieumieszczaćkuchenkiwszafce,któraniespełniawymogówzawartychwinstrukcjiinstalacji.Przedprzystąpieniemdo
konserwacjinależyzawszewyłączyćurządzenieiwyjąćwtyczkęprzewoduzasilającegozgniazdka.
Nieustawiaćurządzeniawpobliżuźródełciepła,łatwopalnychmateriałówaniwmiejscach,wktórychwystępujewilgoćlub
wysokawilgotność.
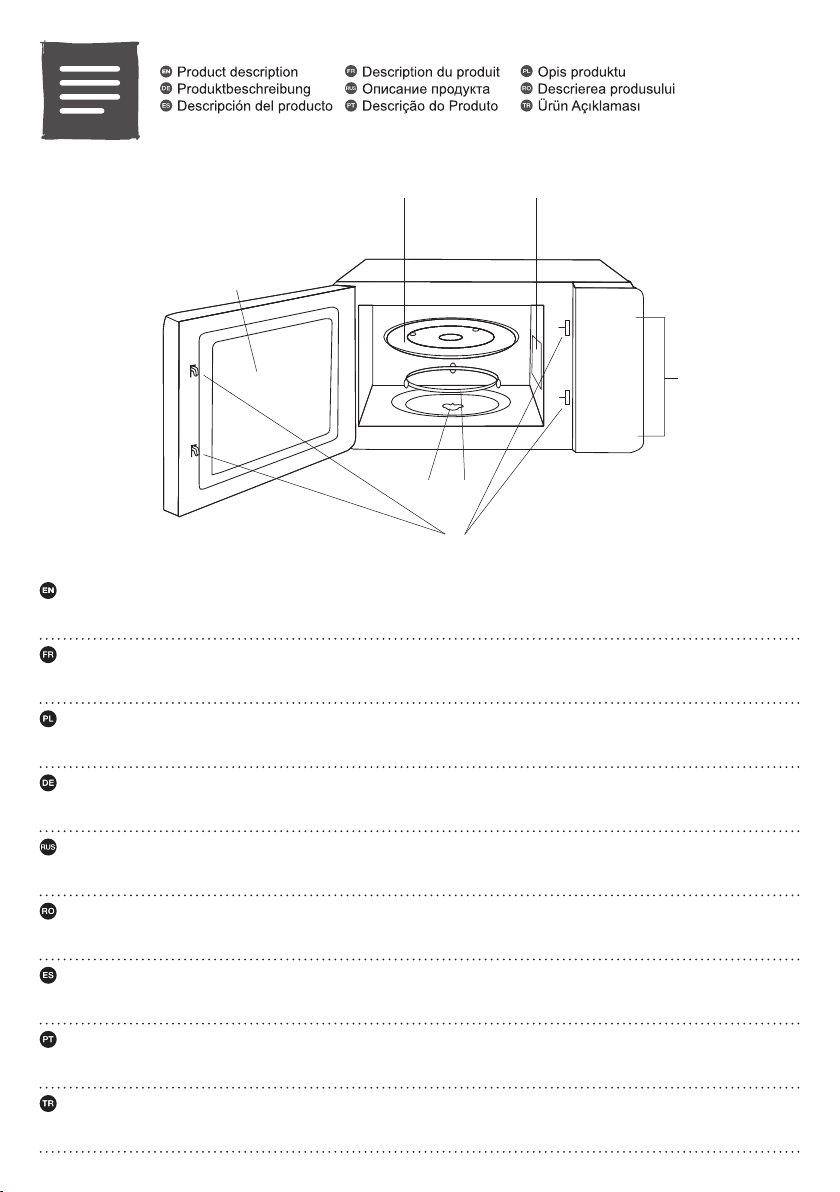
Nieużywaćurządzeniabezprawidłowoosadzonegoszklanegotalerza,pierścieniaobrotowegoiosisilnikanapędowego.
Należyupewnićsię,żeprzewódzasilającyniejestuszkodzonyinieprzebiegaonpodurządzeniem,nadgorącąpowierzchniąani
ostrymi powierzchniami.
Gniazdozasilającemusibyćłatwodostępne,abywsytuacjiawaryjnejmożnabyłoszybkoodłączyćurządzenieodźródłazasilania.
Nieużywaćkuchenkimikrofalowejnawolnympowietrzu.
WARNUNG: Verwenden Sie die Mikrowelle nicht ohne Speisen oder Getränke im Garraum, um eine Beschädigung des Geräts
zu vermeiden und die Garantie nicht zu verlieren.
Entfernen Sie sorgfältig alle Verpackungsmaterialien aus der Mikrowelle, und stellen Sie sicher, dass alle Teile intakt sind.
Stellen Sie sicher, dass alle Dichtungen sauber und fettfrei sind, und platzieren Sie keine Gegenstände zwischen der Tür und der
Dichtung, da dies die Dichtung beschädigen kann.
ReinigenSiedieOberächedesProduktsmitwarmemSeifenwasserundeinemweichen,feuchtenTuch.VerwendenSiezum
Trocknen ein sauberes Tuch. Reinigen Sie sofort Flecken oder Lebensmittel in der Mikrowelle.
Verwenden Sie keine Dampfreiniger und Reinigungsprodukte wie Scheuerpulver, Glaswolle oder Scheuerschwämme sowie
Haushaltschemikalien, die Aceton, Chlor oder Lösungsmittel enthalten.
WARNUNG: Wenn die Tür oder die Türdichtungen beschädigt sind, darf die Mikrowelle so lange nicht in Betrieb genommen
werden,bissievoneinemqualiziertenServicetechnikerrepariertwurde.BetreibenSiedasGerätnurfürdenvorgesehenen
Zweck, wie in diesem Handbuch beschrieben.
Dieser Mikrowellenherd ist für den Hausgebrauch zum Erhitzen von Lebensmitteln und Getränken vorgesehen.
StellenSiedieMikrowellenichtaufKochfelderoderanderewärmeerzeugendeGeräte.StellenSiesieaufeineache,stabile
Oberäche,z.B.eineKüchenarbeitsplatteodereinspeziellentwickeltesMikrowellenregal.
Die Mikrowelle darf nicht in einem Schrank aufgestellt werden, der nicht in Übereinstimmung mit den Installationsanweisungen
steht. Schalten Sie das Gerät vor der Wartung aus und ziehen Sie den Netzstecker aus der Steckdose.
Stellen Sie die Mikrowelle nicht an eine Stelle, an der Hitze, Flüssigkeiten oder hohe Feuchtigkeit erzeugt werden, oder in der Nähe
von brennbaren Materialien.
Verwenden Sie die Mikrowelle nicht, wenn ihr Glasteller, ihre Rollenhalterung und ihre Motorwelle sich nicht in der korrekten
Positionbenden.
Stellen Sie sicher, dass das Netzkabel nicht beschädigt ist und nicht unter der Mikrowelle oder über einer heißen oder scharfen
Oberächeverläuft.
Der Netzanschluss muss leicht zugänglich sein, damit der Stecker in einem Notfall leicht entfernt werden kann.
Verwenden Sie den Mikrowellenherd nicht im Freien.
Неиспользуйтемикроволновуюпечьбезпродуктовилинапитковвнутрикамерывоизбежание
поврежденияприбораианнулированиягарантии.
Аккуратноснимитеупаковочныематериалысвнутреннихэлементовмикроволновойпечииубедитесь,чтоэлементы
неповреждены.
Убедитесь,чтовсеуплотнительныеэлементычистыеинеимеютследовсмазки.Невставляйтекакие-либопредметы
междудверцейиуплотнительнымиэлементами,посколькуэтоможетпривестикихповреждению.
Дляочисткиповерхностииспользуйтетеплуюмыльнуюводуимягкуювлажнуюткань.Затемпротирайтенасухо
чистойтканью.Припоявлениипятенилипопаданиичастицпродуктовнастенкинемедленновытирайтекамеру
микроволновойпечи.
Неиспользуйтепароочистителиичистящиесредства,такиекакабразивныепорошки,губкисжесткимабразивнымслоем
илиметаллическиемочалки,атакжебытовыехимикаты,содержащиеацетон,хлорилирастворители.
ВНИМАНИЕ!Вслучаеповреждениядверцыилиуплотнителядверцынеследуетпользоватьсямикроволновойпечьюдо
устранениянеисправностиквалифицированнымспециалистомпоремонту.Используйтеприбортолькопоназначению,как
описановданномруководстве.
Этамикроволноваяпечьпредназначенадлябытовогоиспользованиядляприготовленияиразогреванияпищиинапитков.

7
Неставьтемикроволновуюпечьнаварочныепанелиилидругиенагревающиесяприборы.Установитеприборнаплоскую
устойчивуюповерхность,напримернакухоннуюстолешницуилинаспециальнуюполкудлямикроволновыхпечей.
Микроволновуюпечьнельзяставитьвшкафы,несоответствующиеинструкциямпоустановке.Передпроведением
техническогообслуживаниявыключитеприбориотключитеегоотэлектросети.
Неустанавливайтемикроволновуюпечьвпомещенияхсвысокимиуровнямитемпературыивлажности,атакжевблизи
горючихматериалов.
Передиспользованиеммикроволновойпечистекляннаяподставка,роликиивалдвигателядолжныбытьустановлены
должнымобразом.
Убедитесь,чтокабельпитаниянеповрежденинепроходитподпечьюилинаднагревающимисяповерхностямии
острымипредметами.
Электророзеткадолжнанаходитьсявлегкодоступномместе,чтобывилкупитанияможнобылолегкоибыстроизвлечьиз
розеткивэкстреннойситуации.
Неиспользуйтепечьвнепомещений.
AVERTISMENT: Nuutilizaţicuptorulfărăalimentesaubăuturiîninteriorulincintei,pentruaevitadeteriorareaaparatuluişi
anulareagaranţiei.
Îndepărtaţicuatenţietoatematerialeledeambalaredininteriorulcuptoruluicumicroundeşiasiguraţi-văcătoatepieselesunt
primite intacte.
Asiguraţi-văcătoategarniturilesuntcurateşifărăurmedegrăsimişievitaţiaşezareaoricărorobiecteîntreuşăşigarnitură,
deoarece acest lucru poate deteriora garnitura.
Utilizaţiapăcaldăcusăpunşiolavetămoaleumedăpentruacurăţasuprafaţaprodusului.Uscaţicuolavetăcurată.Curăţaţi
imediat orice pete sau urme de mâncare din interiorul incintei cuptorului cu microunde.
Evitaţiutilizareaaparatelordecurăţarecuaburişiaproduselordecurăţareprecumpudreleabrazive,vatadesticlăsaulavetelede
curăţarecusuprafaţădură,precumşiasubstanţelorchimicedeuzcasniccareconţinacetonă,clorsausolvenţi.
AVERTISMENT:Dacăuşasaugarniturileuşiisuntdeteriorate,cuptorulcumicroundenutrebuiefolositpânănuestereparatde
cătreuntehniciandeservicecalicat.Utilizaţiaparatulnumaiînscopuldestinatacestuia,conformdescrieriidinacestmanual.
Cuptorulcumicroundeestedestinatuzuluicasnicpentruîncălzireasaugătireaalimentelorşiabăuturilor.
Nuaşezaţicuptorulcumicroundepeplitepentrugătitsaualteaparatecaregenereazăcăldură.Aşezaţi-ldoarpeosuprafaţăstabilă
şiplanăprecumunblatdelucrupentrubucătăriesauunraftspecialconceputpentrucuptorulcumicrounde.
Cuptorulcumicroundenutrebuiesăeaşezatîntr-undulapcarenuesteînconformitatecuinstrucţiuniledeinstalare.Înaintede
întreţinere,dezactivaţiaparatulşiscoateţiştecăruldinpriză.
Nuaşezaţicuptorulcumicroundeîntr-unlocîncareestegeneratăcăldură,umezealăsaumultăumiditatesauînapropierea
materialelorinamabile.
Nuutilizaţicuptorulcumicroundefărătavadesticlăaacestuia,suportulderotireşiarborelemotoruluiînpoziţiilecorespunzătoare
ale acestora.
Asiguraţi-văcănuestedeterioratcabluldealimentareelectricăşicăacestanutrecepesubcuptorsaupesteosuprafaţăîncinsă
sauascuţită.
Prizadelareţeatrebuiesăeuşoraccesibilăastfelîncâtştecărulsăpoatăscoscuuşurinţăîncazdeurgenţă.
Nuutilizaţicuptorulînexterior.
ADVERTENCIA: No utilice el microondas sin alimentos o bebidas en el interior de la cavidad para evitar dañar el aparato y que
la garantía quede invalidada.
Retire con cuidado todos los materiales de embalaje del interior del microondas y asegúrese de que todas las piezas se han
recibido intactas.
Asegúrese de que todas las juntas están limpias y libres de grasa, y evite colocar elementos entre la puerta y la junta, ya que esto
podría dañar la junta.
Humedezcaunpañoenaguatempladajabonosaparalimpiarlasuperciedelproducto.Sequeconunpañolimpio.Quite
inmediatamente las manchas o alimentos del interior de la cavidad del microondas.
Evite el uso de limpiadores a vapor y productos de limpieza como polvos abrasivos, lana de vidrio o estropajos abrasivos, así como
productos químicos del hogar que contengan acetona, cloro o disolventes.
ADVERTENCIA: Si la puerta o las juntas están dañadas, debe dejar de utilizarse el microondas hasta que lo haya reparado un
técnicocualicado.Utiliceelaparatoparasuusoprevistosolotalycomosedescribeenestemanual.
Este horno microondas está diseñado para calentar y cocinar comida y bebida en el ámbito doméstico.
Nocoloqueelmicroondasencimadeplacasdecocciónuotrosaparatosquegenerencalor.Colóquelosobreunasupercieplana
estable,comounaencimeradecocinaounestantediseñadoespecícamentesoloparamicroondas.
Elmicroondasnodebecolocarseenunarmarioquenoestéfabricadodeconformidadconlasinstruccionesdeinstalación.Antes
de realizar el mantenimiento, apague el aparato y desconecte el enchufe de la toma de corriente.
No coloque el microondas donde se genere calor, vapor o un alto nivel de humedad, así como tampoco cerca de

8
materiales combustibles.
No utilice el microondas sin la bandeja de cristal, el soporte giratorio y el eje del motor en sus correspondientes posiciones.
Asegúresedequeelcabledealimentaciónnoestádañadoydequenoseencuentradebajodelaparatonisobrecualquierotra
superciecalienteoalada.
Se debe poder acceder fácilmente a la toma de corriente para poder quitar el enchufe rápidamente en caso de emergencia.
No utilice el horno en exteriores.
AVISO: Nãoutilizeomicro-ondassemalimentosoubebidasdentrodocompartimentoparaevitardanicaroaparelhoe
invalidar a sua garantia.
Removacuidadosamentetodososmateriaisdeembalamentodomicro-ondasecertique-sedequetodasaspeçasforam
recebidas intactas.
Certique-sequetodososvedantesestãolimposesemgorduraeevitecolocaritensentreaportaeovedante,dadoqueistopode
danicarovedante.
Use água quente com sabão e um pano macio e húmido para limpar a superfície do produto. Seque com um pano limpo. Limpe
imediatamente quaisquer manchas ou alimentos dentro do compartimento do micro-ondas.
Eviteutilizardispositivosdelimpezaavaporeprodutosdelimpezacomopósabrasivos,lãdevidroouesfregões,bemcomo
produtos químicos domésticos que contenham acetona, cloro ou solventes.
AVISO:Seaportaouosvedantesdaportaestiveremdanicados,omicro-ondasnãopodeserutilizadoatétersidoreparado
porumtécnicodemanutençãoqualicado.Utilizeoaparelhoexclusivamenteparaomaquesedestina,talcomodescrito
neste manual.
Este micro-ondas destina-se a uso doméstico para o aquecimento e cozedura de alimentos e bebidas.
Não coloque o micro-ondas sobre placas de cozinha ou outros aparelhos que produzam calor. Coloque-o apenas sobre uma
superfícieplanaeestável,como,porexemplo,bancadasdecozinhasouprateleirasconcebidasespecicamenteparamicro-ondas.
Omicro-ondasnãodevesercolocadonumarmárioquenãoestejaemconformidadecomasinstruçõesdeinstalação.Antesde
efetuaramanutenção,desativeoaparelhoedesligueachadatomadaelétrica.
Não coloque o micro-ondas em locais onde sejam gerados calor, condensação ou humidade elevada, ou na proximidade de
materiais combustíveis.
Nãoutilizeomicro-ondassemopratoemvidro,osuportedosroleteseoeixodomotornasposiçõesadequadas.
Certique-sedequeocabodealimentaçãonãoestádanicadoequenãopassaporbaixodofornoousobresuperfíciesquentes
ouaadas.
Atomadaelétricatemdeserdefácilacessoparaqueachapossaserremovidafacilmenteemcasodeemergência.
Não utilize o produto no exterior.
UYARI: Mikrodalgafırınınzarargörmemesivegarantisüresiningeçerliliğiniyitirmemesiiçinmikrodalgafırınıiçindehiçbir
yiyecekveyaiçecekyokkenkullanmayın.
Mikrodalganıniçindekitümambalajmalzemelerinidikkatliceçıkartınvetümparçalarınsağlambirşekildeteslimalındığından
emin olun.
Tümcontalarıntemizveyağdanarındırılmışolmasınadikkatedinvekapakilecontaarasınahiçbirşeykoymayın,aksihaldeconta
zarar görebilir.
Ürününyüzeyinitemizlemekiçinılıksabunlusuveyumuşaknemlibirbezkullanın.Temizbirbezlekurulayın.Mikrodalgaiçindeki
hertürlülekeyiveyayiyeceğihementemizleyin.
Buharlıtemizleyicilerveaşındırıcıtozlar,camyünüveyabulaşıkteligibitemizlikürünleriveaseton,klorveçözücüleriçeren
kimyasaldeterjanlarkullanmaktankaçının.
UYARI:Kapakveyakapakcontalarıhasarlıysamikrodalgavasııbirteknikertarafındanonarılanakadarçalıştırılmamalıdır.Cihazı
sadecebukılavuzdatarifedilenkullanımamacıdoğrultusundakullanın.
Bumikrodalgafırınevdeyiyecekveiçecekısıtmakvepişirmekamacıylakullanılmasıiçintasarlanmıştır.
Mikrodalgafırınıocağınveyabaşkaısıüretencihazlarınüzerinekoymayın.Sadecemutfaktezgahıveyaözeltasarlanmış
mikrodalgarafıgibisabitvedüzbiryüzeyeyerleştirin.
Mikrodalga,montajtalimatlarınauygunolmayanbirdolabayerleştirilmemelidir.Bakımöncesindecihazıdevredışıbırakınveşini
prizden çekin.
Mikrodalgafırınıısı,nemveyayüksekrutubetinmeydanageldiğiyerlereveyayanıcımalzemelerinyakınınakoymayın.
Mikrodalgafırınıcamtepsisi,tekerleklidesteğivemotorgövdesiuygunkonumlarındadeğilkençalıştırmayın.
Güçkaynağıkablosununhasaralmadığındanvefırınınaltındanyadahiçbirsıcakveyakeskinyüzeydengeçmediğindeneminolun.
Acildurumhalindeşinkolaycasökülebilmesiiçinprizkolaycaerişilebilirolmalıdır.
Fırınıaçıkhavadakullanmayın.

BenutzungUtilisationUse
Utilizare Uso Utilização
9
Before you start
01
Radio Interference
Operation of a microwave oven can cause radio wave interference with other devices operating in its vicinity such as radio,
television,wi-,wirelesstelephonesandsimilarequipment.
You can reduce or minimize the interference by:
1. Relocating the microwave in relation to the other devices.
2. Changing the orientation between the microwave and the other devices.
3. Ensuring the microwave and other devices are plugged into separate ring mains or circuits.
02
Getting the best from your microwave oven
IMPORTANT: Metal utensils and containers are not allowed to be used in a microwave
ovenastheymaycausesparksandres.
1. Only use glass, ceramic and microwave safe plastic containers.
2. Always follow the manufacturer’s guidelines regarding cooking food and drink and ensure it is piping hot before consumption.
3. Cover food during cooking to prevent spattering and stir regularly to ensure heat is distributed evenly.
4. Removeallprotectivelmfromthemicrowaveanditsdisplaypanel.
Functions and settings
01
Control panel
POWER ( )
Use to set the power output level of the microwave.
DEFROST ( )
Use to program the weight and time for thawing
frozen food.
CLOCK ( )
Use to set the microwave oven clock.
PAUSE / CANCEL ( )
Use to temporarily pause a cooking program or
cancel a program altogether.
TIME / WEIGHT ( )
Rotate the dial to enter times, weights or the
number of servings.
START ( )
Use to start cooking instantly or commence
a program.
AUTO COOK ( )
Use for instant cooking of some popular foods.
1. Hot drinks 5. Reheating
2. Rice 6. Fish
3. Pasta 7. Popcorn
4. Potatoes 8. Pizza

10
02
Display panel
AUTO Auto Mode
Cooling Mode
Start / Pause
Future Mode
Time Set Mode
Child Lock
88:88 Remaining Time
% Percentage
g Weight(Grams)
Defrost Mode
Microwave Mode
1S Program 1
Full Power
2S Program 2
Reduced Power
03
• Whentheovenisrstpluggedinandturnedon,therewillbeabeepandthedisplaywillshow“1:01”and“( )”.
• It is recommended that you set the clock to the current time before further use.
04
Setting the clock
Tosettheclock,rstpresstheCLOCK( )buttononcefor12hourortwicefor24houroperation.TheClockicon( )ashesin
the display.
For example, to set the time to 08:30 in 12 hour mode:
1. PresstheCLOCK( )buttononceand12Hisdisplayed.
2. TurntheTIME/WEIGHT( )dialclockwisetoindicatethehourdigit8.
3. PresstheCLOCK( )buttonagain.
4. TurntheTIME/WEIGHT( )dialclockwisetoindicatetheminutedigit30.
5. PresstheCLOCK( )buttontoconrmthesetting.
For example, to set the time to 15:45 in 24 hour mode:
1. PresstheCLOCK( )buttontwiceand24Hisdisplayed.
2. TurntheTIME/WEIGHT( )dialclockwisetoindicatethehourdigit15.
3. PresstheCLOCK( )buttonagain.
4. TurntheTIME/WEIGHT( )dialclockwisetoindicatetheminutedigit45.
5. PresstheCLOCK( )buttontoconrmthesetting.
NOTE:Tocheckthecurrenttimeduringcooking,presstheCLOCK( )buttononceandthetimewillbedisplayedfor
three seconds.
05
Instant cooking
This feature allows you to start cooking instantly on full power.
PresstheSTART( )buttononceandthemicrowavewillstartcookingatfullpowerfor30seconds.Eachconsecutivepressofthe
START( )buttonwillincreasethecookingtimeby30secondsfromthecurrentremainingtimetoamaximumtimeof10minutes.
Ifyouwishtopausethecookingprogramatanytime,pressthePAUSE/CANCEL( )buttononceandtheSTART( )icon
willashinthedisplay.PresstheSTART( )buttontorecommencecooking.Tocancelcookingcompletely,pressthePAUSE
/CANCEL( )buttontwice.Aftercookinghasnished,themicrowavewillbeepfourtimesanddisplayEnd.Themicrowavewill
beepfourtimeseverytwominutesuntilthePAUSE/CANCEL( )buttonispressed,orthedoorisopened.

11
06
Programmable cooking
This feature allows you to reduce the power output of the microwave and program a cooking time up to a maximum of 60 minutes.
There are 6 power levels available, see Table 1.
Table 1
PRESS POWER ( ) button MICROWAVE
POWER SETTING
MICROWAVE
POWER OUTPUT
Once 100% 800W
Twice 80% 640W
3 times 60% 480W
4 times 40% 320W
5 times 20% 160W
6 times 0% 0W - Fan Only
There are two ways of using this feature.
Cooking on full power
For example, to cook at 100% full power for 1 minute:
1. TurntheTIME/WEIGHT( )dialclockwiseuntil1:00isdisplayed.
2. PresstheSTART( )buttontocommencecooking.
Cooking on reduced power
For example, to cook at 60% reduced power for 3 minutes:
1. PressthePOWER( )button3timesasTable1above.
2. TurntheTIME/WEIGHT( )dialclockwiseuntil3:00isdisplayed.
3. PresstheSTART( )buttontocommencecooking.
NOTE:Tocheckthepowerlevelduringcooking,pressthePOWER( )button.
IMPORTANT:WhenprogrammingthecookingtimebyturningtheTIME/WEIGHT( )dial,thedisplaywillincreaseata
differentratebaseduponthelengthoftimerequired,seeTable2.IftheSTART( )buttonisnotpressed,theprogramwillbe
cancelled after 20 seconds.
Table 2
REQUIRED COOKING TIME TIME / WEIGHT INCREMENT
0:10 – 5:00 10 seconds
5:30 – 10:00 30 seconds
11:00 – 30:00 1 minute
35:00 – 60:00 5 minutes
07
Weight defrost
The microwave can be used to defrost food and calculates the required time based upon the frozen weight programmed in the
range 100g to 1800g, see Table 3.
Table 3
FROZEN WEIGHT (g) DEFROST TIME (minutes)
100 5
200 7
300 9
400 11
500 13

12
FROZEN WEIGHT (g) DEFROST TIME (minutes)
600 15
700 17
800 19
900 21
1000 23
1100 25
1200 27
1300 29
1400 31
1500 33
1600 35
1700 37
1800 39
For example, to defrost 600g of meat:
1. PresstheDEFROST( )buttononce.
2. TurntheTIME/WEIGHT( )dialclockwiseuntil600gisdisplayed.
3. PresstheSTART( )buttontocommencedefrosting.
4. The microwave will start to countdown from 15:00 and will automatically turn off and on many times whilst the glass platter
continues to rotate.
NOTE: Additionally, during the defrosting cycle, the glass platter will stop rotating and beep twice part way through the cooking time
toremindyoutoturnthefoodover.PresstheSTART( )buttonagaintorestartthedefrostingcycle.
08
Time defrost
This function allows you to program a defrosting time, without entering a weight, up to a maximum of 60 minutes.
Forexample,todefrostshfor20minutes:
1. PresstheDEFROST( )buttontwice.
2. TurntheTIME/WEIGHT( )dialclockwiseuntil20:00isdisplayed.ThetimewillincreaseasinTable2above.
3. PresstheSTART( )buttontocommencedefrosting.
4. The microwave will automatically turn off and on many times whilst the glass platter continues to rotate.
NOTE: Additionally, during the defrosting cycle, the glass platter will stop rotating and beep twice part way through the cooking time
toremindyoutoturnthefoodover.PresstheSTART( )buttonagaintorestartthedefrostingcycle.
09
Multi-program cooking
This function allows you to program two consecutive cooking sequences, using different power levels if required. Also refer to
PROGRAMMABLE COOKING above.
For example, to cook at 100% power for 4 minutes, followed by 60% power for 2 minutes:
1. PressthePOWER( )buttononcetoselect100%power(1Sisshowninthedisplay).
2. TurntheTIME/WEIGHT( )dialclockwiseuntil4:00isdisplayed.
3. PressthePOWER( )buttonagainthreetimestoselect60%power(2Sisshowninthedisplay).
4. TurntheTIME/WEIGHT( )dialclockwiseuntil2:00isdisplayed.
5. PresstheSTART( )buttontocommencecooking,andthemicrowavewillcookfor6:00minutesintotalatthetwoselected
power levels. The microwave will beep once when changing from Program 1S to Program 2S.
NOTE: The INSTANT COOKING, WEIGHT DEFROST, SPEED DEFROST and AUTO-PROGRAM functions cannot be used in
MULTI-PROGRAM COOKING.

13
10
Auto-program cooking
This function allows you to program a number of popular foods by selecting the number of units or weight of each option and the
microwave selects the pre-programmed cooking time accordingly. See Table 4.
For example, to cook 300g of rice at 100% power:
1. PresstheAUTOCOOK( )button twice until AUTO 2 shows in the display.
2. TurntheTIME/WEIGHT( )dialclockwiseuntil300gisdisplayed,theSTART( )iconashesinthedisplay.
3. PresstheSTART( )buttontocommencecooking,andthemicrowavewillcookfor20:00minutes.
Forexample,tocook2potatoes(230geach)at100%power:
1. PresstheAUTOCOOK( )button four times until AUTO 4 shows in the display.
2. TurntheTIME/WEIGHT( )dialclockwiseuntil2isdisplayed,theSTART( )iconashesinthedisplay.
3. PresstheSTART( )buttontocommencecooking,andthemicrowavewillcookfor9:00minutes.
NOTE: The preset timings for each program may not cook food to your taste dependent upon the weight and
shape of the food. Please ensure food is piping hot before consumption and cook the food for longer if necessary.
The microwave power is automatically set at 100% and cannot be altered.
Table 4
AUTO-PROGRAM USE FOR WEIGHT / UNITS OPTIONS COOKING TIME
AUTO 1 Hot Drinks PerCup(200ml) 1 1:30
2 2:40
3 3:50
AUTO 2 Rice
(Addboiledwater)
Weight(g) 150g 16:00
300g 20:00
450g 24:00
600g 28:00
AUTO 3 Pasta
(Addboiledwater)
Weight(g) 100g 22:00
200g 27:00
300g 32:00
AUTO 4 Potatoes PerUnit(230g) 1 5:00
2 9:00
3 13:00
AUTO 5 Reheating Weight(g) 200g 1:30
300g 2:00
400g 2:30
500g 3:00
600g 3:30
700g 4:00
800g 4:30
AUTO 6 Fish Weight(g) 200g 3:00
300g 4:20
400g 5:40
500g 7:00
600g 8:20
AUTO 7 Popcorn Weight(g) 99g 2:20

14
AUTO-PROGRAM USE FOR WEIGHT / UNITS OPTIONS COOKING TIME
AUTO 8 Pizza Weight(g) 150g 0:50
300g 1:20
450g 1:50
11
Preset cooking
This function allows you to program a cooking start time in the future up to one day in advance.
For example, if the time is now 10:15 and you wish to start a cooking program on full power at 14:30 for 30 minutes:
1. PressthePOWER( )buttononcetoselect100%power.
2. TurntheTIME/WEIGHT( )dialclockwiseuntil30:00isdisplayed.
3. PresstheCLOCK( )buttonandthehoursnumber10willash(FUTURE( )iconwillashinthedisplay).
4. TurntheTIME/WEIGHT( )dialclockwiseuntil14isdisplayed.
5. PresstheCLOCK( )buttonandtheminutesnumber15willash(FUTURE( )iconwillashinthedisplay).
6. TurntheTIME/WEIGHT( )dialclockwiseuntil30isdisplayed.
7. PresstheCLOCK( )buttontosetthetime(FUTURE( )iconissolidinthedisplay).
NOTE:Oncethepresettimedprogramisset,presstheCLOCK( )buttononcetocheckthestarttime.Tocancelthepreset
timedprogram,presstheCLOCK( )buttononceandthenpressthePAUSE/CANCEL( )buttononcewhenthepresettimeis
showing on the display.
12
Automatic Childlock
This function allows all control buttons to be locked automatically to prevent unsupervised operation by young children. The CHILD
LOCK( )iconwillshowinthedisplaywhenthedoorisopenorclosedifnobuttonshavebeenpressedformorethanoneminute.
To disengage the lock function the door must be opened or closed accordingly.

Entretien et maintenance
ș ținere
Cuidados y Mantenimiento
Bakım ve Onarım
15
1. Turn off the microwave and remove the power plug from the wall socket before cleaning.
2. Keep the inside of the oven cavity clean. Remove food splatters or spilt liquids promptly with a well wrung damp cloth. Avoid the
use of spray cleaners or abrasives as they may stain or damage the surface.
3. The outside surfaces should be cleaned with a well wrung damp cloth and dried with a soft dry cloth. Do not allow moisture to
enter the ventilation openings.
4. Do not use a steam cleaner on this appliance.
5. Moisture may condense on the oven during use because of steam or high humidity. This is normal and should be removed with
a soft dry cloth.
6. Removetheglassplatterandrollerringregularlyandcleaninwarmsoapywater.Drythoroughly.Ensurethecavityoorisclean
and dry before replacing carefully.
7. To remove odours from your microwave, slice a lemon in half and squeeze the juice into a microwaveable bowl. Add the lemon
halves to the bowl. Add half a cup of water and microwave on full power for 3 minutes or until the water boils. Let stand for 5
minutes for the steam to soften dried on food. Then remove the bowl, platter and roller ring and wipe thoroughly with a dry soft
cloth to remove the residue.
8. If the internal cavity light fails, please contact the Customer Services helpline to arrange an engineer visit – DO NOT attempt to
replace this yourself.
Customer helpline (toll free):

BenutzungUtilisationUse
Utilizare Uso Utilização
16
Avant de commencer
01
Interférence radio
Le fonctionnement d'un four à micro-ondes peut provoquer des interférences avec d'autres appareils fonctionnant à proximité
commelaradio,latélévision,leWi-Fi,lestéléphonessansletleséquipementssimilaires.
Il est possible de réduire ou de minimiser cette interférence :
1. En déplaçant le four à micro-ondes par rapport aux autres appareils.
2. Enmodiantl'orientationentrelefouràmicro-ondesetlesautresappareils.
3. En s'assurant que le four à micro-ondes et les autres appareils sont branchés sur des circuits ou des secteurs séparés.
02
Tirer le meilleur parti de votre four à micro-ondes
IMPORTANT : l'utilisation d'ustensiles et de récipients en métal n'est pas autorisée
dans un four à micro-ondes, car ils peuvent provoquer des étincelles et des incendies.
1. N'utiliser que des récipients en verre, en céramique et en plastique spécial pour four à micro-ondes.
2. Toujours suivre les recommandations du fabricant concernant la cuisson des aliments et des boissons et s'assurer qu'ils sont
chauds avant de les consommer.
3. Couvrir les aliments pendant la cuisson pour empêcher les éclaboussures et remuer régulièrement pour répartir la
chaleur uniformément.
4. Retirerlelmdeprotectiondufouràmicro-ondesetdesonbandeaud'afchage.
Fonctions et réglages
01
Panneau de commande
PUISSANCE ( )
Permetdedénirleniveaudepuissancedesortie
du four à micro-ondes.
DÉCONGÉLATION ( )
Sert à programmer le poids et le temps de
décongélation des aliments congelés.
HORLOGE ( )
Permet de régler l’horloge du four à micro-ondes.
PAUSE/ANNULER ( )
Utiliser pour interrompre momentanément un
programme de cuisson ou annuler complètement
un programme.
TEMPS/POIDS ( )
Faire tourner le cadran pour saisir les temps
de cuisson, le poids des aliments ou le nombre
de portions.
DÉMARRAGE ( )
Utiliser pour démarrer la cuisson instantanément ou
commencer un programme.
AUTO COOK ( )
Utiliser pour la cuisson instantanée de certains
aliments populaires.
1. Boissons chaudes 5. Réchauffer
2. Riz 6. Poisson
3. Pâtes 7. Popcorn
4. Pommes de terre 8. Pizza

17
02
AUTO Mode Auto
Mode refroidissement
Démarrage/Pause
Mode programmation
Mode de réglage de l'heure
Verrouillage enfant
88:88 Temps restant
% Pourcentage
g Poids(grammes)
Mode décongélation
Mode micro-ondes
1S Programme 1
Pleine puissance
2S Programme 2
Puissance réduite
03
Première utilisation du four à micro-ondes
• Lorsquelefourestbranchéetallumépourlapremièrefois,unbipretentitetl'afchageindique«1:01»et«( )».
• Il est recommandé de régler l'horloge à l'heure actuelle avant de poursuivre l'utilisation.
04
Réglage de l'horloge
Pourréglerl'horloge,appuyerd'abordsurleboutonHORLOGE( ):unefoispourlemode12heuresoudeuxfoispourlemode
24heures.L'icôned'horloge( )clignotesurl'afchage.
Par exemple, pour régler l'heure à 08:30 en mode 12 heures :
1. AppuyerunefoissurleboutonHORLOGE( )pourafcher12H.
2. TournerlecadranTEMPS/POIDS( )danslesensdesaiguillesd'unemontrejusqu'àcequelechiffred'heure8
soit indiqué.
3. AppuyerànouveausurleboutonHORLOGE( ).
4. TournerlecadranTEMPS/POIDS( )danslesensdesaiguillesd'unemontrejusqu'àcequelechiffredesminutes30
soit indiqué.
5. AppuyersurleboutonHORLOGE( )pourconrmerleréglage.
Par exemple, pour régler l'heure à 15:45 en mode 24 heures :
1. AppuyerdeuxfoissurleboutonHORLOGE( )pourafcher24H.
2. TournerlecadranTEMPS/POIDS( )danslesensdesaiguillesd'unemontrejusqu'àcequelechiffred'heure15
soit indiqué.
3. AppuyerànouveausurleboutonHORLOGE( ).
4. TournerlecadranTEMPS/POIDS( )danslesensdesaiguillesd'unemontrejusqu'àcequelechiffredesminutes45
soit indiqué.
5. AppuyersurleboutonHORLOGE( )pourconrmerleréglage.
REMARQUE :pourvérierl'heureactuelleencoursdecuisson,appuyerunefoissurleboutonHORLOGE( )pourafcher
l'heure pendant trois secondes.
05
Cuisson instantanée
Cette fonction vous permet de démarrer instantanément la cuisson à pleine puissance.
AppuyerunefoissurleboutonDÉMARRAGE( )pourquelefouràmicro-ondesdémarrelacuissonàpleinepuissancependant
30secondes.ChaqueappuiconsécutifsurleboutonDÉMARRAGE( )augmenteletempsdecuissonde30secondesàpartir
de l'heure actuelle, jusqu'à une durée maximale de 10 minutes.

18
Poursuspendreleprogrammedecuissonàtoutmoment,appuyerunefoissurleboutonPAUSE/ANNULER( );l'icône
DÉMARRAGE( )clignoteàl'écran.AppuyersurleboutonDÉMARRAGE( )pourreprendrelacuisson.Pourannuler
complètementlacuisson,appuyerdeuxfoissurleboutonPAUSE/ANNULER( ).Unefoislacuissonterminée,lefouràmicro-
ondesémetquatresignauxsonoresetafcheFIN.Lefouràmicro-ondesémetquatresignauxsonorestouteslesdeuxminutes
jusqu'àcequeleboutonPAUSE/ANNULER( )soitenfoncé,oubienjusqu'àl'ouverturedelaporte.
06
Cuisson programmable
Cette fonction vous permet de réduire la puissance de sortie du four à micro-ondes et de programmer un temps de cuisson allant
jusqu'à 60 minutes maximum. Il y a 6 niveaux de puissance disponibles, voir tableau 1.
Tableau 1
APPUYER sur le bouton
PUISSANCE ( )
RÉGLAGE DE PUISSANCE
DU FOUR À MICRO-ONDES
PUISSANCE DE SORTIE
DU FOUR À MICRO-ONDES
Une fois 100 % 800 W
Deux fois 80 % 640 W
3 fois 60 % 480 W
4 fois 40 % 320 W
5 fois 20 % 160 W
6 fois 0 % 0 W - Ventilateur uniquement
Il y a deux façons d'utiliser cette fonction.
Cuisson à pleine puissance
Par exemple, pour cuire à 100 % de puissance pendant 1 minute :
1. TournerlecadranTEMPS/POIDS( )danslesensdesaiguillesd'unemontrejusqu'àceque1:00s'afche.
2. AppuyersurleboutonDÉMARRAGE( )pourcommencerlacuisson.
Cuisson à puissance réduite
Par exemple, pour cuire à 60 % de puissance pendant 3 minutes :
1. Appuyer3foissurleboutonPUISSANCE( )commeindiquédansletableau1ci-dessus.
2. TournerlecadranTEMPS/POIDS( )danslesensdesaiguillesd'unemontrejusqu'àceque3:00s'afche.
3. AppuyersurleboutonDÉMARRAGE( )pourcommencerlacuisson.
REMARQUE :pourcontrôlerleniveaudepuissancependantlacuisson,appuyersurleboutonPUISSANCE( ).
IMPORTANT :lorsdelaprogrammationdutempsdecuissonàl'aideducadranTEMPS/POIDS( ),l'afchageaugmente
àunrythmedifférentenfonctiondeladuréenécessaire,voirtableau2.SileboutonDÉMARRAGE( )n'estpasenfoncé,le
programme s'annule au bout de 20 secondes.
Tableau 2
TEMPS DE CUISSON REQUIS INCRÉMENT TEMPS/POIDS
0:10 – 5:00 10 secondes
5:30 – 10:00 30 secondes
11:00 – 30:00 1 minute
35:00 – 60:00 5 minutes
07
Décongélation en fonction du poids
Le four à micro-ondes peut être utilisé pour décongeler les aliments et calcule le temps nécessaire en fonction du poids de l'aliment
congelé programmé entre 100 g à 1 800 g, voir tableau 3.
Tableau 3
POIDS DE L'ALIMENT CONGELÉ (g) TEMPS DE DÉCONGÉLATION
(minutes)
100 5
200 7

19
POIDS DE L'ALIMENT CONGELÉ (g) TEMPS DE DÉCONGÉLATION
(minutes)
300 9
400 11
500 13
600 15
700 17
800 19
900 21
1 000 23
1 100 25
1 200 27
1 300 29
1 400 31
1 500 33
1 600 35
1 700 37
1 800 39
Par exemple, pour décongeler 600 g de viande :
1. AppuyerunefoissurleboutonDÉCONGÉLATION( ).
2. TournerlecadranTEMPS/POIDS( )danslesensdesaiguillesd'unemontrejusqu'àceque600gs'afche.
3. AppuyersurleboutonDÉMARRAGE( )pourcommencerladécongélation.
4. Le four à micro-ondes commence un compte à rebours à partir de 15:00 et s'active et se désactive automatiquement à plusieurs
reprises tandis que le plateau en verre continue à tourner.
REMARQUE : pendant le cycle de décongélation, le plateau en verre s'arrête de tourner et l'appareil émet deux signaux sonores à
lamoitiédutempsdecuissonpourrappelerqu'ilfautretournerlanourriture.AppuyerànouveausurleboutonDÉMARRAGE( )
pour relancer le cycle de décongélation.
08
Temps de décongélation
Cette fonction vous permet de programmer un temps de décongélation, sans saisir de poids, jusqu'à un maximum de 60 minutes.
Par exemple, pour décongeler du poisson pendant 20 minutes :
1. AppuyerdeuxfoissurleboutonDÉCONGÉLATION( ).
2. TournerlecadranTEMPS/POIDS( )danslesensdesaiguillesd'unemontrejusqu'àceque20:00s'afche.Letemps
augmente comme indiqué dans le tableau 2 ci-dessus.
3. AppuyersurleboutonDÉMARRAGE( )pourcommencerladécongélation.
4. Le four à micro-ondes s'active et se désactive automatiquement à plusieurs reprises tandis que le plateau en verre continue
à tourner.
REMARQUE : pendant le cycle de décongélation, le plateau en verre s'arrête de tourner et l'appareil émet deux signaux sonores à
lamoitiédutempsdecuissonpourrappelerqu'ilfautretournerlanourriture.AppuyerànouveausurleboutonDÉMARRAGE( )
pour relancer le cycle de décongélation.
09
Cuisson multiprogramme
Cette fonction permet de programmer deux séquences de cuisson consécutives, en utilisant différents niveaux de puissance si
nécessaire. Se référer également à la section CUISSON PROGRAMMABLE ci-dessus.
Par exemple, pour cuire à 100 % de puissance pendant 4 minutes, puis à 60 % de puissance pendant 2 minutes :
1. AppuyersurleboutonPUISSANCE( )unefoispoursélectionner100%depuissance(1Ss'afcheàl'écran).

20
2. TournerlecadranTEMPS/POIDS( )danslesensdesaiguillesd'unemontrejusqu'àceque4:00s'afche.
3. AppuyerànouveautroisfoissurleboutonPUISSANCE( )poursélectionner60%depuissance(2Ss'afcheàl'écran).
4. TournerlecadranTEMPS/POIDS( )danslesensdesaiguillesd'unemontrejusqu'àceque2:00s'afche.
5. AppuyersurleboutonDÉMARRAGE( )pourcommencerlacuisson.Lefouràmicro-
ondes cuit pendant 6:00 minutes au total aux deux niveaux de puissance sélectionnés.
Le four à micro-ondes émet un seul signal sonore : lors du passage du programme 1S au programme 2S.
REMARQUE : les fonctions CUISSON INSTANTANÉE, DÉCONGÉLATION EN FONCTION DU POIDS, DÉCONGÉLATION
RAPIDE et AUTO-PROGRAMME ne peuvent pas être utilisées en mode CUISSON MULTIPROGRAMME.
10
Cuisson auto-programmée
Cettefonctionvouspermetdeprogrammerlacuissond'uncertainnombred'alimentscourants:ilsuftdesélectionnerle
nombre d'unités ou le poids de chaque option pour que le four à micro-ondes sélectionne le temps de cuisson préprogrammé en
conséquence. Voir tableau 4.
Par exemple, pour cuire 300 g de riz à 100 % de puissance :
1. AppuyerdeuxfoissurleboutonCUISSONAUTOMATIQUE( )jusqu'àcequ'AUTO2s'afcheàl'écran.
2. TournerlecadranTEMPS/POIDS( )danslesensdesaiguillesd'unemontrejusqu'àceque300gs'afcheetquel'icône
DÉMARRAGE( )clignote à l'écran.
3. AppuyersurleboutonDÉMARRAGE( )pourcommencerlacuisson.Lefouràmicro-ondescuitpendant20:00minutes.
Parexemple,pourcuire2pommesdeterre(de230gchacune)à100%depuissance:
1. AppuyerquatrefoissurleboutonCUISSONAUTOMATIQUE( )jusqu'àcequ'AUTO4s'afcheàl'écran.
2. TournerlecadranTEMPS/POIDS( )danslesensdesaiguillesd'unemontrejusqu'àceque2s'afcheetquel'icône
DÉMARRAGE( )clignoteàl'écran.
3. AppuyersurleboutonDÉMARRAGE( )pourcommencerlacuisson.Lefouràmicro-ondescuitpendant9:00minutes.
REMARQUE : lestempsprédénispourchaqueprogrammepeuventnepassufrepourcuirelanourritureàvotregoûtàcause
du poids et de la forme de la nourriture. S'assurer que la nourriture est chaude avant de la consommer et la cuire plus longtemps si
nécessaire.Lapuissancedufouràmicro-ondesestautomatiquementrégléesur100%etnepeutpasêtremodiée.
Tableau 4
AUTO-PROGRAMME À UTILISER POUR POIDS/UNITÉS OPTIONS TEMPS DE CUISSON
AUTO 1 Boissons chaudes Partasse(200ml) 1 1:30
2 2:40
3 3:50
AUTO 2 Riz
(ajouterde
l'eaubouillante)
Poids(g) 150 g 16:00
300 g 20:00
450 g 24:00
600 g 28:00
AUTO 3 Pâtes
(ajouterde
l'eaubouillante)
Poids(g) 100 g 22:00
200 g 27:00
300 g 32:00
AUTO 4 Pommes de terre Parunité(230g) 1 5:00
2 9:00
3 13:00
This manual suits for next models
3
Table of contents
Languages:
Other Cooke & Lewis Microwave Oven manuals

Cooke & Lewis
Cooke & Lewis CLBIMW34L User manual

Cooke & Lewis
Cooke & Lewis CLBIMW34L User manual

Cooke & Lewis
Cooke & Lewis CLFSMW20LUKa User manual

Cooke & Lewis
Cooke & Lewis CLBIMW25LUK User manual

Cooke & Lewis
Cooke & Lewis MG25CL User manual

Cooke & Lewis
Cooke & Lewis CLBIMW25LUKa User manual

Cooke & Lewis
Cooke & Lewis CLM1W-C User manual

Cooke & Lewis
Cooke & Lewis CLBIMW34LUKa User manual

Cooke & Lewis
Cooke & Lewis MGO45CL User manual

Cooke & Lewis
Cooke & Lewis 5059340213767 User manual