Cooke & Lewis CLBIMW34LUKa User manual

V10821 BX220IM
5059340213767
CLBIMW34LUKa
5059340213774
CLBIMW34LEUa
213170_s2_s3_5059340213767-5059340213774_C&L_A5_IM_Multi_V02.indd 1213170_s2_s3_5059340213767-5059340213774_C&L_A5_IM_Multi_V02.indd 1 24-08-2021 10:01:2424-08-2021 10:01:24

1 2
IMPORTANT - Please read
carefully the separate safety
guide before use.
IMPORTANT - Lire
attentivement le guide
de sécurité séparé avant
utilisation.
WAŻNE - Przed użyciem
proszę dokładnie zapoznać się
z instrukcją bezpieczeństwa.
IMPORTANT - Vă rugăm
să citiţi cu atenţie ghidul de
siguranţă separat înainte de
utilizare.
IMPORTANTE - Lea
atentamente la guía de
seguridad separado antes de
utilizar.
IMPORTANTE - Leia
atentamente o guía de
segurança separado antes
de usar.
x1
[01] x 1 [02] x 1
[03] x 1 [04] x 1 [05] x 1 [06] x 1
(Ø4 x 32 mm)
213170_s2_s3_5059340213767-5059340213774_C&L_A5_IM_Multi_V02.indd 2213170_s2_s3_5059340213767-5059340213774_C&L_A5_IM_Multi_V02.indd 2 24-08-2021 10:01:2424-08-2021 10:01:24

Product description
Description du produit
Opis produktu
Descrierea produsului
Descripción del producto
Descrição do Produto
4
5
59
5 8
6
7
9
10
Installation
Installation
Instalacja
Instalare
Instalación
Instalação
Use
Utilisation
Użytkowanie
Utilizare
Uso
Utilização
Care & maintenance
Entretien et maintenance
Pielęgnacja i konserwacja
îngrijire și întreținere
Cuidado y mantenimiento
Cuidados e manutenção
17
17 38
24
31
45
52
59 62
60
61
63
64
213170_s2_s3_5059340213767-5059340213774_C&L_A5_IM_Multi_V02.indd 3213170_s2_s3_5059340213767-5059340213774_C&L_A5_IM_Multi_V02.indd 3 24-08-2021 10:01:2524-08-2021 10:01:25

4
Product description
Description du produit
Opis produktu
Descrierea produsului
Descripción del producto
Descrição do Produto
Front view
1. Door Safety Lock 2. Microwave Window 3. Motor Shaft 4. Roller Ring
5. Control Panel 6. Microwave Guide 7. Glass Platter
Vue de face
1. Verrou de sécurité de la porte 2. Vitre du four à micro-ondes 3. Arbre du moteur 4. Anneau à roulettes
5. Panneau de commande 6. Guide du four à micro-ondes 7. Plateau en verre
Widok z przodu
1. Blokada bezpieczeństwa drzwi 2. Okno kuchenki mikrofalowej 3. Oś silnika napędowego 4. Pierścień obrotowy
5. Panel sterowania 6. Płytka mikowa 7. Szklany talerz obrotowy
Vedere din faţă
1. Încuietoare de siguranţă uşă 2. Fereastră cuptor cu microunde 3. Arbore motor 4. Inel rotativ
5. Panou de control 6. Ghid cuptor cu microunde 7. Platou din sticlă
Vista frontal
1. Bloqueo de seguridad de la puerta 2. Ventana del microondas 3. Eje del motor 4. Anillo giratorio
5. Panel de control 6. Guía del microondas 7. Plato de cristal
Vista frontal
1. Bloqueio de segurança da porta 2. Janela do micro-ondas 3. Eixo do motor 4. Anel dos roletes
5. Painel de controlo 6. Guia do micro-ondas 7. Prato de vidro
[04]
[03]
[01] [01]
[06][07]
[02]
[05]
213170_s2_s3_5059340213767-5059340213774_C&L_A5_IM_Multi_V02.indd 4213170_s2_s3_5059340213767-5059340213774_C&L_A5_IM_Multi_V02.indd 4 24-08-2021 10:01:2524-08-2021 10:01:25

Installation
Installation
Instalacja
Instalare
5
WARNING: Do not use the microwave without any food or drink inside the cavity to avoid damaging the appliance and
invalidating your guarantee.
Carefully remove all packaging materials from within the microwave and ensure all parts are received intact.
Ensure that all seals are clean and free of grease and avoid placing any items between the door and seal as this can damage the
seal.
Use warm soapy water and a soft damp cloth to clean the surface of the product. Wipe dry with a clean cloth. Immediately clean
any stains or food from within the microwave cavity.
Avoid using steam cleaners and cleaning products such as abrasive powders, glass wool or scouring pads, as well as domestic
chemicals containing acetone, chlorine or solvents.
WARNING: If the door or door seals are damaged, the microwave must not be operated until it has been repaired by a qualied
service technician. Operate the appliance for its intended purpose only as described in this manual.
This microwave oven is intended for domestic use of heating and cooking of food and drink.
Do not place the microwave on cooking hobs or other heat generating appliances. Place it on a at stable surface such as a
kitchen worktop or specically designed microwave shelf only.
The microwave must not be placed in a cabinet that is not in compliance with the installation instructions. Before maintenance,
deactivate the appliance and disconnect the mains plug from the mains socket.
Do not place the microwave where heat, moisture, or high humidity are generated, or near combustible materials.
Do not operate the microwave without its glass tray, roller support and motor shaft in their proper positions.
Make sure that the power supply cord is undamaged and does not run under the oven or over any hot or sharp surface.
The mains socket must be readily accessible so that the plug can be easily removed in an emergency.
Do not use the oven outdoors.
Before you start
01 Radio Interference
Operation of a microwave oven can cause radio wave interference with other devices operating in its vicinity such as radio,
television, wi-, wireless telephones and similar equipment.
You can reduce or minimize the interference by:
1. Relocating the microwave in relation to the other devices.
2. Changing the orientation between the microwave and the other devices.
3. Ensuring the microwave and other devices are plugged into separate ring mains or circuits.
02 Getting the best from your microwave oven
IMPORTANT: Metal utensils and containers are not allowed to be used in
a microwave oven as they may cause sparks and res.
1. Only use, glass, ceramic and microwave safe plastic containers.
2. Always follow the manufacturer’s guidelines regarding cooking food and drink and ensure it is piping hot before consumption.
3. Cover food during cooking to prevent spattering and stir regularly to ensure heat is distributed evenly.
4. The supplied grill rack [02] is intended for use in GRILL mode only and is used to raise food nearer the heating element built
into the top of the cavity.
Installation
Installation
Instalacja
Instalare
Instalación
Instalação
213170_s2_s3_5059340213767-5059340213774_C&L_A5_IM_Multi_V02.indd 5213170_s2_s3_5059340213767-5059340213774_C&L_A5_IM_Multi_V02.indd 5 24-08-2021 10:01:2524-08-2021 10:01:25

6
AVERTISSEMENT : Ne pas utiliser le four à micro-ondes sans nourriture ou boisson à l’intérieur de la cavité pour éviter
d’endommager l’appareil et de mettre un terme à sa garantie.
Retirer soigneusement tous les matériaux d’emballage de l’intérieur du four à micro-ondes et s’assurer que toutes les pièces sont
reçues intactes.
S’assurer que tous les joints sont propres et exempts de graisse. Éviter de placer des éléments entre la porte et le joint car cela
peut endommager le joint.
Nettoyer la surface du produit à l’eau savonneuse avec un chion doux et humide. Sécher à l’aide d’un chion propre. Nettoyer
immédiatement les taches ou les restes de nourriture dans la cavité du four à micro-ondes.
Éviter l’utilisation de nettoyeurs à vapeur et de produits de nettoyage tels que poudres abrasives, laines de verre ou tampons
à récurer, ainsi que de produits chimiques ménagers contenant de l’acétone, du chlore ou des solvants.
AVERTISSEMENT : Il ne faut pas mettre le four à micro-ondes en marche si la porte ou des joints de porte sont endommagés,
avant d’en avoir coné la réparation à un technicien d’entretien qualié. Utiliser l’appareil pour son but prévu et uniquement
comme décrit dans ce manuel.
Ce four à micro-ondes est destiné à l’utilisation ménagère pour chauer et cuire des aliments et des boissons.
Ne pas placer le four à micro-ondes sur des plaques de cuisson ou d’autres appareils produisant de la chaleur. Le placer plutôt
sur une surface stable, telle qu’un plan de travail de cuisine ou une étagère spécialement conçue pour four à micro-ondes.
Le four à micro-ondes ne doit pas être placé dans un élément de cuisine non conforme aux instructions d’installation. Avant
l’entretien, désactiver l’appareil et débrancher la che secteur de la prise secteur.
Ne pas placer le four à micro-ondes à proximité d’une source de chaleur ou d’humidité ni près de matériaux combustibles.
Ne pas faire fonctionner le four à micro-ondes sans son plateau en verre, son support à roulettes et l’arbre du moteur dans leur
bonne position.
S’assurer que le cordon d’alimentation est intact et ne passe pas sous le four ni sur une surface chaude ou tranchante.
La prise secteur doit être facilement accessible an que la che puisse être retirée aisément en cas d’urgence.
Ne pas utiliser le four en plein air.
Avant de commencer
01 Interférence radio
Le fonctionnement d’un four à micro-ondes peut provoquer des interférences avec d’autres appareils fonctionnant à proximité
comme la radio, la télévision, le Wi-Fi, les téléphones sans l et les équipements similaires.
Il est possible de réduire ou de minimiser cette interférence :
1. En déplaçant le four à micro-ondes par rapport aux autres appareils.
2. En modiant l’orientation entre le four à micro-ondes et les autres appareils.
3. En s’assurant que le four à micro-ondes et les autres appareils sont branchés sur des circuits ou des secteurs séparés.
02 Tirer le meilleur parti de votre four à micro-ondes
IMPORTANT : l'utilisation d'ustensiles et de récipients en métal n'est pas autorisée
dans un four à micro-ondes, car ils peuvent provoquer des étincelles et des incendies.
1. N’utiliser que des récipients en verre, en céramique et en plastique spécial pour four à micro-ondes.
2. Toujours suivre les recommandations du fabricant concernant la cuisson des aliments et des boissons et s’assurer qu’ils sont
chauds avant de les consommer.
3. Couvrir les aliments pendant la cuisson pour empêcher les éclaboussures et remuer régulièrement pour répartir la chaleur
uniformément.
4. La grille fournie [02] est destinée à être utilisée en mode GRILL uniquement et sert à élever la nourriture plus près de
l’élément chauant intégré dans la partie supérieure de la cavité.
Installation
Installation
Instalacja
Instalare
Instalación
Instalação
213170_s2_s3_5059340213767-5059340213774_C&L_A5_IM_Multi_V02.indd 6213170_s2_s3_5059340213767-5059340213774_C&L_A5_IM_Multi_V02.indd 6 24-08-2021 10:01:2524-08-2021 10:01:25

7
OSTRZEŻENIE: Aby uniknąć uszkodzenia urządzenia i unieważnienia gwarancji, nie należy uruchamiać pustej
kuchenki mikrofalowej.
Ostrożnie usunąć ze środka urządzenia wszelkie elementy opakowaniowe i upewnić się, że żadna z części nie została uszkodzona.
Utrzymywać wszystkie uszczelki w czystości (usuwać zabrudzenia z tłuszczu) i nie umieszczać żadnych przedmiotów między
drzwiami urządzenia a uszczelką, ponieważ może spowodować to jej uszkodzenie.
Do czyszczenia powierzchni produktu należy używać ciepłej wody z mydłem oraz miękkiej, wilgotnej szmatki. Wytrzeć do sucha
czystą szmatką. Natychmiast usuwać z wnętrza kuchenki mikrofalowej resztki jedzenia.
Nie używać do czyszczenia urządzenia myjek parowych ani środków czyszczących takich jak proszki ścierne, wata szklana czy
szorstkie czyściki. Unikać także stosowania środków chemii gospodarczej zawierających aceton, chlor lub rozpuszczalniki.
OSTRZEŻENIE: Jeśli drzwi lub uszczelki drzwi są uszkodzone, nie należy uruchamiać urządzenia do czasu jego naprawienia
przez wykwalikowanego specjalistę. Używać urządzenia wyłącznie zgodnie z przeznaczeniem opisanym w niniejszej instrukcji.
Kuchenka mikrofalowa jest przeznaczona wyłącznie do użytku domowego.
Nie wolno stawiać kuchenki na płytach kuchennych ani na innych urządzeniach grzejnych. Ustawić kuchenkę na równej i stabilnej
powierzchni, takiej jak blat kuchenny lub specjalnie zaprojektowana w tym celu półka.
Nie umieszczać kuchenki w szafce, która nie spełnia wymogów zawartych w instrukcji instalacji. Przed przystąpieniem do
konserwacji należy zawsze wyłączyć urządzenie i wyjąć wtyczkę przewodu zasilającego z gniazdka.
Nie ustawiać urządzenia w pobliżu źródeł ciepła, łatwopalnych materiałów ani w miejscach, w których występuje wilgoć lub
wysoka wilgotność.
Nie używać urządzenia bez prawidłowo osadzonego szklanego talerza, pierścienia obrotowego i osi silnika napędowego.
Należy upewnić się, że przewód zasilający nie jest uszkodzony i nie przebiega on pod urządzeniem, nad gorącą powierzchnią ani
ostrymi powierzchniami.
Gniazdo zasilające musi być łatwo dostępne, aby w sytuacji awaryjnej można było szybko odłączyć urządzenie od źródła zasilania.
Nie używać kuchenki mikrofalowej na wolnym powietrzu.
Przed rozpoczęciem użytkowania
01 Zakłócenia radioelektryczne
Działanie kuchenki mikrofalowej może spowodować zakłócenia w działaniu radia, telewizora, urządzeń wi-, telefonów
bezprzewodowych i podobnych urządzeń.
W celu ograniczenia zakłóceń do minimum należy:
1. Zwiększyć odległość pomiędzy kuchenką mikrofalową a innymi urządzeniami.
2. Zmienić położenie kuchenki mikrofalowej względem innych urządzeń.
3. Podłączyć kuchenkę mikrofalową i inne urządzenia do oddzielnych obwodów elektrycznych.
02 Wskazówki dotyczące użytkowania
WAŻNE: W kuchence mikrofalowej nie należy używać metalowych naczyń
i pojemników. Mogą one spowodować iskrzenie, a nawet zapłon urządzenia.
1. Stosować wyłącznie pojemniki plastikowe, szklane i ceramiczne przeznaczone do kuchenek mikrofalowych.
2. Zawsze przestrzegać instrukcji producenta dotyczących podgrzewania potraw i napojów. Przed spożyciem należy sprawdzić
temperaturę potrawy.
3. Podczas gotowania należy przykryć potrawy, aby zapobiec rozpryskiwaniu, a także regularnie je mieszać, aby zapewnić
równomierne rozprowadzanie ciepła.
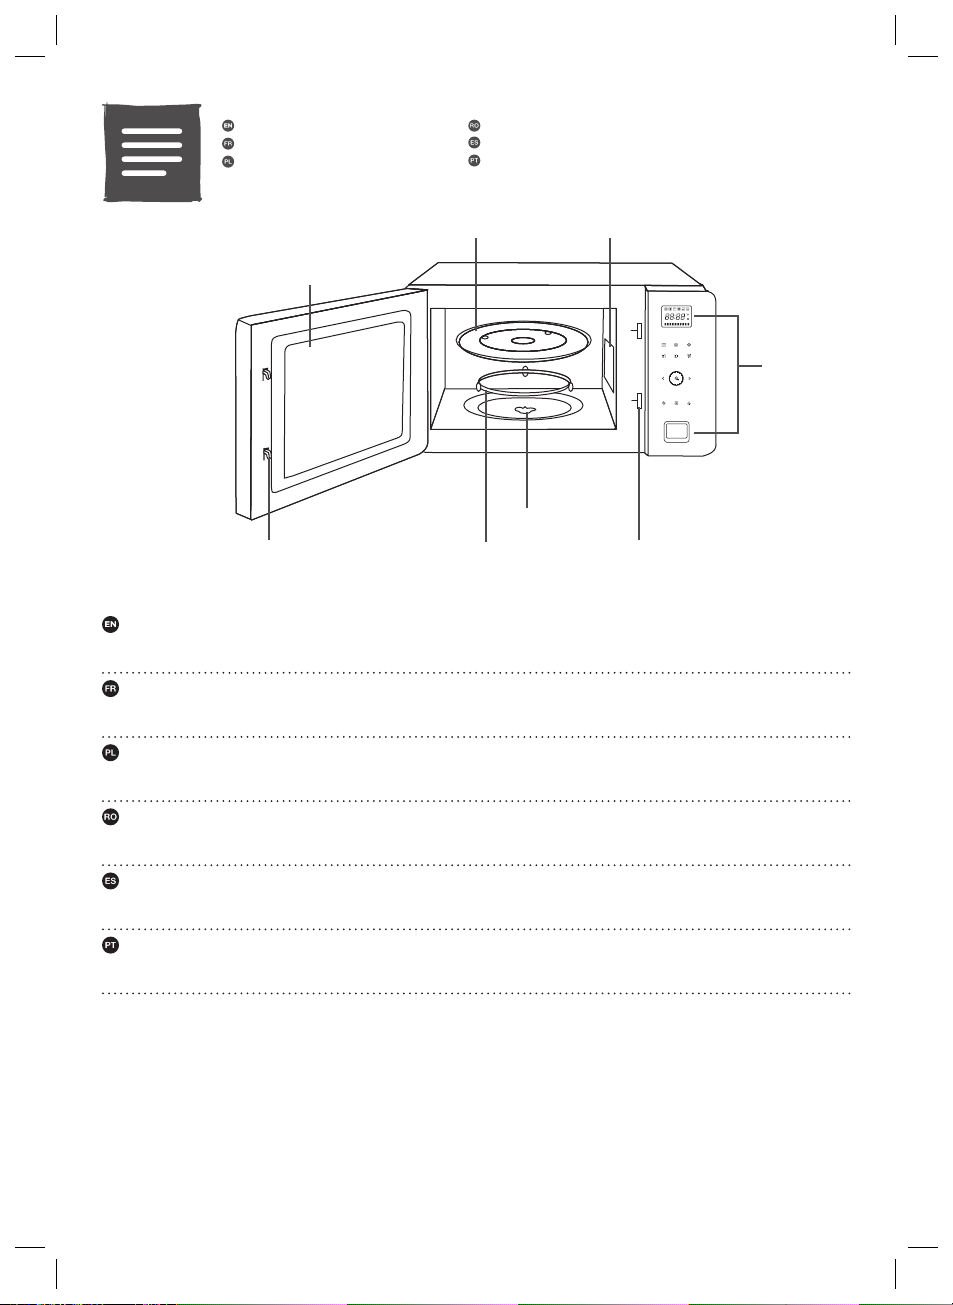
4. W zestawie znajduje się kratka [02], która jest przeznaczona wyłącznie do użytku w trybie GRILL i służy do umieszczania
żywności w pobliżu elementu grzejnego zamontowanego w górnej części wnęki.
Installation
Installation
Instalacja
Instalare
Instalación
Instalação
213170_s2_s3_5059340213767-5059340213774_C&L_A5_IM_Multi_V02.indd 7213170_s2_s3_5059340213767-5059340213774_C&L_A5_IM_Multi_V02.indd 7 24-08-2021 10:01:2624-08-2021 10:01:26

8
AVERTISMENT: Nu utilizaţi cuptorul fără alimente sau băuturi în interiorul incintei, pentru a evita deteriorarea aparatului şi
anularea garanţiei.
Îndepărtaţi cu atenţie toate materialele de ambalare din interiorul cuptorului cu microunde şi asiguraţi-vă că toate piesele sunt
primite intacte.
Asiguraţi-vă că toate garniturile sunt curate şi fără urme de grăsimi şi evitaţi aşezarea oricăror obiecte între uşă şi garnitură,
deoarece acest lucru poate deteriora garnitura.
Utilizaţi apă caldă cu săpun şi o lavetă moale umedă pentru a curăţa suprafaţa produsului. Uscaţi cu o lavetă curată. Curăţaţi
imediat orice pete sau urme de mâncare din interiorul incintei cuptorului cu microunde.
Evitaţi utilizarea aparatelor de curăţare cu aburi şi a produselor de curăţare precum pudrele abrazive, vata de sticlă sau lavetele
de curăţare cu suprafaţă dură, precum şi a substanţelor chimice de uz casnic care conţin acetonă, clor sau solvenţi.
AVERTISMENT: Dacă uşa sau garniturile uşii sunt deteriorate, cuptorul cu microunde nu trebuie folosit până nu este reparat de
către un tehnician de service calicat. Utilizaţi aparatul numai în scopul destinat acestuia, conform descrierii din acest manual.
Cuptorul cu microunde este destinat uzului casnic pentru încălzirea sau gătirea alimentelor şi a băuturilor.
Nu puneţi cuptorul pe plite de gătit sau alte aparate care generează căldură. Amplasaţi-l doar pe o suprafaţă plată şi stabilă,
precum un blat de bucătărie sau o etajeră proiectată special pentru cuptorul cu microunde.
Cuptorul cu microunde nu trebuie să e aşezat într-un dulap care nu este în conformitate cu instrucţiunile de instalare. Înainte de
întreţinere, dezactivaţi aparatul şi scoateţi ştecărul din priză.
Nu aşezaţi cuptorul cu microunde într-un loc în care este generată căldură, umezeală sau multă umiditate sau în apropierea
materialelor inamabile.
Nu utilizaţi cuptorul cu microunde fără tava de sticlă a acestuia, suportul de rotire şi arborele motorului în poziţiile corespunzătoare
ale acestora.
Asiguraţi-vă că nu este deteriorat cablul de alimentare electrică şi că acesta nu trece pe sub cuptor sau peste o suprafaţă încinsă
sau ascuţită.
Priza de la reţea trebuie să e uşor accesibilă astfel încât ştecărul să poată scos cu uşurinţă în caz de urgenţă.
Nu utilizaţi cuptorul în exterior.
Înainte de a începe
01 Interferenţe radio
Folosirea unui cuptor cu microunde poate provoca interferenţe radio cu alte dispozitive care operează în apropiere, precum
aparatele de radio, televizoarele, dispozitive Wi-Fi, telefoanele fără r şi echipamentele similare.
Puteţi reduce sau minimiza interferenţa:
1. Mutând cuptorul la distanţă de celelalte dispozitive.
2. Schimbând orientarea cuptorului cu microunde şi a celorlalte dispozitive.
3. Asigurându-vă că cuptorul şi celelalte dispozitive sunt conectate în prize sau circuite de alimentare diferite.
02 Cum să obţineţi cele mai bune rezultate de la cuptorul dvs. cu
microunde
IMPORTANT: Nu este permisă utilizarea ustensilelor şi recipientelor din metal în
cuptorul cu microunde, deoarece pot provoca scântei şi ăcări.
1. Folosiţi doar recipiente din sticlă, ceramică şi plastic sigur de folosit la microunde.
2. Urmaţi întotdeauna instrucţiunile producătorului în ceea ce priveşte prepararea alimentelor şi băuturilor şi asiguraţi-vă că sunt
foarte erbinţi înainte de a consumate.
3. Acoperiţi mâncarea în timpul preparării pentru a preveni stropirea şi amestecaţi-o regulat pentru a vă asigura că se distribuie
uniform căldura.
4. Raftul pentru grătar [02] furnizat este destinat folosirii doar în modul GRĂTAR şi se utilizează pentru ridicarea mâncării mai
aproape de elementul de încălzire integrat în partea superioară a cuptorului.
Installation
Installation
Instalacja
Instalare
Instalación
Instalação
213170_s2_s3_5059340213767-5059340213774_C&L_A5_IM_Multi_V02.indd 8213170_s2_s3_5059340213767-5059340213774_C&L_A5_IM_Multi_V02.indd 8 24-08-2021 10:01:2624-08-2021 10:01:26

9
ADVERTENCIA: No utilice el microondas sin alimentos o bebidas en el interior de la cavidad para evitar dañar el aparato
y que la garantía quede invalidada.
Retire con cuidado todos los materiales de embalaje del interior del microondas y asegúrese de que todas las piezas se han
recibido intactas.
Asegúrese de que todas las juntas están limpias y libres de grasa, y evite colocar elementos entre la puerta y la junta, ya que
esto podría dañar la junta.
Humedezca un paño en agua templada jabonosa para limpiar la supercie del producto. Seque con un paño limpio. Quite
inmediatamente las manchas o alimentos del interior de la cavidad del microondas.
Evite el uso de limpiadores a vapor y productos de limpieza como polvos abrasivos, lana de vidrio o estropajos abrasivos,
así como productos químicos del hogar que contengan acetona, cloro o disolventes.
ADVERTENCIA: Si la puerta o las juntas están dañadas, debe dejar de utilizarse el microondas hasta que lo haya reparado un
técnico cualicado. Utilice el aparato para su uso previsto solo tal y como se describe en este manual.
Este horno microondas está diseñado para calentar y cocinar comida y bebida en el ámbito doméstico.
El microondas no debe colocarse en un armario que no esté fabricado de conformidad con las instrucciones de instalación. Antes
de realizar el mantenimiento, apague el aparato y desconecte el enchufe de la toma de corriente.
El microondas no debe colocarse en un armario que no esté fabricado de conformidad con las instrucciones de instalación. Antes
de realizar el mantenimiento, apague el aparato y desconecte el enchufe de la toma de corriente.
No coloque el microondas donde se genere calor, vapor o un alto nivel de humedad, así como tampoco cerca de materiales
combustibles.
No utilice el microondas sin la bandeja de cristal, el soporte giratorio y el eje del motor en sus correspondientes posiciones.
Asegúrese de que el cable de alimentación no está dañado y de que no se encuentra debajo del aparato ni sobre cualquier otra
supercie caliente o alada.
Se debe poder acceder fácilmente a la toma de corriente para poder quitar el enchufe rápidamente en caso de emergencia.
No utilice el horno en exteriores.
Antes de empezar
01 Interferencias de radio
El funcionamiento de un horno microondas puede causar interferencias de ondas de radio con otros dispositivos que funcionen
en sus proximidades, como radios, televisores, aparatos de Wi-Fi, teléfonos inalámbricos y otros equipos similares.
Para reducir o minimizar las interferencias:
1. Reubique el microondas en relación con los otros dispositivos.
2. Cambie la orientación entre el microondas y los otros dispositivos.
3. Asegúrese de que el microondas y los otros dispositivos están conectados en tomas de corriente o circuitos diferentes.
02 Cómo sacar el máximo partido de su horno microondas
IMPORTANTE: No se permite el uso de utensilios y recipientes de metal en un
microondas, ya que pueden producir chispas e incendios.
1. Utilice solo recipientes de cristal, cerámica y plástico adecuado para microondas.
2. Siga siempre las directrices del fabricante con respecto a la cocción de comida y bebida y asegúrese de que los productos
están bien calientes antes del consumo.
3. Tape los alimentos durante la cocción para evitar salpicaduras y remuévalos periódicamente para garantizar que el calor se
distribuye de forma uniforme.
4. La parrilla del grill suministrada [02] está pensada para uso en modo GRILL, y sirve para colocar los alimentos más cerca de
la resistencia integrada en la parte superior de la cavidad.
Installation
Installation
Instalacja
Instalare
Instalación
Instalação
213170_s2_s3_5059340213767-5059340213774_C&L_A5_IM_Multi_V02.indd 9213170_s2_s3_5059340213767-5059340213774_C&L_A5_IM_Multi_V02.indd 9 24-08-2021 10:01:2624-08-2021 10:01:26

10
AVISO: Não utilize o micro-ondas sem alimentos ou bebidas dentro do compartimento para evitar danicar o aparelho
e invalidar a sua garantia.
Remova cuidadosamente todos os materiais de embalamento do micro-ondas e certique-se de que todas as peças foram
recebidas intactas.
Certique-se que todos os vedantes estão limpos e sem gordura e evite colocar itens entre a porta e o vedante, dado que isto
pode danicar o vedante.
Use água quente com sabão e um pano macio e húmido para limpar a superfície do produto. Seque com um pano limpo. Limpe
imediatamente quaisquer manchas ou alimentos dentro do compartimento do micro-ondas.
Evite utilizar dispositivos de limpeza a vapor e produtos de limpeza como pós abrasivos, lã de vidro ou esfregões, bem como
produtos químicos domésticos que contenham acetona, cloro ou solventes.
AVISO: Se a porta ou os vedantes da porta estiverem danicados, o micro-ondas não pode ser utilizado até ter sido reparado por um
técnico de manutenção qualicado. Utilize o aparelho exclusivamente para o m a que se destina, tal como descrito neste manual.
Este micro-ondas destina-se a uso doméstico para o aquecimento e cozedura de alimentos e bebidas.
Não coloque o micro-ondas sobre placas de cozinha ou outros aparelhos que produzam calor. Coloque-o apenas sobre uma
superfície plana e estável, como, por exemplo, bancadas de cozinhas ou prateleiras concebidas especicamente para micro-ondas.
O micro-ondas não deve ser colocado num armário que não esteja em conformidade com as instruções de instalação. Antes de
efetuar a manutenção, desative o aparelho e desligue a cha da tomada elétrica.
Não coloque o micro-ondas em locais onde sejam gerados calor, condensação ou humidade elevada, ou na proximidade de
materiais combustíveis.
Não utilize o micro-ondas sem o prato em vidro, o suporte dos roletes e o eixo do motor nas posições adequadas.
Certique-se de que o cabo de alimentação não está danicado e que não passa por baixo do forno ou sobre superfícies quentes
ou aadas.
A tomada elétrica tem de ser de fácil acesso para que a cha possa ser removida facilmente em caso de emergência.
Não utilize o produto no exterior.
Antes de começar
01 Interferências radioelétricas
O funcionamento do forno micro-ondas pode causar interferências radioelétricas noutros dispositivos em funcionamento na
proximidade, tais como rádios, televisões, Wi-Fi, telefones sem os e equipamento semelhante.
É possível reduzir ou minimizar a interferência ao:
1. Reposicionar o micro-ondas em relação aos outros dispositivos.
2. Alterar a orientação entre o micro-ondas e os outros dispositivos.
3. Garantir que o micro-ondas e os outros dispositivos estão ligados a circuitos ou redes de corrente elétrica em separado.
02 Retirar o máximo proveito do seu micro-ondas
IMPORTANTE: Os utensílios e recipientes de metal não devem ser utilizados num
micro-ondas porque podem criar faíscas e incêndios.
1. Utilize apenas recipientes de vidro, cerâmica e de plástico apropriado para micro-ondas.
2. Siga sempre as orientações do fabricante relativamente à cozedura de alimentos e bebidas e certique-se de que estão
quentes antes de os consumir.
3. Cubra os alimentos para evitar salpicos e mexa regularmente para garantir que o calor é distribuído uniformemente.
4. O suporte para grelhar [02] foi concebido para utilização apenas no modo GRILL e é utilizado para elevar os alimentos para
mais perto do elemento de aquecimento integrado na parte superior do compartimento.
Installation
Installation
Instalacja
Instalare
Instalación
Instalação
213170_s2_s3_5059340213767-5059340213774_C&L_A5_IM_Multi_V02.indd 10213170_s2_s3_5059340213767-5059340213774_C&L_A5_IM_Multi_V02.indd 10 24-08-2021 10:01:2624-08-2021 10:01:26

11
01
600 mm
560-568 mm
≥570 mm
380-382 mm
≥45 mm
≥45 mm
Installation of Built-in Microwave Ovens
For correct installation, this product must be installed into a tall oven housing unit.
CAUTION! The panels of the adjacent cabinets must be made of heat-resistant
material. In particular the adhesive that bonds the plastic laminate to the furniture
must be able to withstand temperatures of not less than 120 °C to avoid delamination.
The appliance must be housed in heat-resistant cabinets.
Installation des fours à micro-ondes intégrés
Pour une installation correcte, ce produit doit être installé dans un logement de four de grande taille.
ATTENTION ! Les panneaux des éléments de cuisine adjacents doivent être conçus
à partir de matériaux résistants à la chaleur. La colle permettant de xer le plastique
stratié aux meubles doit notamment pouvoir résister à une température minimale
de 120 °C an d'éviter le décollement. L'appareil doit être installé dans des éléments
résistants à la chaleur.
Montaż kuchenek mikrofalowych do zabudowy
Urządzenie należy zamontować w wysokiej zabudowie na kuchenkę mikrofalową.
UWAGA! Płyty sąsiednich szafek muszą być wykonane z materiału odpornego na
wysokie temperatury. Aby uniknąć delaminacji, klej mocujący laminat z tworzywa
sztucznego do mebla musi być odporny temperaturę co najmniej 120 °C. Urządzenie
musi być umieszczone w szafce odpornej na wysokie temperatury.
213170_s2_s3_5059340213767-5059340213774_C&L_A5_IM_Multi_V02.indd 11213170_s2_s3_5059340213767-5059340213774_C&L_A5_IM_Multi_V02.indd 11 24-08-2021 10:01:2624-08-2021 10:01:26

12
Instalarea cuptoarelor cu microunde încorporate
Pentru instalarea corectă, acest produs trebuie să e instalat într-o carcasă înaltă de cuptor.
ATENŢIE! Panourile dulapurilor adiacente trebuie să e fabricate din materiale
termorezistente. În mod special, adezivul care leagă plasticul laminat de mobilier
trebuie să suporte temperaturi nu mai mici de 120 °C pentru a evita desprinderea părţii
laminate. Aparatul trebuie încastrat în dulapuri rezistente la temperaturi înalte.
Instalación de hornos microondas integrados
Para una instalación correcta, este producto deberá instalarse en un espacio de encastre para horno alto.
PRECAUCIÓN Los paneles de los módulos adyacentes deben estar fabricados de un
material resistente al calor. Especialmente, el adhesivo que une el laminado plástico
al mobiliario debe tener capacidad para resistir temperaturas de 120 °C y superiores
para evitar que el laminado se despegue. El aparato se debe colocar en módulos
resistentes al calor.
Instalação de micro-ondas de encastrar
Para uma instalação correta, este produto deve ser instalado numa unidade alta para instalação de micro-ondas.
ATENÇÃO! Os painéis dos armários adjacentes têm de ser feitos de um material
resistente ao calor. Em particular, o adesivo que xa os laminados de plástico ao
mobiliário tem de ser capaz de suportar temperaturas mínimas de 120 °C para evitar
a delaminação. O aparelho tem de ser instalado em armários resistentes ao calor.
213170_s2_s3_5059340213767-5059340213774_C&L_A5_IM_Multi_V02.indd 12213170_s2_s3_5059340213767-5059340213774_C&L_A5_IM_Multi_V02.indd 12 24-08-2021 10:01:2724-08-2021 10:01:27

13
02
03
[06] x 1
(Ø4 x 32 mm)
[06]
213170_s2_s3_5059340213767-5059340213774_C&L_A5_IM_Multi_V02.indd 13213170_s2_s3_5059340213767-5059340213774_C&L_A5_IM_Multi_V02.indd 13 24-08-2021 10:01:2724-08-2021 10:01:27

14
Installation
All installation must be carried out by a competent person or qualied electrician. Before connecting to the mains supply ensure
that the mains voltage corresponds to the voltage on the rating plate.
This appliance is supplied with a tted plug suitable for use in your country.
The cable must not be bent or compressed.
Regularly check the power cord for damage.
WARNING: This is a Class I appliance and MUST be earthed.
This appliance is supplied with a 3 core mains cable coloured as follows:
Brown = L or Live
Blue = N or Neutral
Green and Yellow = E or Earth
The replacement fuse must be rated at 13 Amps (UK only).
To avoid the risks that are always present when you use an electrical appliance it is important that this appliance is installed
correctly and that you read the safety instructions carefully to avoid misuse and hazards. Please keep this instruction booklet
for future reference and pass it on to any future owners. After unpacking the appliance please check that it is not damaged. If in
doubt, do not use the appliance but contact Customer Services.
The manufacturer declines all liability for damage caused to persons and objects due to incorrect or improper installation of the
appliance. Any permanent electrical installation must comply with the latest wiring regulations applicable to your country and for
your own safety a qualied electrician or contractor should undertake the electrical installation.
Installation
Toute l’installation doit être eectuée par une personne compétente ou un électricien qualié. Avant de raccorder le câble
d’alimentation au secteur, s’assurer que la tension de secteur correspond à la tension indiquée sur la plaque signalétique.
Cet appareil est fourni avec une prise montée, adaptée à une utilisation dans votre pays.
Le câble ne doit pas être plié ou comprimé.
Vérier régulièrement la présence de dommages sur le cordon d’alimentation.
AVERTISSEMENT : Il s’agit d’un appareil de Classe I. Il DOIT être raccordé à la terre.
Cet appareil est livré avec un câble secteur à 3 conducteurs présentant les couleurs suivantes :
Marron = L ou Phase
Bleu = N ou Neutre
Vert et Jaune = E ou Terre
Le fusible de remplacement doit être de 13 A (Royaume-Uni uniquement).
An de prévenir les risques, toujours présents lors de l’utilisation d’un appareil électrique, il est important que cet appareil soit
correctement installé et de lire les instructions de sécurité soigneusement en vue d’empêcher tout danger ou mauvaise utilisation.
Veiller à conserver ce manuel d’instructions pour référence ultérieure et à le transmettre à tout futur propriétaire. Après avoir
déballé l’appareil, vérier qu’il n’est pas endommagé. En cas de doute, ne pas utiliser l’appareil, contacter le service client par
téléphone.
Le fabricant décline toute responsabilité en cas de dommages personnels ou matériels causés par une mauvaise utilisation
ou installation de cet appareil. Toute installation permanente doit être conforme aux dernières réglementations de câblage
applicables dans votre pays et, pour votre propre sécurité, il convient qu’un électricien qualié ou un entrepreneur eectue
l’installation électrique.
213170_s2_s3_5059340213767-5059340213774_C&L_A5_IM_Multi_V02.indd 14213170_s2_s3_5059340213767-5059340213774_C&L_A5_IM_Multi_V02.indd 14 24-08-2021 10:01:2724-08-2021 10:01:27

15
Montaż
Montaż musi zostać wykonany przez osobę kompetentną lub wykwalikowanego elektryka. Przed podłączeniem do sieci należy
upewnić się, że napięcie zasilania odpowiada napięciu na tabliczce znamionowej.
Urządzenie jest dostarczane z wtyczką odpowiadającą standardom w danym kraju.
Przewód nie może być zagięty ani przygnieciony.
Należy regularnie sprawdzać przewód zasilania pod kątem uszkodzeń.
OSTRZEŻENIE: Jest to urządzenie klasy I i MUSI być uziemione.
Urządzenie jest dostarczane z 3-żyłowym przewodem zasilającym o następujących kolorach:
Brązowy = L (Pod napięciem)
Niebieski = N (Neutralny)
Zielono-żółty = E (Uziemienie)
Należy zastosować bezpiecznik 13 A (dotyczy tylko Wielkiej Brytanii).
Aby ograniczyć do minimum ryzyko związane z użytkowaniem urządzenia elektrycznego, niezwykle ważne jest, aby produkt
został prawidłowo zamontowany oraz aby użytkownik dokładnie zapoznał się z instrukcjami dotyczącymi bezpieczeństwa i unikał
nieprawidłowej obsługi oraz związanych z tym zagrożeń. Należy zachować instrukcję obsługi w celu wykorzystania w przyszłości
i przekazania jej kolejnym właścicielom. Po rozpakowaniu urządzenia upewnić się, że nie jest ono uszkodzone. W razie
wątpliwości nie należy używać urządzenia, lecz skontaktować się z działem obsługi klienta.
Producent nie ponosi żadnej odpowiedzialności za obrażenia ciała lub uszkodzenia mienia powstałe na skutek nieprawidłowego
lub nieodpowiedniego montażu urządzenia. Wszelkie stałe instalacje elektryczne muszą być zgodne z najnowszymi przepisami
dotyczącymi okablowania, obowiązującymi w danym kraju. Dla własnego bezpieczeństwa należy zlecić montaż instalacji
elektrycznej wykwalikowanemu elektrykowi lub wykonawcy.
Instalarea
Toate operaţiunile de instalare trebuie efectuate de o persoană competentă sau un electrician calicat. Înainte de conectarea la
reţeaua electrică, asiguraţi-vă că tensiunea reţelei corespunde tensiunii specicate pe plăcuţă.
Aparatul este furnizat cu un ştecăr adecvat utilizării în ţara dvs.
Cablul nu trebuie să e îndoit sau comprimat.
Vericaţi periodic cablul pentru a depista deteriorările.
AVERTISMENT: Acesta este un aparat Clasa I şi TREBUIE împământat.
Acest aparat este echipat cu 3 re colorate după cum urmează:
Maro = L sau sub tensiune
Albastru = N sau nul
Verde şi galben = E sau împământare
Siguranţa de schimb trebuie să aibă 13 Amperi (numai pentru Marea Britanie).
Pentru a evita riscurile aferente utilizării unui echipament electric, este important ca acest aparat să e instalat corect şi să citiţi cu
atenţie instrucţiunile de siguranţă în vederea evitării utilizării greşite şi a pericolelor. Păstraţi această broşură cu instrucţiuni pentru
consultare ulterioară şi predaţi-o proprietarilor viitori. După despachetarea aparatului, vericaţi să nu e deteriorat. Dacă aveţi
îndoieli, nu folosiţi aparatul şi contactaţi serviciul de asistenţă clienţi.
Producătorul nu îşi asumă răspunderea pentru vătămări sau daune cauzate persoanelor sau obiectelor din cauza instalării
necorespunzătoare sau incorecte a aparatului. Toate instalaţiile electrice permanente trebuie să e conforme cu cele mai recente
reglementări de cablare aplicabile la nivel naţional, iar pentru siguranţa dumneavoastră instalaţia electrică trebuie să e realizată
de un electrician sau contractant calicat.
213170_s2_s3_5059340213767-5059340213774_C&L_A5_IM_Multi_V02.indd 15213170_s2_s3_5059340213767-5059340213774_C&L_A5_IM_Multi_V02.indd 15 24-08-2021 10:01:2724-08-2021 10:01:27

16
Instalación
Toda la instalación deberá ser realizada por una persona competente o un electricista cualicado. Antes de conectar la corriente
eléctrica, asegúrese de que la tensión de la red se corresponde con la indicada en la placa de características técnicas.
Este aparato se suministra con un enchufe incluido adecuado para el uso en su país.
El cable no debe quedar doblado ni comprimido.
Compruebe regularmente el cable de alimentación en busca de daños.
ADVERTENCIA: Este es un dispositivo de Clase I y DEBE conectarse a tierra.
Este aparato se suministra con un cable de alimentación de 3 conductores coloreados como sigue:
Marrón = L o fase
Azul = N o neutro
Verde y amarillo = E o tierra
El fusible de repuesto debe ser de 13 amperios (solo Reino Unido).
Para evitar los riesgos que están siempre presentes al utilizar un aparato eléctrico es importante que este dispositivo se instale
correctamente y leer las instrucciones de seguridad cuidadosamente para evitar un mal uso y situaciones peligrosas. Conserve
este manual para futura referencia y páselo a cualquier futuro propietario. Después de desembalar el aparato, compruebe que no
está dañado. En caso de duda, no utilice el aparato y póngase en contacto con el servicio de atención al cliente.
El fabricante se exime de toda responsabilidad por daños personales o materiales que se puedan causar como resultado de la
instalación inadecuada o incorrecta del aparato. Las instalaciones eléctricas permanentes deben cumplir con las últimas normas
de instalación de su país y para su propia seguridad, deberían realizarlas electricistas o contratistas cualicados.
Instalação
A instalação tem de ser efetuada por uma pessoa competente ou por um eletricista qualicado. Antes de ligar à rede elétrica,
certique-se de que a tensão da rede corresponde à tensão na placa de classicação.
Este aparelho é fornecido com uma cha adequada ao seu país.
O cabo não pode ser dobrado nem comprimido.
Verique regularmente se existem danos no cabo elétrico.
AVISO: Este é um aparelho de Classe I e TEM DE estar ligado à terra.
Este aparelho é fornecido com um cabo de alimentação de 3 núcleos, colorido da seguinte forma:
Castanho = L ou fase
Azul = N ou neutro
Verde e amarelo = E ou terra
O fusível sobresselente tem de estar classicado como 13 A (apenas para o Reino Unido).
Para evitar os riscos que estão sempre presentes quando utiliza um aparelho elétrico, é importante que este aparelho esteja
instalado corretamente e que leia as instruções de segurança cuidadosamente para evitar usos indevidos e perigos. Guarde este
manual de instruções para consulta futura e entregue-o a futuros proprietários. Depois de desembalar o aparelho, verique se
não está danicado. Em caso de dúvida, não use o aparelho e entre em contacto com o serviço de atendimento ao cliente.
O fabricante está isento de qualquer responsabilidade por danos pessoais ou materiais resultantes de uma instalação incorreta
ou inadequada do aparelho. Qualquer instalação elétrica permanente deve estar em conformidade com a mais recente
regulamentação aplicável a cablagem para o seu país e, para a sua própria segurança, a instalação elétrica deve ser efetuada
por um eletricista qualicado ou um empreiteiro.
213170_s2_s3_5059340213767-5059340213774_C&L_A5_IM_Multi_V02.indd 16213170_s2_s3_5059340213767-5059340213774_C&L_A5_IM_Multi_V02.indd 16 24-08-2021 10:01:2724-08-2021 10:01:27

17
Use
Utilisation
Użytkowanie
Utilizare
Uso
Utilização
01 Control panel
Microwave Mode ( )
Use to set the power level of the microwave.
Grill / Combi Mode ( )
Use to select the grill or combination microwave option.
Convection Mode ( )
Use to select convection cooking and set the oven temperature.
Weight Defrost dEF1 ( )
Use for defrosting food by weight.
Time Defrost dEF2 ( )
Use for defrosting food by time.
COUNTDOWN TIMER ( )
Use for setting a timer alarm.
START / +30S ( )
Use to start cooking instantly or commence a program.
CLOCK SET ( )
Use to set the oven clock.
Pause / Cancel ( )
Use to temporarily pause a cooking program or cancel a program
altogether.
ChildLock ( )
Use for locking the control panel.
02 Display panel
Microwave Mode
Convection Mode
Grill Mode
Defrost Mode
Childlock Indicator
Autocook Mode
Temperature Selector (ºC)
Weight Indicator (grams)
Temperature Bar Indicator (130-220 ºC)
Note: Each bar represents 10 ºC
213170_s2_s3_5059340213767-5059340213774_C&L_A5_IM_Multi_V02.indd 17213170_s2_s3_5059340213767-5059340213774_C&L_A5_IM_Multi_V02.indd 17 24-08-2021 10:01:2824-08-2021 10:01:28

18
03 Using the microwave for the rst time
• When the oven is rst plugged in and turned on, there will be a beep and the display will show “0:00”.
• It is recommended that you set the clock to the current time before further use to ensure all functions are fully operable.
04 Setting the clock
To set the clock, rst press the CLOCK ( ) button once. Each press of the button will beep.
1. The hours number will ash and press the > button to select the hours between 0 - 23.
2. Press the CLOCK ( ) button again.
3. Press the > button again to select the minutes between 0 - 59.
4. Press the CLOCK ( ) button once more to conrm the setting and the current time is saved.
NOTE: To exit from the clock setting menu at any time, press the PAUSE / CANCEL ( ) button once.
You can use the < or > buttons to select the time and holding down your nger on each button will allow you to scroll faster
through various menu options.
05 Instant cooking
This feature allows you to start cooking instantly on full power.
Press the START/+30S ( ) button once and the microwave will start cooking at full power for 30 seconds. Each consecutive press
of the START/+30S ( ) button will increase the time in 30 second increments during cooking to a maximum time of 95 minutes.
Alternatively, to program a time for instant cooking, for example 2 minutes, rst press the < button and 95.00 will be displayed.
Then press the > button and the clock increases from 0:05 to the time you desire, in this case 2:00. Press the START/+30S ( )
button once to commence cooking.
If you wish to pause the cooking program at any time, press the PAUSE / CANCEL ( ) button once and then the START/+30S
() button to recommence cooking. To cancel cooking completely, press the PAUSE / CANCEL ( ) button twice. After cooking
has nished, the microwave will beep ve times.
06 Programmable cooking
This feature allows you to cook on full power or reduce the power output of the microwave and program a cooking time up to
a maximum of 95 minutes. There are 10 power levels available, see Table 1.
Table 1
DISPLAY
ICON
MICROWAVE
POWER
SETTING
MICROWAVE
POWER
OUTPUT
GRILL
POWER
SETTING
GRILL
POWER
INPUT
CONVECTION
POWER
SETTING
CONVECTION
POWER INPUT
P100 100 % 1000 W 0 % 0 W 0 % 0 W
P80 80 % 800 W 0 % 0 W 0 % 0 W
P50 50 % 500 W 0 % 0 W 0 % 0 W
P30 30 % 300 W 0 % 0 W 0 % 0 W
P10 10 % 100 W 0 % 0 W 0 % 0 W
G 0 % 0 W 100 % 1100 W 0 % 0 W
C-1 48 % 480 W 0 % 0 W 52 % 1300 W
C-2 48 % 480 W 100 % 1100 W 0 % 0 W
C-3 0 % 0 W 100 % 1100 W 100 % 2500 W
C-4 28 % 280 W 72 % 792 W 72 % 1800 W
There are three ways of using this feature.
213170_s2_s3_5059340213767-5059340213774_C&L_A5_IM_Multi_V02.indd 18213170_s2_s3_5059340213767-5059340213774_C&L_A5_IM_Multi_V02.indd 18 24-08-2021 10:01:2824-08-2021 10:01:28

19
07 Cooking on full microwave power
For example, to cook at 100 % full power for 1 minute:
1. Press the MICROWAVE ( ) button once and P100 will ash in the display.
2. Press the START/+30S ( ) button to conrm the selection and P100 will remain lit.
3. Press the > button until 1:00 is displayed.
4. Press the START/+30S ( ) button to commence cooking.
08 Cooking on reduced microwave power
For example, to cook at 50 % reduced power for 3 minutes:
1. Press the MICROWAVE ( ) button three times and P50 will ash in the display.
2. Alternatively, press the MICROWAVE ( ) button once and P100 is displayed and then press the < or > button until P50 is
displayed.
3. Press the START/+30S ( ) button to conrm selection.
4. Press the > button until 3:00 is displayed.
5. Press the START/+30S ( ) button to commence cooking.
09 Cooking on grill or combined microwave and grill power
For example, to cook at 48 % microwave power and 100 % grill power for 10 minutes:
• Press the GRILL / COMBI ( ) button three times and C-2 is displayed.
• Alternatively, press the GRILL / COMBI ( ) button and G is displayed, and then press the > button until C-2 is displayed.
• Press the START/+30S ( ) button to conrm selection.
• Press the > button until 10:00 is displayed.
• Press the START / +30S ( ) button to commence cooking and the oven will beep once when the programs change.
During the use of the Grill function G, the oven will beep twice halfway through the programmed cooking time to remind you to
turn the food. Press the PAUSE / CANCEL ( ) button to temporarily stop cooking and when ready, press the START/+30S ( )
button to recommence cooking.
The grill rack [02] is for use during grilling only, program G, and this can be selected independently by pressing the
GRILL / COMBI ( ) button. Do not use the grill rack for microwave cooking.
Additionally, there are two further ways to use the CONVECTION COOKING feature. The temperature range available is
130-220 °C for a maximum of 95 minutes. Do not use the grill rack for microwave cooking.
10 Cooking on convection power – without preheating
For example, to cook at 160 °C convection power for 20 minutes:
• Press the CONVECTION ( ) button once and 130 °C will ash in the display and the rst temperature indicator will be lit.
• Press the > button until 160 °C is ashing and the fourth temperature indicator will be lit.
• Press the START/+30S ( ) button to conrm the temperature selection.
• Press the > button until 20:00 is displayed.
• Press the START/+30S ( ) button to commence cooking.
NOTE: If the CONVECTION function is used from cold, then the rst few minutes of cooking will be used up to heat the oven to
the required temperature, which may mean your food is underdone. If you need to preheat the oven before cooking starts, see the
following section. You can monitor the temperature inside the oven using the ashing indicators in the display with each indicator
representing a temperature rise of 10 °C. For example, four lit indicators and a ashing fth indicator shows that the oven has
reached 160 °C and is heating to 170 °C.
11 Cooking on convection power – with preheating
For example, to cook at 180 °C convection power for 25 minutes:
• Press the CONVECTION ( ) button once and 130 °C will ash in the display and the rst temperature indicator will be lit.
• Press the > button until 180 °C is ashing and the sixth temperature indicator will be lit.
• Press the START/+30S ( ) button to conrm the temperature selection.
213170_s2_s3_5059340213767-5059340213774_C&L_A5_IM_Multi_V02.indd 19213170_s2_s3_5059340213767-5059340213774_C&L_A5_IM_Multi_V02.indd 19 24-08-2021 10:01:2924-08-2021 10:01:29

20
• Press the START/+30S ( ) button to commence preheating.
• The temperature gauge will ash as the oven warms up and when the correct temperature is reached there will be two beeps
to remind you to put the food in the oven.
• Once the door is closed, press the > button until 25:00 is displayed.
• Press the START/+30S ( ) button to commence cooking.
IMPORTANT: When programming the cooking time by pressing the < or > buttons, the display will increase at a dierent rate
based upon the length of time required, see Table 2.
Table 2
REQUIRED COOKING TIME TIME INCREMENT
0:05 – 1:00 5 seconds
1:10 – 5:00 10 seconds
5:30 – 10:00 30 seconds
11:00 – 30:00 1 minute
35:00 – 95:00 5 minutes
NOTE: As for INSTANT COOKING, if you are using GRILL, COMBI or CONVECTION mode you can increase the time during
cooking by increments of 30 seconds at a time with each consecutive press of the START/+30S ( ) button. This cooking time
can be increased to a maximum of 95 minutes.
12 Weight defrost
The microwave can be used to defrost food and calculates the required time based upon the frozen weight programmed in the
range 100g to 2000g, see Table 3. The program P30 is automatically selected and cannot be changed.
Table 3
FROZEN WEIGHT (g) DEFROST TIME (minutes)
100 3:30
200 5:20
300 7:10
400 9:00
500 10:50
600 12:40
700 14:30
800 16:20
900 18:10
1000 20:00
1100 21:50
1200 23:40
1300 25:30
1400 27:20
1500 29:10
1600 31:00
1700 32:50
1800 34:40
1900 36:30
2000 38:20
For example, to defrost 600g of meat:
1. Press the WEIGHT DEFROST ( ) button once and “dEF1” is displayed.
2. Press the < or > buttons until 600g is displayed.
3. Press the START/+30S ( ) button to commence defrosting.
213170_s2_s3_5059340213767-5059340213774_C&L_A5_IM_Multi_V02.indd 20213170_s2_s3_5059340213767-5059340213774_C&L_A5_IM_Multi_V02.indd 20 24-08-2021 10:01:2924-08-2021 10:01:29
This manual suits for next models
3
Table of contents
Languages:
Other Cooke & Lewis Microwave Oven manuals

Cooke & Lewis
Cooke & Lewis MG25CL User manual

Cooke & Lewis
Cooke & Lewis CLFSMW20LUK User manual

Cooke & Lewis
Cooke & Lewis CLBIMW34L User manual

Cooke & Lewis
Cooke & Lewis CLBIMW34L User manual

Cooke & Lewis
Cooke & Lewis 5059340213767 User manual

Cooke & Lewis
Cooke & Lewis CLBM1SS-C User manual

Cooke & Lewis
Cooke & Lewis CLBIMW25LUKa User manual

Cooke & Lewis
Cooke & Lewis CLFSMW20LUKa User manual

Cooke & Lewis
Cooke & Lewis CLM1W-C User manual

Cooke & Lewis
Cooke & Lewis CLBIMW25LUK User manual