Cooks 780-4343 User manual

Air Fryer
3.7QT
Owner’s Manual
Lot No. 780-4343
SO-316258_22288_3.7qt_AirFryer_IM_r4.indd 1 2019-07-12 3:14 PM

SO-316258_22288_3.7qt_AirFryer_IM_r4.indd 2 2019-07-12 3:14 PM

3
IMPORTANT SAFEGUARDS
When using electrical appliances, basic safety precautions should always be followed, including the following:
1. READ ALL INSTRUCTIONS.
2. Do not touch hot surfaces. Use handles or knobs. Use oven mitts or potholders.
3. To protect against electric shock do not immerse cord, plugs, or appliance in water or other liquid.
4. This appliance is not intended for use by persons (including children) with reduced physical, sensory or mental
capabilities, or lack of experience and knowledge, unless they have been given supervision or instruction concerning
use of the appliance by a person responsible for their safety.
5. Children should be supervised to ensure that they do not play with the appliance.
6. Unplug from outlet when not in use and before cleaning. Allow to cool before putting on or taking off parts, and before
cleaning the appliance.
7. Do not operate any appliance with a damaged cord or plug or after the appliance malfunctions, or has been damaged
in any manner. Bring it to a qualified technician for examination, repair or electrical or mechanical adjustment.
8. The use of accessory attachments not recommended by the appliance manufacturer may cause injuries.
9. Do not use outdoors.
10. Do not let cord hang over edge of table or counter, or touch hot surfaces.
11. Do not place on or near a hot gas or electric burner, or in a heated oven.
12. Extreme caution must be used when moving an appliance containing hot oil or other hot liquids.
13. Always attach plug to appliance first, then plug cord into the wall outlet. To disconnect, turn any control to “off”,
then remove plug from wall outlet.
14. Do not use appliance for other than intended use.
SO-316258_22288_3.7qt_AirFryer_IM_r4.indd 3 2019-07-12 3:14 PM

4
15. Make sure the crisping tray is in place before adding food to be air fried.
16. Make sure the frying basket is locked securely into the front of the Air Fryer, while the Air Fryer is in operation.
WARNING: the Air Fryer will not turn ON unless the frying basket is fully closed,
and the timer dial has been set.
CAUTION: After hot air frying, extreme caution must be used when handling the hot frying basket,
crisping tray, and cooked foods.
17. Do not clean with metal scouring pads. Pieces can break off the pad and touch electrical parts, creating a risk of
electric shock.
FOR HOUSEHOLD USE ONLY
SAVE THESE INSTRUCTIONS
SO-316258_22288_3.7qt_AirFryer_IM_r4.indd 4 2019-07-12 3:14 PM

5
ADDITIONAL IMPORTANT SAFEGUARDS
CAUTION HOT SURFACES: This appliance generates heat and escaping steam during use.
Proper precautions must be taken to prevent the risk of burns, fires or other injury to persons or damage to property.
CAUTION: This appliance is hot during operation and retains heat for some time after turning OFF. Always use oven mitts
when handling hot materials and allow metal parts to cool before cleaning. Do not place anything on top of the appliance
while it is operating or while it is hot.
1. All users of this appliance must read and understand this instruction manual before operating or cleaning this appliance.
2. The cord to this appliance should be plugged into a 120V AC electrical outlet only.
3. If this appliance begins to malfunction during use, immediately unplug the cord. Do not use or attempt to repair the
malfunctioning appliance.
4. Do not leave this appliance unattended during use.
5. Do not immerse power cord in any liquid. If the power cord to this appliance is damaged, it must be replaced by
contacting Consumer Service.
6. Keep the cord out of reach from children and infants to avoid the risk of electric shock and choking.
7. Place the Air Fryer on a flat, heat-resistant work area.
8. Do not obstruct the air outlet or air inlets on the back and sides of the Air Fryer, with any objects. Avoid escaping steam
from the air outlet during air frying.
9. Keep appliance at least 4 inches away from walls or other objects during operation.
10. Always use the frying basket handle to remove the frying basket.
11. WARNING: After air frying, make sure to place the frying basket on a flat, heat-resistant surface.
12 WARNING: Under or over-filling the frying basket may damage the Air Fryer and could result in serious
personal injury.
13. Never move a hot Air Fryer or an Air Fryer containing hot food. Allow to cool before moving.
SO-316258_22288_3.7qt_AirFryer_IM_r4.indd 5 2019-07-12 3:14 PM

6
NOTES ON THE PLUG
This appliance has a polarized plug (one blade is wider than the other). To reduce the risk of electric shock, this plug will
fit in a polarized outlet only one way. If the plug does not fit fully into the outlet, reverse the plug. If it still does not fit,
contact a qualified electrician. Do not modify the plug in any way.
NOTES ON THE CORD
A. A short power-supply cord (or detachable power-supply cord) is to be provided to reduce the risk resulting from becoming
entangled in or tripping over a longer cord.
B. Longer detachable power-supply cords or extension cords are available and may be used if care is exercised in their use.
C. If a long detachable power-supply cord or extension cord is used :
1. The marked electrical rating of the cord or extension cord should be at least as great as the electrical rating of the appliance;
2. If the appliance is of the grounded type, the extension cord should be a grounding-type3-wire cord;
3. The longer cord should be arranged so that it does not drape over the countertop or table top where it can be pulled on
by children or tripped over unintentionally.
PLASTICIZER WARNING
CAUTION: To prevent Plasticizers from migrating to the finish of the counter top or table top or other furniture, place
NON-PLASTIC coasters or place mats between the appliance and the finish of the counter top or table top. Failure to do so
may cause the finish to darken; permanent blemishes may occur or stains can appear.
ELECTRIC POWER
If the electrical circuit is overloaded with other appliances, your appliance may not operate properly. It should be operated
on a separate electrical circuit from other appliances.
SO-316258_22288_3.7qt_AirFryer_IM_r4.indd 6 2019-07-12 3:14 PM

7
GETTING TO KNOW YOUR 3.7QT AIR FRYER
Product may vary slightly from illustrations
Figure 1
Blue HEAT ON Light
Red POWER Light
60 Minute Timer Dial
Cool Touch
Frying Basket
Handle
Frying Basket
Crisping Tray
Power Cord
with Polarized Plug
SO-316258_22288_3.7qt_AirFryer_IM_r4.indd 7 2019-07-12 3:14 PM

8
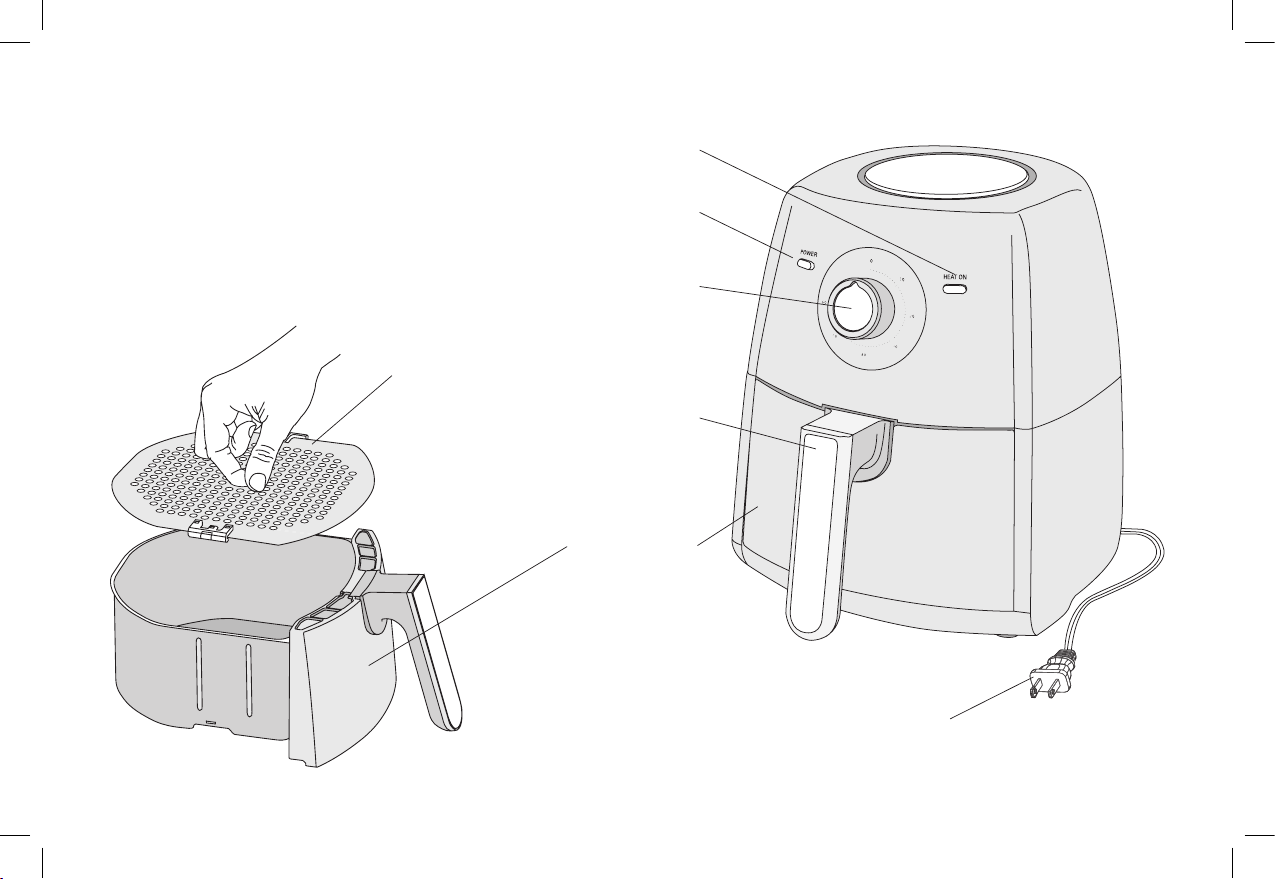
60 MINUTE COUNTDOWN TIMER DIAL
• Turn the timer dial to the desired cook time to turn the Air Fryer ON and OFF.
NOTE: the Air Fryer will not turn ON unless the timer dial is turned.
• Once the timer dial is set, both the red POWER light and blue HEAT ON light will illuminate to show the Air Fryer
is powered ON.
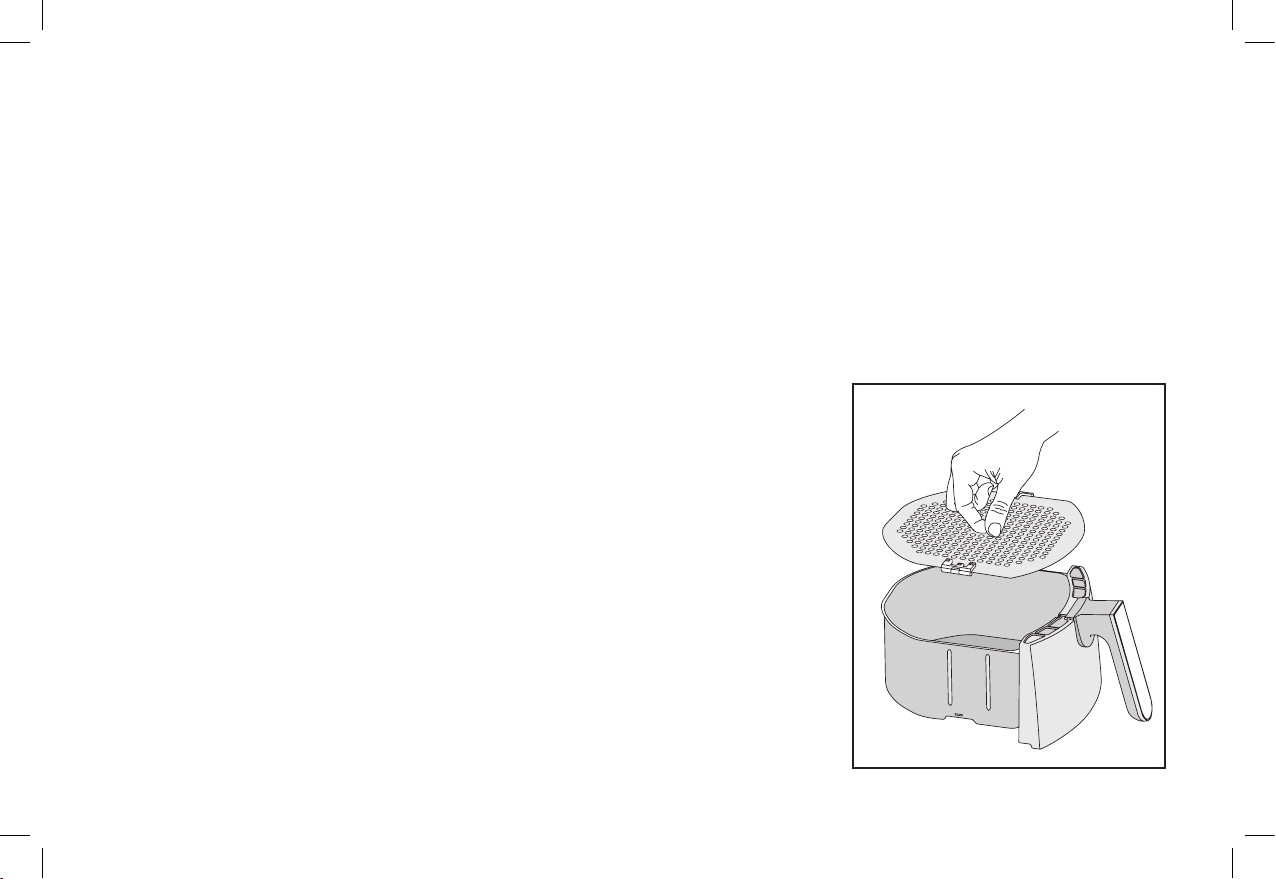
• To ensure even cooking/browning, open the frying basket halfway through the cooking time. Check, turn or vigorously
shake foods in the frying basket.
IMPORTANT: When you pull the frying basket out from the Air Fryer body, both the red POWER light, blue HEAT ON
light and the Air Fryer will turn OFF. The timer will continue to count down when the frying basket is removed.
Heating will resume when the frying basket is replaced.
• One beep will sound when the 60-minute countdown timer reaches 0 (OFF). Both the red POWER light and the blue
HEAT ON light will turn off. the Air Fryer will turn OFF automatically.
IMPORTANT: When all air frying is finished, turn the timer dial to 0 (OFF). Unplug the Air Fryer when not in use.
BLUE HEAT ON LIGHT
• The blue HEAT ON light will illuminate when the timer dial is turned, and the Air Fryer is turned ON.
The blue HEAT ON light will remain illuminated until 400ºF has been reached.
• The blue HEAT ON light and heating element cycle on and off as the temperature is maintained.
• One beep will sound when the set air frying time reaches 0 (OFF). The blue HEAT ON light will turn off and
the Air Fryer will turn OFF automatically.
RED POWER LIGHT
• Once the timer dial is turned, the red POWER light will illuminate to show the Air Fryer is heating.
• When you pull the frying basket out from the Air Fryer body, the red POWER light and the Air Fryer will turn OFF.
The timer will continue to count down when the basket is opened. Check food and increase cook time if necessary.
• One beep will sound when the set air frying time reaches 0 (OFF). The red POWER light will turn off and the Air Fryer
will turn OFF automatically.
SO-316258_22288_3.7qt_AirFryer_IM_r4.indd 8 2019-07-12 3:14 PM

9
BEFORE USING FOR THE FIRST TIME
1. Your Air Fryer is shipped with the frying basket locked inside the Air Fryer body. Firmly grasp the frying basket handle
to remove the frying basket and place on a flat, clean work area.
2. Remove all packing material and labels from the inside and outside of the Air Fryer. Use the center hole of the crisping
tray to lift it up and out of the frying basket. (See Figure 2.) Check that there is no packaging underneath and around
the frying basket and crisping tray.
3. Wash frying basket and crisping tray in hot, soapy water.
4. DO NOT IMMERSE THE AIR FRYER BODY IN WATER. Wipe Air Fryer body with a damp cloth. Dry all parts thoroughly.
5. Following the shape of the frying basket, turn the crisping tray with the flattened edge facing the handle. Drop the tray
down so that the 4 rubber side grips fit snugly into the base of the basket. (See Figure 2.)
6. Insert and lock the clean frying basket into the front of the Air Fryer.
OPERATING INSTRUCTIONS
WARNING! This unit should not be used to boil water or heat oil.
NOTE: During first use, the Air Fryer may emit a slight odor.
This is normal and will not affect food cooked.
1. Place the Air Fryer on a flat, heat-resistant work area, close to an
electrical outlet.
2. Firmly grasp the frying basket handle to remove frying basket and place
on a flat, clean surface.
3. Make sure the crisping tray is fitted into the base of the frying basket.
(See Figure 2.)
4. Arrange food on top of the crisping tray. Do not overfill frying basket with food.
To ensure proper cooking and air circulation, NEVER fill any frying basket more
than 2/3 full. When air frying fresh vegetables, we do not recommend adding
more than 2 to 3 cups of food to the frying basket.
SO-316258_22288_3.7qt_AirFryer_IM_r4.indd 9 2019-07-12 3:14 PM

10
5. Fully insert the frying basket into the front of the Air Fryer.
6. Plug cord in a 120V AC electrical wall outlet.
7. Turn the timer dial to the desired air frying time plus 3 minutes for preheat if the Air Fryer is cold. The blue HEAT ON
light and the red POWER light will illuminate; the Air Fryer will begin heating.
IMPORTANT: The Air Fryer will not heat if the timer dial has not been turned or if the frying basket is not fully closed.
8. The blue HEAT ON light will turn off when 400ºF is reached.
NOTE: During air frying, the blue HEAT ON light will cycle on and off as proper air frying temperature is maintained.
9. To assure even cooking/browning, open the frying basket halfway through the cooking time and check, turn or shake
foods in the frying basket. Adjust time if needed.
NOTE: The timer will continue to count down when the frying basket is removed, but the Air Fryer will stop heating
until the frying basket is replaced.
WARNING: Extreme caution must be used when handling the hot frying basket and crisping tray. Always use oven
mitts. Avoid escaping steam from the frying basket and the food.
NOTE: The Air Fryer can be turned OFF at any time by turning the timer dial to 0 (OFF).
CAUTION: Always use a pair of tongs or a long handled fork to remove food from the frying basket.
To avoid spilling hot oil, NEVER turn the basket containing air fried foods upside down.
10. One beep will sound when the set air frying time has expired. The Air Fryer will turn OFF automatically.
Both the red POWER light and the blue HEAT ON light will turn off.
11. Shake the frying basket vigorously and check food for browning and doneness. If additional air frying is needed,
set timer for 2 minute increments until fully cooked.
12. Allow cooked food to rest for 5 to 10 seconds before removing frying basket from Air Fryer or food from
the crisping tray.
13. When air frying is finished, remove the frying basket from the machine and place on a flat, heat resistant surface.
SO-316258_22288_3.7qt_AirFryer_IM_r4.indd 10 2019-07-12 3:14 PM

11
14. Use tongs or a long handled fork to remove air fried food onto a serving plate. Promptly replace the frying basket
into the front of the Air Fryer. Continue with subsequent batches, if any.
15. When all air frying is completed, turn the timer dial to 0 (OFF). One beep will sound and both the red POWER light
and the blue HEAT ON light will turn off.
16. Unplug the Air Fryer when not in use.
HELPFUL HINTS
1. Your Air Fryer maintains a steady 400ºF high heat, ideal for crisping and browning. The blue HEAT ON light will turn
off when temperature is reached.
2. Many spray oils are available and work very well for air frying. Experiment with spray olive oil, grape seed, coconut,
avocado or vegetable oil.
3. Use your Air Fryer to cook pre-packaged foods with a fraction of the oil, in a fraction of the time! As a general rule,
reduce the conventional oven or toaster oven cooking time by 30% to 50%, depending on the food and amount.
Check for doneness, adjust time if needed, and continue cooking.
4. Do not overfill frying basket with food. NEVER fill any frying basket more than 2/3 full. When air frying fresh
vegetables, we do not recommend adding more than 2 to 3 cups of food to the frying basket.
5. For best results, some foods need to be shaken vigorously or turned over during the air fry time. Consult the Air Frying
Chart following as a general guide.
6. To avoid excess smoke, when cooking naturally high fat foods, such as chicken wings or sausages, it may be necessary
to empty fat from the frying basket between batches.
7. Always pat food dry before cooking to encourage browning and avoid excess smoke.
8. Air fry small batches of freshly breaded foods. Press breading onto food to help it adhere. Arrange in frying basket so
that food is not touching to allow air flow on all surfaces.
SO-316258_22288_3.7qt_AirFryer_IM_r4.indd 11 2019-07-12 3:14 PM

12
9. Any 7” round or 7” square cake pan, micro muffin 6-cup tin, 1.5 qt. bread pan or any 1 or 1-1/2 quart round, square,
or rectangular casserole dishes that measure less than 7” x 7” may be used for air frying.
10. Your Air Fryer’s convection heat assures even, gentle heating, perfect for reheating leftovers.
To prevent reheated food from drying out, tent loosely with aluminum foil. Check leftovers every 2 to 5 minutes
until heated through.
• Pizza. Air fry for a delicious, crispy, reheated crust. Check reheating progress frequently.
• Grilled sandwiches. Reheat leftover Panini or grilled cheese sandwiches quickly and easily.
Sandwiches will be crisp on the outside and warmed through on the inside.
• Crusty breads. Reheat garlic bread, cheese bread for delicious results. Check every 2 minutes.
• Fried or breaded foods. Re-crisp leftovers; check every 2 minutes. Shake or turn.
• Baked goods. Leftover pies, muffins, tarts, and even stale cookies can be revived.
Check every 2 minutes until done.
• Leftover meals. Reheat last night’s chicken, steak, fish, even French fries! Turn and check every 3 minutes
until heated through.
SO-316258_22288_3.7qt_AirFryer_IM_r4.indd 12 2019-07-12 3:14 PM

13
AIR FRYING CHART
WARNING! Times are estimated and based on average sizes and weights.
ALWAYS USE A MEAT THERMOMETER TO ENSURE THAT MEAT, POULTRY AND FISH ARE COOKED THOROUGHLY
BEFORE SERVING.
1. To assure even cooking/browning, open the frying basket drawer halfway through the cooking time. Check, turn or
vigorously shake foods in the frying basket. This chart lists average total air frying time, the time at which some action
is required, and what action is to be taken for best results.
2. Remember, frying smaller batches will result in shorter cooking times and higher food quality. Adjust air frying
temperatures and times as necessary to suit your taste.
IMPORTANT NOTE: Unless food is pre-packaged and pre-oiled, for browned and crispy results, all foods should be
lightly oiled before air frying.
• Oil may be sprayed or brushed onto foods.
• Spray oils work well as oil is evenly distributed and smaller quantities of oil are needed.
• To ensure crispy results, make sure foods are dried before adding oil.
• Cut pieces smaller to create more surface area for crispier results.
• Blanching is a term that refers to pre-cooking foods at a lower temperature before the final air fry.
• Add 3 minutes to the AIR FRY TIME to allow the Air Fryer to preheat.
SO-316258_22288_3.7qt_AirFryer_IM_r4.indd 13 2019-07-12 3:14 PM

14
FOOD APPROX. AMOUNT TIME (MINS.) COMMENTS
Mixed Vegetables (roasted) 2 cups 15 - 20 Spray with oil, shake at 8 minutes
Broccoli/Cauliflower (roasted) 2 cups 15 - 20 Spray with oil, shake at 8 minutes
French Fries,
fresh, hand cut, 1/4 - 1/3” thick
frozen
2 cups
2 cups
18 - 22
15 - 25
Turn halfway through cooking time
Follow directions on the package
Sweet Potato Chips
fresh, 1/8 - 1/16” thick) 2 cups 15- 20
Spray lightly, Shake halfway through cooking.
Bacon 3 - 4 strips 5 - 10 Turn frequently.
Sausage 4 - 8 links 20 - 25 Rotate halfway into cooking time
Steak, 1lb.
1
10 - 13
15 - 30
Medium Rare. Turn 1/2 way through cooking.
Medium Well. Turn 1/2 way through cooking.
Hamburgers, 1/4 lb. 1- 2 10 - 16 Rare to Well. Turn halfway through cooking time
Hot Dogs /Sausages 3 -4 10 - 15 Turn frequently. Cook until done.
Chicken Wings (fresh/thawed) 3 -5 20 - 25 Shake halfway through cooking time
Chicken Pieces, bone in 1 lb. 25 - 30 Turn halfway through cooking time
Catfish Fingers (thawed, battered) 1 lb. 10 - 15 Turn halfway through cooking time
Fish Sticks (frozen) 1 lb. 10 - 15 Turn halfway through cooking time
Biscuits/Rolls 2 - 6 5 - 8 Follow directions on the package
Cake 7” round 10 - 15 Test with toothpick for doneness.
Fruit Turnovers 2 10 - 12 Spray lightly
NOTE: Add 3 minutes to the AIR FRY TIME to allow the Air Fryer to preheat.
SO-316258_22288_3.7qt_AirFryer_IM_r4.indd 14 2019-07-12 3:14 PM

15
USDA COOKING GUIDELINES
NOTE: The United States Department of Agriculture recommends that meat and poultry be cooked to the following internal
temperatures to be sure any harmful bacteria has been killed. Ground turkey and chicken should be cooked to an internal
temperature of 165˚F / 74˚C and ground beef, veal, lamb and pork be cooked to an internal temperature 160˚F / 71˚C.
Whole chicken and turkey should be cooked to an internal temperature of 180˚F / 82˚C; 170˚F / 77˚C for the breast.
Goose and duck should be cooked to an internal temperature of 180˚F / 82˚C. Fresh beef, veal and lamb, etc., should
be cooked to an internal temperature of at least 145˚F / 63˚C. Fresh pork should be cooked to an internal temperature of
at least 160˚F / 71˚C. When re-heating meat and poultry products, they should also be cooked to an internal temperature
of 165˚F / 74˚C.
USER MAINTENANCE INSTRUCTIONS
This appliance requires little maintenance. It contains no user-serviceable parts. Any servicing requiring disassembly other
than cleaning must be performed by a qualified appliance repair technician.
CARE & CLEANING INSTRUCTIONS
WARNING! Allow the Air Fryer to cool fully before cleaning.
1. Unplug the Air Fryer. Remove frying basket. Make sure the frying basket and crisping tray have cooled completely
before cleaning. Use the center hole of the crisping tray to lift crisping tray up and out of the frying basket.
(See Figure 2.)
2. The crisping tray has 4 removable rubber side grips.
3. Wash the frying basket and crisping tray in hot soapy water. Do not use metal kitchen utensils or abrasive
cleansers or cleaning products as this may damage the non-stick coating.
4. The frying basket and crisping tray are dishwasher-safe. For best results, place in the top rack of your dishwasher
to clean.
5. Wipe the Air Fryer body with a soft, non-abrasive damp cloth to clean.
SO-316258_22288_3.7qt_AirFryer_IM_r4.indd 15 2019-07-12 3:14 PM

16
STORING INSTRUCTIONS
1. Make sure the Air Fryer is unplugged and all parts are clean and dry before storing.
2. Never store the Air Fryer while it is hot or wet.
3. Store Air Fryer in its box or in a clean, dry place.
SO-316258_22288_3.7qt_AirFryer_IM_r4.indd 16 2019-07-12 3:14 PM

17
RECIPE GUIDE
Fresh. Snackable. Simple goodness in under 15 minutes!
Potato Wedges with Rosemary and Sea Salt
Serves 1 -2
• Olive oil cooking spray
• 1 medium Idaho russet potato
• 1 tablespoon flaked sea salt
• 1 tablespoon dried rosemary
• 1 teaspoon granulated garlic
1. Wash and cut potato into 8 wedges.
2. Spray wedges liberally. Sprinkle with salt, rosemary, and garlic.
3. Add Potato Wedges to the frying basket.
4. Air fry for 10 to 12 minutes or until golden brown.
No egg. No bread. No carb. These crisps are absolutely delicious.
Crazy Hot Air Fried Chicken Wings
Serves 1
• 1/2 lb. chicken wings (about 5 wings)
• 1/4 cup Sriracha sauce (or your favorite hot sauce)
• 1-1/2 tablespoons butter, melted
• Dash Worcestershire sauce
• Dash tabasco sauce
1. Melt butter. Combine sauce ingredients in a small bowl, mix well.
2. In a large bowl, pour hot sauce over chicken wings and toss to coat.
3. Add Crazy Chicken Wings to the frying basket.
4. Air Fry for 20 minutes or until golden brown.
Crispy on the outside, tender on the inside. These sweet potato tots are the perfect healthy snack or side dish.
SO-316258_22288_3.7qt_AirFryer_IM_r4.indd 17 2019-07-12 3:14 PM

18
Parmesan Zucchini Crisps
Serves 2 - 3
• Olive oil cooking spray
• 1 medium zucchini
• Salt and pepper to taste
• 1 cup Parmesan cheese, grated
• 2 tablespoons granulated garlic
• 2 tablespoons dried oregano
• 1/4 cup infused olive oil: basil, truffle, or garlic
1. Slice zucchini into thin ovals
2. Lay slices onto a cutting board and allow to sit for 10 minutes.
Lay a sheet of paper towels on top and press firmly to blot out excess moisture.
3. Salt and pepper the zucchini liberally.
4. Place all zucchini slices into a large covered bowl or large zipper bag.
5. Add olive oil, cover and shake to coat Make sure zucchini is coated in the oil.
6. Add granulated garlic, oregano, and Parmesan cheese to the bag.
7. Add cheese-coated zucchini slices to the frying basket. Add the leftover cheese from the bag to each of the slices.
8. Air fry for 7 minutes or until golden brown. Continue to air fry the second batch.
9. Allow the Parmesan Zucchini Crisps to cool before eating.
These air fryer pickles are crispy, crunchy and full of silly dilly goodness. Enjoy warm, with a side of 1,000 Island dressing
or your favorite dipping sauce
SO-316258_22288_3.7qt_AirFryer_IM_r4.indd 18 2019-07-12 3:14 PM

19
Silly Dilly Air Fryer Fried Pickles
Serves 3
• 8 oz. jarred hamburger-cut dill pickles
• 1/2 cup all-purpose or whole wheat flour
• 1 tablespoon cornstarch
• Kosher salt, pinch
• Cayenne pepper, pinch
• 1/2 teaspoon Cajun spice
• 1 egg white
• 1/4 cup milk
• 1/4 cup Italian seasoned Panko breadcrumbs
1. Drain pickles and blot with paper towel to remove excess moisture.
2. In a bowl, combine flour, cornstarch, salt, pepper, eggs and milk to create a batter. Mix well.
3. In a separate bowl, add Panko breadcrumbs.
4. Dip each pickle chip into the batter, then into the Panko breadcrumbs.
5. Spray crisping tray with olive oil.
6. Add up to 12 pickles in a single layer to the air fryer basket. Spray breaded pickle tops with olive oil.
Air fry for 5 minutes or until brown and crispy.
SO-316258_22288_3.7qt_AirFryer_IM_r4.indd 19 2019-07-12 3:14 PM

20
Taco Bell Crunch Wrap Copycat
Makes: 4 Crunch Wraps
• 1 lb. ground beef
• 2 tablespoons vegetable oil
• 1 teaspoon chili powder
• 1/2 teaspoon ground paprika
• 1/2 teaspoon ground cumin
• Kosher salt
• Freshly ground black pepper
• 4 (12”) soft flour tortillas
• 4 (6”) corn tostada shells
• 4 (6”) flour tortillas
• 1 cup salsa
• 1 cup nacho cheese sauce
• 1/2 cup sour cream
• 1/2 cup shredded lettuce
• 1/2 cup diced Roma tomatoes
1. Prepare taco meat. Combine ground beef, oil, and spices in a large nonstick skillet over medium heat.
Use a wooden spoon to break up the meat as it cooks. Drain fat and set taco meat aside.
2. Create Crunchwraps. Place a large, soft burrito-size tortilla on a flat surface.
Spread 2 tablespoons salsa, 2 tablespoons taco meat, 2 tablespoons nacho cheese sauce onto a 5-inch circle
in the center of the tortilla.
3. Layer 1 corn tostada, 2 tablespoons sour cream, 2 tablespoons shredded lettuce, and 2 tablespoons diced
tomatoes. Add 2 tablespoons salsa, 2 tablespoons ground beef and 2 tablespoons nacho cheese sauce to the center,
leaving a generous border for folding.
4. Place the smaller flour tortilla on top. Tightly fold edges of large tortilla toward the center, creating pleats.
5. Spray the frying basket with oil. Turn the Crunchwrap over, pleated-side down, into the frying basket.
6. Air fry for 6 minutes, 3 minutes per side, until tortilla is golden. Repeat with remaining Crunchwraps.
SO-316258_22288_3.7qt_AirFryer_IM_r4.indd 20 2019-07-12 3:14 PM
Table of contents
Popular Fryer manuals by other brands

Frymaster
Frymaster 1814E Series Service & parts manual

Elite Gourmet
Elite Gourmet EAF9310 user manual

Trebs
Trebs Comfortcook 99212 manual

Bravetti
Bravetti PROFESSIONAL DEEP FRYER EP65 Use and care instructions

PowerXL
PowerXL VORTEX PRO AF-E4001-LA user manual

Pitco
Pitco SELV14 Installation & operation manual