Coolmed CMST100 User manual

INSTRUCTION MANUAL
CMST100
Staff Room Larder
Refrigerator
Please read and follow all safety rules and operating instructions
before use.

2
REFRIGERATOR SAFETY
Your safety and the safety of others is very important.
We have provided many important safety messages in this manual.
Always readandobey all safety instructions.
Danger means that failure to heed this safety
statement may result in severe personal injury
or death.
Warning means that failure to heed this safety
statement may result in extensive product
damage, seriouspersonal injury or death.
Caution means that failure to heed this safety
statement may result in minor or moderate
personal injury, property or equipmentdamage.
The safety instructions will alert you to the potential hazards, tell you how to reduce the chance of injury
andadvise what can happen if the instructions are not followed.

3
IMPORTANT INFORMATION
Before the refrigerator is used, it must be properly installed as described in this
manual, so please read the manual carefully. To reduce risk of fire, electric shock
or injury when using the appliance, follow basic precautions as follows:
Plug into an earthed 3-pin socket ONLY, DO NOT remove the earth pin or wire,
DO NOT use an adaptor and DO NOT use an extension cable.
It is recommended that you use a single socket for the refrigerator alone. Use a socket which can
be turned off by a separate switch.
Never clean the appliance with flammable fluids. The fumes can create a fire hazard or cause
explosion. DO NOT store petrol or other flammable fluids in the vicinity of the appliance to avoid
these hazards.
Before undertaking cleaning or maintenance, ensure that the power cable is disconnected. DO
NOT connect or disconnect the appliance when yourhands are wet.
Unplug the appliance or disconnect power before cleaning or servicing. Failure to do so can result in
electric shock and potentially be fatal.
Do not attempt to repair or replace anypart of your refrigerator unless it is specifically
recommended in this manual. All other servicing should be referred to a qualified technician.
FOLLOW WARNING MESSAGES BELOW ONLY IF APPLICABLE TO YOUR MODEL
The refrigerator should be installed and moved by 2 people to avoid injury.
To ensure proper ventilation for the appliance, the front of the unit must be completely
unobstructed.
Choose a well-ventilated area with temperatures above 16°C andbelow 32°C. The area should
be protected from the elements (wind, rain etc.)and water spray or drips.
The refrigeration should not be installed next to ovens, grills or other heat sources.
The appliance must be installed in accordance with all UK regulations for electrical connection,
water and drains. A standard UK electrical supply is required (220-240v AC only, 50Hz),
following UK and European standards.
Do not kink or trap the power cable of the refrigerator. The fuse (or circuit breaker) should be
13amp.
The appliance must be level in order for it to function correctly – use the levelling legs to adjust
accordingly.
Installation should be in accordance with the local plumbing requirements.
Ensure that the pipes are not kinked, trapped or damagedduring installation.
Never allow children to operate, play with or crawl inside the refrigerator.
Due to transit and storage time, the first batch of ice cubes should be discarded.
Do not use solvent-based or abrasive cleaning agents on the interior.
These cleaners may damage or discolour the interior.
Do not use this appliance for anything other than its intended purpose.
THIS APPLIANCE IS NOT INTENDED FOR USE BY YOUNGCHILDREN OR INFIRM PERSONS,
UNLESS THEY ARE ADEQUATELY SUPERVISED BY A RESPONSIBLE ADULT TO ENSURE

4
THAT THEY CAN USE THE APPLIANCE SAFELY. YOUNG CHILDREN MUST BE SUPERVISED TO
ENSURETHAT THEY DO NOT PLAY WITH THE APPLIANCE.
PARTS & FEATURES
1. Temperature Control Knob
2. Glass Shelf
3. Levelling Legs
4. Hinge Cover
5. Compartment Lid
6. Dairy Compartment
7. Bole Rack
8. Gasket
9. Lamp
⑨

5
TABLE OF CONTENTS
REFRIGERATOR SAFETY........................................................................................................................................... 2
IMPORTANT INFORMATION................................................................................................................................... 3
PARTS &FEATURES................................................................................................................................................. 4
IMPORTANT SAFETY INSTRUCTIONS...................................................................................................................... 6
INSTALLATION INSTRUCTIONS................................................................................................................................6
Before Using The Appliance................................................................................................................................. 6
Installing The Appliance....................................................................................................................................... 6
Electrical Connection........................................................................................................................................... 7
Extension Cable.................................................................................................................................................... 7
Reversing the Door...............................................................................................................................................7
OPERATING THE UNIT............................................................................................................................................. 8
Setting the Temperature Control.........................................................................................................................8
CARE AND MAINTENANCE...................................................................................................................................... 9
CleaningThe Unit................................................................................................................................................. 9
Power Failure....................................................................................................................................................... 9
Holidays................................................................................................................................................................ 9
Moving The Unit...................................................................................................................................................9
Energy Saving Tips..............................................................................................................................................10
TROUBLESHOOTING GUIDE...................................................................................................................................10
WIRING DIAGRAM.................................................................................................................................................11

6
IMPORTANT SAFETY INSTRUCTIONS
TO REDUCE THE RISK OF FIRE, ELECTRICAL SHOCK OR INJURY WHEN USING THE APPLIANCE FOLLOW THESE
BASIC PRECAUTIONS:
Read all instrucons before using the refrigerator.
WARNING:Child entrapment and suffocaon are sll a danger. Old or abandoned refrigerators are sll
dangerous even though they are not being used.
Before you throw away your old refrigerator: Remove the doors but leave shelves in place so that
children cannot climb inside.
Never allow children to operate, play with or crawl inside the refrigerator.
Never clean refrigerator parts with flammable fluids. The fumes can create a fire hazard or an explosion.
Do not store petrol or any other flammable liquids in the vicinity of this or any other refrigerator. The
fumes can create a fire hazard or an explosion.
If the power cable is damaged, it must be replaced by the manufacturer, its service agent or similarly
qualified person in order to avoid a hazard.
INSTALLATION INSTRUCTIONS
Before Using The Appliance
Remove the exterior and interior packaging.
Check to ensure that you have the following parts: 2 shelves and the instruction manual.
Before connecting the unit to the power source and switching it on, let it standupright for
approximately 2 hours. This will reduce the risk of a malfunction in the cooling system from movement
during transportation.
Clean the interior surface with lukewarm water using a soft cloth.
Installing The Appliance
This appliance is designed to be free standing only and should not be recessed or built-in.
Place yourunit on a floor that is strongenough to support the unit when it is fully loaded. To level your
unit, adjust the levelling legs at the bottom of the unit.
Allow 125mm of space between the back and sides of the unit which allows sufficient air circulation to
cool the compressor and the condenser.
Locate the unit away from direct sunlight and sources of heat (stove, heater, radiator, etc.). Direct
sunlight may affect the acrylic coating andheat sources may increase the electrical consumption.
Extreme cold ambient temperatures may also cause the unit not to perform properly.
Avoid locating the unit in moist areas.
Plug the unit into an exclusive, properly earthed wall socket. DO NOT, under any circumstances, cut
or remove the 3rd pin from the plug or earth wire from the power cable. Any questions concerning
earthing should be directed to a qualified electrician or authorised service company.
After plugging the appliance into a wall socket, allow the unit to cooldown for 2-3 hours before placing
food inside the refrigerator.

7
Electrical Connecon
IMPROPER USE OF THE EARTHED PLUG CAN RESULT IN THE RISK OF AN ELECTRIC SHOCK. IF THE POWER CABLE
IS DAMAGED, HAVE IT REPLACED BY AN AUTHORISED SERVICE CMPANY OR A QUALIFIED ELECTRICIAN.
This unit should be properly earthed for safety reasons. The power cable is fitted with a 3-pin plug,
which is correct for UK wall sockets, to minimise the risk of electric shock.
DO NOT, under any circumstances, cut or remove the 3-pin plug from the power cable supplied. For
personal safety, this appliance must be properly earthed. This unit requires a standard 220-240v
AC/50Hz electrical outlet with 3-pin UK socket.
Have the socket and circuit checked by a qualified electrician to ensure that the socket is properly
earthed.
To prevent accidental injury, the cable should be secured behind the unit and not left exposed or
dangling.
The unit should always be plugged into its own individual electric socket with a voltage rating
matching the rating label on the appliance. This ensures the best performance and also prevents the
overloading of household circuits which could cause a fire hazard if they overheated. NEVER unplug
the unit by just pulling on the power cable. Always switch off at the electric point first, then grip the
plug firmly and pull out from the socket. Repair or replace (with the help of a qualified electrician) all
power cables that have become frayed or otherwise damaged. Do not use a cable which shows
cracks or abrasion damage along its length or at either end. Take care not to damage the power cable
when moving the appliance.
Extension Cable
Because of potential safety hazards under certain conditions, it is strongly recommended that you DO
NOT use an extension cable with this unit. However, if you must use an extension cable, it is
absolutely essential that it is a 3-pin earthed extension cable with a UK standard plug and socket, and
that the electrical rating of the extension cable is 220-240v with a 13amp fuse.
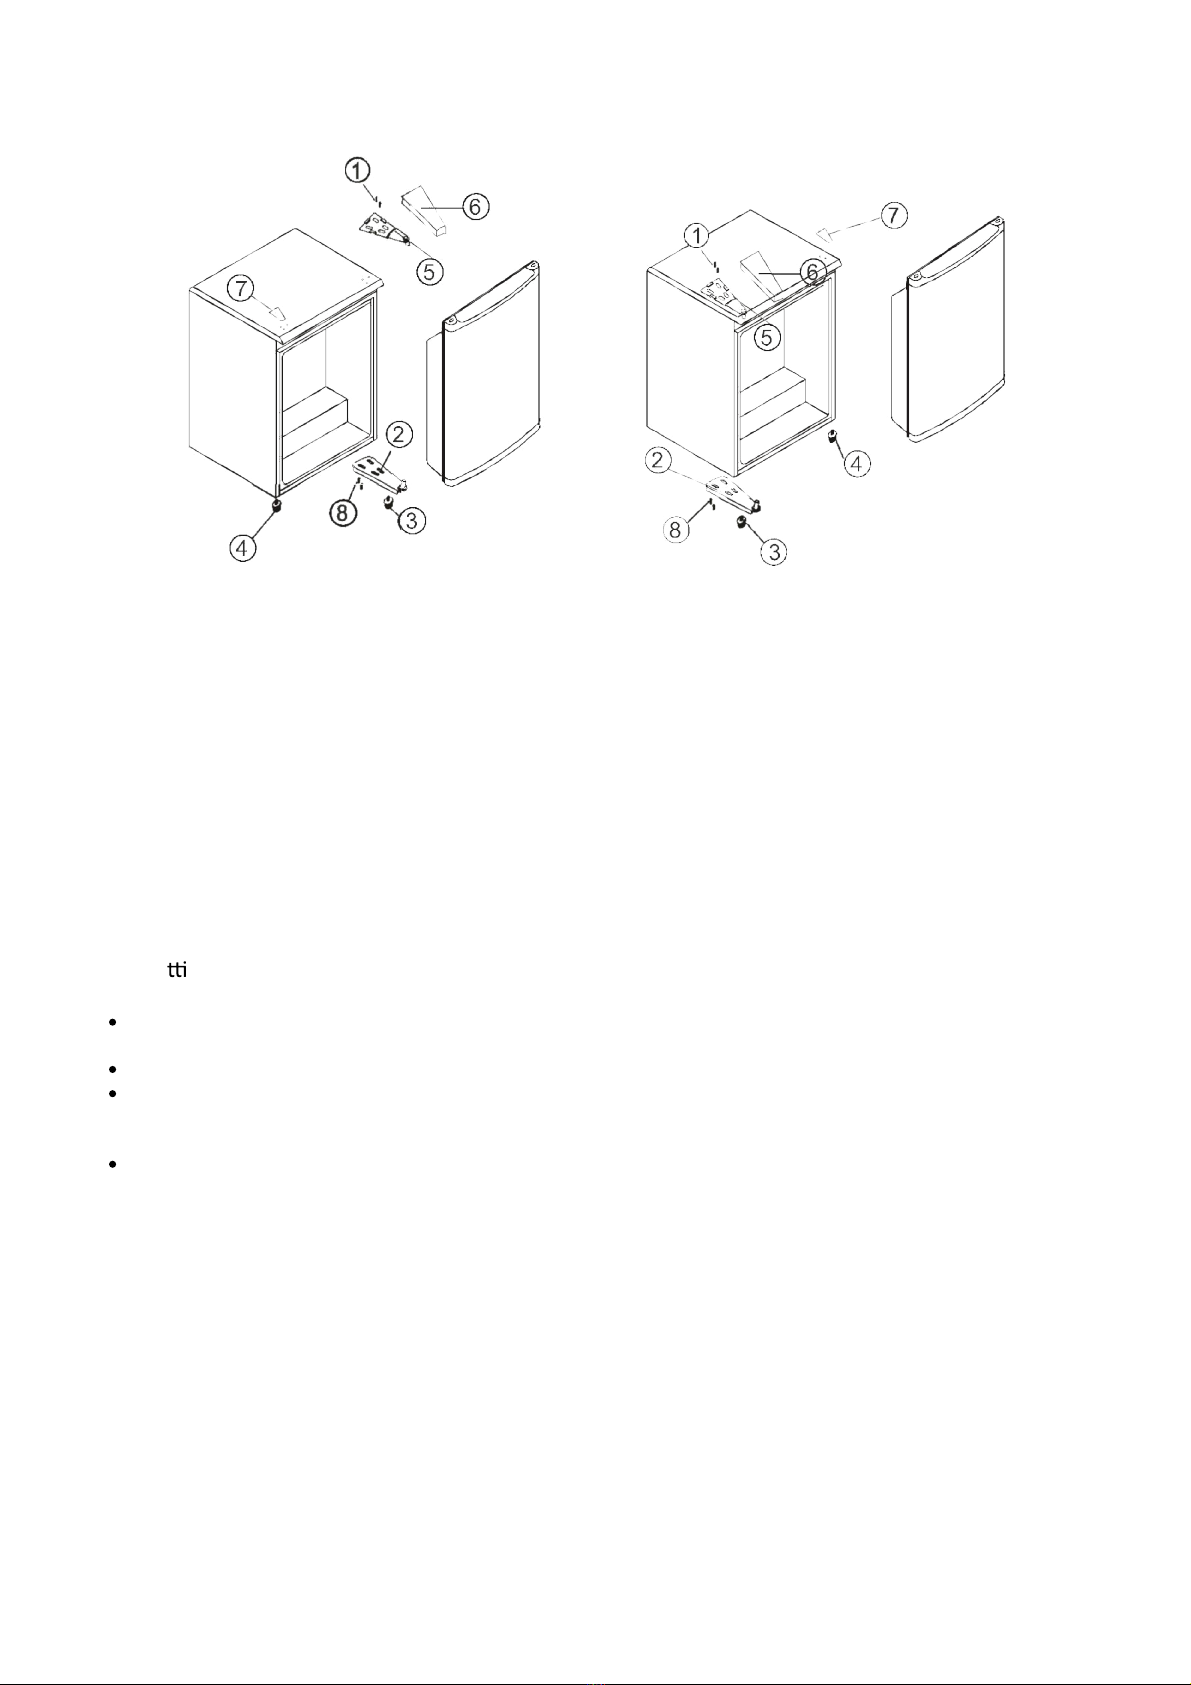
Reversing the Door
This larder fridge has been fitted with the door hinges on the right. If you wish to change the opening
side of the door, follow the instructions below:
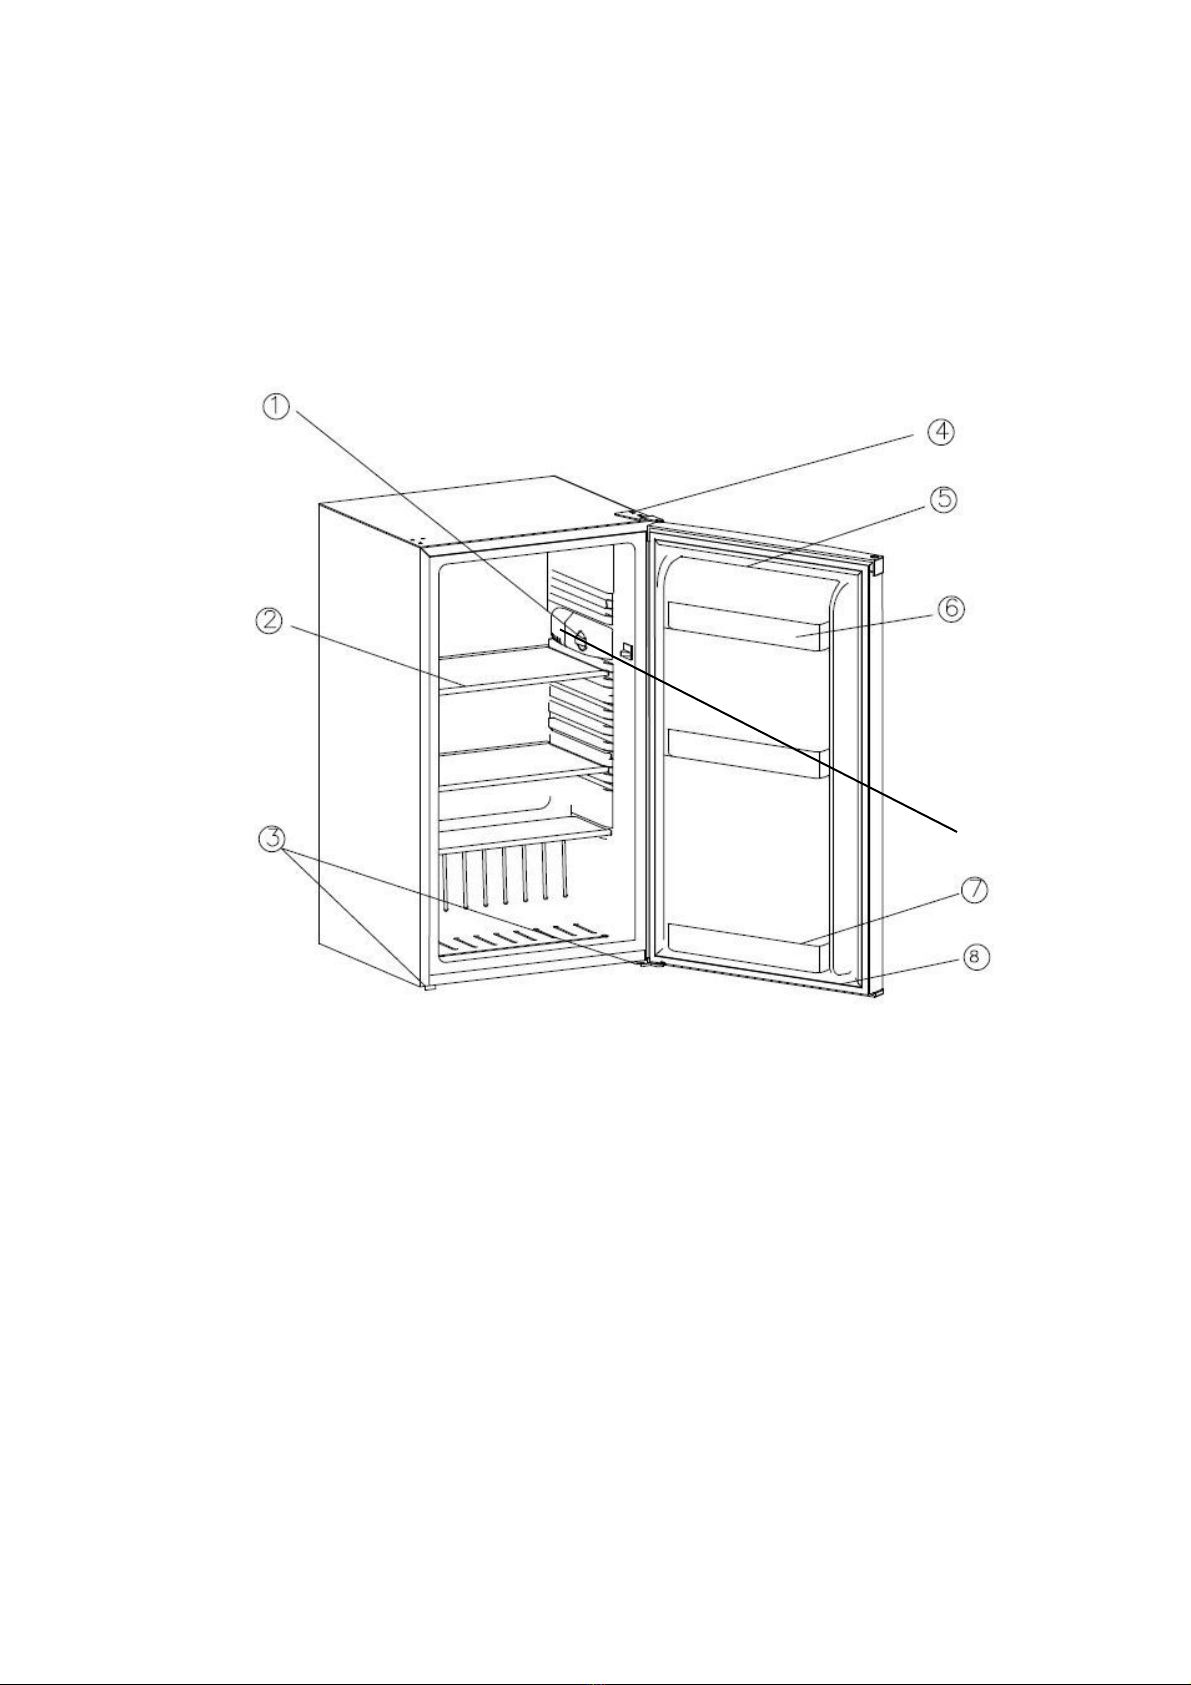
1. Remove the upper hinge cover (6).
2. Remove the two screws (1) thathold the upper hinge (5) to the frame. Remove the upper
hinge (5).
3. Remove the door by lifting it and place it on a padded surface to prevent scratching.
4. Remove the two screws (8) thathold the lower hinge (2) and then remove the lower hinge (2).
5. Swap over the levelling legs.
6. Remove the hole cover plate (7) and place it on the opposite side.
7. Attach the lower hinge (2) on the opposite side with the two screws (8).
8. Set the door in its place, making sure it sits on the door seat at the lower hinge (2).
9. Re-attach the upper hinge (5) on the opposite side using the screws (1). Do not tighten the
screws until the top of the door is level with the counter top.
10. Place the upper hinge cover (6) on the upper hinge.

8
FIGURE 1
FIGURE 2
Door opening from the right side
1. Screws
2. Lower hinge
3. – 4. Levelling legs
5. Upper hinge
6. Upper hinge cover
7. Hole cover plate
8. Screws
OPERATING THE UNIT
Se ng the Temperature Control
The unit only has one control for regulating the temperature of the refrigerator. The temperature
control is located on the inside of the appliance (top right).
The first time you turn the unit on, set the temperature control to position “6”.
The range of the temperature control is from position “OFF” to “6”. After 24-48 hours adjust the
temperature control to the setting that best suits your needs.Setting “3” should be appropriate for
home or office use.
To turn the appliance off, turn the temperature control to ”OFF”.
NOTE: Turning the temperature control to “OFF” position stops the cooling cycle but does not shut
off the power to the unit. If the unit is unplugged, has lost power or is turned off, you must wait 3 to 5
minutes before restarting the unit. If you attempt to restart before this time delay, the unit will not start.
Door opening from the le side

9
CARE AND MAINTENANCE
DO NOT USE BOILING WATER BECAUSE IT MAY DAMAGE THE PLASTIC PARTS. IN ADDITION,
NEVER USE ASHARP OR METALLIC INSTRUMENT TO REMOVE FROST AS IT MAY DAMAGE
THE COOLING SYSTEM AND WILL VOID THE WARRANTY. IF NECESSARY, USE APLASTIC
SCRAPER.
Cleaning The Unit
Turn the temperature control to “OFF”, unplug the unit and remove any food and the shelves.
Clean the inside surfaces with awarm water and baking soda solution. The solution should be about
2tablespoons of baking soda to 1.13 litres of water.
Clean the shelves with amild detergent solution.
Squeeze excess water out of the sponge or cloth before cleaning the controls or any electrical parts.
Clean the outside of the cabinet with warm water and mild liquid detergent. Rinse well and wipe dry
with aclean soft cloth.
Replacing the Bulb
The appliance is equipped with an internal light next to the thermostat dial. Should you need to
replace the bulb, you can do this by removing the bulb cover with asmall screwdriver and then
proceed to replace the E14 bulb.
FAILURE TO UNPLUG THE UNIT COULD RESULT IN AN ELECTRICAL SHOCK OR PERSONAL INJURY.
Power Failure
Most power failures are corrected within a few hours and should not affect the temperature of your
unit if you minimise the number of times the door is opened. If the power is going to be off for a
longer period of time, you need to take the appropriate steps to protect your food.
Holidays
Short Holidays: Leave the unit operating during holidays of less than 3weeks.
Long Holidays: If the appliance will not be used for several months, remove all food and unplug from
the socket. Clean and dry the interior thoroughly. To prevent odour and mould growth, leave the door
slightly open for ventilation, wedging it open if necessary.
Moving The Unit
Remove all the food.
Securely tape down all loose items inside the unit.

10
Turn the levelling legs up to the base to avoid damage.
Tape the door shut.
Make sure the unit stays secure in the upright position during transportation.
Ensure to protect the outside of the unit with a blanket or a similar item.
Energy Saving Tips
The unit should be located in the coolest area of the room, away from heat producing appliances and
out of direct sunlight.
Let hot foods cool to room temperature before placing in the unit. Overloading the unit forces the
compressor to run longer.
Be sure to wrap foods properly and wipe containers dry before placing them in the unit. This
minimises frost build-up inside the unit.
The compartment of the appliance should not be lined with aluminum foil, wax paper or paper towels.
Liners interfere with cold air circulation, making the unit less efficient.
Organise and label food to reduce door openings and extended searches. Remove as many items as
needed at one time and close the door as soon as possible.
TROUBLESHOOTING GUIDE
You can easily resolve many problems yourself. First try the suggestions below to see if a service
call is really necessary.
PROBLEM
POSSIBLE CAUSE(S)
Unit does not operate. Not plugged in.
The circuit breaker tripped/ blown fuse.
The unit temperature control is set to “OFF”.
Turns on and off frequently. The room temperature is hotter than
normal.
A large amount of food has been recently
added to the unit.
The door is opened too often.
The door is not closed properly.
The temperature control is not set
correctly.
The door gasket does not seal properly.
The unit does not have the correct
clearances.
Vibrations
Ensure that the unit is level.
The unit seems to make too much noise. The rattling noise may come from the flow
of the refrigerant which is normal.
As each cycle ends, you may hear gurgling
sounds caused by the flow of refrigerant in
the unit.
Contraction and expansion of the inside
walls may cause popping and crackling
noises.
The unit is not level.
The door will not close properly. The unit is not level.
The door was reversed and not properly
installed.
The gasket is dirty or bent.
The shelves or baskets are out of position.
Table of contents
Other Coolmed Refrigerator manuals