Cornelius QUEST ELITE 4000 User manual

QUEST ELITE 4000
Installation Manual
Release Date: December 10, 2010
Publication Number: 620048956INS
Revision Date: August 30, 2016
Revision: G
Visit the Cornelius web site at www.cornelius.com for all your Literature needs.

The products, technical information, and instructions contained in this manual are subject to change without notice.
These instructions are not intended to cover all details or variations of the equipment, nor to provide for every possi-
ble contingency in the installation, operation or maintenance of this equipment. This manual assumes that the per-
son(s) working on the equipment have been trained and are skilled in working with electrical, plumbing, pneumatic,
and mechanical equipment. It is assumed that appropriate safety precautions are taken and that all local safety and
construction requirements are being met, in addition to the information contained in this manual.
This Product is warranted only as provided in Cornelius’ Commercial Warrant applicable to this Product and is sub-
ject to all of the restrictions and limitations contained in the Commercial Warranty.
Cornelius will not be responsible for any repair, replacement or other service required by or loss or damage resulting
from any of the following occurrences, including but not limited to, (1) other than normal and proper use and normal
service conditions with respect to the Product, (2) improper voltage, (3) inadequate wiring, (4) abuse, (5) accident,
(6) alteration, (7) misuse, (8) neglect, (9) unauthorized repair or the failure to utilize suitably qualified and trained per-
sons to perform service and/or repair of the Product, (10) improper cleaning, (11) failure to follow installation, oper-
ating, cleaning or maintenance instructions, (12) use of “non-authorized” parts (i.e., parts that are not 100%
compatible with the Product) which use voids the entire warranty, (13) Product parts in contact with water or the
product dispensed which are adversely impacted by changes in liquid scale or chemical composition.
Contact Information:
To inquire about current revisions of this and other documentation or for assistance with any Cornelius product con-
tact:
www.cornelius.com
800-238-3600
Trademarks and Copyrights:
This document contains proprietary information and it may not be reproduced in any way without permission from
Cornelius.
This document contains the original instructions for the unit described.
CORNELIUS INC
101 Regency Drive
Glendale Heights, IL
Tel: + 1 800-238-3600
Printed in U.S.A.

TABLE OF CONTENTS
Quest elite 4000. . . . . . . . . . . . . . . . . . . . . . . . . . . . . . . . . . . . . . . . . . . . . . . . . . . . . . . . . . . . . . . . . . . . .i
Safety Instructions . . . . . . . . . . . . . . . . . . . . . . . . . . . . . . . . . . . . . . . . . . . . . . . . . . . . . . . . . . . . . . . . . . 1
Read And Follow All Safety Instructions . . . . . . . . . . . . . . . . . . . . . . . . . . . . . . . . . . . . . . . . . . . . . . 1
Safety Overview . . . . . . . . . . . . . . . . . . . . . . . . . . . . . . . . . . . . . . . . . . . . . . . . . . . . . . . . . . . . . . 1
Recognition . . . . . . . . . . . . . . . . . . . . . . . . . . . . . . . . . . . . . . . . . . . . . . . . . . . . . . . . . . . . . . . . . 1
Different Types of Alerts. . . . . . . . . . . . . . . . . . . . . . . . . . . . . . . . . . . . . . . . . . . . . . . . . . . . . . . . 1
Safety Tips . . . . . . . . . . . . . . . . . . . . . . . . . . . . . . . . . . . . . . . . . . . . . . . . . . . . . . . . . . . . . . . . . . . . . 1
Qualified Service Personnel. . . . . . . . . . . . . . . . . . . . . . . . . . . . . . . . . . . . . . . . . . . . . . . . . . . . . . . . 2
Safety Precautions. . . . . . . . . . . . . . . . . . . . . . . . . . . . . . . . . . . . . . . . . . . . . . . . . . . . . . . . . . . . . . . 2
Shipping And Storage . . . . . . . . . . . . . . . . . . . . . . . . . . . . . . . . . . . . . . . . . . . . . . . . . . . . . . . . . . . . 2
Mounting In or On A Counter . . . . . . . . . . . . . . . . . . . . . . . . . . . . . . . . . . . . . . . . . . . . . . . . . . . . . . . 2
Requirements. . . . . . . . . . . . . . . . . . . . . . . . . . . . . . . . . . . . . . . . . . . . . . . . . . . . . . . . . . . . . . . . . . . . . . 3
Nameplate Data . . . . . . . . . . . . . . . . . . . . . . . . . . . . . . . . . . . . . . . . . . . . . . . . . . . . . . . . . . . . . . 3
Concentrate Storage . . . . . . . . . . . . . . . . . . . . . . . . . . . . . . . . . . . . . . . . . . . . . . . . . . . . . . . . . . 3
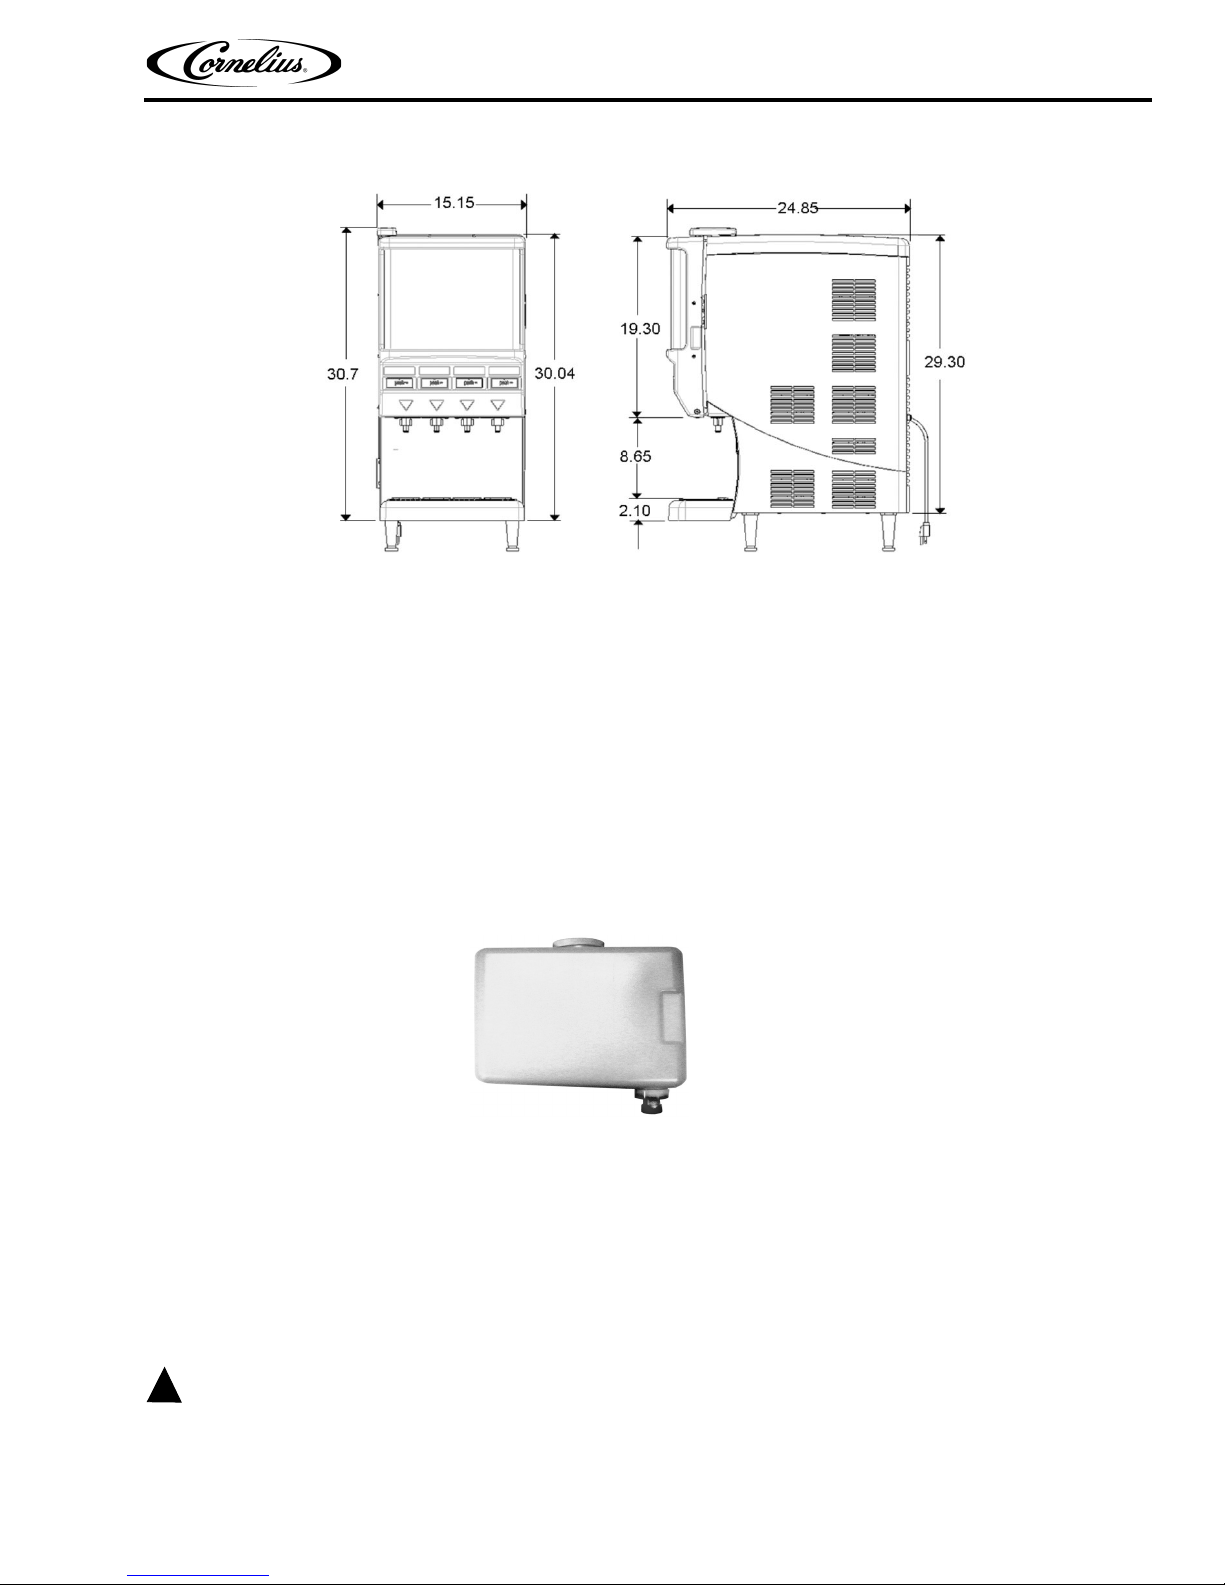
Recommended Clearance . . . . . . . . . . . . . . . . . . . . . . . . . . . . . . . . . . . . . . . . . . . . . . . . . . . . . . 3
Electrical Connection . . . . . . . . . . . . . . . . . . . . . . . . . . . . . . . . . . . . . . . . . . . . . . . . . . . . . . . . . . 3
Power Supply . . . . . . . . . . . . . . . . . . . . . . . . . . . . . . . . . . . . . . . . . . . . . . . . . . . . . . . . . . . . . . . . 4
Water Connection . . . . . . . . . . . . . . . . . . . . . . . . . . . . . . . . . . . . . . . . . . . . . . . . . . . . . . . . . . . . 4
Water Supply Requirements . . . . . . . . . . . . . . . . . . . . . . . . . . . . . . . . . . . . . . . . . . . . . . . . . . . . 4
Ice Bank/Pull Down . . . . . . . . . . . . . . . . . . . . . . . . . . . . . . . . . . . . . . . . . . . . . . . . . . . . . . . . . . . 4
Applications . . . . . . . . . . . . . . . . . . . . . . . . . . . . . . . . . . . . . . . . . . . . . . . . . . . . . . . . . . . . . . . . . . . . . . . 5
Plumbing Requirements. . . . . . . . . . . . . . . . . . . . . . . . . . . . . . . . . . . . . . . . . . . . . . . . . . . . . . . . . . . 5
Receiving . . . . . . . . . . . . . . . . . . . . . . . . . . . . . . . . . . . . . . . . . . . . . . . . . . . . . . . . . . . . . . . . . . . . . . . . . 6
Unpacking . . . . . . . . . . . . . . . . . . . . . . . . . . . . . . . . . . . . . . . . . . . . . . . . . . . . . . . . . . . . . . . . . . . . . 6
Counter Location . . . . . . . . . . . . . . . . . . . . . . . . . . . . . . . . . . . . . . . . . . . . . . . . . . . . . . . . . . . . . . . . . . . 7
Minimum Airflow Clearance . . . . . . . . . . . . . . . . . . . . . . . . . . . . . . . . . . . . . . . . . . . . . . . . . . . . . . . . 7
Filling the Ice Bath . . . . . . . . . . . . . . . . . . . . . . . . . . . . . . . . . . . . . . . . . . . . . . . . . . . . . . . . . . . . . . . . . . 8
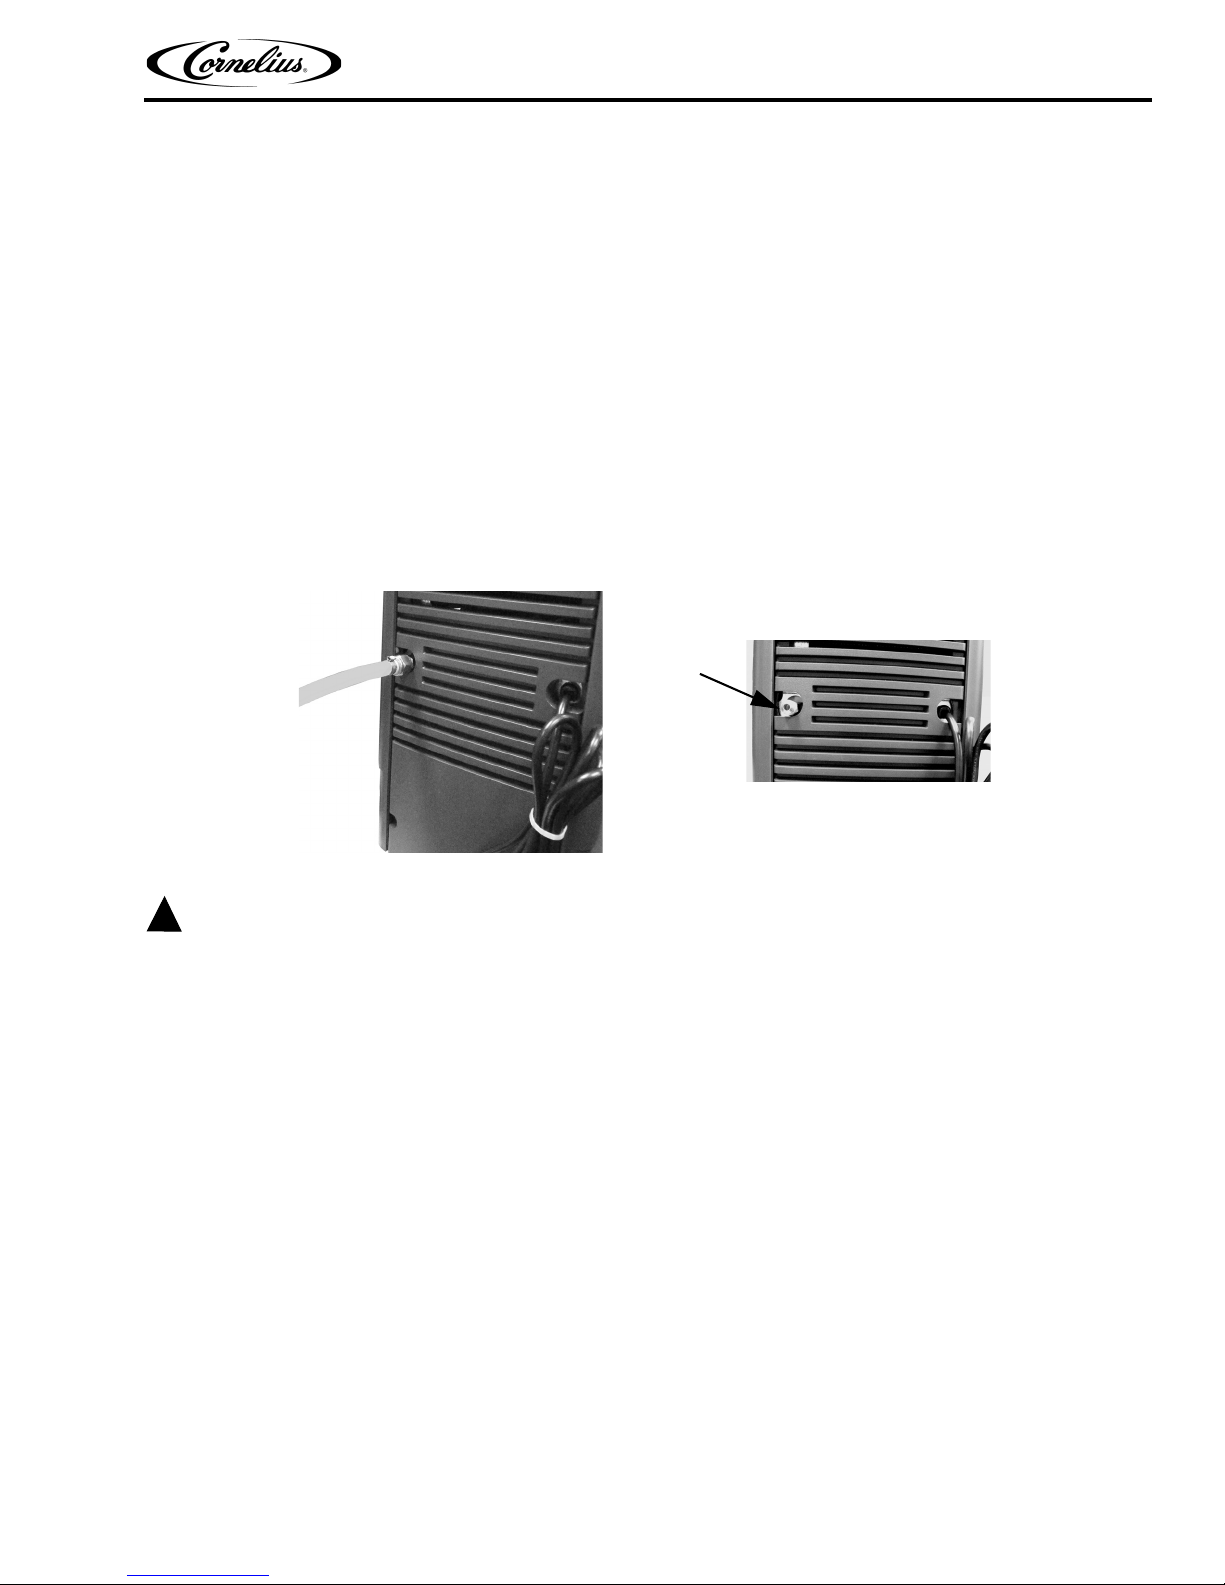
Connecting the Water Supply . . . . . . . . . . . . . . . . . . . . . . . . . . . . . . . . . . . . . . . . . . . . . . . . . . . . . . . . . 9
Electrical Requirements . . . . . . . . . . . . . . . . . . . . . . . . . . . . . . . . . . . . . . . . . . . . . . . . . . . . . . . . . . . . . . 9
Priming/Flushing Water System. . . . . . . . . . . . . . . . . . . . . . . . . . . . . . . . . . . . . . . . . . . . . . . . . . . . . . . 10
Programming the Portion Control. . . . . . . . . . . . . . . . . . . . . . . . . . . . . . . . . . . . . . . . . . . . . . . . . . . . . . 11
Stop Button . . . . . . . . . . . . . . . . . . . . . . . . . . . . . . . . . . . . . . . . . . . . . . . . . . . . . . . . . . . . . . . . . . . 11


Quest Elite 4000 Installation Manual
© 2010-2016, Cornelius Inc. - 1 - Publication Number: 620048956INS
SAFETY INSTRUCTIONS
READ AND FOLLOW ALL SAFETY INSTRUCTIONS
Safety Overview
• Read and follow ALL SAFETY INSTRUCTIONS in this manual and any warning/caution labels
on the unit (decals, labels or laminated cards).
• Read and understand ALL applicable OSHA (Occupational Safety and Health Administration) safety regula-
tions before operating this unit.
Recognition
Different Types of Alerts
!
DANGER:
Indicates an immediate hazardous situation which if not avoided WILL result in serious injury, death or equipment
damage.
!
WARNING:
Indicates a potentially hazardous situation which, if not avoided, COULD result in serious injury, death, or
equipment damage.
!
CAUTION:
Indicates a potentially hazardous situation which, if not avoided, MAY result in minor or moderate injury or
equipment damage.
SAFETY TIPS
• Carefully read and follow all safety messages in this manual and safety signs on the unit.
• Keep safety signs in good condition and replace missing or damaged items.
• Learn how to operate the unit and how to use the controls properly.
• Do not let anyone operate the unit without proper training. This appliance is not intended for use by very
young children or infirm persons without supervision. Young children should be supervised to ensure that
they do not play with the appliance.
• Keep your unit in proper working condition and do not allow unauthorized modifications to the unit.
NOTE: The dispenser is not designed for a wash-down environment and MUST NOT be placed in
an area where a water jet could be used.
Recognize Safety Alerts
This is the safety alert symbol. When you see it in this manual or on the unit, be alert
to the potential of personal injury or damage to the unit.
!

Quest Elite 4000 Installation Manual
Publication Number: 620048956INS - 2 - © 2010-2016, Cornelius Inc.
QUALIFIED SERVICE PERSONNEL
!
WARNING:
Only trained and certified electrical, plumbing and refrigeration technicians should service this unit.
ALL WIRING AND PLUMBING MUST CONFORM TO NATIONAL AND LOCAL CODES. FAILURE TO COMPLY
COULD RESULT IN SERIOUS INJURY, DEATH OR EQUIPMENT DAMAGE.
IF THE SUPPLY CORD IS DAMAGED, IT MUST BE REPLACED BY THE MANUFACTURER, ITS SERVICE
AGENT OR SIMILARLY QUALIFIED PERSONS IN ORDER TO AVOID A HAZARD.
SAFETY PRECAUTIONS
This unit has been specifically designed to provide protection against personal injury. To ensure continued
protection observe the following:
!
WARNING:
Disconnect power to the unit before servicing following all lock out/tag out procedures established by the user. Verify
all of the power is off to the unit before any work is performed.
FAILURE TO DISCONNECT THE POWER COULD RESULT IN SERIOUS INJURY, DEATH OR EQUIPMENT
DAMAGE.
!
CAUTION:
Always be sure to keep area around the unit clean and free of clutter. Failure to keep this area clean may result in
injury or equipment damage.
DO NOT STORE EXPLOSIVE SUBSTANCES SUCH AS AEROSOL CANS WITH A FLAMMABLE
PROPELLANT IN THIS APPLIANCE.
CHILDREN SHALL NOT PLAY WITH THE APPLIANCE.
CLEANING AND USER MAINTENANCE SHALL NOT BE MADE BY CHILDREN WITHOUT SUPERVISION.
SHIPPING AND STORAGE
!
CAUTION:
Before shipping, storing, or relocating the unit, the unit must be sanitized and all sanitizing solution must be drained
from the system. A freezing ambient environment will cause residual sanitizing solution or water remaining inside the
unit to freeze resulting in damage to internal components.
MOUNTING INOR ONA COUNTER
!
WARNING:
When installing the unit in or on a counter top, the counter must be able to support a weight in excess of 140 lbs. (63.5
kg.) to insure adequate support for the unit.
FAILURE TO COMPLY COULD RESULT IN SERIOUS INJURY, DEATH OR EQUIPMENT DAMAGE.
THE APPLIANCE HAS TO BE PLACED IN A HORIZONTAL POSITION

Quest Elite 4000 Installation Manual
© 2010-2016, Cornelius Inc. - 3 - Publication Number: 620048956INS
REQUIREMENTS
Figure 1. Unit Dimensions
Nameplate Data
Model QST ELITE 4000, 115 VAC, 5 amps, 1 phase 60 hertz, 6.34 – 6.41 oz. (180-182g) R-134a refrigerant. Test
press: High side 400 psi (2757.9 kilopascals), (27.6 bar). Low side 88 psi (606.7 kilopascals), (6.1 bar).
Model Quest ELITE 4000, 230 VAC, 2 amps, 1 phase 50 hertz, 6.34 - 6.41 oz. (180-182g) R-134a refrigerant. Test
press: High side 400 psi (2757.9 kilopascals) (27.6 bar). Low side 88 psi (606.7 kilopascals), (6.1 bar).
Model Quest ELITE 4000, 220 VAC, 2 amps, 1 phase 60 hertz, 6.34 - 6.41 oz. (180-182g) R-134a refrigerant. Test
press: High side 400 psi (2757.9 kilopascals) (27.6 bar). Low side 88 psi (606.7 kilopascals), (6.1 bar).
Concentrate Storage
Four 0.8 gallon (3.0 liter) disposable bottles.
NOTE: Refillable Concentrate reservoirs also available.
Figure 2. Concentrate Storage
Recommended Clearance
12” (30.48 cm) on top and 4” (10.16 cm) required in back for air circulation and 4” at the sides of the unit.
Electrical Connection
6 ft. long (1.83 m) power cord with 3-prong plug attached to dispenser. Export models are shipped with a European
plug.
!
CAUTION:
Only trained and certified electrical technicians should replace the power cord or the unit should be returned to an
Authorized Service Center for power cord replacement.” The replacement cord must meet all requirements of the
original equipment manufacturer.
FAILURE TO COMPLY COULD RESULT IN SERIOUS INJURY, DEATH OR DAMAGE TO THE EQUIPMENT.

Quest Elite 4000 Installation Manual
Publication Number: 620048956INS - 4 - © 2010-2016, Cornelius Inc.
Power Supply
15 amps at 120 volts dedicated power supply.
10 amps at 230 volts dedicated power supply.
Water Connection
3/8 in. (0.95 cm) SAE male flare fitting on dispenser (Figure 3).
Water
Connection
Figure 3. Water Connection
Water Supply Requirements
60 psi (413.7 kilopascals) (4.1 bar) maximum static pressure. 30 psi (206.8 kilopascals) (2.1 bar) minimum
dynamic pressure; i.e., flowing pressure measured at dispenser water inlet with 3.0 (88.7 ml) per second water
flow. Optimum recommended pressure 50 psi (344.7 kilopascals) (3.5 bar) dynamic pressure.
Ice Bank/Pull Down
Weight 14-16 lbs. (6.35 - 7.25 kg.). Pull Down: 3.5 - 5.5 hours at 75°F (24°C)

Quest Elite 4000 Installation Manual
© 2010-2016, Cornelius Inc. - 5 - Publication Number: 620048956INS
APPLICATIONS
This appliance is intended to be used in household and similar applications such as the following:
• Staff kitchen areas in shops, offices and other working environments.
• Farm houses and by clients in hotels, motels and other residential type environments
• Bed and breakfast type environments
• Catering and similar non-retail applications
PLUMBING REQUIREMENTS
This dispenser must be connected to a COLD WATER system with operating pressure between 30psi minimum
and 60 psi maximum (206.8 kilopscals and 413.7 kilopscals). This water source must be capable of producing a
minimum flow rate of 3 fluid ounces (88.7 milliliters) per second. A shut off valve should be installed in the line
before the dispenser. Install a regulator in the line when pressure is greater than 100 psi (690 kPa) to reduce it to
50 psi (345 kPa). The regulator is also necessary if the water source has pressure fluxuations. The main water inlet
is a 3/8” (9.52 mm) MFL connection (Figure 4).
Water
Connection
Figure 4. Plumbing Connection
!
WARNING:
This equipment must be installed to comply with the International Plumbing Code of the International Code Council
and the Food Code Manual of the Food and Drug Administration (FDA). For models installed outside the U.S.A., you
must comply with the applicable Plumbing/Sanitation Code for your area.
Failure to comply could result in serious injury, death or damage to the equipment.

Quest Elite 4000 Installation Manual
Publication Number: 620048956INS - 6 - © 2010-2016, Cornelius Inc.
RECEIVING
Each unit is completely tested and inspected before shipment. At the time of shipment, the carrier accepts the unit
and any claim for damage must be made with the carrier.
Upon receiving the unit(s) from the carrier, inspect the carton for visible damage. If damage exists, have the carrier
make a note on the bill of lading and file a claim with the carrier.
UNPACKING
• Remove staples securing carton to pallet.
• Lift carton up and off of unit.
• Remove inserts and shipping bag.
• Open upper cabinet door and remove installation kit.
• Remove bolts securing unit to pallet.
• Lift unit off of pallet.
NOTE: Do not lay the unit on it’s side or back. This may cause vital oils to drain from the compres-
sor resulting in damage during start-up and consequently voiding the warranty.

Quest Elite 4000 Installation Manual
© 2010-2016, Cornelius Inc. - 7 - Publication Number: 620048956INS
COUNTER LOCATION
Select a location in a well ventilated area, close to a grounded electrical outlet. If possible do not place the unit
close to hot and/or steaming machines.
MINIMUM AIRFLOW CLEARANCE
The minimum airflow clearance is: 4” (10.16 cm) in back and 12” (30.48 cm) on top and open to the front.
!
IMPORTANT:
Condenser air is drawn in from the bottom of the rear panel and discharged out the top of the rear panel.
Failure to maintain clearance space will reduce capacity of the unit and cause premature compressor
failure.
The Dispenser needs to be placed using 4inch legs that are included.
MINIMUM 12’’ AIR
CLEARANCE AT TOP
MINIMUM 4’’ AIR FLOW
CLEARANCE AT BACK
AND 4’’ AT SIDES
Figure 5. Minimum Clearances

Quest Elite 4000 Installation Manual
Publication Number: 620048956INS - 8 - © 2010-2016, Cornelius Inc.
FILLING THE ICE BATH
The ice bath holds approximately 3.5 gallons (13.4 liters) of water. The fill tube is located behind the front splash
plate and capped with a 0.5” plug.
1. Remove the 0.5” plug and attach the tube to any one of the dispense nozzles.
2. Open the door and verify that the flush/dispense lever is in the dispense mode. (see Figure 6) Ice
bath must always be filled in the dispense mode.
NOTE: Non flush units does not have a flush/dispense lever hence for filling water bath on non
flush units please remove the concentrate Storage bottles first and then attach the tube to
any one of the dispense nozzles and Close the door, press and hold the dispense button
(push) until the tank is filled and water trickles from the overflow
Dispense/Flush
Lever
Water Bath
Fill Tube
Water Bath
Overflow
Water Bath
Fill Tube
Connection
Figure 6. Water Bath and Dispense/Flush Lever
3. Close the door, press and hold the dispense button (push), shown in . Dispense Buttons, until the
tank is filled and water trickles from the overflow.
Figure 7. Dispense Buttons
4. Once the ice bath is full, store the fill tube in the vertically recessed holder. The fill tube can now be
used as a “sight glass” to monitor the water level in the ice bath.

Quest Elite 4000 Installation Manual
© 2010-2016, Cornelius Inc. - 9 - Publication Number: 620048956INS
CONNECTING THE WATER SUPPLY
The Quest Elite series Juice Dispenser is designed to dispense juice at a high flow rate. It is very important that the
incoming water line be dedicated for use by the dispenser only and does not have other machines connected which
could cause a water surge, (i.e., a dishwasher, coffee maker, etc.).
!
IMPORTANT:
The water supply should be consistent with proper water quality standards (neutral pH of 7.0 to 8.0), and
should not be connected to a water softener. It is the installer’s responsibility to ensure that all water
connections to the dispenser are sized, installed with adequate backflow protection and maintained to
comply with Federal, State, and Local Laws.
1.
Water Inlet
with Supply Tubing
Connected
Secure the 3/8” (0.95 cm) swivel nut on the flexible supply tubing to the water inlet located at the rear
of the dispenser. Make sure that the flared gasket is used (flared gasket P/N 311304000 is included
with the installation kit).
Figure 8. Water Supply Connection on Rear of Unit
2. When securing flare nut, use a backup wrench on the male side of the inlet fitting (unit side) to prevent
twisting of the copper tube inside the unit and/or possible damage to the water strainer/solenoid.
Water shut off outside the unit is recommended.
ELECTRICAL REQUIREMENTS
A minimum of 15 amps electrical service is needed for 120VAC power supply. A minimum of 10 amps electrical
service is needed for 230VAC power supply.

Quest Elite 4000 Installation Manual
Publication Number: 620048956INS - 10 - © 2010-2016, Cornelius Inc.
PRIMING/FLUSHING WATER SYSTEM
To properly prime the unit with water and remove air pockets in the system, open the cabinet door and make sure
that all the valve levers are in the Dispense position.
Close the door and press the dispense button for a few seconds. Repeat until a steady flow of water is observed
from all dispense valves.
NOTE: Some splashing may occur during this purge cycle.
Static Mixer
Dispenser Nozzle
Figure 9. Dispense Nozzle

Quest Elite 4000 Installation Manual
© 2010-2016, Cornelius Inc. - 11 - Publication Number: 620048956INS
PROGRAMMING THE PORTION CONTROL
If the dispenser has optional portion controls, they have been pre-programmed from the factory to pour 7, 12, and
16 ounce drinks. The “extra large” (pitcher icon) size has also been pre-programmed to pour 16 ounces.
To change the pour sizes, please perform the procedure described in .
Table 1.
Step Action
1
Simultaneously, press and hold Small and Extra Large buttons on
the Portion Control Module until the Refill light starts blinking.
Release the buttons. The blinking Refill light indicates the program-
ming mode is active. See . Control Panel.
2
Place a cup under the dispense nozzle and push the selected size
button (small, medium, large, or extra large). Hold the button in until
the cup fills to the desired portion, then release the button. Repeat
the procedure for the remaining sizes.
3
After programming all the drink sizes, press and release the Stop
button to return the Portion Control to the operational mode. The
blinking REFILL light goes off.
4
In the future, to change the portion size of the drinks, the individual
sizes can be adjusted by performing Step 2. It is not necessary to
reprogram every size. Additionally, the portion control has full mem-
ory retention in case of a power failure.
Figure 10. Control Panel
STOP BUTTON
To pour a drink without using a pre-programmed portion control size, simply push and hold the Stop button.
Release when the glass is full.

Quest Elite 4000 Installation Manual
Publication Number: 620048956INS - 12 - © 2010-2016, Cornelius Inc.


Cornelius Inc.
www.cornelius.com
Other manuals for QUEST ELITE 4000
1
Table of contents
Other Cornelius Juicer manuals