Corsair iCUE NEXUS User manual

Companion Touch Screen
iCUE NEXUS
A— iCUE NEXUS
B— TOUCH SCREEN
C— USB CONNECTOR
D— STANDALONE BASE
E— BASE USB PASSTHROUGH
F— BASE USB CONNECTOR
G— KEYBOARD MOUNTING BRACKETS x 3
H— BRACKET REMOVAL TOOL
A— iCUE NEXUS
B— ÉCRAN TACTILE
C— CONNECTEUR USB
D— BASE AUTONOME
E— PASSE-CÂBLE USB DE LA BASE
F— CONNECTEUR USB DE LA BASE
G— SUPPORTS DE FIXATION POUR
CLAVIER x 3
H— OUTIL DE DÉMONTAGE DU SUPPORT
iCUE NEXUS connects to PC USB via the standalone base or when attached to a K70 RGB MK.2 or
K95 RGB PLATINUM series keyboard via an included bracket.
L'iCUE NEXUS se connecte à votre ordinateur PC via la base autonome ou lorsque fixé à un clavier de la gamme
CORSAIR K70 RGB MK.2 ou K95 RGB PLATINUM à l'aide du support fourni.
IMPORTANT: If attached to a keyboard, allow 24 hours for the adhesive tape on the bracket to set before using
the touch screen. To remove the bracket later, turn over the keyboard and insert the included removal tool (H)
into the gap between the bracket and the keyboard from the bottom side, and then gently press down to lift the
bracket until it begins to detach. Hold the partially detached portion while continuing to lift different areas of the
bracket until it is fully released from the keyboard. Additional brackets are available at www.corsair.com.
IMPORTANT: Si l'appareil est fixé à un clavier, attendez 24 heures pour que le ruban adhésif du support durcisse
avant d'utiliser l'écran tactile. Pour retirer ultérieurement le support, retournez le clavier et insérez l'outil de
démontage (H) fourni dans l'espace entre le support et le clavier à partir du bas, puis appuyez doucement vers le
bas pour lever le support jusqu'à ce qu'il commence à se détacher. Tenez la partie partiellement détachée tout en
continuant à lever différentes parties du support jusqu'à ce qu'il soit entièrement dégagé du clavier. Des supports
supplémentaires sont disponibles à l'adresse www.corsair.com.
iCUE NEXUS requires the iCUE software. Download iCUE from www.corsair.com/downloads
and install on your Windows®PC.
> Launch iCUE, click the iCUE NEXUS device tile, and then go to the Screens tab to begin
designing your own screens with custom graphics and functions.
> Swipe left and right on the touch screen to quickly navigate between screens.
NOTE: For more information on advanced programming and product tutorials,
visit www.corsair.com/nexus-faq.
L'iCUE NEXUS requiert le logiciel iCUE. Téléchargez le logiciel iCUE sur le site
www.corsair.com/downloads et installez-le sur votre ordinateur PC fonctionnant
sous Windows®.
> Lancez le logiciel iCUE, cliquez sur la vignette du périphérique iCUE NEXUS, et allez
dans l'onglet Écrans pour commencer à concevoir vos propres écrans avec des fonctions
et des graphiques personnalisés.
> Balayez vers la gauche et la droite sur l'écran tactile pour naviguer rapidement entre les écrans.
REMARQUE: Pour plus d'informations sur la programmation avancée et pour des tutoriels sur le produit,
visitez le www.corsair.com/nexus-faq.
HARDWARE SETUP INSTALLATION MATÉRIELLESOFTWARE SETUP INSTALLATION LOGICIELLE
ENGLISH ENGLISH FRANÇAIS FRANÇAIS
WEB: corsair.com
PHONE: (888) 222-4346
SUPPORT: support.corsair.com
BLOG: corsair.com/blog
FORUM: forum.corsair.com
YOUTUBE: youtube.com/corsairhowto
© 2020 CORSAIR MEMORY Inc. All rights reserved. CORSAIR and the sails logo
are registered trademarks in the United States and/or other countries. All other
trademarks are the property of their respective owners. Product may vary slightly
from those pictured. 49-002031 AB
iCUE NEXUS
1. Connect USB to base
2. Insert iCUE NEXUS
3. Connect base USB to PC
STANDALONE BASE
3
1
2
1. Locate bracket matching keyboard
rear center panel
2. Peel off protective film
3. Attach bracket to keyboard
4. Slide iCUE NEXUS onto bracket
5. Connect USB to keyboard
KEYBOARD BRACKET
1
3
2
4
5
1. Brancher le connecteur USB sur la base
2. Insérer l'iCUE NEXUS
3. Brancher le connecteur USB de la base
sur l'ordinateur PC
BASE AUTONOME
3
1
2
1. Repérer le panneau arrière central du clavier
correspondant au support
2. Retirer le film protecteur
3. Fixer le support au clavier
4. Glisser l'iCUE NEXUS sur le support
5. Brancher le connecteur USB sur le clavier
SUPPORT POUR CLAVIER
1
3
2
4
5
GETTING TO KNOW iCUE NEXUS
A D
B
G
H
CF
E
PRÉSENTATION DE L'iCUE NEXUS
A D
B
G
H
CF
E

ESPAÑOL ESPAÑOL PORTUGUÊS PORTUGUÊS
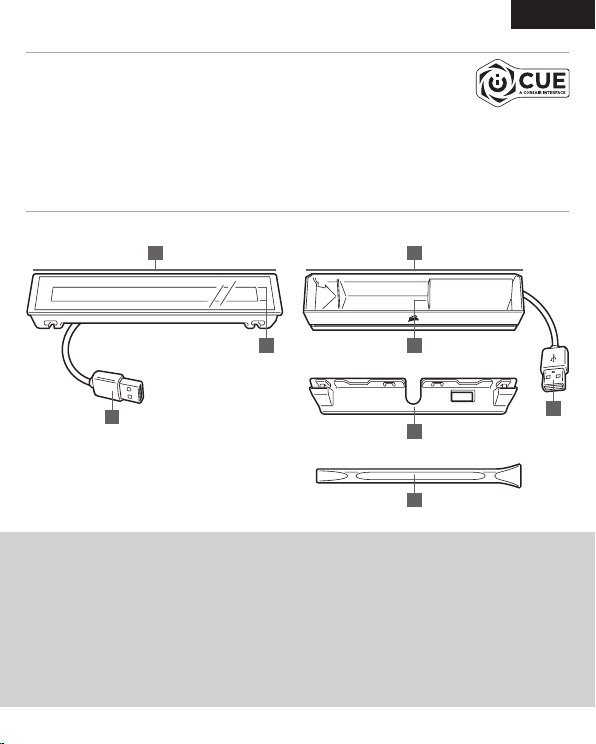
A— iCUE NEXUS
B— PANTALLA TÁCTIL
C— CONECTOR USB
D— BASE INDEPENDIENTE
E— CABLE DE EXTENSIÓN DEL
CONECTOR USB DE LA BASE
F— CONECTOR USB DE LA BASE
G— SOPORTES DE MONTAJE PARA EL
TECLADO x 3
H— HERRAMIENTA DE EXTRACCIÓN
DEL SOPORTE
A— iCUE NEXUS
B— TOUCH SCREEN
C— CONECTOR USB
D— BASE AVULSA
E— PASSTHROUGH USB DA BASE
F— CONECTOR USB DA BASE
G— SUPORTES DE MONTAGEM DO
TECLADO x 3
H— FERRAMENTA DE REMOÇÃO
DO SUPORTE
iCUE NEXUS se conecta al puerto USB de la PC a través de la base independiente o, cuando se conecta a un
teclado K70 RGB MK.2 o K95 RGB PLATINUM, a través de un soporte incluido.
O iCUE NEXUS se conecta com o PC pela base avulsa ou ao ser anexado ao teclado das séries K70 RGB MK.2
ou K95 RGB PLATINUM por meio de um suporte incluído.
IMPORTANTE: Si lo conecta a un teclado, deje pasar 24 horas para que se fije la cinta adhesiva del soporte antes
de usar la pantalla táctil. Para quitar el soporte, dé vuelta el teclado e inserte la herramienta de extracción incluida
(H) en el espacio que se encuentra entre el soporte y el teclado desde la parte inferior. Luego, presione con
suavidad para levantar el soporte hasta que se empiece a desprender. Sostenga la parte levemente desprendida
y, a su vez, siga levantando diferentes partes del soporte hasta separarlo por completo del teclado. Hay soportes
adicionales disponibles en www.corsair.com.
IMPORTANTE: Depois de prendê-lo ao teclado, espere 24 horas para que a fita adesiva se fixe antes de usar a
tela touchscreen. Para remover o suporte posteriormente, vire o teclado e insira a ferramenta de remoção
incluída (H) no espaço entre o suporte e o teclado, no lado inferior, e depois pressione para baixo
cuidadosamente para levantar o suporte até que ele se solte. Segure a parte parcialmente solta enquanto
continua a levantar diferentes áreas do suporte até que ele se solte completamente do teclado. Suportes
adicionais estão disponíveis em www.corsair.com
iCUE NEXUS requiere el software iCUE. Descargue el software iCUE en
www.corsair.com/downloads y, luego, instálelo en su PC con Windows®.
> Ejecute el software iCUE, haga clic en la ficha del dispositivo iCUE NEXUS y,
luego, vaya a la pestaña Pantallas para diseñar sus propias pantallas con gráficos
y funciones personalizados.
> Deslice el dedo hacia la izquierda y la derecha en la pantalla táctil para navegar rápidamente de
una pantalla a otra.
NOTA: Para obtener más información sobre programación avanzada e instructivos del producto,
visite www.corsair.com/nexus-faq.
O iCUE NEXUS exige o software iCUE. Baixe o iCUE em www.corsair.com/downloads e o
instale no seu PC Windows®.
> Inicie o iCUE, clique no bloco do dispositivo iCUE NEXUS, depois vá até a guia Telas para
começar a projetar suas próprias telas com gráficos e funções personalizadas.
> Deslize para a esquerda e direita na tela touchscreen para navegar rapidamente entre telas.
OBSERVAÇÃO: Para mais informações sobre programação avançada e tutoriais de produtos,
visite www.corsair.com/nexus-faq.
CONFIGURACIÓN DEL HARDWARE CONFIGURAÇÃO DE HARDWARECONFIGURACIÓN DEL SOFTWARE CONFIGURAÇÃO DO SOFTWARE
1. Conecte el USB a la base
2. Inserte el dispositivo iCUE NEXUS
3. Conecte el USB de la base a la PC
BASE INDEPENDIENTE
3
1
2
1. Identifique el panel central posterior para
conectar el soporte al teclado
2. Retire la película protectora
3. Conecte el soporte al teclado
4. Inserte el dispositivo iCUE NEXUS en el
soporte deslizándolo
5. Conecte el USB al teclado
SOPORTE DEL TECLADO
1
3
2
4
5
1. Conectar USB à base
2. Inserir iCUE NEXUS
3. Conectar base USB ao PC
BASE AVULSA
3
1
2
1. Localize o suporte correspondente ao painel
central traseiro do teclado
2. Retire o filme de proteção
3. Prenda o suporte ao teclado
4. Deslize o iCUE NEXUS no suporte
5. Conecte o USB ao teclado
SUPORTE DO TECLADO
1
3
2
4
5
CONHEÇA O iCUE NEXUS
A D
B
G
H
CF
E
CONOZCA iCUE NEXUS
A D
B
G
H
CF
E
This device complies with Part 15 of the FCC Rules. Operation is subject to the following two conditions: (1) This
device may not cause harmful interference, and (2) this device must accept any interference received, including
interference that may cause undesired operation.
This equipment has been tested and found to comply with the limits for a Class B digital device, pursuant to Part
15 of the FCC Rules. These limits are designed to provide reasonable protection against harmful interference in a
residential installation. This equipment generates, uses and can radiate radio frequency energy and, if not installed
and used in accordance with the instructions, may cause harmful interference to radio communications. However,
there is no guarantee that interference will not occur in a particular installation. If this equipment does cause harmful
interference to radio or television reception, which can be determined by turning the equipment off and on, the user is
encouraged to try to correct the interference by one of the following measures:
- Reorient or relocate the receiving antenna.
- Increase the separation between the equipment and receiver.
- Connect the equipment into an outlet on a circuit different from that to which the receiver is connected.
- Consult the dealer or an experienced radio/TV technician for help.
This device must not be co-located or operating in conjunction with any other antenna or transmitter.
Operation is subject to the following two conditions:
(1) this device may not cause harmful interference, and
(2) this device must accept any interference received, including interference that may cause undesired operation.
This Class B digital apparatus meets all requirements of the Canadian Interference-Causing Equipment Regulations.
CAN ICES-3(B)/NMB-3(B)
Cet appareil numérique de la class B respecte toutes les exigences du Règlement sur le materiel brouilleur du
Canada. CAN ICES-3(B)/NMB-3(B)
Changes or modifications not expressly approved by the party responsible
for compliance could void the user’s authority to operate the equipment.

Companion Touch Screen
iCUE NEXUS
A— iCUE NEXUS
B— TOUCH SCREEN
C— USB CONNECTOR
D— STANDALONE BASE
E— BASE USB PASSTHROUGH
F— BASE USB CONNECTOR
G— KEYBOARD MOUNTING BRACKETS x 3
H— BRACKET REMOVAL TOOL
A— iCUE NEXUS
B— ÉCRAN TACTILE
C— CONNECTEUR USB
D— BASE AUTONOME
E— PASSE-CÂBLE USB DE LA BASE
F— CONNECTEUR USB DE LA BASE
G— SUPPORTS DE FIXATION POUR
CLAVIER x 3
H— OUTIL DE DÉMONTAGE DU SUPPORT
iCUE NEXUS connects to PC USB via the standalone base or when attached to a K70 RGB MK.2 or
K95 RGB PLATINUM series keyboard via an included bracket.
L'iCUE NEXUS se connecte à votre ordinateur PC via la base autonome ou lorsque fixé à un clavier de la gamme
CORSAIR K70 RGB MK.2 ou K95 RGB PLATINUM à l'aide du support fourni.
IMPORTANT: If attached to a keyboard, allow 24 hours for the adhesive tape on the bracket to set before using
the touch screen. To remove the bracket later, turn over the keyboard and insert the included removal tool (H)
into the gap between the bracket and the keyboard from the bottom side, and then gently press down to lift the
bracket until it begins to detach. Hold the partially detached portion while continuing to lift different areas of the
bracket until it is fully released from the keyboard. Additional brackets are available at www.corsair.com.
IMPORTANT: Si l'appareil est fixé à un clavier, attendez 24 heures pour que le ruban adhésif du support durcisse
avant d'utiliser l'écran tactile. Pour retirer ultérieurement le support, retournez le clavier et insérez l'outil de
démontage (H) fourni dans l'espace entre le support et le clavier à partir du bas, puis appuyez doucement vers le
bas pour lever le support jusqu'à ce qu'il commence à se détacher. Tenez la partie partiellement détachée tout en
continuant à lever différentes parties du support jusqu'à ce qu'il soit entièrement dégagé du clavier. Des supports
supplémentaires sont disponibles à l'adresse www.corsair.com.
iCUE NEXUS requires the iCUE software. Download iCUE from www.corsair.com/downloads
and install on your Windows®PC.
> Launch iCUE, click the iCUE NEXUS device tile, and then go to the Screens tab to begin
designing your own screens with custom graphics and functions.
> Swipe left and right on the touch screen to quickly navigate between screens.
NOTE: For more information on advanced programming and product tutorials,
visit www.corsair.com/nexus-faq.
L'iCUE NEXUS requiert le logiciel iCUE. Téléchargez le logiciel iCUE sur le site
www.corsair.com/downloads et installez-le sur votre ordinateur PC fonctionnant
sous Windows®.
> Lancez le logiciel iCUE, cliquez sur la vignette du périphérique iCUE NEXUS, et allez
dans l'onglet Écrans pour commencer à concevoir vos propres écrans avec des fonctions
et des graphiques personnalisés.
> Balayez vers la gauche et la droite sur l'écran tactile pour naviguer rapidement entre les écrans.
REMARQUE: Pour plus d'informations sur la programmation avancée et pour des tutoriels sur le produit,
visitez le www.corsair.com/nexus-faq.
HARDWARE SETUP INSTALLATION MATÉRIELLESOFTWARE SETUP INSTALLATION LOGICIELLE
ENGLISH ENGLISH FRANÇAIS FRANÇAIS
WEB: corsair.com
PHONE: (888) 222-4346
SUPPORT: support.corsair.com
BLOG: corsair.com/blog
FORUM: forum.corsair.com
YOUTUBE: youtube.com/corsairhowto
© 2020 CORSAIR MEMORY Inc. All rights reserved. CORSAIR and the sails logo
are registered trademarks in the United States and/or other countries. All other
trademarks are the property of their respective owners. Product may vary slightly
from those pictured. 49-002031 AB
iCUE NEXUS
1. Connect USB to base
2. Insert iCUE NEXUS
3. Connect base USB to PC
STANDALONE BASE
3
1
2
1. Locate bracket matching keyboard
rear center panel
2. Peel off protective film
3. Attach bracket to keyboard
4. Slide iCUE NEXUS onto bracket
5. Connect USB to keyboard
KEYBOARD BRACKET
1
3
2
4
5
1. Brancher le connecteur USB sur la base
2. Insérer l'iCUE NEXUS
3. Brancher le connecteur USB de la base
sur l'ordinateur PC
BASE AUTONOME
3
1
2
1. Repérer le panneau arrière central du clavier
correspondant au support
2. Retirer le film protecteur
3. Fixer le support au clavier
4. Glisser l'iCUE NEXUS sur le support
5. Brancher le connecteur USB sur le clavier
SUPPORT POUR CLAVIER
1
3
2
4
5
GETTING TO KNOW iCUE NEXUS
A D
B
G
H
CF
E
PRÉSENTATION DE L'iCUE NEXUS
A D
B
G
H
CF
E
Other manuals for iCUE NEXUS
1
Table of contents
Popular Touch Panel manuals by other brands

IEI Technology
IEI Technology AFL2-17A-H61 Series user manual

Icop
Icop PPC-150T-D2N4N user manual

Extron electronics
Extron electronics TLP 1000MV user guide

Armacost Lighting
Armacost Lighting 733121 quick start guide

IEI Technology
IEI Technology POC-W24C-ULT3 user manual

YOKOGAWA
YOKOGAWA UM33A/S006 user manual