Cosco EASY ELITE User manual

FUNSMARTSIMPLE
EASY ELITE
3-IN-1 CAR SEAT
KEEP INSTRUCTIONS FOR FUTURE USE.
Read all instructions before using this car seat.
WARNING Failure to follow the warnings on the
labels and in the instruction manual can result in
serious injury or death to your child.
www.coscokids.com
4358-7844
9.9.19

Quick NavigationOverview
Welcome to the Cosco family and thank you for choosing
this car seat, also known as a child restraint!
To help you get started using your child’s new car seat,
here are the 4 main tasks you’ll need to complete:
Your child’s safety is worth the time it will take
for you to read and follow these instructions.
Ready? Let’s go!
Pages 1-3 will introduce you to the parts of the car seat.
Page 77 has our contact information. If at any point you would like
assistance, please feel free to reach out to us.
REAR-FACING
5-40 lb
(2.3-18 kg) and
19-40 in.
(48-101.6 cm)
PAGE 5
BOOSTER SEAT
40-80 lb
(18.1-36.3 kg)
and 43-52 in.
(110.1-132.1 cm)
PAGE 5
Rear-
Facing
Child Fit
PAGE 7
Forward-
Facing
Child Fit
PAGE 8
Adjusting
Car Seat
PAGES 9-16
Removing
Harness
System
PAGE 58
Securing
Child
PAGE 54
Vehicle
Belt
PAGE 26
Lower
Anchor
Belt
PAGE 33
Vehicle
Belt +
Tether
PAGE 41
Lower
Anchor
Belt +
Tether
PAGE 47
FORWARD-FACING
22-50 lb (10.1-22.6 kg)
and 29-45 in.
(73.6-114.3 cm)
And at least 1 year old
PAGE 5
Adjust Car Seat to Fit Your Child
Measure Your Child
Install Car Seat into Your Vehicle
Snugly Secure Your Child in Car Seat
Booster
Seat
Child Fit
PAGE 61
Lap/
Shoulder
Belt
PAGE 62

Contents
Getting Started
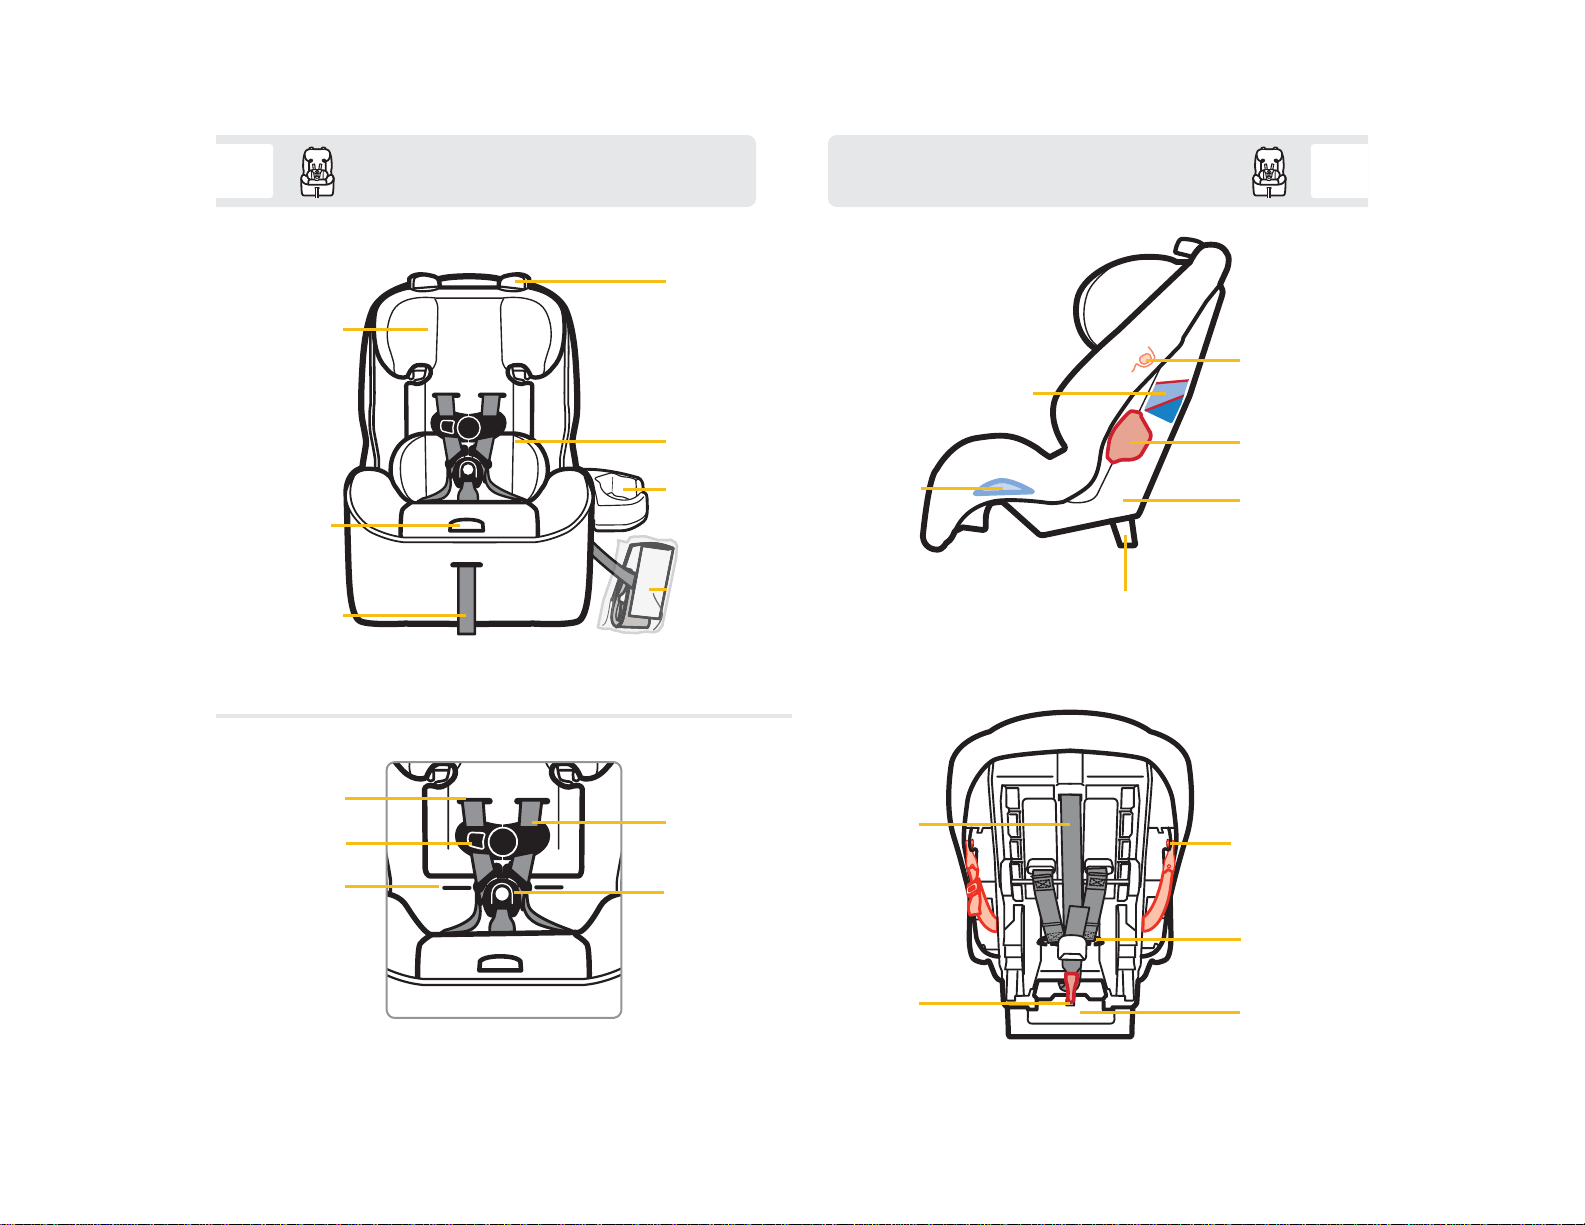
Parts of Car Seat................................................................. 1
Accessory Use ................................................................... 3
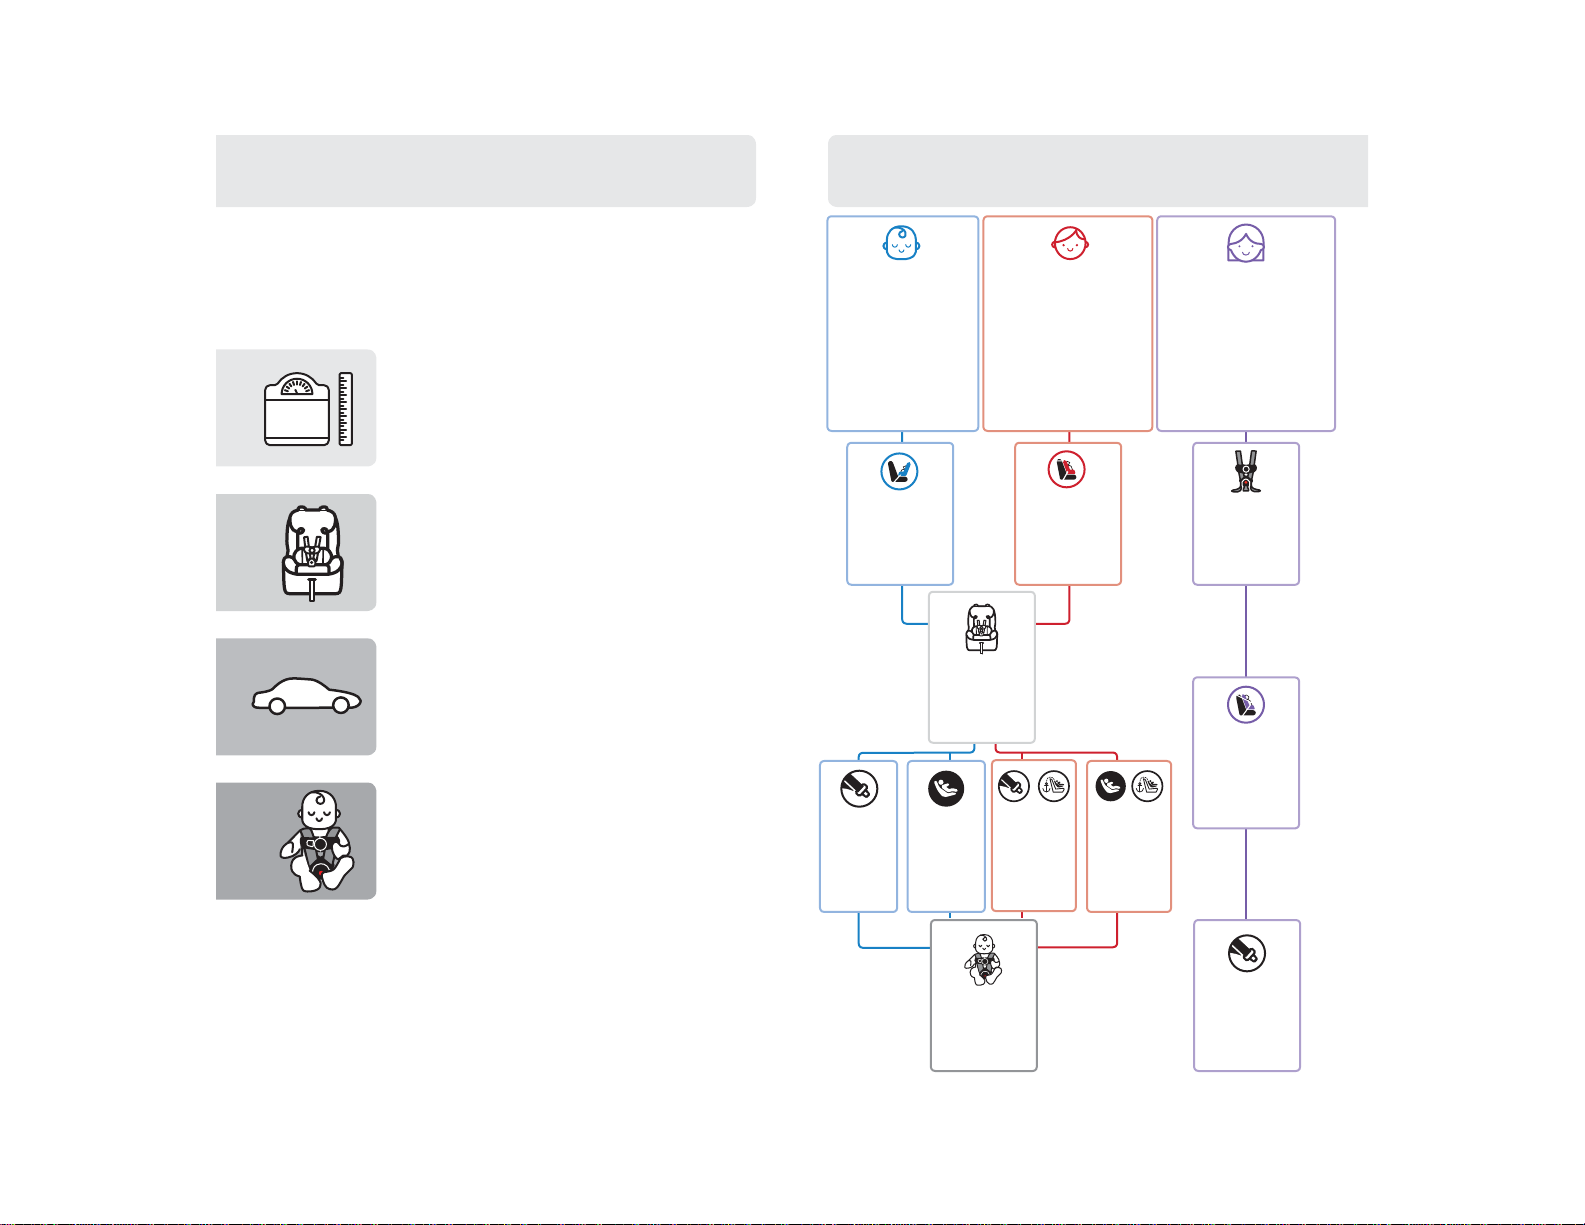
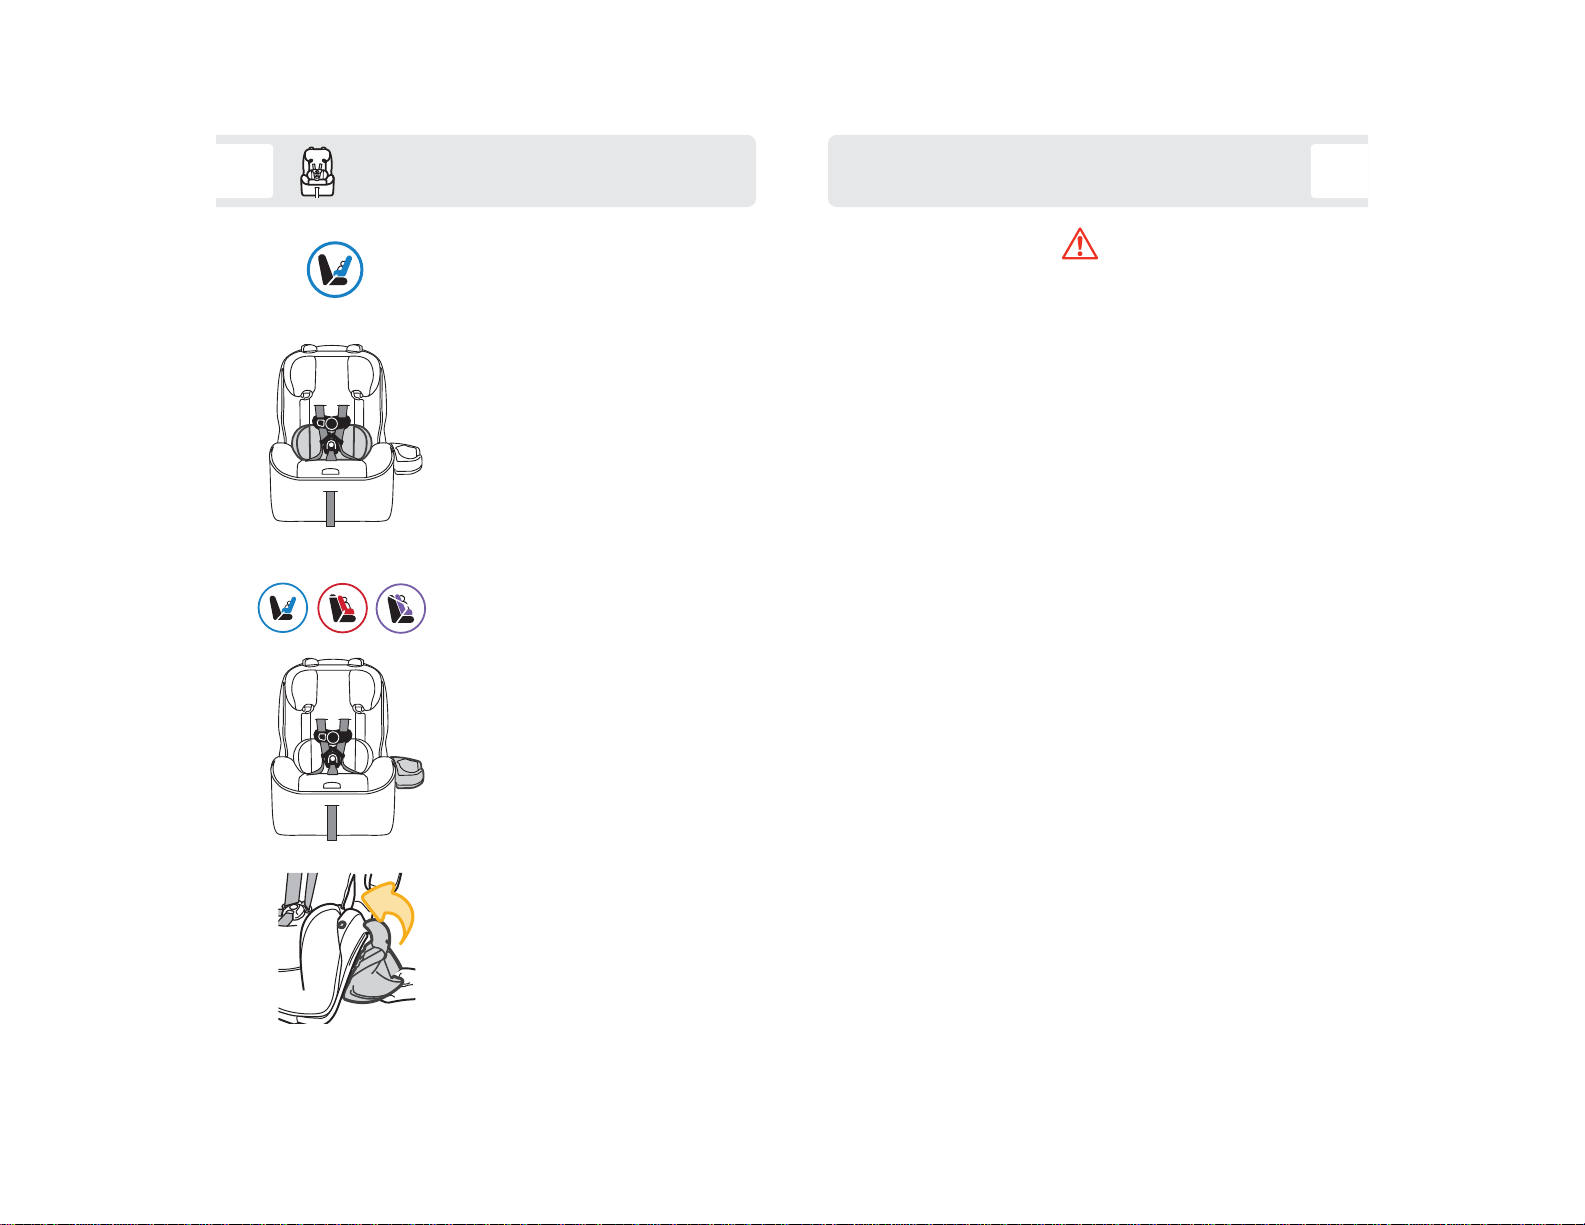
Choosing Car Seat Mode ................................................... 4
Preparing Car Seat for Child Fit............................................. 6
Rear-Facing Child Fit ......................................................... 7
Forward-Facing Child Fit ............................................................ 8
Making Adjustments to Car Seat
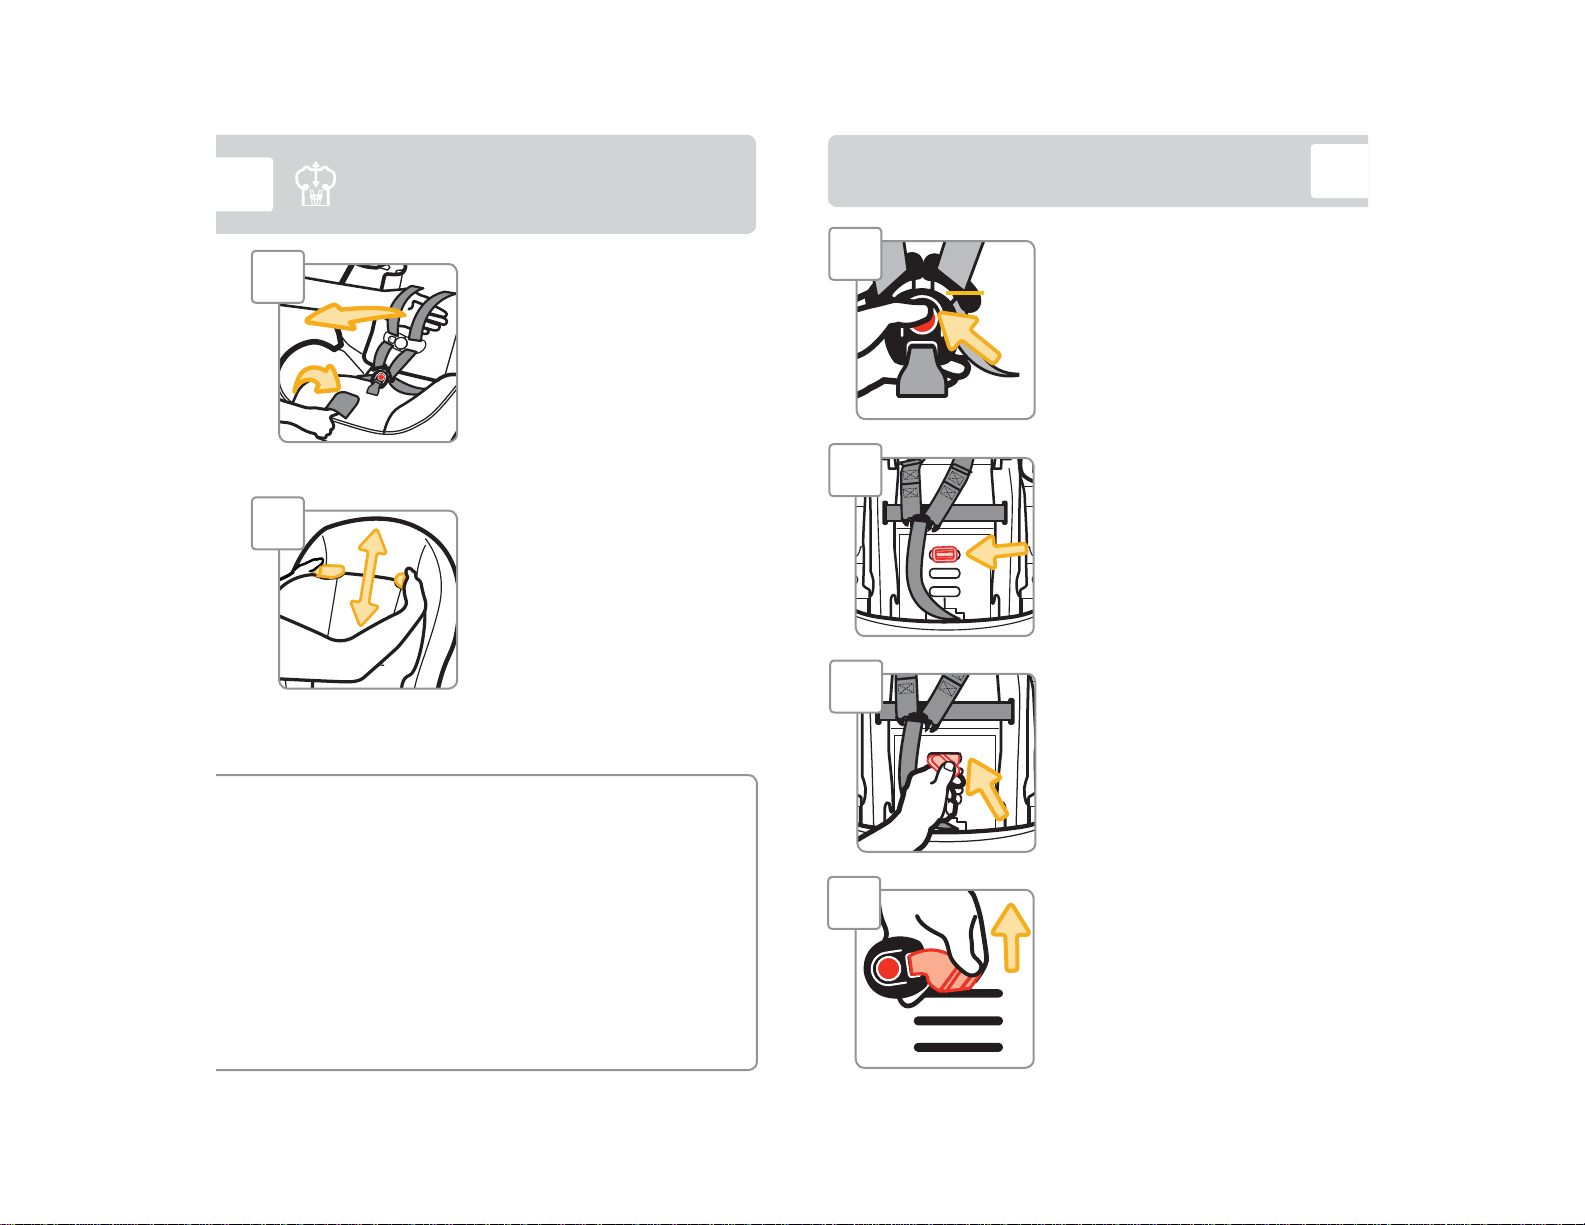
Changing Headrest/Harness Height ................................... 9
Changing Buckle Position................................................... 10
Harness System Adjustments For Smaller Infants................... 12
Reclining Car Seat .............................................................. 16
Choosing LATCH or Vehicle Belt
LATCH: Lower Anchor Use .................................................. 17
Vehicle Belts ...................................................................... 19
Tether Use .......................................................................... 23
Installation in Vehicle
Rear-Facing Mode ............................................................. 25
Vehicle Belt Install .............................................................. 26
LATCH: Lower Anchor Belt Install........................................ 33
Forward-Facing Mode ....................................................... 40
Vehicle Belt + Tether Install................................................ 41
LATCH: Lower Anchor Belt + Tether Install ......................... 47
Securing Child in Car Seat ........................................ 54
Booster Seat
Booster Seat Mode ............................................................ 57
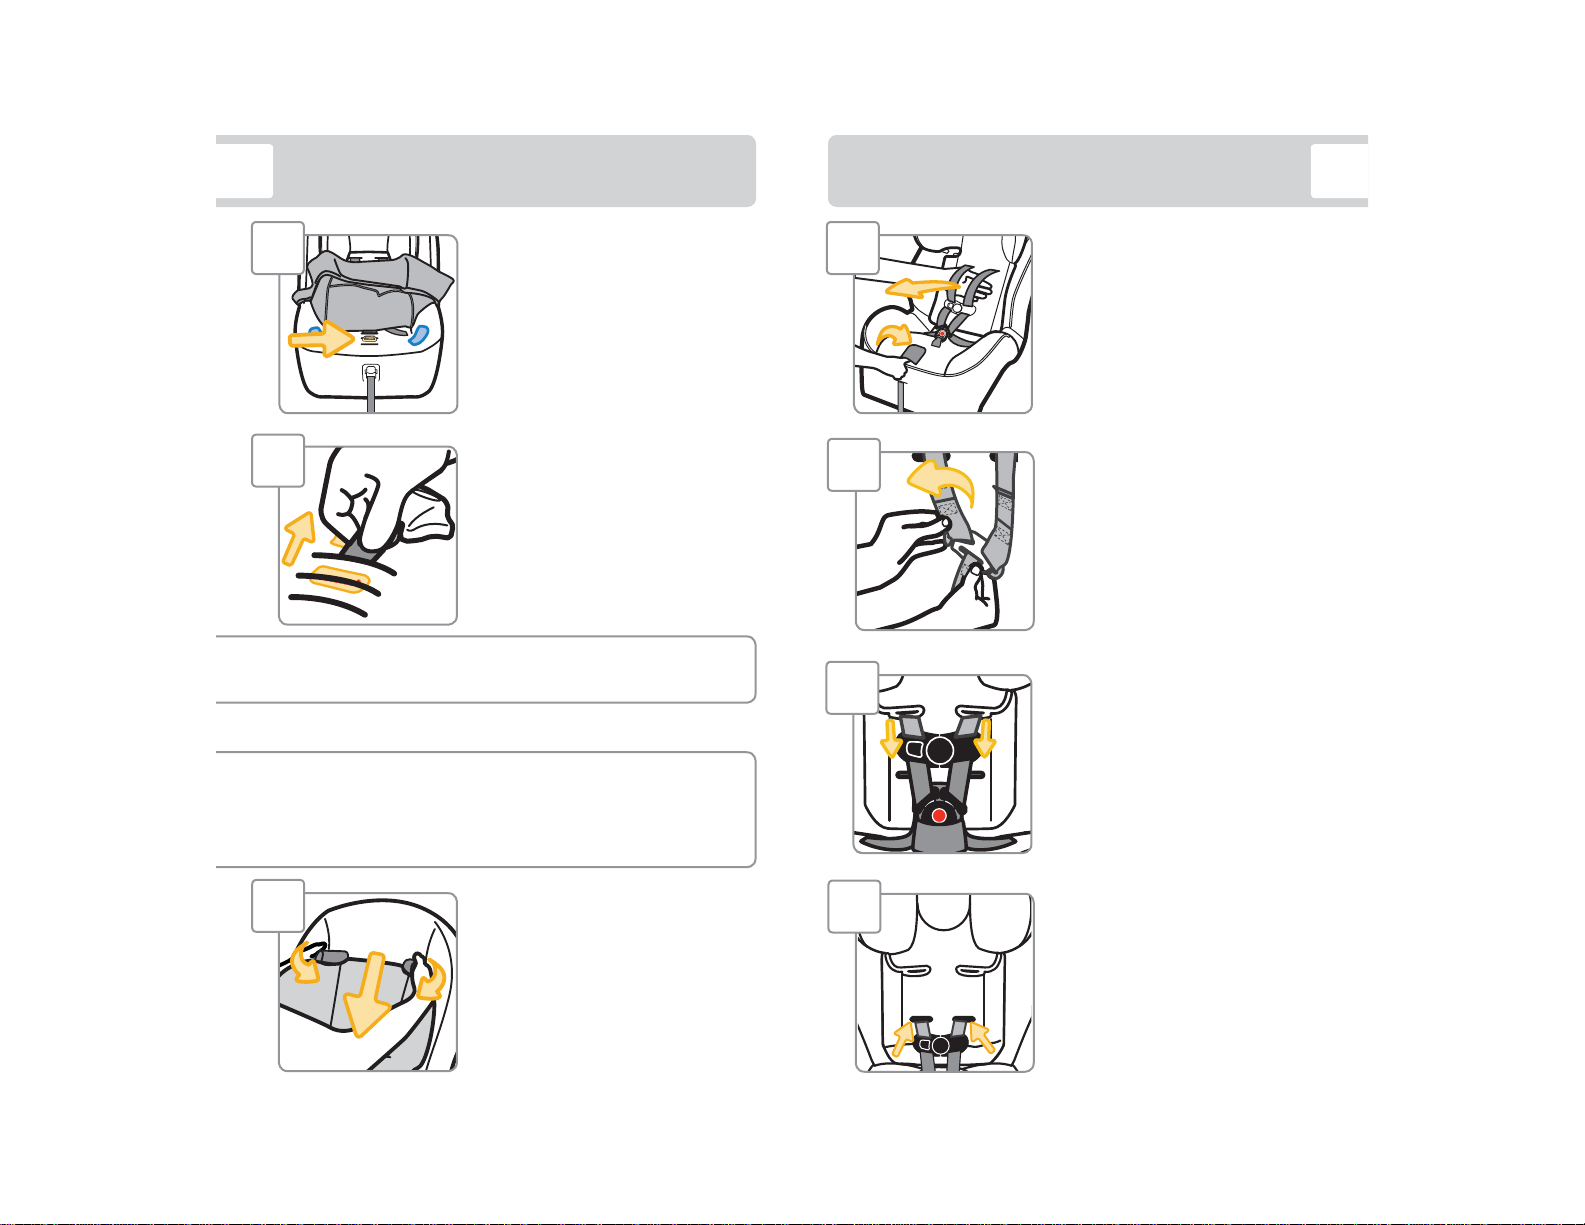
Removing Harness System................................................ 58
Booster Seat Child Fit ........................................................ 61
Lap/Shoulder Belt Use ....................................................... 62
Car Seat Pad Use and Care
Removing Seat Pad Set for Cleaning ..................................... 64
Cleaning and Installing Seat Pad Set ................................ 66
Installing Harness System ................................................. 67
Safety Information
Aircraft Information .......................................................... 70
Replacement and Expiration of Car Seat ............................ 71
Child Restraint Use............................................................... 72
Installation in Vehicle............................................................ 72
Vehicle Seating Position ....................................................... 73
Registration and Safety Notices............................................. 74
Additional Information
Warranty ............................................................................. 75
Troubleshooting ................................................................... 76
Replacement Parts List ........................................................ 77
Dorel Juvenile Group Information........................................... 78
© 2019 Dorel Juvenile. All Rights Reserved.

LATCH: Lower
Anchor Belt
Bag May Be in
Forward-Facing
Belt Path
2
Parts of Car Seat
1
Headrest/
Harness
Adjustment
Levers
Harness
Release
Lever
(under flap)
Harness
Adjustment
Strap
Chest Clip
Harness System Detail
Adjustable
Headrest
*See page 3 for Accessory Use.
Removable
Cup
Holder*
Buckle
Harness
Straps
Body
Pillow*Forward-
Facing
Belt Path
Rear-
Facing
Level Lines
Recline
Stand
Rear-
Facing
Belt Path
Tether
Strap
Tether
Storage
Attachment
Instruction
Manual
Storage
LATCH: Lower
Anchor Belt
Storage
Attachment
Splitter
Plate
Shell
(car seat)
LATCH: Lower
Anchor Belt
Storage
Attachment
Lower
Shoulder
Harness
Slots for
Smaller
Infants
Upper
Shoulder
Harness
Slots

4
Accessory Use
3
For Use in Rear-Facing
Mode Only
Body Pillow
To remove, slide it out from behind
the harness straps.
Removable Cup Holder
To install, pull the seat pad off the
corner of the shell.
Hook the bottom of the cup holder to
the edge of the shell.
Rotate the cup holder up until it snaps
into the hole in the shell.
Replace the seat pad.
For Use in All Modes
Choosing Car Seat Mode
Measure your child’s weight and height
(do not guess) before choosing the car seat’s mode.
Your child’s height, weight, and age determine how the car seat should
be placed in the vehicle.
Children vary widely in body size, shape, and temperament—please
consult your doctor before switching between any of these
modes within the limits and fit requirements of the seat.
State Laws
Please be certain to follow your state’s laws regarding car seat use.
American Academy of Pediatrics Recommendations
Infants and Toddlers
Should ride in a rear-facing car seat as long as possible, until they
reach the highest weight or height allowed by their seat.
Toddlers and Preschoolers
Once they are facing forward, children should use a forward-facing car
seat with a harness for as long as possible, until they reach the height
and weight limits for their seats.
School-Aged Children
Once they have outgrown their forward-facing car seat, children should
use a belt-positioning booster seat until the vehicle’s lap and shoulder
seat belt fits properly. This is often when they have reached at least
4 feet 9 inches in height and are 8 to 12 years old.
Older Children
All children younger than 13 years should be restrained in the rear
seats of vehicles for optimal protection.
continued on next page

65
FORWARD-FACING MODE
22-50 lb (10.1-22.6 kg) and 29-45 in. (73.6-114.3 cm)
Children must be at least 1 year of age to ride Forward-Facing.
In this car seat, your child can remain harnessed Forward-
Facing until they outgrow any one of the following:
• Weight Limit: 50 lb (22.6 kg); OR
• Height Limit: 45 in. (114.3 cm); OR
• Forward-Facing Child Fit requirements, see page 8
BOOSTER SEAT MODE
40-80 lb (18.1-36.3 kg) and 43-52 in. (110.1-132.1 cm)
In this car seat, your child can remain in a Booster Seat until
they outgrow any one of the following:
• Weight Limit: 80 lb (36.3 kg); OR
• Height Limit: 52 in. (132.1 cm); OR
• Booster Seat Child Fit requirements, see page 61
REAR-FACING MODE
5-40 lb (2.3-18 kg) and 19-40 in. (48-101.6 cm)
Children under 1 year of age must ride Rear-Facing.
In this car seat, your child can remain Rear-Facing until
they outgrow any one of the following:
• Weight Limit: 40 lb (18 kg); OR
• Height Limit: 40 in. (101.6 cm); OR
• Rear-Facing Child Fit requirements, see page 7
Fully Loosen Harness Straps
Push down on the harness release
lever (through the opening in the
pad) while pulling out on the harness
straps as shown.
Unbuckle Harness
Press in towards the top of the
red button and pull out the buckle
tongues.
Release Chest Clip
Hold each side of the chest clip.
Press on the release button with your
thumb and pull the chest clip apart.
Place the harness straps out of the
way.
1
2Buckle
Tongue
3
Release
Button
Preparing Car Seat for Child Fit
4Place Child in Car Seat
to Determine Proper
Harness Fit
Your child’s bottom and back should
be flat against the car seat.
For Rear-Facing Child Fit, see page 7.
For Forward-Facing Child Fit, see page 8.

1
2
3
1
2
Forward-Facing Child Fit 8
Rear-Facing Child Fit
7
Need to make adjustments?
To change headrest/harness height, see page 9.
To change buckle position, see pages 15-16.
Need to make adjustments?
To change headrest/harness height, see page 9.
To change buckle position, see pages 15-16.
Harness Strap Position
The harness strap must be at or
slightly above your child’s shoulders;
never below.
Max Seated Shoulder Height
In this car seat, the maximum seated
shoulder height is 17 in. (43.2 cm).
To measure your child’s seated
shoulder height:have them sit on
the floor with their back flat against a
wall. Then measure from the floor up
to the top of their shoulder.
Buckle Position
The buckle can be used in any buckle
slot.
Choose the slot closest to your child.
The buckle should not be
underneath or behind your child.
Head Position
The tops of your child’s ears must
be below the top of the car seat’s
headrest.
Harness Strap Position
The harness strap must be at or
slightly below your child’s shoulders;
never above.
Buckle Position
The buckle must be used in either
the 1st or 2nd buckle slot.
Choose the slot closest to your child.
The buckle should not be
underneath or behind your child.
Head Position
The top of your child’s head must be
at least 1 in. (2.5 cm) below the top
of the car seat’s headrest.
Do not use 3rd slot in
Rear-Facing Mode.
Max Seated
Height
17 in.
(43.2 cm)

10
Changing Headrest/
Harness Height
9
Fully Loosen Harness Straps
Push down on the harness release
lever (through the opening in the
pad) while pulling out on the harness
straps as shown.
Changing Headrest/
Harness Height
Rotate the headrest/harness
adjustment levers inward.
Move the headrest up or down to
the proper height for your child.
Make sure it locks securely.
For Rear-Facing Child Fit, see page 7.
For Forward-Facing Child Fit, see page 8.
Check your child’s fit often.
If you cannot achieve a snug harness fit for your child,
see pages 12-15.
To learn how to check harness tightness, see pages 54-56.
Check the harness straps often for any wear or damage.
1
2
2
Changing Buckle Position
Unbuckle Harness
Press in towards the top of the
red button and pull out the buckle
tongues.
Turn Car Seat Over
Locate the buckle’s metal retainer
on the bottom of the shell.
1
Buckle
Tongue
Rotate Metal Retainer and
Push It Up Through Buckle
Slot in Shell
3
From Top of Car Seat,
Pull Buckle Out of Shell
and Pad
4
continued on next page

11 12
Check your child’s fit often.
If you cannot achieve a snug harness fit for your child, see
pages 12-15.
To learn how to check harness tightness, see pages 54-56.
Insert Buckle’s Metal
Retainer into Buckle
Slot Closest to Child
The buckle must face out.
Rear-Facing Mode:You must use
the 1st or 2nd buckle slot.
Forward-Facing Mode: Any slot can
be used.
Pull Metal Retainer Completely
Through Pad and Shell
Check Buckle
Pull up on the buckle to make sure it
is secured.
The buckle must not pull out.
5
6
7
Failure to place buckle’s metal retainer completely
through pad and shell can result in serious injury or death. continued on next page
Harness System Adjustments for
Smaller Infants
With Buckle in 1st Slot,
Turn Car Seat Over
If you need to move the buckle to
the 1st slot, see pages 10-11.
Pull Up Front of Car Seat Pad
From Bottom of Seat,
Pull Metal Retainer
Towards You and Push
It Up into Middle Slot
As Shown
If you cannot achieve a snug harness fit for your child,
you may need to adjust the buckle strap and
harness strap length as shown in this section.
1
2
3
Adjusting Buckle Strap

13 14
Pull Harness Straps Out of
Upper Shoulder Harness Slots
From Back of Car Seat,
Remove Harness Strap
Loops From Splitter Plate
Fully Loosen Harness Straps
Push down on the harness release
lever (through the opening in the
pad) while pulling out on the harness
straps as shown.
3
4
2
5Thread Harness Straps Through
Lower Shoulder Harness Slots
For Smaller Infants in Seat Pad
and Shell
continued on next page
Replace Pad and Check Buckle
Pull up on buckle to make sure it is
secured.
The buckle must not pull out.
Check your child’s fit often.
To learn how to check harness tightness, see pages 54-56.
5
Adjusting Harness Strap
When using the lower shoulder harness slots for smaller
children, you must use the body pillow and the headrest
must be in the lowest position.
Adjust Headrest to
Lowest Position
1
From Top of Car Seat, Lay Metal
Retainer Flat Against Shell As
Shown
4

16
15
This car seat has 2 positions.
To Recline: Pull the recline stand down
and rotate it under the car seat.
Rear-Facing Mode -1 Reclined
For children between 5-22 lb (2.3-10 kg), the bottom level line on
the shell must be parallel with the ground.
For children 22-40 lb (10.1-18 kg) who can sit up unassisted,
rotate the car seat between the 2 level lines.
Forward-Facing Mode - 2 Upright
Booster Seat Mode - 2 Upright
Reclining Car Seat
For Upright: Rotate the recline stand
out and push it upward to lock it into
position.
Attach 2nd Harness Strap
Loops to Splitter Plate As
Shown
The sewn ends of the harness strap
loops must face towards you.
Do not twist the harness strap or the
harness adjustment strap.
Make sure the same harness strap
loops are fitted completely on both
sides of the splitter plate.
From Back of Car Seat, Pull
Harness Straps Through Shell
The harness straps must be in the
shoulder harness slots below the
metal bar as shown.
Do not twist the harness straps.
6
7
sewn
end
The harness system must be installed correctly. Do not use a
child restraint with damaged harness straps.
Check your child’s fit often.
To learn how to check harness tightness, see pages 54-56.

18
Lower Anchor
Hooks
Adjuster
Lower Anchor Belt
Storage Attachment
Lower Anchor Belt
Storage Location
Lower Anchor
Belt Parts
To Remove Lower Anchor Belt from Storage
Attachment on Car Seat
Squeeze the spring lever on the hooks and remove the hooks from the
storage attachments.
To Store Lower Anchor Belt
When using the vehicle belts to install,
using the Booster Seat Mode, or when
the car seat is not installed in a vehicle,
the lower anchor belt must be properly
stored in its storage location.
Thread the lower anchor belt through the
Forward-Facing Belt Path then attach
the hooks to the storage attachments as
shown. Gently tighten to remove slack.
To Remove Lower Anchor Belt from
Vehicle’s Lower Anchor Bars
Remove the tension from the belt by
pushing down on the side of the car seat
with the adjuster. Then press the adjuster’s
button to loosen the belt.
Remove the hook from the anchor by squeezing the spring lever on the
hook, pushing the hook back into the seat bight, and rotating the hook
to the side. Then pull the hook out of the vehicle seat bight.
17
Vehicle
Seat Bight
LATCH: Lower Anchor Bars
For Use in Rear-Facing Mode
or Forward-Facing Mode
Your vehicle’s features may be considerably different
than those pictured here.
The lower anchors of LATCH (Lower Anchors and Tethers for
CHildren) is a universal system for installing car seats without using
vehicle seat belts.
The LATCH: lower anchor belt can only be used in vehicles that have
the lower anchor bars installed in designated seating positions. Most
vehicles manufactured after September 2002 are equipped with
LATCH: lower anchor bars.
Check your vehicle owner’s manual to see which seating positions
may be equipped with LATCH: lower anchor bars.
Do not use both the lower anchor belt and vehicle belt
at the same time. When used correctly the lower anchor
belt or the vehicle belts are equally safe.
LATCH: Lower Anchor Use

continued on next page
2019
Your vehicle’s features may be considerably different
than those pictured here.
If LATCH: lower anchors are not an option or if your child weighs more
than 40 lb (18 kg), you must use the vehicle seat belt system to install
the car seat.
Not all vehicle belts and seating positions will work with
car seats.
Please go through the steps following steps to understand
how to lock a car seat in Rear-Facing Mode or Forward-
Facing Mode with a vehicle belt.
Lap/Shoulder Belts
Vehicle Belts
You Must Review Your
Vehicle Owner’s Manual
Your vehicle owner’s manual will let
you know which vehicle belts and
seating positions car seats can be
installed in.
Check How This Car Seat Will
Be Locked Into Place
The vehicle belt must not loosen
after tightening. This means there
needs to be a way to lock the vehicle
belt.
The ways this can be done are:
• By using the seat belt’s retractor,
see step 3; OR
• By using the seat belt’s latch plate,
see step 4.
Check Retractor
Retractors pull seat belts into stored
positions and lock the belt to hold
passengers in place.
See the next page for some common
types of vehicle belt retractors that
will work with this car seat.
1
2
3

2221
Automatic Locking Retractor
Emergency Locking Retractor
This retractor always locks.
It will automatically lock after slowly pulling the seat belt out at least
halfway and letting the belt go back into the retractor 1-2 in.
(2.5-5 cm).
If the retractor does not lock, it is most likely an Emergency Locking
Retractor. These retractors only lock during a sudden stop or collision.
You will need to determine if your seat belt’s latch plate can lock the
belt. See step 4, “Check the Latch Plates”.
See Step 4, “Check
the Latch Plates”.
Switchable Retractor
(most vehicles have this type)
This retractor can be switched to a locking mode.
You must have the retractor in the locking mode to use the seat
belt with this car seat.
Switching to locking mode: Slowly pull the shoulder belt all the way
out, then let it go back in 1-2 in. (2.5-5 cm).
As it goes back in, you will most likely hear a ratcheting sound.
Gently pull the belt to see if it has locked. You will not be able to pull
any more belt out if the lock has engaged.
Types of Retractors
Locking Latch Plate
Emergency Locking
Retractor with a
Sliding Latch Plate
Emergency Locking Retractor Lap Only Belt
Inflatable Seat Belts
Never Use With This Car Seat
Check Latch Plates
Latch plates are the part of
the seat belt that goes into the
buckle.
To see if the latch plate locks:
1. Buckle Vehicle Belt
2. Firmly Tug Lap Portion of Seat Belt
While Pulling It Up
If the vehicle belt does not slide
through the latch plate, it’s locked.
If the latch plate slides up and down
the vehicle belt, it is a sliding latch
plate.
Sliding latch plates easily slip
between the lap and shoulder
portions of the belt.
If you have an Emergency Locking
Retractor with a Sliding Latch
Plate, you must use a locking clip.
Please contact us for one,
see page 77.
4

2423
Your vehicle’s features may be considerably different
than those pictured here.
You must always attach, adjust, and secure the tether (top
anchorage) strap when installing the car seat in the Forward-Facing
Mode with internal harness. Tethers improve the installation and
stability of car seats and reduce the risk of injury.
Attach the tether hook to the tether anchor designated by your vehicle
manufacturer for that seating position. Check your vehicle owner’s
manual for more information.
If the seating position does not have a tether anchor, use a different
seating position or see your dealer or a qualified mechanic and have
one installed.
Using this child restraint without the tether strap
anchored as required by the manufacturer would be a
misuse of the child restraint and, in a sudden stop or crash,
could result in serious injury or death.
Do not fasten multiple tether hooks on the same tether
anchor in the vehicle.
For Forward-Facing Mode Only
Tether Anchors
Tether Use
Adjusting Tether Strap
To tighten:After the car seat is
locked into place with the lower
anchor belt or vehicle belt, push
down on the car seat and gently pull
on the free end of the tether strap.
To loosen: Lift up on the tether
adjuster and push it towards the
tether hook.
Pull Free End
of Belt to
Tighten
Lift Adjuster Up to
Loosen
Storing Tether Strap
When installing in the Rear-Facing
Mode, using the Booster Seat
Mode, or when the car seat is not
installed in a vehicle, attach the
tether hook to its storage attachment
on the back of the car seat as shown.
Gently tighten to remove slack.
Adjuster
Strap
Hook
Storage
Attachment
Tether Storage
and Parts

2625
Never install a rear-facing child restraint in the
front seat of a vehicle equipped with an active
frontal airbag.
Do not use the tether for rear-facing mode. Secure the
tether strap hook to its storage attachment.
Do not use the lower anchor belt along with the vehicle lap
or lap/shoulder belt.
Check the vehicle belt or the lower anchor belt before each
use. Use only if the belt can be tightened properly and
locked securely in place.
Do not fasten multiple lower anchor hooks on the same
lower anchor bar in the vehicle.
This child restraint must always face the rear of the
vehicle until the child is at least 1 year old and weighs
22 lb (10 kg).
Lap/Shoulder
Belt
Lap Belt LATCH: Lower
Anchor Belt
5-40 lb (2.3-18 kg) and 19-40 in. (48-101.6 cm)
Rear-Facing Mode
1Recline Car Seat
Pull down the recline stand to unlock
and fold it under the car seat.
Before you begin installing the car seat
into your vehicle, did you check:
Your child’s weight and height?
5-40 lb (2.3-18 kg) and
19-40 in. (48-101.6 cm)
Your child’s fit? See page 7.
Do you need to make adjustments to the
harness/headrest height or the buckle position?
continued on next page
Vehicle Belt Install
Loosely attach the tether hook to the storage attachment before
folding the recline stand. Then gently tighten the tether strap to
remove slack.
Store Tether

2827
continued on next page
3
4
Place Car Seat Rear-Facing
in Back Seat
Check if Your Vehicle Belts Will
Work With This Car Seat
This is very important because not
all vehicle belts will work with car
seats.
Review pages 19-22 and your
vehicle owner’s manual to find out
what kind of vehicle belts you have
and how to lock a car seat in place.
5Locate Rear-Facing Belt Path
2Pull Seat Pad Off Front of Car
Seat
Route Vehicle Belt
Thread the vehicle belt through the
Rear-Facing Belt Path opening as
shown.
The belt goes:
• across the car seat; AND
• under the car seat pad; AND
• in front of the buckle; AND
• out the other Rear-Facing Belt
Path opening.
Do not twist belt.
6
1
2

3029
Buckle Vehicle Belt
Replace Seat Pad Around Front
of Car Seat
7
8
9Check Rear-Facing Level Line
For children between 5-22 lb
(2.3-10 kg), the bottom level line on
the shell must be parallel with the
ground.
For children 22-40 lb (10.1-18 kg)
who can sit up unassisted, rotate
the car seat between the 2 level
lines.
Start by making the bottom level line
parallel with the ground, then rotate
seat up. Do not rotate past the top
level line.
Tighten Belt
Place your hand in the car seat.
Firmly push the car seat down and
back towards the vehicle seat back
while pulling the shoulder belt or the
free end of lap belt parallel with the
Rear-Facing Belt Path as shown.
Check Belt Tightness
Hold the car seat at the Rear-Facing
Belt Path with your weaker hand.
Push and pull the car seat from side
to side. It should not move more than
1 in. (2.5 cm).
If it moves more than 1 in. (2.5 cm), you can try:
• Pulling the belt tighter; OR
• Reinstalling the car seat; OR
• Changing to a different seating location; OR
• Switching to LATCH: lower anchor belt installation if lower
anchors are available in your vehicle
10
11

3231
Recheck Rear-Facing
Level Line
Redo the installation if the car
seat is not reclined correctly for
your child.
Finished!
Check the tightness of the
install often to make sure it
has not loosened.
You may need to place a tightly
rolled towel(s) or foam pool
noodle(s) under the front of the car
seat to help get the correct recline
angle for the Rear-Facing Level
Line.
Check often to make sure padding
is still in place and the belt is tight.
13
Secure Child in Car Seat
To properly secure your child in the
car seat, see pages 54-56.
Check your child’s fit often and make
any needed adjustments to the car
seat as they grow.
12

Pull Seat Pad Off Front of Car
Seat
continued on next page
34
4
3
Locate Rear-Facing Belt Path
Recline Car Seat
Pull down the recline stand to unlock
and fold it under the car seat.
33
Before you begin installing the car seat
into your vehicle, did you check:
Remove Lower Anchor Belt
from Storage Attachments
Or if the lower anchor belt was
used Forward-Facing,remove it
from the Forward-Facing Belt Path
so both hooks are on the same side
of the car seat as shown.
1
Your child’s weight and height?
5-40 lb (2.3-18 kg) and
19-40 in. (48-101.6 cm)
Your child’s fit? See page 7.
Do you need to make adjustments to the
harness/headrest height or the buckle position?
2
LATCH: Lower Anchor Install
Loosely attach the tether hook to the storage attachment before
folding the recline stand. Then gently tighten the tether strap to
remove slack.
Store Tether
Other manuals for EASY ELITE
1
Table of contents
Other Cosco Car Seat manuals

Cosco
Cosco EASY ELITE User manual

Cosco
Cosco LIGHT 'N COMFY IC169 User manual

Cosco
Cosco Scenera Next User manual

Cosco
Cosco Light 'n Comfy User manual

Cosco
Cosco RISE User manual

Cosco
Cosco APT 50 User manual

Cosco
Cosco HIGHBACK 2-in-1 Installation instructions

Cosco
Cosco VENUTRA User manual

Cosco
Cosco APT 50 User manual

Cosco
Cosco Pronto User manual

Cosco
Cosco Scenera Next User manual

Cosco
Cosco Scenera Next User manual

Cosco
Cosco APT 40 User manual

Cosco
Cosco Stack-It! User manual

Cosco
Cosco Scenera User manual

Cosco
Cosco Pronto User manual

Cosco
Cosco Scenera Next User manual

Cosco
Cosco FINALE User manual

Cosco
Cosco Scenera Next User manual

Cosco
Cosco MIGHTYFIT LX User manual