Cosco LIGHT 'N COMFY 35 User manual

FUNSMARTSIMPLE
LIGHT ‘N COMFY 35
INFANT CAR SEAT
KEEP INSTRUCTIONS FOR FUTURE USE.
Read all instructions before using this car seat.
WARNING Failure to follow the warnings on the
labels and in the instruction manual can result in
serious injury or death to your child.
www.coscokids.com
4358-8070
8.26.20

Quick NavigationOverview
Welcome to the Cosco family and thank you for choosing
this car seat, also known as a child restraint!
To help you get started using your child’s new car seat,
here are the 4 main tasks you’ll need to complete:
Your child’s safety is worth the time it will take
for you to read and follow these instructions.
Ready? Let’s go!
Pages 1-3 will introduce you to the parts of the car seat.
Page 58 has our contact information. If at any point you would like
assistance, please feel free to reach out to us.
Adjust Car Seat to Fit Your Child
Measure Your Child
Install Car Seat into Your Vehicle
Snugly Secure Your Child in Car Seat
REAR-FACING
4-35 lb (1.8-15.9 kg) and
32 in. (81.3 cm) or less in height
PAGE 4
Rear-Facing Child Fit PAGE 6
Adjusting Car Seat PAGES 7-18
Securing Child PAGES 19-21
Vehicle Belt
PAGE 29
Vehicle Belt
PAGE 38
Lower
Anchor Belt
PAGE 33
Install
with
Base
Install
without
Base

Contents
Getting Started
Parts of Car Seat................................................................. 1
Accessory Use ................................................................... 3
Rear-Facing Use Requirements ......................................... 4
Preparing Car Seat for Child Fit............................................. 5
Rear-Facing Child Fit ......................................................... 6
Making Adjustments to Car Seat
Changing Harness Strap Position ....................................... 7
Changing Buckle Position................................................... 9
Harness System Adjustments for Smaller Infants ............. 11
Removing and Installing Car Seat to Base......................... 14
Base Use............................................................................. 15
Canopy Use ......................................................................... 16
Carrier Use .......................................................................... 18
Securing Child in Car Seat ........................................ 19
Choosing LATCH or Vehicle Belt
LATCH: Lower Anchor Use .................................................. 22
Vehicle Belts ...................................................................... 24
Installation in Vehicle
Rear-Facing Use with Base ............................................... 28
Vehicle Belt Install .............................................................. 29
LATCH: Lower Anchor Belt Install........................................ 33
Rear-Facing Use Without Base .......................................... 37
Vehicle Belt Install .............................................................. 38
Wash & Care of Car Seat Parts
Removing Harness System ................................................... 41
Removing Seat Pad Set for Cleaning ..................................... 44
Cleaning Parts of Car Seat and Installing Seat Pad Set..... 46
Installing Harness System ................................................. 47
Safety Information
Aircraft Information .......................................................... 50
Replacement and Expiration of Car Seat ............................ 51
Child Restraint Use............................................................... 52
Installation in Vehicle............................................................ 52
Vehicle Seating Position ....................................................... 53
Registration and Safety Notices............................................. 54
Additional Information
Warranty ............................................................................. 55
Troubleshooting ................................................................... 56
Replacement Parts List ........................................................ 57
Dorel Juvenile Group Information........................................... 58
© 2020 Dorel Juvenile. All Rights Reserved.

2
Parts of Car Seat
1
Vehicle Belt
Path Guide
(when used
without the
base)
Harness
Adjustment
Strap
Carry
Handle
Infant
Insert*
Rear-
Facing
Level Line
Base
Release
Handle
Base
Release
Handle
Instruction
Manual
Storage
Adjustable
Base
Carry Handle
Adjustment
Button
Base Belt
Path
Shell
(car seat)
Canopy
Harness
Release
Lever
(through
opening in
pad)
Chest Clip
Harness System Detail
*See page 3 for Accessory Use.
Buckle
Harness
Straps
Shoulder
Harness
Slots
Shoulder
Harness
Slots
Stroller
Attachment
Pins
Harness
Strap
Splitter
Plate
Harness
Ajustment
Strap
Buckle’s
Metal
Retainer
Lock Bars
LATCH:
Lower
Anchor
Belt
Base
Alignment
Slots Lower
Anchor Belt
Storage
Base
Buckle Slot

4
Rear-Facing Use Requirements
3
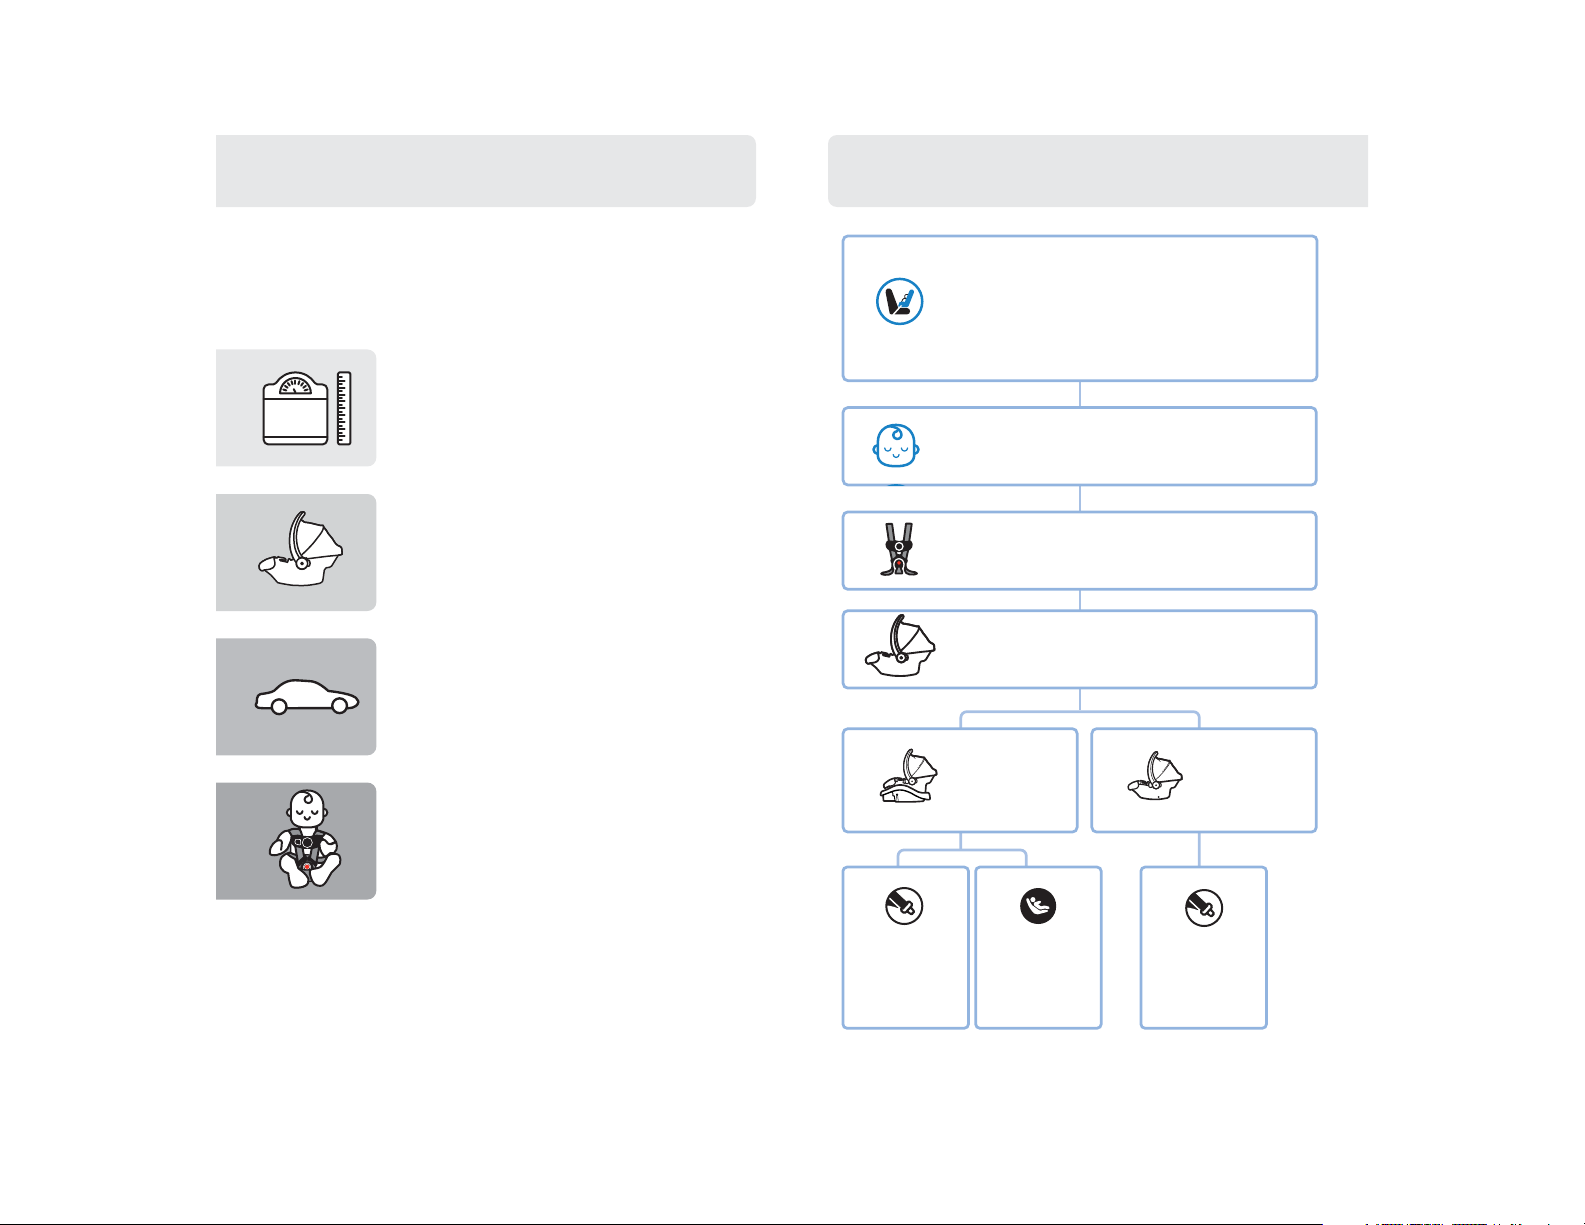
Measure your child’s weight and height
(do not guess) before choosing the car seat’s mode.
Your child’s height, weight, and age determine how the car seat should
be placed in the vehicle. Children vary widely in body size, shape,
and temperament—please consult your doctor before switching
between any types or modes of car seats within the limits and fit
requirements of the seat.
State Laws
Please be certain to follow your state’s laws regarding car seat use.
American Academy of Pediatrics Recommendations
Infants and Toddlers: Should ride in a rear-facing car seat as long as
possible, until they reach the highest weight or height allowed by their
seat.
Toddlers and Preschoolers: Once they are facing forward, children
should use a forward-facing car seat with a harness for as long as
possible, until they reach the height and weight limits for their seats.
School-Aged Children: Once they have outgrown their forward-facing
car seat, children should use a belt-positioning booster seat until the
vehicle’s lap and shoulder seat belt fits properly. This is often when
they have reached at least 4 feet 9 inches in height and are 8 to 12
years old.
Older Children: All children younger than 13 years should be re-
strained in the rear seats of vehicles for optimal protection.
Accessory Use
REAR-FACING
4-35 lb (1.8-15.9 kg) and 32 in. (81.3 cm) or less in
height
Children under 1 year of age must ride Rear-Facing.
This car seat can only be used Rear-Facing.
Your child can remain in this car seat until they outgrow
any one of the following:
• Weight Limit: 35 lb (15.9 kg); OR
• Height Limit: 32 in. (81.3 cm); OR
• Rear-Facing Child Fit requirements, see page 6
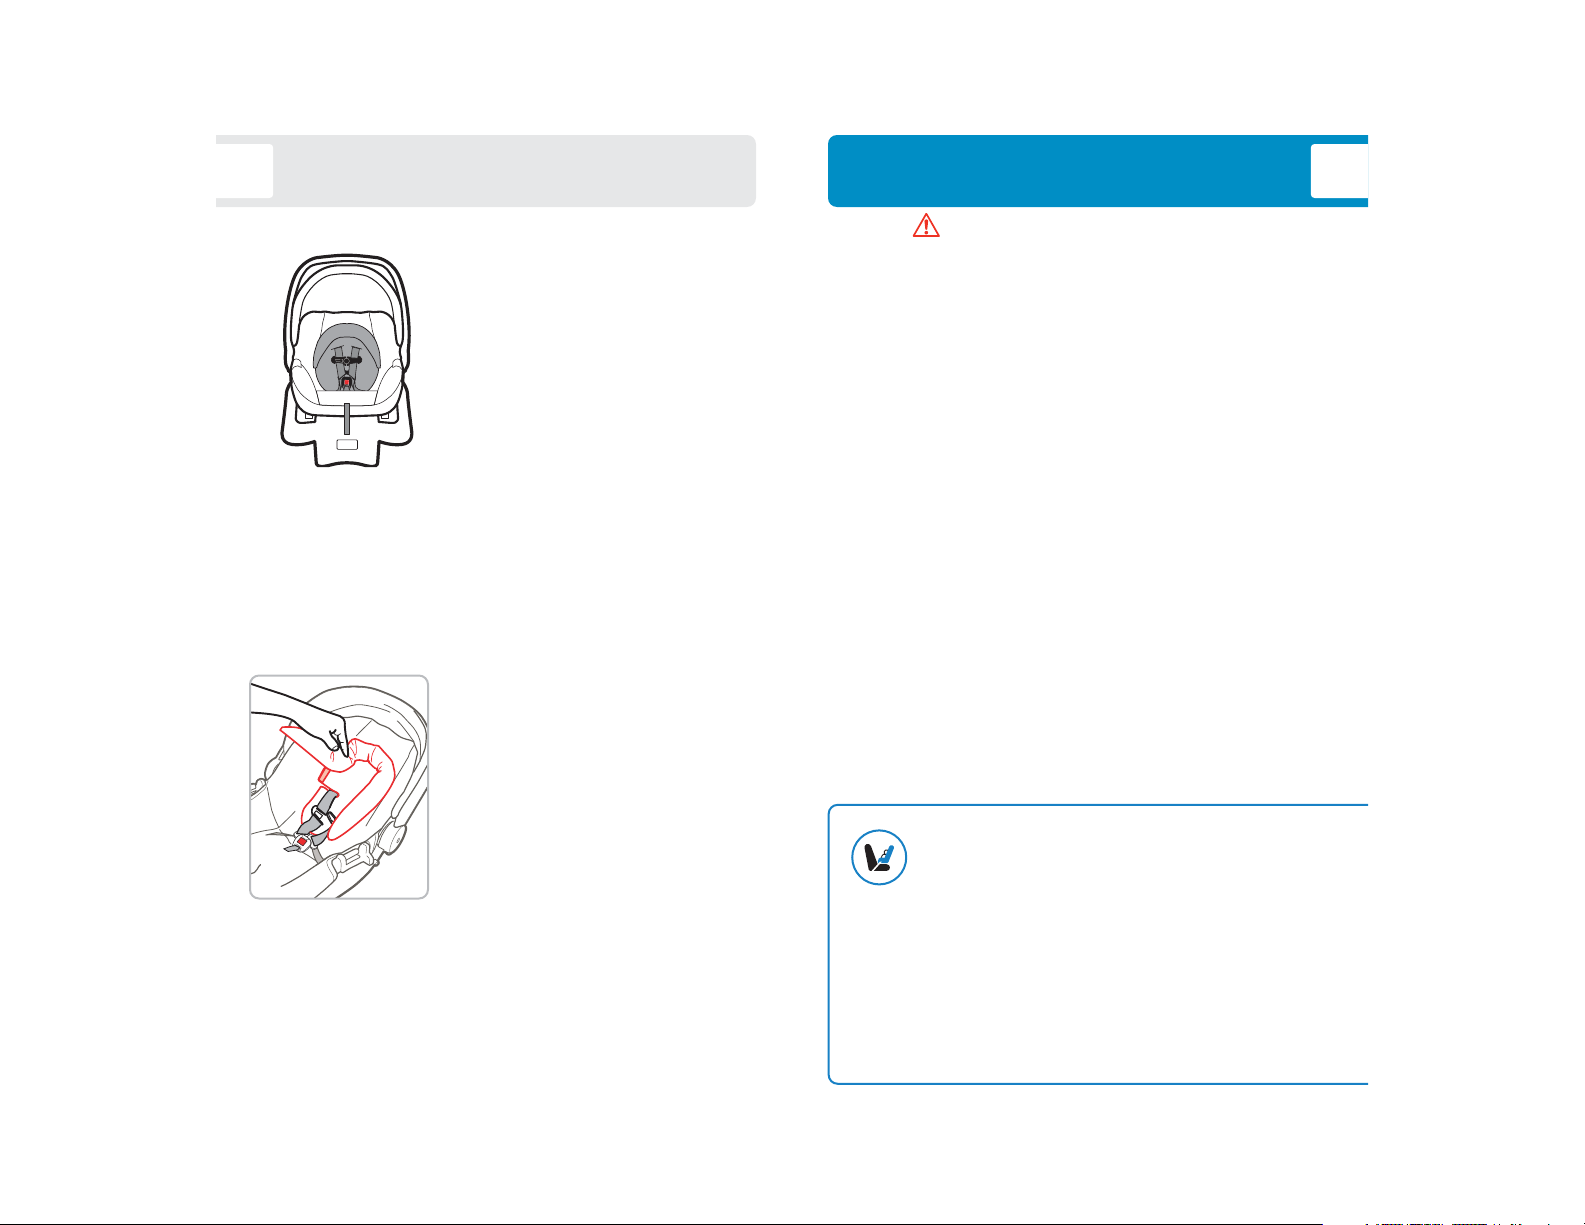
Basic Infant Insert
When using the infant insert, make sure
it does not cover your infant’s face in any
way. You may remove it for bigger infants.
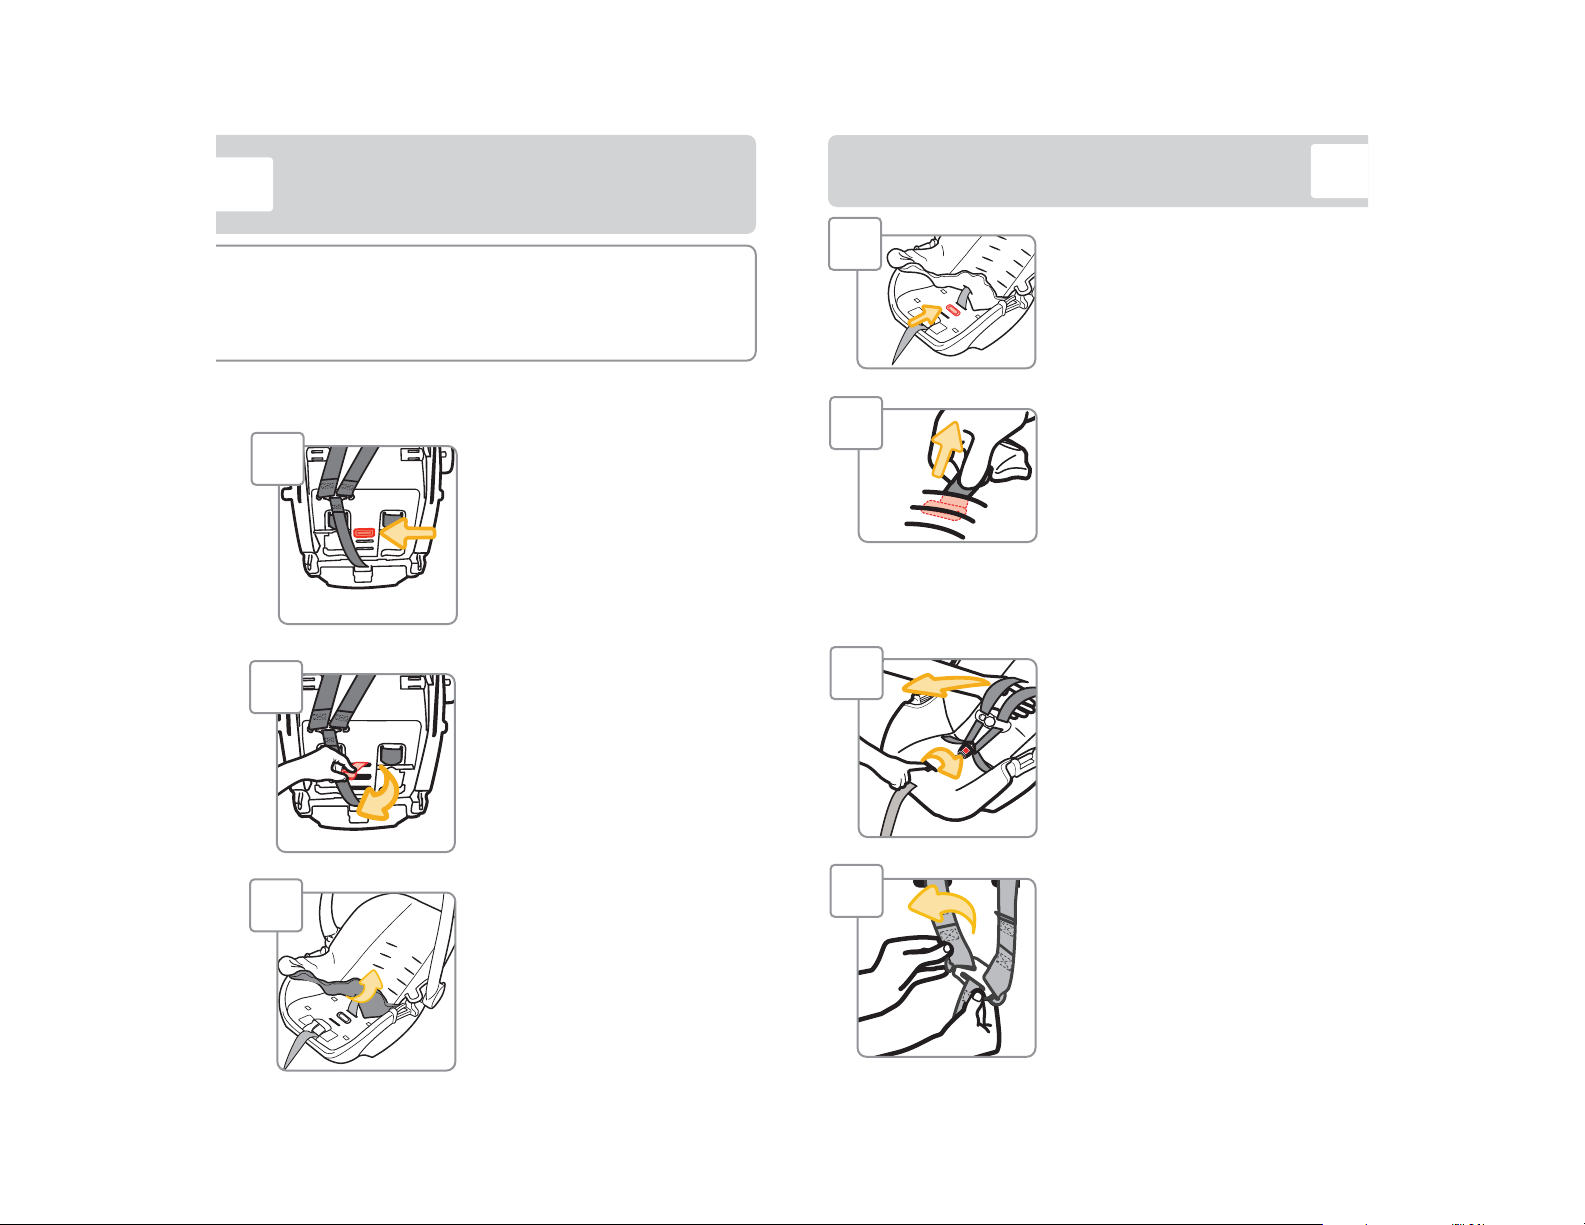
To remove, remove harness straps from
splitter plate.
Pull harness through the top slots and
remove the insert.
Attach harness strap loops to splitter plate.
See pages 7-8.
Reverse to install the infant insert.
Deluxe Infant Insert
When using the infant insert, make sure
it does not cover your infant’s face in any
way.
You may remove it for bigger infants.
To remove, undo the fastening strips and
pull the infant insert out from behind the
harness straps.
To install, undo the fastening strips and
fit the insert behind the harness straps.
Reattach the fastening strips.

1
2
65
Need to make adjustments?
To change harness strap position, see page 7-8.
To change buckle position, see pages 9-10.
Harness Strap Position
The harness strap must be at or
slightly below your child’s shoulders;
never above.
Buckle Position
Choose the slot closest to your child.
The buckle should not be
underneath or behind your child.
Head Position
The top of your child’s head must be
at least 1 in. (2.5 cm) below the top
of the car seat.
Rear-Facing Child Fit
Fully Loosen Harness Straps
Push down on the harness release
lever (through the opening in the
pad) while pulling out on the harness
straps as shown.
Unbuckle Harness
Press in on the red button and pull
out buckle tongues.
Release Chest Clip
Hold each side of the chest clip.
Press on the release button with your
thumb and pull the chest clip apart.
1
4Place Child in Car Seat
to Determine Proper
Harness Fit
Your child’s bottom and back should
be flat against the car seat.
2
Buckle
Tongue
3
Release
Button
Preparing Car Seat for Child Fit
For Rear-Facing Child Fit, see page 6.

sewn
end
87
Check your child’s fit often.
If you cannot achieve a snug harness fit for your child,
see pages 11-13.
To learn how to check harness tightness, see pages 19-21.
Check the harness straps often for any wear or damage.
5From Back of Car Seat,
Attach 1st Harness Strap
Loops to Splitter Plate As
Shown
The sewn ends of the harness strap
loops must face towards you.
Do not twist the harness strap or the
harness adjustment strap.
Make sure the harness strap loops
are fitted completely on both sides
of the splitter plate.
Fully Loosen Harness Straps
Push down on the harness release
lever (through the opening in the
pad) while pulling out on the harness
straps as shown.
Pull Harness Straps Out of
Shoulder Harness Slots
Rethread Harness Straps into
Correct Shoulder Harness Slots
for Your Child
For Rear-Facing Child Fit, see page
6.
From Back of Car Seat,
Remove Harness Strap Loops
From Splitter Plate
1
3
4
2
Changing Harness Strap Position

109
Check your child’s fit often.
If you cannot achieve a snug harness fit for your child,
see pages 11-13.
To learn how to check harness tightness, see pages 19-21.
From Bottom of Car Seat, Pull
Metal Retainer Completely
Through Pad and Shell
Check Buckle
Pull up on the buckle to make sure it
is secured.
The buckle must not pull out.
6
7
Failure to place buckle’s metal retainer completely
through pad and shell can result in serious injury or death.
Unbuckle Harness
Press in on the red button and pull
out buckle tongues.
Turn Car Seat Over
Locate the buckle’s metal retainer
on the bottom of the shell.
From Top of Car Seat, Pull
Buckle Out of Shell and Pad
Insert Buckle’s Metal Retainer
into Buckle Slot Closest to
Child
The buckle must face out.
1
2
3
1
2
4
5
Buckle
Tongue
Changing Buckle Position
Rotate Metal Retainer and Push
It Up Through Shell and Pad
3

Harness System Adjustments
for Smaller Infants
11 12
From Top of Car Seat,
Lay Metal Retainer Flat
Against Shell As Shown
Fully Loosen Harness Straps
From Back of Car Seat,
Remove Harness Strap
Loops From Splitter Plate
4
1
2
Adjusting Harness Strap Length
Replace Pad and Check Buckle
Pull up on the buckle to make sure it
is secured.
The buckle must not pull out.
5
If you cannot achieve a snug harness fit for your child,
you may need to adjust the buckle strap and/or the
harness strap length as shown in this section.
With Buckle in 1st Slot,
Turn Car Seat Over
If you need to move the buckle to
the 1st slot, see pages 9-10.
Pull Up Front of Car Seat Pad
Pull Buckle’s Metal Retainer
Towards You, Then Push It up
into Middle Buckle Slot As
Shown
2
1
3
Adjusting Buckle Strap Length
continued on next page

Removing and Installing
Car Seat to Base 14
13
When installing with a base, only use this car seat with
a compatible Light N Comfy 35 base.
Failure to use a correct base can cause serious injury or
death.
Failure to securely attach child restraint to base can result
in serious injury or death.
sewn
end
Pull Harness Straps Out of
Shoulder Harness Slots
Attach 2nd Harness Strap
Loops to Splitter Plate As
Shown
The sewn ends of the harness strap
loops must face towards you.
Do not twist the harness strap or the
harness adjustment strap.
Make sure the harness strap loops
are fitted completely on both sides
of the splitter plate.
5
3
Rethread Harness Straps into
Correct Shoulder Harness Slots
For Your Child
For Rear-Facing Child Fit,
see page 6.
4
Check your child’s fit often.
To learn how to check harness tightness, see pages 19-21.
Check the harness straps often for any wear or damage.
The harness system must be installed correctly. Do not
use a child restraint with damaged harness straps.
To Remove Car Seat from Base
From the back of the car seat, slide the
base release handle up and lift the car
seat out of the base.
To Attach Car Seat to Base
Align the slots on the side of car seat
with the lock bars in the base.
Push down firmly on the carry handle and
front of the car seat to lock it to the base.
You will hear a “click” when it is locked.
Pull up on the front two corners of the
car seat by infant’s feet to make sure it is
locked to the base.

Canopy Use 16
Base Use
15
To Adjust Canopy
Grasp the front or sides of the
canopy hoop and move it front to
back to desired location.
To Clean Canopy
Hand wash using warm sudsy water. Line dry.
To Lower Base Foot
Push in on the foot release button and
pull the foot all the way down.
To Store Base Foot
Pull the foot down and press in on the
release button.
Push the foot up into the base to the
locked position.
Lock the foot on the release button as
shown.
Canopy Hoop
(plastic strip)
Canopy
(fabric)
continued on next page

18
Carrier Use
17
To Adjust Carry Handle
Squeeze both adjustment buttons on each
side of the carry handle.
Rotate up or down to desired location.
Release buttons. Make sure both carry
handle adjuster
buttons are in the locked position. Carry
handle must be upright and locked
when carrying and when installed in
the vehicle.
To Remove Canopy
Undo Canopy Hoop
Pull the top of the canopy hoop
up and the bottom down where
they connect.
Then pull the hoop apart and pull
the canopy fabric off of the hoop.
Reverse the order to put back
together.
Undo Fastening Strip on Back
of Shell
Expose Canopy Hoop
Connection in Middle of Hoop
by Sliding Canopy Fabric to
One Side of Shell
3
1
2
WARNINGS
Read ALL instructions before using child restraint as a carrier.
NEVER use carrier unless child is properly secured.
Use only as a carrier by children weighing 4-35 pounds (1.8-
15.9 kg) and 32 inches (81.3 cm) or less in height.
NEVER leave child unattended. Always keep child within arm’s
reach.
Suffocation Hazard: Infant carrier can roll over on soft surfaces
and suffocate child. NEVER place carrier on beds, sofas or other
soft surfaces.
Strangulation Hazard: Children have STRANGLED in loose or
partially buckled harness straps. Fully restrain the child even
when carrier is used outside the vehicle.
Fall Hazard: Child’s movement can slide
carrier. NEVER place carrier on counter tops,
tables, or any other elevated surface.
The carrier can fall from the shopping cart.
Do not use on shopping cart.
Do not use the carrier if it is damaged or
broken, or if any parts are missing.

2019
Place Child in Car Seat
Your child’s bottom and back should
be flat against the car seat.
Position the harness straps over your
child’s shoulders and upper thighs.
Buckle Harness
Push the buckle tongues into the
buckle until you hear them “click”.
Pull up on the harness straps to
make sure the buckle is locked.
Fasten Chest Clip
Insert right half of the chest clip into
the left half and snap together.
1
2
3
Tighten Harness
Pull the harness adjustment strap
straight out to snugly tighten the
harness system.
4
Securing Child in Car Seat
Check Harness Tightness
Try to pinch the harness strap at the
shoulder vertically between your index
finger and thumb as shown.
If your fingers slip off, the harness
system is tight enough.
If you can pinch the harness strap,
tighten more.
5
6
Position Chest Clip
Slide the chest clip up the harness
straps and position it at mid-chest
(even with armpits) and away from
your child’s neck.
A snug strap should not allow any slack.
It lies in a relatively straight line without sagging.
It does not press on the child’s flesh or push the child’s body
into an unnatural position.
continued on next page

continued on next page
2221
Vehicle
Seat Bight
LATCH: Lower Anchor Bars
Your vehicle’s features may be considerably different
than those pictured here.
The lower anchors of LATCH (Lower Anchors and Tethers for
CHildren) is a universal system for installing car seats without using
vehicle seat belts.
The LATCH: lower anchor belt can only be used in vehicles that have
the lower anchor bars installed in designated seating positions. Most
vehicles manufactured after September 2002 are equipped with
LATCH: lower anchor bars.
Check your vehicle owner’s manual to see which seating positions
may be equipped with LATCH: lower anchor bars.
Do not use both the lower anchor belt and vehicle belt
at the same time. When used correctly the lower anchor
belt or the vehicle belts are equally safe.
LATCH: Lower Anchor Use
Failure to fasten and tighten the harness system correctly
may allow the child to be ejected from the child restraint in
a crash or sudden stop causing serious injury or death.
Do not mistake comfort for safety.
The harness system must be snugly
adjusted.
Do not put snowsuits or bulky garments
on your child when placing them in the
child restraint. Bulky clothing can prevent
the harness straps from being tightened
properly.
Finished!
Your child is now secured in the
car seat.
Check your child’s fit often and
make any needed adjustments to
the car seat as they grow.
To Remove Child from Car Seat:
1. Loosen Harness Strap
2. Unbuckle Harness
3. Release Chest Clip
4. Remove Child

2423
Your vehicle’s features may be considerably different
than those pictured here.
If LATCH: lower anchors are not an option, you must use the vehicle
seat belt system to install the car seat.
Not all vehicle belts and seating positions will work with
car seats.
Please go through the following steps to understand how to
lock a car seat with a vehicle belt.
Lap/Shoulder Belts
Vehicle Belts
Lower Anchor
Hooks
Adjuster
Lower Anchor Belt
Storage Attachments
Lower Anchor Belt
Storage Attachments
Lower Anchor
Belt Parts
To Remove Lower Anchor Belt from Storage
Attachment on Base
Squeeze the spring lever on the hooks and remove the hooks from the
storage attachments.
To Store Lower Anchor Belt
When using the vehicle belts to install
or when the base is not installed in a
vehicle, the lower anchor belt must be
properly stored.
Attach the hooks to the storage
attachments in the base.
To Remove Lower Anchor Belt from
Vehicle’s Lower Anchor Bars
Remove the tension from the belt by
pushing down on the side of the base with
the adjuster. Then press the adjuster’s
button to loosen the belt.
Remove the hook from the anchor by squeezing the spring lever on
the hook, pushing the hook back into the seat bight, and rotating the
hook to the side. Then pull the hook out of the vehicle seat bight.
continued on next page

continued on next page
2625
Automatic Locking Retractor
Emergency Locking Retractor
This retractor always locks.
It will automatically lock after slowly pulling the seat belt out at least
halfway and letting the belt go back into the retractor 1-2 in. (2.5-
5 cm).
If the retractor does not lock, it is most likely an Emergency Locking
Retractor. These retractors only lock during a sudden stop or collision.
You will need to determine if your seat belt’s latch plate can lock the
belt. See step 4, “Check Latch Plates”.
See Step 4, “Check
Latch Plates”.
Switchable Retractor
(most vehicles have this type)
This retractor can be switched to a locking mode.
You must have the retractor in the locking mode to use the seat
belt with this car seat.
Switching to locking mode: Slowly pull the shoulder belt all the way
out, then let it go back in 1-2 in. (2.5-5 cm).
As it goes back in, you will most likely hear a ratcheting sound.
Gently pull the belt to see if it has locked. You will not be able to pull
any more belt out if the lock has engaged.
Types of Retractors
You Must Review Your
Vehicle Owner’s Manual
Your vehicle owner’s manual will let
you know which vehicle belts and
seating positions car seats can be
installed in.
Check How This Car Seat Will
Be Locked Into Place
The vehicle belt must not loosen
after tightening. This means there
needs to be a way to lock the vehicle
belt.
The ways this can be done are:
• By using the seat belt’s retractor,
see step 3; OR
• By using the seat belt’s latch plate,
see step 4.
Check Retractor
Retractors pull seat belts into stored
positions and lock the belt to hold
passengers in place.
See the next page for some common
types of vehicle belt retractors that
will work with this car seat.
1
2
3

27 Rear-Facing Use with Base 28
Never install a rear-facing child restraint in the
front seat of a vehicle equipped with an active
frontal airbag.
Do not use the lower anchor belt along with the vehicle lap
or lap/shoulder belt.
Check the vehicle belt or the lower anchor belt before each
use. Use only if the belt can be tightened properly and
locked securely in place.
Do not fasten multiple lower anchor hooks on the same
lower anchor bar in the vehicle.
The child restraint must be securely attached to the base.
Even when unoccupied, this child restraint must be firmly
secured to the vehicle with a lower anchor belt or with the
vehicle seat belt.
This child restraint must always face the rear of the
vehicle.
Lap/Shoulder
Belt
Lap Belt LATCH: Lower
Anchor Belt
4-35 lb (1.8-15.9 kg) and 32 in. (81.3 cm)
or less in height
Locking Latch Plate
Emergency Locking
Retractor with a
Sliding Latch Plate
Emergency Locking Retractor Lap Only Belt
Inflatable Seat Belts
Never Use With This Car Seat
Check Latch Plates
Latch plates are the part of
the seat belt that goes into the
buckle.
To see if the latch plate locks:
1. Buckle Vehicle Belt
2. Firmly Tug Lap Portion of Seat Belt
While Pulling It Up
If the vehicle belt does not slide
through the latch plate, it’s locked.
If the latch plate slides up and down
the vehicle belt, it is a sliding latch
plate.
Sliding latch plates easily slip
between the lap and shoulder
portions of the belt.
If you have an Emergency Locking
Retractor with a Sliding Latch
Plate, you must use a locking clip.
Please contact us for one,
see page 57.
4

continued on next page
30
Vehicle Belt Install
29
3
1
2
Store Lower Anchor Belt
Check if Your Vehicle Belts Will
Work With This Car Seat
This is very important because not
all vehicle belts will work with car
seats.
Review pages 24-27 and your
vehicle owner’s manual to find out
what kind of vehicle belts you have
and how to lock a car seat in place.
Place Base Rear-Facing in
Vehicle
Center the base in the chosen
seating position.
Before you begin installing the car seat
into your vehicle, did you check:
Your child’s weight and height? See page 4.
Your child’s fit? See page 6.
Do you need to make adjustments to the
harness strap position or the buckle position? Route Vehicle Lap or Lap/
Shoulder Belt Through Base
Belt Path
4
Buckle Vehicle Belt
If your car’s vehicle belt has a
switchable retractor, use it to lock the
vehicle belt.
For information about switchable
retractors, see pages 26 or review
your vehicle owner’s manual.
5
Tighten Belt
Place your hand in the base. Firmly
push the base down and back
towards the vehicle seat back while
pulling the shoulder belt or the free
end of the lap belt to tighten.
6

3231
Secure Child in Car Seat
To properly secure your child in the
car seat, see pages 19-21.
Check your child’s fit often and make
any needed adjustments to the car
seat as they grow.
Check Belt Tightness
Hold the base at the Rear-Facing
Belt Path with your weaker hand.
Push and pull the base from side to
side. It should not move more than
1 in. (2.5 cm).
If it moves more than 1 in. (2.5 cm), you can try:
• Pulling the belt tighter; OR
• Reinstalling the base; OR
• Changing to a different seating location; OR
• Switching to LATCH: lower anchor belt installation if lower
anchors are available in your vehicle
7
8
Check Level Line
Redo the installation if the base is
not reclined correctly.
Adjust the base if needed, see page
15.
Finished!
Check the tightness of the
install often to make sure it
has not loosened.
Only if necessary, you may need
to place a tightly rolled towel(s) or
foam pool noodle(s) under the front
of the base to help get the correct
recline.
Check often to make sure padding
is still in place and the belt is tight.
10
9Attach Car Seat to Base
To attach to the base, see page 14.
Pull up on the front two corners of
car seat by your child’s feet to make
sure it is locked to the base.
The carry handle must be upright
and locked when installed in the
vehicle.

continued on next page
LATCH: Lower Anchor Install 3433
Before you begin installing the car seat
into your vehicle, did you check:
Remove Lower Anchor Belt
from Storage Attachments
1
Your child’s weight and height? See page 4.
Your child’s fit? See page 6.
Do you need to make adjustments to the
harness strap position or the buckle position?
Place Base Rear-Facing
in Back Seat
Center the base between the
vehicle’s lower anchors in the chosen
seating position.
Attach Lower Anchor
Hooks to Vehicle’s Lower
Anchors in Seat Bight
Review your vehicle owner’s manual
for LATCH: lower anchor locations
and lower anchor belt use.
Fasten one hook to one vehicle lower
anchor bar.
Then repeat for the second hook on
the other side of the base.
Tighten Belt
Place your hand in the base.
Firmly push the base down and back
towards the vehicle seat back while
pulling the free end of the belt
parallel with the Rear-Facing Belt
Path.
Route Lower Anchor Belt
Through Base Belt Path
The adjuster can be on either side of
the car seat.
Do not twist belt.
2
3
4
5
LATCH: Lower Anchor Belt Install
1
2
Table of contents
Other Cosco Car Seat manuals

Cosco
Cosco MIGHTY FIT 65 User manual

Cosco
Cosco Pronto Belt-Positioning Booster User manual

Cosco
Cosco RISE User manual

Cosco
Cosco 22859 User manual

Cosco
Cosco FINALE User manual

Cosco
Cosco EASY ELITE User manual

Cosco
Cosco Scenera Next User manual

Cosco
Cosco APT 50 User manual

Cosco
Cosco Commuter User manual

Cosco
Cosco LIGHT 'N COMFY IC169 User manual

Cosco
Cosco Pronto User manual

Cosco
Cosco Scenera Next User manual

Cosco
Cosco VENUTRA User manual

Cosco
Cosco Stack-It! User manual

Cosco
Cosco Pronto User manual

Cosco
Cosco Scenera User manual

Cosco
Cosco BC027ASW User manual

Cosco
Cosco Scenera Next User manual

Cosco
Cosco MIGHTYFIT LX User manual

Cosco
Cosco Scenera Next User manual