Costco Andes Radiant Micro LED Pot Tree User manual

US, CAN, MX, TW
(TS-8W29V)
1 m / 3.5 ft Andes Radiant Micro LEDTM Pot Tree
ITM. / ART. 2009000
IMPORTANT, RETAIN FOR FUTURE REFERENCE: READ CAREFULLY
Carefully follow the instructions below on how to quickly and easily set up your new tree.
1. Choose an appropriate location near a wall outlet.
2. Assemble the tree stand on a level surface. (Tree Stand)
TREE ASSEMBLY INSTRUCTIONS
Page: 1 of 5
Fig. B - Tree and Light Assembly
Control box
For assistance with assembly, parts and customer service, call (US & Canada only): 1-888-919-0070 (English, Spanish,
French) at 10am-6pm, Mon-Fri, Eastern Time, email: [email protected], or visit www.polygroupstore.com.
Please note if you are calling outside of USA & Canada, international toll fees may apply.
Customer Service Hotline Hours: 8am-4pm, Mon-Fri, MST.
(For Indoor and Outdoor Use)
Section 1
Tree Top
Insert Red Label
Plugs Into Red
Labeled Extension Cord
Tree Stand
Plug Adapter
Into Wall
Outlet
NEED HELP?
DO NOT RETURN TO STORE. PLEASE VISIT US AT:
www.polygroupstore.com OR 1-888-919-0070

3. Please identify all sections before assembling.
4. Assemble the tree from the bottom to the top (See Fig. B). Remove protection cap, and insert the center
pole into the stand. Then slot together the remaining poles securely until the tree top is installed. Be sure
that all cords are free from branch hinges.
5. Plug the adapter into a wall outlet (See Fig. B), your entire tree should now be lit.
6. Just slightly upsweep all tips (See Fig. C) and shift branches to fill in any gaps for a fuller, uniform look. Your
Christmas tree is now ready to be decorated.
Top view Side view
Fig. C
Page: 2 of 5
1. Remove all ornaments and decorations. For pre-lit trees, first unplug adapter from the wall outlet and then
disconnect light adapter between each section of the tree.
2. Disassemble the tree from the top to the bottom. Start with the tree top and gently lift straight up to remove
from section below and fold all branches toward the pole.
3. In case of difficulty separating the tree pole (trunk), apply a small amount of lubricant at the joint and rotate the
upper pole in both directions. Lift up the upper pole again.
4. Continue by gently lifting straight up each section(s) from the section below and fold all branches toward the
pole until the bottom section is removed from the tree stand.
5. Carefully place all tree sections into shipping box and tape it shut.
6. When not in use, please store your tree in a cool, dry place away from sunlight. Exposing your tree to excessive
heat or humidity may damage your tree.
7. Keep out of reach of pets and children.
STORAGE INSTRUCTIONS
Simply press the selector button to select from the following light functions:
1.CLEAR STEADY 2.CLEAR FADING 3.MULTI-COLOR STEADY
4.MULTI-COLOR FADING 5.CLEAR/MULTI-COLOR ALTERNATING
DUAL COLOR LIGHT CONTROLLER & REMOTE CONTROL
Remote
Control Light
Controller
Selector Button
If extra parts are needed, please contact our customer service center.
SPARE PARTS
If Tree Does Not Illuminate / Some Bulbs Do Not Light or Flicker
Check to make sure that all connectors are properly connected and the adapter is plugged firmly into the wall outlet.
TROUBLESHOOTING TIPS
Insulation Tab
REMOTE CONTROL INSTRUCTIONS
1. Remove the insultation tab of the remote control.
2. Press either selector button and wait for a second to enjoy light effects in the following sequence
(see DUAL COLOR LIGHT CONTROLLER & REMOTE CONTROL).

Page: 3 of 5
AUSTRALIA: Our goods come with guarantees that cannot be excluded under the Australian Consumer Law. You are
entitled to a replacement or refund for a major failure and for compensation for any other reasonably foreseeable
loss or damage. You are also entitled to have the goods repaired or replaced if the goods fail to be of acceptable
quality and the failure does not amount to a major failure.
Hereby, Polygroup declares that the Christmas Tree is in compliance with RED 2014/53/EU.
DISPOSAL OF USED BATTERIES
Battery may contain hazardous substances which could endanger the environment and human
health.
This symbol marked on the battery and/ or packaging indicates that used battery shall not be
treated as municipal waste. Batteries should be disposed of at an appropriate collection point for
recycling. By ensuring the used batteries are disposed of correctly, you will help preventing
potential negative consequences for the environment and human health. The recycling of
materials will help to conserve natural resources. For more information about recycling of used
batteries, please contact your local municipality waste disposal service.
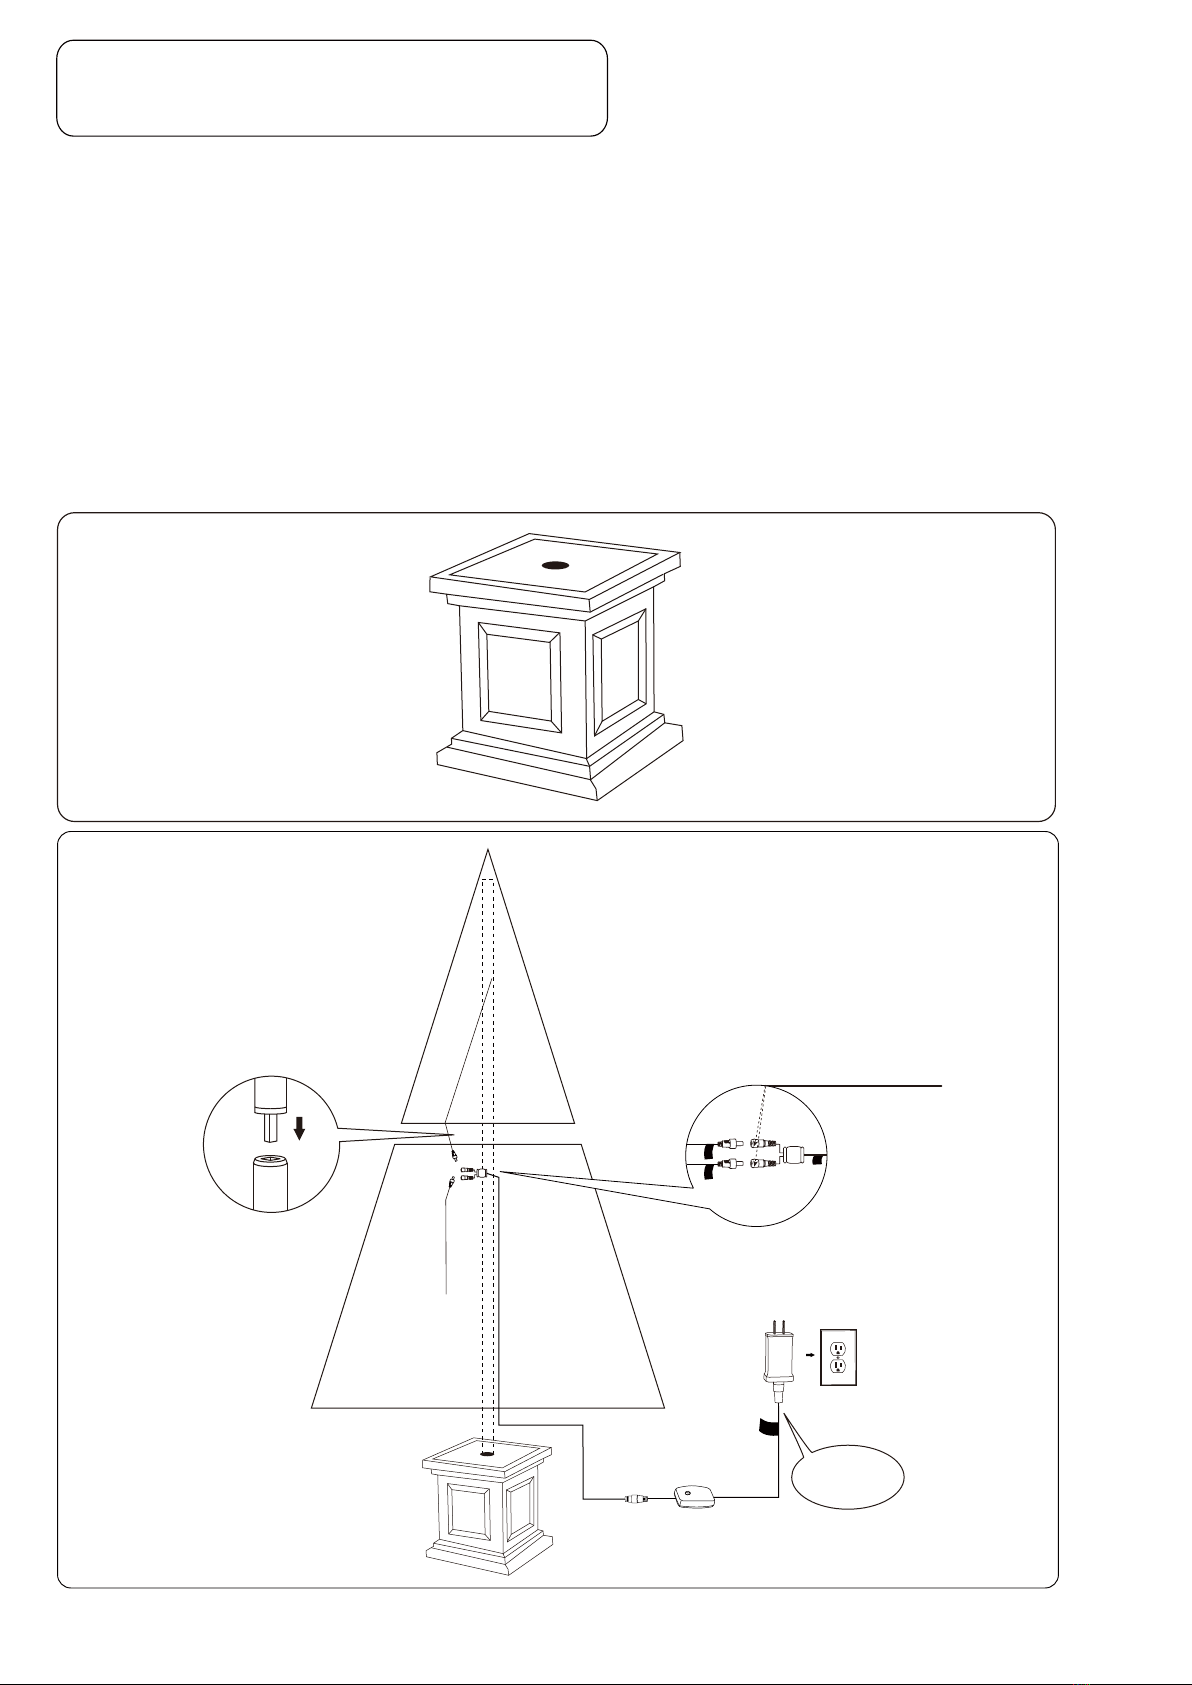
1. Use only the power adapter supplied with this product. Using a different adapter can damage the lights and will cause
fire or electrical shock hazards.
2. For indoor use only.
3. This product contains a CR2032 button cell battery. If swallowed, it could cause severe injury or death in just 2 hours
due to chemical burns and potential perforation of the oesophagus – seek medical attention immediately.
4. Keep batteries out of reach of children.
5. If you suspect your child has swallowed or inserted a button cell battery, immediately seek urgent medical assistance.
6. Make sure the battery compartment is correctly secured (e.g. the screw or other mechanical fastener is tightened), and
do not use if the compartment is not secured.
7. Dispose of used button cell batteries immediately and safely. Flat batteries can still be dangerous.
8. Inform others about the risk associated with button cell batteries and how to keep their children safe.
9. Do not expose the lights to moisture.
10. Remove the batteries when the controllers are left unused, and are not expected to be used for an extended period
of time, or when depleted.
11. Dispose of the used battery properly as per the directions on batteries, and local laws and regulations regarding the
disposal of hazardous waste.
12. Clean the battery contact surfaces prior to battery installation.
13. Do not dispose of batteries in fire – batteries may leak or rupture.
WARNING
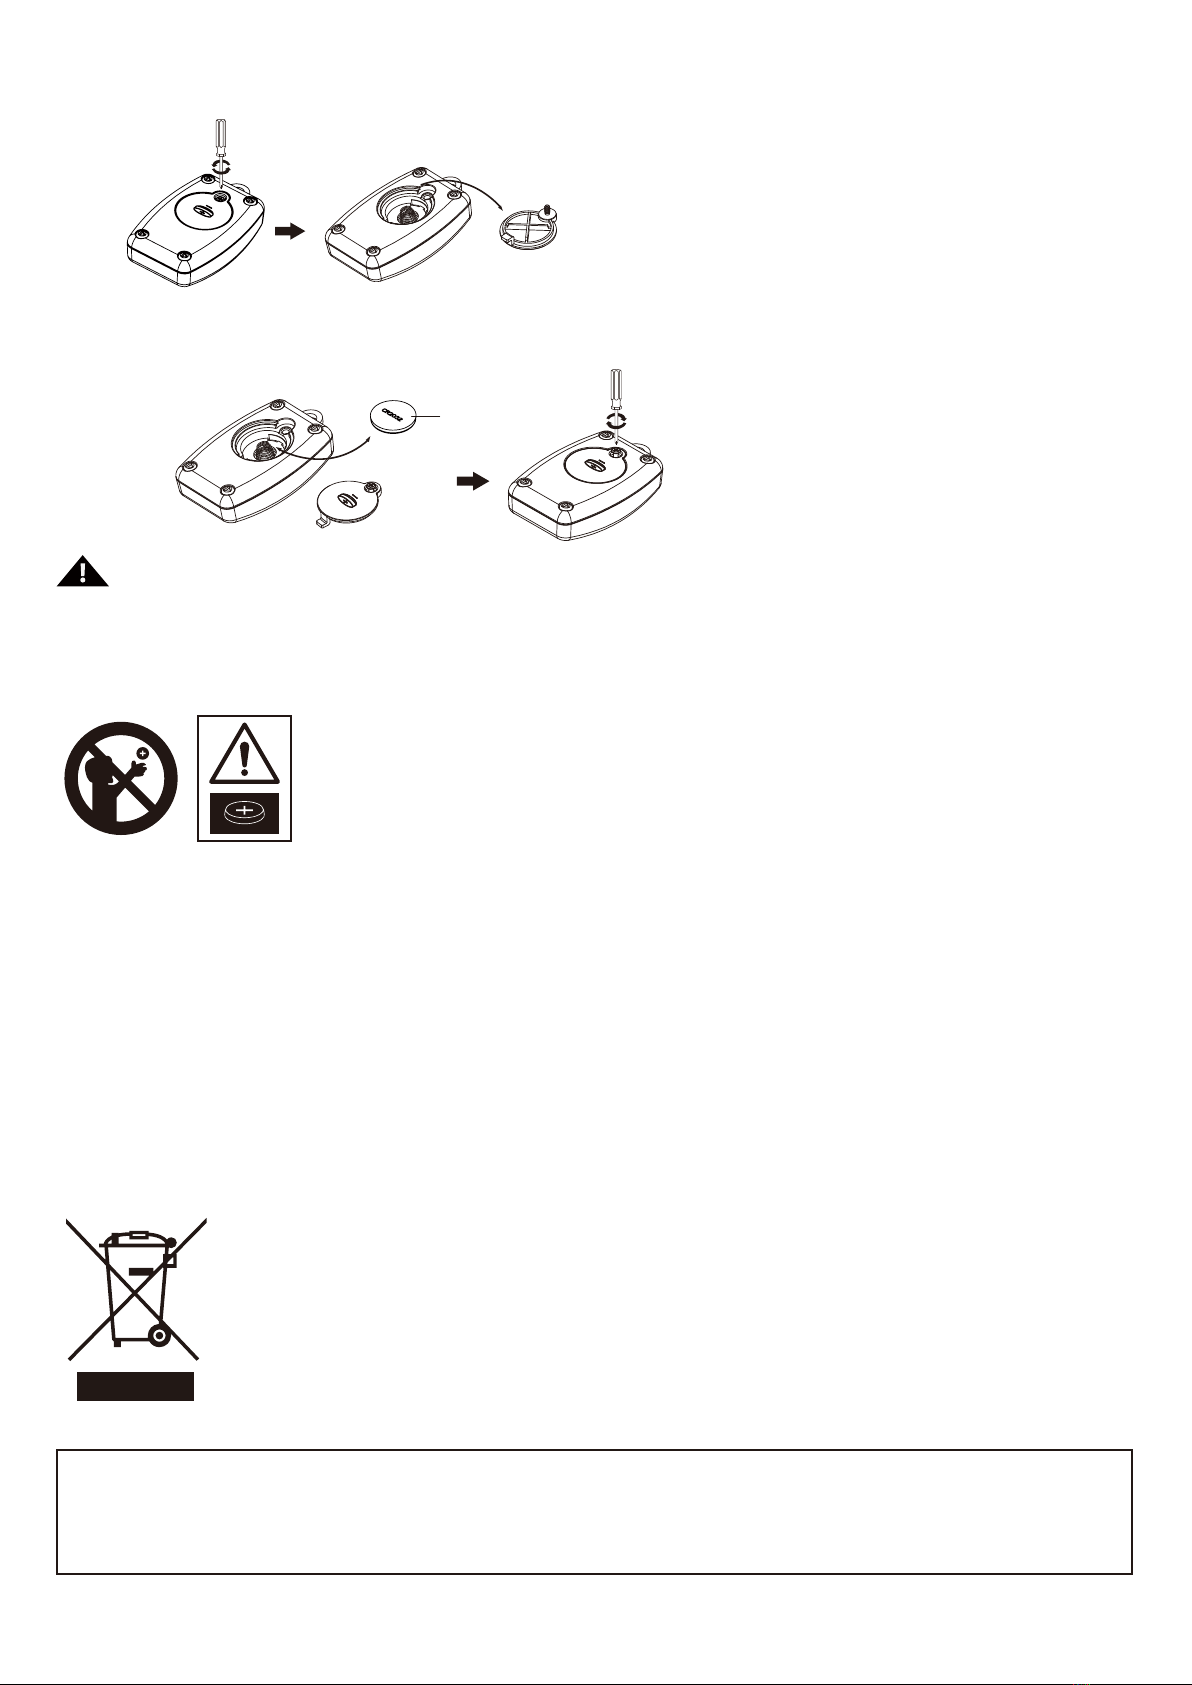
2. Replace the used battery with a new CR2032 button cell battery (not included). Make sure that the battery is installed
with the correct polarity (+ and -).
3. Retighten the screw to close and secure the battery cover.
Cover
Battery
CR2032
BATTERY REPLACEMENT
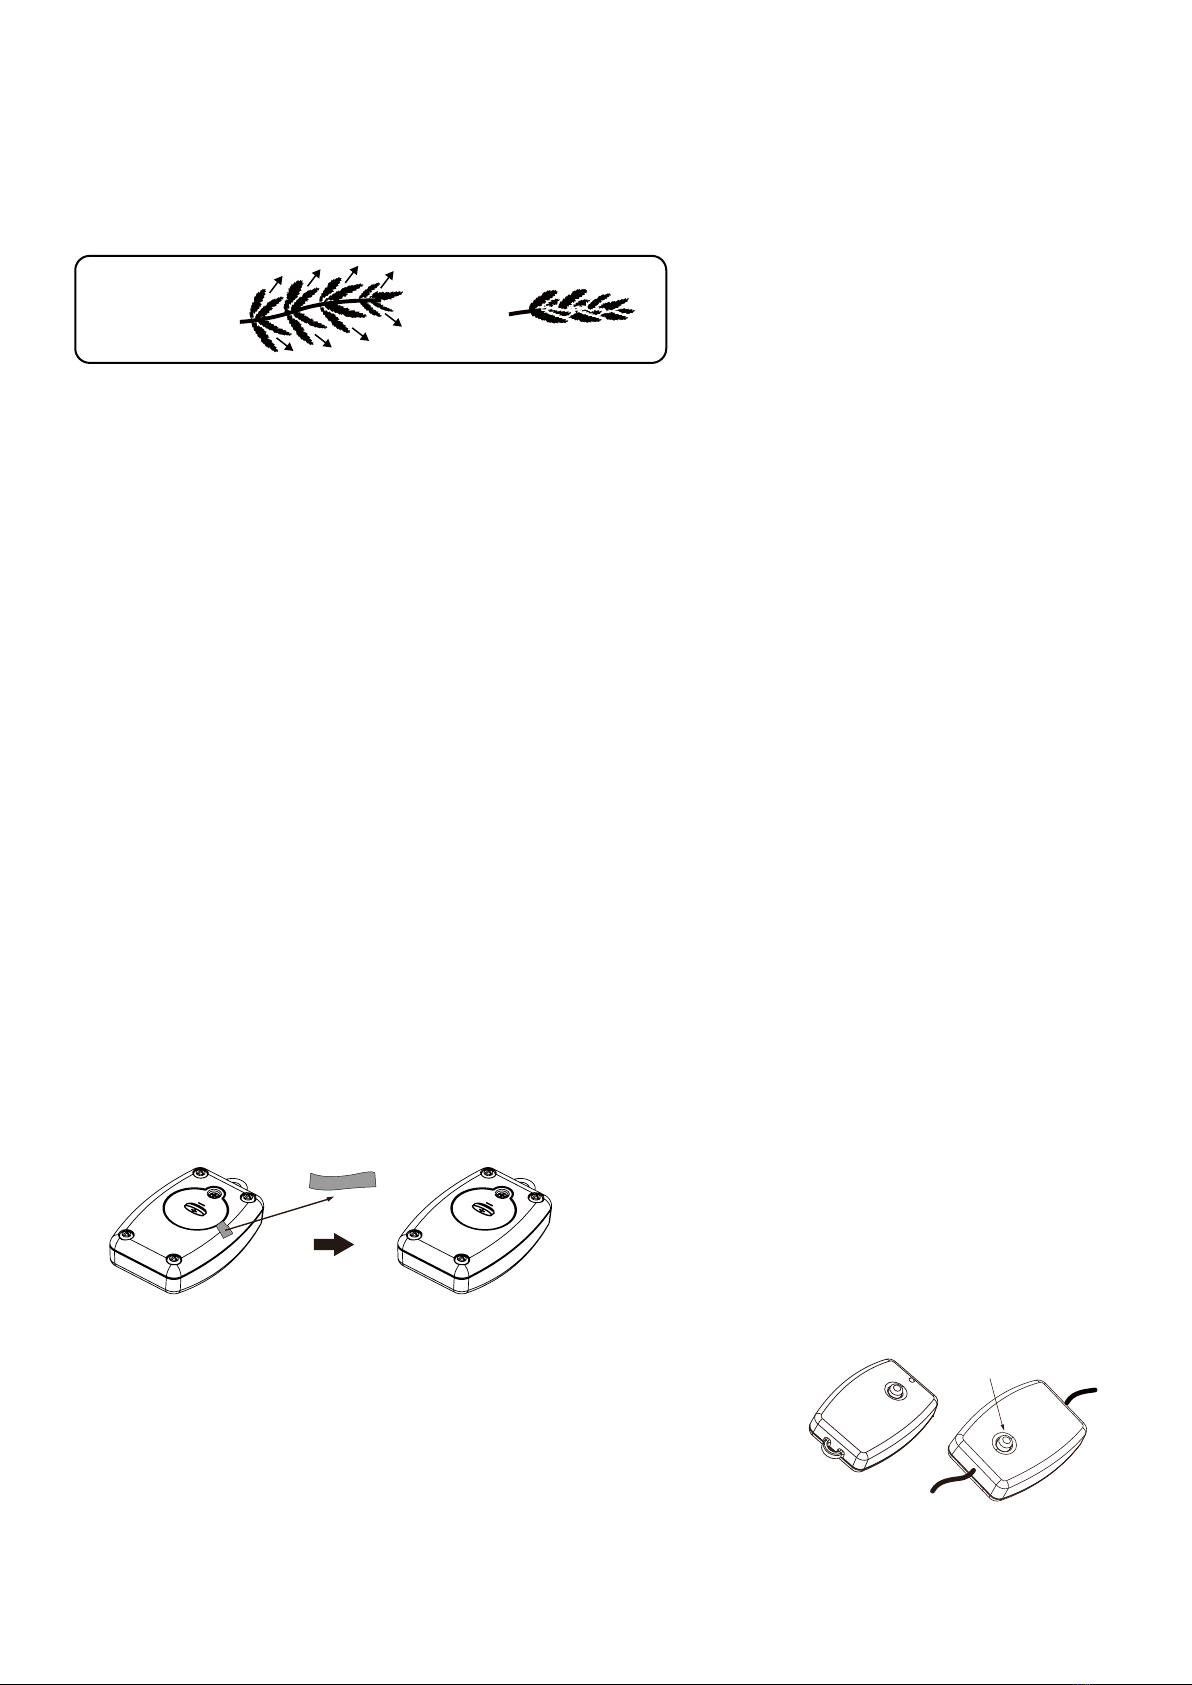
1. Loosen the screw of the battery cover with a screwdriver (not included).

Page: 4 of 5
MADE IN CHINA / FABRIQUÉ EN CHINE / HECHO EN CHINA
Distributed by:
Costco Wholesale Corporation
P.O. Box 34535
Seattle, WA 98124-1535
USA
1-800-774-2678
www.costco.com
Costco Wholesale Iceland ehf.
Kauptún 3-7, 210 Gardabaer
Iceland
www.costco.is
Costco France
1 avenue de Bréhat
91140 Villebon-sur-Yvette
France
01 80 45 01 10
www.costco.fr
Costco Wholesale Japan Ltd.
3-1-4 Ikegami-Shincho
Kawasaki-ku, Kawasaki-shi,
Kanagawa 210-0832 Japan
0570-032600
www.costco.co.jp
Costco Wholesale Korea, Ltd.
40, Iljik-ro
Gwangmyeong-si
Gyeonggi-do, 14347, Korea
1899-9900
www.costco.co.kr
Costco President Taiwan, Inc.
No. 656 Chung-Hwa 5th Road
Kaohsiung, Taiwan
Company Tax ID: 96972798
449-9909 or 02-449-9909 (if cellphone)
www.costco.com.tw
Shanghai Minhang Costco Trading Co., Ltd
Unit 109, No. 388, Lian You Road,
Minhang District, Shanghai
China 201107
+86-21-6257-7065
Costco Wholesale Canada Ltd.*
415 W. Hunt Club Road
Ottawa, Ontario
K2E 1C5, Canada
1-800-463-3783
www.costco.ca
* faisant affaire au Québec sous
le nom Les Entrepôts Costco
Importado por:
Importadora Primex S.A. de C.V.
Blvd. Magnocentro No. 4
San Fernando La Herradura
Huixquilucan, Estado de México
C.P. 52765
RFC: IPR-930907-S70
(55)-5246-5500
www.costco.com.mx
Costco Wholesale Australia Pty Ltd
17-21 Parramatta Road
Lidcombe NSW 2141
Australia
www.costco.com.au
Costco Wholesale UK Ltd /
Costco Online UK Ltd
Hartspring Lane
Watford, Herts
WD25 8JS
United Kingdom
01923 213113
www.costco.co.uk
Costco Wholesale Spain S.L.U.
Polígono Empresarial Los
Gavilanes
C/ Agustín de Betancourt, 17
28906 Getafe (Madrid) España
NIF: B86509460
900 111 155
www.costco.es

Page: 5 of 5
CUSTOMER SERVICE FOR CHRISTMAS TREES
For any questions, assistance, or missing parts, DO NOT RETURN YOUR TREE TO PLACE OF PURCHASE. Please
contact us via: call (US & Canada only) 1-888-919-0070 (English, Spanish, French) at 10am-6pm, Mon-Fri, Eastern
Time, email: warranty@polygroup.com, or visit www.polygroupstore.com.
TREE ID# IS LOCATED ON END PANEL OF BOX.TREE ID# IS REQUIRED WHEN REQUESTING REPLACEMENT
PARTS.
Customer Name:
Address (No P.O. boxes):
City & State:
Zip Code:
Day Phone:
Date Purchased:
Tree ID#:
Tree UPC#:
Store Purchased:
Specify Problem:
This manual suits for next models
1
Table of contents
Popular Lawn And Garden Equipment manuals by other brands

DAYE
DAYE DY907 instructions

Luminor
Luminor LB4-Z1 Operation & installation instructions

Gazebo penguin
Gazebo penguin W1608MR-12 Assembly instructions

Stihl
Stihl KombiMotor KMA 130 R instruction manual

Hyundai power products
Hyundai power products HYSC210 instruction manual

Koolatron
Koolatron MK12 owner's manual