Cramer TOURNO de Luxe 95 User manual

TOURNO 696.01-01 As of 2014
Original Operation Manual English
Operation Manual
Models
TOURNO compact 95 TOURNO de Luxe 95
TOURNO compact 115 TOURNO de Luxe 115
TOURNO compact 95 4
WD
TOURNO de Luxe 95
4
WD
TOURNO compact 115 4
WD
TOURNO de Luxe 115
4
WD
Machine no.

TOURNO 696.01-01 2 of 26 As of 2014
Original Operation Manual English
Contents
1
Important information..........................................................................................................................3
1.1
General ..................................................................................................................................3
1.2
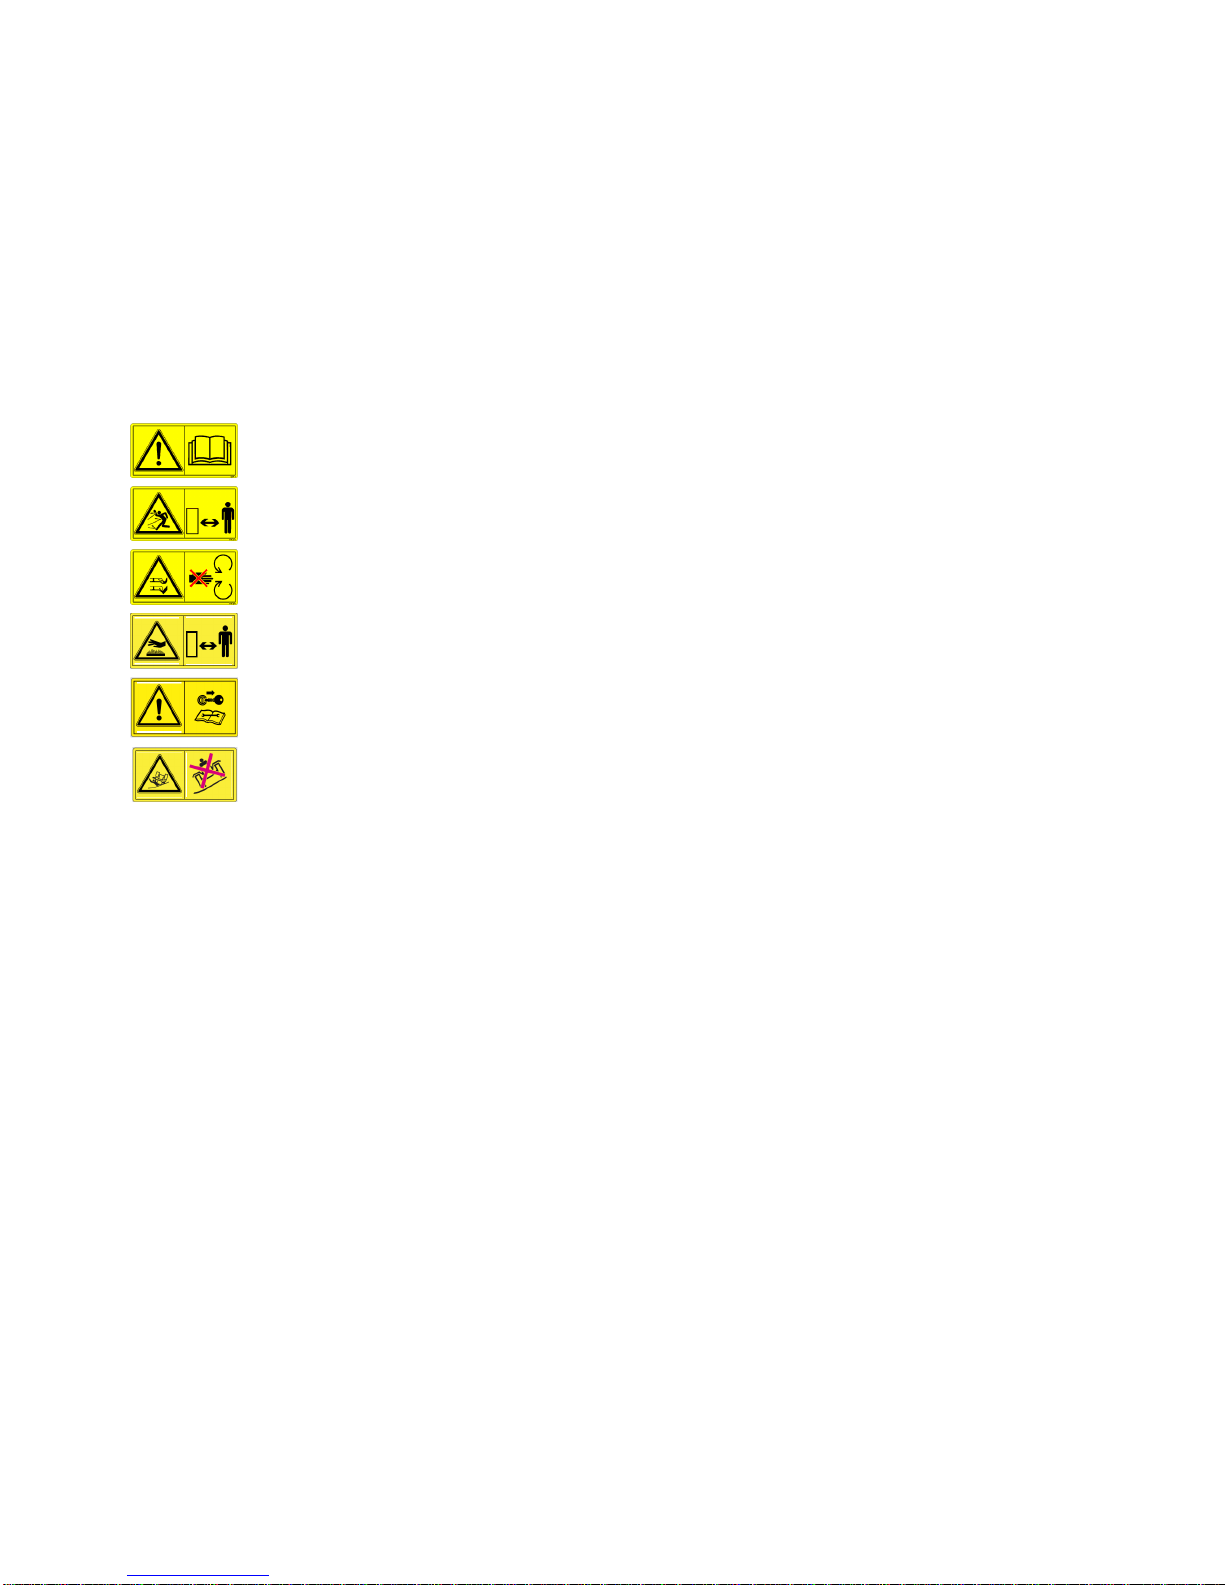
Symbols .................................................................................................................................3
1.3
Limitation of liability................................................................................................................3
1.4
Copyright................................................................................................................................3
1.5
Warranty ................................................................................................................................3
2
Safety..................................................................................................................................................4
2.1
Use in compliance with intended purpose..............................................................................4
2.2
Possible misuse.....................................................................................................................4
2.3
General sources of risks........................................................................................................4
2.3.1
Use and operation ..................................................................................................4
2.3.2
Product-specific risks..............................................................................................4
2.3.3
Risks from motor operation ....................................................................................4
2.3.4
Operating risks .......................................................................................................4
2.3.5
Risks by rotating cutting blades..............................................................................4
2.3.6
Risks for children, elderly persons and pets...........................................................4
2.4
Maintenance...........................................................................................................................4
2.5
Staff and operator qualification ..............................................................................................5
2.6
Safety instructions..................................................................................................................5
2.7
Required protection equipment for operation.........................................................................5
2.8
Safety devices........................................................................................................................5
2.9
Behaviour in case of fire.........................................................................................................5
2.10
Environmental protection .......................................................................................................5
3
Technical data.....................................................................................................................................6
4
Design and function............................................................................................................................7
4.1
Brief description .....................................................................................................................7
4.2
Overview................................................................................................................................7
4.3
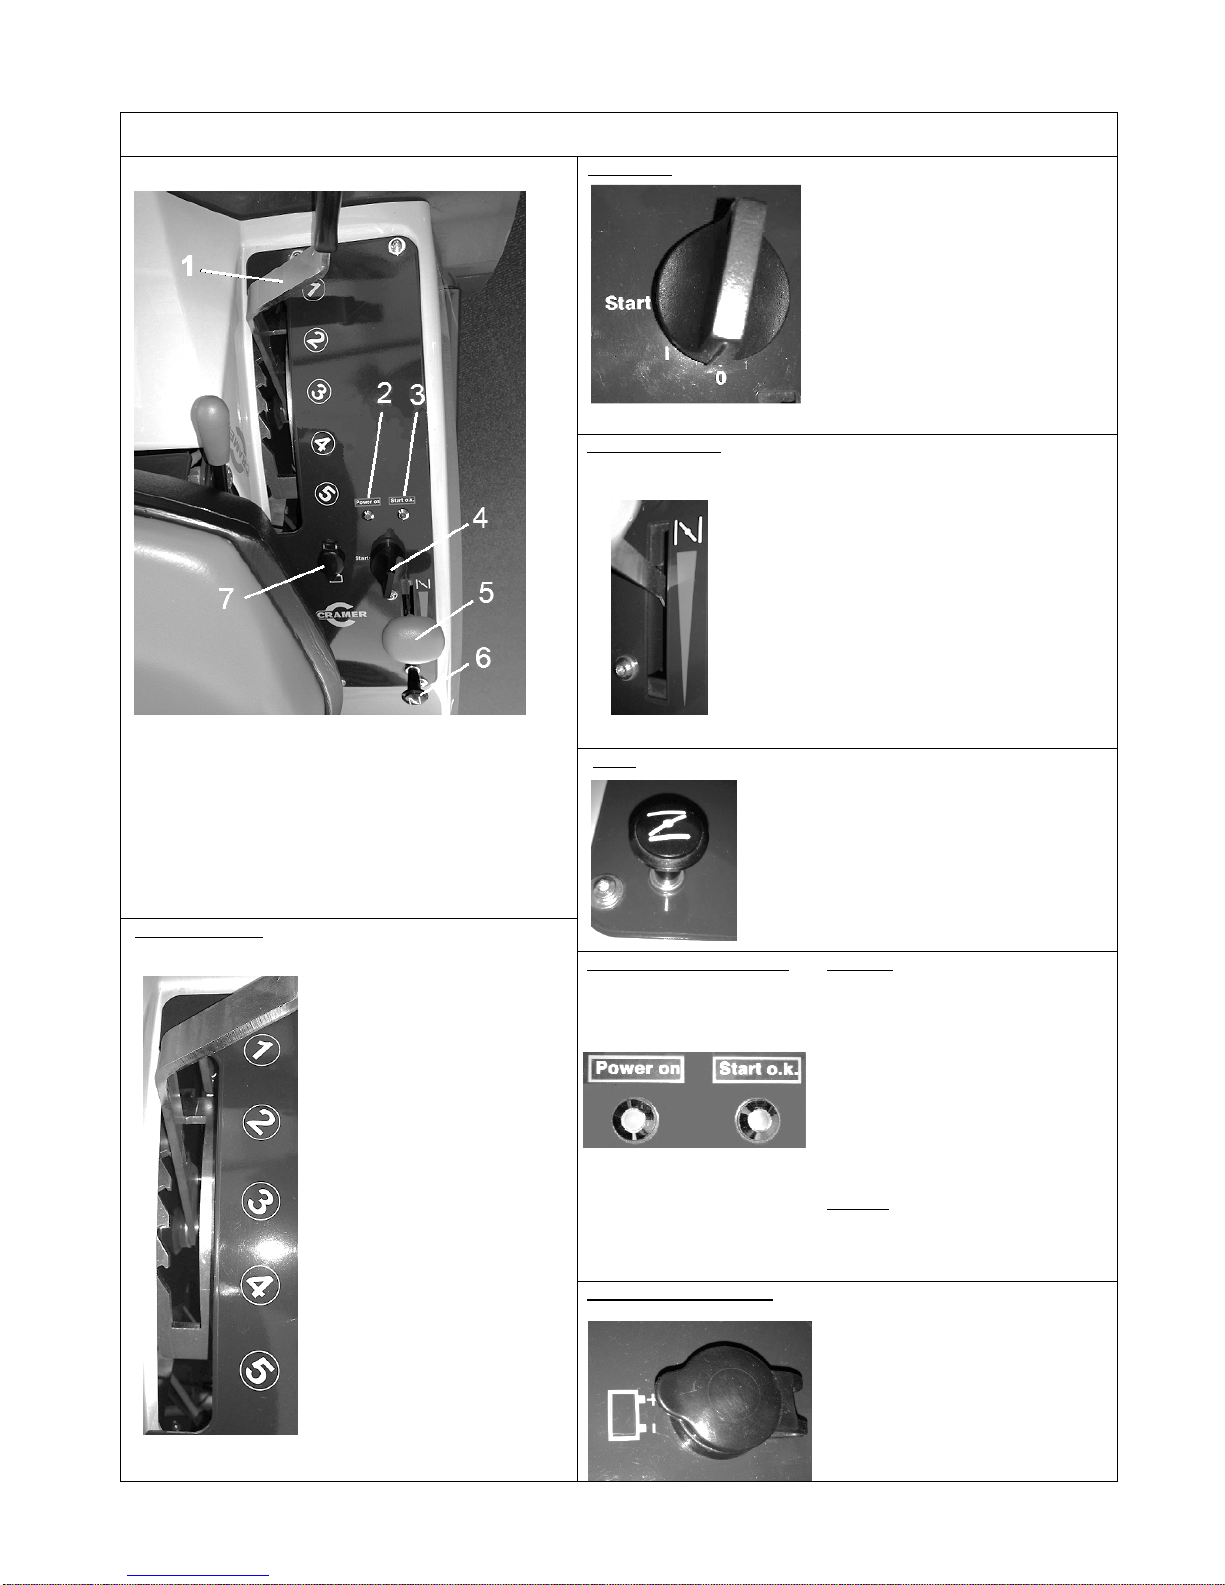
Displays and operating elements...........................................................................................8
4.4
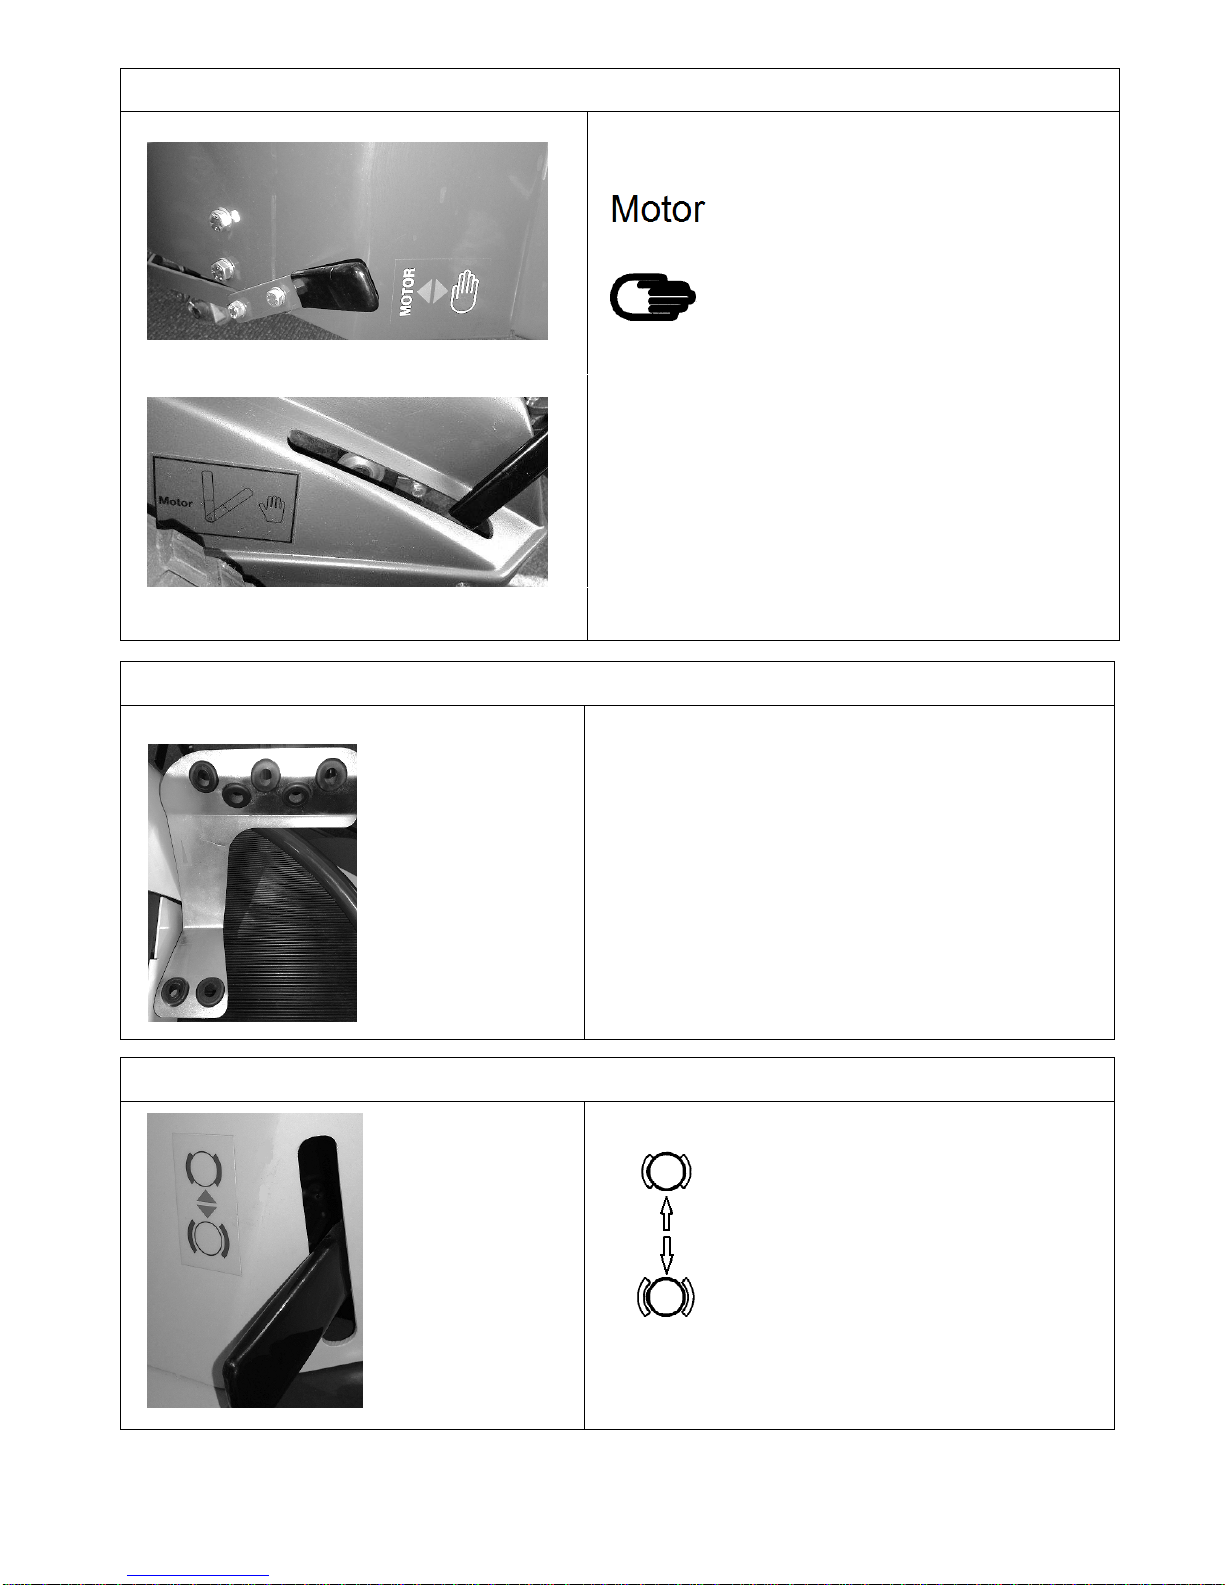
Functions..............................................................................................................................11
4.5
Working position and areas of risk.......................................................................................16
4.6
Accessories and spare parts................................................................................................16
4.7
Transport..............................................................................................................................16
4.8
Storage (short-term).............................................................................................................16
4.9
Storage (long-term)..............................................................................................................16
5
First commissioning (first inspection of the machine) after installation.............................................16
5.1
Safety...................................................................................................................................16
5.2
Assembly..............................................................................................................................16
5.3
First commissioning and functional test...............................................................................16
6
Operation..........................................................................................................................................17
6.1
Activities prior to use............................................................................................................17
6.2
Start and stop.......................................................................................................................17
6.3
Starting and stopping the mowing mechanism ....................................................................17
6.4
Normal operation..................................................................................................................18
6.5
Activities after use................................................................................................................18
6.6
Risks when mowing on slopes.............................................................................................18
6.7
Tips for mulching..................................................................................................................18
7
Maintenance .....................................................................................................................................19
7.1
Safety...................................................................................................................................19
7.2
Maintenance work................................................................................................................19
7.2.1
Machine cleaning..................................................................................................19
7.2.2
Check safety precautions .....................................................................................19
7.3
Maintenance work................................................................................................................19
8
Troubleshooting................................................................................................................................20
8.1
Safety...................................................................................................................................20
8.2
Service address ...................................................................................................................20
8.3
First action for troubleshooting.............................................................................................20
9
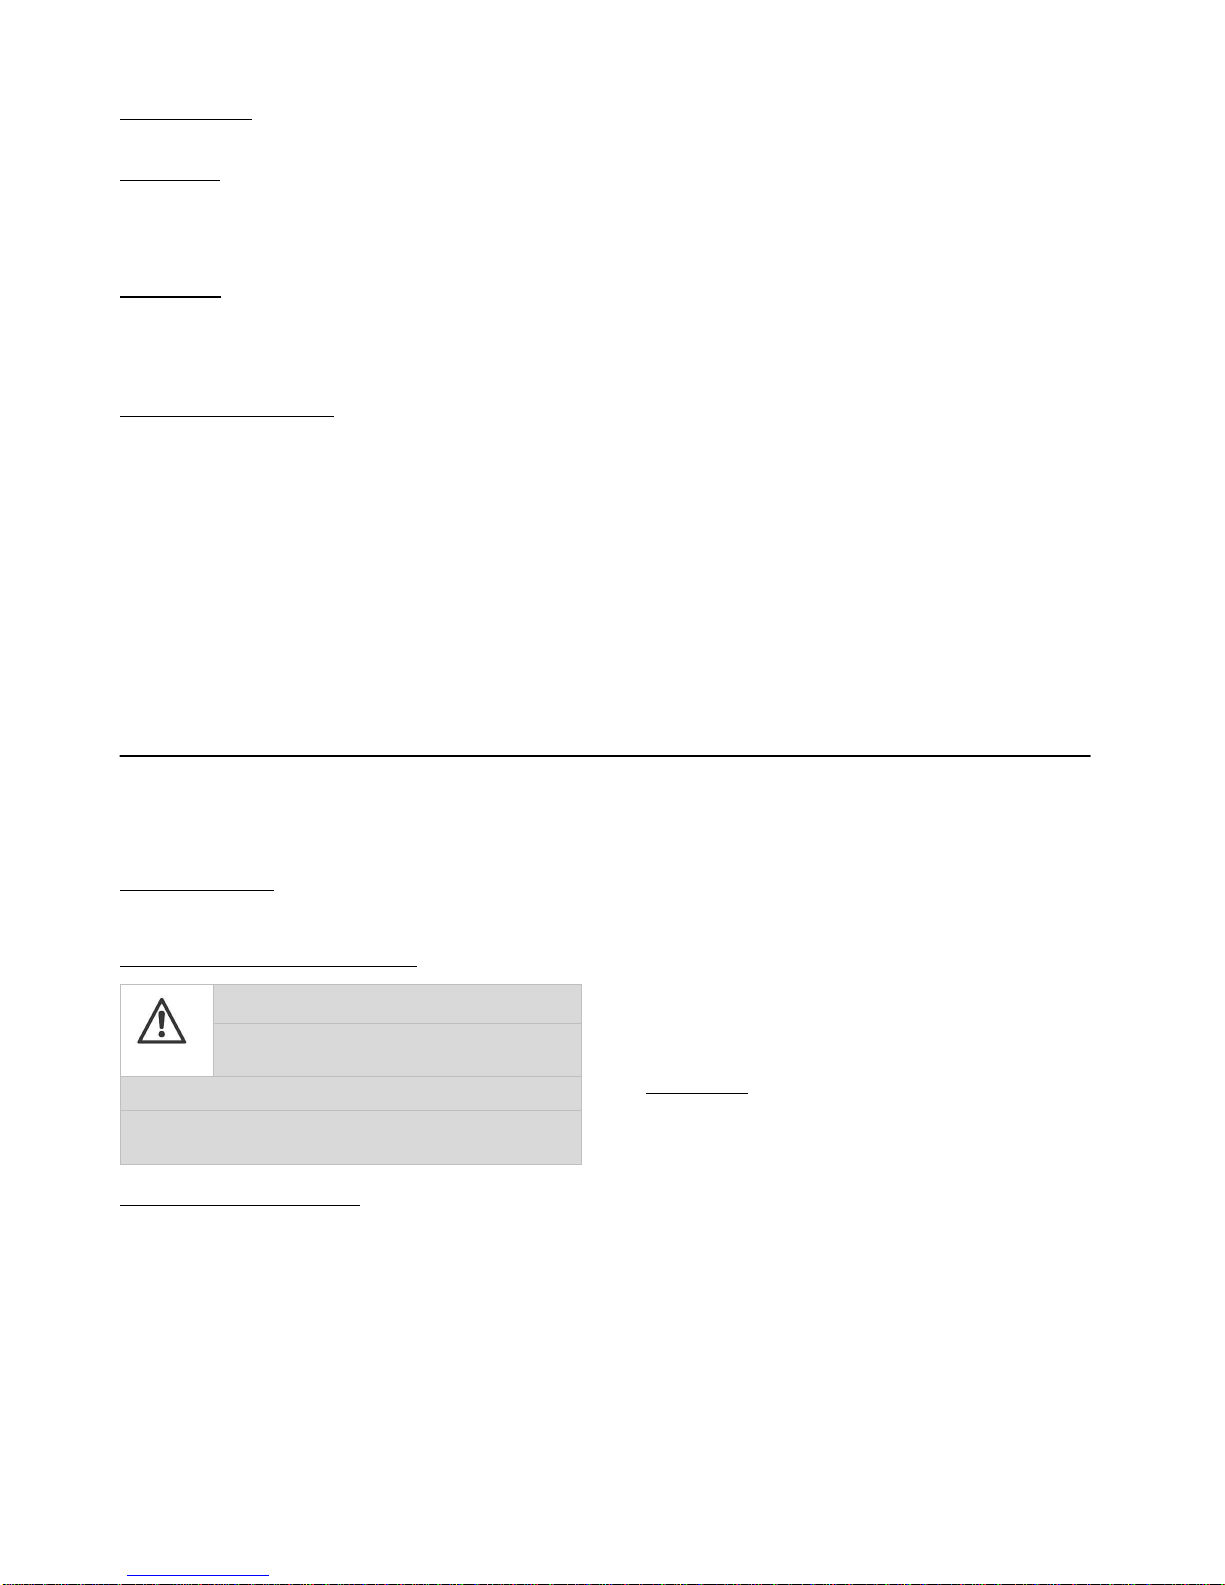
Assembling the mowing mechanism ................................................................................................21
Overview...........................................................................................................................................21
10
EU Declaration of conformity pursuant to machine directive 2006/42/EC Annex II 1-A...................26

TOURNO 696.01-01 As of 2014
Original Operation Manual English
1 Important information
We are pleased that you have selected a machine from
Cramer GmbH in Germany.
Please read this Operation Manual before you use the
machine for the first time and observe the notes and
safety instructions.
Imprint
Cramer GmbH
Reimersstr. 36
D-26789 Leer
Phone: +49491/60950
Fax: +49491/6095200
District court of Aurich HRB 110877
VAT ID: DE 814 305 398
1.1 General
Information on this Manual
•Observing the instructions in this manual allows for the
safe and efficient handling of the machine.
•The operator must have read this manual carefully and
understood it before starting working with the machine.
•Compliance with the safety instructions contained is a
prerequisite for using the machine without any risk.
Keeping the Operation Manual
•The Operation Manual is an integral part of the machine
and shall be kept in its immediate vicinity.
•The operator must have access to this Manual at any
time.
Traffic regulations
•Any applicable traffic regulations have to be complied
with in regard to manoeuvring and transporting the
machine on public roads.
Accident prevention regulations
•General safety and local accident prevention regulations
must also be observed.
•National occupational safety regulations shall be
complied with.
Other applicable documents
Installation, declaration of conformity
1.2 Symbols
DANGER !
This symbol cautions against an immediate
threat resulting in serious injuries or death if
not avoided.
WARNING !
This symbol cautions against a potentially
dangerous source of risk which may result in
death or serious injury if not avoided.
ATTENTION !
Indication of a potential risk which may result
in minor injuries if not avoided.
NOTE !
This symbol indicates a potential risk source which may
result in damage to property or minor personal injuries.
1.3 Limitation of liability
Liability on part of the manufacturer is excluded in the
following cases:
•Non-compliance with the Operation Manual
•Use of the machine and accessory equipment not in
compliance with intended purpose
•Assignment of untrained staff
•Use of unauthorized spare parts. Only original
components may be used.
•Unauthorized modifications on the machine and the
accessory equipment.
1.4 Copyright
© Cramer GmbH
Copying of the Operation Manual is only permissible for
internal training purposes.
1.5 Warranty
The General Terms and Conditions of Business as issued by
us in every country shall be applicable. Failures within the
statutory warranty period will be remedied by us free of
charge if they are caused by a material or manufacturing
defect in our responsibility. Please contact your authorized
dealer in case of a failure and submit the proof of purchase.

TOURNO 696.01-01 4 of 26 As of 2014
Original Operation Manual English
2 Safety
2.1 Use in compliance with intended purpose
The machine is approved as a mulching mower for
mowing and mulching of grass areas.
Any use exceeding this is considered not in
compliance with the intended purpose. The
manufacturer shall not be liable for damage resulting
from use not in compliance with the intended
purpose; the risk for this shall be in the sole
responsibility of the user.
Use in compliance with the intended purpose shall also
include compliance with the operation and maintenance
provisions specified by the manufacturer.
2.2 Possible misuse
•Do not use for mulching piles of leaves. The machine
could be damaged by foreign objects under the leaves.
(Risk of mower damage).
•Do not access any slopes transversely (danger of tilting).
•Avoid jerky steering movements when using the machine
on a slope (danger of tilting).
•Avoid high speeds in bends or when driving round
obstacles (damage to property).
2.3 General sources of risks
2.3.1 Use and operation
•Prior to starting the machine, the machine including
accessories shall be checked for their proper condition
and operational safety.
•The operation shall use the machine in compliance with
its intended purpose.
•Indoor machine operation is prohibited.
•The machine is only approved for floorings as indicated in
the Operation Manual.
•The machine may only be operated by staffs who have
been instructed in its use or have provided evidence of
their operating capability, and who have explicitly been
instructed to operate the machine.
•When starting the motor, no other persons may be in the
vicinity of the machine.
•Any protection equipment must be properly attached and
in functional order.
•Never leave the machine unattended.
•When leaving the machine, stop the motor and secure
the machine against unintended movement.
•The operator shall be responsible for accidents involving
other persons or their property.
2.3.2 Product-specific risks
•Do not mow over any highly flammable materials or hot
objects (e.g. barbecue coal) - danger to life by burns!
2.3.3 Risks from motor operation
•Do not touch any parts of the motor during or after
operation. Significant risk of burning by hot surfaces.
•Stop the motor and let it cool down before working on the
machine as well as before performing maintenance,
cleaning and repair work.
•Do not refill the tank when the motor is running - danger
of life by burning and explosion.
•Immediately remove spilled fuel with a cloth - danger of
life by burning and explosion.
•Keep fuel in designated containers.
•Exhaust gases are toxic and dangerous to health; they
must not be inhaled.
2.3.4 Operating risks
•Do not access any slopes with an inclination
exceeding 15°.
•When using the machine transverse to the direction of
travel, this is only possible on slopes up to 15°.
2.3.5 Risks by rotating cutting blades
•Parts of the body may be seized or cut if you reach into
the mower (danger of life!).
•Do not open any covers during operation.
2.3.6 Risks for children, elderly persons and pets
•The operator shall take account of surrounding
conditions, e.g. the effects of noise on persons and
animals.
•The machine must never be left on a slope.
•Children, elderly persons and pets/livestock must not stay
near the machine.
•Children must not play with/on the machine.
2.4 Maintenance
•Servicing, maintenance and repair work as well as
troubleshooting shall only be carried out when the
machine is switched off and the motor is at a standstill.
As required, the spark plug connectors shall be
disconnected.
•The machine must not be cleaned with spray water (risk
of short circuits or other damage).
•Safety checks pursuant to local regulations for non-
stationary commercially used machines shall be complied
with.
•Wear suitable gloves and use appropriate tools for
working on the machine.
•Only use the manufacturer's original spare parts.

TOURNO 696.01-01 5 of 26 As of 2014
Original Operation Manual English
2.5 Staff and operator qualification
•Persons with physical, sensory or mental handicaps or
persons with insufficient experience or knowledge must
not operate the machine unless a person in charge for
their safety acts as operation or instruction supervisor.
•People under the age of 16 must not operate the
machine.
•The operator's responsiveness must not be affected, e.g.
by drugs, alcohol or medications.
•The operator shall have been instructed in the operation
of the machine.
•The operator shall be familiar with the Operation Manual.
2.6 Safety instructions
The operation manual and safety instructions
must be read and observed prior to starting
the machine.
Risk by flinging parts with running motor.
Keep a safety distance of 3 m.
Keep sufficient distance to mower blade
during operation.
Keep sufficient distance to hot surfaces.
Stop the motor and remove the key prior to
maintenance and repair work.
Danger of tilting! Avoid slopes. Downhill
slope: max 15° Side tilt max. 15°
2.7 Required protection equipment for operation
•Rugged footwear
•Close-fitting clothing
•Ear protection
•Safety gloves
2.8 Safety devices
•Do not remove any covers during operation.
•Immediately remedy any damage to safety devices.
2.9 Behaviour in case of fire
1. Stop immediately.
2. Stop the motor.
3. Lift the mower.
4. Leave the machine.
5. Remedy the risk situation.
2.10 Environmental protection
•Oils, fuels, greases and filters shall be disposed of
properly and separately in accordance with legal
regulations. Please do not dispose of any wastes in the
environment.
•Packaging materials are recyclable. Please make sure
that they are collected for reuse.
•Legacy devices contain valuable recyclable materials
which should be collected for reuse. These devices may
be disposed of through appropriate collection systems.

TOURNO 696.01-01 6 of 26 As of 2014
Original Operation Manual English
3 Technical data
Models Tourno compact Tourno de luxe
Machine data
Motor
Briggs & Stratton
Honda
GXV
502 ccm AVS* INTEK OHV 688 ccm 2-cylinder
Power output 12.8 kW / 17.4 PS / 3600 rpm 14.9 kW / 20.3 PS / 3300 rpm
Generator 9 Ampere 20 Ampere
Start E-Start E-Start
Battery 12 V / 24 AH 12 V / 24 AH
Tank capacity 13.5 litres 13.5 litres
Fuel Unleaded petrol min. 85 octane Premium unleaded petrol min. 85
octane
Forward speed 7.6 km/h 7.6 km/h
Reverse speed 3 km/h 3 km/h
Steering Chain / cable Chain / cable
Connections / interfaces Fixture for mounting tools at front and rear
Year of construction 2013
Tyres
Tyre size 16 x 6.50-8" 16 x 6.50-8"
Tyre pressure 0.8 bar 0.8 bar
Track width 700 mm 700 mm
Axle spacing 917/996 mm (4WD) 917/996 mm (4WD)
Ground clearance 160 mm 160 mm
Noise emission
Guaranteed acoustic power level 99 dB 99 dB
Mower noise level at operator's ear 87 dB(A) 87 dB(A)
Hand / arm vibration ˂2,5 m/sec² ˂2,5 m/sec²
Full body vibration ˂1,1 m/sec² ˂1,1 m/sec²
Responsibility limits for components Motor Motor
Ambient conditions
Working ground Park areas, lawns, tarmac, concrete, paving stones
Application area Conventional use in agriculture and forestry, park maintenance and
landscape gardening, and for winter maintenance
Temperature, °C See Briggs & Stratton and Honda motor data
Mower data Tourno 95 DS-Tourno 115
Length / width / height without mower 2015 / 875 / 1185 mm 2015 / 875 / 1185 mm
Length / width / height with mower 2547 / 1013 / 1185 mm 2461 / 1260 / 1185 mm
Type of mower Mulching / rear discharge Mulching / rear discharge
Models mower
Tourno compact
95 / 115 Tourno compact 4 WD
95 / 115
Tourno de luxe
95 / 115 Tourno de luxe 4 WD
95 / 115
Cutting width 95 cm /115 cm 95 cm / 115 cm 95 cm /115 cm 95 cm /115 cm
Cutting height 40-90 mm 40-90 mm 40-90 mm 40-90 mm
Cutting height adjustment 5 levels 5 levels 5 levels 5 levels
Number of blades 2 2 3 3
DS mowing mechanism No / Yes No /Yes No /Yes No / Yes
Weight without mowing
mechanism 260 kg 256 kg 278 kg 274 kg
Weight of mowing
mechanism 55 kg 55 kg 55 kg 55 kg
Power transmission Hydrostatic front
drive Hydrostatic all-wheel
drive 4 WD Hydrostatic front
drive Hydrostatic all-wheel
drive 4 WD

TOURNO 696.01-01 7 of 26 As of 2014
Original Operation Manual English
4 Design and function
4.1 Brief description
On the TOURNO model, the mowing mechanism is mounted in the front section. For better road adhesion and traction, the
machine has a front-wheel drive and a double-axle drive for the four wheel drive version, respectively. The machine has an
articulated steering via the rear wheels. The speed is controlled progressively by a hydrostatic drive. The height of the mowing
mechanism can be adjusted. The mowing mechanism can be folded up for cleaning and repairs. Various mounting tools can be
attached at the front and rear of the machine.
4.2 Overview
1
Accelerator pedal (forward and reverse drive)
2
Adjustment lever for mulching or mowing (model 115 only)
3
Lifting and lowering the mowing mechanism
4
Steering wheel
5
Driver's seat
6
Motor cover
7
Tank opening
8
Lever for motor-gear connection (all-wheel drive)
9
Lever for motor-gear connection (all models)
10
Parking brake lever
11
Seat adjustment
12
Operating panel
13
Mowing mechanism

TOURNO 696.01-01 8 of 26 As of 2014
Original Operation Manual English
4.3 Displays and operating elements
Operating panel
1Adjustment lever for mowing height setting
2Green safety indicator lamp
3Red operating indicator lamp
4Ignition
5ever for rotational speed
6Choke
7Charging socket for battery
Ignition lock
Put the ignition key into the ignition lock
and turn it.
O → Machine inopera+ve
1 → Machine in opera+on (motor is
running)
Throttle with choke
Push throttle to the desired position.
Choke
Full throttle
Idle
Choke
Pull the choke before starting the machine.
Push down again before starting to move.
Set mowing height The height of the mowing
mechanism can be set by adjusting
the lever. Move the lever until it
engages in the desired position.
approx. 4 cm
approx. 5 cm
approx. 6 cm
approx. 7 cm
approx. 9 cm
Green and red indicator lamp Power on
ights up green when starting, provided
that the following conditions are met
prior to starting:
•Ignition off
•Driver seat occupied
•Mowing mechanism raised
•Accelerator pedal in neutral position
The motor can only be started when the
indicator lamp is lit.
Start o.k.
ights up red when starting.
The indicator lamp shows that the
ignition is switched on.
Charging socket for battery
To charge the battery, open the
protective cap and connect the charger.

TOURNO 696.01-01 9 of 26 As of 2014
Original Operation Manual English
Motor-gear connection
You may move the machine manually by setting the lever for the motor-
gear connection as follows:
Drive via motor
Motor is decoupled, manual pushing is possible.
The lever is located behind the left front wheel.
On the all-wheel drive version only, there is a second lever behind the
left rear wheel.
The lever is located behind the left rear wheel (all-wheel drive). Note!
Do not start the machine in the manual setting - potential damage to gear.
Accelerator pedal
Forward The accelerator pedal has a progressive drive in two directions.
Forward: Push the upper pedal downward with your foot.
Backward: Push the lower pedal downward with your foot.
Neutral
Reverse
Parking brake
Push the lever for the parking brake.
Brake on
Brake off
Note!
The machine cannot be started with the parking brake on.

TOURNO 696.01-01 10 of 26 As of 2014
Original Operation Manual English
Driver's seat adjustment
The position of the driver's seat can be adjusted to suit the height of the
driver. To move the driver's seat forward or back, the lever must be lifted
up.
ifting and lowering the front device
1Pedal unlocking
2Pedal for lifting and
lowering the front
device
3ocking of raised
front device
In order to lift or lower the front device, the following steps are to be
observed:
ift front device:
1. Push the pedal downward with your foot
until it engages behind the locking.
ower front device:
1. Slightly push the pedal downward and
hold it.
2. Press the lever for unlocking until the
securing device disengages.
3. You may now slowly lift your foot until the
mounting tool is completely lowered.
Note!
Do not transfer the machine with lowered front device.
Receiver points
The TOURNO model has two receiver points to mount Cramer accessory devices.
Receiver point for trailer devices
Receiver point for front devices

TOURNO 696.01-01 11 of 26 As of 2014
Original Operation Manual English
Opening the motor cover
The motor cover can be lifted as follows:
First tilt the driver's seat forward. Then unlock the motor cover using
the twist handle and lift up the cover
4.4 Functions
Tilt mower upward
1. ower the mowing mechanism to the ground.
2. Disassemble the belt guard: Only loosen the star handle screws,
then pull the cover forward. The cover can then be removed in an
upward direction.
3. Move the lever upwards to slacken the V-belt.
4. Take the V-belt off the front belt pulley.
5. Place the belt in the recess so that it does not fall off the rear belt
pulley.
6. On each side, pull out the spring clip and remove the bolt.
7. Detach the fork with the folding spring bolt from the height
adjustment.
ATTENTION !
Risk of entrapment when adjusting
Overview
1 = Folding spring bolt
2 = Bolts
3 = Spring clip
8. Insert a bolt and spring clip in the hole.
Important! To avoid the risk of entrapment when dismantling
and folding the mechanism.

TOURNO 696.01-01 12 of 26 As of 2014
Original Operation Manual English
9. ift the mowing mechanism with the pedal
and engage it in the pedal lock.
10. Only now should you pull the mowing
mechanism forward.
11. The guide pin is now in the fork.
12. Swivel up the mowing mechanism.

TOURNO 696.01-01 13 of 26 As of 2014
Original Operation Manual English
13. Protect the mechanism from falling back
down again by inserting the removed bolt
and spring clip in the holes.
Swivelling back the mowing mechanism
1. Remove the bolt and spring clip (from step 13).
Caution!
Always use one hand to hold up the upper end of the mowing mechanism.
2. Pull the underside of the mowing mechanism forward until the bolt slides out of the fork (see previous picture).
3. Fold the mowing mechanism down again and push it back at the same time.
4. Remove the bolt and spring clip (from step 8).
5. Secure the two bolts and spring clips back in the previous holes (no. 6 in overview).
6. Place the V-belt back onto the belt pulley.
7. Push the tensioning lever back in order to tighten the V-belt.
Switching between mulching and discharge
Push the adjustment lever to the desired position:
Mulching: The mowed grass is chopped into small pieces
and strewn onto the lawn.
Discharge: The mowed grass is ejected onto the lawn.

TOURNO 696.01-01 14 of 26 As of 2014
Original Operation Manual English
Adjustment rod for inclination setting
For optimum mulching, the mowing mechanism should be
inclined forward.
B1: Release the catch spring from the adjustment rod
and pull it slightly upward.
B2: Remove the catch spring from its fixture.
B3: For setting, loosen the adjustment rod bolt on one
side.
B4: Subsequently turn the adjustment rod until the
mowing mechanism inclines forward. At the back, the
mowing mechanism should be 2-10 mm higher than
at the front. Then tighten the bolt (A3) again.
B1: Engage the adjustment rod in the catch spring again.
B1
B2
B3
B4
Engaging the V-belt tensioning lever
V-belt tight V-belt slack

TOURNO 696.01-01 15 of 26 As of 2014
Original Operation Manual English
V-belt tensioning
Readjusting the mowing mechanism
1. Loosen the lock nut (2).
2. Loosen the nut (1).
3. The belt can be tensioned by adjusting the tensioning
screw (3).
4.
Secure: first tighten the nut (1), then the lock nut (2).

TOURNO 696.01-01 16 of 26 As of 2014
Original Operation Manual English
4.5 Working position and areas of risk
Working position:
On the carrier
Areas of risk:
•Area of action in front of the machine
•Area of action behind the machine
4.6 Accessories and spare parts
Original parts
Only original spare parts and original accessories may be
used.
4.7 Transport
Transport without packaging
•Lift the front device first as appropriate
•Stop the machine
•Subsequently activate the parking brake
•Finally fix the machine by using lashing straps.
4.8 Storage (short-term)
The machine:
•must not be stored in the open air.
•Do not expose it to aggressive materials.
•Clean machine with a soft brush before start up.
4.9 Storage (long-term)
The following recommendations will help to ensure the long-
standing functionality of your Cramer machines:
1. Ensure that fuels are prepared for long-term storage
(longer than 30 days), e.g. add fuel stabilizer
2. Clean the machine - Important! Also clean the underfloor
3. Renew motor oil
4. Treat spark plugs
5. Check machine for wear, repair paint damage
6. Store the TOURNO in a dry place.
Please refer to the attached motor operation manual for
instructions on how to care for the motor!
5 First commissioning (first inspection of the machine) after installation
Installation and first commissioning shall be performed by your authorized Cramer dealer.
5.1 Safety
Unauthorized restart
•It is prohibited to start the machine while another person
is working on it.
Risks of non-applied protection devices
WARNING !
Danger of injuries due to missing
protective covers!
Lack of covers may cause injuries by flinging materials.
Do not open or remove any covers during operation.
Requirements at location of use
•Only leave the machine on plane surfaces and solid
ground.
5.2 Assembly
Please refer to installation instructions in Annex before first
commissioning.
5.3 First commissioning and functional test
Prior to first commissioning, all missing machine parts have
to be composed as indicated in the installation instruction.
Only then the following functional test shall be performed:
Machine start
1. Fill the fuel tank
2. Release parking brake
3. Check motor and oil level (see Motor Operation
Manual)
4. Set throttle to choke
5. Start machine / turn ignition key
6. After a short time, move throttle to FULL THROTTLE
position
7. If no functional failures occur until then, the machine is
ready for use.

TOURNO 696.01-01 17 of 26 AS OF 2014
Original Operation Manual English
6 Operation
6.1 Activities prior to use
•Remove any obstacles (toys, stones, etc.)
•Top up with petrol.
6.2 Start and stop
Basic prerequisites for switching on the machine
1. Occupy the driver's seat
2. Raise the mowing mechanism
3. Start the machine
Indicator lamps lit.
Switching on the different models
Models Cold motor Warm motor
TOURNO Compact 1. Push throttle forward to choke position
2. Start the machine
3. Move throttle away from choke position
4. Move throttle to full throttle
1. Move throttle to full throttle
2. Start the machine
TOURNO de Luxe 1. Pull the choke knob
2. Move throttle to full throttle
3. Start the machine
4. Reduce the choke
1. Move throttle to full throttle
2. Start the machine
Switching off
1. Raise and lock the mowing mechanism
2. Pull back motor drive lever until idle speed is reached
3. Switch off the motor
4.
Remove ignition key
Switching off in an emergency
1. Immediately bring the machine to a standstill
2. Stand up from the driver's seat (EMERGENCY-OFF)
3.
Leave the machine.
Switching on again after EMERGENCY-OFF
1. Switch off the motor
2. Raise the mowing mechanism
3. Move motor drive lever to full throttle
4. Start the machine.
6.3 Starting and stopping the mowing mechanism
Starting / lowering
•Depress the left pedal
•Pull the locking lever
•Slowly release the left pedal
The mowing mechanism starts
Switching off / raising
•Depress the left pedal until behind the lock
•Engage the pedal in the lock
The mowing mechanism stops.

TOURNO 696.01-01 18 of 26 AS OF 2014
Original Operation Manual English
6.4 Normal operation
WARNING !
Risk of injuries by highly flammable
materials and heat!
Materials coming into contact with a hot surface may result
in serious burns on the body when they inflame; e.g. hot or
burning materials such as coal.
Keep highly flammable materials away from the
machine.
Do not move the machine over any spilled fuel or
similar substances.
1. Basic setting:
•Park machine on an even surface
•Refill consumables
•Set throttle to O
•Fix mounting devices as required
2. Start the machine.
•Release parking brake
•Set throttle to Choke on operating panel
•Put ignition key into ignition lock and turn to 1to start the
machine
•Let the motor run for a short time
•Only then move throttle to Full throttle
•In the Full throttle position, accessories may be used.
Forward drive
Press the right upper part of the pedal downward
Reverse drive
Press the right lower part of the pedal downward
3. Stop the machine.
•Bring machine to a standstill
•Set throttle to Idle
•Turn ignition key to Oto switch off the machine
•Remove ignition key
6.5 Activities after use
1. Stop the motor.
2. Roughly remove dirt and sand by using a soft hand
brush.
3. Check machine condition; remedy damage to paint
coating, if any
4. The machine must be left in a clean and dry condition.
6.6 Risks when mowing on slopes
Tips for driving on slopes
•Never drive sideways to the slope. Risk of tipping over!
•Always drive up and down the line of fall.
•Drive very slowly when going downhill and in bends.
→Danger of tilting!
•Be especially aware of the risk of tipping over when using
trailers and accessories on slopes. The trailer increases
the risk of tipping over.
•Avoid the edges of slopes and ditches. →The wheels
could go over the edge or slip down.
•Take special care when driving in unknown territory. →
Furrows may be hidden in the grass.
•Never deactivate the safety function of the seat, as the
motor and therefore the blades would otherwise not be
switched off in an emergency.
6.7 Tips for mulching
With a regular, short mowing rhythm
•Only dry grass should be mulched.
•Make sure the ground is dry, otherwise wheel ruts may
arise.
•If the ground is wet the drive wheels will have reduced
traction and an unstable grip on the terrain surface.
•Mow the area from the inside to the outside.
•An optimum mowing result is achieved with high
rotational speed and low driving speed.
•Only cut the blades of grass by 1/3 to leave enough room
for the grass chaff.
•The ideal length of grass for mulching is 5 cm.
After a longer break from mowing
•Mulching should be performed at the highest setting,
otherwise the mowing mechanism will become clogged.
•Now mow the grass in two separate stages.

TOURNO 696.01-01 19 of 26 AS OF 2014
Original Operation Manual English
7 Maintenance
7.1 Safety
DANGER !
Risk of injury by inappropriately
performed maintenance work!
Defective work may result in serious bodily injuries and
damage to property.
Make sure that you have sufficient working space.
Disconnect spark plug connectors when working on
the machine
Place components separately.
Remount all components.
Remount all safety covers.
Keep the risk area clear of persons.
ATTENTION!
Risk of injuries by combustion motors
Cleaning and repair work must never be carried out during
operation or when the machine runs idle, since this may
result in burns and cuts.
Stop machine and motor and let them cool down.
7.2 Maintenance work
7.2.1 Machine cleaning
The machine should be cleaned regularly so that damage to
the paint coating or plastic components can be detected.
Please observe the notes listed for cleaning in order to avoid
damage to the electronics.
1. Park machine on an even surface before cleaning it and
activate the parking brake.
2. Clean the machine with a soft brush.
3. Subsequently clean the machine with a damp cloth.
NOTE !
Machine damage!
Do not clean the machine with spray water.
7.2.2 Check safety precautions
Safety precautions comprise:
- Cover of blades and V-belts
- Covers of drive wheels
- Motor cover
The machine must not be operated if the covers show any
signs of damage or are removed. They are to be replaced in
case of damage or loss. The machine must not be started
without safety precautions.
7.3 Maintenance work
Maintenance Prior to each use Annually Intervals in hours
25 50 100 200
Cleaning X (Item 7.2.1)
Check safety precautions X (Item 7.2.2)
Check all screws for tight fitting O
Check motor oil level B
Check air filter B
Clean or replace air filter (normal use) B
Clean or replace air filter (dusty conditions) B
Adjust tyre pressure O
Check machine for damage or corrosion on paint
coating and remedy as appropriate O
Grease rotating points and joints O
Check machine for fuel or oil leaks O
Replace fuel filter B
Replace spark plugs B
X = Described in this Operation Manual in the indicated section.
O = Not described in the present Operation Manual
B = Description is enclosed in attached motor operation instructions.

TOURNO 696.01-01 20 of 26 AS OF 2014
Original Operation Manual English
8 Troubleshooting
8.1 Safety
Procedure for failures and accidents
1. Initiate emergency stop (leave working position).
2. Stop the machine.
3. Determine the failure cause.
4. Remedy failure or contact specialist dealer.
8.2 Service address
Please contact your sales consultant in case of failures,
problems or otherwise. Please always indicate the machine
serial no. in inquiries. (Please refer to nameplate on the
machine or on the Operation Manual cover).
8.3 First action for troubleshooting
Failure Cause / Remedy
Motor will not start
Check tank filling level and refill as appropriate
Green indicator lamp does not light up, check the basic conditions for starting the machine
Check and adjust choke setting
Ignition plug failure →Clean ignition plug contacts or replace ignition plug
Fuel pump clogged →Check pump and clean fuel filter
Starter does not move Check battery and charge or refill as appropriate
Contact to battery poles insufficient →clean and grease poles
Green indicator lamp does not light up →check prerequisites for starting machine
Motor is running rough Ignition plug failure →Clean ignition plug contacts or replace ignition plug
Clean air filter - See Maintenance
Clean fuel filter - See Maintenance
Battery cannot be loaded
sufficiently
Battery cells are damaged →Replace battery
Battery acid level too low →Refill distilled water
Contact problems, clean and grease poles
Mower vibrates Tighten blade bolts
Blades are imbalanced →replace them with new, original blades.
Uneven mowing result
Blades are blunt →replace blades
Excessively high speed at insufficient motor rpm.
Mowing mechanism is not set parallel to the ground →use the adjustment screws on the mowing
mechanism linkage to set the mowing mechanism parallel to the ground
Different pressure levels in wheels
Drive performance null or
weak
Air in gear unit →Set both gear units to manual operation, start motor and push accelerator
pedal several times, both forward and backward (bleeding). In case of insufficient remedy,
please contact your authorized dealer.
This manual suits for next models
7
Table of contents
Other Cramer Lawn Mower manuals

Cramer
Cramer 2502386 User manual

Cramer
Cramer 2500386 User manual

Cramer
Cramer 82LM46S User manual

Cramer
Cramer RM1000 User manual

Cramer
Cramer 40LM35 User manual

Cramer
Cramer 2500386 User manual

Cramer
Cramer 2502886 User manual

Cramer
Cramer 2500686 User manual

Cramer
Cramer 2501286 User manual

Cramer
Cramer PRO82 LMS46 User manual

Cramer
Cramer RM800 User manual

Cramer
Cramer RM2700 User manual

Cramer
Cramer RM2000 User manual

Cramer
Cramer 40LM35 User manual

Cramer
Cramer 82ZT132 User manual

Cramer
Cramer RM1500 User manual

Cramer
Cramer 40LM41 User manual

Cramer
Cramer 82 LMS51S User manual

Cramer
Cramer 82LM61SX User manual

Cramer
Cramer 2500586 User manual