Cramer RM2700 User manual

RM1000 / RM1500 /RM2000 / RM2700
Robotic Lawnmower
Rasenmähroboter
Cortacésped robótico
Tondeuse à gazon robotique
Gogo Tosaerba
Corta-relva robótico
Robotmaaier
Роботизированная газонокосилка
Robottiruohonleikkuri
Robotgräsklippare
Robotklipper
Robotplæneklipper
Robokosiarka
Robotická sekačka na trávu
Robotická kosačka
Robotska kosilnica
Robotska kosilica
Robotfűnyíró
Robot de tuns iarba
Роботизирана ливадна косачка
Original instructions/Übersetzung der ursprünglichen Anweisungen/Traducción de las instrucciones originales/Tradu-
zione delle istruzioni originali/Traduction des instructions d’origine/Tradução das instruções originais/Vertaling van de
originele gebruiksaanwijzing/Перевод оригинальных инструкций/Alkuperäisten käyttöohjeiden käännös/Översättning
av originalanvisningarna/Oversettelse av den originale bruksanvisningen/Oversættelse af den originale instruktions-
bog/Tłumaczenie oryginalnej instrukcji/Překlad originálního návodu/Preklad originálneho návodu/Prevod izvirnih navo-
dil/Prijevod izvornih uputa/Az eredeti utasítás fordítása/Traducere a instrucţiunilor originale/Превод на оригиналните
инструкции/ Originalių instrukcijų vertimas/ Oriģinālie norādījumi/ Originaalkasutusjuhend
OPERATOR’S MANUAL
BEDIENUNGSHANDBUCH
MANUAL DEL OPERARIO
MANUALE DI ISTRUZIONI
MANUEL OPÉRATEUR
MANUAL DO OPERADOR
GEBRUIKERSHANDLEIDING
РУКОВОДСТВО ОПЕРАТОРА
KÄYTTÖOPAS
ANVÄNDARHANDBOK
BRUKERHÅNDBOK
BRUGERVEJLEDNING
INSTRUKCJA OBSŁUGI
NÁVOD K OBSLUZE
NÁVOD NA OBSLUHU
PRIROČNIK ZA UPRAVLJAVCA
PRIRUČNIK ZA RUKOVATELJE
KEZELŐI KÉZIKÖNYV
MANUAL DE INSTRUCŢIUNI
РЪКОВОДСТВО НА ОПЕРАТОРА
BG
CS
DA
DE
ES
FI
FR
HU
IT
NL
NO
PL
PT
RO
RU
SK
SL
SV
EN
HR
Robotas vejapjovė OPERATORIAUS VADOVAS
Robotizēts zāles pļāvējs LIETOTĀJA ROKASGRĀMATA
Robotmuruniiduk KASUTUSJUHEND
LT
LV
ET

CRAMERTOOLS.COM 1
EN
Version 3 - 2022.08.30
Contents
Installation ..................................................................................................................2
Connecting the power supply.......................................................................2
Installing the boundary wire...........................................................................2
Product Safety........................................................................................................... 3
Explanation of symbols on the mower........................................................ 3
Reading the operator manual........................................................................ 3
Operational safety............................................................................................5
Maintenance..............................................................................................................6
Replacing the battery.......................................................................................6
Environmental Protection.......................................................................................6
Troubleshooting........................................................................................................ 7
Indicator leds on mower ................................................................................. 7
Breaks in boundary wire and guide wire.................................................... 7
Technical Data...........................................................................................................8
CE Declaration of Conformity................................................................................9
Declaration of Conformity (UK) ........................................................................... 10
The materials, technical data, and figures in this manual are provided for guidance only and are not
binding. The manufacturer reserves the right to make any changes to the technical characteristics
and all features of operation, materials, technical data, or figures without prior warning.
The following pages contain safety instructions,servicing and maintenance. For the operation please see the quick
guide supplied with the machine.
Carefully read and review all safety instructions, warnings and cautions contained in this manual and the quick guide.
Failure to read and follow these instructions, warnings and cautionary statements may result in severe injury or death to
persons and pets or damage to personal property.
THE FULL INSTRUCTION MANUAL IS AVAILABLE ON WEBSITE:
https://url.globetools.systems/ofarX
QR code:

CRAMERTOOLS.COM
Version 3 - 2022.08.30
2
EN Installation
0cm
30cm
35cm
Connecting the Power Supply
Connect the power supply in a cool, dry environment; out of direct
sunlight.
If the power supply is connected to an electrical socket outdoors, it must
be approved for outdoor use.
The low voltage cable can cross the operating area if it is stapled down
or buried.
CAUTION: Do not cut, splice, or alter the low voltage cable. Altering
product gurantee.
Installing the Boundary Wire
Lay down the loop wire reel at the charging station.
Go back around the boundary of the operating area and secure the
boundary wire either using pegs or buried in the ground. Pegs are
recommended since this allows for adjustment during the first few
weeks of operation.
When securing the boundary wire with pegs:
•Cut the grass very low with a standard lawnmower or a trimmer
where the wire is to be laid.
•Lay the boundary wire on the ground and secure with pegs
close together.
•Push or hammer the pegs into the ground.
Do not push the pegs so far into the ground so that they strain the
boundary wire.
When burying the boundary wire:
•Bury the boundary wire 1—20 cm into the ground.
Please see the complete manual online for the guide wire installation.
>1.5m
>1.5m
1m
>3m
10m
35cm
CRAMERTOOLS.COM 3
EN
Version 3 - 2022.08.30
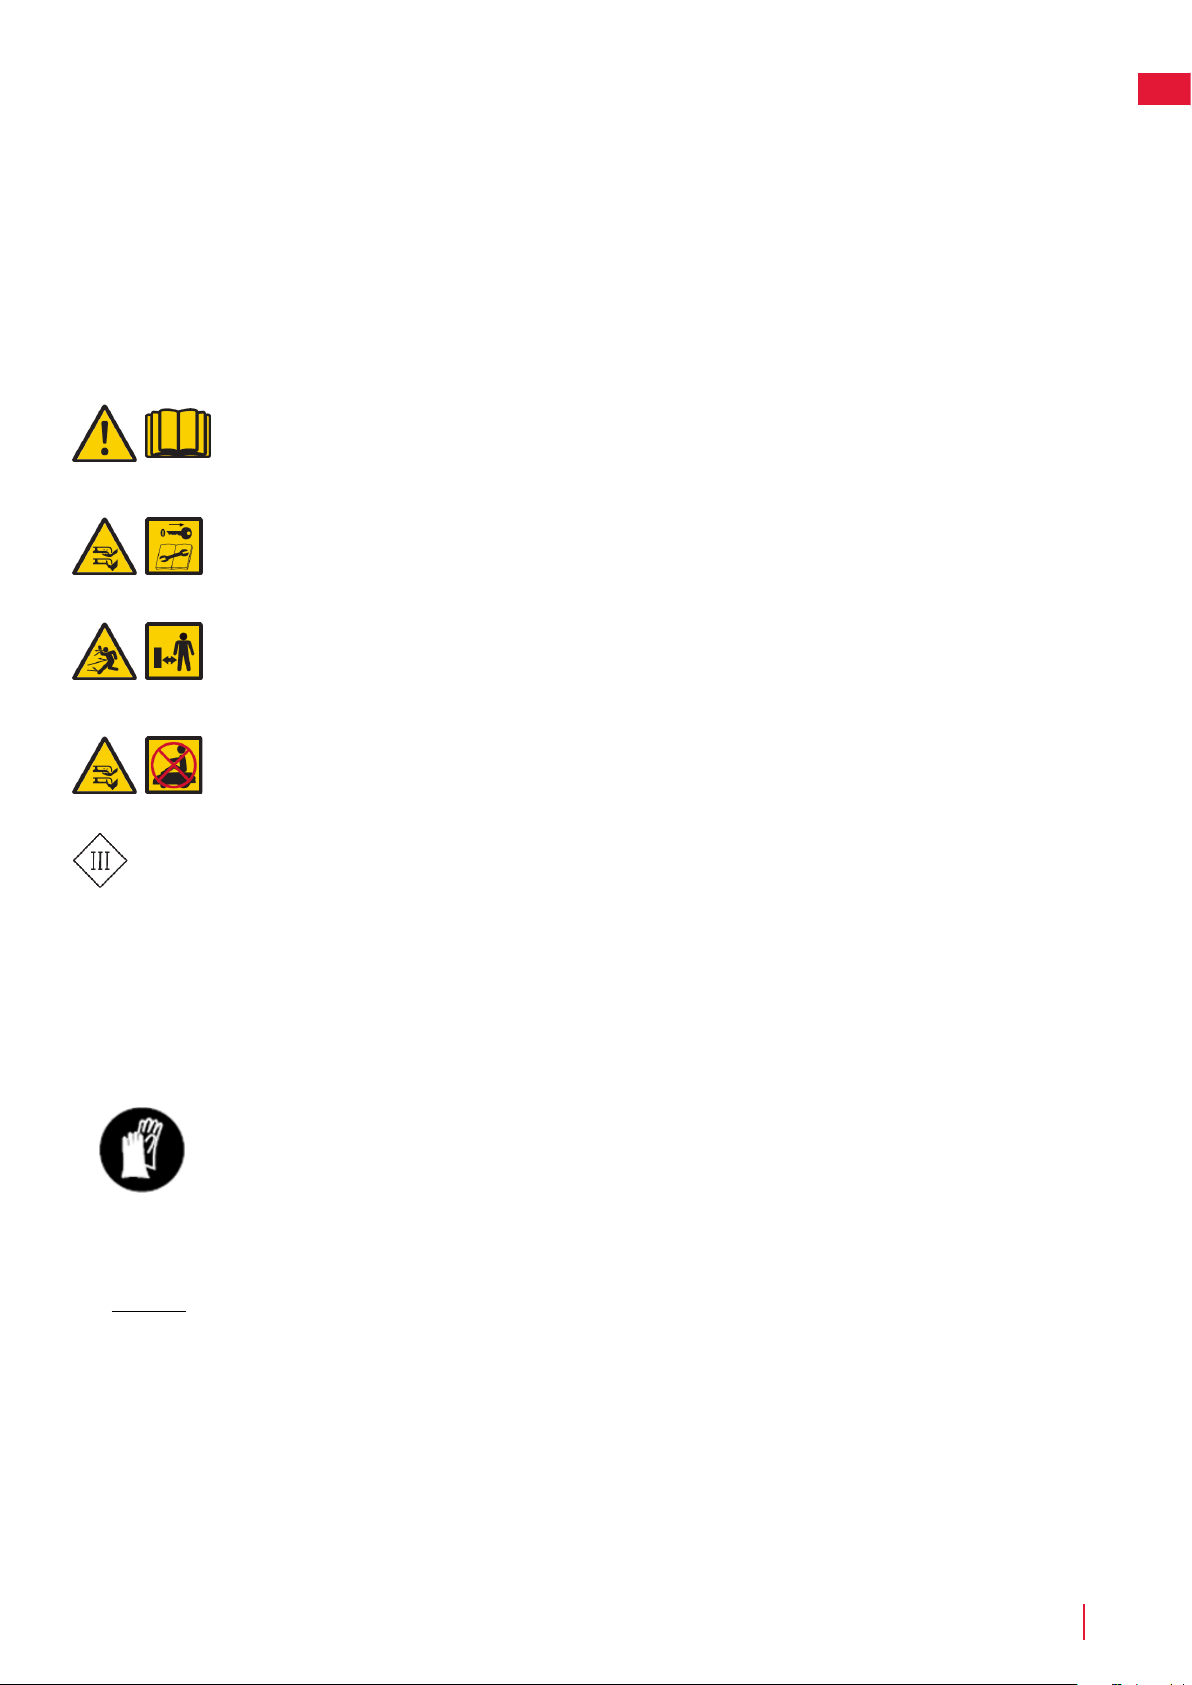
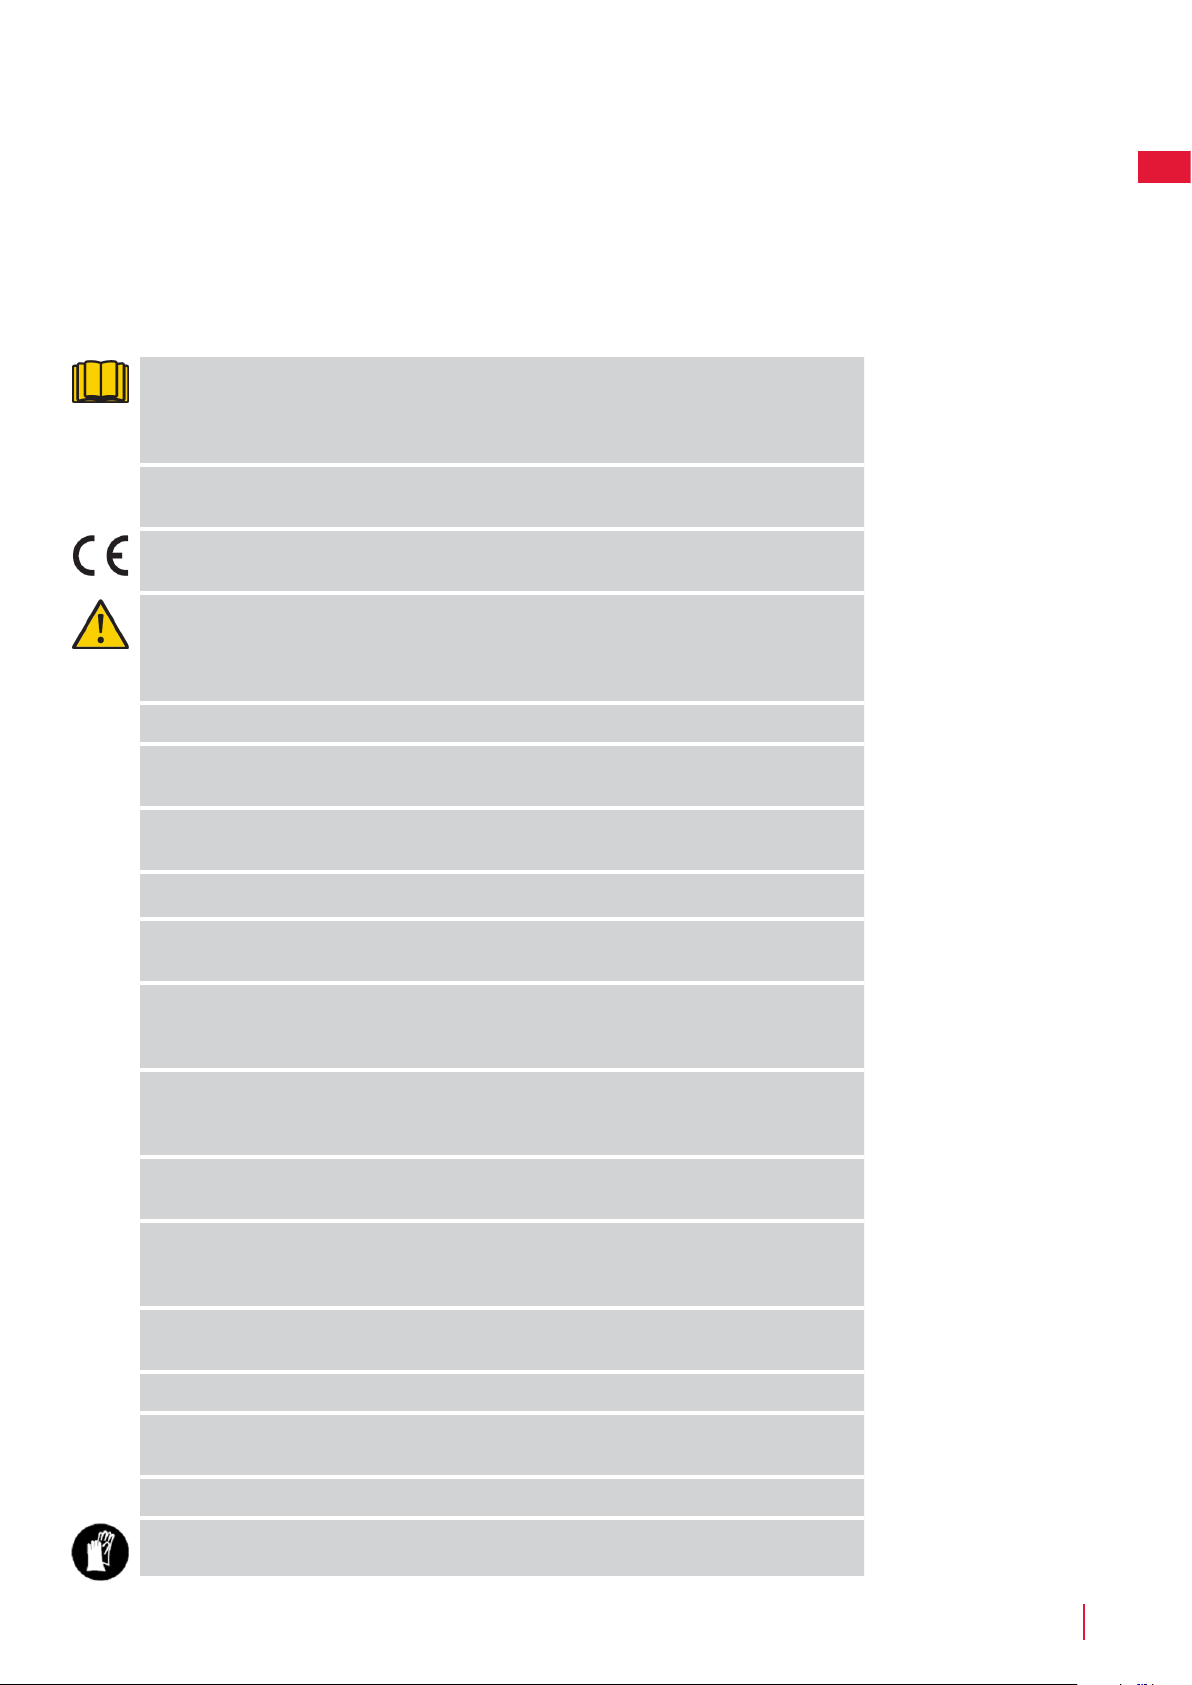
Explanation of Symbols on the Mower
This is a dangerous power tool. Use care when operating and follow all safety
instructions and warnings.
Read the operator manual carefully before operating the mower.
Remove the safety key before working on or lifting the mower.
Hazard of thrown objects during operation.
Keep a safe distance from the mower when operating and keep people, especially
children, pets and bystanders away from the area where mower is being operated.
Do not ride on the mower.
Class III appliance
As a complement to this operator manual, more information is available on the website:
www.cramertools.com
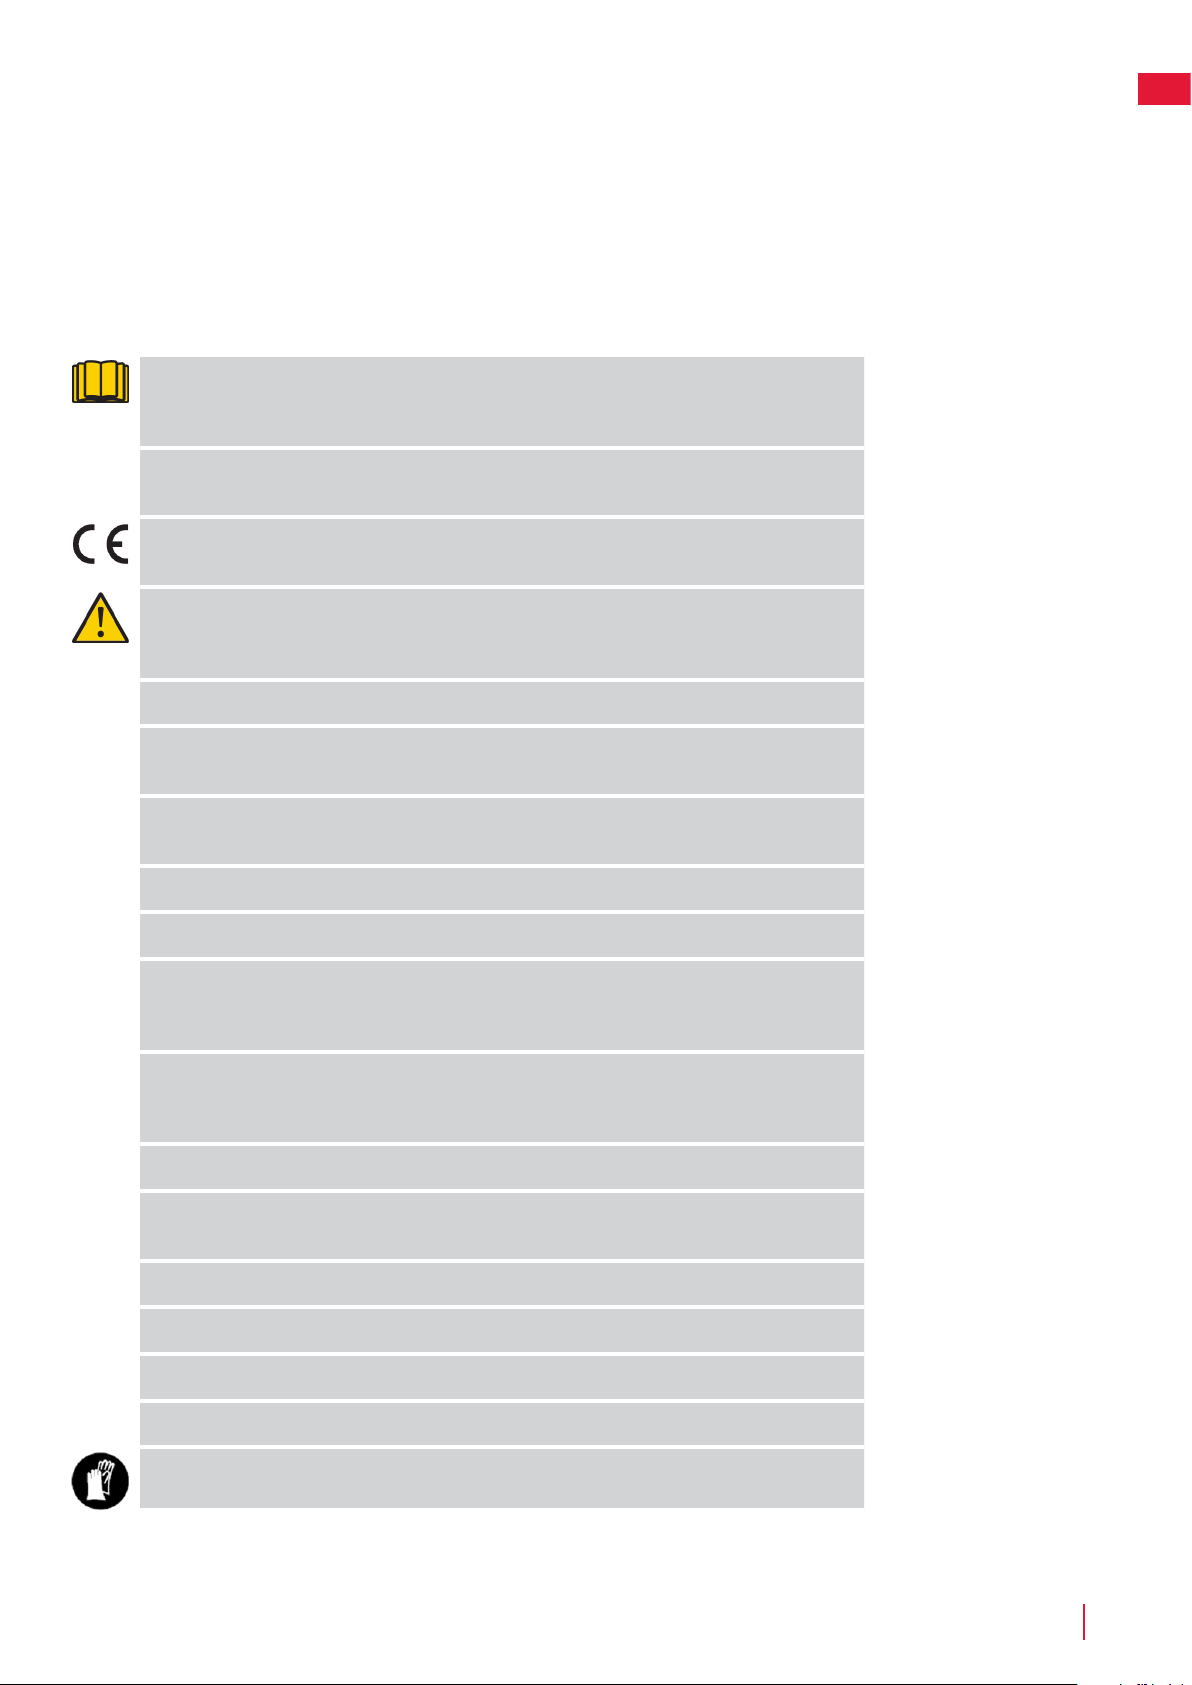
Reading the operator manual
The following symbols are important for reading and understanding
the operating instructions.
Wear protective gloves
The following system is used in the operator manual to make it easier to understand:
•WARNING! Warning texts alert users and consumers to the existence and nature of hazards so that
they can prevent injury by appropriate conduct during use of the product.
•CAUTION: Caution texts alert users and consumers to the existence and nature of product risks so that
they can prevent damaging the product by appropriate conduct during use of the product.
•NOTE: Notes inform users and consumers about additional information about product use.
•Text written in bold italics refers to another section in the operator manual.
•Text written in bold refers to settings on the mower.
Product Safety

CRAMERTOOLS.COM
Version 3 - 2022.08.30
4
EN Product Safety
IMPORTANT
READ CAREFULLY BEFORE USE! KEEP FOR FUTURE REFERENCE!
Safe operating practices
Training
WARNING! Automatic lawnmower! Keep away from the machine! Supervise children!
•Read the instructions carefully. Be familiar with the controls and the proper use of the machine.
•Never allow people unfamiliar with these instructions or children to use the machine. Local regulations may
restrict the age of the operator.
•The operator or user is responsible for accidents or hazards occurring to other people or their property.
Preparation
•Ensure the correct installation of boundary and guide wires as instructed.
•Periodically inspect the area where the machine is to be used and remove all stones, sticks, wires, bones,
and other foreign objects.
•Periodically visually inspect to see that the blades, blade bolts and cutter assembly are not worn or
damaged. Replace worn or damaged blades and bolts in sets to preserve balance.
operation
•Never operate the machine with defective guards, or without safety devices, for example the body, in place.
•Do not put hands or feet near or under rotating parts.
•Never pick up or carry an machine while the motor is running.
•Remove (or Operate) the disabling device from the machine
-before clearing a blockage;
-before checking, cleaning or working on the machine.
•Do not leave the machine to operate unattended if you know that there are pets, children or people in the
vicinity.
Maintenance and storage
•Keep all nuts, bolts, and screws tight to be sure the machine is in safe working condition.
•Replace worn or damaged parts for safety.
•Ensure that only replacement cutting means of the right type are used.
•Ensure that batteries are charged using the correct charger recommended by the manufacturer. Incorrect
use may result in electric shock, overheating or leakage of corrosive liquid from the battery.
•In the event of leakage of electrolyte flush with water/neutralizing agent, seek medical help if it comes into
contact with the eyes, etc.
•Servicing of the machine should be according to manufacturers’ instructions.
WARNING! For the purposes of recharging the battery, only use the detachable supply unit
provided with this appliance.
WARNING! This appliance contains batteries that are only replaceable by a skilled persons.
To start the mower:
1 Insert the safety key and rotate counter clockwise to position ”1”.
2 Slide the START button latch backwards.
3 Press down the START button.
To stop the mower:
Press the STOP button on the mower.
Press the STOP button on the mower and remove the safety key.
WARNING! Always remove the safety key when performing
maintenance or if the mower must be moved.
Starting and Stopping the Mower Switching O the Mower
Operation
CRAMERTOOLS.COM 5
EN
Version 3 - 2022.08.30
Operational safety
This operator manual contains all of the basic information concerning the safe operation
and maintenance of the mower.
Product Safety
Carefully read all the safety precautions and instructions in this operator manual before operating
the mower. Save this operator manual for future reference. Follow manufacturer instructions
regarding installation, operation, maintenance, and repair.
This mower is designed to mow grass in open and level areas. Use only equipment recommended
by the manufacturer. All other types of use are incorrect.
This mower conforms to CE safety standards and directives concerning electromagnetic
compatibility, machines, and low voltage.
The mower is not intended for use by persons (including children) with reduced physical, sensory,
or mental capabilities, or lack of experience and knowledge, unless they have been given
supervision or instruction concerning use of the appliance by a person responsible for their safety.
Children should be supervised to ensure that they do not play with the appliance.
The mower must only be operated, maintained, and repaired by persons that fully understand its
special characteristics and safety regulations.
Start the mower in accordance with the instructions. When the safety key is in the Enabled position,
keep your hands and feet away from the rotating blades.
Never put your hands and feet under the mower.
Do not modify the original design of the mower. All modifications void the guarantee.
Switch o mower using the STOP button on the mower when persons, especially children, or pets
are in the cutting area. It is recommended that the mower be programmed for use during hours
when the area is free from persons or pets.
Remove objects from the operating area such as branches, toys, stones, tools that can damage
the blades. The mower can fasten on objects in the operating area and help may be required to
remove the object before the mower can continue mowing.
Never lift up the mower or carry it with the safety key inserted.
Always switch o the mower using the STOP button when the mower is not in use. The mower can
only start when the safety key is inserted and the START button is pressed.
The built-in alarm is very loud. Be careful, especially if the mower is handled indoors.
Do not use the mower with a defective blade disc or body.
Do not let persons who do not know how the mower works and behaves use it.
Do not put anything on top of the mower or its charging station.
Always wear protective gloves when working with the mower’s blades.
CRAMERTOOLS.COM
Version 3 - 2022.08.30
6
EN
Environmental Protection
According to the European law 2012/19/EU, electrical and electronic equipment that is no longer usable, and according to
the European law 2006/66/EC, defective or used battery packs/batteries, must be collected separately and disposed of in an
environmentally correct manner.
The symbol on the mower or its packaging indicates that this product cannot be treated as domestic waste. It should instead be left at
a suitable recycling centre to recycle its electronic components and batteries.
The batteries are enclosed in the chassis under the mower.
By ensuring that this product is taken care of correctly, you can help to counteract the potential negative impact on the environment
and people that can otherwise result through the incorrect waste management of this product.
For more detailed information about recycling this product, contact your municipality, your domestic waste service or the shop from
where you purchased the product.
Separate collection of used machine and packaging let you recycle materials and use them again. Use of the recycled materials helps
prevent environmental pollution and decreases the requirements for raw materials.
At the end of their useful life, discard batteries with a precaution for our environment. The battery contains material that is dangerous
to you and the environment. You must remove and discard these materials separately at a equipment that accepts lithium-ion
batteries.
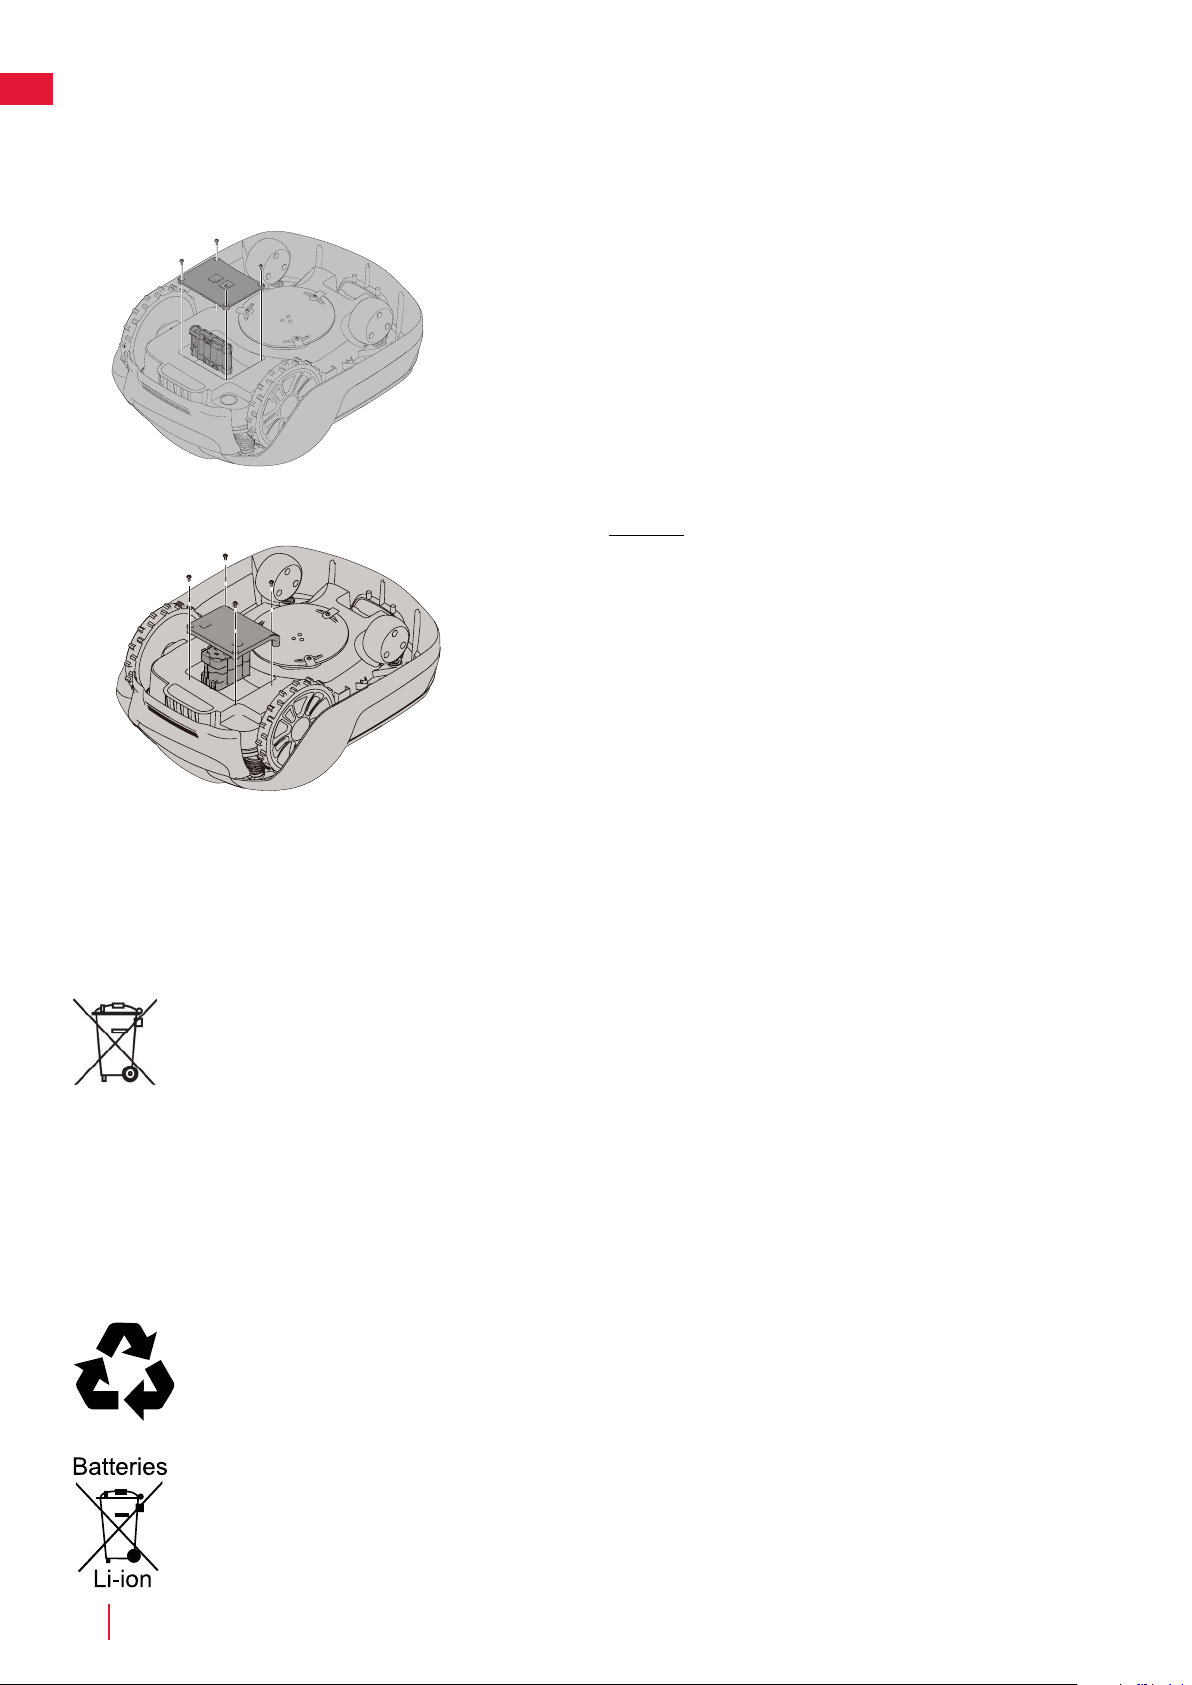
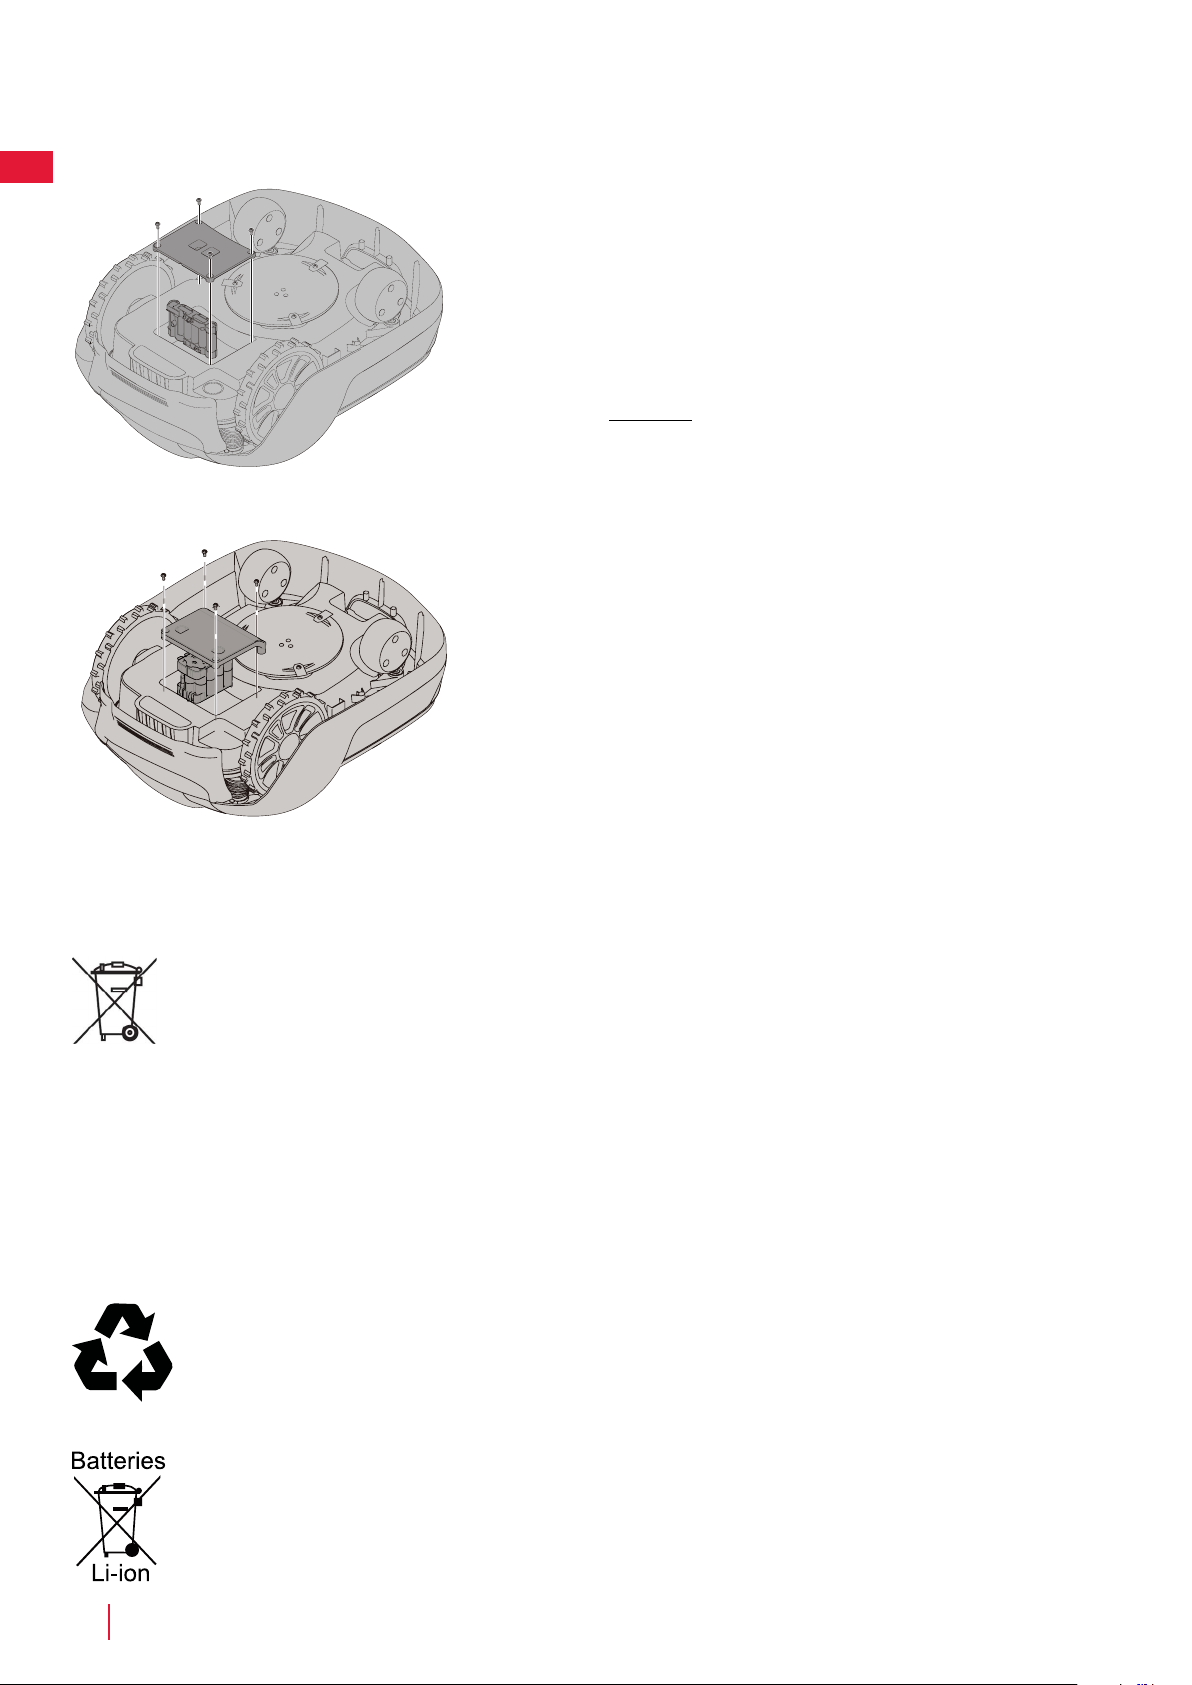
Replacing the Battery
WARNING! Press the STOP button and remove the safety key
before replacing batteries and wear protective gloves.
CAUTION: Use only original replacement parts.
Turn the mower upside down and remove the four Torx T20 screws and
remove the battery cover.
Disconnect the battery terminal connector.
Lift the battery straight out.
Insert the new battery in slot 1 (the rear slot).
Connect the battery terminal connector to the new battery.
Put the battery cover back into place and insert and tighten the four Torx
T20 screws.
Insert the safety key into the underside of mower and turn to the Enable
position.
Place the mower into the charging station for enable and charing the
battery.
WARNING! In the event of electrolyte leakage, flush with
water/neutralizing agent and seek medical care if electrolyte
comes in contact with the eyes.
Only charge the battery in the original charging station. Incorrect use
may result in electric shock, overheating, or leakage of corrosive liquid
from the battery.
The battery is maintenance-free, but has a limited service life of 2 to 4
years depending on the length of the season and how many hours a day
the mower is used.

CRAMERTOOLS.COM 7
EN
Version 3 - 2022.08.30
Troubleshooting
This section also presents some symptoms that can guide you if the mower does not work as expected.
Indicator LEDs on Mower
LED Status Meaning Action
1. Operating
(Green)
Flashing Recovery mode Place the robot in charging station for up to 5
hours and wait for the green LED to stop flash.
If LED doesn’t stop flash then restart the robot
outside the CS and try again.
On Mower in operation mode (charging, parked in Charging
station, paused, mowing or searching)
O Mower stopped with Stop button on mower, safety key in
Disabled position, mower in error state or mower waiting for
PIN code.
2. Connectivity
(Blue)
Flashing Trying to connect to internet server
On Connected to internet server
O Mower not in ”Power on mode”
3. Security
(Yellow)
Flashing PIN code authorization required ... via Mobile App.
O No pin required No action required
4. Error
(Red)
Flashing Mower stopped with error Check the reason for the error and then restart
by pressing the Start button on the mower.
Breaks in Boundary Wire and Guide Wire
Breaks in the boundary wire and guide wire (if installed) are usually the result of unintentional physical damage.
Inspect the entire boundary wire from the charging station and back.
Inspect the guide wire (if installed) from the charging station to the splice into the boundary wire.
Inspect that all the couplings have been properly squeezed to make connections.

CRAMERTOOLS.COM
Version 3 - 2022.08.30
8
EN Technical Data
RM1000 RM1500 RM2000 RM2700
Dimensions:
Height 26 cm 26 cm 26 cm 26 cm
Length 62 cm 62 cm 62 cm 62 cm
Width 50 cm 50 cm 50 cm 50 cm
Weight 11 kg 11 kg 11 kg 11 kg
Electrical system:
Battery, Special Lithium-Ion battery
24 V / 2.0 Ah, Part No.
211022355 /
T0100607-00
24 V / 2.0 Ah, Part No.
211022355 /
T0100607-00
24 V / 2.0 Ah, Part No.
211022355 /
T0100607-00
24 V / 2.0 Ah, Part No.
211022355 /
T0100607-00
24 V / 4.0 Ah, Part No.
T0100273-00 /
T0100609-00
24 V / 4.0 Ah, Part No.
T0100273-00 /
T0100609-00
24 V / 4.0 Ah, Part No.
T0100273-00 /
T0100609-00
24 V / 4.0 Ah, Part No.
T0100273-00 /
T0100609-00
Power supply 220-240 V/32 V DC 220-240 V/32 V DC 220-240 V/32 V DC 220-240 V/32V DC
Low voltage cable length 10 m 10 m 10 m 10 m
Mean energy consumption at maximum use 8 kWh/month for a
working area of 1,000
m2
10 kWh/month for a
working area of 1,500
m2
12 kWh/month for a
working area of 2,000
m2
14 kWh/month for a
working area of 2,700
m2
Charge current 1.3 A DC 1.3 A DC 2.4 A DC 2.4 A DC
Average charging time (with 211022355 battery) 140 minutes 70 minutes 40 minutes 40 minutes
Average charging time (with T0100273-00 battery) 270 minutes 130 minutes 70 minutes 70 minutes
Average cutting time (with 211022355 battery) 70 minutes 70 minutes 70 minutes 60 minutes
Average cutting time (with T0100273-00 battery) 150 minutes 150 minutes 150 minutes 140 minutes
Noise emissions: *)
Measured sound power noise level **) 55 dB (A) 55 dB (A) 55 dB (A) 55 dB (A)
Guaranteed sound power noise level 57 dB (A) 57 dB (A) 57 dB (A) 57 dB (A)
Sound pressure noise level ***) 44 dB (A) 44 dB (A) 44 dB (A) 44 dB (A)
Mowing:
Cutting system Three pivoted cutting
blades Three pivoted cutting
blades Three pivoted cutting
blades Three pivoted cutting
blades
Average power consumption during cutting 25 W ± 20% 25 W ± 20% 25 W ± 20% 25 W ± 20%
Cutting height 2-6 cm 2-6 cm 2-6 cm 2-6 cm
Cutting width 22 cm 22 cm 22 cm 22 cm
Narrowest possible passage 60 cm 60 cm 60 cm 60 cm
Maximum slope for cutting area 35% 35% 35% 35%
Maximum slope for boundary wire 15% 15% 15% 15%
Maximum length boundary wire 800 m 800 m 800 m 800 m
Maximum working capacity 1,000 m21,500 m22,000 m22,700 m2
Recommended area capacity 0 - 700 m2500 - 1,200 m21000 - 1,700 m21500 - 2400 m2
IP classification:
Mower IPX5 IPX5 IPX5 IPX5
Charging station IPX3 IPX3 IPX3 IPX3
Power supply IP67 IP67 IP67 IP67
Radio Frequency Data Sheet
LTE & GSM Short Range Devices (SRD)
(Boundary Wire)z
Frequency Bands LTE-FDD: B1/B2/B3/B4/B5/B8/B12/B13/B18/B19/B20/B25/
B26/B27/B28/B66/B71/B85 GSM: 850/900/1800/1900 MHz
0~148.5KHz
Max Output Power
(dBm)
LTE-FDD: 21 dBm +1.7/-3 dB
GSM850/EGSM900: 33 dBm ±2 dB
DCS1800/PCS1900: 30 dBm ±2 dB
GSM850/EGSM900 (8-PSK): 27 dBm ±3 dB
DCS1800/PCS1900 (8-PSK): 26 dBm ±3 dB
NA
*) The noise emission declarations conforms to EN 50636-2-107
**) uncertainties KWA, 2 dB (A)
***) uncertainties KPA, 2 dB (A)
CRAMERTOOLS.COM 9
EN
Version 3 - 2022.08.30
Name and address of manufacturer:
Name : GLOBGRO AB, Globe Group Europe
Address: Riggaregatan 53, 211 13 Malmö, Sweden
Name and address of the person authorised to compile the
technical file:
Name: Micael Johansson
Address: Riggaregatan 53, 211 13 Malmö, Sweden
Herewith we declare that the product:
Category: Robotic Lawnmower
Model: RM1000/ RM1500/ RM2000 /
RM2700
Serial number: See product rating label.
Year of Construction See product rating label.
•Is in conformity with the relevant provisions of the Machinery
Directive 2006/42/EC
•Is in conformity with the provisions of the following other
directives:
•Electromagnetic Compatibility - Directive 2014/30/EU
•Radio equipment - Directive 2014/53/EU
•Low Voltage Directive 2014/35/EU
•Restriction of the Use of certain Hazardous
Substances in Electrical and Electronic
Equipment (RoHS) Directive 2011/65/EU &
(EU) 2015/863
•Furthermore, we declare that the following standards have
been used:
•EN 60335-1, EN 50636-2-107, EN 60335-2-29,
•EN 62233, EN 55014-1, EN 55014-2, EN 61000-3-2,
•EN 61000-3-3, EN 61558-1, EN 61558-2-16, EN 62311,
•EN 303 447, EN 303 413, EN 301 511,
•EN 301 489-1, EN 301 489-19, Draft ESTI EN 301 489-52,
•EN 62321-3-1, EN 62321-4, EN 62321-5, EN 62321-6,
•EN 62321-7-1, EN 62321-7-2, EN 62321-8
Ted Qu Haichao
Quality Director
Malmö, 26.06.2021
CE Declaration of Conformity
RM1000 RM1500 RM2000 RM2700
Dimensions:
Height 26 cm 26 cm 26 cm 26 cm
Length 62 cm 62 cm 62 cm 62 cm
Width 50 cm 50 cm 50 cm 50 cm
Weight 11 kg 11 kg 11 kg 11 kg
Electrical system:
Battery, Special Lithium-Ion battery
24 V / 2.0 Ah, Part No.
211022355 /
T0100607-00
24 V / 2.0 Ah, Part No.
211022355 /
T0100607-00
24 V / 2.0 Ah, Part No.
211022355 /
T0100607-00
24 V / 2.0 Ah, Part No.
211022355 /
T0100607-00
24 V / 4.0 Ah, Part No.
T0100273-00 /
T0100609-00
24 V / 4.0 Ah, Part No.
T0100273-00 /
T0100609-00
24 V / 4.0 Ah, Part No.
T0100273-00 /
T0100609-00
24 V / 4.0 Ah, Part No.
T0100273-00 /
T0100609-00
Power supply 220-240 V/32 V DC 220-240 V/32 V DC 220-240 V/32 V DC 220-240 V/32V DC
Low voltage cable length 10 m 10 m 10 m 10 m
Mean energy consumption at maximum use 8 kWh/month for a
working area of 1,000
m2
10 kWh/month for a
working area of 1,500
m2
12 kWh/month for a
working area of 2,000
m2
14 kWh/month for a
working area of 2,700
m2
Charge current 1.3 A DC 1.3 A DC 2.4 A DC 2.4 A DC
Average charging time (with 211022355 battery) 140 minutes 70 minutes 40 minutes 40 minutes
Average charging time (with T0100273-00 battery) 270 minutes 130 minutes 70 minutes 70 minutes
Average cutting time (with 211022355 battery) 70 minutes 70 minutes 70 minutes 60 minutes
Average cutting time (with T0100273-00 battery) 150 minutes 150 minutes 150 minutes 140 minutes
Noise emissions: *)
Measured sound power noise level **) 55 dB (A) 55 dB (A) 55 dB (A) 55 dB (A)
Guaranteed sound power noise level 57 dB (A) 57 dB (A) 57 dB (A) 57 dB (A)
Sound pressure noise level ***) 44 dB (A) 44 dB (A) 44 dB (A) 44 dB (A)
Mowing:
Cutting system Three pivoted cutting
blades Three pivoted cutting
blades Three pivoted cutting
blades Three pivoted cutting
blades
Average power consumption during cutting 25 W ± 20% 25 W ± 20% 25 W ± 20% 25 W ± 20%
Cutting height 2-6 cm 2-6 cm 2-6 cm 2-6 cm
Cutting width 22 cm 22 cm 22 cm 22 cm
Narrowest possible passage 60 cm 60 cm 60 cm 60 cm
Maximum slope for cutting area 35% 35% 35% 35%
Maximum slope for boundary wire 15% 15% 15% 15%
Maximum length boundary wire 800 m 800 m 800 m 800 m
Maximum working capacity 1,000 m21,500 m22,000 m22,700 m2
Recommended area capacity 0 - 700 m2500 - 1,200 m21000 - 1,700 m21500 - 2400 m2
IP classification:
Mower IPX5 IPX5 IPX5 IPX5
Charging station IPX3 IPX3 IPX3 IPX3
Power supply IP67 IP67 IP67 IP67
Radio Frequency Data Sheet
LTE & GSM Short Range Devices (SRD)
(Boundary Wire)z
Frequency Bands LTE-FDD: B1/B2/B3/B4/B5/B8/B12/B13/B18/B19/B20/B25/
B26/B27/B28/B66/B71/B85 GSM: 850/900/1800/1900 MHz
0~148.5KHz
Max Output Power
(dBm)
LTE-FDD: 21 dBm +1.7/-3 dB
GSM850/EGSM900: 33 dBm ±2 dB
DCS1800/PCS1900: 30 dBm ±2 dB
GSM850/EGSM900 (8-PSK): 27 dBm ±3 dB
DCS1800/PCS1900 (8-PSK): 26 dBm ±3 dB
NA
*) The noise emission declarations conforms to EN 50636-2-107
**) uncertainties KWA, 2 dB (A)
***) uncertainties KPA, 2 dB (A)

CRAMERTOOLS.COM
Version 3 - 2022.08.30
10
EN Declaration of Conformity (UK)
Name and address of the manufacturer:
Name: GLOBGRO AB, Globe Group Europe
Address: Riggaregatan 53, 211 13 Malmö, Sweden
Name and address of the Authorized representative:
Name: Garden Equipment Ltd
Address: First, Floor, 3a Groveley Road, Christchurch, Dorset, BH23 3HB,
UK
Name and address of the person authorised to compile the technical file:
Name: Simon Del-Nevo
Address: First, Floor, 3a Groveley Road, Christchurch, Dorset, BH23 3HB,
UK
Here with we declare that the product
Category: Robotic Lawnmower
Model: RM1000/ RM1500/ RM2000 /
RM2700
Serial number: See product rating label.
Year of construction: See product rating label.
•is in conformity with the relevant provisions of the Supply of
Machinery (Safety) Regulations 2008.
•is in conformity with the provisions of the following other UK
legislation:
Electromagnetic Compatibility Regulations 2016
Radio Equipment Regulations 2017
Electrical Equipment (Safety) Regulations 2016
The Restriction of the Use of Certain Hazardous Substances in
Electrical and Electronic Equipment Regulations 2012
Furthermore, we declare that the following standard have been used:
BS EN 60335-1, BS EN 50636-2-107, BS EN 60335-2-29,
BS EN 62233, BS EN 55014-1, BS EN 55014-2, BS EN 61000-3-2,
BS EN 61000-3-3, BS EN 61558-1, BS EN 61558-2-16, BS EN 62311,
EN 303 447, EN 303 413, EN 301 511,
EN 301 489-1, EN 301 489-19, Draft ESTI EN 301 489-52,
BS EN 62321-3-1, BS EN 62321-4, BS EN 62321-5, BS EN 62321-6,
BS EN 62321-7-1, BS EN 62321-7-2, BS EN 62321-8
Place, date: Christchurch, Dorset, UK 26.06.2021
Signature: Ted Qu, Quality Director

CRAMERTOOLS.COM 11
DE
Inhalt
Montage.....................................................................................................................12
Anschluss des Netzteils.................................................................................12
Installation des Begrenzungsdrahts ...........................................................12
Produktsicherheit ....................................................................................................13
Erläuterung der Symbole am Mäher...........................................................13
Lesen des Bedienungshandbuchs..............................................................13
Betriebssicherheit............................................................................................15
Schutz der Umwelt..................................................................................................16
Fehlerbehebung......................................................................................................17
Anzeige-LEDs am Mäher ...............................................................................17
Brüche im Begrenzungsdraht und Führungsdraht .................................17
Technische Daten....................................................................................................18
EG-Konformitätserklärung.....................................................................................19
Die Materialien, technischen Daten und Abbildungen in diesem Handbuch dienen nur der
Orientierung und sind nicht verbindlich. Der Hersteller behält sich das Recht vor, ohne vorherige
Ankündigung Änderungen an den technischen Eigenschaften und allen Merkmalen des Betriebs, der
Materialien, der technischen Daten oder der Abbildungen vorzunehmen.
Die folgenden Seiten behandeln Sicherheitshinweise, die Wartung und die Instandhaltung. Die Bedienung entnehmen
Sie bitte der mit dem Gerät gelieferten Kurzanleitung.
Lesen und überprüfen Sie sorgfältig alle Sicherheitshinweise, Warnungen und Vorsichtsmaßnahmen in diesem
Handbuch und in der Kurzanleitung.
Das Nichtbeachten dieser Anweisungen, Sicherheits- und Warnhinweise kann zu schweren Verletzungen oder zum Tod
von Personen und Haustieren oder zu Beschädigung von persönlichem Eigentum führen.
Die vollständige Bedienungsanleitung ist verfügbar
unter Website: https://url.globetools.systems/d5GSq
QR code:
Version 3 - 2022.08.30

CRAMERTOOLS.COM
12
DE
Montage
0cm
30cm
35cm
INSTALLATION DES BEGRENZUNGSDRAHTS
Nachdem Sie den Begrenzungsdraht ausgelegt haben, legen Sie die
Schleifendrahttrommel an der Ladestation ab.
Gehen Sie nun entlang der Begrenzung des Betriebsbereichs den Weg
zurück und sichern Sie den Begrenzungsdraht entweder mit Haken
oder graben den Draht im Boden ein. Es werden Haken empfohlen, da
deren Position insbesondere in den ersten Wochen des Betriebs leicht
angepasst werden kann.
Bei der Befestigung des Begrenzungsdrahts mit Haken:
•Schneiden Sie das Gras mit einem handelsüblichen Rasenmäher
oder einem Trimmer dort, wo der Draht verlegt werden soll, sehr
niedrig.
•Legen Sie den Begrenzungsdraht auf den Boden und befestigen
Sie ihn mit in kurzen Abständen gesetzten Haken.
•Drücken oder hämmern Sie die Haken in den Boden.
Stecken Sie die Haken nicht so weit in den Boden, dass sie den
Begrenzungsdraht strapazieren.
Beim Eingraben des Begrenzungsdrahts:
•Graben Sie den Begrenzungsdraht 1 bis -20cm in den Boden ein.
Lesen Sie für die Installation des Führungsdrahts bitte das
vollständige Handbuch online.
>1.5m
>1.5m
1m
>3m
10m
35cm
Version 3 - 2022.08.30
ANSCHLUSS DES NETZTEILS
Schließen Sie das Netzteil in einer kühlen, trockenen Umgebung
außerhalb direkter Sonneneinstrahlung an.
Wird das Netzteil an eine Steckdose im Freien angeschlossen, muss
diese für den Außeneinsatz zugelassen sein.
Das Niederspannungskabel für die Stromversorgung kann den
Mähbereich durchqueren. In diesem Fall muss es fest im Boden
verankert werden bzw. eingegraben werden.
VORSICHT: Das Niederspannungskabel darf nicht geschnitten, gespleißt
oder modifiziert werden. Veränderungen am Niederspannungskabel
führen zum Erlöschen der Produktgarantie.

CRAMERTOOLS.COM 13
DE
Version 3 - 2022.08.30
ERLÄUTERUNG DER SYMBOLE AM MÄHER
Dies ist ein gefährliches Elektrowerkzeug. Seien Sie bei der Bedienung vorsichtig und
befolgen Sie alle Sicherheitshinweise und Warnungen.
Lesen Sie das Bedienungshandbuch sorgfältig durch, bevor Sie den Mäher in Betrieb
nehmen.
Entfernen Sie den Sicherheitsschlüssel, bevor Sie am Mäher arbeiten oder ihn anheben.
Es besteht Gefahr durch herumfliegende während des Betriebs.
Halten Sie beim Bedienen einen sicheren Abstand zum Mäher und halten Sie Personen,
insbesondere Kinder, Haustiere und umstehende Personen von dem Bereich fern, in
dem der Mäher betrieben wird.
Steigen Sie nicht auf den Mäher.
Gerät der Klasse III
Ergänzend zu diesem Bedienungshandbuch finden Sie weitere Informationen auf der
Website: www.cramertools.com
LESEN DES BEDIENUNGSHANDBUCHS
Die folgenden Symbole sind wichtig zum Lesen und Verstehen der Betriebsanleitung.
Schutzhandschuhe tragen
Das folgende System wird im Bedienungshandbuch verwendet, um das Verständnis zu
erleichtern:
•WARNUNG! Warnhinweise weisen Benutzer und Verbraucher auf Vorhandensein und Art von Gefahren
hin, damit Benutzer und Verbraucher durch angemessenes Verhalten bei der Verwendung des Produkts
Verletzungen vermeiden können.
•VORSICHT: Warnhinweise weisen Benutzer und Verbraucher auf Vorhandensein und Art der Produktrisiken
hin, so damit Benutzer und Verbraucher durch angemessenes Verhalten während der Verwendung des
Produkts eine Beschädigung des Produkts vermeiden können.
•HINWEIS: Hinweise informieren Benutzer und Verbraucher über zusätzliche Informationen zur
Produktnutzung.
•Fett kursiv gedruckter Text verweist auf einen weiteren Abschnitt im Bedienungshandbuch.
•Fett gedruckter Text bezieht sich auf die Einstellungen am Mäher.
Produktsicherheit

CRAMERTOOLS.COM
14
DE
Version 3 - 2022.08.30
Produktsicherheit
Zum Starten des Mähers:
1 Den Sicherheitsschlüssel einstecken und gegen den Uhrzeigersinn
in Position ”1” drehen.
2 Schieben Sie die Verriegelung der START-Taste nach hinten.
3 Drücken Sie die START-Taste.
Zum Stoppen des Mähers:
Drücken Sie die STOP-Taste am Mäher.
Drücken Sie die STOP-Taste am Mäher und ziehen Sie den
Sicherheitsschlüssel ab.
WARNUNG! Ziehen Sie bei Wartungsarbeiten oder wenn der
Mäher bewegt werden muss immer den Sicherheitsschlüssel
ab.
Starten und Stoppen des Mähers Ausschalten des Mähers
Bedienung
WICHTIG
VOR GEBRAUCH AUFMERKSAM LESEN! ZUR SPÄTEREN VERWENDUNG AUFBEWAHREN!
Einführung
WARNUNG! Kinder beaufsichtigen!
•Lesen Sie die Anleitung aufmerksam durch. Machen Sie sich mit den Bedienelementen und dem ordnungsgemäßen Gebrauch der
Maschine vertraut.
•Lassen Sie niemals Personen, die mit diesen Anweisungen nicht vertraut sind, oder Kinder die Maschine benutzen. Lokale Vorschriften
können das Alter für den Betrieb der Maschine einschränken.
•Der Betreiber oder Benutzer ist für Unfälle oder Gefahren für andere Personen oder deren Eigentum verantwortlich.
Vorbereitung
•Vergewissern Sie sich, dass die korrekte Installation des Begrenzungs- und Führungsdrahts gemäß den Anweisungen durchgeführt
wurde.
•Überprüfen Sie regelmäßig den Einsatzbereich der Maschine und entfernen Sie alle Steine, Stöcke, Kabel, Hundespielzeug und andere
Fremdkörper.
•Regelmäßig visuell überprüfen, um sicherzustellen, dass die Messer, Messerschrauben und die Schneidevorrichtung nicht abgenutzt
oder beschädigt sind. Wenn Messer oder Schrauben verschlissen oder beschödigt sind, müssen alle Messer und Schrauben gleichzeitg
ersetzt werden, damit das Gleichgewicht erhalten bleibt.
Allgemeines
•Betreiben Sie die Maschine niemals mit defekten Schutzabdeckungen oder ohne Sicherheitsvorrichtungen, wie z. B. dem Gehäuse.
•Hände oder Füße nicht in die Nähe von oder unter rotierende Teile bringen.
•Nehmen Sie niemals eine Maschine in die Hand, während der Motor läuft.
•Entfernen (oder Bedienen) Sie die Sperrvorrichtung von der Maschine
-vor dem Beseitigen einer Verstopfung;
-vor dem Prüfen, Reinigen oder Arbeiten an der Maschine.
•Lassen Sie die Maschine nicht unbeaufsichtigt arbeiten, wenn Sie wissen, dass sich Haustiere, Kinder oder Personen in der Nähe
befinden.
Wartung und Lagerung
•Alle Muttern, Bolzen und Schrauben müssen stets fest angezogen sein, um sicherzustellen, dass sich die Maschine in einem sicheren
Betriebszustand befindet.
•Ersetzen Sie verschlissene oder beschädigte Teile aus Sicherheitsgründen.
•Achten Sie darauf, dass nur Ersatzschneidmittel des richtigen Typs verwendet werden.
•Stellen Sie sicher, dass die Akkus mit dem vom Hersteller empfohlenen Ladegerät geladen werden. Unsachgemäße Verwendung kann
zu Stromschlag, Überhitzung oder Austreten von korrosiver Flüssigkeit aus dem Akku führen.
•Bei Austreten von Elektrolyt, mit Wasser/Neutralisierungsmittel spülen. Suchen Sie einen Arzt auf, wenn die Augen etc. mit Elektrolyt in
Berührung gekommen sind.
•Die Wartung der Maschine sollte gemäß den Anweisungen des Herstellers erfolgen.
WARNUNG! Verwenden Sie zum Aufladen der Batterie nur die abnehmbare Versorgungseinheit, die mit diesem Gerät
geliefert wird.
WARNUNG! Dieses Gerät enthält Batterien, die nur von einem Fachmann ausgetauscht werden dürfen.
CRAMERTOOLS.COM 15
DE
Version 3 - 2022.08.30
Produktsicherheit
Betriebssicherheit
Dieses Bedienungshandbuch enthält alle grundlegenden Informationen über den sicheren
Betrieb und die Wartung des Mähers.
Lesen Sie vor der Inbetriebnahme des Mähers alle Sicherheitshinweise und Anweisungen in
diesem Bedienungshandbuch sorgfältig durch. Bewahren Sie dieses Bedienungshandbuch zum
späteren Nachschlagen auf. Befolgen Sie die Anweisungen des Herstellers bezüglich Installation,
Betrieb, Wartung und Reparatur.
Dieser Mäher wurde entwickelt, um Gras in oenen und ebenen Bereichen zu mähen. Verwenden
Sie nur die vom Hersteller empfohlenen Geräte. Alle anderen Nutzungsarten sind unsachgemäß.
Dieser Mäher entspricht den CE-Sicherheitsnormen und -richtlinien bezüglich elektromagnetischer
Verträglichkeit, Maschinen und Niederspannung.
Der Mäher ist nicht zur Verwendung durch Personen (einschließlich Kinder) vorgesehen, deren
physische, sensorische oder geistige Fähigkeiten eingeschränkt sind, denen die Erfahrung und
das Wissen fehlt, sofern sie nicht bei der Verwendung der Maschine durch eine für ihre Sicherheit
verantwortliche Person überwacht werden oder eingewiesen wurden.
Kinder sollten beaufsichtigt werden, um sicherzustellen, dass sie nicht mit der Vorrichtung spielen.
Der Mäher darf nur von Personen betrieben, gewartet und repariert werden, die seine
Besonderheiten und Sicherheitsvorschriften kennen.
Starten Sie den Mäher gemäß den Anweisungen. Wenn sich der Sicherheitsschlüssel in der
aktivierten Position befindet, halten Sie Ihre Hände und Füße von den rotierenden Messern fern.
Stecken Sie niemals Ihre Hände und Füße unter den Mäher.
Ändern Sie nicht die ursprüngliche Konstruktion des Mähers. Alle diesbezüglichen Veränderungen
führen zum Erlöschen der Garantie.
Schalten Sie den Mäher mit der STOP-Taste am Mäher aus, wenn sich Personen, insbesondere
Kinder oder Haustiere im Schneidebereich befinden. Es wird empfohlen, den Mäher so zu
programmieren, dass der Bereich während des Betriebs frei von Personen oder Haustieren ist.
Entfernen Sie Gegenstände aus dem Betriebsbereich wie Äste, Spielzeug, Steine, Werkzeuge, die
die Messer beschädigen können. Der Mäher kann an Gegenständen im Betriebsbereich hängen
bleiben und somit nicht weitermähen, bevor die Gegenstände entfernt werden.
Heben Sie den Mäher niemals an und tragen Sie ihn nicht während der Sicherheitsschlüssel noch
eingesteckt ist.
Schalten Sie den Mäher immer mit der STOP-Taste aus, wenn der Mäher nicht in Gebrauch ist. Der
Mäher kann nur gestartet werden, wenn der Sicherheitsschlüssel eingesteckt und die START-Taste
gedrückt ist.
Der eingebaute Alarm ist sehr laut. Seien Sie vorsichtig, besonders wenn der Mäher in
Innenräumen eingesetzt wird.
Verwenden Sie den Mäher nicht mit einer defekten Messerscheibe oder Karosserie.
Lassen Sie ihn nicht von Personen benutzen, die nicht wissen, wie der Mäher funktioniert und sich
verhält.
Stellen Sie nichts auf den Mäher oder seine Ladestation.
Tragen Sie bei Arbeiten mit den Messern des Mähers immer Schutzhandschuhe.
CRAMERTOOLS.COM
16
DE
Version 3 - 2022.08.30
Schutz der Umwelt
Nach der EU-Gesetzgebung 2012/19/EU müssen nicht mehr verwendbare Elektro- und Elektronikgeräte und nach der EU-
Gesetzgebung 2006/66/EC defekte oder gebrauchte Akkupacks/Batterien getrennt gesammelt und umweltgerecht entsorgt werden.
Das Symbol auf dem Mäher oder seiner Verpackung zeigt an, dass dieses Produkt nicht als Hausmüll behandelt werden kann.
Stattdessen sollte es einem geeigneten Recyclingzentrum zugeführt werden, um seine elektronischen Komponenten und Batterien
zu recyceln.
Die Batterien sind im Fahrgestell unter dem Mäher untergebracht.
Indem Sie sicherstellen, dass dieses Produkt richtig behandelt wird, können Sie dazu beitragen, den potenziellen negativen
Auswirkungen auf Umwelt und Mensch entgegenzuwirken, die andernfalls durch eine falsche Entsorgung dieses Produkts entstehen
könnten.
Weitere Informationen zum Recycling dieses Produkts erhalten Sie bei Ihrer Stadtverwaltung, Ihrem Hausmüllentsorger oder dem
Geschäft, in dem Sie das Produkt gekauft haben.
Die gesonderte Entsorgung von Gebrauchtmaschinen und Verpackungen ermöglicht es, Materialien zu recyceln und
wiederzuverwenden. Die Verwendung der recycelten Materialien trägt dazu bei, Umweltbelastungen zu vermeiden und den Bedarf
an Rohstoen zu senken.
Entsorgen Sie Batterien am Ende ihrer Lebensdauer mit Rücksicht auf unsere Umwelt. Die Batterie enthält Stoe, die für Sie und die
Umwelt gefährlich sind. Sie müssen diese Stoe separat bei einer Einrichtung entsorgen, die Lithium-Ionen-Batterien annimmt.
Auswechseln des akkus
WARNUNG! Drücken Sie die STOP-Taste und ziehen Sie den
Sicherheitsschlüssel ab, bevor Sie Akkus austauschen. Tragen
Sie dabei Schutzhandschuhe.
VORSICHT: Verwenden Sie nur Original-Ersatzteile.
Drehen Sie den Mäher auf den Kopf und entfernen Sie die vier Torx-
Schrauben T20 und entfernen Sie die Batterieabdeckung.
Ziehen Sie den Batterieklemmenanschluss ab.
Heben Sie den Akku gerade heraus.
Setzen Sie den neuen Akku in Steckplatz 1 (den hinteren Steckplatz) ein.
Schließen Sie den Batterieklemmenanschluss an den neuen Akku an.
Setzen Sie die Batterieabdeckung wieder ein und setzen Sie die vier
Torx-Schrauben T20 ein und ziehen Sie sie fest.
Stecken Sie den Sicherheitsschlüssel in die Unterseite des Mähers und
drehen Sie ihn in die aktivierte Position. Platzieren Sie den Mäher in der
Ladestation, um das Akku zu aktivieren und zu laden.
WARNUNG! Bei Austreten von Elektrolyt, mit Wasser/
Neutralisierungsmittel spülen. Suchen Sie einen Arzt auf,
wenn die Augen mit Elektrolyt in Berührung gekommen sind.
Laden Sie den Akku nur in der Original-Ladestation. Unsachgemäße
Verwendung kann zu Stromschlag, Überhitzung oder Austreten von
korrosiver Flüssigkeit aus der Batterie führen.
Die Batterie ist wartungsfrei, hat aber eine begrenzte Lebensdauer von 2
bis 4 Jahren, abhängig von der Dauer der Mähsaison und der täglichen
Nutzungsdauer des Mähers.

CRAMERTOOLS.COM 17
DE
Version 3 - 2022.08.30
Fehlerbehebung
In diesem Abschnitt werden auch einige Problemlösungen vorgestellt, die Ihnen weiterhelfen können, wenn der
Mäher nicht wie erwartet funktioniert.
Anzeige-LEDs am Mäher
LED Status Bedeutung Maßnahme
1. In Betrieb
(Grün)
Blinken Wiederherstellungsmodus Setzen Sie den Roboter für bis zu 5 Stunden
auf die Ladestation und warten Sie, bis die
grüne LED auört zu blinken. Wenn die LED
nicht auört zu blinken, starten Sie den
Mähroboter außerhalb der Ladestation und
versuchen Sie es erneut.
Ein Mäher im Betriebsmodus (Laden, Parken in der Ladestation,
Pausieren, Mähen oder Suchen)
Aus Mäher gestoppt mit Stop-Taste am Mäher,
Sicherheitsschlüssel in der Position Deaktiviert, Mäher im
Fehlerzustand oder Mäher wartet auf den PIN-Code.
2. Konnektivität
(Blau)
Blinken Versuch, eine Verbindung zum Internetserver herzustellen
Ein Mit Internetserver verbunden
Aus Mäher nicht im "Einschaltmodus"
3. Sicherheit
(Gelb)
Blinken PIN-Code-Autorisierung erforderlich ... über Mobile App.
Aus Kein Pin Code erforderlich Keine Maßnahmen erforderlich
4. Fehler
(Rot)
Blinken Mäher gestoppt mit Fehler Überprüfen Sie die Ursache des Fehlers und
starten Sie ihn dann erneut, indem Sie die
Start-Taste am Mäher drücken.
Brüche im Begrenzungsdraht und Führungsdraht
Brüche im Begrenzungsdraht und im Führungsdraht (falls installiert) sind in der Regel die Folge unbeabsichtigter
Schäden durch Kontakt.
Überprüfen Sie den gesamten Begrenzungsdraht von der Ladestation und zurück.
Überprüfen Sie den Führungsdraht (falls vorhanden) von der Ladestation bis zum Begrenzungsdraht.
Überprüfen Sie, ob alle Kupplungen richtig gequetscht wurden, um die Verbindungen herzustellen.

CRAMERTOOLS.COM
18
DE
RM1000 RM1500 RM2000 RM2700
Abmessungen:
Höhe 26 cm 26 cm 26 cm 26 cm
Länge 62 cm 62 cm 62 cm 62 cm
Breite 50 cm 50 cm 50 cm 50 cm
Gewicht 11 kg 11 kg 11 kg 11 kg
Elektrisches System:
Batterie, spezieller Lithium-Ionen-Akku 24 V / 2,0 Ah, Teile-Nr.
211022355 /
T0100607-00
24 V / 2,0 Ah, Teile-Nr.
211022355 /
T0100607-00
24 V / 2.0 Ah, Teile-Nr.
211022355 /
T0100607-00
24 V / 2.0 Ah, Teile-Nr.
211022355 /
T0100607-00
24 V / 4,0 Ah, Teile-Nr.
T0100273-00 /
T0100609-00
24 V / 4,0 Ah, Teile-Nr.
T0100273-00 /
T0100609-00
24 V / 4,0 Ah, Teile-Nr.
T0100273-00 /
T0100609-00
24 V / 4,0 Ah, Teile-Nr.
T0100273-00 /
T0100609-00
Netzteil 220-240 V/32 V DC 220-240 V/32 V DC 220-240 V/32 V DC 220-240 V/32 V DC
Länge Niederspannungskabel 10 m 10 m 10 m 10 m
Mittlerer Energieverbrauch bei maximaler
Nutzung
8 kWh/Monat bei einer
Arbeitsfläche von 1.000
m2
10 kWh/Monat bei einer
Arbeitsfläche von 1.500
m2
12 kWh/Monat bei
einer Arbeitsfläche von
2,000 m2
14 kWh/Monat bei einer
Arbeitsfläche von 2,700 m2
Ladestrom 1,3 A DC 1,3 A DC 2.4 A DC 2.4 A DC
Durchschnittliche Ladezeit
(mit 211022355-Akku)
140 Minuten 70 Minuten 40 Minuten 40 Minuten
Durchschnittliche Ladezeit
(mit T0100273-00-Akku)
270 Minuten 130 Minuten 70 Minuten 70 Minuten
Durchschnittliche Schnittzeit
(mit 211022355-Akku)
70 Minuten 70 Minuten 70 Minuten 60 Minuten
Durchschnittliche Schnittzeit
(mit T0100273-00-Akku)
150 Minuten 150 Minuten 150 Minuten 140 Minuten
Lärmemissionen: *)
Gemessener Schallleistungspegel **) 55 dB (A) 55 dB (A) 55 dB (A) 55 dB (A)
Gemessener Schallleistungspegel 57 dB (A) 57 dB (A) 57 dB (A) 57 dB (A)
Schalldruckpegel ***) 44 dB (A) 44 dB (A) 44 dB (A) 44 dB (A)
Mähen:
Schneidesystem Drei schwenkbare
Schneidemesser
Drei schwenkbare
Schneidemesser
Drei schwenkbare
Schneidemesser
Drei schwenkbare
Schneidemesser
Durchschnittlicher Stromverbrauch
während des Rasenmähens
25 W ± 20% 25 W ± 20% 25 W ± 20% 25 W ± 20%
Schnitthöhe 2-6 cm 2-6 cm 2-6 cm 2-6 cm
Schnittbreite 22 cm 22 cm 22 cm 22 cm
Engstmöglicher Durchgang 60 cm 60 cm 60 cm 60 cm
Maximaler Hang für den Schneidebereich 35% 35% 35% 35%
Maximaler Hang für Begrenzungskabel 15% 15% 15% 15%
Maximale Länge Begrenzungsdraht 800 m 800 m 800 m 800 m
Maximale Arbeitsleistung 1.000 m21.500 m22,000 m22,700 m2
Empfohlene Flächenkapazität 0 - 700 m2500 - 1.200 m21000 - 1,700 m21500 - 2,400 m2
IP-Klassifizierung:
Mäher IPX5 IPX5 IPX5 IPX5
Ladestation IPX3 IPX3 IPX3 IPX33
Netzteil IP67 IP67 IP67 IP67
Datenblatt zur Funkfrequenz
LTE & GSM Funkgerät mit geringer Reichweite (short range
device – SRD) (Begrenzungskabel)
Frequenzband
LTE-FDD: B1/B2/B3/B4/B5/B8/B12/B13/B18/B19/
B20/B25/B26/B27/B28/B66/B71/B85
GSM: 850/900/1800/1900 MHz
0~148.5KHz
Maximale Ausgangsleistung (dBm)
LTE-FDD: 21 dBm +1.7/-3 dB
GSM850/EGSM900: 33 dBm ±2 dB
DCS1800/PCS1900: 30 dBm ±2 dB
GSM850/EGSM900 (8-PSK): 27 dBm ±3 dB
DCS1800/PCS1900 (8-PSK): 26 dBm ±3 dB
NA
*) Die Schallemissionsdeklarationen entsprechen der EN 50636-2-107
**) Messunsicherheiten KWA, 2 dB (A)
***) Messunsicherheiten KPA, 2 dB (A)
Version 3 - 2022.08.30
Technische Daten

CRAMERTOOLS.COM 19
DE
Version 3 - 2022.08.30
EG-Konformitätserklärung
Name und Anschrift der Hersteller:
Hersteller: GLOBGRO AB, Globe Group Europe
Anschrift: Riggaregatan 53, 211 13 Malmö, Sweden
Name und Anschrift der Person, die zur Erstellung der technischen
Unterlagen berechtigt ist:
Name: Micael Johansson
Anschrift: Riggaregatan 53, 211 13 Malmö, Sweden
Hiermit erklären wir, dass das Produkt:
Kategorie: Rasenmähroboter
Modell: RM1000/ RM1500/ RM2000/ RM2700
Seriennummer: Siehe Produktetikett.
Seriennummer Siehe Produktetikett.
•den einschlägigen Bestimmungen der Maschinenrichtlinie
2006/42/EG entspricht
•den Bestimmungen der folgenden anderen Richtlinien entspricht:
•EMV-Richtlinie 2014/30/EU
•Funkanlagenrichtlinie 2014/53/EU
•Niederspannungsrichtlinie 2014/35/EU
•Richtlinie zur Beschränkung der Verwendung bestimmter
gefährlicher Stoe in Elektro- und Elektronikgeräten 2011/65/EU &
2015/863/EU
•Darüber hinaus erklären wir, dass die folgenden
harmonisierten Normen verwendet wurden:
•EN 60335-1, EN 50636-2-107, EN 60335-2-29,
•EN 62233, EN 55014-1, EN 55014-2, EN 61000-3-2,
•EN 61000-3-3, EN 61558-1, EN 61558-2-16, EN 62311,
•EN 303 447, EN 303 413, EN 301 511,
•EN 301 489-1, EN 301 489-19, Entwurf ESTI EN 301 489-52,
•EN 62321-3-1, EN 62321-4, EN 62321-5, EN 62321-6,
•EN 62321-7-1, EN 62321-7-2, EN 62321-8
Ted Qu Haichao
Qualitätsleiter
Malmö, 26.06.2021
This manual suits for next models
3
Table of contents
Languages:
Other Cramer Lawn Mower manuals

Cramer
Cramer 82LM46S User manual

Cramer
Cramer 40LM35 User manual

Cramer
Cramer PRO82 LMS46 User manual

Cramer
Cramer TOURNO de Luxe 95 User manual

Cramer
Cramer 82ZT132 User manual

Cramer
Cramer 2502486 User manual

Cramer
Cramer 40LM35 User manual

Cramer
Cramer RM1500 User manual

Cramer
Cramer 2500586 User manual

Cramer
Cramer RM1000 User manual

Cramer
Cramer 2500686 User manual

Cramer
Cramer 2500386 User manual

Cramer
Cramer 2502886 User manual

Cramer
Cramer 82 LMS51S User manual

Cramer
Cramer 2500386 User manual

Cramer
Cramer 82LM61SX User manual

Cramer
Cramer RM2000 User manual

Cramer
Cramer RM800 User manual

Cramer
Cramer 40LM41 User manual

Cramer
Cramer 2502386 User manual


