Crane 53077 User manual

English... 3
Español... 16
PREMIUM VOLLEYBALL
& BADMINTON SET
JUEGO DE VOLEIBOL
Y BÁDMINTON DE PRIMERA CALIDAD
User Manual
del usuario
Manual

Contents
Parts List ...................................................................................3
Safety Instructions ...................................................................4
Assembly ..................................................................................5
Badminton Rules ....................................................................12
Volleyball Rules ......................................................................14

3
Parts List
53077 PARTS LIST
53077 PRE-INSTALLED PARTS
2 31
x2 x2 x2
4
x2
6 75
x2 x2 x1
8
x2
109
x2 x1
Pole Cap-A Top Pole Middle Pole Boom Pole
Pole Anchor Net Tension Device
Push Buon Rope connector Locking Net BoltPole Cap-B
Net Top guide rope
Boom guide rope Volleyball Air Pump Racket
Shulecock
1211
x1 x4
x2 x2 x2
Net Tension Device-B Net Tension Device-CNet Tension Device-A
x2 x2 x2
x2
13
x4
P2P1 P4P3
P6P5 P7
12 3 4 5 6 7 8 9 10 11 12 13 14 15 16 17 18 19 20 21 12 3 4 5 6 7 8 9 10 11 12 13 14 15 16 17 18 19 20 21

WARNING:
Please Do Not sit, climb or lean on the product.
WARNING:
CHOKING HAZARD - This item contains small parts. Not suitable for children under 3
years.
WARNING:
Adult supervision is required at all mes when children are in the area. Being struck
by a thrown object can cause serious injury.
WARNING:
This item is not a toy, adult supervision is required at all mes for children. Please be
sure to carefully read the instrucons, proper use of this item will reduce the risk of
injury.
4
Safety Instructions

Assembly
5
1. POLE ASSEMBLY:
Assemble the poles as shown in Fig 1.
FIG. 1
2
X 2
3
X 2
4
X 2
5
X 2
P1
P2
X 2
X 2
Top Pole
Middle Pole
Bottom Pole
Top guide rope hole
Pole Cap-B
Bottom Guide Rope Hole
Net Tension Device Hole
Push Button
Pole Anchor
P1
P2
2
3
4
5
FIG. 1A

Assembly
6
2. NET ATTACHMENT:
Slide the sleeve of the Net (#7) over the top pole of the assembled pole structure
making sure that the top of the Net with the Connecng Cord Loop is at the top
end of the pole. See FIG. 2.
FIG. 2
7
X 1
X 2
FIG. 1 Assembly
1 2 3 4 5 6 7 8 9 10 11 12 13 14 15 16 17 18 19 20 21
7
P3
Connecting Cord Loop
12 3 4 5 6 7 8 9 10 1112 13 14 15 16 17 18 19 20 21 12 3 4 5 6 7 8 9 10 1112 13 14 15 16 17 18 19 20 21
P3

Assembly
7
3. TOP CABLE ATTACHMENT:
A. Unscrew the Net Tension Device (#6) and insert through the holes in the middle
poles, securing each bolt by screwing back on the original nut. See FIG. 3A.
B. Aach the top cable to the buckle of the tension adjuster. See FIG. 3C.
FIG.3
1
X 1
6
X 2
X 2
1 2 3 4 5 6 7 8 9 10 11 12 13 14 15 16 17 18 19 20 21
7
2
1
7
P1
FIG. 3B
P4
P5 P6 P7
6
P3
6
7
FIG. 3A
FIG. 3C
P4
X 2
P5
X 2
P6
X 2
P7

Assembly
8
4. TOP & BOTTOM GUIDE ROPE ATTACHMENT.
FIG. 4
8
X 2
9
X 2
1 2 3 4 5 6 7 8 9 10 11 12 13 14 15 16 17 18 19 20 21
7
Knot
8
Tension
Clip
Stake
Knot
99
FIG. 4C
FIG. 4B
87
8
FIG. 4A

Assembly
9
5. NET SET UP:
Stretch the assembled Net and poles across the playing area unl the Net is taut.
Press the Pole Anchors into the ground with the poles touching the ground. Slip
the poles onto the anchors. Holding the poles in the vercal posion, press the
Guide Rope stakes into the ground at a 45º angle, 3 feet to 5 feet from the pole
and 3 feet to 5 feet apart. Make sure that the hooks on the stakes are facing away
from the poles. See FIG. 5 and 6.
FIG. 5
1 2 3 4 5 6 7 8 9 10 11 12 13 14 15 16 17 18 19 20 21
Top Guide
Rope
Bottom Guide
Rope
1 2 3 4 5 6 7 8 9 10 11 12 13 14 15 16 17 18 19 20 21
3 feet - 5 feet
3 feet - 5 feet

Assembly
10
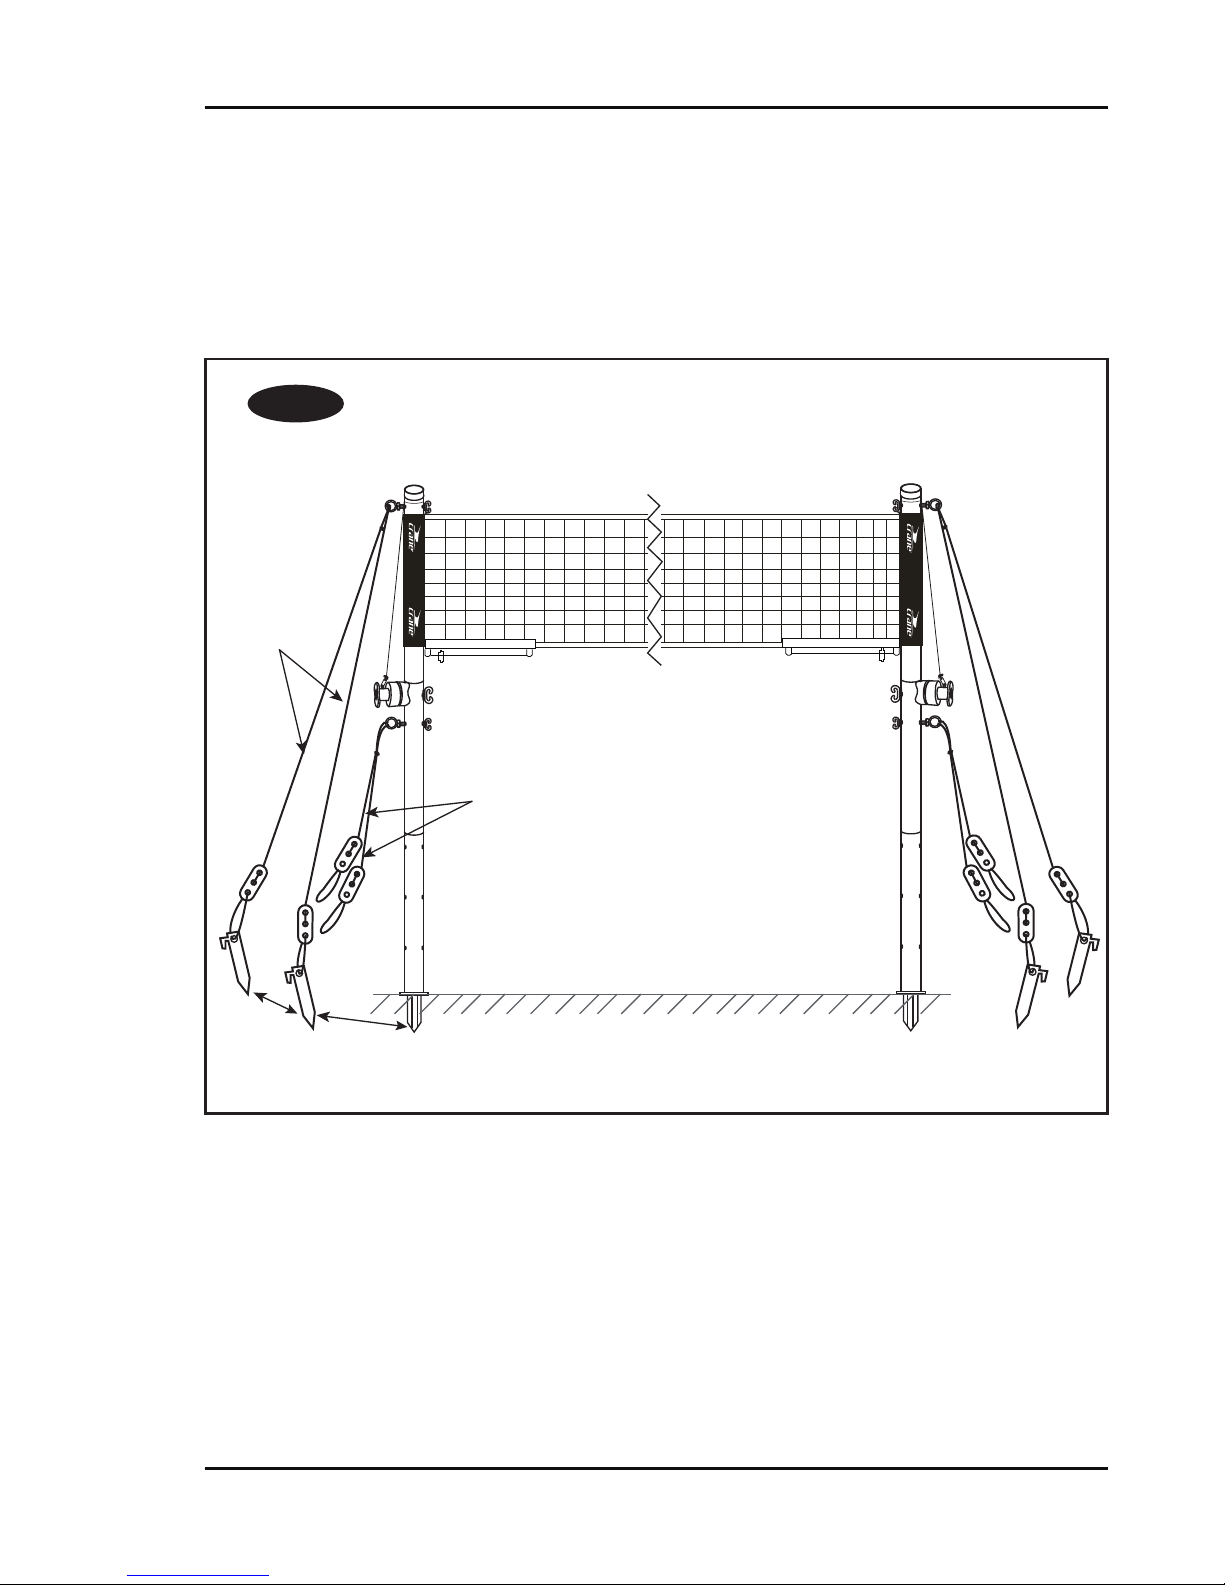
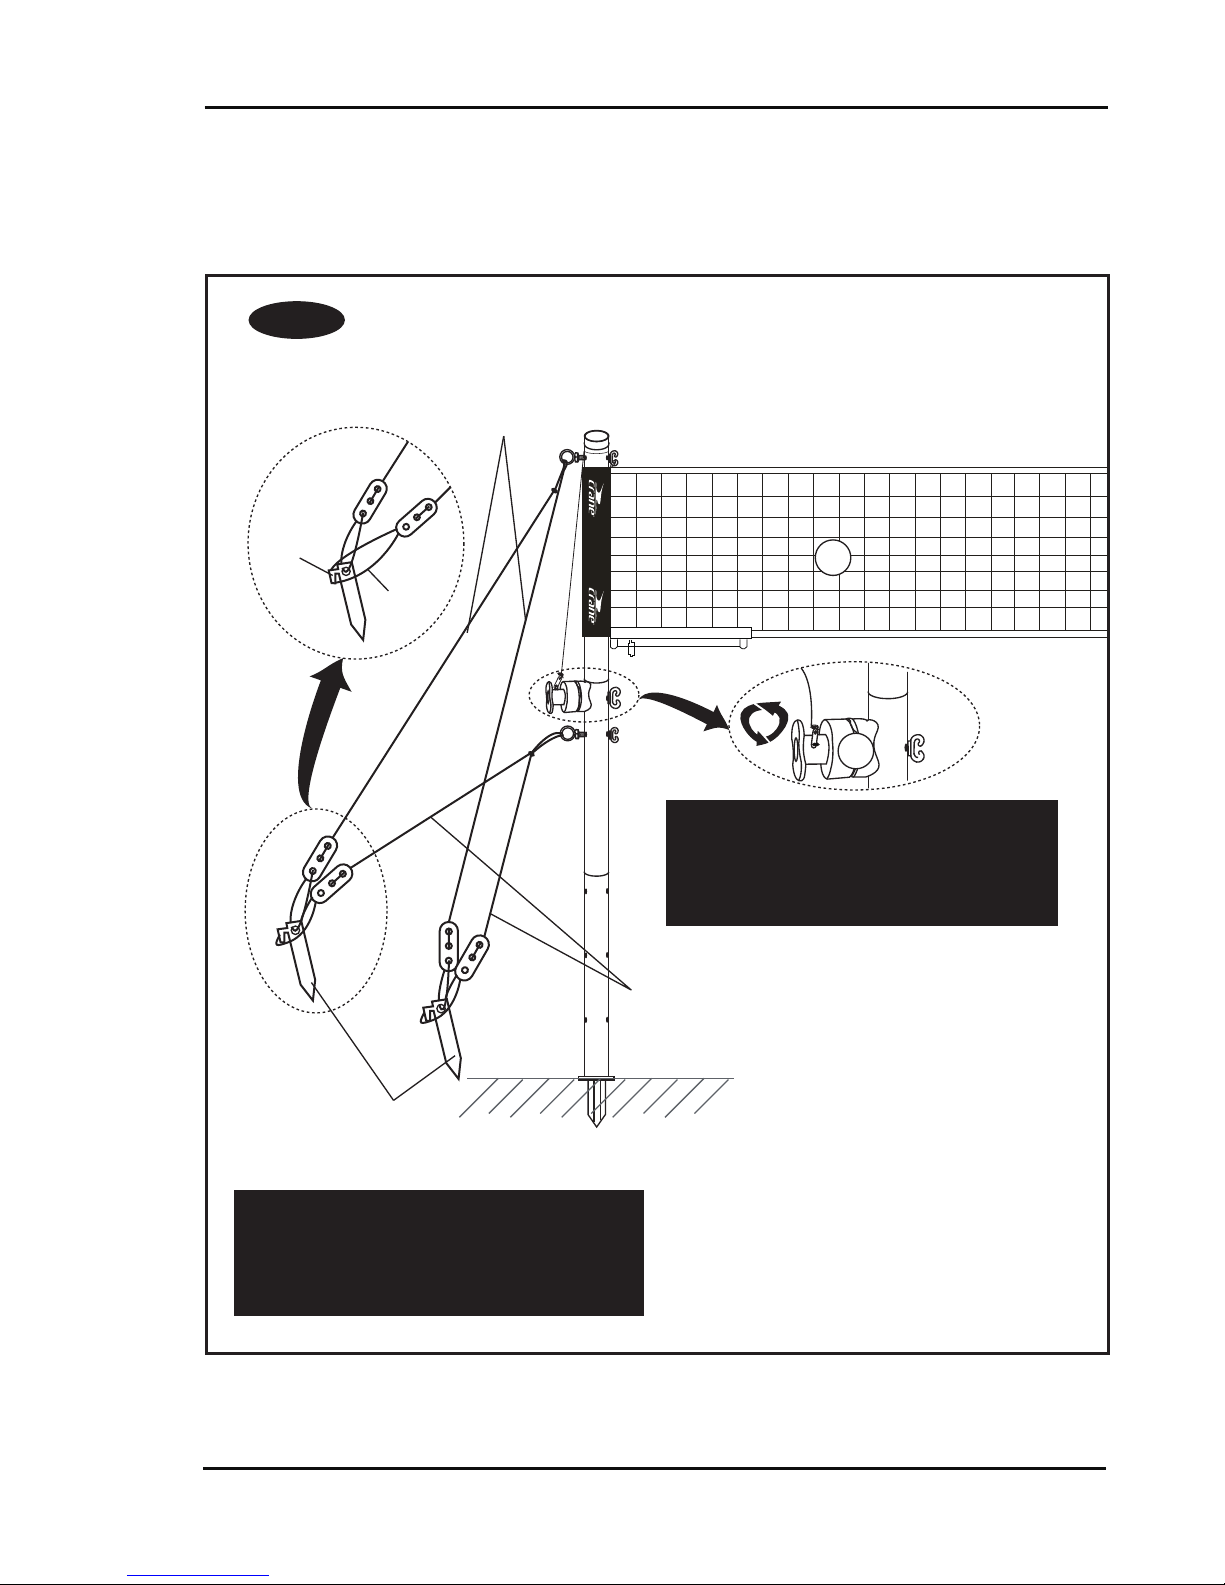
6. BOTTOM GUIDE ROPE SET UP:
Make the loops on the Boom Guide Rope tension clips large enough to slip over
the stakes already in the ground. Make sure that the Guide Rope loops are placed
under the stake hooks as shown in FIG. 6.
FIG. 6
1 2 3 4 5 6 7 8 9 10 11 12 13 14 15 16 17 18 19 20 21
7
Ground
Stakes
Bottom Guide
Rope
Loop
Top Guide
Rope
Ground
Stake
Hook
6
TIP: Aer the net is completely
assembled and the pole tension is
correct, the net can be ghtened by
adjusng the Net Tension Device (#6).
TIP: Aer the net is assembled, you can
adjust the pole tension by sliding the
tension clips up or down along the
guide ropes.

Assembly
11
Push
Button
Push
Button
Push
Button
5 ft. 1 in. pole 7 ft. pole6 ft. pole
7. NET HEIGHT ADJUSTMENT:
The net can be adjusted to three different heights by aligning the push buons
with the proper holes in the top (7 ), middle (6 ) or boom of the poles, as
shown in FIG. 1 and FIG. 7.
FIG. 7

Badminton Rules
12
Badminton Rules
COURT SIZE:
The standard size badminton court is 20 feet wide and 44 feet long. The length and width can
be increased or decreased based on the space available.
NET:
Stretch the net across the center of the court dividing it in half. The net height should be 5
feet in the center of the net and 5 feet 1 inch at the poles (bottom setting).
NUMBER OF PLAYERS:
In doubles match, the game is played with four total players, two on each side of the net.
A singles match is played with one player on each side of the net.
SERVICE:
The game should begin by tossing a coin to see which team serves first. The side that serves
first is only allowed one serve to start the game. After the game begins, each team is allowed
two serves.
SERVICE ROTATION:
The team that serves first must serve from their right half of the court. (see diagram below).
lN DOUBLES: The serve must alternate from the right half court to left half court after each
serve, so no player on the opposing team receives two consecutive serves. Teammates must
serve consecutively.
IN SINGLES: The players serve from the right half court when their score is "0" or an even
number of points. Service is delivered from left half court on odd number points. If the team
serving makes a fault, one serve is lost. If the team receiving the serve makes a fault, the team
serving gets a point and continues the serve. The serve must alternate from right and left half
courts after each serve as stated before.
THE GAME:
The game can be played to 15 or 21 points. The best two out of three games wins the match.
Teams shall change court ends after each game.
SCORING:
Points are scored if a serve lands on the opponent’s court without being volleyed back or if the
opponent returns a volley outside of the field of play. The player who gains the point retains the
serve until it is broken by the opponent.
SERVICE COURT ERROR:
1) A service court error has been made when a player has served or received out of turn; or
has served or received from the wrong service court.
2) If a service court error is discovered, the error shall be corrected and the existing score
shall stand.

Badminton Rules
13
FAULTS:
A fault occurs when:
1) If on the serve, the shuttle is contacted above the server's waist.
2) During the serve, the shuttle must fall into the correct part of the court. The shuttle should
not fall in front of the short service line, beyond the long service line or outside the side
boundary line.
3) If during the serve, the feet of server and receiver are not within boundaries of their
respective service courts.
4) If the server or player intentionally distracts, balks or obstructs his opponent.
5) If the server misses the shuttle while attempting to serve.
6) If either in service or play, the shuttle falls outside the boundaries of the court, or passes
through or under the net, or fails to pass the net, or touches the roof or side walls, or the
person or clothing of a player.
7) If a player reaches over the net and hits the shuttle on their opponents side of the court.
However a player may hit the shuttle on their side of the court and follow through on the
swing over the net.
8) If when the shuttle is in play a player touches the net of its supports with racket, person, or
clothing.
9) One player hitting the shuttle twice in succession.
Note: It is not a fault
1) If the shuttle hits the net during service or play and goes over the net. If this occurs during
the serve it is just reserved.
2) If the frame, shaft, or handle of the racket hits the shuttle, or if the base and the feathers of
the shuttle are struck simultaneously.
2 feet- 6 inch
2 feet- 6 inch
13 feet
13 feet
44 feet
20 feet
6 feet - 6 inch
6 feet - 6 inch
STANDARD COURT LAYOUT
BACK BOUNDARY LINE
BACK BOUNDARY LINE
SHORT SERVICE LINE
SHORT SERVICE LINE
RIGHT HALF COURT
RIGHT HALF COURT LEFT HALF COURT
LEFT HALF COURT RIGHT HALF COURT
NET
POST POST
LONG SERVICE LINE
LONG SERVICE LINE

Volleyball Rules
14
Volleyball Rules
COURT SIZE:
The standard size of a volleyball court is 30 feet wide and 60 feet long. The playfield can be
increased or decreased based on the space available.
NET:
Stretch the net across the center of the court dividing it in half. The net height should be set at 7
feet when playing volleyball, but it can be set to 6 feet or 5 feet 1 inch if all of the players agree
to the change.
NUMBER OF PLAYERS:
Each team should have the same number of players and the there shouldn’t be more than 6
total players.
SERVICE:
Each player shall serve in turn and will continue to serve until side is out. When serving, the ball
must go over the net; if the ball hits the net when served and goes over the net, the ball must be
re-served. If the ball does not go over the net when served or is out of bounds or touches any
team-mate before touching an opponent or opponent’s court, the side is out and the opponent
takes possession and becomes the serving team.
SERVING AREA:
The serving area should be a minimum of 5 feet behind the back boundary of the court. In the
event that the playing area does not provide enough space for such an area, then the serving
area shall extend into the court. The serving area should be located in the right end section of
each court; the width should not exceed 8 feet. (see diagram).
VOLLEY:
Each team is allowed three consecutive ball touches before it is returned to the opponent’s
area.
ROTATION:
After a team has lost its serve, the team receiving the ball for the serve should rotate clockwise,
one player position.
GAME:
The game shall be played to 21 or 15 points. In order to win the match, a team must win two out
of three games.
SCORING:
Only the serving team can score. When the serving team fails to score, it is “side out” and the
receiving team becomes the serving team.

Volleyball Rules
15
ERRORS AND FAULTS:
1) When a player does not clearly hit the ball or allows the ball to rest on any part of his/her body.
2) A player hits the ball out of bounds.
3) A player allows the ball to hit the floor or any other object outside the established play area
(except the net), before being legally returned to the opponent side of the court.
4) When a player touches or hits the ball two times in a row.
5) When a player fails to make a good serve within the play area.
6) The ball is caught and/or thrown; it does not rebound from the hit.
7) If the ball touches any part of the body,except the hands or forearms.
8) Touching the net with any part of the body or reaching over the net.
9) If a player plays out of position when ball is being served.
PENALTY:
Touching the net with any part of the body or reaching over the net.
Caution: Stand clear of the court area to avoid being
injured while a player is taking his or her turn.
STANDARD COURT LAYOUT
LEFT FORWARD
LEFT FORWARD
LEFT BACK
LEFT BACK
CENTER BACK
CENTER BACK
RIGHT BACK
RIGHT BACK
RIGHT FORWARD
RIGHT FORWARD
NET CENTER LINE
SERVING AREA
SERVING AREA
30 feet 30 feet
8 feet
8 feet
CENTER FORWARD
CENTER FORWARD
30 feet

Contenido
Lista de piezas .......................................................................................
Instrucciones de seguridad ...................................................................
Ensamblaje ...........................................................................................
Reglas del bádminton ...........................................................................
Reglas del voleibol ................................................................................
17
18
16
25
27

Lista de piezas
16
53077 LISTA DE PIEZAS
53077 PIEZAS PREINSTALADAS
2 31
x2 x2 x2
4
x2
6 75
x2 x2 x1
8
x2
109
x2 x1
Tapa del poste-A Poste superior Poste intermedio Poste inferior
Estaca del poste Disposivo de
tensión de la red
Botón de presión Conector de cuerda Perno de fijación de la redTapa del poste-B
Red Cuerda guía superior
Cuerda guía inferior Balón de voleibol Bomba de aire Raqueta
Volante de bádminton
1211
x1 x4
x2 x2 x2
Disposivo de
tensión de la red-B
Disposivo de
tensión de la red-C
Disposivo de
tensión de la red-A
x2 x2 x2
x2
13
x4
P2P1 P4P3
P6P5 P7
12 3 4 5 6 7 8 9 10 11 12 13 14 15 16 17 18 19 20 21 12 3 4 5 6 7 8 9 10 11 12 13 14 15 16 17 18 19 20 21

Instrucciones de seguridad
17
ADVERTENCIA:
Por favor, no se siente, suba o incline sobre el producto.
ADVERTENCIA:
PELIGRO DE ASFIXIA - Este arculo conene piezas pequeñas. No es apto para niños
menores de 3 años de edad.
ADVERTENCIA:
Se requiere la supervisión de adulto en todo momento cuando hay niños en el área.
El impacto de un objeto arrojado puede causar lesiones graves.
ADVERTENCIA:
Este arculo no es un juguete; se requiere la supervisión de los niños por adulto en
todo momento. Asegúrese de leer atentamente las instrucciones; el uso apropiado
de este arculo reducirá el riesgo de lesiones.

Ensamblaje
18
1. ENSAMBLAJE DEL POSTE:
Ensamblar los palos como indicado en Fig 1.
FIG. 1
2
X 2
3
X 2
4
X 2
5
X 2
P1
P2
X 2
X 2
Poste superior
Poste intermedio
Poste inferior
Agujero para la cuerda guía superior
Tapa del poste-B
Agujero para la cuerda guía inferior
Agujero para el dispositivo
de tensión de la red
Botón de presión
Estaca del poste
P1
P2
2
3
4
5
FIG. 1A

Ensamblaje
19
2. INSTALACIÓN DE LA RED:
Deslice la manga de la Red (#7) sobre la parte superior de la estructura del poste
montado, asegurándose de que la parte superior de la red con el lazo de conexión
está en el extremo superior del poste. Vea la FIG. 2.
FIG. 2
7
X 1
X 2
Conjunto de la FIG. 1
1 2 3 4 5 6 7 8 9 10 11 12 13 14 15 16 17 18 19 20 21
7
P3
Lazo de conexión
12 3 4 5 6 7 8 9 10 1112 13 14 15 16 17 18 19 20 21 12 3 4 5 6 7 8 9 10 1112 13 14 15 16 17 18 19 20 21
P3
Table of contents
Languages:
Other Crane Accessories manuals